TFA 30.5038 User manual

Bedienungsanleitung
Instruction manual
Mode d’emploi
Istruzioni per l'uso
Gebruiksaanwijzing
Instrucciones de uso
Instruction manuals
www.tfa-dostmann.de/en/service/downloads/instruction-manuals
Instruction manuals
www.tfa-dostmann.de/en/service/downloads/instruction-manuals
Kat. Nr. 30.5038
TFA_No. 30.5038_Anleit_04_23 20.04.2023 10:33 Uhr Seite 1

B 1
B 2
B 3
B 4
Fig. 2
B 6
B 5
A 1
A 3
A 5
A 4
A 6
A 2
Fig. 1
32
TFA_No. 30.5038_Anleit_04_23 20.04.2023 10:33 Uhr Seite 2

Fig. 3
C 1
54
Digitales Thermo-Hygrometer
Vielen Dank, dass Sie sich für dieses Gerät aus dem Hause TFA entschieden haben.
1. Bevor Sie mit dem Gerät arbeiten
•Lesen Sie sich bitte die Bedienungsanleitung genau durch.
•Durch die Beachtung der Bedienungsanleitung vermeiden Sie auch Beschädigungen
des Geräts und die Gefährdung Ihrer gesetzlichen Mängelrechte durch Fehlgebrauch.
•Für Schäden, die aus Nichtbeachtung dieser Bedienungsanleitung verursacht werden,
übernehmen wir keine Haftung. Ebenso haften wir nicht für inkorrekte Messwerte und
Folgen, die sich aus solchen ergeben können.
•Beachten Sie besonders die Sicherheitshinweise!
•Bewahren Sie diese Anleitung gut auf!
2. Lieferumfang
• Thermo-Hygrometer • Bedienungsanleitung
3. Einsatzbereich und alle Vorteile Ihres neuen Gerätes auf einen Blick
• Innentemperatur und Luftfeuchtigkeit mit Komfortzone
• Mit Höchst- und Tiefstwerten
• Uhrzeit
• Alarm mit Snooze-Funktion
• Stundensignal
• Datumsanzeige
4. Zu Ihrer Sicherheit
• Das Produkt ist ausschließlich für den oben beschriebenen Einsatzbereich geeignet. Verwen-
den Sie das Produkt nicht anders, als in dieser Anleitung dargestellt wird.
• Das eigenmächtige Reparieren, Umbauen oder Verändern des Gerätes ist nicht gestattet.
TFA_No. 30.5038_Anleit_04_23 20.04.2023 10:33 Uhr Seite 3

76
Digitales Thermo-Hygrometer
Vorsicht!
Verletzungsgefahr:
• Halten Sie das Gerät und die Batterie außerhalb der Reichweite von Kindern.
• Kleinteile können von Kindern (unter drei Jahren) verschluckt werden.
• Batterien enthalten gesundheitsschädliche Säuren und können bei Verschlucken lebensgefähr-
lich sein. Wurde eine Batterie verschluckt, kann dies innerhalb von 2 Stunden zu schweren
inneren Verätzungen und zum Tode führen. Wenn Sie vermuten, eine Batterie könnte ver-
schluckt oder anderweitig in den Körper gelangt sein, nehmen Sie sofort medizinische Hilfe in
Anspruch.
• Batterien nicht ins Feuer werfen, kurzschließen, auseinandernehmen oder aufladen. Explosi-
onsgefahr!
• Um ein Auslaufen der Batterien zu vermeiden, sollten schwache Batterien möglichst schnell
ausgetauscht werden.
• Sollte eine Batterie ausgelaufen sein, vermeiden Sie Kontakt mit Haut, Augen und Schleimhäu-
ten. Spülen Sie ggf. umgehend die betroffenen Stellen mit Wasser und suchen Sie einen Arzt auf.
Wichtige Hinweise zur Produktsicherheit!
•
Setzen Sie das Gerät keinen extremen Temperaturen, Vibrationen und Erschütterungen aus.
• Vor Feuchtigkeit schützen.
5. Bestandteile
A: Display:
A 1: Uhrzeit/Datum/Alarmzeit
Digitales Thermo-Hygrometer
A 2: Symbol Alarm
A 3: Symbol Stundensignal
A 4: Innentemperatur, MAX/MIN
A 5: Innenluftfeuchtigkeit, MAX/MIN
A 6: Symbol Komfortstufe
B:Tasten:
B 1: SNOOZE Taste B 2: MODE Taste
B 3: UP Taste B 4: MEM Taste
B 5: °C/°F Taste B 6: RESET Knopf
C: Gehäuse:
C 1: Ständer mit Batteriefach
6. Inbetriebnahme
• Öffnen Sie das Batteriefach und legen Sie eine neue Batterie 1,5 V AA ein, +/- Pol wie abgebil-
det.
• Schließen Sie das Batteriefach wieder.
• Es werden alle LCD Segmente kurz angezeigt.
• Das Gerät ist jetzt betriebsbereit.
• Im Display erscheint die aktuelle Innentemperatur und Luftfeuchtigkeit.
• Neben der Uhrzeit (12:00 Voreinstellung) erscheint AM.
• Um das Gerät auszuschalten, entfernen Sie die Batterie.
7. Bedienung
• Halten Sie die UP Taste im jeweiligen Einstellmodus gedrückt, gelangen Sie in den Schnelllauf.
TFA_No. 30.5038_Anleit_04_23 20.04.2023 10:33 Uhr Seite 4

98
Digitales Thermo-Hygrometer
• Das Gerät verlässt automatisch den Einstellmodus, wenn länger als 60 Sekunden keine Taste
gedrückt wird.
7.1 Einstellung der Uhrzeit und Kalender
• Halten Sie die MODE Taste gedrückt.
• Die Minutenanzeige blinkt.
• Stellen Sie mit der UP Taste die Minuten ein.
• Drücken Sie die MODE Taste noch einmal und Sie können nun nacheinander die Stunden, das
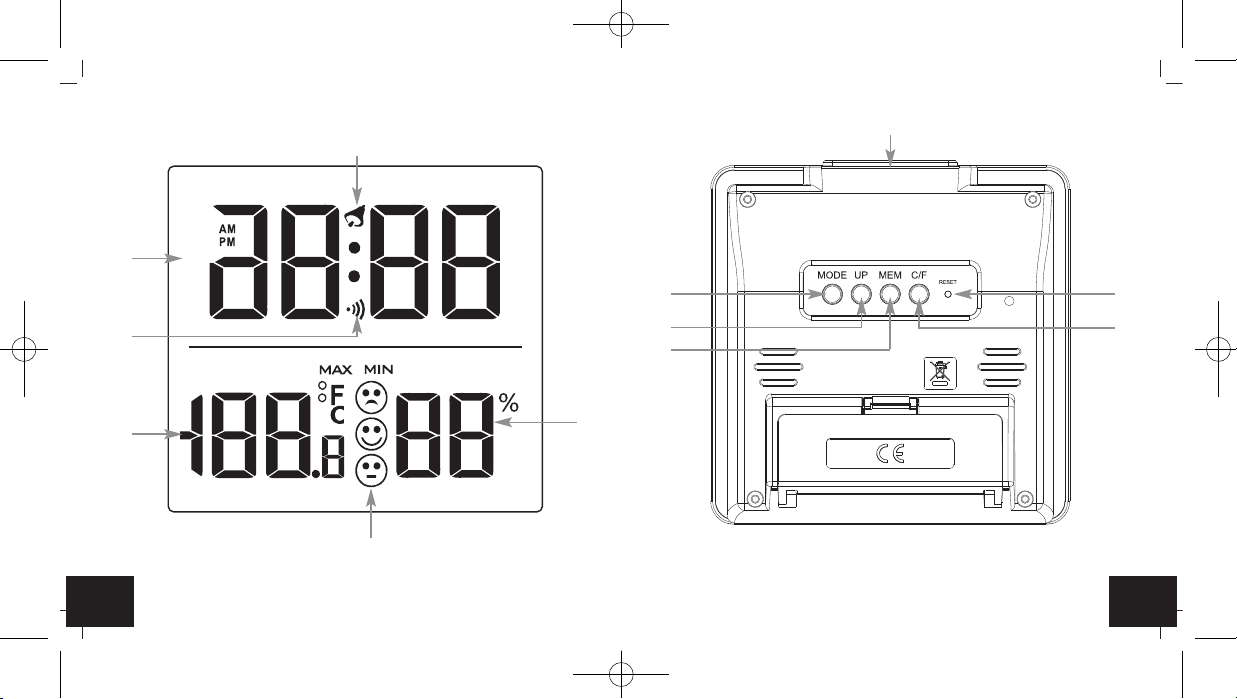
12- oder 24-Stunden-Anzeigeformat (AM oder PM nach 12 Uhr erscheint im Display), den
Monat und den Tag ansteuern und mit der UP Taste einstellen.
• Bestätigen Sie die Eingabe mit der MODE Taste.
• Auf dem Display erscheint die eingestellte Uhrzeit.
7.2 Einstellung des Weckalarms
• Drücken Sie die MODE Taste im Normalmodus, um in den Alarmmodus zu gelangen.
• 0:00 (Voreinstellung) oder die zuletzt eingestellte erste Weckzeit wird auf dem Display ange-
zeigt.
• Halten Sie die MODE Taste gedrückt.
• Das Alarmsymbol erscheint und die Minutenanzeige blinkt.
• Stellen Sie mit der UP Taste die Minuten ein.
• Bestätigen Sie die Eingabe mit der MODE Taste und stellen Sie die Stunden ein.
• Bestätigen Sie die Eingabe mit der MODE Taste.
• Auf dem Display erscheinen die eingestellte Weckzeit und das Alarmsymbol. Der Alarm ist akti-
viert.
• Drücken Sie die MODE Taste noch einmal, um zur aktuellen Uhrzeit zurückzukehren.
• Wenn die eingestellte Weckzeit erreicht ist, beginnt der Wecker zu klingeln.
Digitales Thermo-Hygrometer
• Drücken Sie eine beliebige Taste und der Alarm wird beendet.
• Wird der Alarm nicht unterbrochen, schaltet sich der ansteigende Alarmton automatisch nach
ein paar Minuten aus und aktiviert sich erneut zur gleichen Weckzeit wieder.
• Das Alarmsymbol bleibt im Display stehen.
•
Wenn der Wecker klingelt, drücken Sie die SNOOZE Taste, um die Snooze-Funktion zu aktivieren.
• Der Alarm wird für die Dauer von 8 Minuten unterbrochen.
7.3 Aktivieren und Deaktivieren des Weckalarms und des stündlichen Alarmtons
• Drücken Sie die MODE Taste im Normalmodus, um in den Alarmmodus zu gelangen.
• Die eingestellte Alarmzeit erscheint.
• Drücken Sie die UP Taste einmal, um den Alarm einzuschalten. Auf dem Display erscheint das
Symbol .
• Drücken Sie die UP Taste zweimal, um den stündlichen Alarmton einzuschalten. Auf dem Dis-
play erscheint das Symbol .
• Drücken Sie die UP Taste dreimal, um den Alarm und den stündlichen Alarmton einzuschalten.
Auf dem Display erscheint das Symbol und .
• Drücken Sie die UP Taste viermal, um den Alarm und den stündlichen Alarmton auszuschal-
ten. Die Symbole verschwinden.
• Drücken Sie die MODE Taste, um in den Normalmodus zurückzukehren.
7.4 Datumsanzeige
• Drücken Sie die UP Taste im Normalmodus, um sich das Datum anzeigen zu lassen.
7.5 Temperaturanzeige
• Drücken Sie die °C/°F Taste im Normalmodus, um zwischen °C (Celsius) auf °F (Fahrenheit)
als Temperatureinheit umzuschalten.
TFA_No. 30.5038_Anleit_04_23 20.04.2023 10:33 Uhr Seite 5

1110
Digitales Thermo-Hygrometer
7.5 Höchst- und Tiefstwerte
• Drücken Sie die MEM Taste.
• MAX erscheint auf dem Display.
• Die höchste Innentemperatur und Luftfeuchtigkeit seit der letzten Rückstellung werden ange-
zeigt.
• Drücken Sie die MEM Taste noch einmal.
• MIN erscheint auf dem Display.
• Die niedrigste Innentemperatur und Luftfeuchtigkeit seit der letzten Rückstellung werden ange-
zeigt.
• Um wieder die Anzeige mit den aktuellen Werten zu erhalten, drücken Sie die MEM Taste noch
einmal.
• Das Gerät verlässt automatisch den MAX/MIN-Modus, wenn die MEM Taste nicht gedrückt wird.
• Halten Sie die MEM Taste gedrückt, wenn die maximalen oder minimalen Werte angezeigt wer-
den, um die entsprechenden Werte zu löschen.
8. Pflege und Wartung
• Reinigen Sie das Gerät mit einem weichen, leicht feuchten Tuch. Keine Scheuer- oder
Lösungsmittel verwenden!
• Entfernen Sie die Batterie, wenn Sie das Gerät längere Zeit nicht verwenden.
• Bewahren Sie Ihr Gerät an einem trockenen Platz auf.
8.1 Batteriewechsel
• Tauschen Sie die Batterie aus, wenn die Anzeige oder der Alarmton schwächer wird.
•
Öffnen Sie das Batteriefach und legen Sie eine neue Batterie 1,5 V AA ein, +/- Pol wie abgebildet.
• Schließen Sie das Batteriefach wieder.
Digitales Thermo-Hygrometer
9. Fehlerbeseitigung
Problem Lösung
Keine Anzeige auf dem Gerät ➜ Batterie polrichtig einlegen
➜ Batterie wechseln
Unkorrekte Anzeige ➜ RESET Knopf mit einem spitzen Gegenstand drücken
➜Batterie wechseln
Wenn Ihr Gerät trotz dieser Maßnahmen immer noch nicht funktioniert, wenden Sie sich an den
Händler, bei dem Sie das Produkt gekauft haben.
10. Entsorgung
Dieses Produkt und die Verpackung wurden unter Verwendung hochwertiger Materialien und
Bestandteile hergestellt, die recycelt und wiederverwendet werden können. Dies verringert den
Abfall und schont die Umwelt.
Entsorgen Sie die Verpackung umweltgerecht über die eingerichteten Sammelsysteme.
Entsorgung des Elektrogeräts
Entnehmen Sie nicht festverbaute Batterien und Akkus aus dem Gerät und entsorgen
Sie diese getrennt.
Dieses Gerät ist entsprechend der EU-Richtlinie über die Entsorgung von Elektro- und
Elektronik-Altgeräten (WEEE) gekennzeichnet.
Dieses Produkt darf nicht mit dem Hausmüll entsorgt werden. Der Nutzer ist verpflichtet,
das Altgerät zur umweltgerechten Entsorgung bei einer ausgewiesenen Annahmestelle
für die Entsorgung von Elektro- und Elektronikgeräten abzugeben. Die Rückgabe ist
unentgeltlich. Beachten Sie die aktuell geltenden Vorschriften!
TFA_No. 30.5038_Anleit_04_23 20.04.2023 10:33 Uhr Seite 6

1312
Digitales Thermo-Hygrometer
Entsorgung der Batterien
Batterien und Akkus dürfen keinesfalls in den Hausmüll. Sie enthalten Schadstoffe, die
bei unsachgemäßer Entsorgung der Umwelt und der Gesundheit Schaden zufügen kön-
nen. Als Verbraucher sind Sie gesetzlich verpflichtet, gebrauchte Batterien und Akkus zur
umweltgerechten Entsorgung beim Handel oder entsprechenden Sammelstellen gemäß
nationalen oder lokalen Bestimmungen abzugeben. Die Rückgabe ist unentgeltlich.
Die Bezeichnungen für enthaltene Schadstoffe sind: Cd=Cadmium, Hg=Quecksilber,
Pb=Blei.
11.Technische Daten
Spannungsversorgung: Batterie 1 x 1,5 V AA
Messbereich Temperatur: 0°C…+50°C (+32°F…+122°F) °C/°F umschaltbar
Messbereich Luftfeuchtigkeit: 20...90 % rF
Anzeige LL/HH: Messung liegt außerhalb des Messbereichs
Gehäusemaße: 94 x 37 x 94 mm
Gewicht: 95 g (nur das Gerät)
TFA Dostmann GmbH & Co.KG, Zum Ottersberg 12, 97877 Wertheim, Deutschland
Diese Anleitung oder Auszüge daraus dürfen nur mit Zustimmung von TFA Dostmann veröffentlicht werden. Die
technischen Daten entsprechen dem Stand bei Drucklegung und können ohne vorherige Benachrichtigung geän-
dert werden. Die neuesten technischen Daten und Informationen zu Ihrem Produkt finden Sie auf unserer Home-
page unter Eingabe der Artikel-Nummer in das Suchfeld.
www.tfa-dostmann.de 04/23
Digital thermo-hygrometer
Thank you for choosing this instrument from TFA.
1. Before you use this product
•Please make sure you read the instruction manual carefully.
• Following and respecting the instructions in your manual will prevent damage to your
instrument and loss of your statutory rights arising from defects due to incorrect use.
• We shall not be liable for any damage occurring as a result of non-following of these
instructions. Likewise, we take no responsibility for any incorrect readings or for any
consequences resulting from them.
• Please pay particular attention to the safety notices!
• Please keep this instruction manual safe for future reference.
2. Delivery contents
• Thermo-Hygrometer • Instruction manual
3. Field of operation and all the benefits of your new instrument at a glance
• Indoor temperature and humidity with comfort level
• With maximum and minimum values
•Time
• Alarm with snooze function
• Hourly chime
• Display of date
4. For your safety
• This product is exclusively intended for the field of application described above. It should only
be used as described within these instructions.
• Unauthorized repairs, modifications or changes to the product are prohibited.
TFA_No. 30.5038_Anleit_04_23 20.04.2023 10:33 Uhr Seite 7

1514
Digital thermo-hygrometer
Caution!
Risk of injury:
• Keep this device and the battery out of reach of children.
• Small parts can be swallowed by children (under three years old).
• Batteries contain harmful acids and may be hazardous if swallowed. If a battery is swallowed,
this can lead to serious internal burns and death within two hours. If you suspect a battery
could have been swallowed or otherwise caught in the body, seek medical help immediately.
• Batteries must not be thrown into a fire, short-circuited, taken apart or recharged. Risk of
explosion!
• Low batteries should be changed as soon as possible to prevent damage caused by leaking.
• Avoid contact with skin, eyes and mucous membranes when handling leaking batteries. In case
of contact, immediately rinse the affected areas with water and consult a doctor.
Important information on product safety!
• Do not expose the device to extreme temperatures, vibrations or shocks.
• Protect it from moisture.
5. Elements
A: Display:
A 1: Time, date, alarm
A 2: Symbol for alarm
A 3: Symbol for hourly chime
Digital thermo-hygrometer
A 4: Indoor temperature, MAX/MIN
A 5: Indoor humidity, MAX/MIN
A 6: Symbol comfort level
B: Buttons:
B 1: SNOOZE button B 2: MODE button
B 3: UP button B 4: MEM button
B 5: °C/°F button B 6: RESET button
C: Housing:
C 1: Support with battery compartment
6. Getting started
• Open the battery compartment and insert a new battery 1,5 V AA, ensure that the battery
polarity is correct.
• Close the battery compartment again.
• All LCD segments will be displayed for a short moment.
• The unit is ready for use.
• The display shows the current indoor temperature and humidity.
• Next to the time (12:00 default) AM appears on the display.
• Remove the battery to shut down the instrument.
7. Operation
• Press and hold UP button in the setting mode for fast running.
• The instrument will automatically quit the setting mode if no button is pressed within 60 seconds.
TFA_No. 30.5038_Anleit_04_23 20.04.2023 10:33 Uhr Seite 8

1716
Digital thermo-hygrometer
7.1 Setting of the clock and calendar
• Press and hold the MODE button.
• The minute digits will be flashing.
• Press the UP button to set the minutes.
• Press the MODE button again and the setting sequence is shown as follows: Hours, 12-hour or
24-hour display format (AM or PM after 12 h appears on the display) month and day and adjust
it with the UP button.
• Confirm the setting with the MODE button.
• The display shows the current time.
7.2 Setting of the alarm time
• To enter the alarm mode, press the MODE button in normal mode.
• 0:00 (default) or the last adjusted alarm time appears on the display.
• Press and hold MODE button.
• The alarm symbol appears and the minute digits will be flashing.
• Press the UP button to set the minutes.
• Confirm the setting with the MODE button and set the hours in the same way.
• Confirm the setting with the MODE button.
• The display shows the adjusted alarm time and the alarm symbol. The alarm is activated.
• Press the MODE button again to return to the current time.
• When the adjusted alarm time is reached, the alarm will ring.
• Press any button to stop the alarm.
• If the alarm is not stopped manually, the increasing alarm will automatically turn off after cer-
tain minutes and will be reactivated at the same time.
• The alarm symbol stays in the display.
Digital thermo-hygrometer
•
When the alarm rings, press the SNOOZE button and the snooze function will be activated.
• The alarm will be interrupted for 8 minutes.
7.3 Activate and deactivate the alarm time and the hourly chime
• To enter the alarm mode, press the MODE button in normal mode.
• The adjusted alarm time appears on the display.
• Press the UP button once to activate the alarm. On the display appears the alarm symbol .
• Press the UP button twice to activate the hourly chime. On the display appears the symbol for
the hourly chime .
• Press the UP button three times to activate the alarm and the hourly chime. On the display
appear both symbols and .
• Press the UP button four times to deactivate both alarms. Both symbols disappear.
• Press the MODE button to return to normal mode.
7.4 Display of date
• Press the UP button in normal mode to show the date.
7.5 Temperature display
• Press the °C/°F button to change between °C (Celsius) or °F (Fahrenheit) as temperature unit.
7.5 Maximum and minimum values
• Press the MEM button.
• MAX appears on the display.
• The highest indoor temperature and humidity are displayed since the last reset.
• Press the MEM button again.
TFA_No. 30.5038_Anleit_04_23 20.04.2023 10:33 Uhr Seite 9

1918
Digital thermo-hygrometer
• MIN appears on the display.
• The lowest indoor temperature and humidity are displayed since the last reset.
• To go back to the present temperature and humidity display, press the MEM button once more.
• The instrument will automatically quit the MAX/MIN mode if no button is pressed.
• Press and hold the MEM button in the respective mode to clear the recorded maximum or mini-
mum values.
8. Care and maintenance
• Clean your instrument with a soft damp cloth. Do not use solvents or scouring agents.
• Remove the battery if you do not use the product for a long period of time.
• Keep the instrument in a dry place.
8.1 Battery replacement
• Replace the battery when the display becomes weak or the alarm tone declines.
• Open the battery compartment and insert a new battery 1,5 V AA, ensure that the battery
polaritiy is correct.
• Close the battery compartment again.
9. Troubleshooting
Problems Solution
No indication on the device ➜ Ensure that the battery polarity is correct
➜ Change the battery
Incorrect indication ➜ Use a pin to press the RESET button
➜ Change the battery
Digital thermo-hygrometer
If your device fails to work despite these measures contact the supplier from whom you purchased
it.
10.Waste disposal
This product and its packaging have been manufactured using high-grade materials and compo-
nents which can be recycled and reused. This reduces waste and protects the environment.
Dispose of the packaging in an environmentally friendly manner using the collection systems that
have been set up.
Disposal of the electrical device
Remove non-permanently installed batteries and rechargeable batteries from the device
and dispose of them separately.
This product is labelled in accordance with the EU Waste Electrical and Electronic
Equipment Directive (WEEE).
This product must not be disposed of in ordinary household waste. As a consumer, you
are required to take end-of-life devices to a designated collection point for the disposal
of electrical and electronic equipment, in order to ensure environmentally-compatible
disposal. The return service is free of charge. Observe the current regulations in place!
Disposal of the batteries
Never dispose of empty batteries and rechargeable batteries with ordinary household
waste. They contain pollutants which, if improperly disposed of, can harm the environ-
ment and human health. As a consumer, you are required by law to take them to your
retail store or to an appropriate collection site depending on national or local regulations
in order to protect the environment.The return service is free of charge.
The symbols for the contained heavy metals are: Cd=cadmium, Hg=mercury, Pb=lead.
TFA_No. 30.5038_Anleit_04_23 20.04.2023 10:33 Uhr Seite 10

2120
Digital thermo-hygrometer
11. Specifications
Power consumption: Battery 1 x 1.5 V AA
Measuring range temperature: 0°C…+50°C (+32°F…+122°F) °C/°F-reversible
Measuring range humidity: 20...90 % rH
Display shows LL/HH: Measuring is out of the range
Housing dimension: 94 x 37 x 94 mm
Weight: 95 g (instrument only)
TFA Dostmann GmbH & Co.KG, Zum Ottersberg 12, 97877 Wertheim, Germany
No part of this manual may be reproduced without written consent of TFA Dostmann. The technical data are correct
at the time of going to print and may change without prior notice.
The latest technical data and information about this product can be found in our homepage by simply entering the
product number in the search box.
www.tfa-dostmann.de 04/23
Thermo-hygromètre numérique
Nous vous remercions d'avoir choisi l'appareil de la Société TFA.
1. Avant d'utiliser votre appareil
•Veuillez lire attentivement le mode d'emploi.
• En respectant ce mode d'emploi, vous éviterez d'endommager votre appareil et de per-
dre vos droits légaux en cas de défaut si celui-ci résulte d’une utilisation non-conforme.
• Nous n'assumons aucune responsabilité pour des dommages qui auraient été causés par
le non-respect du présent mode d'emploi. De même, nous n’assumons aucune responsa-
bilité pour des relevés incorrects et les conséquences qu’ils pourraient engendrer.
• Suivez bien toutes les consignes de sécurité !
• Conservez soigneusement le mode d'emploi !
2. Contenu de la livraison
• Thermomètre-hygromètre • Mode d'emploi
3. Aperçu du domaine d'utilisation et tous les avantages de votre nouvel appareil
• Température et humidité intérieures avec niveau de confort
• Avec valeurs maximales et minimales
• Horloge
• Alarme avec fonction snooze
• Signal de l’heure
4. Pour votre sécurité
• L'appareil est destiné uniquement à l'utilisation décrite ci-dessus. Ne l'utilisez jamais à d'autres
fins que celles décrites dans le présent mode d'emploi.
• Vous ne devez en aucun cas réparer, démonter ou modifier l'appareil par vous-même.
TFA_No. 30.5038_Anleit_04_23 20.04.2023 10:33 Uhr Seite 11

2322
Thermo-hygromètre numérique
Attention !
Danger de blessure :
• Placez votre appareil et la pile hors de la portée des enfants.
• Les petites pièces peuvent être avalées par les enfants (de moins de trois ans).
• Les piles contiennent des acides nocifs pour la santé et peuvent être mortelles dans le cas
d’une ingestion. Si une pile a été avalée, elle peut entraîner des brûlures internes graves ainsi
que la mort dans l’espace de 2 heures. Si vous craignez qu’une pile ait pu être avalée ou ingé-
rée d’une autre manière, quelle qu’elle soit, contactez immédiatement un médecin d’urgence.
• Ne jetez jamais de piles dans le feu, ne les court-circuitez pas, ne les démontez pas et ne les
rechargez pas. Risque d'explosion !
• Une pile faible doit être remplacée le plus rapidement possible afin d'éviter toute fuite.
• Évitez tout contact de la peau, des yeux et des muqueuses avec le liquide des piles. En cas de
contact, rincez immédiatement les zones concernées à l’eau et consultez un médecin.
Conseils importants de sécurité du produit !
• Évitez d’exposer l’appareil à des températures extrêmes, à des vibrations ou à des chocs.
• Protégez-le contre l'humidité.
5. Composants
A : Écran :
A 1 : Horloge, date, alarme
A 2 : Symbole de l'alarme
Thermo-hygromètre numérique
A 3 : Symbole du signal de l’heure
A 4 : Température ambiante, MAX/MIN
A 5 : Humidité intérieure, MAX/MIN
A 6 : Symbole du niveau de confort
B :Touches :
B 1 : Touche SNOOZE B 2 : Touche MODE
B 3 : Touche UP B 4 : Touche MEM
B 5 : Touche °C/°F B 6 : Bouton RESET
C : Boîtier :
C 1 : Support avec compartiment à pile
6. Mise en service
• Ouvrez le compartiment à pile et insérez une nouvelle pile 1,5 V AA, pôles +/- comme indi-
qués.
• Refermez le compartiment à pile.
• Tous les segments LCD s'allument.
• Votre appareil est maintenant prêt à fonctionner.
• La température et l’humidité actuelles intérieures apparaissent sur l’écran.
• À côté de temps (12:00 par défaut) AM apparaît à l’écran.
• Pour éteindre votre appareil, retirez la pile.
7. Utilisation
• Maintenez la touche UP appuyée au mode de paramétrage pour accéder au défilement rapide.
TFA_No. 30.5038_Anleit_04_23 20.04.2023 10:33 Uhr Seite 12

2524
Thermo-hygromètre numérique
• L'appareil quitte automatiquement le mode de paramétrage si aucune entrée n'a été effectuée
pendant 60 secondes.
7.1 Réglage de l'heure et du calendrier
• Maintenez la touche MODE appuyée.
• L’indicateur des minutes clignote
• Réglez les minutes avec la touche UP.
• Appuyez sur la touche MODE pour ajuster les heures, l'affichage de 12 heures (après
12 h PM apparaît sur l'écran) ou de 24 heures, le mois et le jour avec la touche UP.
• Validez au moyen de la touche MODE.
• L'heure actuelle apparaît sur l’écran.
7.2 Réglage alarme de réveil
• Appuyez sur la touche MODE en mode normal pour arriver au mode d’alarme.
• 0:00 (par défaut) ou l'heure d'alarme réglée précédemment apparaît sur l'affichage.
• Maintenez la touche MODE appuyée.
• Le symbole de l'alarme apparaît et l’indicateur des minutes clignote
• Réglez les minutes avec la touche UP.
• Validez au moyen de la touche MODE et procédez de la même manière pour le paramétrage
des heures.
• Validez au moyen de la touche MODE.
• La dernière heure de l'alarme et le symbole d’alarme apparaissent sur l’écran. L’alarme est
activée.
• Appuyez sur la touche MODE afin de retourner à affichage de l'heure actuelle.
• Lorsque l'heure d'alarme fixée est atteinte, le réveil commence à sonner.
Thermo-hygromètre numérique
• Appuyez sur une touche de votre choix pour que l’alarme soit désactivée.
• Si l'alarme n'est pas coupée, elle s'arrêtera automatiquement après quelques minutes et sera
de nouveau active pour l'heure de réveil suivant.
• Le symbole reste à l'écran.
• Lorsque le réveil sonne, appuyez sur la touche SNOOZE pour activer la fonction snooze.
• L’alarme s'interrompt pendant 8 minutes.
7.3 Activer et désactiver l’alarme et le signal de l’heure
• Appuyez sur la touche MODE en mode normal pour arriver au mode d’alarme.
• L'heure d'alarme réglée apparaît sur l’écran.
• Appuyez une fois sur la touche UP pour activer l’alarme. Le symbole d’alarme apparaît.
• Appuyez deux fois sur la touche UP pour activer le signal de l’heure. Le symbole de signal de
l’heure apparaît .
• Appuyez trois fois sur la touche UP pour activer l’alarme et le signal de l’heure. Les symboles
et apparaissent.
• Appuyez quatre fois sur la touche UP pour désactiver l’alarme et le signal de l’heure. Les sym-
boles désappariassent.
• Appuyez sur la touche MODE afin de retourner au mode normale.
7.4 Affichage de la date
• Appuyez sur la touche UP en mode normal, cela vous permet d’afficher la date.
7.5 Affichage de la température
• Appuyez sur la touche °C/°F en mode normal, vous pouvez maintenant sélectionner la tempé-
rature en °C (Celsius) ou en °F (Fahrenheit).
TFA_No. 30.5038_Anleit_04_23 20.04.2023 10:33 Uhr Seite 13

2726
Thermo-hygromètre numérique
7.5 Valeurs maximales et minimales
• Appuyez sur la touche MEM.
• MAX apparaît sur l'écran.
• La température ambiante maximale et l'humidité maximale depuis la dernière réactualisation
apparaissent.
• Appuyez sur la touche MEM.
• MIN apparaît sur l'écran.
• La température ambiante minimale et l'humidité minimale depuis la dernière réactualisation
apparaissent.
• Appuyez encore une fois sur la touche MEM et les valeurs actuelles apparaissent sur l'écran.
• L'appareil quitte automatiquement le mode MAX/MIN si aucune entrée n'a été effectuée.
• Maintenez la touche MEM appuyée pour effacer les valeurs maximales et minimales selon le
mode correspondant.
8. Entretien et maintenance
• Pour le nettoyage de l'appareil, utilisez un chiffon doux et humide. N’utilisez pas de solvants ou
d´agents abrasifs !
• Enlevez la pile si vous n'utilisez pas votre appareil pendant une durée prolongée.
• Conservez votre appareil dans un endroit sec.
8.1 Remplacement de la pile
• Remplacez la pile, si l’affichage s'affaiblit ou la sonnerie de l’alarme s’affaiblit.
• Ouvrez le compartiment à pile et insérez une nouvelle pile 1,5 V AA, pôles +/- comme indiqué.
• Refermez le compartiment à pile.
Thermo-hygromètre numérique
9. Dépannage
Problème Solution
Aucun affichage sur l’écran ➜ Contrôlez la bonne polarité de pile
➜ Changez la pile
Indication incorrecte ➜Appuyez sur la touche RESET à l'aide d'un objet
pointu
➜ Changez la pile
Si votre appareil ne fonctionne toujours pas malgré ces mesures, adressez-vous au vendeur
auquel vous avez acheté votre appareil.
10.Traitement des déchets
Ce produit et son emballage ont été fabriqués avec des matériaux de haute qualité qui peuvent
être recyclés et réutilisés. Cela permet de réduire les déchets et de protéger l’environnement.
Éliminez les emballages de manière respectueuse de l'environnement par le biais des systèmes
de collecte établis.
TFA_No. 30.5038_Anleit_04_23 20.04.2023 10:33 Uhr Seite 14

2928
Thermo-hygromètre numérique
Mise au rebut de l'appareil électrique
Retirez de l'appareil les piles et les batteries rechargeables qui ne sont pas installées de
façon permanente et jetez-les séparément.
Cet appareil est conforme aux normes de l'UE relatives au traitement des déchets élec-
triques et électroniques (WEEE).
L'appareil usagé ne doit pas être jeté dans les ordures ménagères. L’utilisateur s’enga-
ge, pour le respect de l’environnement, à déposer l’appareil usagé dans un centre de
traitement agréé pour les déchets électriques et électroniques. La collecte est gratuite.
Respectez les réglementations en vigueur !
Élimination des piles
Les piles et les batteries rechargeables ne doivent pas être jetées dans les détritus
ménagers. Elles contiennent des polluants qui peuvent nuire à l'environnement et à la
santé si elles sont éliminées de manière inappropriée. En tant qu'utilisateur, vous avez
l'obligation légale de rapporter les piles et les batteries rechargeables usagées à votre
revendeur ou de les déposer dans une déchetterie proche de votre domicile conformé-
ment à la réglementation nationale et locale. La collecte est gratuite.
Les métaux lourds sont désignés comme suit :
Cd = cadmium, Hg = mercure, Pb = plomb.
11. Caractéristiques techniques
Alimentation : Pile 1 x 1,5 V AA
Plage de mesure - température : 0°C…+50°C (+32°F…+122°F) °C/°F réversible
Thermo-hygromètre numérique
Plage de mesure - humidité : 20...90 % rH
LL/HH apparaît sur l'écran : Hors de portée de la gamme de mesure
Mesure de boîtier : 94 x 37 x 94 mm
Poids : 95 g (appareil seulement)
TFA Dostmann GmbH & Co.KG, Zum Ottersberg 12, 97877 Wertheim, Allemagne
La reproduction, même partielle, du présent mode d'emploi est strictement interdite sans l'accord explicite de TFA
Dostmann. Les caractéristiques techniques de ce produit ont été actualisées au moment de l'impression et peu-
vent être modifiées sans avis préalable.
Les dernières données techniques et les informations concernant votre produit peuvent être consultées en entrant
le numéro de l'article sur notre site Internet.
www.tfa-dostmann.de 04/23
TFA_No. 30.5038_Anleit_04_23 20.04.2023 10:33 Uhr Seite 15

3130
Termo-igrometro digitale
Vi ringraziamo per aver scelto l'apparecchio della TFA.
1. Prima di utilizzare l'apparecchio
•Leggete attentamente le istruzioni per l'uso.
• Seguendo le istruzioni per l'uso, eviterete anche di danneggiare il prodotto e di pregiudi-
care, a causa di un utilizzo scorretto, i diritti di consumatore che vi spettano per legge.
• Decliniamo ogni responsabilità per i danni derivanti dal mancato rispetto delle presenti
istruzioni per l'uso. Allo stesso modo, non siamo responsabili per eventuali misurazioni
errate e per le conseguenze che ne possono derivare.
• Prestate particolare attenzione alle misure di sicurezza!
• Conservate con cura queste istruzioni per l'uso.
2. La consegna include
• Termo-igrometro digitale • Istruzioni per l'uso
3. Utilizzi e vantaggi del vostro nuovo apparecchio
• Temperatura e umidità interna con livello di comfort
• Con valori massimi e minimi
• Orologio
• Allarme con funzione snooze
• Allarme orario
• Indicazione della data
4. Per la vostra sicurezza
• Il prodotto è adatto esclusivamente agli utilizzi di cui sopra. Non utilizzate il prodotto in maniera
diversa da quanto descritto in queste istruzioni.
• Non sono consentite riparazioni, alterazioni o modifiche non autorizzate del dispositivo.
Termo-igrometro digitale
Avvertenza!
Pericolo di lesioni:
• Tenere il dispositivo e la batteria lontano dalla portata dei bambini.
• Le piccole parti possono essere ingerite dai bambini (sotto i tre anni)
• Le batterie contengono acidi nocivi per la salute. Se ingerite, le batterie possono essere morta-
li. Se una batteria venisse ingerita, potrebbe causare gravi ustioni interne e portare alla morte
nel giro di due ore. Se si sospetta che una batteria sia stata ingerita o inserita nel corpo in altra
maniera, consultare immediatamente un medico.
• Non gettare le batterie nel fuoco, non polarizzarle in maniera scorretta, non smontarle e non
cercare di ricaricarle. Pericolo di esplosione!
• Sostituire quanto prima le batterie esauste, in modo da evitare perdite.
• Evitare il contatto del liquido delle batterie con la pelle, gli occhi e le mucose. In casi di contat-
to, sciacquare subito la zona interessata con acqua e consultare un medico.
Avvertenze sulla sicurezza del prodotto!
• Non esporre l'apparecchio a temperature estreme, vibrazioni e urti.
• Proteggere dall’umidità.
5. Componenti
A: Display:
A 1: Orologio, data, allarme A 2: Simbolo della sveglia
A 3: Simbolo dell’allarme orario A 4: Temperatura interna MAX/MIN
A 5: Umidità interna, MAX/MIN A 6: Simbolo del livello di comfort
TFA_No. 30.5038_Anleit_04_23 20.04.2023 10:33 Uhr Seite 16

3332
Termo-igrometro digitale
B:Tasti:
B 1: Tasto SNOOZE B 2: Tasto MODE
B 3: Tasto UP B 4: Tasto MEM
B 5: Tasto °C/°F B 6: Bottone RESET
C: Struttura esterna:
C 1: Supporto con vano batteria
6. Messa in funzione
• Aprire il vano batteria e inserire una batteria nuove tipo AA da 1,5 V, rispettando le corretta
polarità.
• Richiudere il vano batteria.
• Tutti i segmenti dell'LCD appaiono contemporaneamente.
• L'apparecchio è pronto per l'uso.
• Sul display appaiono la temperatura e l’umidità attuali.
• Il simbolo AM appare sul display vicino all'indicazione dell’ora (12:00 predefinito).
• Per spegnere l'apparecchio, rimuovere la batteria.
7. Uso
• Tenere premuto il tasto UP in modalità impostazione per procedere velocemente.
• L'apparecchio esce automaticamente dalla modalità impostazione se non si preme alcun tasto
per più di 60 secondi.
7.1 Regolazione dell’ora e data
• Premere il tasto MODE.
Termo-igrometro digitale
• L'indicazione dei minuti inizia a lampeggiare.
• Impostare i minuti desiderati con il tasto UP.
• Premendo il tasto MODE è possibile modificare uno dopo l'altro le impostazioni per ora, 12
(AM o PM dopo mezzogiorno appare sul display) o 24 ore, mese e giorno. Impostare i valori
desiderati con il tasto UP.
• Confermare con il tasto MODE.
• Sul display viene visualizzata l'ora attuale
7.2 Regolazione dell’ora della sveglia
• Premere il tasto MODE nella modalità normale per attivare la modalità di allarme.
• 0:00 (predefinito) o l'ultima ora della sveglia impostata vengono visualizzati sul display.
• Tenere premuto il tasto MODE.
• Il simbolo della sveglia appare e l'indicazione dei minuti iniziano a lampeggiare.
• Impostare i minuti con il tasto UP.
• Confermare con il tasto MODE e inserire l'ora procedendo nello stesso modo.
• Confermare con il tasto MODE.
• Sul display viene visualizzata l'ora della sveglia impostata e il simbolo. La funzione
dell’allarme è attivata.
• Premere nuovamente il tasto MODE per ritornare alla visualizzazione dell'ora attuale.
• Quando l'orario di allarme inserito viene raggiunto, la sveglia comincia a suonare.
• Per arrestare l’allarme, premere un tasto qualunque.
• Se non viene interrotto, il segnale si disattiva automaticamente dopo pochi minuti e si riattiva
nuovamente alla stessa ora di sveglia.
• Il simbolo resta fisso sul display.
• Quando suona la sveglia innestare la funzione snooze con il tasto SNOOZE.
• Il suono della sveglia verrà interrotto per 8 minuti.
TFA_No. 30.5038_Anleit_04_23 20.04.2023 10:33 Uhr Seite 17

3534
Termo-igrometro digitale
7.3 Attivare e disattivare la funzione sveglia e l’allarme orario
• Premere il tasto MODE nella modalità normale per attivare la modalità di allarme.
• Sul display viene visualizzata l'orario di allarme.
• Premere una volta il tasto UP per attivare l’allarme.
• Sul display appare il simbolo .
• Premere due volte il tasto UP per attivare l’allarme orario. Sul display appare il simbolo .
• Premere tre volte il tasto UP per attivare l’allarme e l’allarme orario. Sul display vengono visua-
lizzati i simboli e .
• Premere quattro volte il tasto UP per disattivare l’allarme e l’allarme orario. Sul display scom-
paiono i simboli.
• Premere il tasto MODE per ritornare alla visualizzazione dell’ora attuale.
7.4 Visualizzazione della data
• Premendo il tasto UP nella modalità normale, è possibile visualizzare la data.
7.5 Visualizzazione della temperatura
• Premendo il tasto °C/°F nella modalità normale, è possibile commutare la visualizzazione della
temperatura da °C (Celsius) a °F (Fahrenheit).
7.5 Valori massimi e minimi
• Premere il tasto MEM.
• Sul display appare MAX.
• Vengono visualizzate la temperatura interna massima e l'umidità dell'aria massima raggiunte
dopo l´ultimo azzeramento.
• Premere nuovamente il tasto MEM.
• Sul display appare MIN.
Termo-igrometro digitale
• Vengono visualizzate la temperatura interna minima e l'umidità dell'aria minima raggiunte dopo
l´ultimo azzeramento.
• Per tornare alla visualizzazione dei valori attuali, premere ancora una volta il tasto MEM.
• L'apparecchio esce automaticamente dalla modalità MAX/MIN se non preme alcun tasto.
• Tenendo premuto il tasto MEM durante la visualizzazione dei valori massimi e minimi per can-
cellarli.
8. Cura e manutenzione
• Per pulire l'apparecchio utilizzare solo un panno morbido leggermente inumidito. Non usare
solventi o prodotti abrasivi.
• Rimuovere la batteria, se non si utilizza l'apparecchio per un periodo prolungato.
• Collocare il dispositivo in un luogo asciutto.
8.1 Sostituzione della batteria
• Quando le indicazioni sul display o il segnale acustico di allarme diventano più deboli, sostitui-
te le batterie.
• Aprire il vano batteria e inserire una batteria nuove tipo AA da 1,5 V rispettando le corretta
polarità.
• Richiudere il vano batteria.
9. Guasti
Problema Risoluzione del problema
Nessuna indicazione ➜ Inserire la batteria rispettando le corrette polarità
sul dispositivo ➜ Sostituite la batteria
TFA_No. 30.5038_Anleit_04_23 20.04.2023 10:33 Uhr Seite 18

3736
Termo-igrometro digitale
Indicazione non corretta ➜ Premere il tasto RESET con un oggetto appuntito
➜ Sostituite la batteria
Qualora il vostro apparecchio continui a non funzionare nonostante queste procedure, rivolgetevi
al rivenditore presso il quale lo avete acquistato.
10. Smaltimento
Questo prodotto e il suo imballaggio sono stati realizzati utilizzando materiali e componenti di alta
qualità che possono essere riciclati e riutilizzati. Questo riduce i rifiuti e protegge l'ambiente.
Smaltire gli imballaggi in modo ecologico attraverso i sistemi di raccolta in vigore.
Smaltimento del dispositivo elettrico
Rimuovere dal dispositivo le batterie estraibili e le batterie ricaricabili estraibili e smaltir-
le separatamente.
Questo apparecchio è contrassegnato in conformità alla Direttiva UE sullo smaltimento
delle apparecchiature elettriche ed elettroniche (WEEE).
Questo prodotto non deve essere smaltito insieme ai rifiuti domestici. Il consumatore è
tenuto a consegnare il vecchio apparecchio presso un punto di raccolta per lo smalti-
mento di apparecchiature elettriche ed elettroniche ai fini di uno smaltimento ecologico.
La restituzione è gratuita. Osservare i regolamenti in vigore!
Smaltimento delle batterie
È assolutamente vietato gettare le batterie e le batterie ricaricabili tra i rifiuti domestici.
Contengono sostanze tossiche che possono danneggiare l'ambiente e la salute se smal-
tite in modo improprio.
Termo-igrometro digitale
In qualità di consumatori, siete tenuti per legge a smaltire le batterie usate presso i punti
vendita o consegnarle presso altri enti preposti al riciclaggio in conformità alle vigenti
disposizioni nazionali o locali, ai fini di uno smaltimento ecologico. La restituzione è gra-
tuita.
Le sigle dei metalli pesanti contenuti sono: Cd=cadmio, Hg=mercurio, Pb=piombo
11. Dati tecnici
Alimentazione: Pila 1 x 1,5 V AA
Campo di misura - temperatura: 0°C…+50°C (+32°F…+122°F) °C/°F- commutabile
Campo di misura - umidità: 20...90 % rH
Sul display appare LL/HH: Fuori dal campo di misura
Dimensioni esterne: 94 x 37 x 94 mm
Peso: 95 g (solo apparecchio)
TFA Dostmann GmbH & Co.KG, Zum Ottersberg 12, 97877 Wertheim, Germania
È vietata la pubblicazione delle presenti istruzioni o di parti di esse senza una precedente autorizzazione della TFA
Dostmann. I dati tecnici corrispondono allo stato del prodotto al momento della stampa e possono cambiare senza
preavviso.
È possibile trovare dati tecnici e informazioni aggiornate sul prodotto inserendo il numero di articolo sul nostro sito.
www.tfa-dostmann.de 04/23
TFA_No. 30.5038_Anleit_04_23 20.04.2023 10:33 Uhr Seite 19

3938
Digitale thermo-hygrometer
Hartelijk dank dat u voor dit apparaat van TFA hebt gekozen.
1. Voordat u met het apparaat gaat werken
•Lees de gebruiksaanwijzing aandachtig door.
• Door rekening te houden met wat er in de handleiding staat, vermijdt u ook beschadigin-
gen van het product en riskeert u niet dat uw wettelijke rechten door verkeerd gebruik
niet meer gelden.
• Voor schade die wordt veroorzaakt doordat u geen rekening houdt met de handleiding
aanvaarden wij geen aansprakelijkheid. Ook zijn wij niet verantwoordelijk voor verkeerde
metingen en de mogelijke gevolgen die daaruit voortvloeien.
• Volg met name de veiligheidsinstructies op!
• Deze gebruiksaanwijzing goed bewaren a.u.b.!
2. Levering
• Digitale thermo-hygrometer • Gebruiksaanwijzing
3. Toepassing en alle voordelen van uw nieuwe apparaat in één oogopslag
• Binnentemperatuur en luchtvochtigheid met behaaglijkheidsgraad
• Met de maximum- en minimumwaarden
• Tijd
• Wekalarm met snooze functie
• Alarm per uur
• Weergave voor de datum
4. Voor uw veiligheid
• Het product is uitsluitend geschikt voor de hierboven beschreven doeleinden. Gebruik het pro-
duct niet anders dan in deze handleiding is aangegeven.
Digitale thermo-hygrometer
• Het eigenmachtig repareren, verbouwen of veranderen van het apparaat is niet toegestaan.
Voorzichtig!
Kans op letsel:
• Houd het apparaat en de batterij buiten de reikwijdte van kinderen.
• Het apparaat bevat kleine onderdelen, die door kinderen (jonger dan drie jaren) ingeslikt kun-
nen worden.
• Batterijen bevatten zuren die de gezondheid schaden. Het inslikken van batterijen kan levens-
gevaarlijk zijn. Als een batterij wordt ingeslikt, kan dit binnen 2 uur tot ernstige interne brand-
wonden en tot fataal letsel leiden. Als u denkt dat de batterijen zijn ingeslikt of in een willekeu-
rig lichaamsdeel terecht zijn gekomen, dient u onmiddellijk medische hulp te zoeken.
• Batterijen niet in het vuur gooien, niet kortsluiten, niet uit elkaar halen of opladen. Explosiege-
vaar!
• Zwakke batterijen moeten zo snel mogelijk worden vervangen om lekkage van de batterijen te
voorkomen.
• Als een batterij heeft gelekt, vermijd dan contact met de huid, ogen en slijmvliezen. Spoel in
geval van contact met batterijzuur de desbetreffende plekken onmiddellijk af met water en
raadpleeg een arts.
Belangrijke informatie over de productveiligheid!
• Stel het apparaat niet bloot aan extreme temperaturen, trillingen en schokken.
• Tegen vocht beschermen.
TFA_No. 30.5038_Anleit_04_23 20.04.2023 10:33 Uhr Seite 20
Table of contents
Languages:
Other TFA Clock manuals
Popular Clock manuals by other brands

Howard Miller
Howard Miller 615114 Set up and operating instructions

Oregon Scientific
Oregon Scientific WL388 user manual

Karlsson
Karlsson KA5601BK instruction manual

InfoTronics
InfoTronics IDpunch 7 user guide

Oregon Scientific
Oregon Scientific RRM320P user manual

Lenovo
Lenovo Smart Clock 2 Safety, warranty & quick start guide

Oregon Scientific
Oregon Scientific Slim Projection Clock RA368P user manual

Perel
Perel WC118 user manual

Chung’s Electronic
Chung’s Electronic C6057 user manual

Eurotops
Eurotops LANDMARK quick start guide

La Crosse Technology
La Crosse Technology WS-8418U-IT instruction manual

La Crosse Technology
La Crosse Technology WT-3122A manual