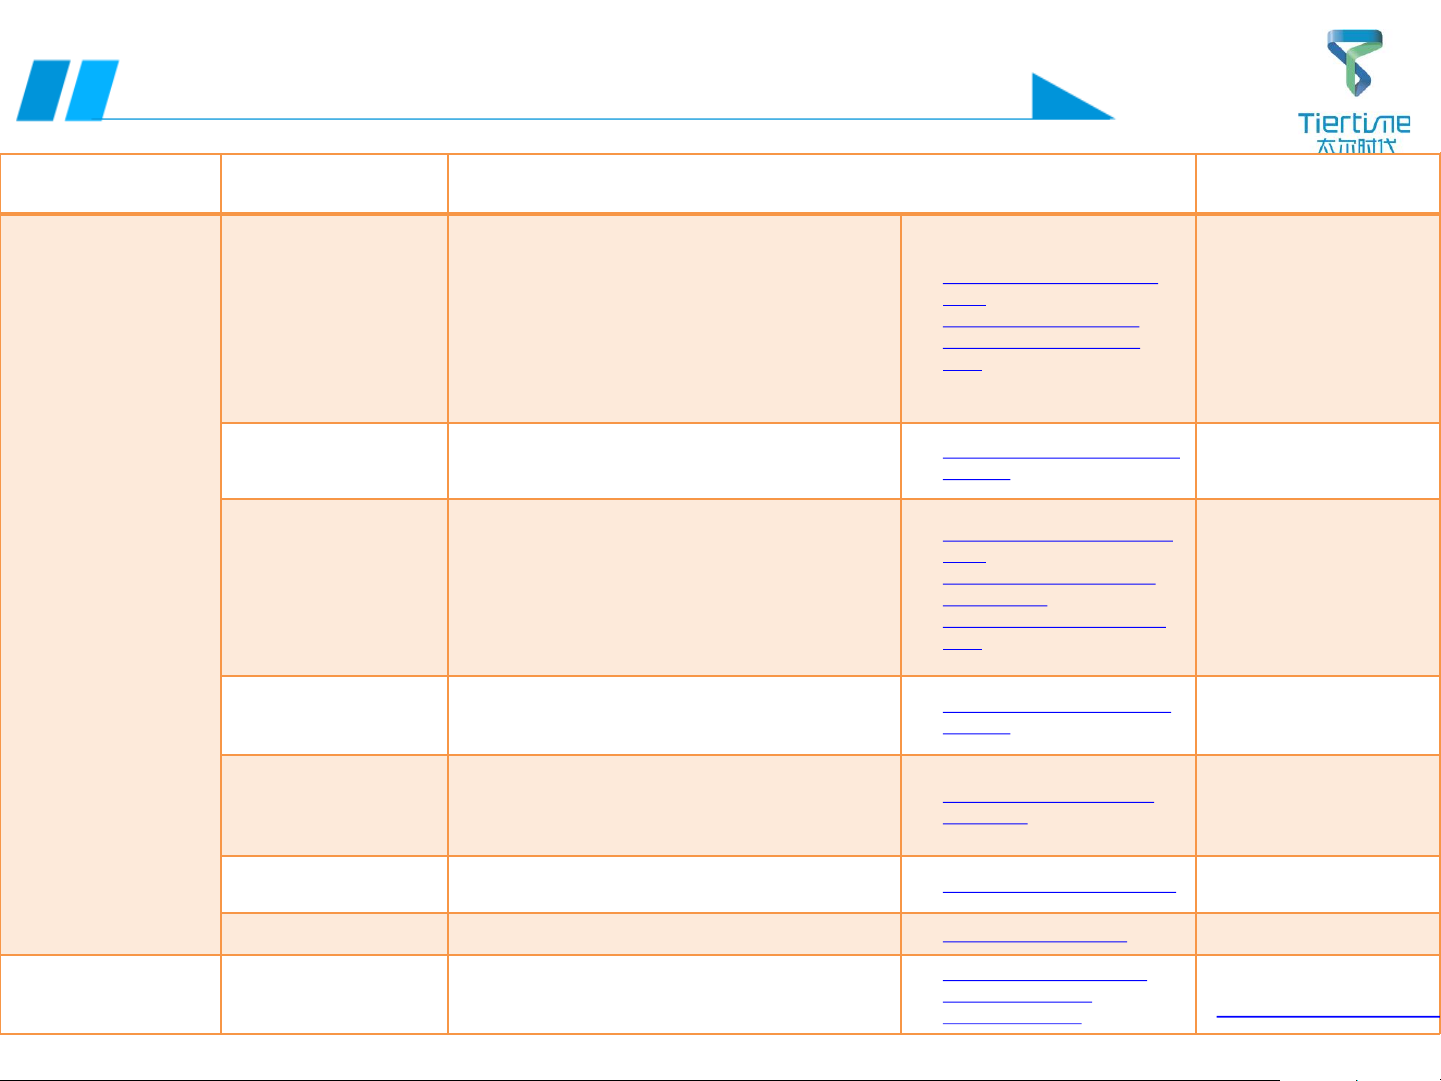
manuals.online logo
Brands
  1. Home
  2. •
  3. Brands
  4. •
  5. TierTime
  6. •
  7. 3D Printer
  8. •
  9. TierTime UP300 User manual

TierTime UP300 User manual

UP 300 Service Manual
1UP 300 Service Manual
2UP 300 Service Manual
Failure Directory
01 Initialization failed: abnormal sound /can't touch the limit
02 Initialization failed: no action on an axis
03 Initialization failed: directly power off
04 A certain axis has slight abnormal sound during initialization, but initialization can be done
05 Buzzer has no sound / low volume
06 Software shows that the nozzle temperature or platform temperature is too high
07 Failed to connect UP 300 (USB), USB transfer failed
08 Failed to connect UP 300 (Wi-Fi), Wi-Fi transmission failed
09 Failed to connect UP 300 (Wi-Fi)
10 Failed to register an account (no activation email received)
11 nozzle calibration/alignment failed
12 The nozzle does not extrude filament or the filament is not smooth during extrusion and printing
13 Failed to return activation code from server when printer is activated
14 Prompt insufficient material when transferring model
15 The model displays red when clicking Print, and reports error “Model out of print range” when transmitting.
16 The device does not start printing after the print info appears
17 During printing: Z axis automatically drops / X, Y axis suddenly stops move
18
Please close the front door of the printer
3UP 300 Service Manual
Failure Directory
19 Platform temperature is too high
20 nozzle temperature is too low / no temperature rise / print model has breakpoints
21 Print model has staggered layers
22 Print model warped or deformed
23 Printing pauses automatically
24 No model or support in a certain height range, the model does not match the original image
25 The surface quality of the model is poor, the surface has abnormal texture
26 Print platform continues to heat up automatically
27 The display does not work/works abnormally (no response when tapping an icon on the touch screen)
28 Data transmission error 6/SD card error/repeated printing failure/unable to save and update high value
29 Motion system error
4UP 300 Service Manual
Operation Guide Directory
01 Method of replacing rear plate, left and right side plates (extruder parts)
02 Method of replacing mainboard adapter board
03 Method of replacing PCB-extruder adapter board
04 Method of replacing PCB-height aligning board
05 Replacing steering gear assembly
06 Method of replacing platform FFC heating wire, height aligning cable and platform adapter board
07 Method of replacing Wire-interior lights
08 Method of replacing Wire-door inspection cable
09 Replacing front door magnet
10 Method of replacing nozzle FFC
11 Method of replacing nozzle assembly
12 Method of servicing filament feeding wheel and nozzle
13 Method of replacing nozzle PCB board, heating parts, nozzle parts
14 Method of replacing Wi-Fi antenna, TF card, CPU, mainboard
15 Method of replacing FFC-Y axis cable and Y-axis limit
16 Method of replacing PCB-Y axis adapter board
17
Method of replacing HEPA filter
5UP 300 Service Manual
18 Method of replacing centrifugal fan
19 Method of replacing platform aluminum substrate
20 Method of replacing wire feeder and wire inspection limit
21 Method of replacing X-axis motor
22 Method of replacing X-axis connecting rod assembly
23 Method of replacing X-axis belt
24 Method of replacing X-axis light bar
25 Method of replacing X-axis limit
26 Method of replacing Y-axis belt
27 Method of replacing Y-axis motor
28 Method of replacing Y-axis light bar assembly
29 Method of replacing Z-axis screw motor
30 Method of replacing Z-axis limit
31 Method of replacing 26P color cable
32 Method of replacing screen power cable, signal cable, CFC-USB disk interface, SD card
33 Method of replacing display, Wi-Fi component, USB disk interface board
35
36
Operation Guide Directory
6UP 300 Service Manual
Failure Cause Solution Remark
⚫An axis has abnormal
sound during
initialization
⚫Manual three-axis
motion can’t touch the
limit switch
⚫The only method is to
turn off the power
➢Confirm the fault
axis
The axis that causes the initialization failed is the
fault axis (initialization sequence: Z-X-Y)
Normal initialization:
➢Z axis collides downwards with
limit once;
➢X axis collides backwards with
limit twice;
➢Y axis collides rightwards with
limit twice;
➢LED light is on
➢Limit switch of fault
axis is
deformed/damaged

Turn off the power, and move the XY axis manually; if
the fault axis can’t touch the limit contact or no
sound is made after touching the limit contact, the
limit is damaged and should be repaired or replaced;
if the failure still exists, process as follows;
✓Remove and
replace X limit
✓Remove and
replace Y limit
✓Remove and
replace Z limit
➢Do not break off the limit with
hands if it can’t touch
➢Limit wire, motor
wire broken, plug
loose, needle
retreated
Turn off the power, remove the rear panel and check
if the limit (on mainboard side) and motor wire of
the fault axis is broken; if not, re-plug the
limit/motor plug of the fault axis

Turn off the power and replace the motor of the fault
axis
✓Remove and
replace X motor
✓Remove and
replace Y motor
✓Remove and
replace Z motor
➢Check which axis isn’t moving
normally during initialization,
touch the limit by hand, and
check whether it can resume
normal initialization
➢Mainboard
damaged Turn off the power and replace the mainboard ✓Remove and
replace mainboard
➢Mainboard adapter
board damaged Turn off the power and replace the mainboard
✓Remove and
replace mainboard
adapter board
➢CPU damaged Turn off the power and replace the CPU ✓Remove and
replace CPU
➢Display damaged Turn off the power and replace the display ✓Remove and
replace display
Failure 01: Initialization failed: abnormal sound /can't touch the limit
Back to Directory
7UP 300 Service Manual
Failure Cause Solution Remark
⚫A certain axis has no
action during initialization
and the motor has no
motion sound
⚫Initialization is always in
the state that can’t be
finished
⚫The only method is to
turn off the power
➢Confirm the fault
axis

The axis that causes the initialization failed
is the fault axis (initialization sequence: Z-
X-Y)
Normal initialization:
➢Z axis collides downwards with
limit once;
➢X axis collides backwards with
limit twice;
➢Y axis collides rightwards with
limit twice;
➢Motor wire of fault
axis broken, needle
retreated, plug loose
➢Check if the motor of
the fault axis is
damaged
Turn off the power, check if the motor wiring of
the fault axis is damaged, and if the plug is broken;
if not, remove the mainboard and check if the
motor wire is broken or if the plug is loose
Turn off the power, open the rear panel, plug an
intact motor into the motor terminal of the
mainboard, and then initialize and test the motor
for damage. Replace the motor of the fault axis
✓Remove and
replace X limit
✓Remove and
replace Y limit
✓Remove and
replace Z limit
➢After abnormal initialization by
touching the limit with hand, push
each axis by hand to see if there is any
power failure
➢Mainboard damaged Turn off the power and replace the mainboard
✓Remove and
replace
mainboard
➢CPU damaged Turn off the power and replace the CPU ✓Remove and
replace CPU
Failure 02: Initialization failed: no action on an axis
Back to Directory
8UP 300 Service Manual
Failure Cause Solution Remark
⚫The machine
directly powers
off and restarts
when the
initialization
function is
triggered in any
method
⚫The cause of this
fault is a short
circuit
➢26P colour cable
➢Platform FFC short
circuit
➢Platform adapter
board damaged
➢LED light short
circuit
➢
Height aligning cable
short circuit
Turn off the power and replace the 26P color cable
Turn off the power, replace the platform adapter
board
Replace the LED light cable
Replace the height aligning cable
✓Replace the platform adapter
board
✓Replace the LED light cable
✓Replace the height aligning
cable
Short circuit is easy to
damage the mainboard and
platform adapter board
➢Platform adapter board is
damaged
➢Mainboard is damaged,
there is obvious burning
during initialization, and the
light appears
➢Short circuit of
aluminum substrate
Turn off the power, and replace the aluminum
substrate assembly
✓Replace the aluminum substrate
assembly
➢nozzle adapter
board short circuit
➢nozzle CFC cable
adapter board
➢nozzle FFC cable is
damaged or contact
is poor
Turn off the power and replace the nozzle adapter
board
Turn off the power and replace the mainboard
adapter board
Turn off the power and check if the FFC cable of the
nozzle has defects such as false connection,
crushing, and plug loose. If yes, replace it
✓Replace the PCB nozzle adapter
board
✓Replace the mainboard cable
adapter board
✓Replace the FFC-Y axis adapter
cable
➢Short circuit of
internal components
of the nozzle
Turn off the power and replace the nozzle assembly ✓Remove and replace the nozzle
assembly
➢Power cable or
signal cable of
screen short circuit
Turn off the power, check if the power cable and
signal cable are damaged, and if the connector is
broken or the plug is loose. If yes, replace the
power cable, signal cable / re-plug
✓Replace the power cable and
signal cable
➢Mainboard
damaged Turn off the power and replace the mainboard ✓Remove and replace mainboard
➢CPU damaged Turn off the power and replace the CPU ✓Remove and replace CPU
➢Display damaged/
power/signal cable
damaged
Turn off the power and replace the display
Check if the power/signal cable is disconnected or
broken
✓Remove and replace display
✓Remove and replace
power/signal cable
Failure 03: Initialization failed: direct power off
Back to Directory
9UP 300 Service Manual
Failure Cause Solution Remark
⚫Initialization can be
done normally, but
abnormal sound is
caused by slight friction
of the faulty axis during
initialization and
printing
➢Fault axis lacks
lubrication
If it is Y/X/Z axis, check if there is any jam or dry
noise; if yes, lubricate the fault axis bar with
industrial grade lubricating oil directly
If it is Z-axis, remove the rear panel first, and
then apply the industrial grade lubricating oil
evenly to the screw motor
✓Disassemble the rear
panel
➢Y axis abnormal
sound
Turn off the power, manually pull the Y-axis
nozzle holder, and check if the Y-axis motor
pulley is loose
Y-axis light bars not parallel, too tight
✓Remove and replace Y
motor
✓Replace Y-axis light bar
➢X axis light bar
abnormal sound
Turn off the power, manually pull the Y-
axis, and
check if the X-axis has obvious blackening or
axial scratches
✓Remove and replace X-
axis light bar
It is difficult to
replace Y-axis
linear bearing; it
is recommended
to replace the Y-
axis assembly
➢X-axis pulley
abnormal sound
Turn off the power supply and manually pull the
Y-axis to check if the X-axis motor pulley is loose
Place the belts on both sides of the pulley, and
pull the Y-axis back and forth five times to check
if the belt has obvious displacement and wear
✓Replace X-axis belt
✓Replace X motor
➢Z axis abnormal
sound

Check if the 26P color cable with black net under
the platform falls off
Failure 04: A certain shaft has slight abnormal sound during
initialization, but initialization can be done
Back to Directory
10UP 300 Service Manual
Failure Cause Solution Remark
⚫
No sound under
any operation
⚫Low volume under
any operation
➢
Buzzer / display
damaged
Turn off the power, remove the display,
and replace the buzzer components on
the display
Remove and
replace display
➢Mainboard
damaged
Turn off the power and replace the
mainboard
✓Remove and
replace
mainboard
Failure 05: Buzzer has no sound / low volume
Back to Directory
11
UP 300 Service Manual
Failure 06: Software shows that the nozzle
temperature or platform temperature is too high
Software reports nozzle high
temperature error
Software reports platform high
temperature error
Failure Cause Solution Remark
⚫
Reports nozzle
high
temperature
when the
nozzle powers
on
⚫Printing stops
and reports
nozzle high
temperature
error
⚫Platform
automatically
heats up after
initialization
⚫Software
reports
platform high
temperature
error when
loading model
➢nozzle (nozzle
plate,
temperature
control
components,
etc.)

Turn off the power, remove and replace
the nozzle PCB board
Turn off the power, remove the nozzle,
and replace the integrated liquefied gas
Turn off the power and replace the
nozzle assembly
✓Remove and replace
the nozzle assembly
✓Remove and replace
the nozzle plate
✓Remove and replace
the integrated
liquefied gas
It is
recommende
d to replace
the nozzle
assembly
➢nozzle is not
heated, fan
doesn’t run
when the
motor is
turned on
Turn off the power and replace the
nozzle PCB adapter board
Turn off the power and replace the
nozzle PCB board
Remove and replace
nozzle PCB adapter
board
➢FFC-platform
heating wire
false
connection
Re-plug or replace the FFC-platform
heating cable
✓Replace FFC-platform
heating cable
➢26P adapter
cable short
circuit
Re-plug or replace the 26P color cable ✓Replace the 26P color
cable
➢Mainboard
damaged
Turn off the power and replace the
mainboard ✓Remove and replace
mainboard
Printing stops and reports nozzle
high temperature error
Back to Directory
12UP 300 Service Manual
Failure Cause Solution Remark
⚫
When the UP 300 is
connected with a
USB cable, there is
no prompt on the
connection, and
the software
control operation
can’t be performed
⚫Unstable
connection state
causes
transmission model
data to fail/crash
after connection
➢USB cable is not
fixed/loose; USB
cable is damaged
Check if the USB cable is damaged (damaged, connector
deformed), and re-plug the USB cable on the mainboard
and PC
If the fault persists, replace the USB cable
➢USB port on PC The USB interface of the connected PC may be damaged.
Change the USB interface or check it with another PC
➢Software driver
installation failed
Connect the device to the PC with USB and update the
UP300 driver in the PC device manager (drive location:
software installation directory)
➢Software version
problem
Download the latest control software from the designated
official website
http://www.tiertime.com
https://www.up3d.com
➢PC mainboard is
underpowered
Change another PC (some MACs have experienced
insufficient power supply to the mainboard and the symbol
of “USB connection” always flashes when connecting, and
eventually the connection is abnormal)
➢Peripheral interface
board damaged /
display damaged /
external interface
board damaged
Turn off the power and replace the peripheral interface
board
Turn off the power and replace the display
Turn off the power and replace the peripheral interface
board
✓Remove and replace
display
✓Replace the
peripheral interface
board
➢Screen signal/
power cable
Turn off the power, and replace the screen signal/ power
cable
✓Remove and replace
screen power / signal
cable
Failure 07: Failed to connect UP 300 (USB), USB transfer failed
Back to Directory
13UP 300 Service Manual
Failure 08: Failed to connect UP 300 (Wi-Fi), Wi-Fi transmission failed
Failure Cause Solution Remark
⚫When UP300 is
connected wirelessly,
there is no prompt on
the connection, and the
software control
operation can’t be
performed
⚫Unstable Wi-Fi
connection state causes
transmission model data
to fail/crash after
connection
⚫Error when connecting
Wi-Fi: the printer is not
responding
➢The wireless status
of the connection
between the PC
and the UP300 is
different
Restart the UP 300 and UP Studio software, and confirm that the
display and PC are connected to the same Wi-Fi
If the workspace has multiple Wi-Fis for different purposes, its
Wi-Fi name needs to be distinguished from other Wi-Fis
➢Insufficient
wireless signal
strength / wireless
signal instable
Restart UP 300 and the software and reconnect;
Reconfigure wireless settings;
Replace a more stable and stronger wireless signal
➢Software version
problem
Download the latest control software from the designated
official website
http://www.tiertime.com
https://www.up3d.com
➢Wireless router is
not compatible
Check the router type. Currently, the UP Studio software only
supports wireless router in the 2.4GHz band. It is not compatible
with other routers and needs to be replaced with a router
supporting the 2.4GHz band
➢CPU damaged Connect Wi-Fi with the PC in the standard procedure. If it can’t be
connected normally, turn off the power and replace the CPU
✓Remove and
replace CPU
➢Wi-Fi cable
assembly or
display damaged
Turn off the power and replace the Wi-Fi cable assembly or
display
✓Remove and
replace the Wi-Fi
cable assembly or
display
Back to Directory
14UP 300 Service Manual
Failure Cause Solution Remark
⚫When UP300 is connected wirelessly, there is no
prompt on the connection, and the software
control operation can’t be performed
⚫Unstable Wi-Fi connection state causes
transmission model data to fail/crash after
connection
⚫Error when connecting Wi-Fi: the printer is not
responding
➢The wireless
status of the
connection
between the
display and the
PC is different
Restart the UP 300 and UP Studio software,
and confirm that the display and PC are
connected to the same Wi-Fi
If the workspace has multiple Wi-Fis for
different purposes, its Wi-Fi name needs to
be distinguished from other Wi-Fis
➢Insufficient
wireless signal
strength /
wireless signal
instable
Restart the router
Restart UP BOX and the software and
reconnect;
Reconfigure wireless settings;
Replace a more stable and stronger wireless
signal
➢Software version
problem
Download the latest control software from
the designated official website
http://www.tiertime.com
https://www.up3d.com
➢CPU damaged
Connect Wi-Fi with the display in the standard
procedure. If it can’t be connected normally,
turn off the power and replace the CPU
✓Remove and
replace CPU
➢Wi-Fi cable
assembly or
display damaged
Turn off the power and replace the Wi-Fi
cable assembly or display
✓Remove and
replace the
Wi-Fi cable
assembly or
display
Failure 9: Failed to connect UP 300 (Wi-Fi)
⚫Software error
Back to Directory
15UP 300 Service Manual
Failure 10: Failed to register an account (no activation email received)
Failure Cause Solution Remark
⚫
No error. When
register an account
with the UP Studio
software, the
message has been
sent to the specified
email address, but
the activation email
has not been
received
➢Intercepted as spam Check the spam and restore the email
➢Software version
problem
Download the latest control software
from the designated official website
http://www.tiertime.com
https://www.up3d.com
➢PC firewall settings Check your firewall settings
➢
Some email suffixes
have limitation
(e.g. .org)
Replace with commonly used email for
registration (QQ, NetEase, 263, etc.)
Back to Directory
16UP 300 Service Manual
Failure 11: nozzle calibration/alignment failed
Failure Cause Solution Remark
⚫Error: nozzle temperature too high
⚫Error: Calibration failed
⚫There is abnormal sound several
times when the platform rises to
the nozzle and no error reported
➢nozzle
temperature is
high during
calibration or
height aligning
after the nozzle
extruded
Wait for the nozzle temperature to drop
below 80°C
Clean residual
wire on the
nozzle before
aligning
➢Height aligning
cable damaged
Unplug the height aligning cable connecting
the height aligning assembly
✓Replace the height
aligning cable
➢Short circuit or
damage to
height aligning
PCB board
Remove the height aligning assembly and
replace the height aligning PCB board
✓Replace height
aligning PCB board
➢Steering gear is
not powered
Remove and replace the steering gear
assembly
✓Replace the steering
gear assembly
➢Mainboard
damaged 
Turn off the power and replace the mainboard
✓Remove and replace
mainboard
➢nozzle adapter
cable is broken Remove and replace the nozzle adapter cable
✓Remove and replace
the nozzle adapter
cable
Back to Directory
17UP 300 Service Manual
Failure Cause Solution Remark
⚫Extrusion
failure when
the nozzle
extrudes the
wire
⚫The nozzle
suddenly
stops in
printing
process
➢Material problems (wire
used up, knotted, damp,
broken, uneven diameter)
Rearrange unrolled wires
Put in a drying oven for drying
Replace with new materials or reinstall
materials
➢nozzle plugging Clean or replace the nozzle ✓Remove and replace the
nozzle
➢nozzle height and platform
compensation value setting
is unreasonable
Reset nozzle height
Calibrate the platform manually (using
calibration sheet)
➢
nozzle CFC cable is damaged
and the contact is poor
➢nozzle FFC adapter cable

Turn off the power and check if the CFC cable of
the nozzle is damaged, and replace if yes
Check the nozzle FFC cable for damage, if
replace if yes
✓Remove and replace the
nozzle FFC cable
✓Remove and replace the
nozzle CFC cable
➢nozzle (nozzle plate, nozzle
motor, temperature control
components, etc.)
Turn off the power, remove and replace the
nozzle board
Turn off the power, remove the nozzle, and
replace the integrated liquefied gas;
Turn off the power and replace the nozzle
motor
Turn off the power and replace the nozzle
assembly
✓Remove and replace the
nozzle assembly
✓Remove and replace the
nozzle board
✓Remove and replace the
integrated liquefied gas
✓Remove and replace the
nozzle motor
It is recommended
to replace the
nozzle assembly
➢Mainboard damaged Turn off the power and replace the mainboard ✓Remove and replace
mainboard
Failure 12: The nozzle does not extrude filament or the
filament is not smooth during extrusion and printing
Back to Directory
18UP 300 Service Manual
Failure 13:Failed to receive activation code from server
when printer is activated
Failure Cause Solution Remark
⚫
Error: Failed to receive
activation code from
server
⚫
Error: “Not factory
activation status” /
“Failed to acquire
activation status”
⚫
Error: “Activation code
error” / “Activation failed,
wrong activation code”
➢The number of
prints reaches
the preset value
Download the latest control
software from the designated
official website, connect to the
network and activate CPU
http://www.tiertime.com
https://www.up3d.com
➢Error when CPU
is activated,
failed to return
activation code
from server
Query whether the CPU number
has been imported into the
database
➢Failed to get
activation status
The customer shall
return the CPU
to the factory
➢The activation
code returned by
the server does
not match the
printer’s check
code
Need to confirm with the IT
department of the factory
whether the serial number has
been uploaded to the cloud
Back to Directory
19UP 300 Service Manual
Failure Cause Solution Remark
⚫Error when transferring data model:
material not enough, continue?
➢The remaining
material in the
filament spool is
not enough to print
the model being
transferred
Remove the cover of the
wire box and check if the
remaining filament in the
box is about to run out
➢Software material
weight setting is
improper

Set the actual weight of the
material being used in the
wire box in the “Material”
interface of the UP Studio
software
Software prompt
Failure 14: material not enough when transferring model
Back to Directory
20UP 300 Service Manual
Failure 15: The model displays red when clicking Print, and reports error
“Model out of print range” when transmitting
Failure Cause Solution
Remark

The model displays red
when sending a print task
and the error “Model out of
print range” is reported
when transmitting
➢The model is not
automatically placed
after being scaled
and moved, and
some areas are
outside the molding
space
Set to automatically place and
retransfer the model in the software
➢Model size out of
molding range
In the software, if you select the
model with the left mouse button,
you can know the maximum size of
the XYZ-axis. It can’t be transferred
and printed if it exceeds the molding
space of UP 300
The forming space of UP 300 model
is X*Y*Z=205mm*255mm*225mm
➢nozzle height value
not reasonable
Restart the machine and re-run the
height aligning
Software error
Model shows red
(not primary color)
Back to Directory

Other manuals for UP300

1

Other TierTime 3D Printer manuals

TierTime UP300 User manual

TierTime

TierTime UP300 User manual

TierTime UP Plus 2 User manual

TierTime

TierTime UP Plus 2 User manual

TierTime UP Mini 2 ES User manual

TierTime

TierTime UP Mini 2 ES User manual

TierTime UP mini 2 Configuration guide

TierTime

TierTime UP mini 2 Configuration guide

TierTime UP mini User manual

TierTime

TierTime UP mini User manual

TierTime UP BOX User manual

TierTime

TierTime UP BOX User manual

TierTime UP BOX Installation and operation manual

TierTime

TierTime UP BOX Installation and operation manual

TierTime UP600 User manual

TierTime

TierTime UP600 User manual

TierTime UP BOX User manual

TierTime

TierTime UP BOX User manual

TierTime UP300D User manual

TierTime

TierTime UP300D User manual

TierTime UP mini 3 User manual

TierTime

TierTime UP mini 3 User manual

TierTime UP BOX+ User manual

TierTime

TierTime UP BOX+ User manual

TierTime UP300D User manual

TierTime

TierTime UP300D User manual

TierTime Filament Dryer PRO User manual

TierTime

TierTime Filament Dryer PRO User manual

Popular 3D Printer manuals by other brands

be3D DeeGreen user guide

be3D

be3D DeeGreen user guide

Allevi Allevi 1 user guide

Allevi

Allevi Allevi 1 user guide

DGSHAPE LC-3DPrint Box user manual

DGSHAPE

DGSHAPE LC-3DPrint Box user manual

weistek RS IdeaWerk Pro user manual

weistek

weistek RS IdeaWerk Pro user manual

Acadian Robotics Copperhead Assembly guide

Acadian Robotics

Acadian Robotics Copperhead Assembly guide

Airwolf 3D HDR quick start guide

Airwolf 3D

Airwolf 3D HDR quick start guide

Cocoon Touch Getting started guide

Cocoon

Cocoon Touch Getting started guide

Variquest Trifecta 800 user guide

Variquest

Variquest Trifecta 800 user guide

Createbot MINI-Pro instructions

Createbot

Createbot MINI-Pro instructions

Printrbot Simple Getting started guide

Printrbot

Printrbot Simple Getting started guide

AnyCubic Prusa i3 product manual

AnyCubic

AnyCubic Prusa i3 product manual

Snapmaker A250 quick start guide

Snapmaker

Snapmaker A250 quick start guide

MakerBot METHOD reference guide

MakerBot

MakerBot METHOD reference guide

Bfb RapMan 3.2 Operation manual

Bfb

Bfb RapMan 3.2 Operation manual

Stratasys F770 Site preparation guide

Stratasys

Stratasys F770 Site preparation guide

Bondtech LGX PRO Quick setup guide

Bondtech

Bondtech LGX PRO Quick setup guide

LulzBot TAZ 5 Guide

LulzBot

LulzBot TAZ 5 Guide

zortrax X/Y manual

zortrax

zortrax X/Y manual

manuals.online logo
manuals.online logoBrands
  • About & Mission
  • Contact us
  • Privacy Policy
  • Terms and Conditions

Copyright 2025 Manuals.Online. All Rights Reserved.