TierTime UP mini 3 User manual

UP mini 3
User Manual
V 1
https://www.tiertime.com

1
Index
1 Safety and Printing Environment ......................................................................................... 3
1.1 Safety Precautions .................................................................................................. 3
1.2 Printing Environment ................................................................................................... 3
1.3 One Year Warranty ........................................................................................................ 4
1.4Compliance ................................................................................................................. 4
2 Product Introduction .............................................................................................................. 5
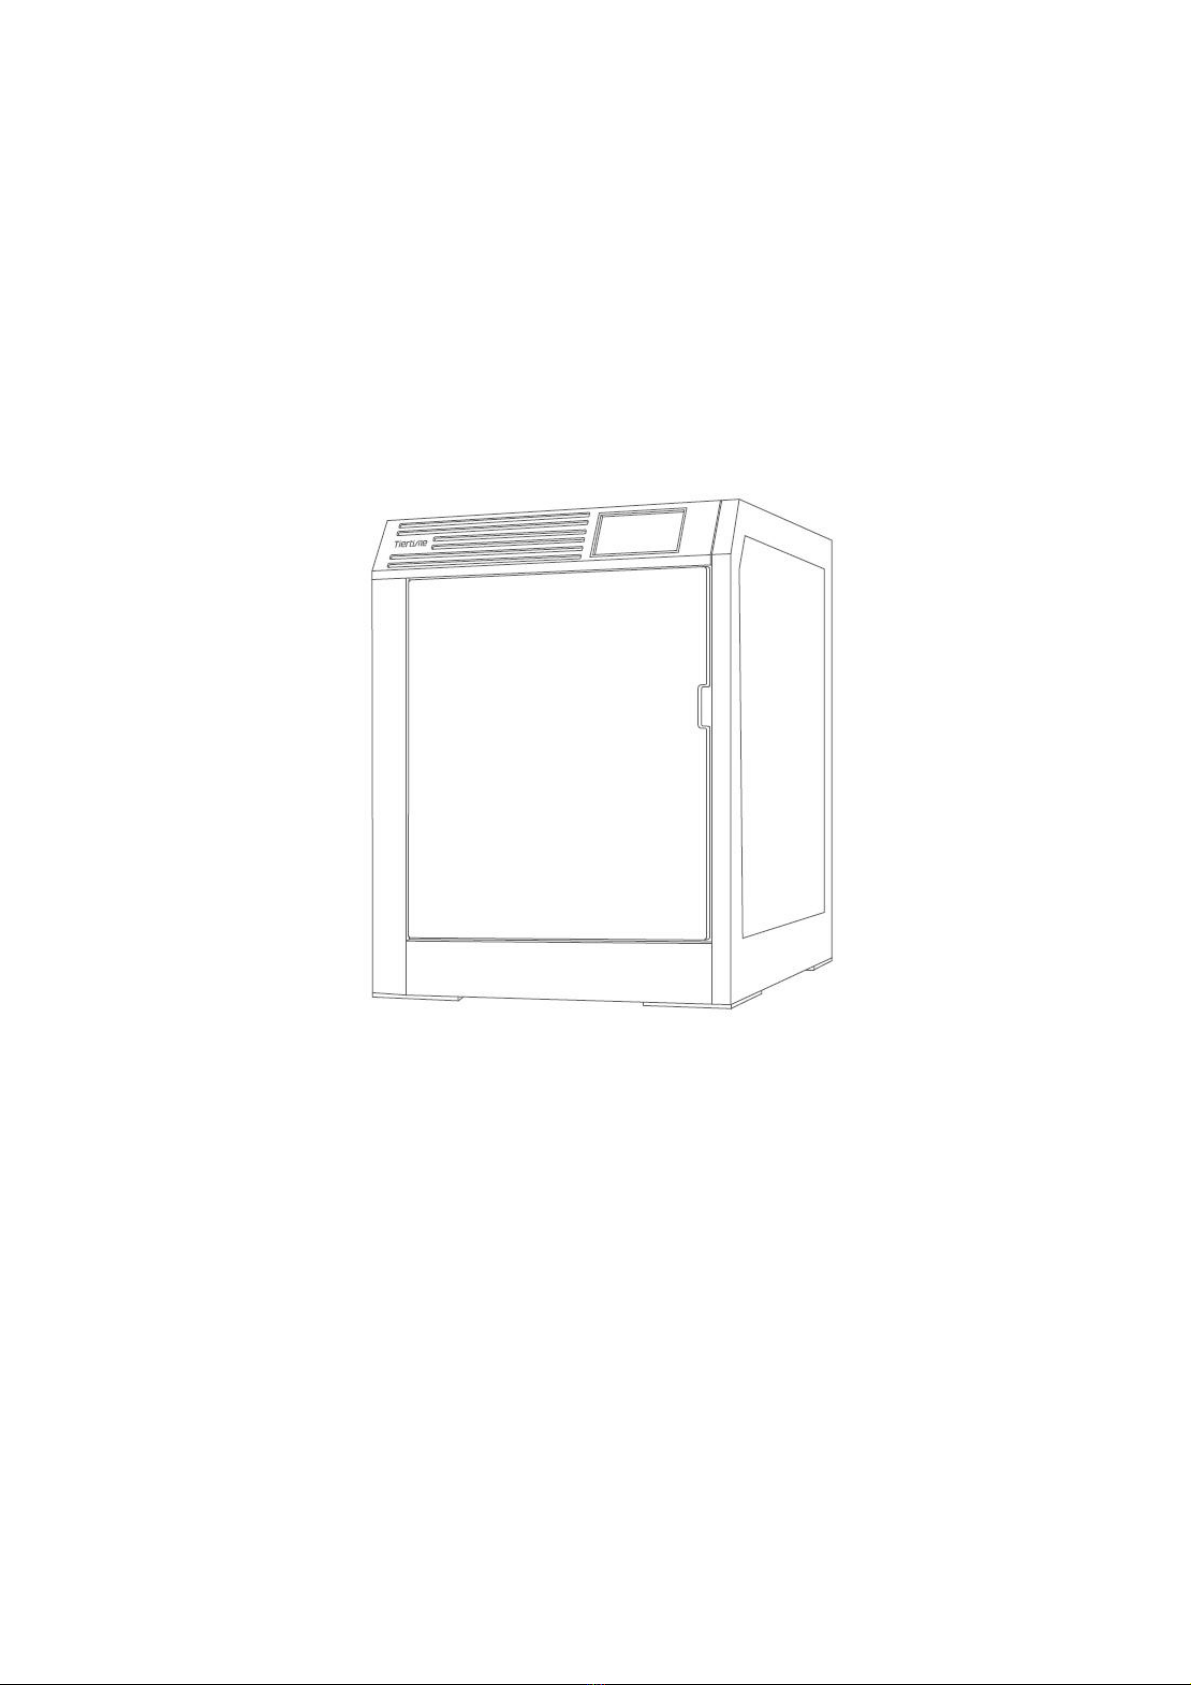
2.1 UP mini 3 ...................................................................................................................... 5
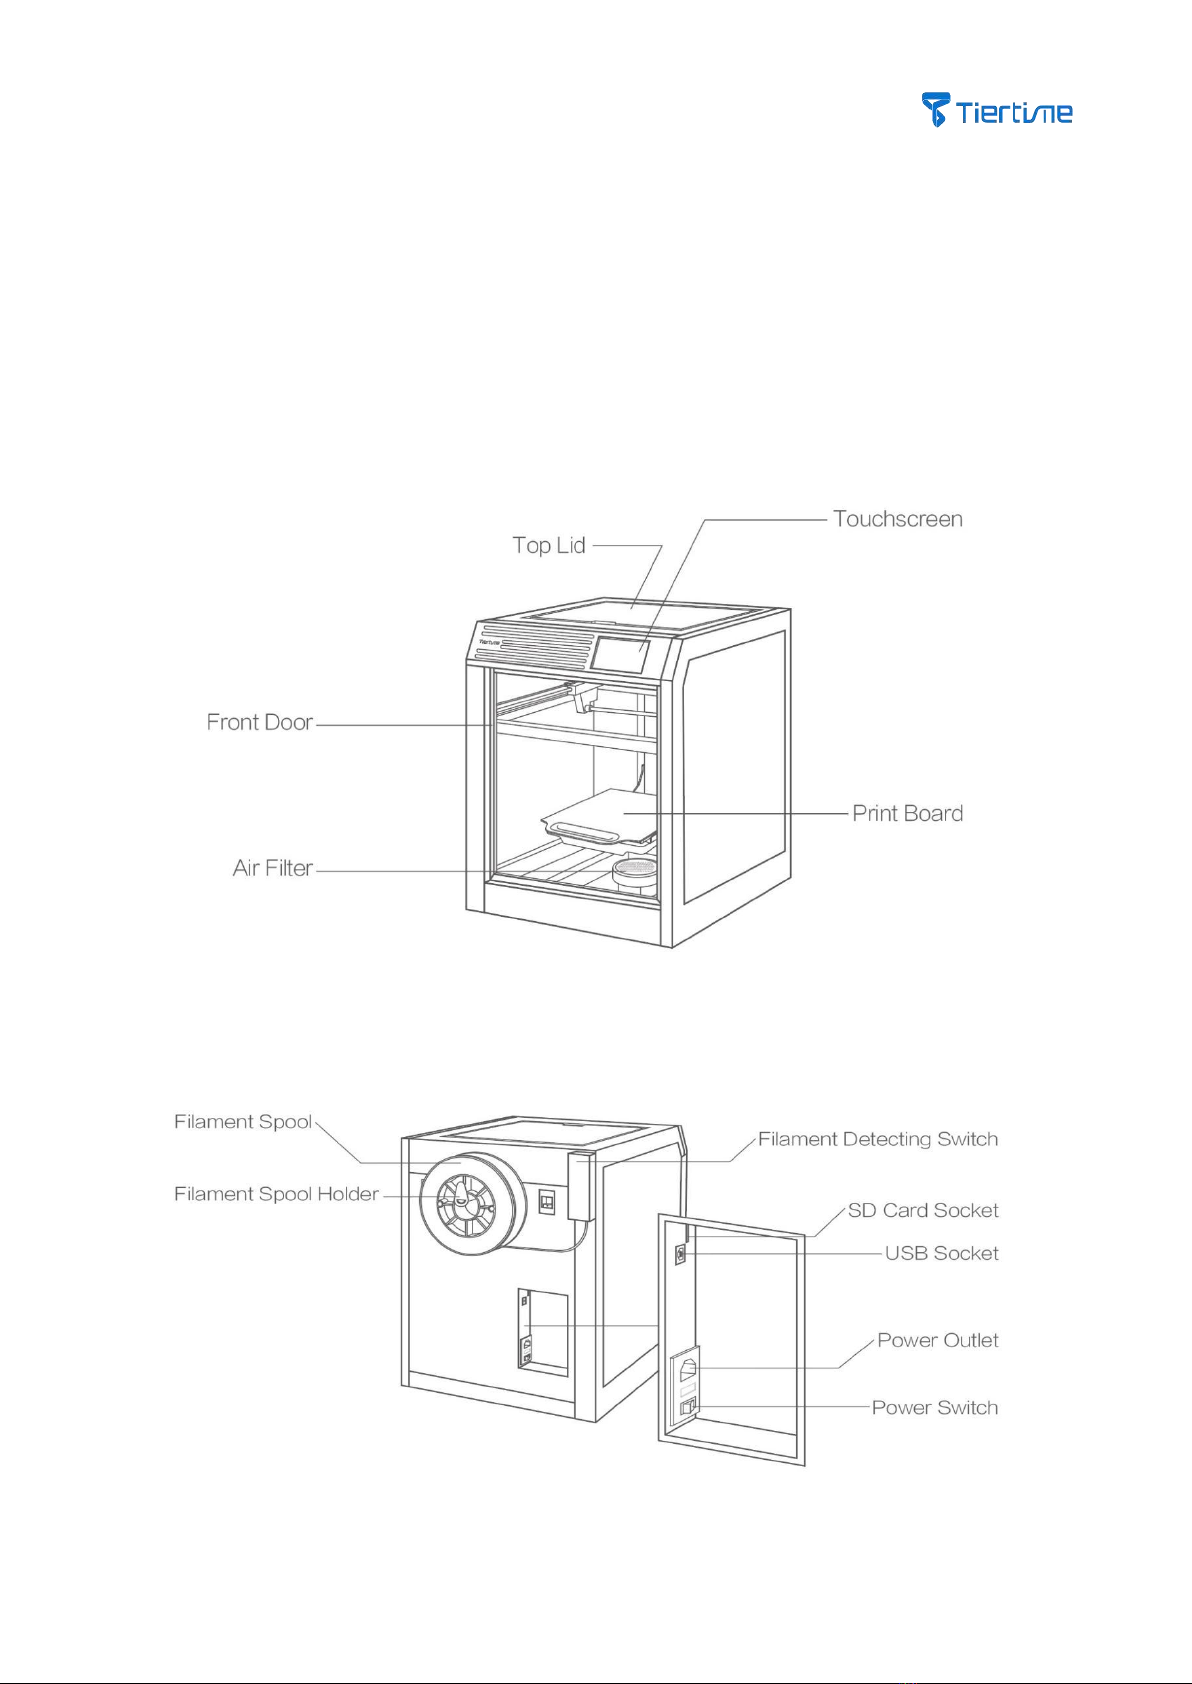
2.2 Main Structure ............................................................................................................... 5
3 Printer Installation ................................................................................................................... 6
3.1 Install Filament Spool Holder ........................................................................................ 6
3.2Install Air Filter ................................................................................................................ 6
3.3Install Build Plate ......................................................................................................... 7
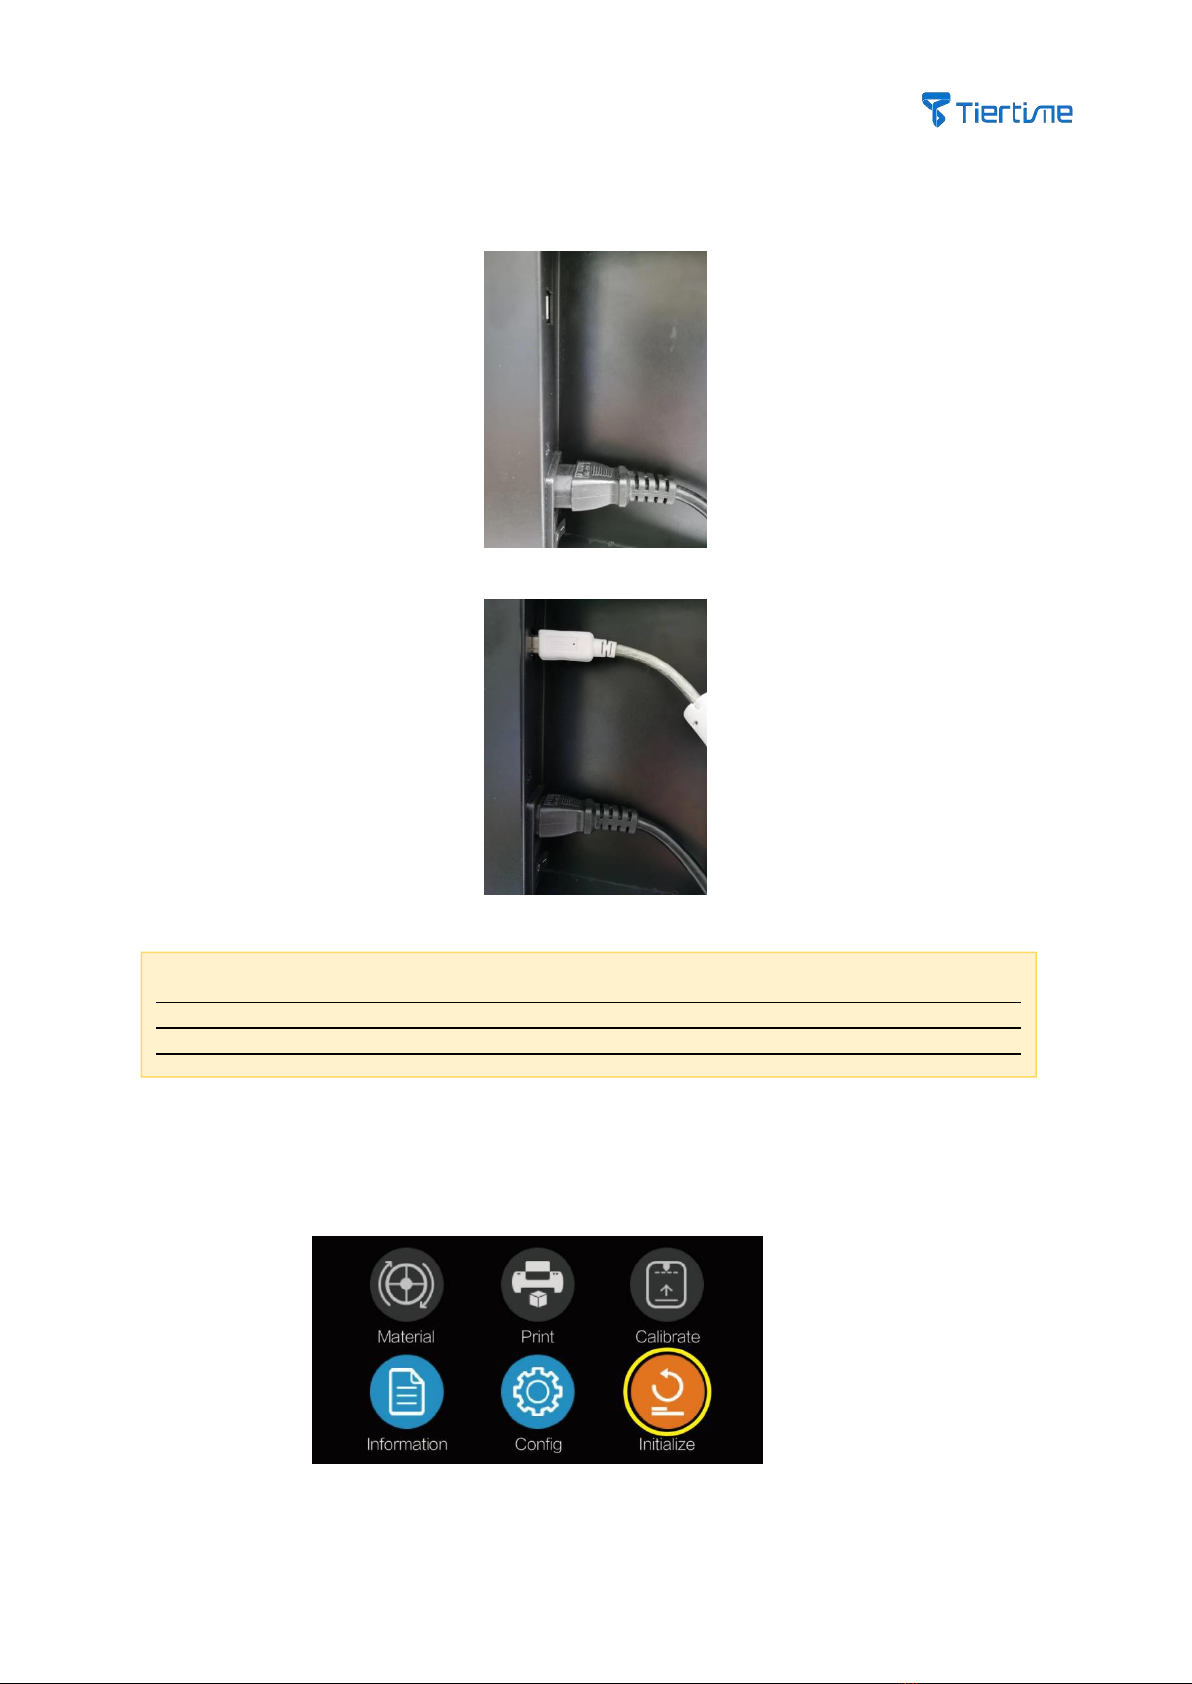
3.4 Cable Connection ......................................................................................................... 8
3.5 Initialize Printer ............................................................................................................... 8
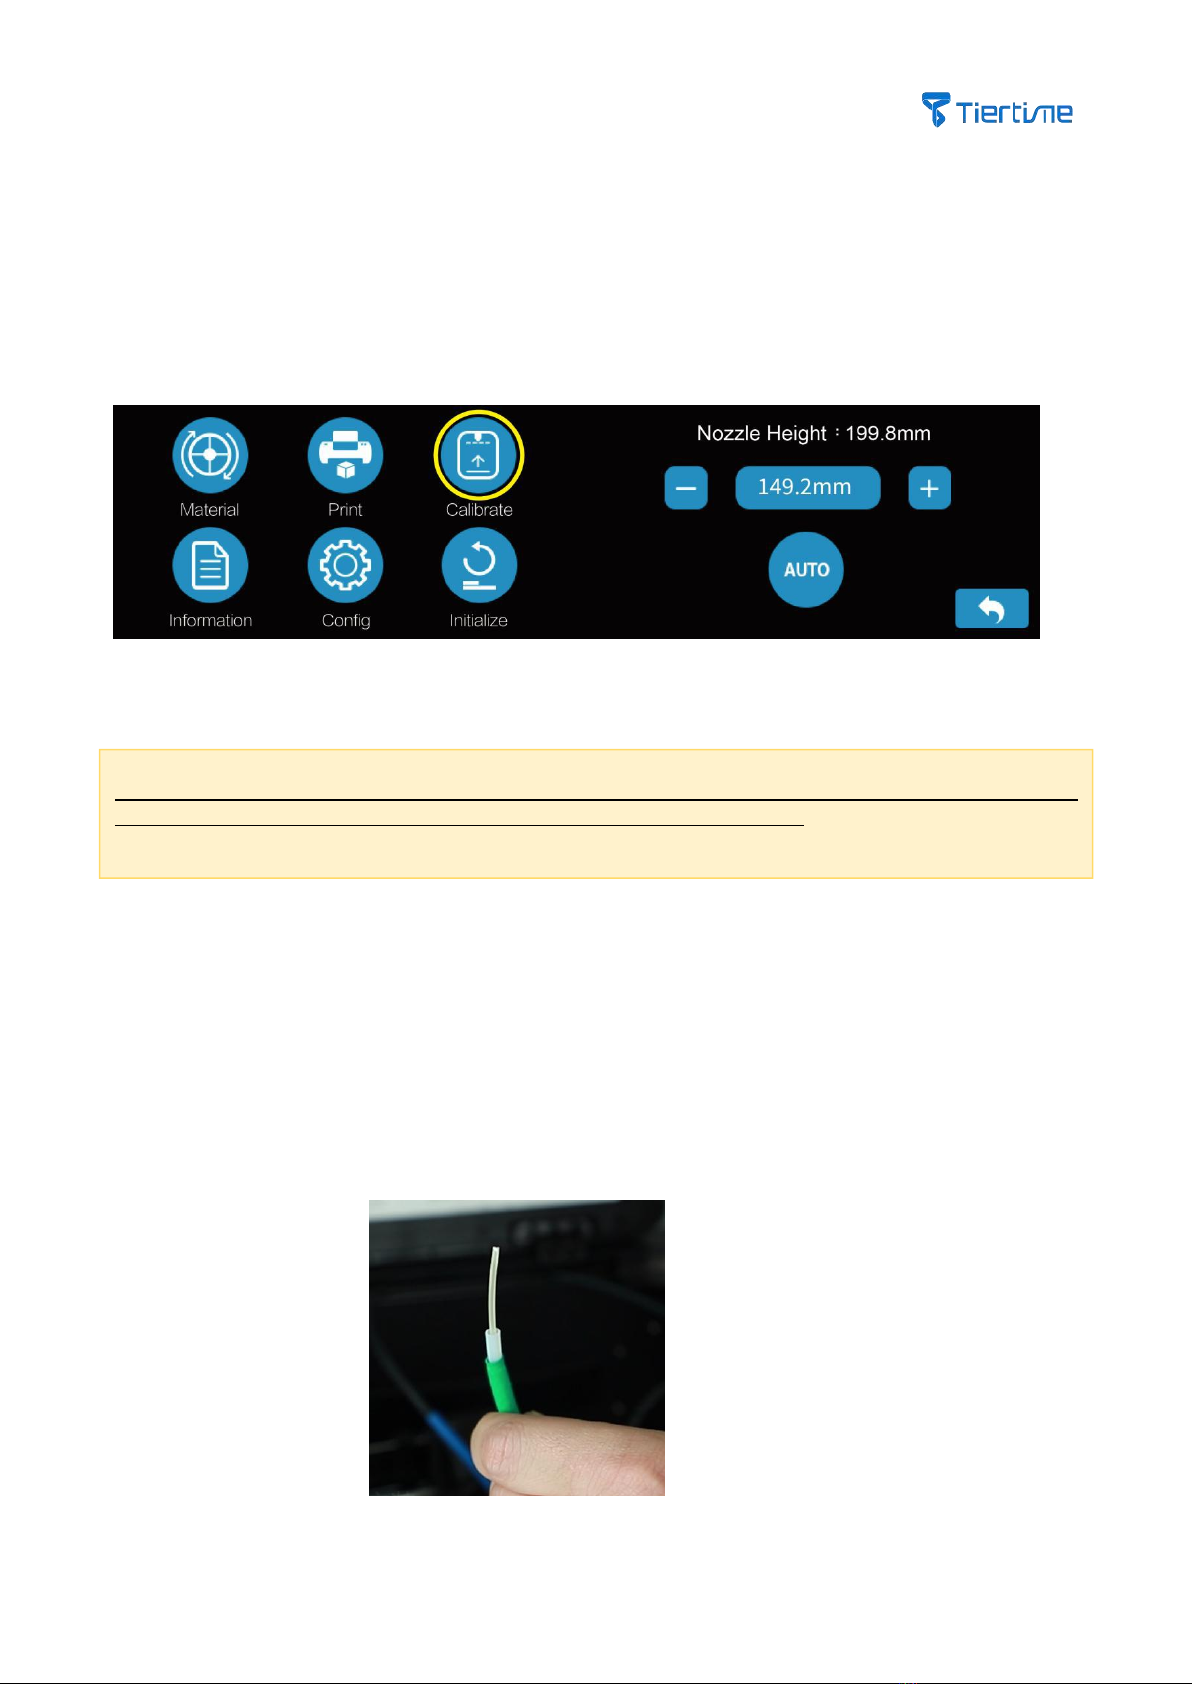
3.6 Calibrate Printer ........................................................................................................... 9
3.7 Install Filament ............................................................................................................ 9
4 Software Installation and Printing ........................................................................................... 12
4.1 Download and Install the UP Studio Software .............................................................. 12
4.2 Software Interface ......................................................................................................... 13
4.3 Touchscreen Interface ................................................................................................... 14
4.4 Load 3D Models ............................................................................................................ 14
4.5 Print Models ................................................................................................................ 16
4.6 Print Progress (Touchscreen) ....................................................................................... 17
4.7 Change Filament during Printing ................................................................................... 18
4.8 Resume Printing after Power Outage ............................................................................ 19
4.9 Repeat Print Jobs / Print Saved Jobs ........................................................................... 19
5 Printer Initialization .................................................................................................................. 21
5.1 Printer Initialization ....................................................................................................... 21
5.2 Filament Settings .......................................................................................................... 22
5.2.1 Filament Install (Touchscreen) ............................................................................. 23
5.2.2 Install Filament (UP Studio software) .................................................................. 24
5.2.3 Withdraw Filament (Touchscreen) ....................................................................... 25
5.2.4 Withdraw Filament (UP Studio)............................................................................. 26
5.2.5 Set 3rd Party Filament Printing Parameters ........................................................ 28
5.3 WiFi Connection ............................................................................................................ 32
5.3.1 WiFi Settings (Touchscreen) ................................................................................ 32
5.3.2 WiFi Settings (UP Studio) ..................................................................................... 34
5.4 Printer Calibration .......................................................................................................... 36
5.4.1 Printer Auto Calibration (Touchscreen) ................................................................ 36
5.4.2 Auto Calibration (UP Studio) ............................................................................... 37
5.4.3 Manual Calibration and Nozzle Height Adjustment ............................................. 38
5.4.4 Manual Calibration of Nozzle Height ................................................................... 41
5.5 Printer Settings .............................................................................................................. 45
5.6 Language Settings and Factory Settings ...................................................................... 46
5.7 Error Messages ............................................................................................................. 47
6 UP Studio2.x Software Features ............................................................................................ 48
6.1 Rotate ............................................................................................................................ 48
6.2 Scale ............................................................................................................................... 49
6.3 Move ............................................................................................................................... 50
6.4 Copy ............................................................................................................................... 51
6.5 Fix Errors ........................................................................................................................ 51
6.6 Merge / Save Models ..................................................................................................... 52

2
6.7 Advanced Printing Options ............................................................................................ 53
6.8 Printer Information ........................................................................................................ 56
6.9 Software Version and Upgrades .................................................................................... 57
6.10 Image Conversion ........................................................................................................ 57
7 Printing Tips and Maintenance ................................................................................................. 59
7.1 Printing Tips ................................................................................................................... 59
7.2 Printer Nozzle Maintenance .......................................................................................... 60
7.3 Replace Extruder ........................................................................................................... 61

3
1.Safety and Printing Environment
1.1 Safety Precautions
1. The UP mini 3 3D printer requires the power adapter provided by the original
manufacturer, otherwise the machine could be damaged or even cause fire. Keep the power
adapter away from water and out of high temperature environments.
2. During printing, the temperature of the nozzle of the printer could reach 300°C and the
temperature of the print platform could be over 100°C. Do not touch these parts with your
bare hands when the printer is in the operation mode, not even with the heat resistant
gloves included in the accessories, as the temperature could damage the gloves and injure
your hands.
3. During printing, the print head and other mechanical parts move at high speed. Touching
these parts while they are moving could cause injuries.
4. Make sure to remove the build plate off the build chamber first before removing the
model off the build plate. If you remove the model from the build plate directly, the build
plate could be damaged.
5. Wear goggles when removing the supporting material from models or detaching models
from the build plates.
6. When printing with plastic filaments, the process could generate slight and, for some
people, annoying odor. It is recommended to run the printer in a well ventilated
environment. We also suggest keeping the printer in an environment with a stable
temperature as unwanted cooling could cause adverse effects to the print quality.
7. After changing the extruder, make sure to conduct a calibration before a printing.
8. Adult Supervision: Adult supervision is required in the presence of children. Small printed
parts are a choking hazard, and always keep sharp tools away from children.
1.2Printing Environment
1.As the slight odor could be generated during printing, keep the printer in a well ventilated
environment. The ideal working temperature of the UP mini 3 is between 15°C and 30°C
with a relative humidity between 20–70%. Printing at temperatures out of this range could
cause adverse effects to the printing process and print quality.
2. It is recommended that you avoid wearing cotton, wool and other materials that are
prone to static electricity before using the printer to prevent damage to the precision
components of the equipment when the equipment is in operation.

4
1.3 One Year Warranty
Tiertime and its authorized resellers warrant to the original purchaser that this product is
free from defects in material and workmanship. Tiertime or its resellers will for one year, at
its option, repair or replace at no charge for parts and labour from the date you purchase
the product from Tiertime or its authorized resellers. Print heads, print boards, nozzles and
other consumables are warranted for thirty (30) days.
• Tiertime reserves the right to determine the validity of all warranty claims.
• Warranty is voided if the product serial number has been altered or removed.
• Warranty is voided if the product has been misused or damaged or if evidence is present
that the product was altered, modified, or serviced by unauthorized service people.
For the detailed Warranty and Service Level Agreement, visit our website
https://www.tiertime.com.
1.4 Compliance
The UP mini 3 is compliant to the following quality certification:
FCC
RoHS
CE

5
2. Product Introduction
2.1 UP mini 3
UP mini 3 is an entry-level 3D printer launched by Tiertime, which can meet daily work requirements such as
high-frequency design verification for schools and research institutes.
2.2 Main Structure

6
3 Printer Installation
3.1 Install Filament Spool Holder
Insert the filament spool holder into the slot at the back of the printer.
3.2 Install Air Filter
1. Rotate counterclockwise to remove the top cover of the air filter.
2. Put the air filter provided in the packaging box into the base of the air filter system.

7
Note: Change the air filter every 3 months, or every 300 hours of active printing.
Note: Print board has two surfaces. One side is perf board and the other side is glass board, both of which can be
a print plate. The perf board side is suitable to print with raft, and it can be used to print the materials that are
easy to warp, e.g. ABS. If printing with no raft, use the glass side of the board with glue or tapes on the surface.
3. Turning the upper cover of the air filter clockwise to close it.
3.3 Install Build Plate
Place the print board in the slots of the platform with the side of the perf board facing up, push the board
forward and make sure the board fits in the slot.
If printing with no raft, make sure the glass side of the print board facing upward, and then apply glue or tapes
on the surface of the print board.

8
Note: Before switching on the printer for the first time, do not connect the USB cable with a
computer, because connecting to a computer may lock the buttons on the touchscreen. After
switching on printer for the first time, use the touchscreen to initialize the printer, calibrate it and
load the filament, then connect the printer to the computer.
3.4 Cable Connection
1. Secure the power connector into the power interface at the back of the machine, and plug the other side of
the cable in the power outlet. Turn on the power switch at the back of the machine.
2. Plug in the USB cable (provided in the package) into the USB socket at the back of the machine.
3.5 Initialize Printer
Click the lower right “Initialize” button, and confirm the machine to start the initialization process, which may
take several minutes. The printer will get back to the zero position once the process is done.

9
Note: Before the calibration process, make sure the tip of the nozzle is clean without any residue, otherwise, it
will introduce extra delta in the nozzle height which could affect the print quality.
3.6 Calibrate Printer
All the UP mini 3 3D printers have gone through the calibration process in our factory. However, due to bumpy
shipping conditions, we strongly recommend you conduct platform leveling and nozzle height adjustment before
your first use of the machine.
Click the “Calibrate” button on the touchscreen, and make sure the nozzle is clear away from the print platform.
If the nozzle is very close to the platform, click the “-” button to reduce the nozzle height. Click the “Auto” button
to kick start the calibration process. The extruder will start moving and do 9-point matrix leveling and the nozzle
height adjustment process.
The whole calibration process can take several minutes. Once the process is finished, click the “Back” button to
return to the main menu.
3.7 Install Filament
In order to keep the consistency of the print quality, we recommend using Tiertime Fila filaments on Tiertime 3D
Printer. Our operational software, UP Studio has the optimized parameter settings built in, which will ensure the
best printing experience.
There is a 500-gram UP Fila PLA spool that comes with the printer. Install the filament spool in the following steps:
1, Take out the PLA spool from the vacuum bag.
2, Use the cutting pliers in the accessory to trim the end of the filament making sure it is flat.

10
Note: The spool turns counter clockwise. When placing the spool, make sure the filament is tightly coiled around
the spool to avoid any filament tangles.
3, Hang the filament spool on the filament holder at the back of the machine.
4, Insert the loose end of the filament into the filament feeding device at the top right at the back of the machine.
When inserting the filament into the entrance of the filament guiding tube, you should feel the filament triggers
the mechanical switch, which is the detector of filament broken device.
5, Continue feeding the filament into the device, until the end of the filament comes out of the other side of the
guiding tube. You may open the top lid to observe.
6, Click the “Filament” button on the touchscreen, and click the filament type button until it turns to the “PLA”
(The button switches to different filament types when you click it)

11
7, Click the “Extrude” button to start the extrusion process. The nozzle will get heated to the preset temperature
which will be shown on the screen with 100%.
8, The printer will beep when the nozzle temperature reaches the preset value. Press the loose end of the
filament into the filament inlet on the top of the extruder, until the motor inside the extruder grabs the filament
and drags it into the extruder.
9, The filament should be heated inside the extruder. A clean and straight line of melted filament should be
extruded from the tip of the nozzle.

12
4 Software Installation and Printing
4.1 Download and Install the UP Studio Software
1. You can download the latest UP Studio software and other previous released versions via following URL:
https://www.tiertime.com/software/
2.Double click the installation file, and follow the instructions shown in the installation program. After the
installation is finished successfully, you can run the program and start printing.
OS System:
Windows 7 (SP1) and over (32bit and 64bit)
Mac OS 10.10
Hardware Requirement:
OpenGL 2.0 with at least 4GB RAM

13
4.2 Software Interface
Connect the printer with a computer via USB cable or WiFi connection. Click the icon and enter the
software interface.
Printer Status
Other Options
Main
Page
Load
Print
Init
Calibrat
ion
Maintenance
Print Table
Model Ops
Menu
Section
View
View
Rotate
Display
Pan
Scale
More
Options
Back
Mirror
Auto Place
Fix
Save
Models
Merge
Support
Editor
Reset

14
4.3 Touchscreen Interface
Calibration
Options, Nozzle
height
Printing Options
Filament Operations
Init Printer
Printer Setting/WiFi
Setting
Printer Info,
Reset, and
Language Settings

15
4.4 Load 3D Models
Open UP Studio software, click the UP icon on the left navigation menu, and follow the instructions to load
models:
Load Model Button

16
4.5 Print Models
Make sure the printer is connected via USB or WiFi with your computer, and a model has been loaded into the
UP Studio software.
Shell Mode: No
Infill, regular
Vertical walls.
Surface: No Top
and bottom
layer, no infill
and single
peripheral
15% Infill
20%infill
65%infill
99%infill
Shell Mode:
Suitable to print a model with curves. The internal of the printed model is
hollow, so need to consider the risk of surface collapse.
Advanced Options
Layer Height
Shell Mode
Surface Model
Infill Ratio
Print Quality
Nozzle Height Adjustment
Model Error
Raftless Printing
No Support

17
Note: While the software UP Studio is in the process of slicing and sending data to printer, which is showing in the
status area in the software, do not unplug the USB cable, or disconnect the WiFi connection, which could cause the
data transmission disruption, and print job failure. Once the data transmission is over, the USB cable can be
unplugged, and there is no need to have connections between the printer and the computer during the time of
printing,
Surface Mode:
No top and bottom layer, and no infill, only one go with peripheral wall
Infill Ratio:
The infill ratio can be 13%, 15%, 20%, 65%, 80%, 99%. The larger the value is,
the denser the printed model.
After choosing the printing parameter, click the “Print” button. The software will start calculating for slicing, and
send the printing data to the printer.
4.6 Print Progress (touchscreen)
After the “Pause” button is pressed, the nozzle will pause extrusion, but the temperature of the nozzle will be
maintained. During the period of pausing, the following buttons will be shown. Users can choose resume, stop,
and change filaments.
Print Job Progress
Pause Print Job

18
Note: Once the print job is stopped, it can not be resumed. You can only start the print from the beginning.
4.7 Change Filament during Printing
1. Click the “Pause” button during an
ongoing print job to pause it
2. Extruder stops moving, and the build
table lowers. Click the “Withdraw” button
to withdraw the filament.
3. Insert the new filament into the inlet
on top of the extruder. Press the
“Extrude” button to load the new
filament.
4. Press the “resume” button and resume
the print job.
Stop Print Job
Filament
Withdraw
Resume
Filament Extrude

19
4.8 Resume Printing after Power Outage
If the power was lost during printing, after the power is back, the printer will alert the user whether to resume
the current print job. If you want the print job resume printing, do not move the models on the build table. After
the printer is powered on, do an initialization, and follow the instructions on the touchscreen or UP Studio
software to resume the interrupted print job.
4.9 Repeat Print Jobs / Print Saved Jobs
There are 10 storage slots in the printer. You can choose saved print jobs from those slots from the touchscreen
to start a print job right away, without connecting to a computer.
Save Job Info
Start Printing
Storage Slot
Back
Table of contents
Other TierTime 3D Printer manuals

TierTime
TierTime UP Plus 2 User manual

TierTime
TierTime UP mini User manual

TierTime
TierTime UP300 User manual

TierTime
TierTime UP Mini 2 ES User manual

TierTime
TierTime UP BOX+ User manual

TierTime
TierTime UP300 User manual

TierTime
TierTime UP300D User manual

TierTime
TierTime UP BOX Installation and operation manual

TierTime
TierTime UP600 User manual

TierTime
TierTime UP300D User manual