TierTime UP600 User manual


2
Tiertime .....................................................................................1
UP600/UP600D .......................................................................................................................1
User Manual.............................................................................................................................1
Chaper 1. Safety and Printing Environment ..............................................................................5
1.1 Safety Precautions .......................................................................................................5
1.2 Printing Environment...................................................................................................6
1.3 One Year Warranty ......................................................................................................6
1.4 Compliance ..................................................................................................................6
Chapter 2. Introduction .............................................................................................................7
2.1 Main Parts of UP600/600D ..........................................................................................7
2.1 Accessories...................................................................................................................9
Chapter 3. Printer Installation .................................................................................................10
3.1 UnBoxing....................................................................................................................10
3.2 Build Plate ..................................................................................................................10
3.3 Connect Power...........................................................................................................10
3.4 Install Software UP Studio 3.0 ...................................................................................10
3.5 Update the Touchscreen Firmware ...........................................................................11
Chapter 4. Prepare UP600/UP600D for Printing .....................................................................12
4.1 Printer Calibration From Touch Screen .....................................................................12
4.2 Load Filaments ...........................................................................................................14
4.3 Update the Touchscreen Firmware ...........................................................................14
5. Prepare UP300D for Printing ...............................................................................................15
5.1Connectivity ................................................................................................................15
5.2 Auto Calibration .........................................................................................................15
5.3 Auto Calibrationfrom Touchscreen ...........................................................................15
5.3 Load the Filaments.....................................................................................................16
Chapter 5. First Print................................................................................................................21
5.1 Connect and Send Print Job to Printer.......................................................................21
5.2Remove the Printed model.........................................................................................22
Chapter 6. Dual Extrusion ........................................................................................................23
6.1 Switch Print head .......................................................................................................23
6.2 Load Main and Support Material...............................................................................25
6.3. Slicing ........................................................................................................................26
6.3.1 Turn on Extruder 2 for slicing. ................................................................................26
6.3.2 Load a STL file by click the “+” button on the vertical menu..................................27
6.4 Auxiliary Support (A.S.) ..............................................................................................28
Chapter 7. Printer Calibration..................................................................................................30
7.1 Nozzle Height Measurement .....................................................................................30
7.2 Set Nozzle Height through Touchscreen, please refer to page xxx. ..........................31
7.3 Setup Nozzle Height Value through Wand (computer hosted) .................................31
7.3 Matrix Leveling (9-Point Compensation) ...................................................................33
7.3.1 Auto Matrix Leveling through touchscreen, refer to page xxxx. ............................34
7.3.2 Auto Matrix Leveling through Wand (computer hosted). ......................................34
7.4 Manual calibration .....................................................................................................35
Chapter 8. Introduction to UP Studio 3 ...................................................................................37
8.1 Interface.....................................................................................................................37
8.2 Quick Setting Bar........................................................................................................37

3
8.3 Print Layout Tools ......................................................................................................37
8.4 Support Editor............................................................................................................39
Support List ......................................................................................................................41
Support Filter ...................................................................................................................41
8.5 Print Settings..............................................................................................................42
8.5.1 User Modes.............................................................................................................43
8.6 Introduction to print parameters ..............................................................................44
8.6.2 Path .........................................................................................................................48
8.6.3.Special .....................................................................................................................51
8.6.4 Speed ......................................................................................................................52
8.6.5 Temperature ...........................................................................................................52
Chapter 9. Material Library (Mat Lib) and Custom Materials..................................................55
Chapter 10. Part Sub-setting....................................................................................................56
Part Optimization.............................................................................................................56
Chapter 11. “Wand” - the Printer Hosting Software ...............................................................59
11.1 Wand Interface ........................................................................................................59
7.4 Wi-Fi Connection........................................................................................................61
7.5 Ethernet Connection..................................................................................................61
7.6 Editing Network Configuration ..................................................................................61
Chapter 12. Touchscreen Introduction....................................................................................63
12.1 Printer Status Bar.....................................................................................................63
12.2 Main Menu...............................................................................................................64
The printer must be initialize first before printing. .........................................................64
12.3 Material....................................................................................................................65
12.4 Print..........................................................................................................................66
12.5 Calibrate...................................................................................................................67
12.6 Information ..............................................................................................................68
12.7 Config .......................................................................................................................69
12.8 Network Connection................................................................................................70
Chapter 13. Print Boards..........................................................................................................72
13.1 Perf Glass Boards .....................................................................................................72
13.2 Flex Glass Board .......................................................................................................72
13.3 Glass Surface ............................................................................................................72
Chapter 13. Extruders ..............................................................................................................73
14.1 Single Extrusion Print Heads ....................................................................................73
14.2 Convergence Dual Extruder .....................................................................................74
Chapter 15. Maintenance ........................................................................................................75
15.1 Replacing Nozzle: .....................................................................................................75
15. 2 Change Extruder.....................................................................................................75
15.3 Extruder Maintenace ...............................................................................................76
15.3.2 Convergence Dual ................................................................................................78
Replacing heater module.................................................................................................78
15.3.3 Releasing the heater block....................................................................................79
15.3.4 Remove/Replace Stepper Motor ..........................................................................81
15.3.5 Remove the extrude block...................................................................................82
15.4 Unclogging Extruder.................................................................................................82
15.4.1 Partial Blockage.....................................................................................................83

4
15.4.2 Completely Blockage.............................................................................................83
15.4.3 Remove blockage at heater module.....................................................................83
15.4Dual Filtration System...............................................................................................84
Chapter 16. Specification.........................................................................................................86
Chapter 17. Customer Service and Community ......................................................................87

5
Chaper 1. Safety and Printing Environment
1.1 Safety Precautions
1. The UP600/UP600D 3D printer uses 220V or 110V AC (depends on the
geographical location) as power input. Internally the high voltage AC will be
converted to 24V DC to power its extrusion and motion control system. The build
platform however use 110V or 220V AC directly. For safety, do not try to modify the
platform, especially the circuit of the platform’s heating system.
2. During printing, the print head and other mechanical parts move at high speed.
Due to the size and weight of the motion system, it could easily cause injuries if user
reaches to the inside of the machine during printing or other machine operations.
User should always stay outside of the machine, and do not reach to the inside when
the machine partsare moving!
3. Potential Danger to children: Due to the size of the machine, children could easily
go into the machine and close the front door. As long as the front door closed, the
printer could start printing at any moment especially it can be controlled wirelessly
and remotely. Therefore it could cause extreme danger to small children who wander
into the printer. Machine operators need to highly aware about the possibility of any
youngsters that may reach the machine. Teachers or technical personnel in
education institutes should give adequate safety training to any users that may need
to operate the machine. There is an extra USB port in internal space of the printer,
that could be used to connecting a web camera for monitoring the machine status.
4. During printing, the temperature of theextruder nozzle could reach 300°C and the
temperature of the print platform could be over 100°C. Do not touch these parts with
your bare hands when the printer is in the operation mode, not even with the heat
resistant gloves included in the accessories, as the temperature could damage the
gloves and injure your hands.
5. Wear goggles when removing the supporting material from models or detaching
models from the build plates.
6. When printing with plastic filaments, the process couldgenerateslight and, for
some people, annoying odor. It is recommended to run the printer in a well ventilated
environment. We also suggest to keep the printer in an environment with a stable
temperature as unwanted cooling could cause adverse effects to the print quality.
7. When using the “Extrude” function, make sure there is enough space between the
print head nozzle and the build platform. 50mm is recommended, otherwise the
nozzle could be blocked.
8. Fasten moving parts. Tie back loose hair, secure loose clothing and keep all
printer doors closed during operation.
9. Do not leave the printer unattended during operation. Watch the printing of the first
a few layers to make sure they adhere correctly.

6
1.2 Printing Environment
As the slight odor could be generated during printing, keep the printer in a well
ventilated environment. The UP600/UP600D's ideal working temperature is between
15°C and 30°C with a relative humidity between 20–50%. Printing at temperatures
out of this range could cause adverse effects to the printing process and print quality.
1.3 One Year Warranty
Tiertime and its authorized resellers warrant to the original purchaser that this
product is free from defects in material and workmanship. Tiertime or its resellers will
for one year, at its option, repair or replace at no charge for parts and labor from the
date you purchased the product from Tiertime or a reseller. Print heads, Nozzles and
Print Boards are warranted for thirty (30) days.
• Tiertime reserves the right to determine the validity of all warranty claims.
• Warranty is voided if the product serial number has been altered or removed.
• Warranty is voided if the product has been misused or damaged or if evidence is
present that the product was altered, modified, or serviced by unauthorized service
people.
For the detailed Warranty and Service Level Agreement, please visit our website
https://www.tiertime.com.
1.4 Compliance
FCC
RoHS
CE
7
Chapter 2. Introduction
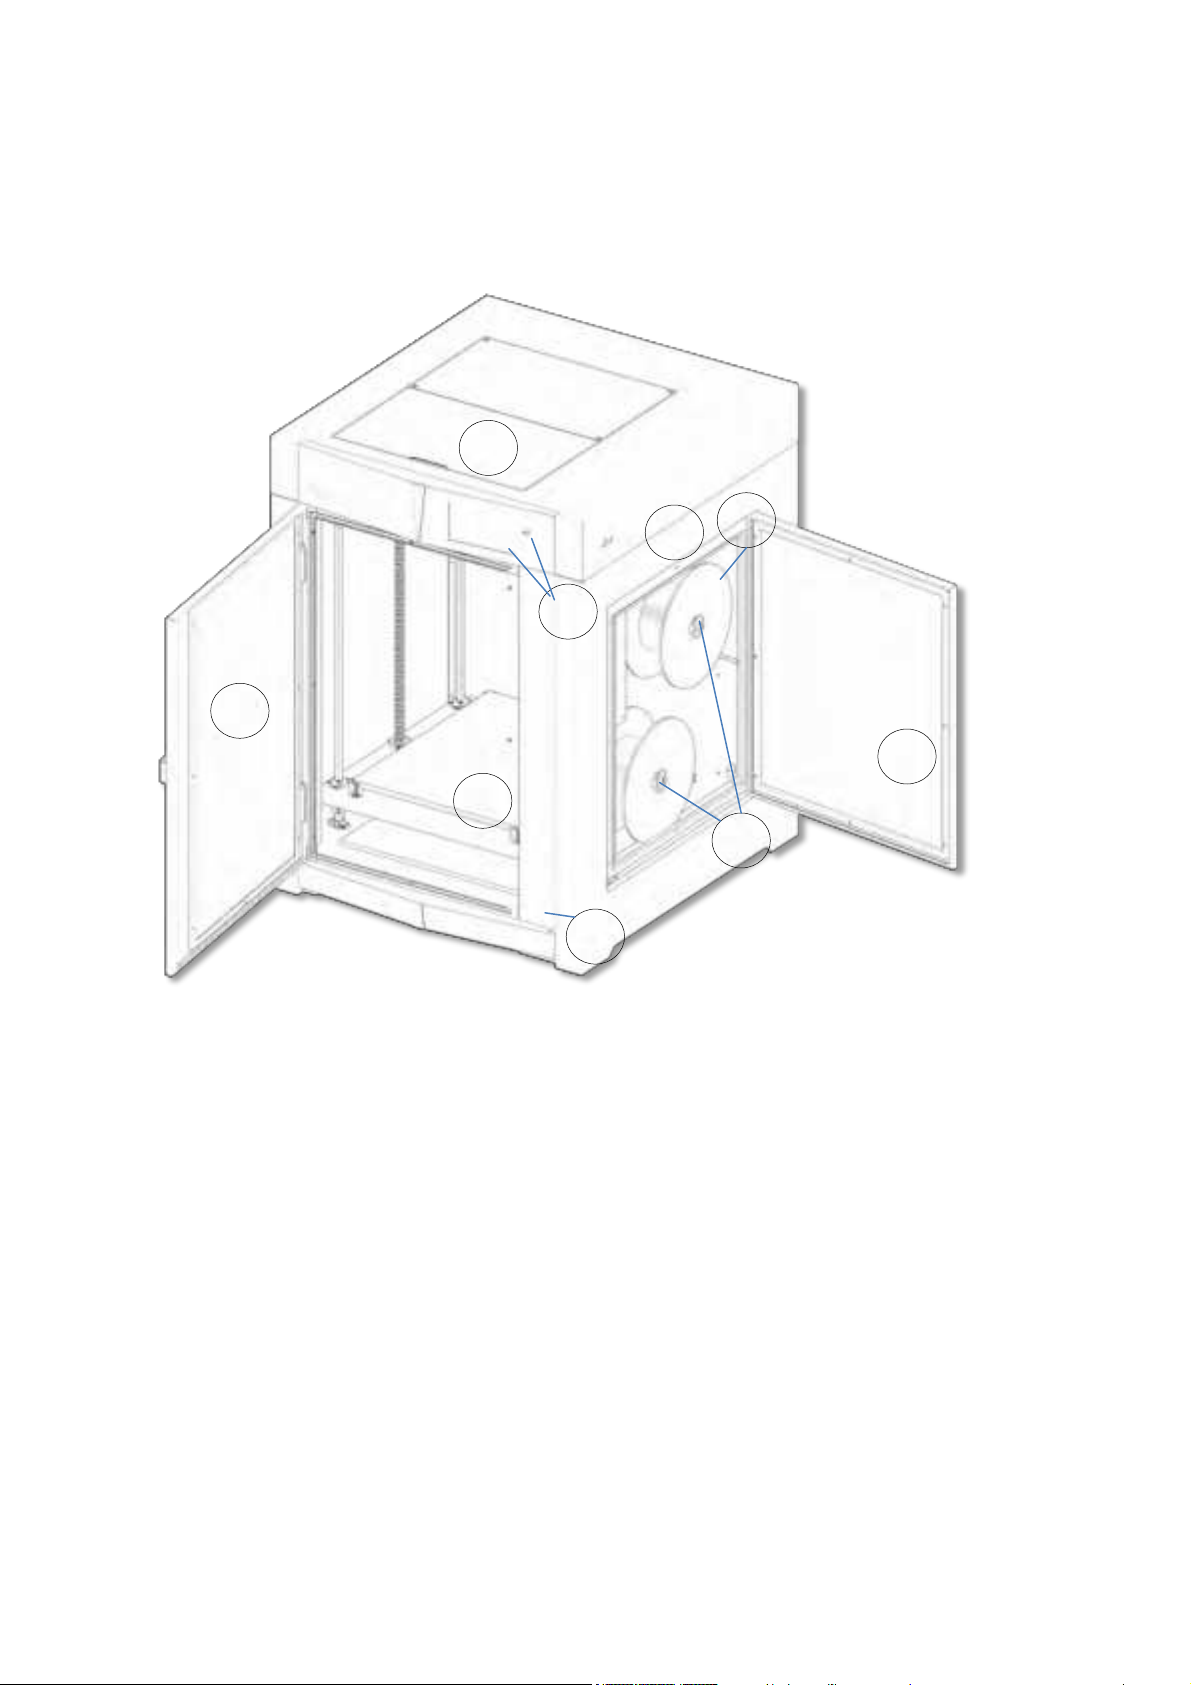
2.1 Main Parts of UP600/600D
1. Top Lid
2. Touchscreen and Front USB port
3. Front Door
4. Platform
5. Door Check Sensor
6. Filament Spool Racks
7. Filament Entrance
8. Side Door
9. USB and Ethernet
9
3
1
7
4
5
2
8
6
8
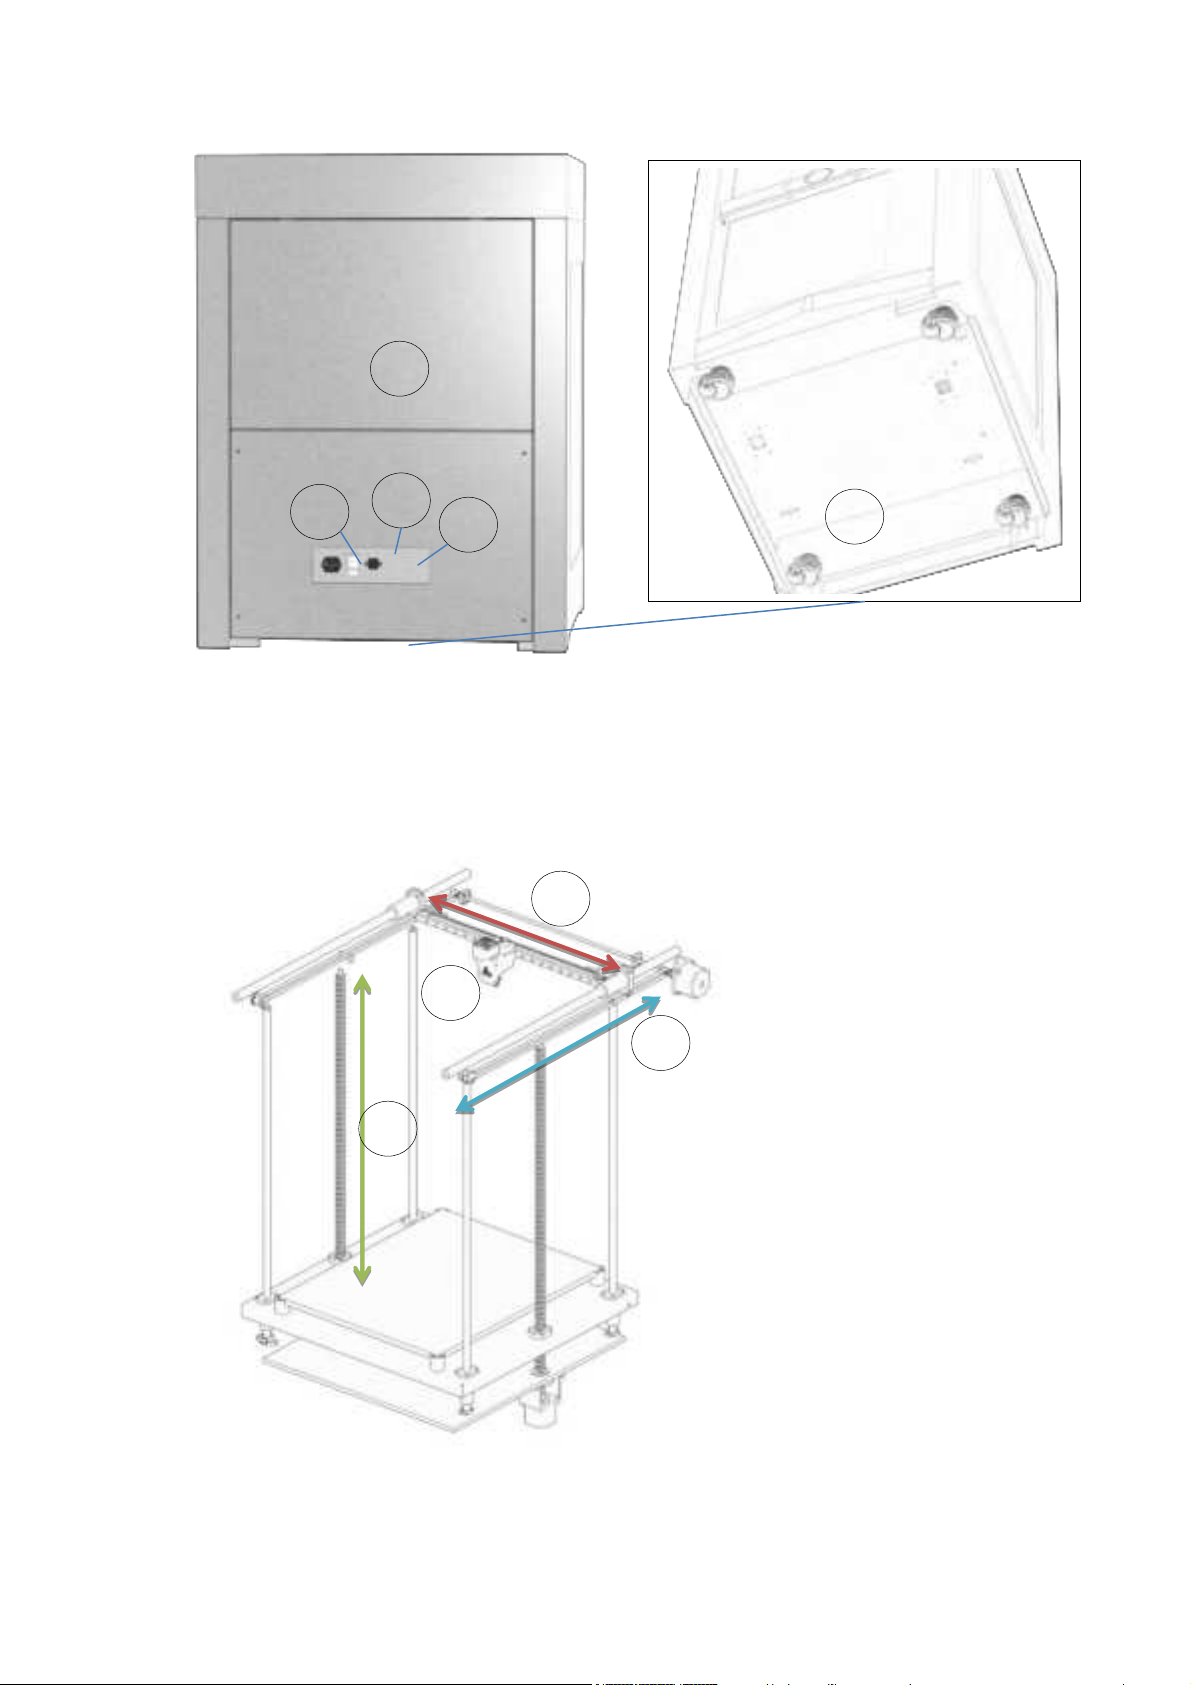
1. Power Input Socket
2. Circuit Breaker
3. Power Switch
4. Back Cover (Air Filtration Unit inside)
5. Caster (FOOTMASTER Type)
6. Y-Axis (Left/Right)
7. X-Axis (Back/Forth)
8. Z-Axis (UP/Down)
9. Print Head
1
2
3
4
5
6
7
8
9

9
2.1 Accessories
MPN
QTY
Part Name
1
130052
1
Gloves
2
130038
1
M3 Hex Wrench
3
130037
1
M2.5 Hex Wrench
4
130036
1
M2 Hex Wrench
5
27115
1
Nozzle Wrench for Dual Extruder
6
291010
1
Nozzle for Dual Extrusion
0.6mm nozzle diameter
7
18126
1
Micro SD card reader
8
130105
1
Micro SD card
9
040037
8
M3 screws
10
23105
1
Calibration Card
11
BC1044
1
Nozzle Detector
12
BC1301
1
UP600 Autocalibration Probe
13
18068
1
Pliers
14
130040
1
Scraper
15
CB0054
1
Tiertime PLA filament 2KG Spool
16
CB0065
1
Tiertime PVA filament 500G Spool
17
1
FFC Ribbon Cable for extruder head.
18
130035
1
USB Cable
19
1
Power Cord
20
1
User Manual
21
1
Packing List
22
1
Power Supply 300W
23
2
Push Pin
The LT SingleExtruder is installed on the UP600 / The Convergence Due Extruder is
installed on the UP600D
Notice: All accessories may subject to change without prior notice. If anything is
missing, please contactyour local distributor, or Tiertime’s global technical support
center, which can be reached via [email protected].

10
Chapter 3. Printer Installation
3.1 UnBoxing.
Please refer to the UP600 unboxing guide attached on the wood packaging.
3.2 Build Plate
The spring steel build plate should be already installed inside the build chamber. Open the
front door and make sure the platform is flat and stick well on the magnetic base.
3.3 Connect Power
Plug in the power on the back of the machine.
Plug the other end of the cable into a wall
outlet. Turn on the power switch.
3.4 Install Software UP Studio 3.0
To operate the UP600/UP600D, you need to install the UP Studio 3.0 software on
your computer. Although UP Studio 2.X can also work with UP600, it does not
support dual extrusion function and will be obsoleted once UP Studio 3.0 is
functionally ready to take the place.
You can download the installation files of UP studio software from the following url:
https://www.tiertime.com/software
System Requirements:
Supported Operating Systems:

11
Windows 7 (SP1) or higher (64 bit only)
Mac OS 10.10 or higher
Hardware requirements:
Open GL 2.0
At least 4GB of RAM
Installation
Make sure you download the correct version of software based on your computer’s
configuration and follow the instructions of the installation program.
3.5 Update the Touchscreen Firmware
We regularly update the Tiertime 3D printer’s touchscreen program. It is important to
make sure your UP600’s touchscreen system is up-to-date before the first use and
pay attention to the upgrade announcement for touchscreen system in the future.
1. Download the UP600 Touchscreen Upgrade Program from
https://www.tiertime.com/touchscreen-upgrade-program/
2. Save the file to the root directory of the USBdrive which comes with the UP600,
and make sure the file is named as “UP600_x.x.x_update.tt” (Case sensitive), x.x.x
being the version number.
3. Insert the USB drive to the USB socket under the touch screen, and turn on the
printer. Wait until the printer is fully ready, go to Information Page, and press the
“Upgrade” button. Follow the instructions on the touchscreen afterwards.
4. Keep the USB drive handy for the future use.
12
Chapter 4. Prepare UP600/UP600D for Printing
UP600/UP600D supports USB and various networking communications protocols.
4.1 Printer Calibration From Touch Screen
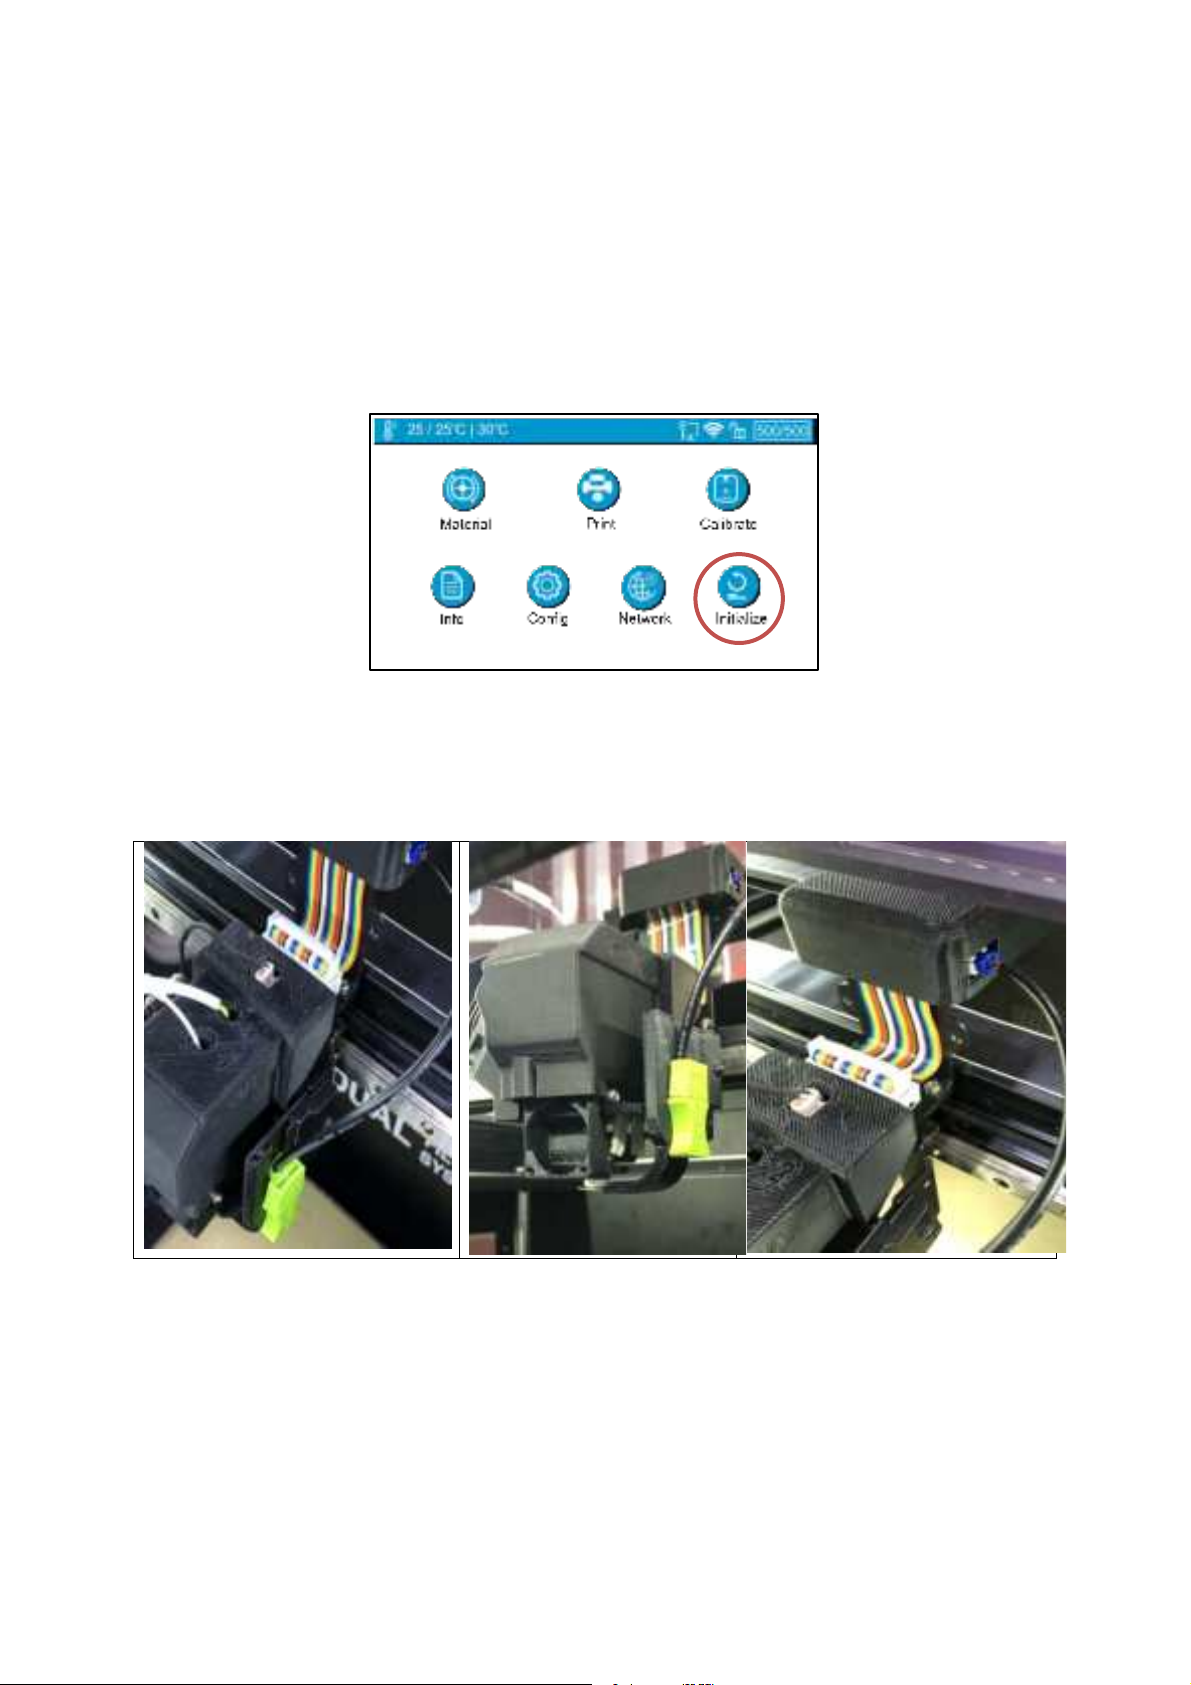
1. Switch on printer then go to touchscreen, press “Initialize” button to initialize the
printer.
2.Install the auto-leveling probe, a magnetic gadget which can hold itself on the
metal extruder mount. Plug the cable of the probe into the probe socket above the
extruder.

13
3.Initiate Auto-leveling.
2. Press “Calibrate” on touchscreen.
3. Press “AUTO” The printer will start
the process of calibration.
Make sure the nozzle is clean, plastic debris will add errors to the Nozzle Height.
4. Touch the probe’s sensor against the nozzle, which will inform the machine that
the probe is installed properly and it is ready for the calibration process. Then the
printer will start the auto calibration process.
5. Remove the auto-leveling probe from the extruder head after the auto-level
process finishes.

14
4.2 Load Filaments
You will find one spool of500g Tiertime PLA for UP600
In order to archive good consistency and print quality, we recommend use Tiertime
filaments. The default print settings of UP Studio are optimized using Tiertime
materials, so you can start printing confidently without adjusting any parameters.
and follow the instructions of the installation program.
4.3 Update the Touchscreen Firmware
We regularly update the Tiertime 3D printer’s touchscreen program. It is important to
make sure your UP600/UP600D’s touchscreen system is up-to-date before the first
use and pay attention to the upgrade announcement for touchscreen system in the
future.
1. Download the UP600/UP600D Touchscreen Upgrade Program from
https://www.tiertime.com/touchscreen-upgrade-program/
2. Save the file to the root directory of the USBdrive which comes with the UP300D,
and make sure the file is named as “UP300D_x.x.x_update.tt” (Case sensitive), x.x.x
being the version number.
3. Turn on the printer and go to the Information Page of the touch screen. Insert the
USB drive to the USB port under the touchscreenand press the “Update” button.
Follow the instructions on the touchscreen to finish the update process. Remove the
USB drive once the update process finishes.
15
OK
Make sure the nozzle is clean, plastic debris will add error to Nozzle Height.
5. Prepare UP300D for Printing
5.1Connectivity
UP300D supports USB and other networking communications. For Wi-Fi, and
Ethernet connection please refer to page 53-54, 66-68.
5.2 Auto Calibration
Auto Calibration can be triggered from the touchscreen, or from Wand software
when the printer is connected to a computer (refer to page 64). The calibration
process consists of leveling of the build plate,and measurement of nozzle height. For
more info please refer to page 25-30.
5.3 Auto Calibrationfrom Touchscreen
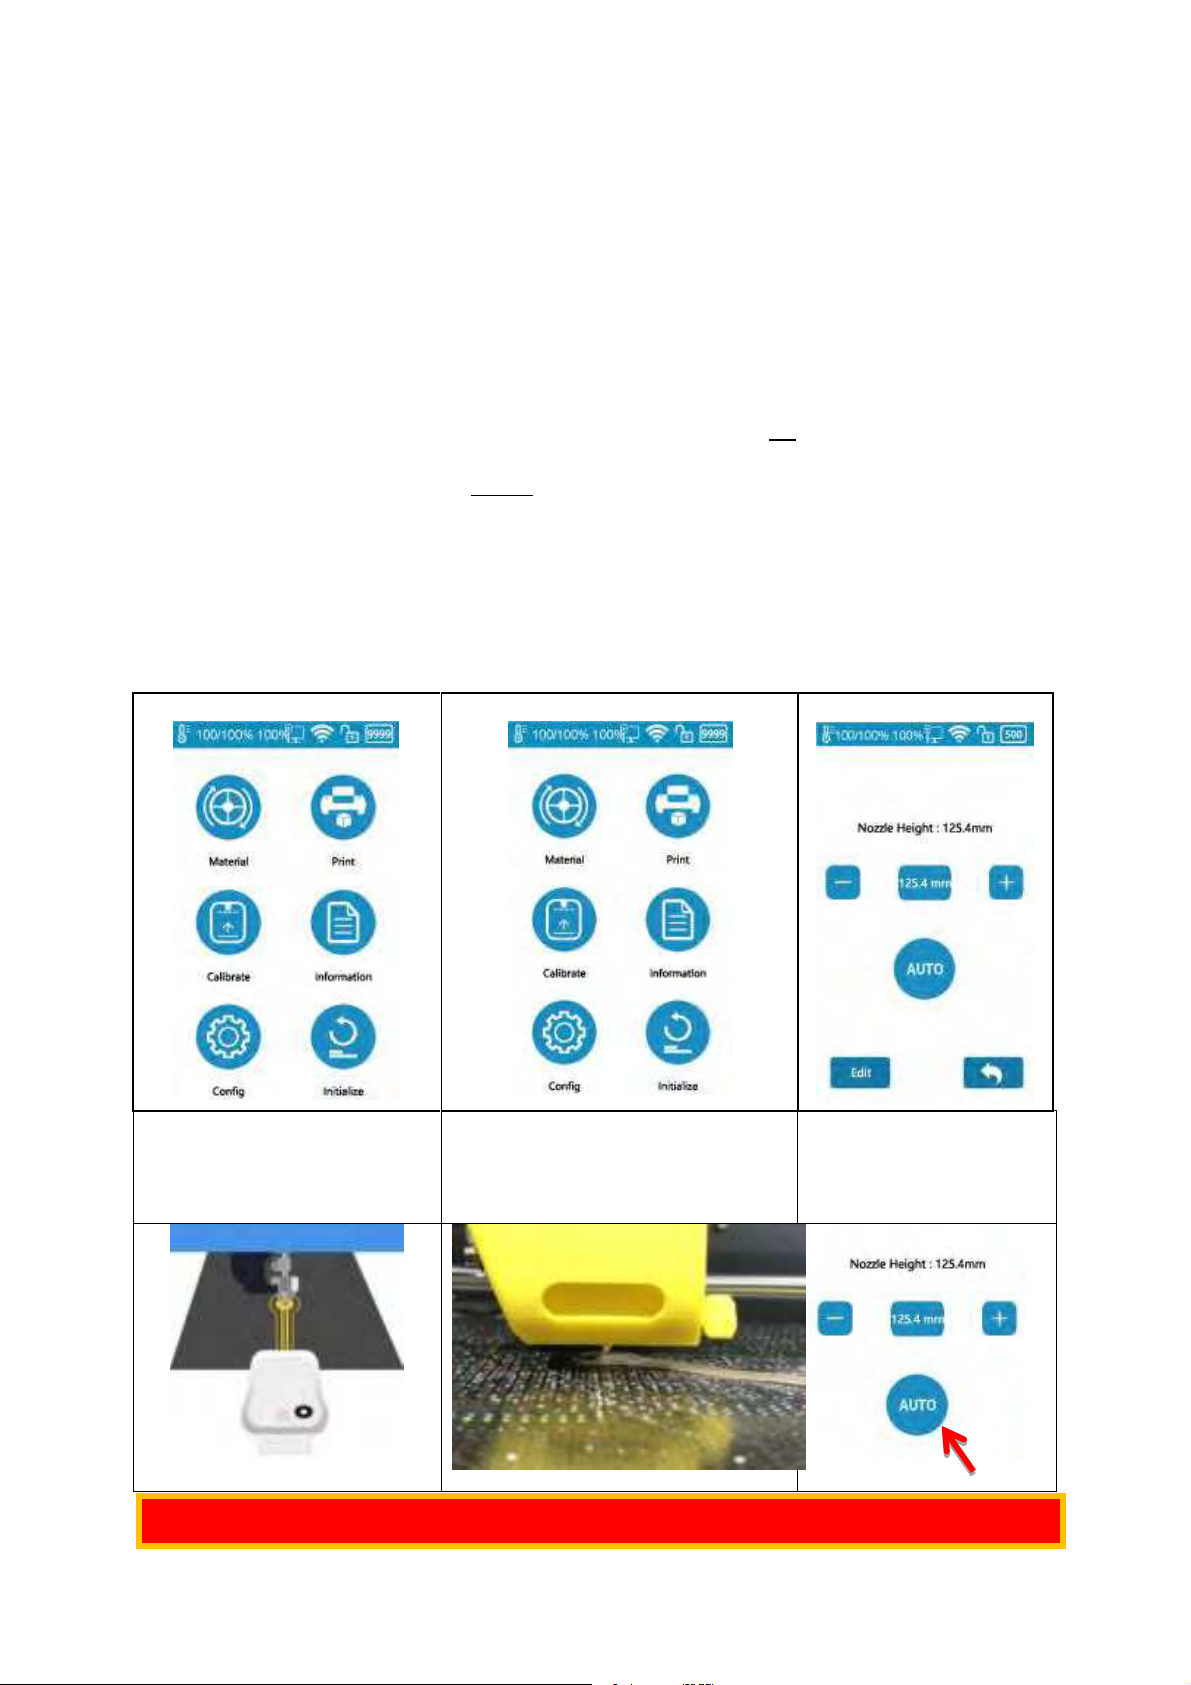
1. When the machine is switched on, user needs to first run the initialization in order
to operate the printer. Go to touchscreen press the initialize button.
2. Click Calibration.
3. AUTO. The printer will start the process of auto calibration.
1. Initialize Printer
2. Press “Calibrate”
3. Press “Auto”
4.When Leveling procedure
finishes, the touchscreen will
ask the user to confirm nozzle
height value.
5. Put the nozzle height detector
under the nozzle.Adjust the + and -
button to make the nozzle just
touching the sensor pad.
6. When the nozzle touch
the sensor it will emit a
buzz sound, press OK
button to save the value.

16
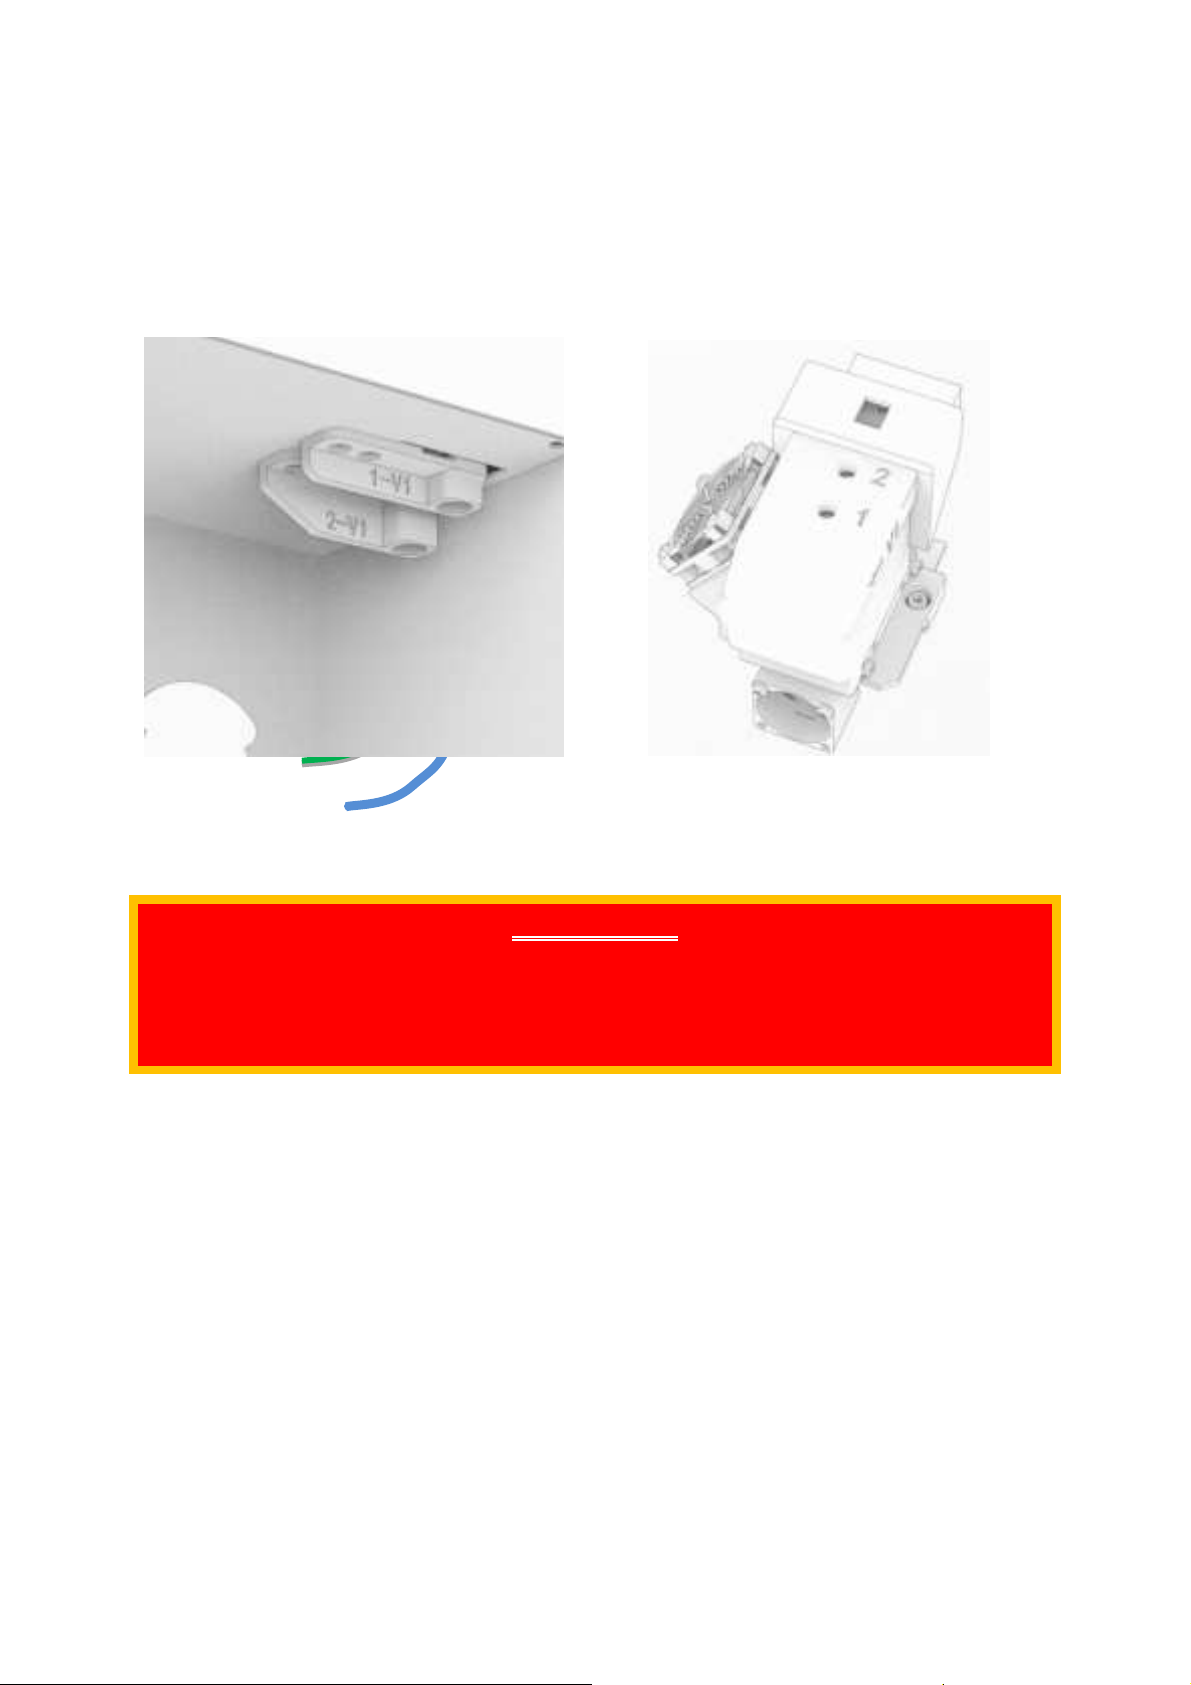
Filament 1
Main Material
Blue Colored
Filament 2
Support Material
Green Colored
5.3 Load the Filaments
You will find two spools of filaments in the package.
1. 500g Tiertime PLA
2. 500g TiertimePVA
In order to achieve good consistency and print quality, we recommend use Tiertime
filaments. The default print settings of UP Studio are optimized using Tiertime
materials, so you can start printing confidently without adjusting any parameters.
Heated Filament Chamber
The filament chamber of UP300D has two
heating elements, designed to keep the
chamber at 55℃. The heaters will generate
warm air current to keep filaments dry. By
default, the chamber will start heating as soon
as the machine is powered on. If user is printing
water soluble support, it is highly recommended
to keep the heaters on, as moisture could have
adverse effect on such materials. If the heaters
are not needed, they can be turned off by a
physical switch on the heater (marked on right).
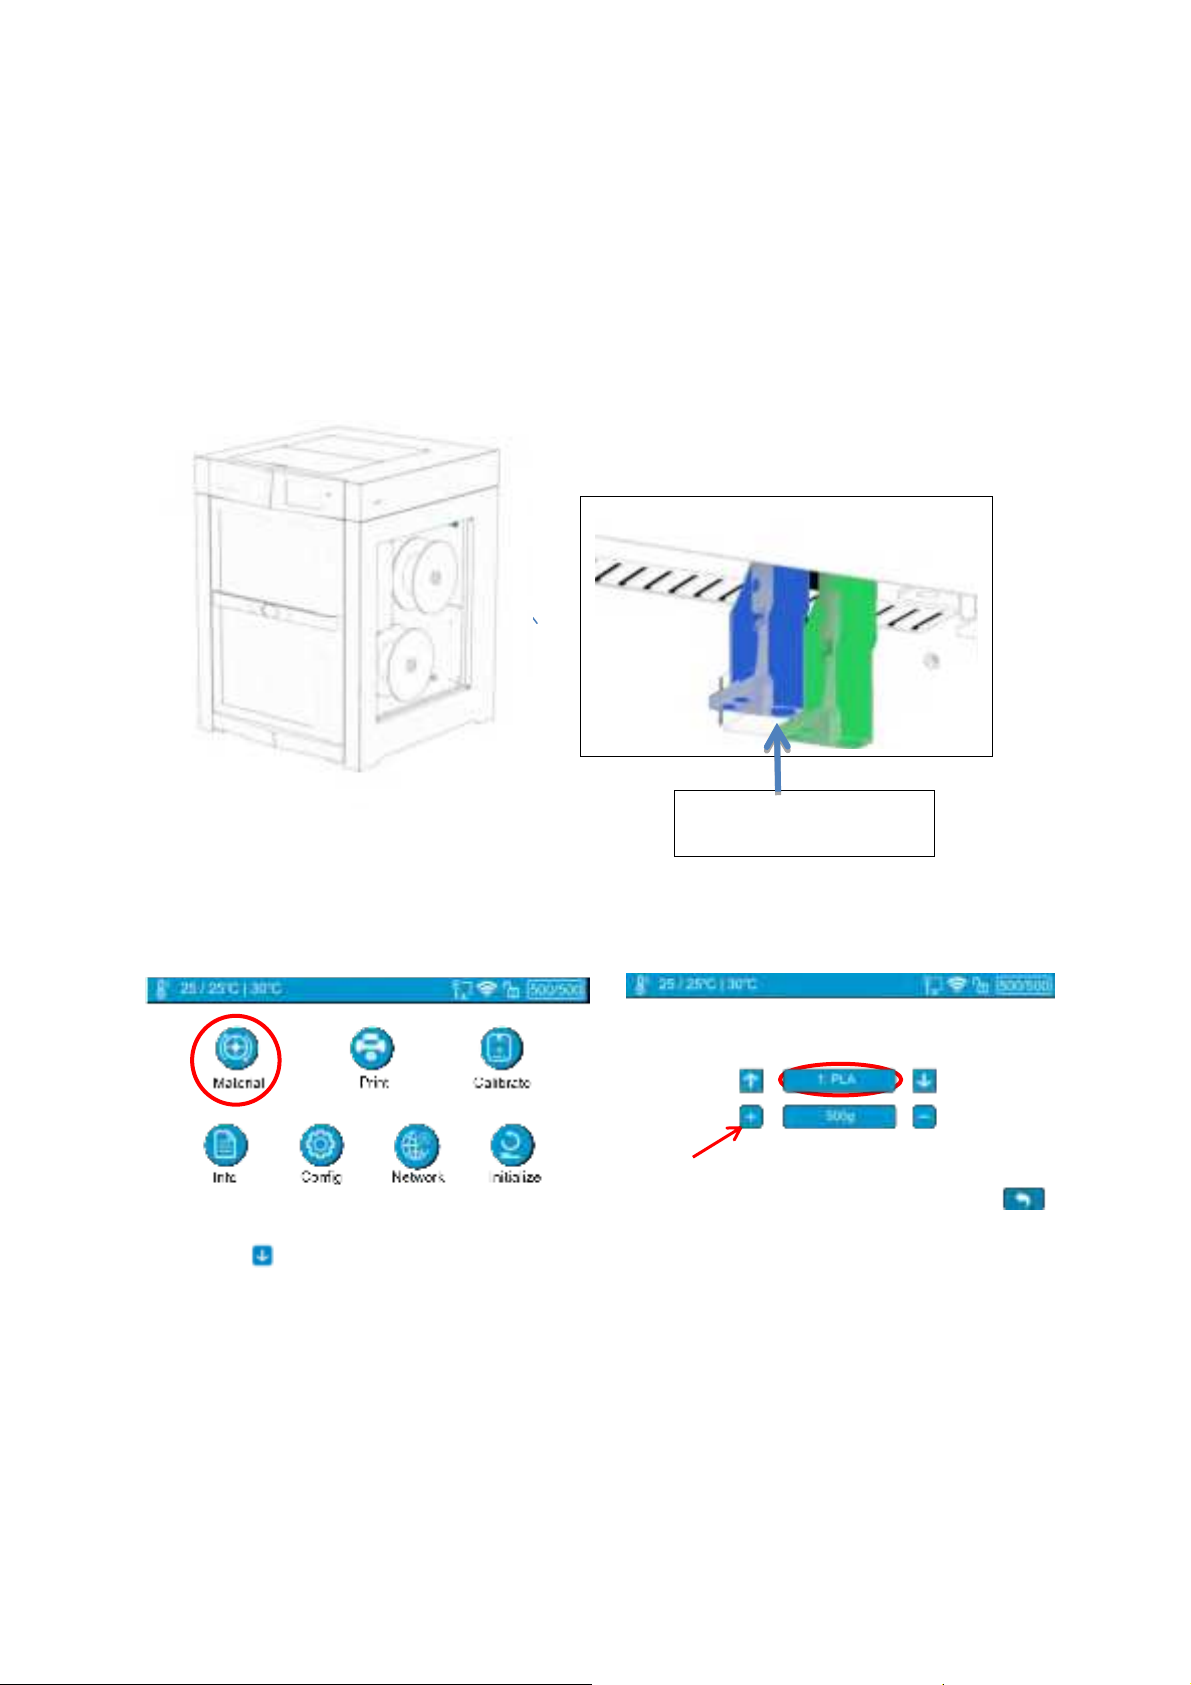
5.3.1 Load Main Material (1)
To install the filament, please following the instruction below:
1. Remove the vacuumed bag.
2. Find the end of the filament, and use pliers to make a clean cut of the end.
3. Open the door of the filament bay, feed it into the guiding tube. You should be
able to feel the filament triggering the mechanical switch (the filament sensor) at the
opening.
4. Keep feeding the filament until the end of the filament sticks out from the other
end of the guiding tube (You can open the top lid, and make sure the filament sticks
out).
Insert the filament into the guiding tube.It
must go through the filament sensor.

17
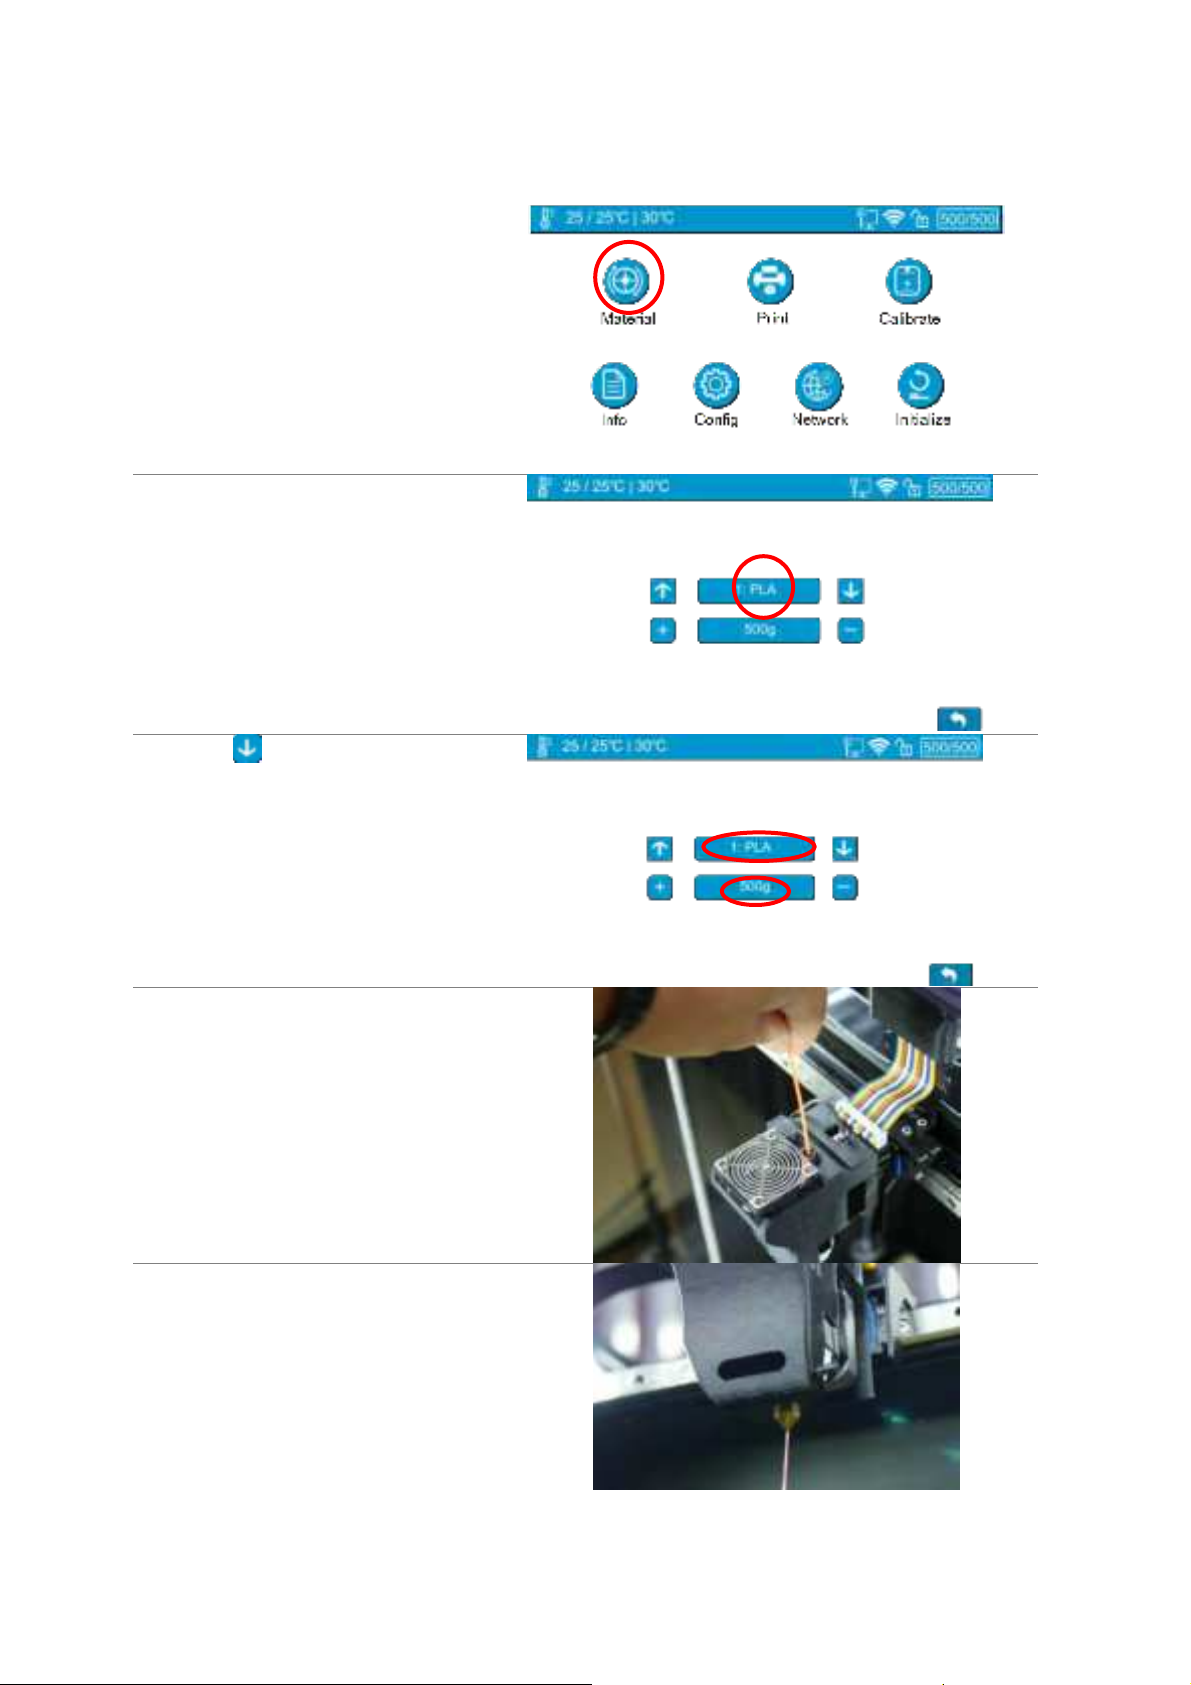
5. Go to touchscreen
4. When the extruder starting to extrude
(starting with a buzz), push the filament into
entry 1 on extruder until the extrusion appears
from the nozzle.
5. The filament should be able to be extruded
from nozzle and form a clean straight thin
thread.
1. Press Material
2. Press “Filament 1”Material
Button until it shows “PLA”,
then press “+” button to
increase material weight to
500g.
3. Press “ ” to extrude
material. The machine will heat
up and buzz when start to
extrude. It will stop
automatically
18
5.3.2 Load Support Material (2)
Loading of the support material is the same as that of the main material but use the
Filament 2 entry from the filament bay and the extruder head. On touchscreen, user
should choose the correct support material that matches the main material. For PLA,
the matching support material could be Tiertime PVA; for ABS, it should be the
Tiertime Breakaway.
Important!!!
For the Convergence Dual Extruder, both main and support materials must be loaded into
the extruder.
When loading filament, do not continuously load one extruder while leaving the other
empty. Leaving one side of the hotend empty will inevitably results in hotend clogging.
19
Insert PLA filament here.
(main material)
To install the filament, please following the instruction below:
1. Remove the vacuumed bag of PLA filament.
2. Find the end of the filament, and use pliers to make a clean cut of the end.
3. Open the filamentbay,and the BLUE colored (for main material) filament entrance
of the feeding tube.Insert PLA filament into the guiding tube, you should able to feel
the filament triggered mechanical switch (filament sensor) at the entrance.
4. Keep feeding the filament until the end of the filament sticks out from the other
end of the guiding tube (You can open the top lid, and make sure the filament sticks
out).
Go to Touchscreen
6. Press Material
7. Press “Filament 1”Material Button until it shows
“PLA” and press “+” button to single the weight of
material to 500g
7. Press the “ ” button to extrude material
8. Hold and gently push the filament into the
extruder entrance marked”1” (Blue Color) until it
feed into the extruder by its motor.
20
5. Go to touchscreen
5.1 Press Material
5.2 Press Material Button until it shows
“PLA”, then press “+” button to increase
material weight to 500g.
5.3 Press “ ” to extrude material. The
machine will heat up and buzz when start
to extrude. It will stop automatically
5.4 When the extruder start to extrude,
push the filament into entry 1 on extruder
until it can be feed by extrusion motor.
5.5 The filament should able to be
extruded from nozzle and form a clean
straight thin thread.
This manual suits for next models
1
Table of contents
Other TierTime 3D Printer manuals

TierTime
TierTime UP300 User manual

TierTime
TierTime UP BOX+ User manual

TierTime
TierTime UP BOX Installation and operation manual

TierTime
TierTime Filament Dryer PRO User manual

TierTime
TierTime UP Plus 2 User manual

TierTime
TierTime UP300 User manual

TierTime
TierTime UP300D User manual

TierTime
TierTime UP BOX User manual

TierTime
TierTime UP mini 2 Configuration guide

TierTime
TierTime UP mini User manual


