TJM Roof Top Tents User manual

Roof Top Tents
Boulia - 620RCTRT01 Yulara - 620RCTRT02


TJM ROOF TOP TENTS
Thank you for your recent purchase of a TJM Roof
Top Tent. Please find enclosed the fitting and set up
instructions as well as other important information
regarding your new product. Should for any reason
this product not live up to your expectations, please
do not hesitate to contact our Customer Support
Team on +61 7 3865 9999.
We advise you read through the following information
manual carefully to familiarise yourself with your new
TJM tent and keep it on file for future reference.
Fitting your TJM Tent to your vehicle
Instructions for Tent Setup
Important Notice
Cautions
Storage Guidelines
2
3
4
5
5
1
TJM Roof Top Tents

FITTING YOUR TJM TENT TO YOUR VEHICLE
Tent Orientation
Before you fit your new TJM tent to your vehicle, you will need to decide whether you wish to have the roof
top tent open over the back or to the side of your vehicle. To assist you with your decision, we have listed the
key features of each option below.
a. Openingovertheback
Best suited for most larger sized vehicles
Leaves extra roof space for additional storage
Not recommended for vertical lift-gates
b. Openingofftheside
Best suited for most small to medium vehicles
Allows for lift-gates to operate normally
The packed tent provides better balance on the roof and creates less wind drag
Once you have decided which is best suited to your situation, follow the relevant mounting instructions
illustrated in this manual.
If you are still uncertain as to the most appropriate method of mounting your TJM tent, please contact us and
we will be happy to provide advice particular to your circumstances.
Mounting Instructions – For tent opening over the back of vehicle
1. Remove the mounting extrusion from the carton and cut as per Figure1.
2. Place the tent on its side onto a clean surface on the ground
3. Using the four supplied 6mm bolts and 6mm fender washers, slide your hand in between the inside of
the case and mattress and insert the bolts into the pre-drilled holes.
Refer to Figure2.
4. Place the mounting extrusion into position over the bolts.
5. Slide the 6mm nuts into the mounting extrusions and tighten the bolts firmly from inside
the tent.
6. Mount the ladder to the base of the tent through the pre-drilled holes. Refer to Figure3.
Mounting Instructions – For tent opening off the side of vehicle
1. Place the tent on its side onto a clean surface on the ground
2. Using the four supplied 6mm bolts and 6mm fender washers, slide your hand in between the inside of
the case and mattress and insert the bolts into the pre-drilled holes. Refer to Figure2.
3. Place the mounting extrusion into position over the bolts.
4. Slide the 6mm nuts into the mounting extrusions and tighten the bolts firmly from inside
the tent.
5. Mount the ladder to the base of the tent through the pre-drilled holes.Refer to Figure3.
cut here
Figure1. Figure3.
6mm stainless steel bolt
fender washer
tent base
6mm nut
aluminium extrusion
slide plate with 8mm stainless
steel bolt
roof rack or roof bars
Figure2.
2TJM Roof Top Tents
INSTRUCTIONS FOR TENT SETUP
Unpacking the tent
1. Ensure the tent is mounted to your vehicle before continuing.
2. Remove the cover from the tent by unzipping around the three edges.
3. Slide the remaining edge from the rope track. Stow the cover.
4. Release the hold down the Velcro straps on each side of the tent.
5. Slide the ladder out until the locking pins engage. The ladder can now be used as a lever to open the tent.
6. Rest the ladder on the ground and enter the tent.
7. Release the four bungee cords from one side of the tent.
8. Retrieve the Sprung Steed Rods (SSR).
9. The SSR’s are then to be positioned to tension the external and internal fly sheet window awnings.
10. Insert the other end of the SSR into the hole in the base of the roof tent, passing through the eyelet in the
roof tent skirt. This will require you to bend the SSR so that the angle of the SSR is equal to the angle of
the hole into which it should be inserted.
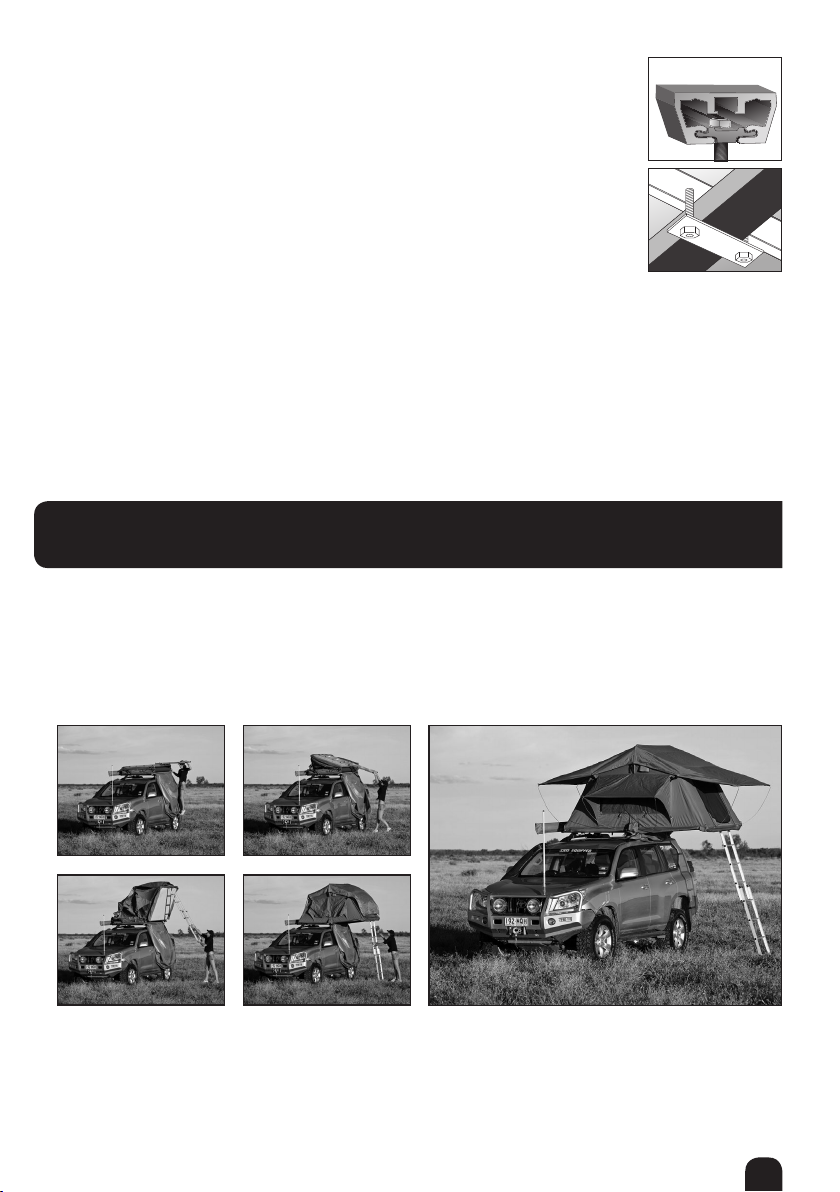
Fitting your TJM Roof Top Tent to your roof racks or bars
1. Lift the tent onto the vehicle
2. Place 8mm bolt into the slide plate.
3. Slide the plate and bolt into the mounting extrusion. Refer Figure4.
4. Attach the roof tent to your roof rack or roof bars in four places as
per Figure5.
5. Use two bolts and two slide plates with the base plate to hang the bar.
One set per corner.
6. Prior to tightening all the nuts, ensure that your roof tent is centred
(side to side) on the roof of your vehicle and that the mounting points
are symmetrically positioned near each corner of the tent.
If the angle of the ladder is too upright, you will require the optional ladder extension. Refer to
page 4 for more information.
NOTE
Figure4.Figure5.
1.
3.
2. 5.
4.
Packing the tent
1. Simply repeat the above steps in the reverse order to pack away your TJM tent.
3
TJM Roof Top Tents

IMPORTANT NOTICE
Pre-weathering notice for TJM tents
During the sewing process of the manufacture of TJM canvas tents, the cotton thread is forced through two or
more layers of canvas. As a result, holes are left through the canvas in which water can enter early in the tent’s
life. This is a consistent process of manufacture and is not a manufacturer or warranty issue. The thread used
in the sewing process is designed to swell after being soaked with rain and then dried by the sun. When the
process is complete, the thread entirely fills the hole eliminating further water entry.
TJM recommends TJM customers adhere to the following steps to ensure and enhance waterproof sealing;
1. TJM tents need to be soaked through with constant rain. A minimum of 4 hours is essential to the
conditioning process of the canvas and seams. Watering with a hose is insufficient and will not ensure
the desired results.
2. After soaking, always dry the tent out in the sun. This is an integral part of the procedure as it swells the
cotton thread and shrinks the canvas around it, forming the desired watertight seal. This watertight seal
will last the lifetime of the tent and will ensure and enhance the waterproof sealing.
Ladder Extension Accessory
A ladder extension may be required depending on the height of your vehicle (in most
cases where the roof tent is more than 2m off the ground).
Slide the ladder extension into the base of the main ladder. Position the ladder and
extension to an appropriate climbing angle. Drill two 8mm holes into the main ladder to
accept the two locking pins from the ladder extension.
The ladder extension is stored separately in its own bag.
The overlap of the ladder extension to the main ladder must be no less than 240mm.
Please take into consideration that TJM tents are made with quality canvas and in some cases it
may take two or three initial soaking periods to achieve the ultimate watertight seals.
NOTENOTE
4TJM Roof Top Tents

CAUTIONS
When dismantling the tent, do not pull down on the side retaining the Velcro straps
These Velcro straps are designed to hold the tent base together, and is not designed to be used to pull the bases
together. When you are closing the tent, hold down the top folded base to compact the tent. Then use Velcro
straps to secure the bases in this position. The Velcro straps will tear out of the tent if excessive force is applied.
Do not store the tent wet
If under special circumstances you have to pack the tent away when wet, ensure all canvas doors and windows
are zipped closed to protect the inside of the tent before dismantling. As soon as you can (no longer than 2
days), open the tent and let it dry out thoroughly to prevent moisture damage. Open up the tent occasionally to
let it vent out. Store the mattress in a dry area during extended periods of wet weather.
If the tent is to be closed up for extended periods of time, it is very important that the tent and
mattress is completely dry.
Do not drill holes below the existing locking holes in the ladder
This will weaken the structure of the ladder and can cause injury. If you need to extend the length of the ladder,
please purchase a ladder extension accessory. Should you need to shorten the ladder, you can drill holes above
the existing ladder locking pin holes.
Be aware that with a roof top tent fitted to your vehicle, the overall height is increased
You should measure the overall height of your vehicle with the roof tent fitted as you will need this information
to decide if the vehicle can enter car parks etc.
Be aware of changes in centre of gravity
The attachment of a roof tent to your vehicle will alter its centre of gravity. Adjust your driving accordingly. This
applies to any other load on your roof rack.
Recommended undertaking on-trip inspections
Regularly check that all nuts and bolts attaching your roof tent to the roof of your vehicle are tight and in
good repair
STORAGE GUIDELINES
If storing the tent separately to the vehicle, ensure the tent is packed away completely dry.
Be careful not to drag the tent on the ground. This will damage the cover and allow potential water ingress the
next time you use your TJM tent.
Do not store directly on concrete.
5
TJM Roof Top Tents

www.tjm.com.au
Table of contents
Other TJM Automobile Accessories manuals


Popular Automobile Accessories manuals by other brands


Tessera4x4
Tessera4x4 SOT-ROLL Series installation manual

KRAM telecom
KRAM telecom Hi-fi Soft mute Quick start quide

GO Industries
GO Industries 44669 installation instructions

Flaircomm Technologies
Flaircomm Technologies BlueTone BTHF205 user manual

Mobis
Mobis HM-T011 user manual

Dakota Digital
Dakota Digital HLY-3073 manual

Yakima
Yakima DoubleDown 2 installation guide

Whispbar
Whispbar K494W Fitting instructions

Metra Electronics
Metra Electronics 95-6547B installation instructions

Thule
Thule 1707 instructions

Husky
Husky 32998 Assembly, Installation, Operation and Maintenance Instructions

Whispbar
Whispbar K823W Fitting instructions