TJM T22 User manual

FITTING INSTRUCTIONS
Product:
T22 Chaser Bar
Vehicle:
Isuzu D-Max & Isuzu MUX
Part No.
070SB22N34F
For product warranty please refer to our website www.tjm.com.au
File: F-26708
Page 1 of 22
16/03/2021
Australian Standards Relating to Installing Vehicle Frontal Protection Systems (VFPS): AS 4876.1-2002
a) Do not attach V.F.P.S. to vehicle using anchorages not intended for this purpose (e.g. engine mounting bolts), other than those
specified by the V.F.P.S. manufacturer in this instruction.
b) Do not use this product for any vehicle make or model other than those specified by the V.F.P.S. manufacturer (as above).
c) Do not remove any plaques or labels from the V.F.P.S.
d) Do not modify the structure of the V.F.P.S. in any way.

FITTING INSTRUCTIONS
Product:
T22 Chaser Bar
Vehicle:
Isuzu D-Max & Isuzu MUX
Part No.
070SB22N34F
For product warranty please refer to our website www.tjm.com.au
File: F-26708
Page 2 of 22
16/03/2021
Item
No.
Description
Qty
Part
Number
PARTS LIST
1
Chaser Bar
1
F-26155
2
Winch Frame
1
F-26283
3
Chassis Mount LH
1
F-11953L
4
Chassis Mount RH
1
F-11953R
5
Wing Guard LH
1
F-26345L
6
Wing Guard RH
1
F-26345R
7
Steering Guard
1
F-26424
8
Bending Angle LH
1
F-26335L
9
Bending Angle RH
1
F-26335R
10
Bending Washer Plate
2
F-26334
11
Sliding Washer Plate
4
F-25266
12
Grille LH
1
F-27143L
13
Grille RH
1
F-27143R
FITTING KIT
14
Spacer Tube (50mm)
2
F-13448
15
Spacer Tube (66mm)
2
F-1931
16
Chassis Spacer (2mm)
8
F-12829
17
Chassis Spacer (4mm)
8
F-13475
18
Lower Chassis Spacer (4mm)
2
F-13467
19
Lower Chassis Spacer (2mm)
4
F-13484
20
Wing Guard Bracket
2
F-26350
21
Chassis Top Bracket LH
1
F-13482L
22
Chassis Top Bracket RH
1
F-13482R
23
TJM Logo Backing Plate
1
F-13430
24
M10 Washer Plate
2
F-13798
25
Chassis End Plate Washer
2
F-13880
26
Chassis End Spacer
2
F-16839
N/A
Pinch-Weld –Steel Sprung (850mm)
2
93154
N/A
Rated Recovery Point Label
1
HC0064
N/A
Recovery Point Use Guide
1
F-1768
N/A
Nylon Plug
4
K0665
FACTORY FITTED
N/A
12.7mm Plastic Plug
4
K0765
N/A
TJM Logo Sticker
1
K3183
N/A
Warning Label - ABC
1
HC0057
N/A
Rated Recovery Point Label
2
HC0064
Item
No.
Description
Qty
Part
Number
BOLT KIT
N/A
M6 x 1.0 x 16mm S/S Button Head Bolt (CL8.8)
6
K1630
N/A
M6 x 1.0 x 20mm Hex Head Bolt (CL8.8)
12
K0550
N/A
M6 x 1.0 Cage Nut (Suit 1.7-2.5mm)
6
K1550
N/A
M6 x 1.0 Cage Nut (Suit 2.6-3.5mm)
2
K1553
N/A
M6 x 1.0 Flange Nut
2
K3033
N/A
M6 x 1.0 S/S Nyloc Nut
8
K1549
N/A
M6 x 2.5 x 1.2 S/S Spring Washer
8
K1552
N/A
M6 x Ø18mm x 1.6mm S/S Flat Washer
20
K1554
N/A
M8 x 1.25 x 35mm Hex Head Bolt (CL8.8)
4
K0555
N/A
M8 x 3.0 x 2.0 Spring Washer
2
K0620
N/A
M8 x 1.25 Nyloc Nut
2
K0606
N/A
5/16” x 7/8” x 16G Flat Washer
6
K2901
N/A
M10 x 1.25 x 30mm Hex Head Bolt (CL8.8)
2
K0564
N/A
M10 x 1.25 x 40mm Hex Head Bolt (CL8.8)
8
K0566
N/A
M10 x 1.25 x 80mm Hex Head Bolt (CL8.8)
2
K0953
N/A
M10 x 1.25 x 100mm Hex Head Bolt (CL8.8)
2
K0962
N/A
M10 x 1.25 Nyloc Nut
8
K3099
N/A
M10 x 3.5 x 2.2 Spring Washer
6
K0621
N/A
M10 x Ø30mm x 3.0mm Flat Washer
20
WSST-W13
N/A
M12 x 1.25 x 35mm Hex Head Bolt (CL8.8)
6
K0570
N/A
M12 x 1.25 x 40mm Hex Head Bolt (CL8.8)
8
K0571
N/A
M12 x 1.25 x 60mm Hex Head Bolt (CL8.8)
2
K0573
N/A
M12 x 1.25 x 120mm Hex Head Bolt (CL8.8)
2
K1955
N/A
M12 x 1.25 Nyloc Nut
18
K1200
N/A
1/2" x Ø1-1/4” x 2.5mm Flat Washer
36
K0623
N/A
M14 x 1.5 x 45mm Hex Head Bolt (CL8.8)
2
-
N/A
M14 x 1.5 Nyloc Nut
2
K0655
N/A
9/16” x Ø1-1/8” x 16G Flat Washer
4
K0656

FITTING INSTRUCTIONS
Product:
T22 Chaser Bar
Vehicle:
Isuzu D-Max & Isuzu MUX
Part No.
070SB22N34F
For product warranty please refer to our website www.tjm.com.au
File: F-26708
Page 3 of 22
16/03/2021
Tools Required
Hand Tools
Power Tools
Metric Socket Set 8-19mm
Electric/Air Impact Driver (Optional)
Ratchet & Socket Extension Bar
Metric Spanner Set 10-19mm
Torx Drivers T25-T30
Hex (Allen) Key Set 4-6mm
Trim Puller Tool
Flat Blade Screwdriver Set
Phillips Head Screwdriver Set
Utility Knife
Side Cutters
Pliers
Drill Bit Ø8mm
Consumables Required
Zip Ties
Masking Tape
Safety Equipment/Notice
Hearing Protection
Eye Protection
Lifting Hazard
Vehicle Support/Lifting
Must be worn when using
power tools.
Must be worn when
cutting, drilling, or
grinding.
Two persons lift or
mechanical lifting aid
required for FPS fitment.
Ensure vehicle is properly
supported before commencing
work.
FITTING INSTRUCTIONS
Product:
T22 Chaser Bar
Vehicle:
Isuzu D-Max & Isuzu MUX
Part No.
070SB22N34F
For product warranty please refer to our website www.tjm.com.au
File: F-26708
Page 4 of 22
16/03/2021
NOTES
•Before commencing fitment read instructions and ensure all listed components
are supplied.
•Left hand & right-hand components are determined as seated in the vehicle.
•The fitment of TJM products does not nullify the OE manufacturer's operating
guidelines and/or warnings. Ensure you are familiar with and adhere to the usage
instructions specified by the manufacturer in the owner's manual or other official
documentation.
•Check for (and remove) any build up in all threads fitted to the product.
•Ensure that the “Rated Recovery Point Label” is affixed alongside the compliance
label in the driver’s side doorjamb.
•When fitting accessories to TJM products (ie. driving lights and aerials), ensure
suitable washer plates are used under the mounting surface that allow the
accessory to be secured in a way that prevents it from damaging the product.
•Where OE air guides require trimming, ensure minimal clearance between air
guides and TJM components to prevent air leakage which may adversely affect
vehicle cooling.
•When removing protective coatings, ensure all new edges are deburred, clean any
swarf from the area and apply rust preventative to exposed surfaces.
•Always place the product on a soft work space to prevent damage prior to
installation
Bolt tensions
Dia. (mm)
Nm
ft.lbs
Dia. (inch)
Nm
ft.lbs
All bolt tensions
are as follows
unless otherwise
specified.
5
5
4
1/4”
9
7
6
9
7
5/16”
22
15
8
22
16
3/8”
33
27
10
44
32
7/16”
55
43
12
77
57
1/2”
86
66
14
121
90
FITTING INSTRUCTIONS
Product:
T22 Chaser Bar
Vehicle:
Isuzu D-Max & Isuzu MUX
Part No.
070SB22N34F
For product warranty please refer to our website www.tjm.com.au
File: F-26708
Page 5 of 22
16/03/2021
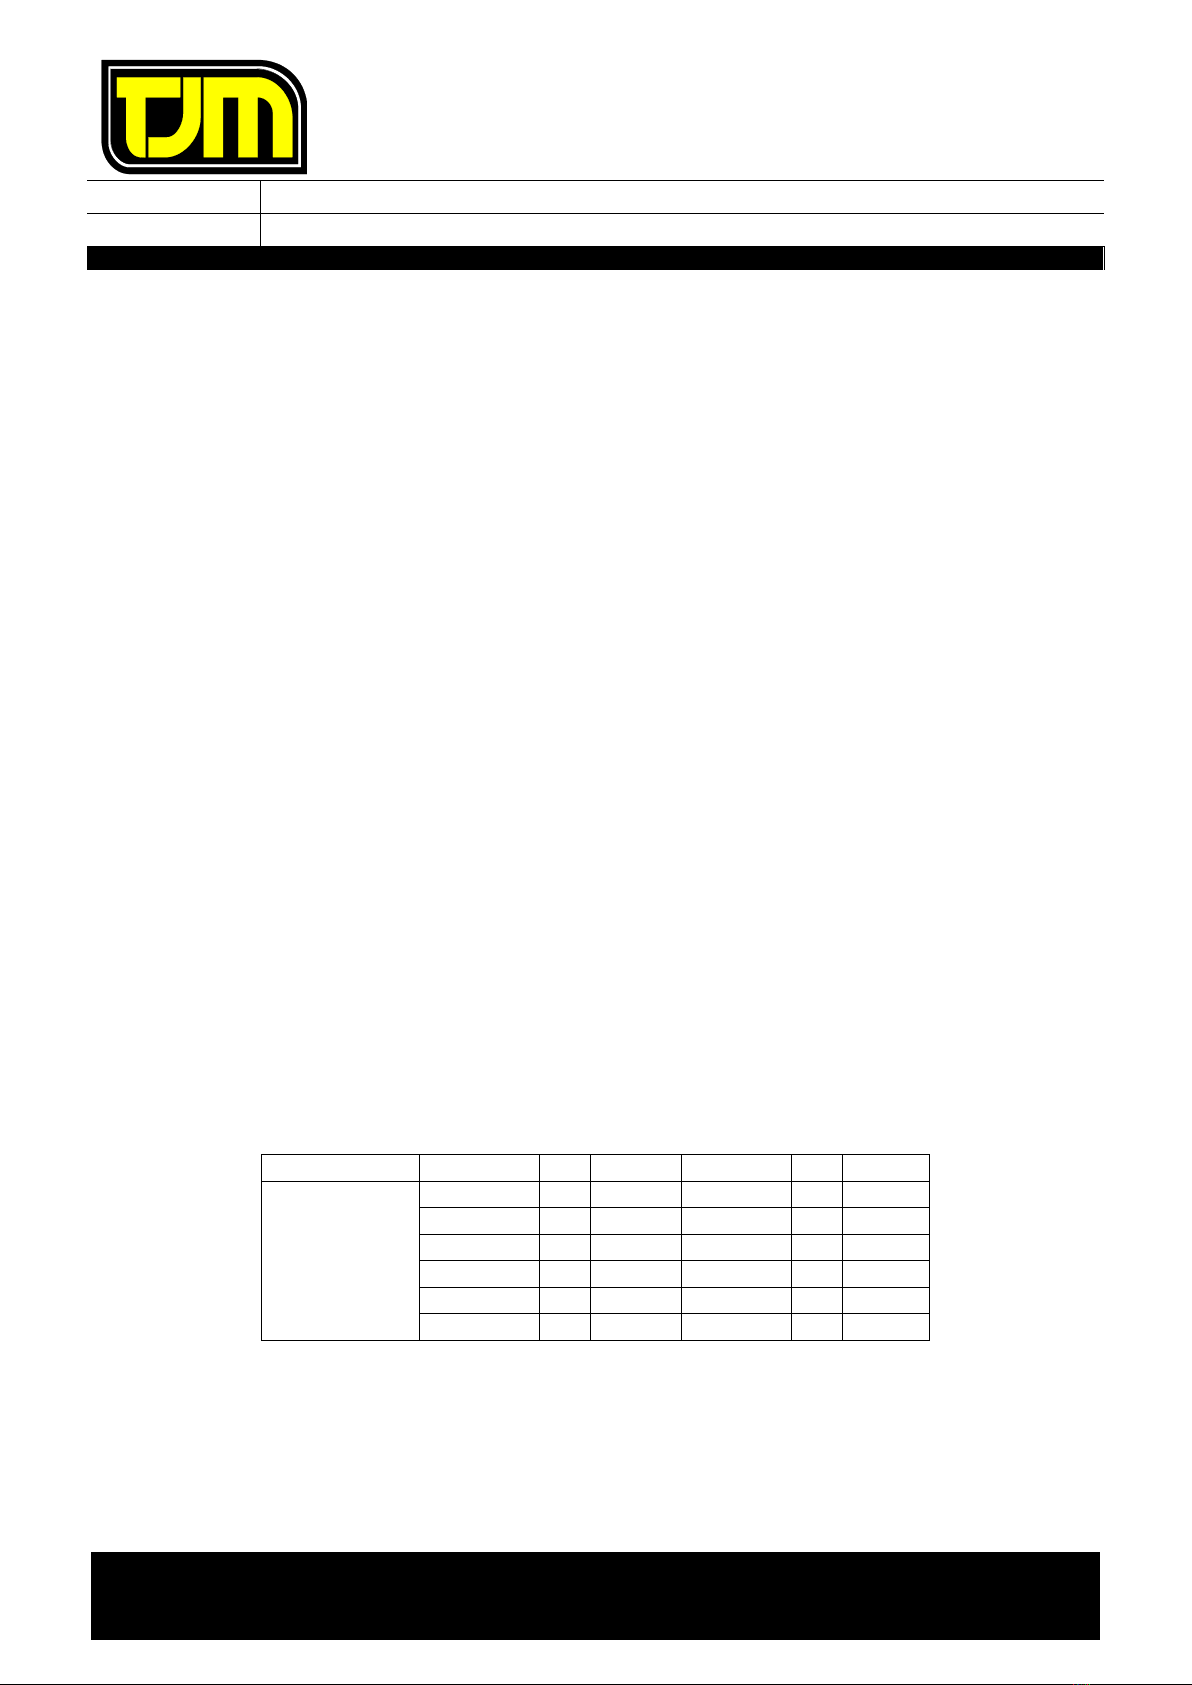
STEPS 1-5 IS ONLY FOR 2016+ D-MAX
1. Start a mark point 65mm down from the
corner of the bumper (A).
2. At the outer upper corner of the fog-light
recess (B) mark a line 22mm down. Mark a
trim line joining these two points.
3. Mark a line 140mm long along the top of
the fog-light recess to point (C).
Repeat on LHS.
4. Under the top edge of the lower bumper
grill mark a trim line (the four plastic
uprights).
5. Extend this line to point (C) fog-light recess.
Repeat on LHS.
STEPS 6-Error! Reference source not
found. IS ONLY FOR 2012 - 2016 D-MAX
6. Start a mark point 60mm down from the
corner of the bumper (A).
7. Mark a point 128mm vertically down from
the top point of the bumper (B).
8. Join these two points making sure this line
is parallel to the ground.
RHS SHOWN
RHS SHOWN
65mm
A
B
C
A
B
RHS SHOWN
140mm

FITTING INSTRUCTIONS
Product:
T22 Chaser Bar
Vehicle:
Isuzu D-Max & Isuzu MUX
Part No.
070SB22N34F
For product warranty please refer to our website www.tjm.com.au
File: F-26708
Page 6 of 22
16/03/2021
9. Mark a horizontal line under the top edge of
the lower bumper grill (the four plastic
uprights). Extend this line to meet point
(B).
STEP 10 TO 18 IS ONLY FOR 2017+ MUX
10. Start a mark point 95mm down from the
corner of the bumper (A).
11. Mark a point 15mm down from the bumper
line and 390mm from the corner of the
bumper (B).
12. Draw a horizontal line from Point A into the
bumper wheel arch valley (C).
13. Draw a line between Point B and C.
14. Draw a line following the bumper line that
is 15mm down from the edge as shown.
15. Mark a point 30mm up from the front
protruding corner of the bumper as shown
(D).
16. Mark a point 90mm perpendicular to the
bumper edge intersecting the previously
marked line in Step 14.
17. Draw a line between Point D and E.
Repeat on LHS.
A
C
B
390mm
15mm
90mm
30mm
D
E
RHS SHOWN
RHS SHOWN
FITTING INSTRUCTIONS
Product:
T22 Chaser Bar
Vehicle:
Isuzu D-Max & Isuzu MUX
Part No.
070SB22N34F
For product warranty please refer to our website www.tjm.com.au
File: F-26708
Page 7 of 22
16/03/2021
18. Mark a horizontal line under the top edge
of the lower bumper grill (the four plastic
uprights).
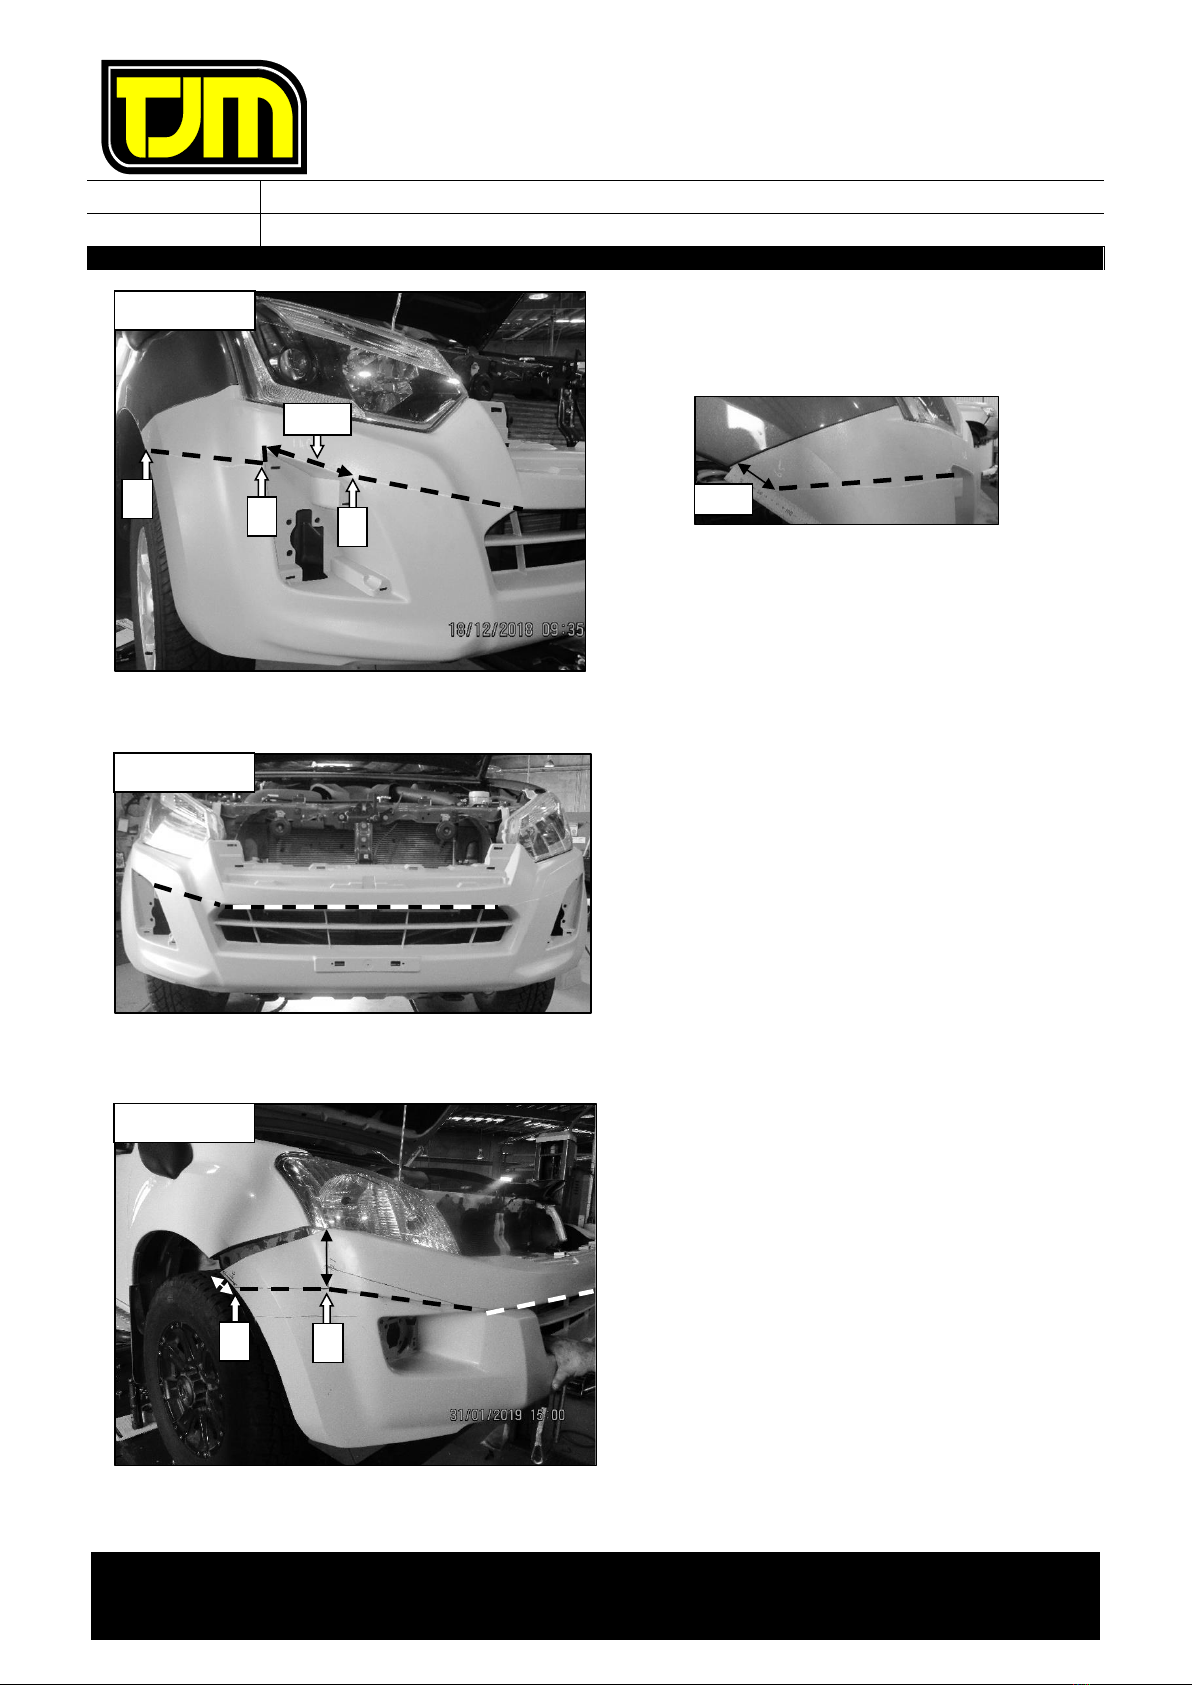
19. Remove (& retain) the number-plate,
discarding the fasteners.
20. Remove (& retain) the clips (4) that are
securing the top of the grille/radiator
shroud.
21. Remove (& retain) the screw (1), from
under the Isuzu badge on the front of the
grille/radiator shroud.
22. Remove (& retain) the grille/radiator
shroud, by pulling it firmly forwards from
the vehicle, then carefully set it aside.
FITTING INSTRUCTIONS
Product:
T22 Chaser Bar
Vehicle:
Isuzu D-Max & Isuzu MUX
Part No.
070SB22N34F
For product warranty please refer to our website www.tjm.com.au
File: F-26708
Page 8 of 22
16/03/2021
23. Remove (& retain) the clips (4) from the
top of the lower bumper.
24. Remove (& retain) the upper screw (1),
from inside the wheel arch, securing the
top of the bumper.
25. Remove (& discard) the lower screw (1),
from inside the wheel arch.
Repeat on LHS.
26. Remove (& discard) the nut (1) from under
the bumper, behind the lower skirt.
Repeat on LHS.
RHS SHOWN
RHS SHOWN
RETAIN
DISCARD

FITTING INSTRUCTIONS
Product:
T22 Chaser Bar
Vehicle:
Isuzu D-Max & Isuzu MUX
Part No.
070SB22N34F
For product warranty please refer to our website www.tjm.com.au
File: F-26708
Page 9 of 22
16/03/2021
27. Remove (& discard) the clips (4) from the
underside of the bumper.
28. Disconnect the fog-lights wiring harness
from the vehicle.
Note: The OE fog-lights are not required for
the installation of this FPS.
29. On both sides of the vehicle, gently pull the
bumper assembly outwards from the
vehicle, so as to release the sides of the
bumper assembly from the vehicle.
30. Remove (& retain) the bumper assembly
from the vehicle & carefully set it aside.
31. Trim the bumper along the previously
marked lines.
STEP 32 IS ONLY IF A WINCH IS TO BE
FITTED
32. Mark and trim the RHS only of the under
side of the newly trimmed bumper to allow
for clearance between the winch control
box. Follow the steps as shown to the left
specific to the vehicle.
RHS SHOWN
RHS SHOWN
RHS D-MAX
2016+
35mm
20mm
205mm
RHS D-MAX 2012 - 2016
RHS MUX
35mm
40mm
200mm
220mm

FITTING INSTRUCTIONS
Product:
T22 Chaser Bar
Vehicle:
Isuzu D-Max & Isuzu MUX
Part No.
070SB22N34F
For product warranty please refer to our website www.tjm.com.au
File: F-26708
Page 10 of 22
16/03/2021
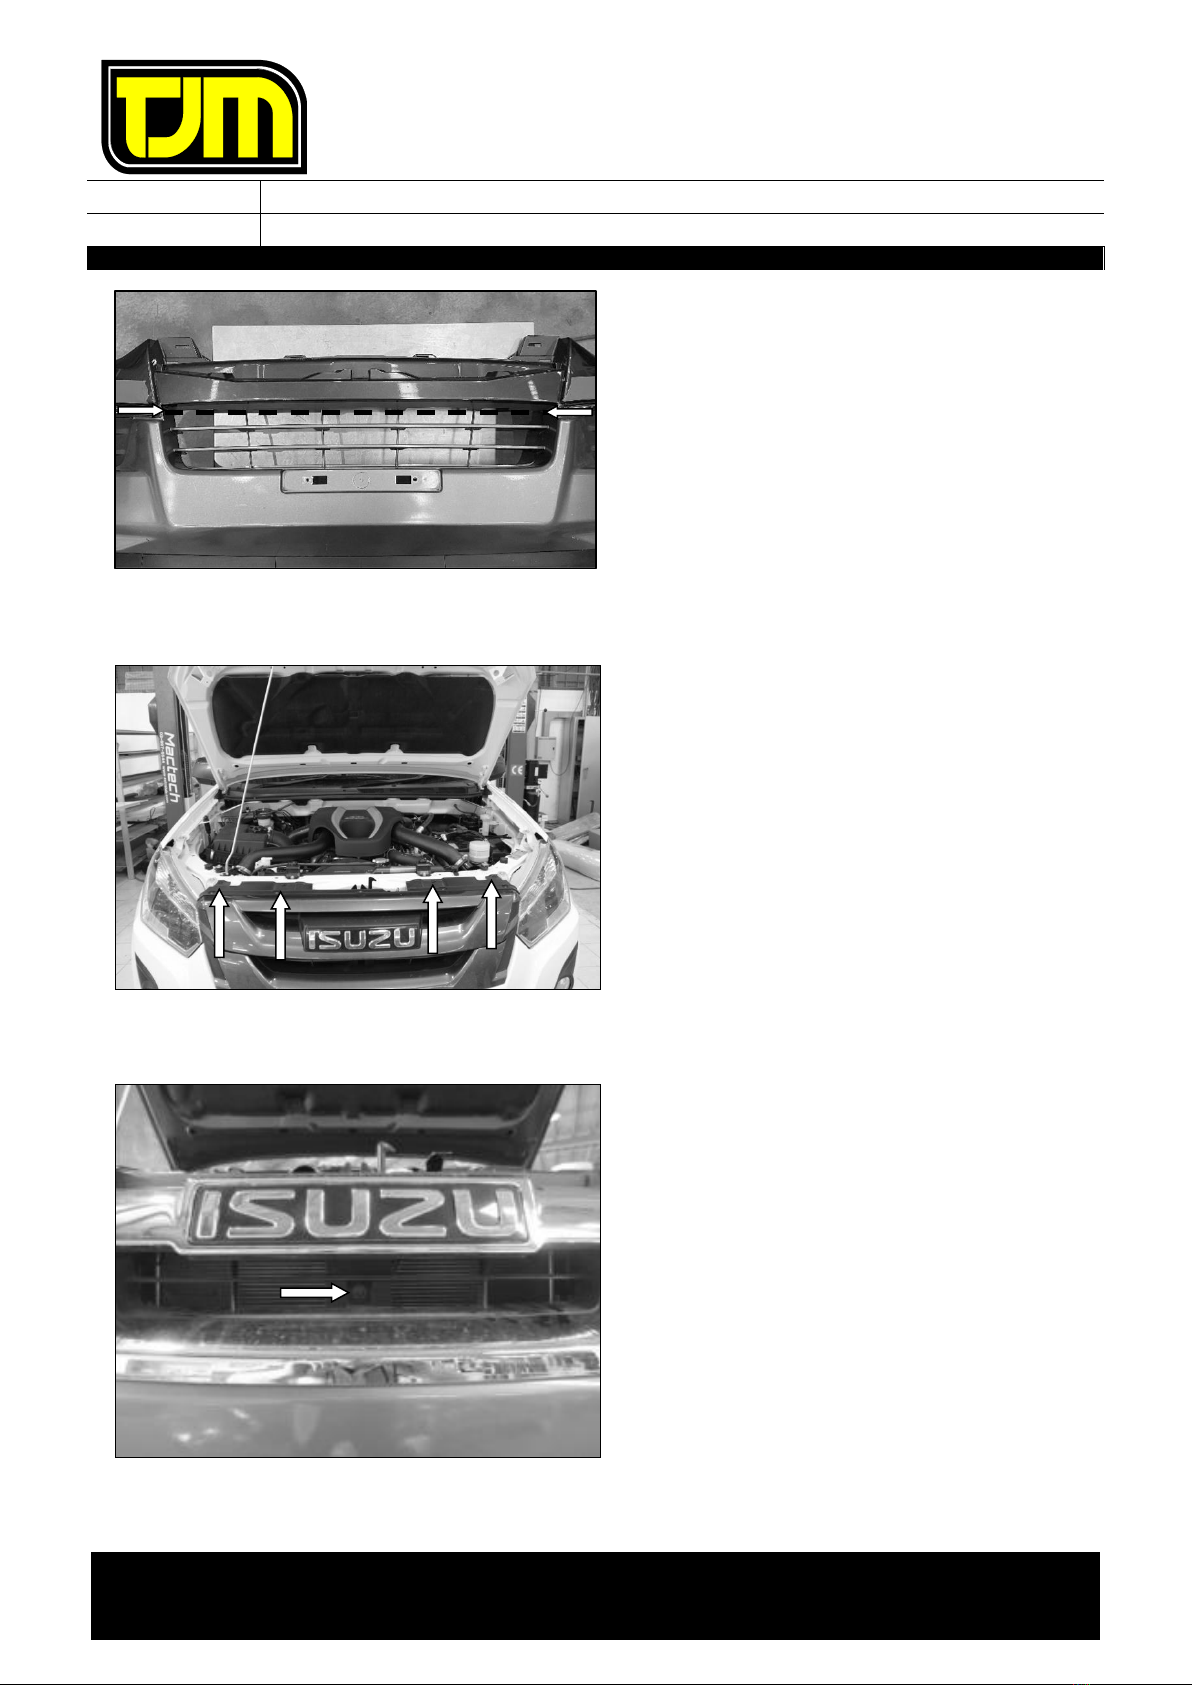
33. On each side of the vehicle, remove
(& discard) the OE inner guard support,
also discarding the indicated fasteners.
34. Remove (& discard) the small steering
guard from the vehicle, discarding the
fasteners (5).
35. Remove (& discard) the fasteners (2) that
are securing the tow points to the chassis
cross-member.
36. Remove (& retain) the large steering guard
from the vehicle, retaining the fasteners
(4).
RHS SHOWN
STEERING
GUARD
STEP 35
STEP 36

FITTING INSTRUCTIONS
Product:
T22 Chaser Bar
Vehicle:
Isuzu D-Max & Isuzu MUX
Part No.
070SB22N34F
For product warranty please refer to our website www.tjm.com.au
File: F-26708
Page 11 of 22
16/03/2021
37. Loosen, but do not remove, the indicated
fasteners (2), so as to allow the front of
the tow points to drop slightly.
38. Remove (& discard) the front intrusion
beam & fasteners (4).
39. Remove (& discard) the center bumper
supports & fasteners.
FRONT INTRUSION
BEAM

FITTING INSTRUCTIONS
Product:
T22 Chaser Bar
Vehicle:
Isuzu D-Max & Isuzu MUX
Part No.
070SB22N34F
For product warranty please refer to our website www.tjm.com.au
File: F-26708
Page 12 of 22
16/03/2021
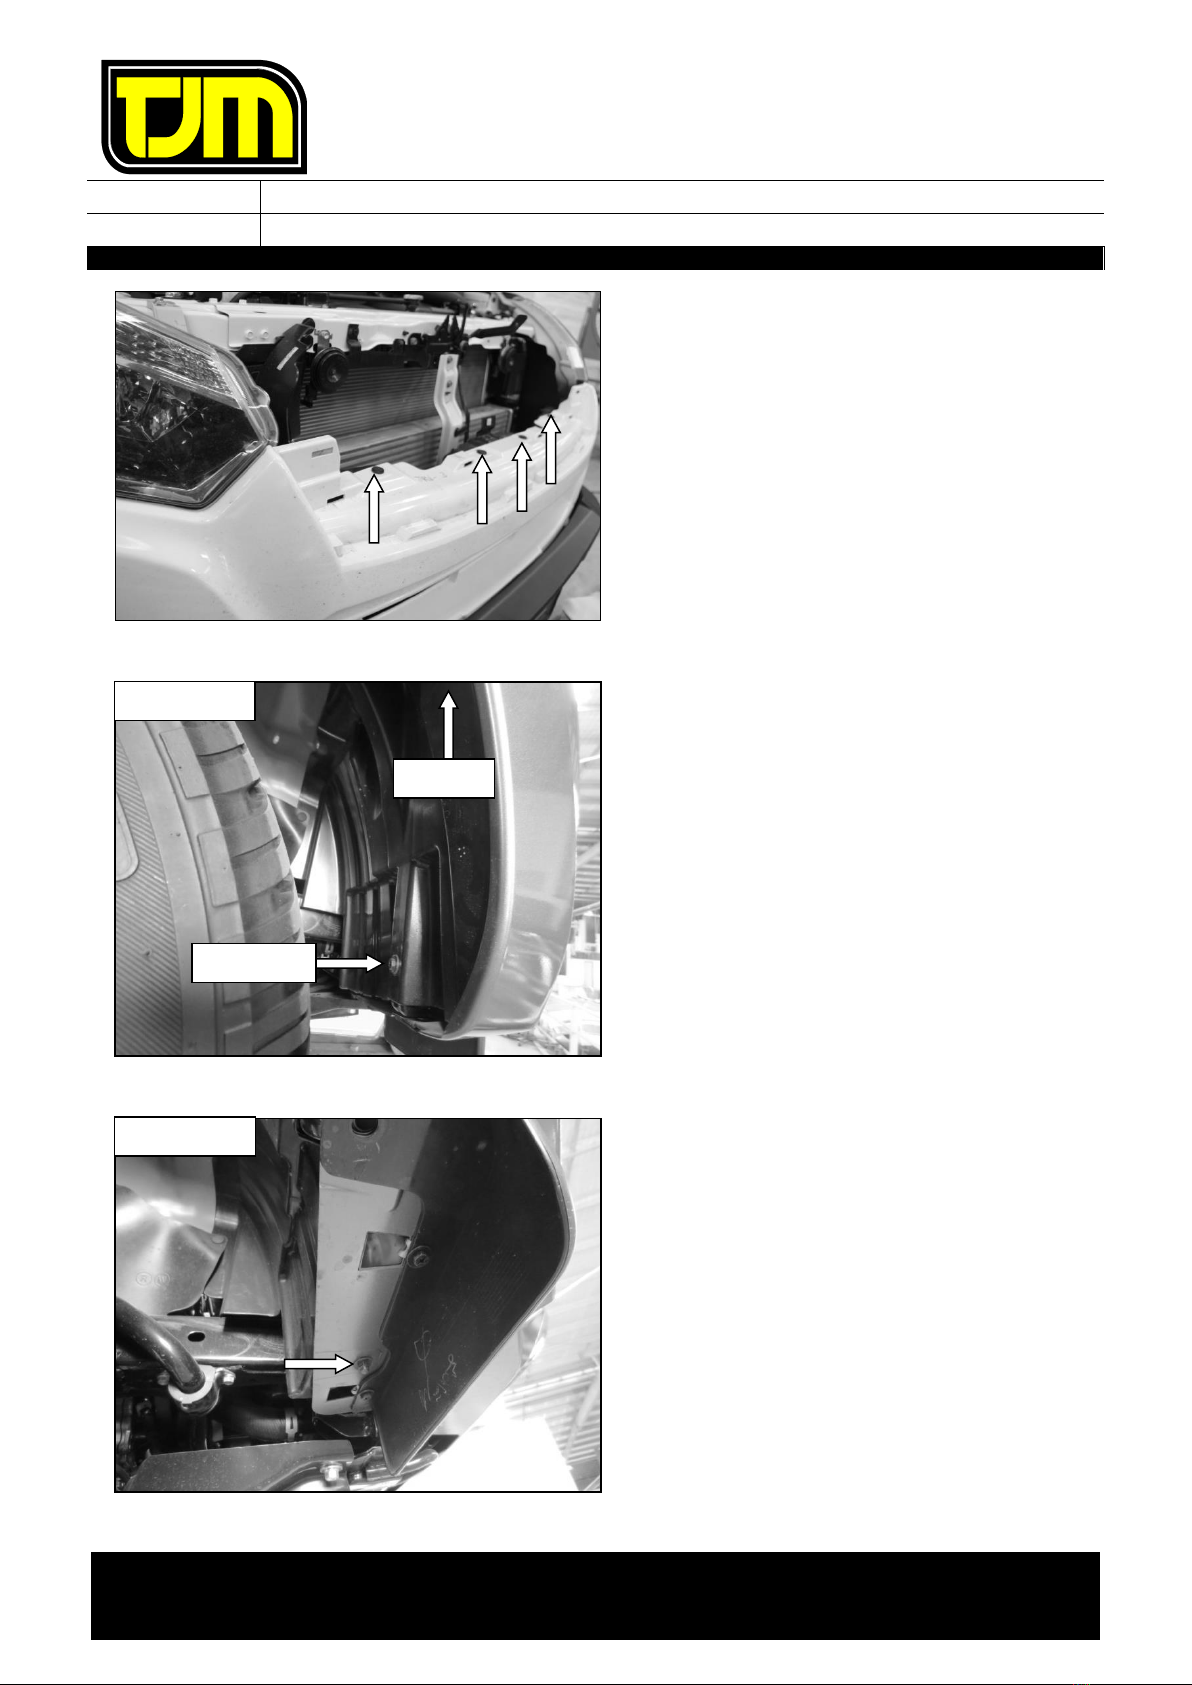
40. Remove (& retain) the 3 indicated clips
securing the air dam to the vehicle.
Remove the air dam from the vehicle.
Repeat on LHS.
41. For both air-dams mark and trim as
follows;
41.1. Mark a line along the top contour as
shown. Draw a 60mm long line that
is 30mm parallel from the front edge.
41.2. Measure 110mm down along the air-
dam contour and mark a point.
41.3. Join the points made in Step 41.1
and 41.2 with a straight line.
41.4. Mark a line from the point made in
Step 41.2 along the air-dam contour
to the lower edge as shown.
41.5. Trim and discard the indicated area.
42. Reinstall the trimmed airdams using the
clips retained from Step 40.
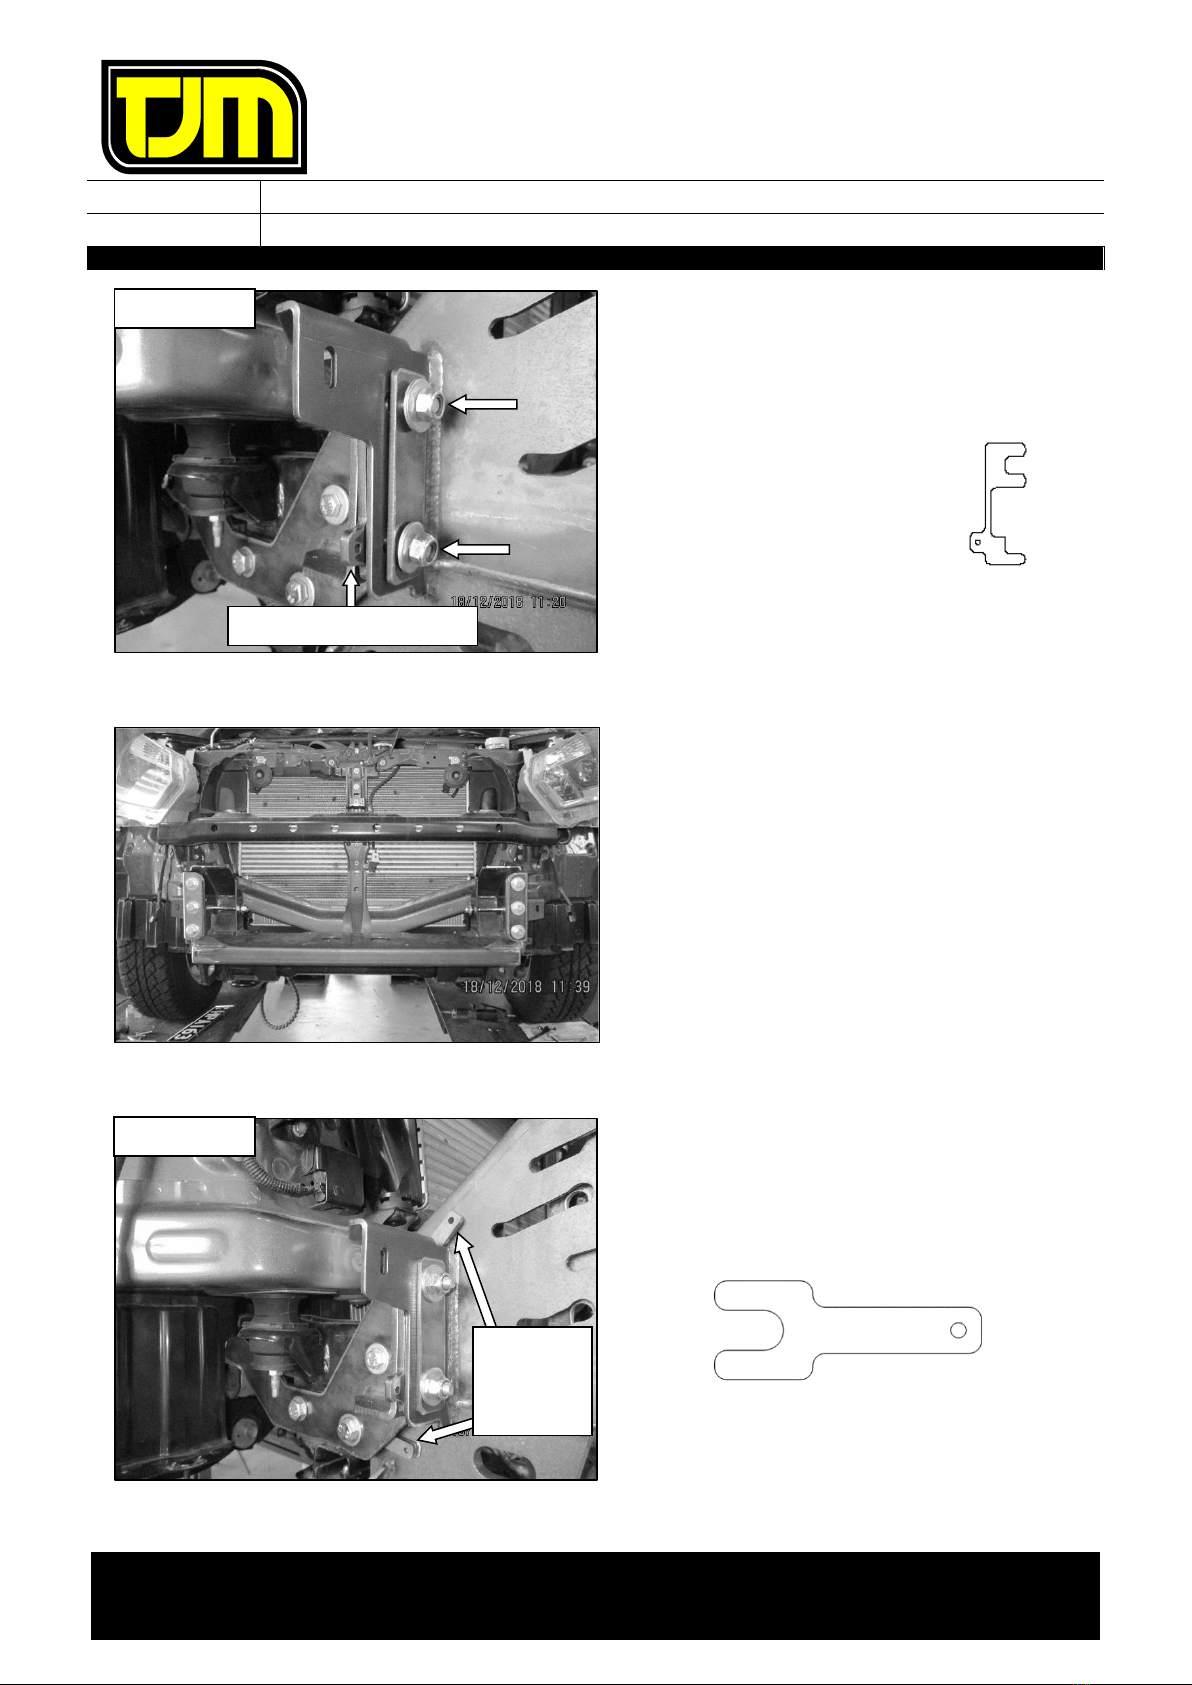
43. Position the “Chassis Mount” (F-11953) as
shown and loosely secure at the indicated
location using an M14 x 1.5 x 45mm Hex
Head Bolt (1), 9/16” x Ø1-1/8” x 16G Flat
Washer (2) & M14 x 1.5 Nyloc Nut (1).
RHS SHOWN
RHS SHOWN
30mm
RHS SHOWN
STEP 41.1
STEP 41.4
STEP
41.2
60mm
110mm
DISCARD

FITTING INSTRUCTIONS
Product:
T22 Chaser Bar
Vehicle:
Isuzu D-Max & Isuzu MUX
Part No.
070SB22N34F
For product warranty please refer to our website www.tjm.com.au
File: F-26708
Page 13 of 22
16/03/2021
44. Insert M10 x 1.25 x 100mm Hex Head Bolt
(1) with M10 x Ø30mm x 3.0mm Flat
Washer (1) through the “Chassis Mount”
and chassis at the indicated location.
45. Fit “Spacer Tube (66mm)” (F-1931) onto
the bolt and into the chassis and loosely
secure in place using M10 x Ø30mm x
3.0mm Flat Washer (1) & M10 x 1.25 Nyloc
Nut (1).
IMPORTANT
Spacer Tube must pass through chassis
holes and fit flush against the inner face of
the chassis.
46. Insert the M10 x 1.25 x 80mm Hex Head
Bolt (1) with the M10 x Ø30mm x 3.0 Flat
Washer (1) through the “Chassis Mount”
and chassis at the indicated location.
47. Fit the “Spacer Tube (50mm)” (F-13448)
onto the bolt and into the chassis, position
the “Chassis Top Bracket” (F-13482) over
the inside of the chassis rail and loosely
secure in place using M10 x Ø30mm x
3.0mm Flat Washer (1) & M10 x 1.25 Nyloc
Nut (1).
IMPORTANT
Spacer Tube must pass through chassis
holes and fit flush against the inner face of
the chassis.
Repeat steps 43 to 47 on LHS.
48. Offer the “Winch Frame” (F-26283) up to
the vehicle and loosely secure to the
“Chassis Mounts”at the indicated location
using M10 x 1.25 x 30mm Hex Head Bolt
(2), M10 x 3.5 x 2.2 Spring Washer (2), &
“M10 Washer Plate” (F-13798) (2) (below).
RHS SHOWN
RHS SHOWN

FITTING INSTRUCTIONS
Product:
T22 Chaser Bar
Vehicle:
Isuzu D-Max & Isuzu MUX
Part No.
070SB22N34F
For product warranty please refer to our website www.tjm.com.au
File: F-26708
Page 14 of 22
16/03/2021
49. On both sides of the vehicle insert the
“Lower Chassis Spacer (4mm)” (F-13467)
(2) (below) between the chassis cross
member and the “Winch Frame”. Loosely
secure in place using M10 x 1.25 x 40mm
Hex Head Bolt (4), M10 3.5 x 2.2 Spring
Washer (4) & M10 x Ø30mmx 3.0mm Flat
Washer (4).
Ensure these bolts also pass through the
OE Tow Points.
50. Use as many “Lower Chassis Spacer
(2mm)” (F-13484) (below) as required to
reduce the gap between the winch frame
and chassis cross member. Finger tighten
only.
51. Loosely secure the “Chassis Mount”to the
“Winch Frame”using the following
fasteners:
51.1. M12 x 1.25 x 120mm Hex Head Bolt
(1), 1/2" x Ø1-1/4” x 2.5mm Flat
Washer (2) & M12 x 1.25 Nyloc Nut
(1).
51.2. M12 x 1.25 x 60mm Hex Head Bolt
(1), 1/2" x Ø1-1/4” x 2.5mm Flat
Washer (2) & M12 x 1.25 Nyloc Nut
(1).
RHS SHOWN
STEP 51.1
STEP 51.2
RHS SHOWN
FITTING INSTRUCTIONS
Product:
T22 Chaser Bar
Vehicle:
Isuzu D-Max & Isuzu MUX
Part No.
070SB22N34F
For product warranty please refer to our website www.tjm.com.au
File: F-26708
Page 15 of 22
16/03/2021
52. Using M10 x 1.25 x 40mm Hex Head Bolt
(2), M10 x Ø30mm x 3.0mm Flat Washer
(4), M10 x 1.25 Nyloc Nut (2) & “Chassis
End Plate Washer”(F-13880) (1), loosely
secure the “Winch Frame”to the chassis.
53. Use “Chassis End Spacer”
(F-16839) (1) between the
“Winch Frame”and “Chassis
Mount”where necessary.
Repeat steps 51 to 53 on LHS.
54. Centre the “Winch Frame”to the vehicle
body.
55. Use as many “Chassis Spacer (2mm)”
(F12829) & “Chassis Spacer (4mm)” (F-
13475) as required around the fasteners
installed in Step 51 to fill the void between
the “Chassis Mount”and “Winch Frame”.
Repeat on LHS.
56. Tighten the fasteners installed in Steps 43
to 53 to relevant torque settings listed on
Page 4
RHS SHOWN
RHS SHOWN
CHASSIS END SPACER
INSERT
SPACERS
AS
REQUIRED

FITTING INSTRUCTIONS
Product:
T22 Chaser Bar
Vehicle:
Isuzu D-Max & Isuzu MUX
Part No.
070SB22N34F
For product warranty please refer to our website www.tjm.com.au
File: F-26708
Page 16 of 22
16/03/2021
57. Fit “Bending Angle” (F-26335) to the
inboard face of the “Winch Frame”and
“Bending Washer Plate” (F-26334) to the
front face using M12 x 1.25 x 35mm Hex
Head Bolt (3), ½” x Ø1-1/4” x 2.5mm Flat
Washer (6) & M12 x 1.25 Nyloc Nut (3).
Align plate with existing holes and tighten
to specified torque. Check holes and slots
align after tightening to allow easy bolt
fitment/clearance.
Repeat on LHS.
58. Loosely secure the “Wing Guard Bracket”
(F-26350) to the “Winch Frame”using a M6
x 1.0 x 20mm Hex Head Bolt (1), M6 x
Ø18mm x 1.6mm Flat Washer (1) & M6 x
1.0 Flange Nut (1).
59. Insert an M6 Cage Nut (K1553) (1) into the
“Wing Guard Bracket”so the nut is situated
on top of the bracket.
Repeat on LHS.
STEP 60 IS ONLY IF A WINCH IS TO BE
FITTED
60. Locating the winch & control box as shown,
refer to the winch fitting instructions.
At this stage, DO NOT FASTEN THE WINCH
TO THE WINCH FRAME, ONLY PLACE
WINCH IN POSITION.
Holes must
align
NUTS
TO INSIDE!
RHS SHOWN
RHS SHOWN
STEP 58
STEP 59

FITTING INSTRUCTIONS
Product:
T22 Chaser Bar
Vehicle:
Isuzu D-Max & Isuzu MUX
Part No.
070SB22N34F
For product warranty please refer to our website www.tjm.com.au
File: F-26708
Page 17 of 22
16/03/2021
61. Re-fit the large steering guard as per its
original installation, using the fasteners
from Step 36.
62. Fit the supplied “TJM Logo Backing Plate”
(F-13430) to the inside of the “Steering
Guard” (F-26424), as shown, using M6 x
1.0 x 16mm Button Head Bolt (2), M6 x
Ø18mm x 1.6mm Flat Washer (2) & M6 x
1.0 Nyloc Nut (2).
63. Remove the inner lower “Winch Frame”
fasteners (2) installed in Step 49
(indicated) and position the “Steering
Guard”as shown. Loosely secure in place
using the removed fasteners.
64. Secure the top of the “Steering Guard”to
the “Winch Frame”using M8 x 1.25 x
35mm Hex Head Bolt (2), M8 x 3.0 x 2.0
Spring Washer (2) & 5/16” x 7/8” x 16G
Flat Washer (2).
Fit the Indicator / Parker wiring harness to the vehicle loom.
Temporarily plug in supplied indicator/park lights.
Check the operation then disconnect the light assemblies.
STEP 64
Secure the
top of the
“Steering
Guard”to
the “Winch
Frame”
using
M8 x 1.25 x
35mm Hex
Head Bolt
(2), M8 x
3.0 x 2.0
Spring
Washer (2)
& 5/16” x
7/8” x 16G
Flat Washer
(2).
STEP 63

FITTING INSTRUCTIONS
Product:
T22 Chaser Bar
Vehicle:
Isuzu D-Max & Isuzu MUX
Part No.
070SB22N34F
For product warranty please refer to our website www.tjm.com.au
File: F-26708
Page 18 of 22
16/03/2021
65. Re-fit the cut bumper to the vehicle, using
the fasteners retained in Steps 23 & 24.
66. Re-fit the grille/radiator shroud to the
vehicle, using the fasteners retained in
Steps 20 & 21.
67. Fit the “Pinch-Weld” (93154) along the
trimmed outer edges of the bumper and
trim off any excess from the ends.
Repeat on LHS.
68. Extend a line down from the angle shown
and trim. Treat newly exposed material
with a rust preventative.
RHS D-MAX
RHS MUX

FITTING INSTRUCTIONS
Product:
T22 Chaser Bar
Vehicle:
Isuzu D-Max & Isuzu MUX
Part No.
070SB22N34F
For product warranty please refer to our website www.tjm.com.au
File: F-26708
Page 19 of 22
16/03/2021
69. Insert the “Nylon Plugs” (K0665) supplied
into the holes on the “Chaser Bar” (F-
26155) for the parker/indicators (as
shown).
Repeat on LHS.
70. Secure the parker/indicator (
Purchased
Separately
), using the screws provided with
the light assemblies.
Repeat on LHS.
71. Fit the “Grilles”(F-27143) to the “Chaser
Bar” using M6 x 1.0 x 16mm Button Head
Bolt (4), M6 x Ø18mm x 1.6mm Flat
Washer (4) & M6 x 1.0 Nyloc Nut (4).
RHS SHOWN
RHS SHOWN

FITTING INSTRUCTIONS
Product:
T22 Chaser Bar
Vehicle:
Isuzu D-Max & Isuzu MUX
Part No.
070SB22N34F
For product warranty please refer to our website www.tjm.com.au
File: F-26708
Page 20 of 22
16/03/2021
STEP 72 IS ONLY IF A WINCH IS FITTED
72. Secure the fairlead to the “Chaser Bar”
using the fasteners supplied with the
winch.
73. With the assistance of another person,
carefully lift the “Chaser Bar” into position
on the “Winch Frame”, then loosely secure
it in place, using the supplied “Sliding
Washer Plate” (F-25266) (2) and
M12 x 1.25 x 40mm Hex Head Bolt (4),
1/2" x Ø1-1/4” x 2.5mm Flat Washer (8) &
M12 x 1.25 Nyloc Nut (4) at the indicated
locations.
Repeat on LHS.
74. Align the “Chaser Bar” to the vehicle,
ensuring that it is level, there is a 15mm–
20mm gap between the lower tube of the
“Chaser Bar” & the trimmed bumper.
75. Tighten the fasteners from the previous
step to the specified torque settings listed
on Page 4.
76. Re-connect the parker/indicator lights to
the corresponding wiring harness.
RHS SHOWN
RHS SHOWN
15-20mm
Other TJM Automobile Accessories manuals


Popular Automobile Accessories manuals by other brands


TEINHOF
TEINHOF S-361 FITTING AND OPERATION MANUAL

Directed
Directed DBALL installation guide

Truck Champ
Truck Champ 22002 installation instructions

Dakota Digital
Dakota Digital BIM-01-2 manual

Ridewell Suspensions
Ridewell Suspensions RAR-260 Installation and service manual

Cruz
Cruz Airo Fix 925-70 Series Assembly instructions