TJM T13 User manual
FITTING INSTRUCTIONS
Product:
T13 Outback Bar
Vehicle:
Ford Ranger & Ford Everest
Part No.
070SB13N21Y
For product warranty please refer to our website www.tjm.com.au
F-34615.docx
Page 1 of 30
12/07/2023
Australian Standards Relating to Installing Vehicle Frontal Protection Systems (VFPS): AS 4876.1-2002
a) Do not attach V.F.P.S. to vehicle using anchorages not intended for this purpose (e.g., engine mounting bolts), other than those
specified by the V.F.P.S. manufacturer in this instruction.
b) Do not use this product for any vehicle make or model other than those specified by the V.F.P.S. manufacturer (as above).
c) Do not remove any plaques or labels from the V.F.P.S.
d) Do not modify the structure of the V.F.P.S. in any way.

FITTING INSTRUCTIONS
Product:
T13 Outback Bar
Vehicle:
Ford Ranger & Ford Everest
Part No.
070SB13N21Y
For product warranty please refer to our website www.tjm.com.au
F-34615.docx
Page 2 of 30
12/07/2023
Item
No.
Description
Qty
Part
Number
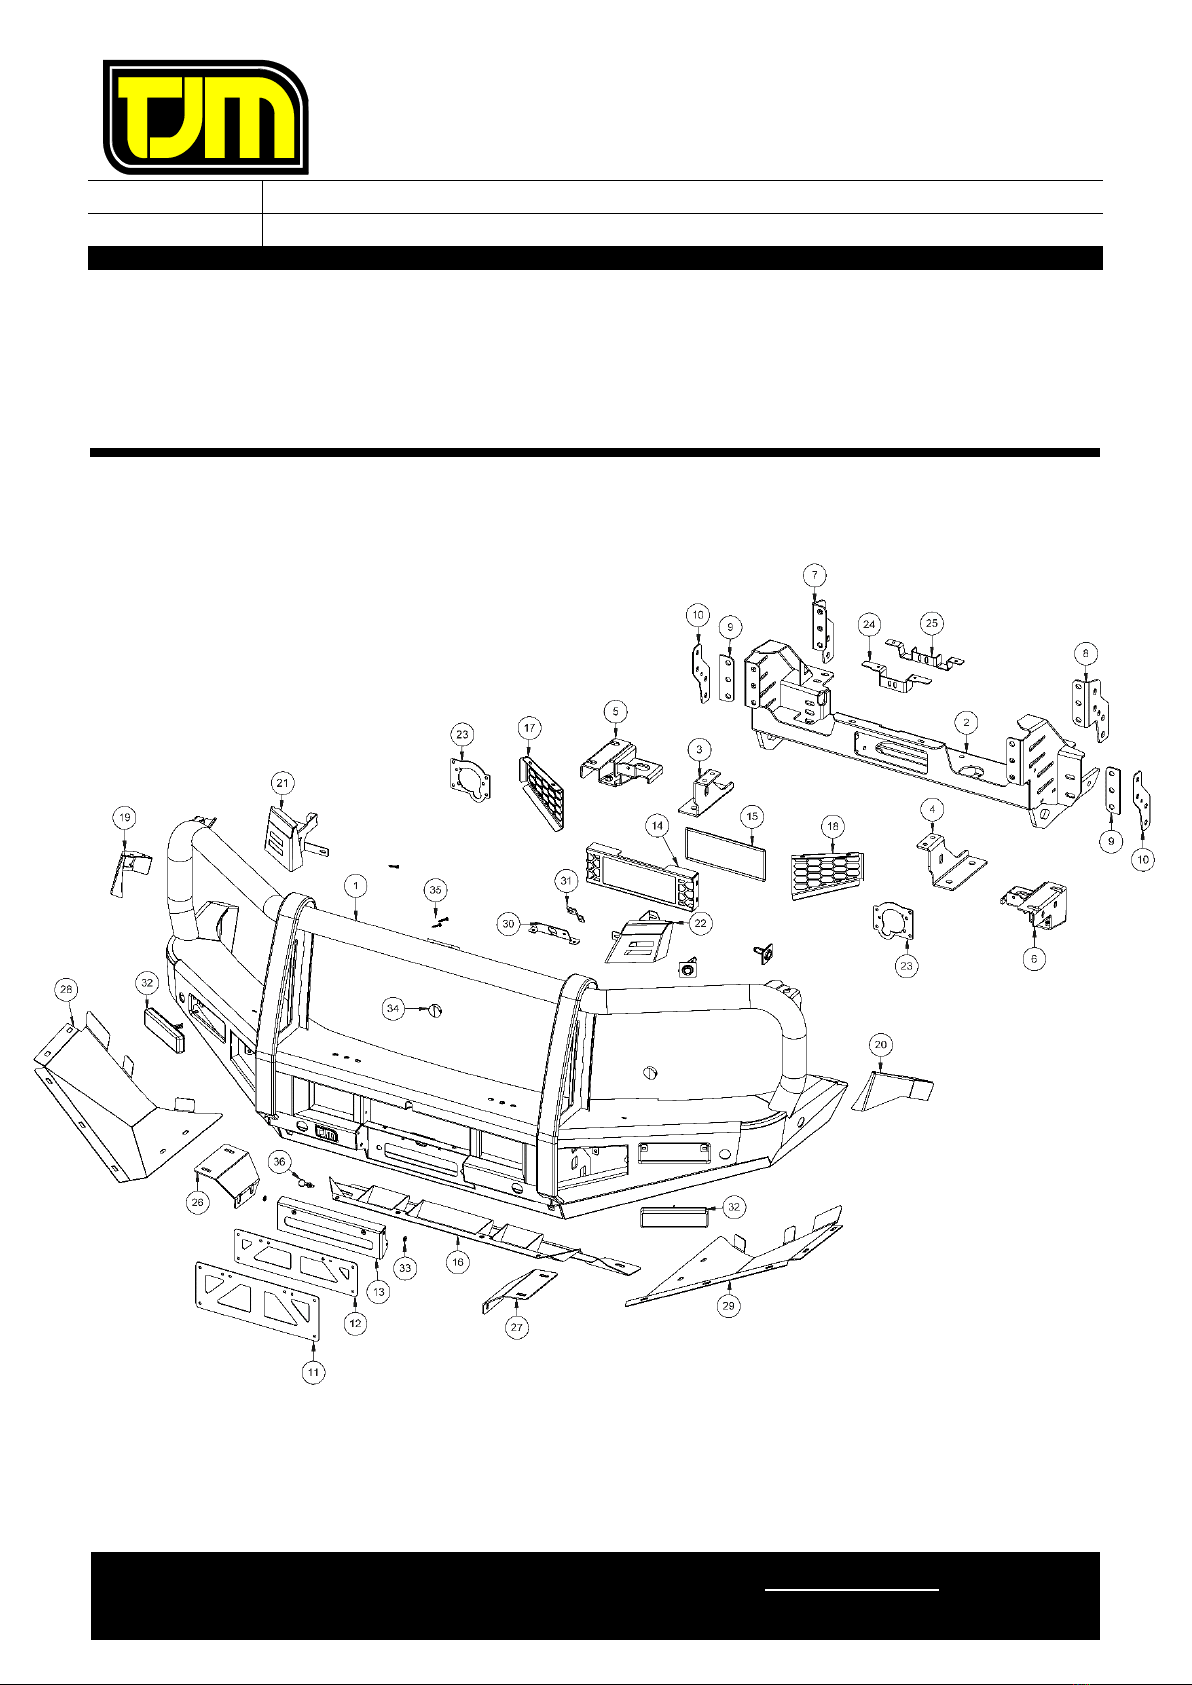
PARTS LIST
1
T13 Outback Bar
1
F-33910
2
Winch Frame
1
F-33821
3
Inner Chassis Plate RH
1
F-33803R
4
Inner Chassis Plate LH
1
F-33803L
5
UBG Mount Assembly RH
1
F-34111R
6
UBG Mount Assembly LH
1
F-34111L
7
Bending Angle RH
1
F-33948R
8
Bending Angle LH
1
F-33948L
9
Washer Plate
2
F-32863
10
Sliding Washer Plate
2
F-34019
11
Number Plate Mount - Standard
1
F-32948
12
Number Plate Mount - Slimline
1
F-33279
13
Number Plate Mount
1
F-33963
14
Radar Grille
1
F-36621
15
Radar Cover Panel
1
F-34605
16
Centre Guard
1
F-34001
17
Wing Grille RH
1
F-34009R
18
Wing Grille LH
1
F-34009L
19
Wing Bumper Infill RH
1
F-34080R
20
Wing Bumper Infill LH
1
F-34080L
21
Bumper Infill RH
1
F-34148R
22
Bumper Infill LH
1
F-34148L
23
Fog Light Plate
2
F-34102
24
OE Grille Bracket
1
F-34126
25
OE Grille Bracket Wildtrak
1
F-34617
26
Wing Guard Mount RH
1
F-34107R
27
Wing Guard Mount LH
1
F-34107L
28
Wing Guard RH
1
F-34135R
29
Wing Guard LH
1
F-34135L
30
Camera Mount
1
F-36622
31
Camera Clamp
1
F-34200
32
LED Indicator/Park Light
2
92750
33
Number Plate Hinge Bush
2
K1292
34
Dome Plug
2
K3110
35
Parking Sensor Housing Kit
4
F-5417
36
M8 Pull Plunger w/ Thin Nut
1
F-33789
N/A
Nylon Plug
4
K0665
N/A
Rated Recovery Point Label
1
HC0064
N/A
Recovery Point Use Guide
1
F-1768
N/A
Foam Tape (25mm)
2
K1361
N/A
Bubble Pinch Weld (1500mm)
1
93151
N/A
VHB Double Sided Tape (30mm)
6
K3209
FACTORY FITTED
N/A
Rated Recovery Point Label
1
HC0064
N/A
TJM LOGO Sticker
1
K3550
N/A
ABC Warning Label
2
HC0057
Item
No.
Description
Qty
Part
Number
BOLT KIT
N/A
M5 x 0.8 x 20mm Pan Head Screw
2
K0688
N/A
M5 x Ø10mm x 1.0mm Flat Washer
4
K0417
N/A
M5 x 0.8 Nyloc Nut
2
K0604
N/A
M6 x 1.0 x 20mm Button Head Bolt SS
49
K3218
N/A
M6 x 1.0 x 20mm Hex Head Bolt
11
K0550
N/A
M6 x 1.0 Cage Nut Type B
14
K1550
N/A
M6 x 1.0 Nyloc Nut SS
42
K1549
N/A
M6 x 2.5 x 1.2 Spring Washer SS
18
K1552
N/A
M6 x Ø12.5mm x 1.2mm Flat Washer SS
56
K1551
N/A
M6 x Ø18mm x 1.6mm Flat Washer SS
44
K1554
N/A
M8 x 1.25 x 35mm Hex Head Bolt
2
K0555
N/A
M8 x 1.25 Nyloc Nut
2
K0606
N/A
M8 x Ø19mm x 18G Flat Washer
4
K0628
N/A
M10 x 1.5 x 25mm Button Head Bolt SS
4
K2690
N/A
M10 x 1.25 x 30mm Hex Head Bolt
8
K0564
N/A
M10 x 1.25 Nyloc Nut
8
K3099
N/A
M10 x 1.5 Nyloc Nut
2
K0607
N/A
M10 x 3.5 x 2.2 Spring Washer
2
K0621
N/A
M10 x Ø21mm x 2.0mm Flat Washer
14
K2900
N/A
M10 x Ø30mm x 3.0mm Flat Washer
8
WSST-W13
N/A
M12 x 1.25 x 35mm Hex Head Bolt
8
K0570
N/A
M12 x 1.25 x 40mm Hex Head Bolt
12
K0571
N/A
M12 x 1.25 Nyloc Nut
20
K1200
N/A
1/2" x Ø1-1/4” x 2.5mm Flat Washer
40
K0623
FITTING INSTRUCTIONS
Product:
T13 Outback Bar
Vehicle:
Ford Ranger & Ford Everest
Part No.
070SB13N21Y
For product warranty please refer to our website www.tjm.com.au
F-34615.docx
Page 3 of 30
12/07/2023
Tools Required
Hand Tools
Power Tools
Metric Socket Set 8-19mm
Electric/Air Impact Driver (Optional)
Ratchet & Socket Extension Bar
Electric Drill
Metric Spanner Set 10-19mm
Air Saw
Torx Drivers T25-T30
Hex (Allen) Key Set 4-6mm
Trim Puller Tool
Flat Blade Screwdriver Set
Phillips Head Screwdriver Set
Utility Knife
Side Cutters
Pliers
Drill Bit Kit 3mm –10.5mm
Digital Angle Indicator
Consumables Required
Zip Ties
Masking Tape
Rust Preventative
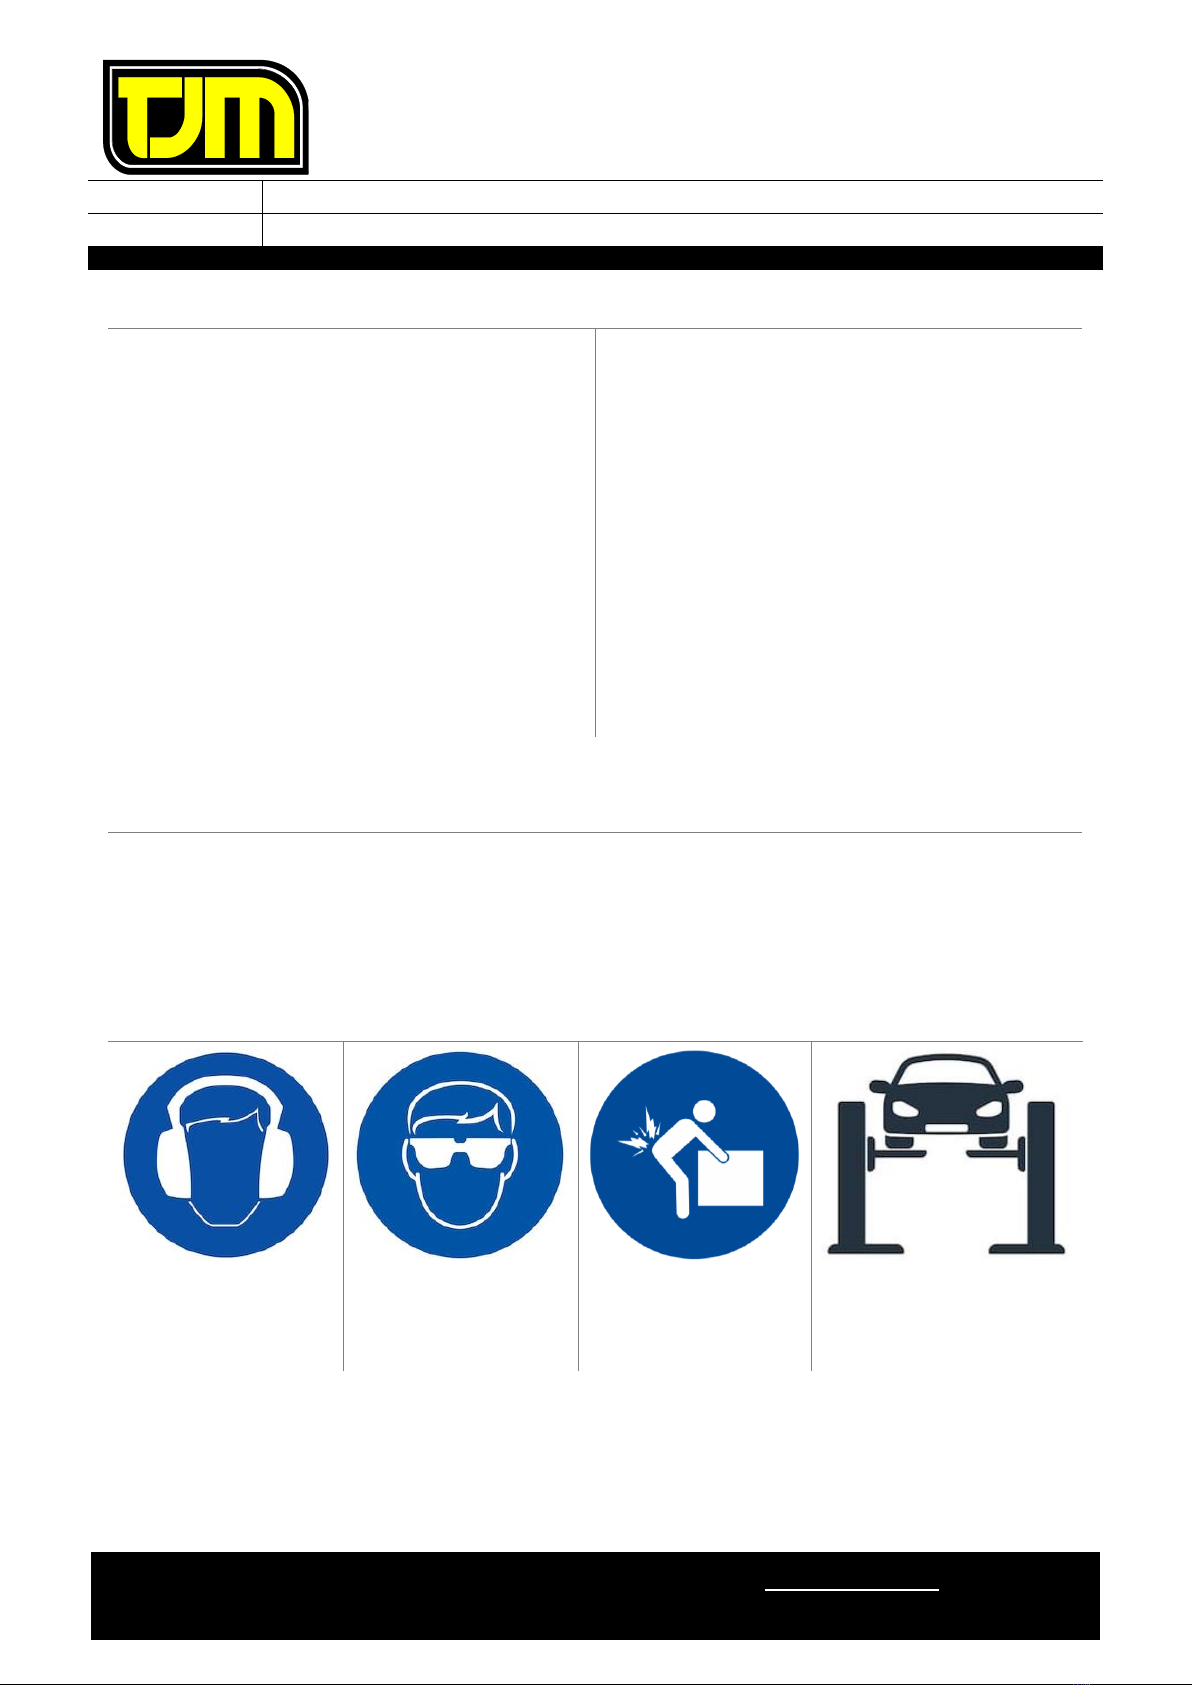
Safety Equipment/Notice
Hearing Protection
Eye Protection
Lifting Hazard
Vehicle Support/Lifting
Must be worn when using
power tools.
Must be worn when
cutting, drilling, or
grinding.
Two persons lift or
mechanical lifting aid
required for FPS fitment.
Ensure vehicle is properly
supported before commencing
work.

FITTING INSTRUCTIONS
Product:
T13 Outback Bar
Vehicle:
Ford Ranger & Ford Everest
Part No.
070SB13N21Y
For product warranty please refer to our website www.tjm.com.au
F-34615.docx
Page 4 of 30
12/07/2023
NOTES
•Before commencing fitment read instructions and ensure all listed components
are supplied.
•Left hand & right-hand components are determined as seated in the vehicle.
•The fitment of TJM products does not nullify the OE manufacturer's operating
guidelines and/or warnings. Ensure you are familiar with and adhere to the usage
instructions specified by the manufacturer in the owner's manual or other official
documentation.
•Check for (and remove) any build up in all threads fitted to the product.
•Ensure that the “Rated Recovery Point Label” is affixed alongside the compliance
label in the driver’s side doorjamb.
•When fitting accessories to TJM products (i.e., driving lights and aerials), ensure
suitable washer plates are used under the mounting surface that allow the
accessory to be secured in a way that prevents it from damaging the product.
•Where OE air guides require trimming, ensure minimal clearance between air
guides and TJM components to prevent air leakage which may adversely affect
vehicle cooling.
•When removing protective coatings, ensure all new edges are deburred, clean any
swarf from the area and apply rust preventative to exposed surfaces.
•Place the product on a soft workspace to prevent damage prior to installation.
Bolt tensions
Dia. (mm)
Nm
ft.lbs
Dia. (inch)
Nm
ft.lbs
All bolt tensions are
as follows unless
otherwise
specified.
5
5
4
1/4”
9
7
6
9
7
5/16”
22
15
8
22
16
3/8”
33
27
10
44
32
7/16”
55
43
12
77
57
1/2”
86
66

FITTING INSTRUCTIONS
Product:
T13 Outback Bar
Vehicle:
Ford Ranger & Ford Everest
Part No.
070SB13N21Y
For product warranty please refer to our website www.tjm.com.au
F-34615.docx
Page 5 of 30
12/07/2023
1. Remove and retain the number plate,
discarding the fasteners. Remove number
plate mount.
2. Remove and retain the plastic scrivets (13)
that secure the top of the grille/radiator
shroud. Remove shroud from vehicle and set
aside.
3. Remove and retain the top bolts (2) securing
the top of the grille to the vehicle.
4. Disconnect the camera plug and washer hose
if vehicle is fitted with it, as well as unclipping
the harness and hose from the plastic.
Clamp the washer hose at the vehicle side to
prevent the system draining.
5. Unclip the lower portion of the grille as well
as the portion attached to the headlight by
applying a forward pulling force to the grille.
Take care as the clips which connect the
grille to the bumper are a molded part of the
grille & the clips can break easily if proper
care is not taken.
6. Remove the grille from vehicle & set it aside.
Grille will need to be removed to expose
bumper retaining clips and bolts.
Place masking tape over 360-Degree Camera
if present to protect it.
RHS SHOWN
STEP 3
Other manuals for T13
8
Table of contents
Other TJM Automobile Accessories manuals


Popular Automobile Accessories manuals by other brands


ULTIMATE SPEED
ULTIMATE SPEED 279746 Assembly and Safety Advice

SSV Works
SSV Works DF-F65 manual

ULTIMATE SPEED
ULTIMATE SPEED CARBON Assembly and Safety Advice

Witter
Witter F174 Fitting instructions

WeatherTech
WeatherTech No-Drill installation instructions

TAUBENREUTHER
TAUBENREUTHER 1-336050 Installation instruction