TJM T13 User manual

FITTING INSTRUCTIONS
Product:
T13 Outback Frontal Protection System
Vehicle:
Toyota LandCruiser 200
Part No.
070SB13N82C
For product warranty please refer to our website www.tjm.com.au
File: F-11094.docx
Page 1 of 25
20/10/2022
Australian Standards Relating to Installing Vehicle Frontal Protection Systems (VFPS): AS 4876.1-2002
a) Do not attach V.F.P.S. to vehicle using anchorages not intended for this purpose (e.g. engine mounting bolts), other than those
specified by the V.F.P.S. manufacturer in this instruction.
b) Do not use this product for any vehicle make or model other than those specified by the V.F.P.S. manufacturer (as above).
c) Do not remove any plaques or labels from the V.F.P.S.
d) Do not modify the structure of the V.F.P.S. in any way.
•Read instructions fully before commencing fitment.
•Left hand and Right hand components are determined as seated in
the vehicle.
•Be aware that a number of government / fleet departments require that
the tow points be painted red.
•Check for (and remove) any build up in all threads fitted to the
product.
•Ensure that the “Rated Recovery Point Label” is affixed alongside the
compliance label, in the driver’s side doorjamb.
•When fitting accessories to TJM products (ie. driving lights and
aerials), ensure suitable washer plates are used under the mounting
surface that allow the accessory to be secured in a way that prevents
it from damaging the product.
•When removing protective coatings, ensure all new edges are
deburred, clean any swarf from the area and apply rust preventative
to exposed surfaces.
Bolt tensions
Dia. (mm)
Nm
ft.lbs
Dia. (inch)
Nm
ft.lbs
All bolt tensions
are as follows
unless otherwise
specified.
5
5
4
1/4”
9
7
6
9
7
5/16”
22
15
8
22
16
3/8”
33
27
10
44
32
7/16”
55
43
12
77
57
1/2”
86
66

FITTING INSTRUCTIONS
Product:
T13 Outback Frontal Protection System
Vehicle:
Toyota LandCruiser 200
Part No.
070SB13N82C
For product warranty please refer to our website www.tjm.com.au
File: F-11094.docx
Page 2 of 25
20/10/2022

FITTING INSTRUCTIONS
Product:
T13 Outback Frontal Protection System
Vehicle:
Toyota LandCruiser 200
Part No.
070SB13N82C
For product warranty please refer to our website www.tjm.com.au
File: F-11094.docx
Page 3 of 25
20/10/2022
ITEM
NO.
Description
Qty
Part
Number
PARTS LIST
1
Outback FPS
1
F-9337
2
Chassis Mount / Winch Frame
1
F-9260
4
Wing Guard LH
1
F-10043L
5
Wing Guard RH
1
F-10043R
FITTING KIT
3
Center Under Guard
1
F-9913
6
M12 x 1.75 x 280mm Threaded Rod
2
F-1613
7
Chassis Rail Mounting Block
2
F-9132
8
Chassis End Spacer
2
F-9235
9
Tow Point Washer
2
F-11067
10
Washer Plate
2
F-9792
11
Bending Angle LH
1
F-9790L
12
Bending Angle RH
1
F-9790R
13
Upper Grille Mount
1
F-9315
14
Bending Washer Plate
2
F-9791
15
Center Guard Mount Angle
2
F-9926
16
Spacer Plate
2
F-10308
17
Wing Mount Angle
2
F-10309
18
Bumper Support
1
F-10478
19
Fairlead Cover
1
F-11096
20
LED Indicator / Park Light
2
92750
21
Fog Light Washer Plate
4
88057
22
Fog Light Blanking Cover
2
92091
N/A
Cable Tie –300mm
12
K1148
N/A
Nylon Plug
4
K0665
N/A
Rated Recovery Point Label
1
HC0064
N/A
Recovery Point Use Guide
1
F-1768
FACTORY FITTED
N/A
Rated Recovery Point Label
1
HC0064
N/A
TJM Logo Sticker
1
K3550
N/A
Warning Label - ABC
1
HC0057
ITEM
NO.
Description
Qty
Part
Number
BOLT KIT
N/A
M6 x 1.0 x 16mm Sckt Butthead Screw
2
K1630
N/A
M6 x 1.0 x 20mm Hex Bolt
26
K0550
N/A
M6 x 1.0 Flange Nut
12
K3033
N/A
M6 x 1.0 Cage Nut Type B
14
K1550
N/A
M6 x Ø12.5mm Flat Washer
14
K0897
N/A
M6 x Ø18mm Flat Washer
14
K2905
N/A
M6 Spring Washer
14
K0915
N/A
M8 x 1.25 x 16mm Hex Bolt
3
K0767
N/A
M8 x 1.25 x 25mm Hex Bolt
10
K0553
N/A
M8 x 1.25 x 35mm Hex Bolt
2
K0555
N/A
M8 x 1.25 Nyloc Nut
10
K0606
N/A
M8 x 1.25 Flange Nut
3
K3035
N/A
M8 x 1.25 Cage Nut Type B
2
K1560
N/A
M8 x Ø24 Flat Washer
27
-
N/A
M8 Spring Washer
2
K0620
N/A
M10 x 1.5 x 25mm Sckt Butthead Screw
2
K2690
N/A
M10 x 1.5 Nyloc Nut
2
K0607
N/A
M10 x Ø30mm Flat Washer
2
WSST-W13
N/A
M10 x Ø21mm x 2mm Flat Washer
4
K2900
N/A
M12 x 1.25 x 35mm Hex Screw
6
K0570
N/A
M12 x 1.25 x 40mm Hex Screw
8
K0571
N/A
M12 x 1.25 x 45mm Hex Bolt
4
K0772
N/A
M12 x 1.25 Nyloc nut
14
K1200
N/A
M12 x 1.75 Hex Nut
2
K0587
N/A
M12 x 32mm x 2.5mm Flat Washer
32
K0623
N/A
M12 x 24mm x 1.6mm Flat Washer
2
K0425
N/A
M12 Spring Washer
6
K0977

FITTING INSTRUCTIONS
Product:
T13 Outback Frontal Protection System
Vehicle:
Toyota LandCruiser 200
Part No.
070SB13N82C
For product warranty please refer to our website www.tjm.com.au
File: F-11094.docx
Page 4 of 25
20/10/2022
1. Remove (& retain) number plate if fitted.
2. Remove (& retain) the front plastic
radiator cover and fasteners (7) located
under hood.
3. Disconnect wiring looms from camera and
radar if fitted.

FITTING INSTRUCTIONS
Product:
T13 Outback Frontal Protection System
Vehicle:
Toyota LandCruiser 200
Part No.
070SB13N82C
For product warranty please refer to our website www.tjm.com.au
File: F-11094.docx
Page 5 of 25
20/10/2022
4. Remove (& retain) chrome headlight trim
covers from front.
5. Remove (& retain) the fasteners (3) along
the top of the grille.
6. Remove (& retain) the grille by releasing
the 8 clips along the bottom of the grille
and the additional clip on each side.
7. If fitted, find the parking sensor / fog-light
wiring loom plug and the headlight washer
hose connection.

FITTING INSTRUCTIONS
Product:
T13 Outback Frontal Protection System
Vehicle:
Toyota LandCruiser 200
Part No.
070SB13N82C
For product warranty please refer to our website www.tjm.com.au
File: F-11094.docx
Page 6 of 25
20/10/2022
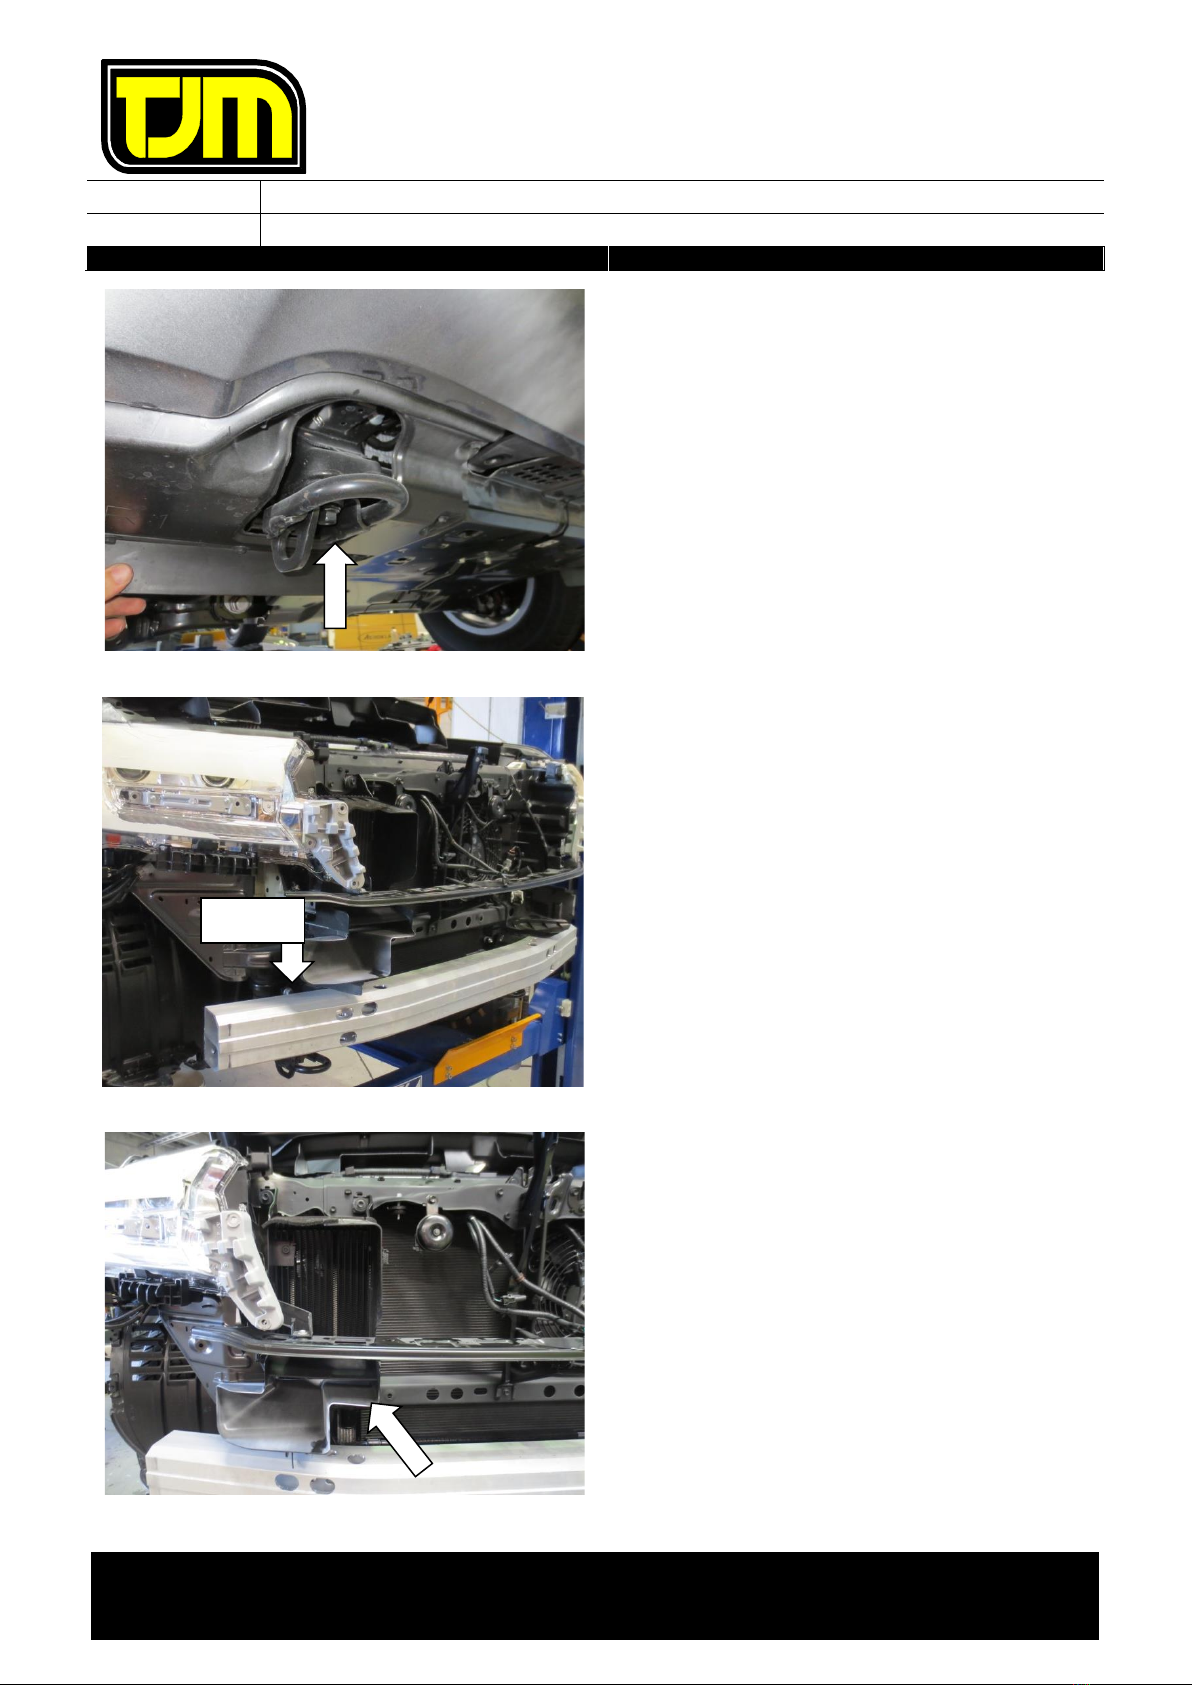
8. If fitted, disconnect the parking sensor / fog-
light wiring loom plug.
Note: The OE fog-lights are not
required for the installation of this
FPS.
9. If fitted, unclip the headlight washer hose
from the underneath the bumper support.
Disconnect the headlight washer hose
connection. Fold the hose over and use a zip
tie to crimp the hose. This will prevent the
washer fluid in the reservoir from draining.
10. Remove the clips across the top of the
remaining bumper and discard.
Clip in bumper support

FITTING INSTRUCTIONS
Product:
T13 Outback Frontal Protection System
Vehicle:
Toyota LandCruiser 200
Part No.
070SB13N82C
For product warranty please refer to our website www.tjm.com.au
File: F-11094.docx
Page 7 of 25
20/10/2022
11. Remove the fasteners in the wheel arch
securing the front bumper and discard.
12. Remove the fasteners retaining the lower
section of the bumper and discard.
13. Remove the lower outer covers and discard
the fasteners.
14. Remove (& retain) the mud flaps and
fasteners (6) from the lower outer cover.
Discard the covers keeping mud flaps,
fasteners and the backing plates.
Step 13
Step 14
FITTING INSTRUCTIONS
Product:
T13 Outback Frontal Protection System
Vehicle:
Toyota LandCruiser 200
Part No.
070SB13N82C
For product warranty please refer to our website www.tjm.com.au
File: F-11094.docx
Page 8 of 25
20/10/2022
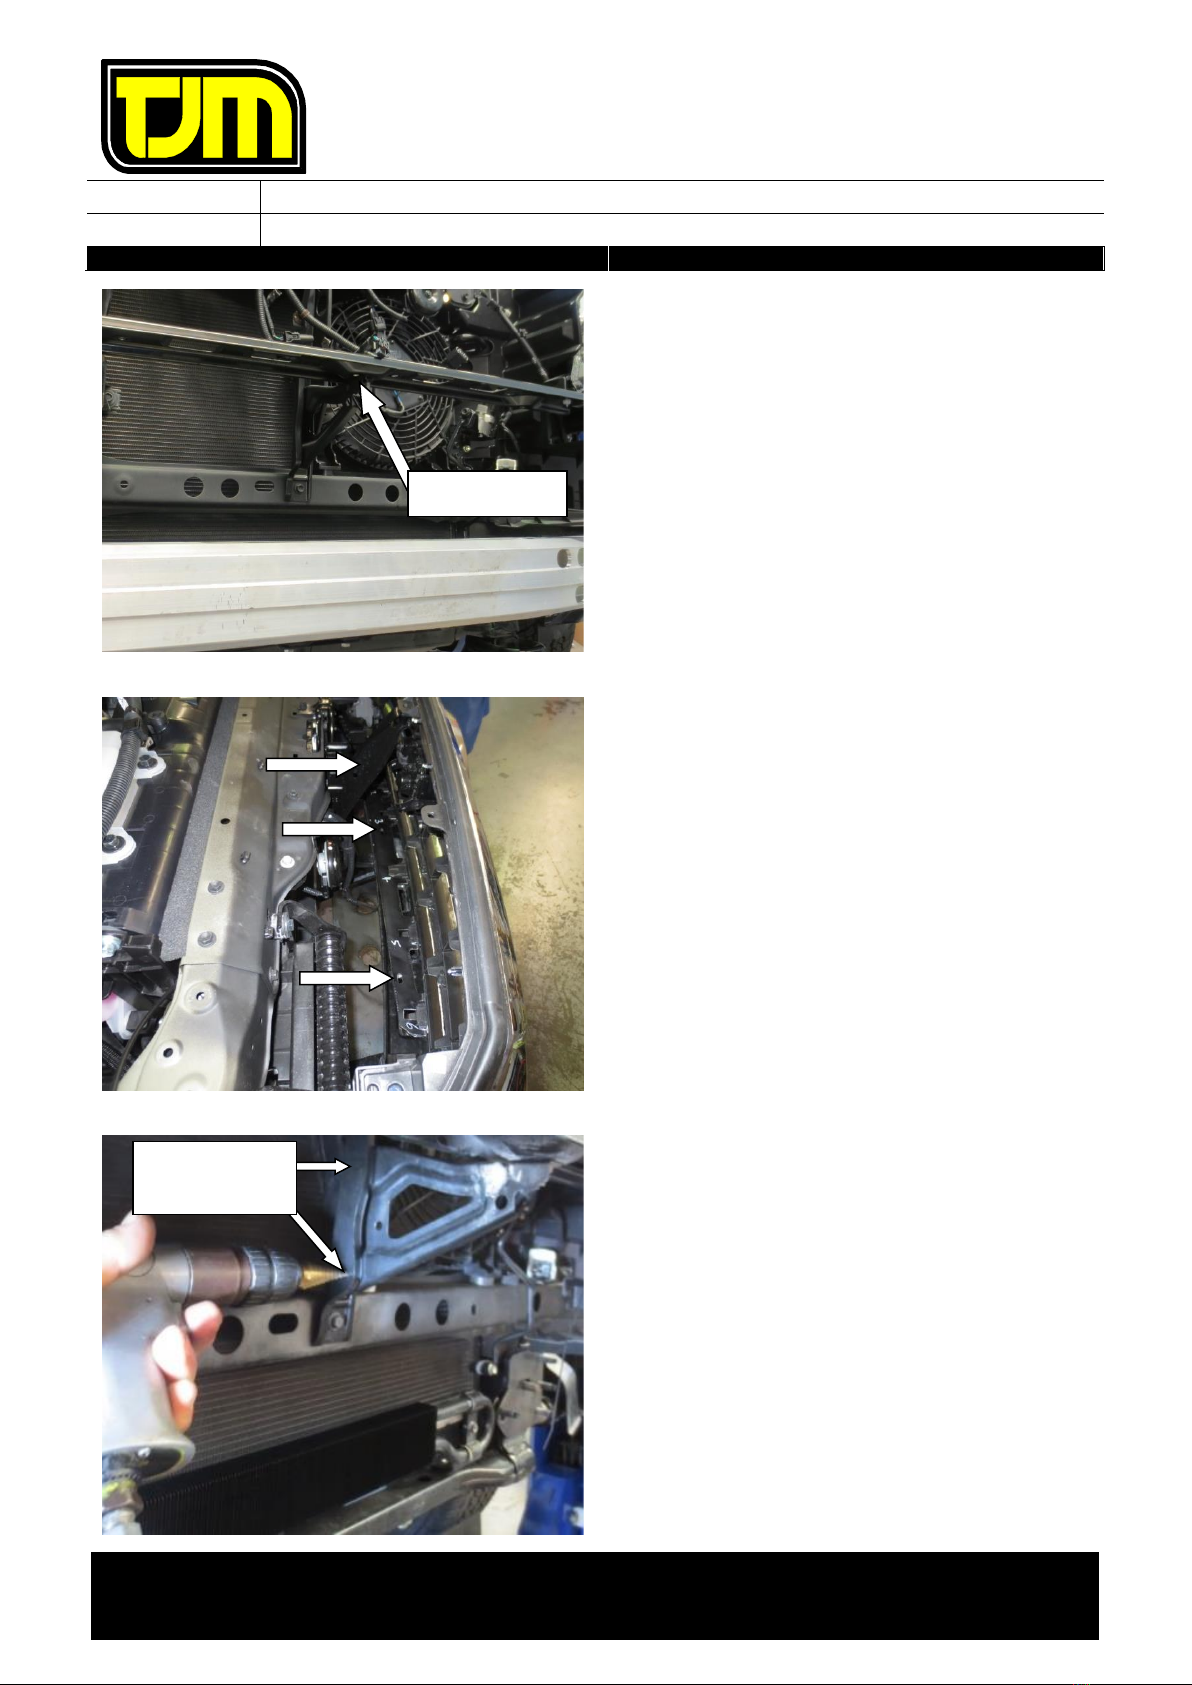
15. Remove the tow / tie down points on each
side of the vehicle and discard.
16. Remove the bumper and remove (&
discard) the outer bumper support plastics
from the front guard.
17. Remove (& discard) the impact foam, front
intrusion beam and mounting brackets from
the chassis ends. Retain the 8 flange nuts to
secure the winch frame to the chassis.
18. If necessary, remove the automatic
transmission cooler air guide for trimming.
Step 17
FITTING INSTRUCTIONS
Product:
T13 Outback Frontal Protection System
Vehicle:
Toyota LandCruiser 200
Part No.
070SB13N82C
For product warranty please refer to our website www.tjm.com.au
File: F-11094.docx
Page 9 of 25
20/10/2022
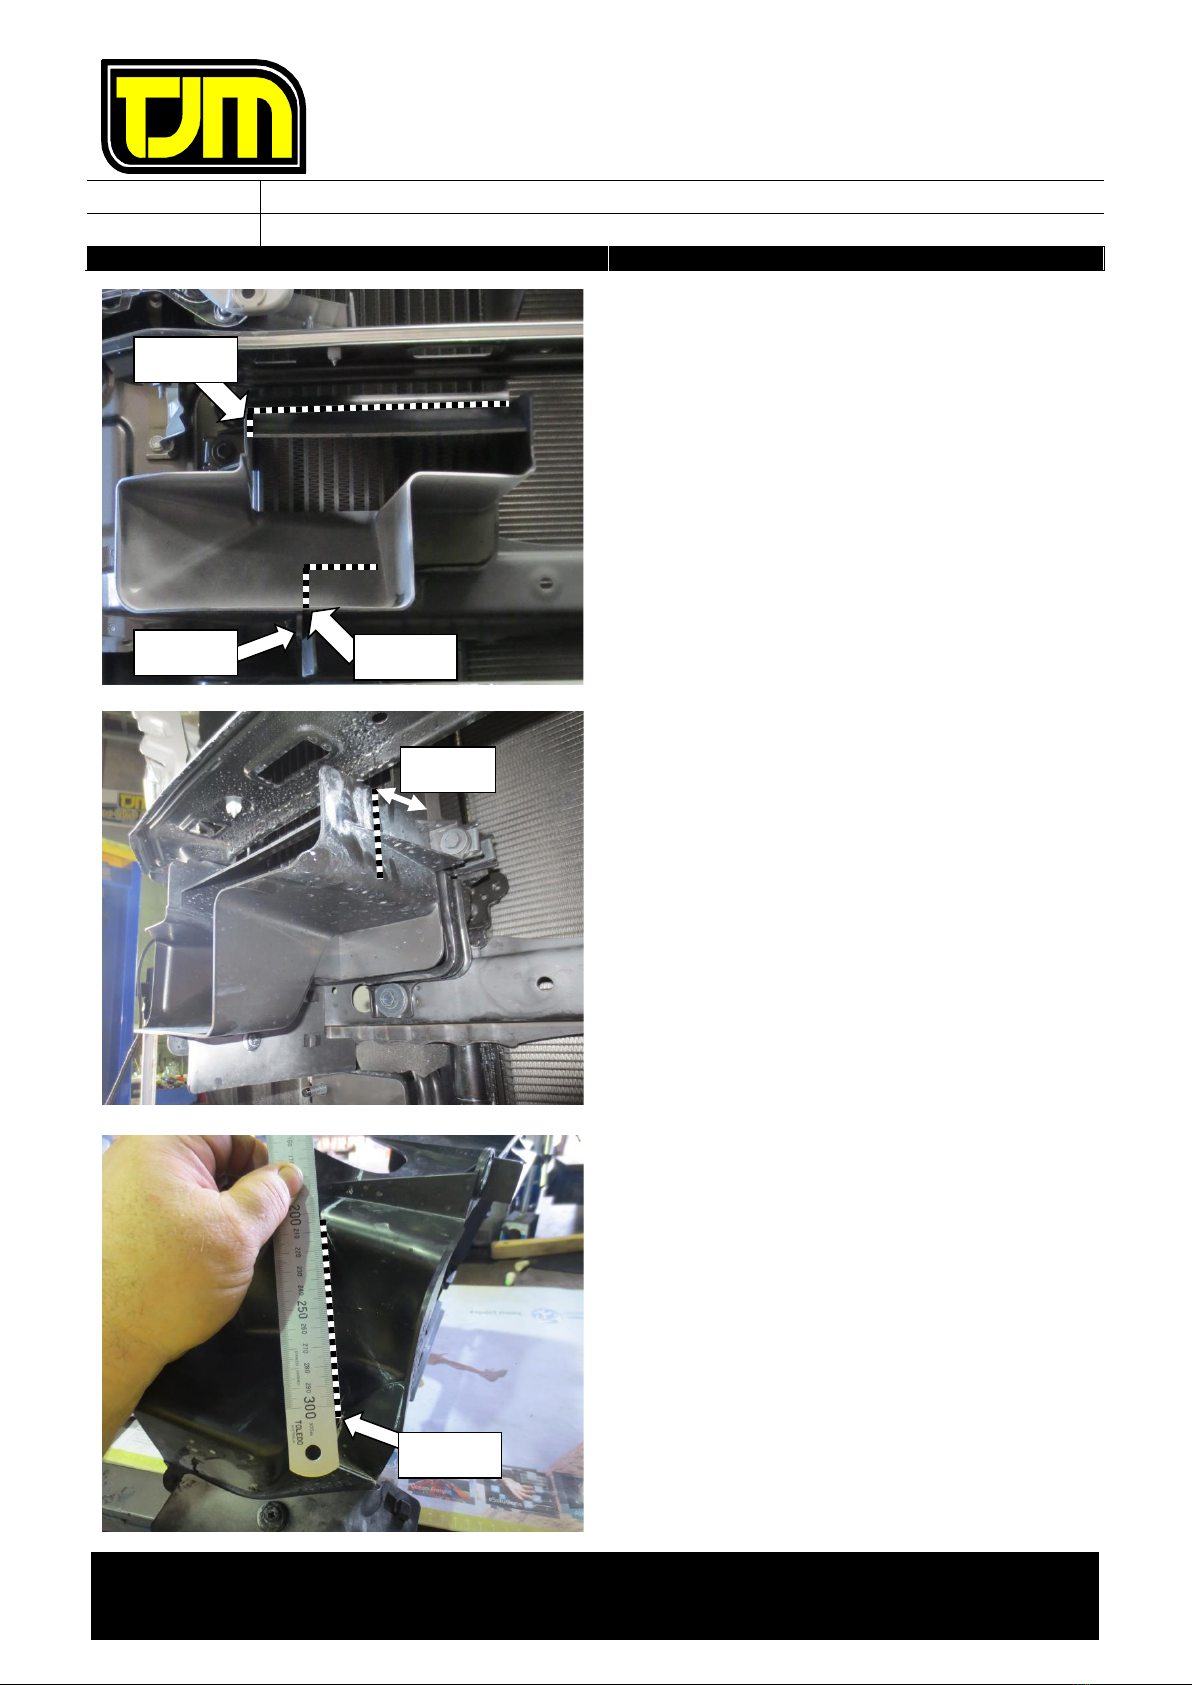
19. Draw a vertical line from the edge of the
top rib approximately 57mm long. Then
mark a horizontal line across the top of
the rib following the ridge of the plastic.
20. Draw a line on the passenger side, parallel
to the gusset. Draw along the lowest face
of the air guide and up 40mm on the
angle. Then draw a horizontal line as
shown that meets with the vertex shown
in step 22.
21. Draw a vertical line from the top rib down
to the edge.
If fitting a TJM winch additional
material will have to be removed
from the air guide to mount the
control box. If this is the case,
reduce the distance of the vertical
line from 75mm to 10mm.
22. Draw a line with a ruler joining the vertex
to the horizontal line drawn in step 21.
23. Trim the plastic air guide along the lines
drawn.
24. Refit the air guide after trimming if
removed.
75mm
Step 19
Step 20
Gusset
Vertex

FITTING INSTRUCTIONS
Product:
T13 Outback Frontal Protection System
Vehicle:
Toyota LandCruiser 200
Part No.
070SB13N82C
For product warranty please refer to our website www.tjm.com.au
File: F-11094.docx
Page 10 of 25
20/10/2022
25. Install and connect the wiring loom patch
harnesses for the parker / indicator
assemblies to both sides of the vehicle
and to the light assemblies. Check light
operation and remove lights for fitting to
the FPS.
To improve the visual appeal of the
FPS once fitted, the headlight
wiring connectors can be moved as
described in step 26.
26. Separate the two connectors from their
mounting bracket and relocate them
closer to the center of the vehicle. Ensure
that the connectors and wiring loom are
securely fastened and as a result, no
vehicle components are crushed or will
chafe. The new position for the headlight
wiring connectors shown prevents them
from being seen when the FPS is fitted
without the pinch weld supplementary kit
(purchased separately). Once the
headlight wiring connectors have been
relocated the OE mounting bracket can be
removed and discarded. Repeat on
opposite side.
27. Fit the new grille mount bracket (F-9315)
to the 6 center lower tabs of the grille
with bracket folds facing up leaving the
outer tabs free.
New location
RHS SHOWN
RHS SHOWN
FITTING INSTRUCTIONS
Product:
T13 Outback Frontal Protection System
Vehicle:
Toyota LandCruiser 200
Part No.
070SB13N82C
For product warranty please refer to our website www.tjm.com.au
File: F-11094.docx
Page 11 of 25
20/10/2022
If fitting a winch complete steps 28
to 39. Alternatively if the customer
wishes to have a winch fitted in the
future, ensure the bumper support
bracket (F-10478) is retained by the
customer and continue to step 40.
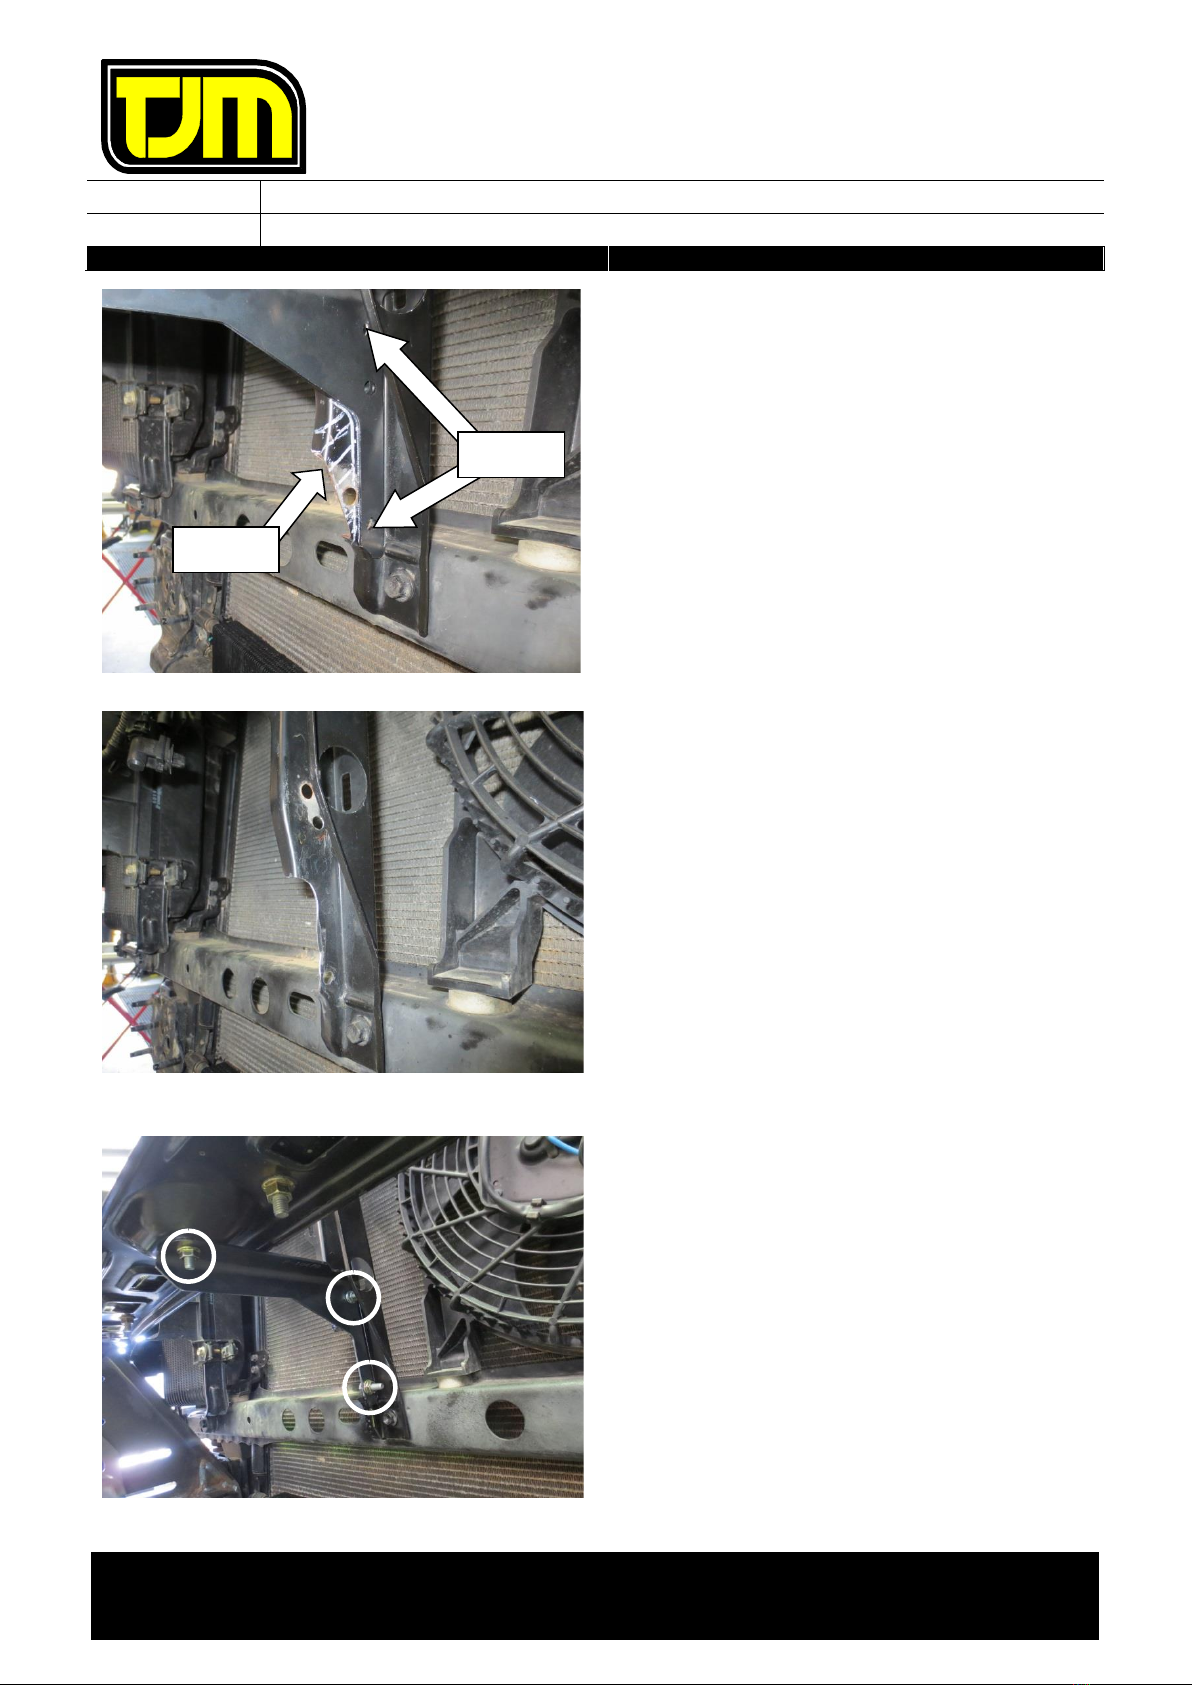
28. Remove the grille support mounting bolt.
29. Temporarily refit grille and bracket to the
vehicle. Fasten in place using M8 x 16mm
hex bolts (3) M8 x Ø24 flat washers (3)
and M8 flange nuts (3).
Note: The grille mount bracket
needs to be fitted to the bumper
support to ensure it is not stressed
out of its designed position after
the grille support is removed in step
30.
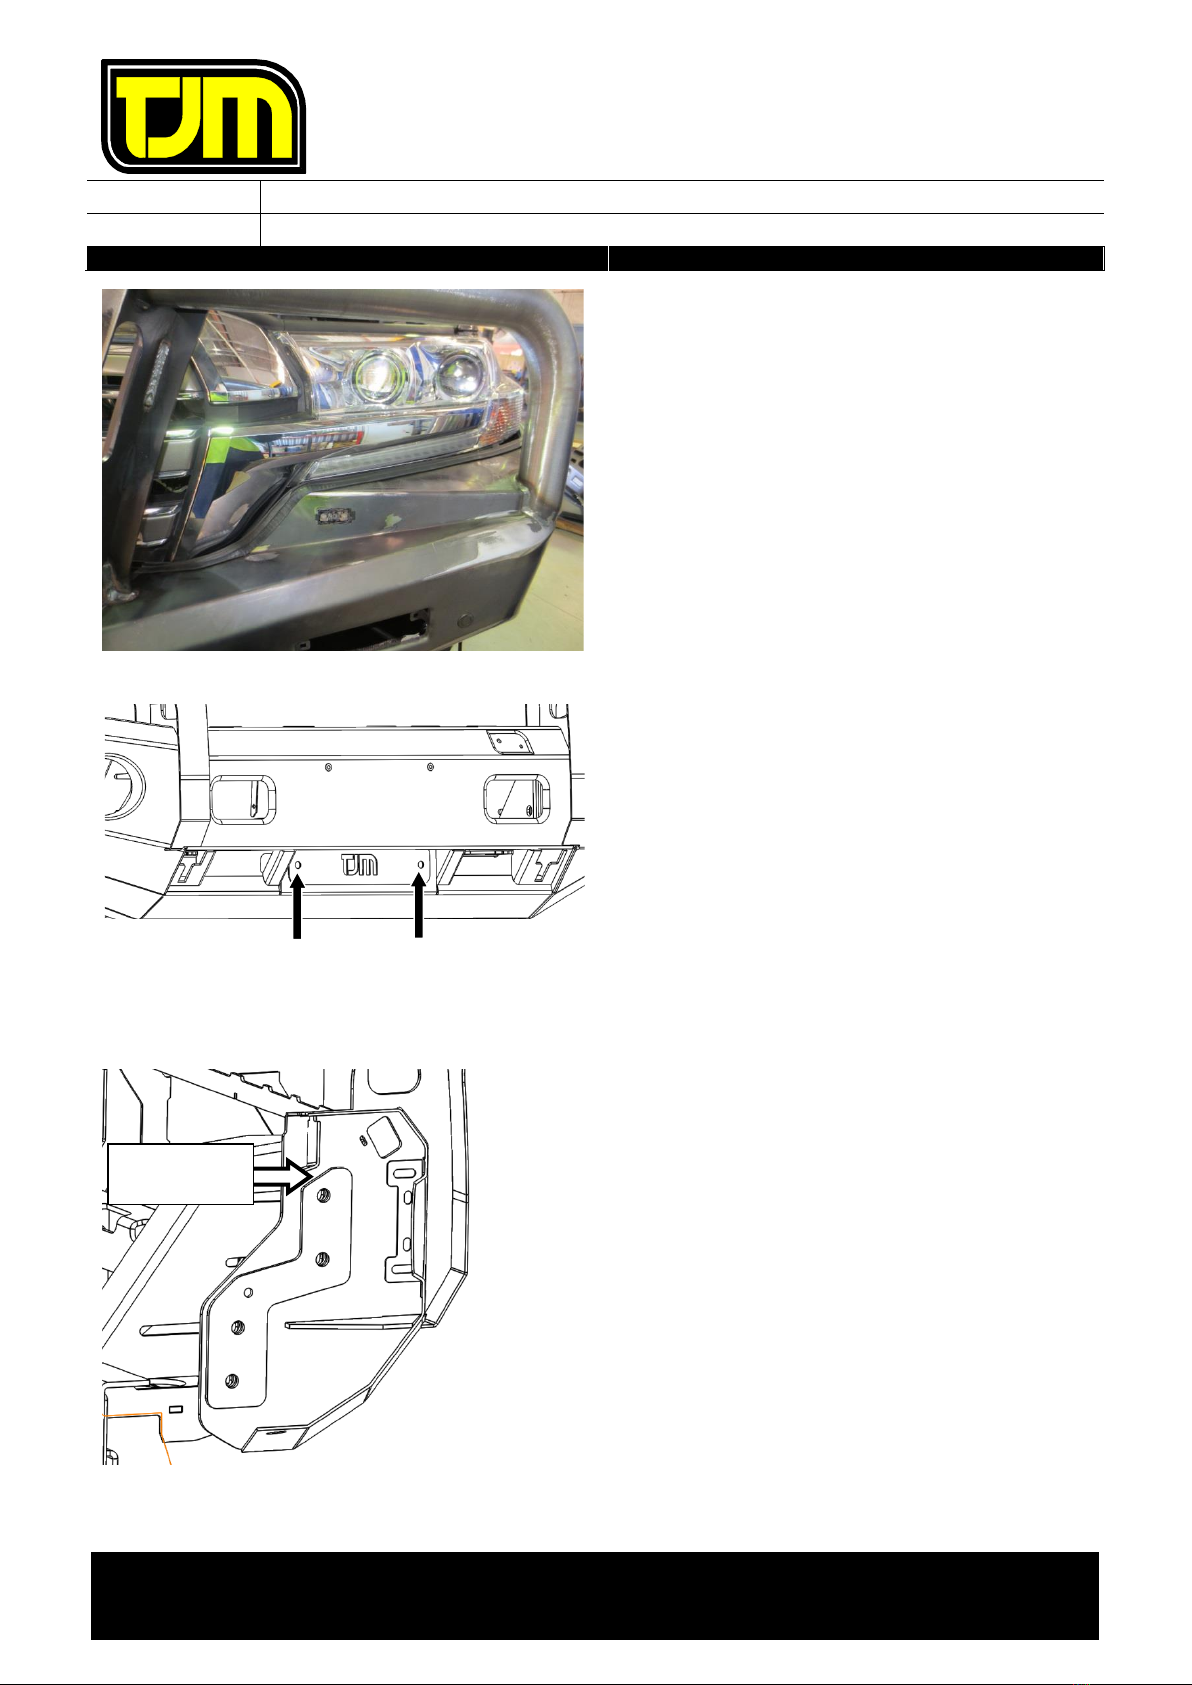
30. Remove the grille support mount by
drilling out the spot welds in the locations
shown.
Drill two
places
Remove bolt
FITTING INSTRUCTIONS
Product:
T13 Outback Frontal Protection System
Vehicle:
Toyota LandCruiser 200
Part No.
070SB13N82C
For product warranty please refer to our website www.tjm.com.au
File: F-11094.docx
Page 12 of 25
20/10/2022
31. Fit new bumper support bracket
(F-10478) to the grille support using an
M6 x 20mm hex bolt (1) M6 x Ø12.5mm
flat washers (1) and M6 flange nut (1) in
the front location only.
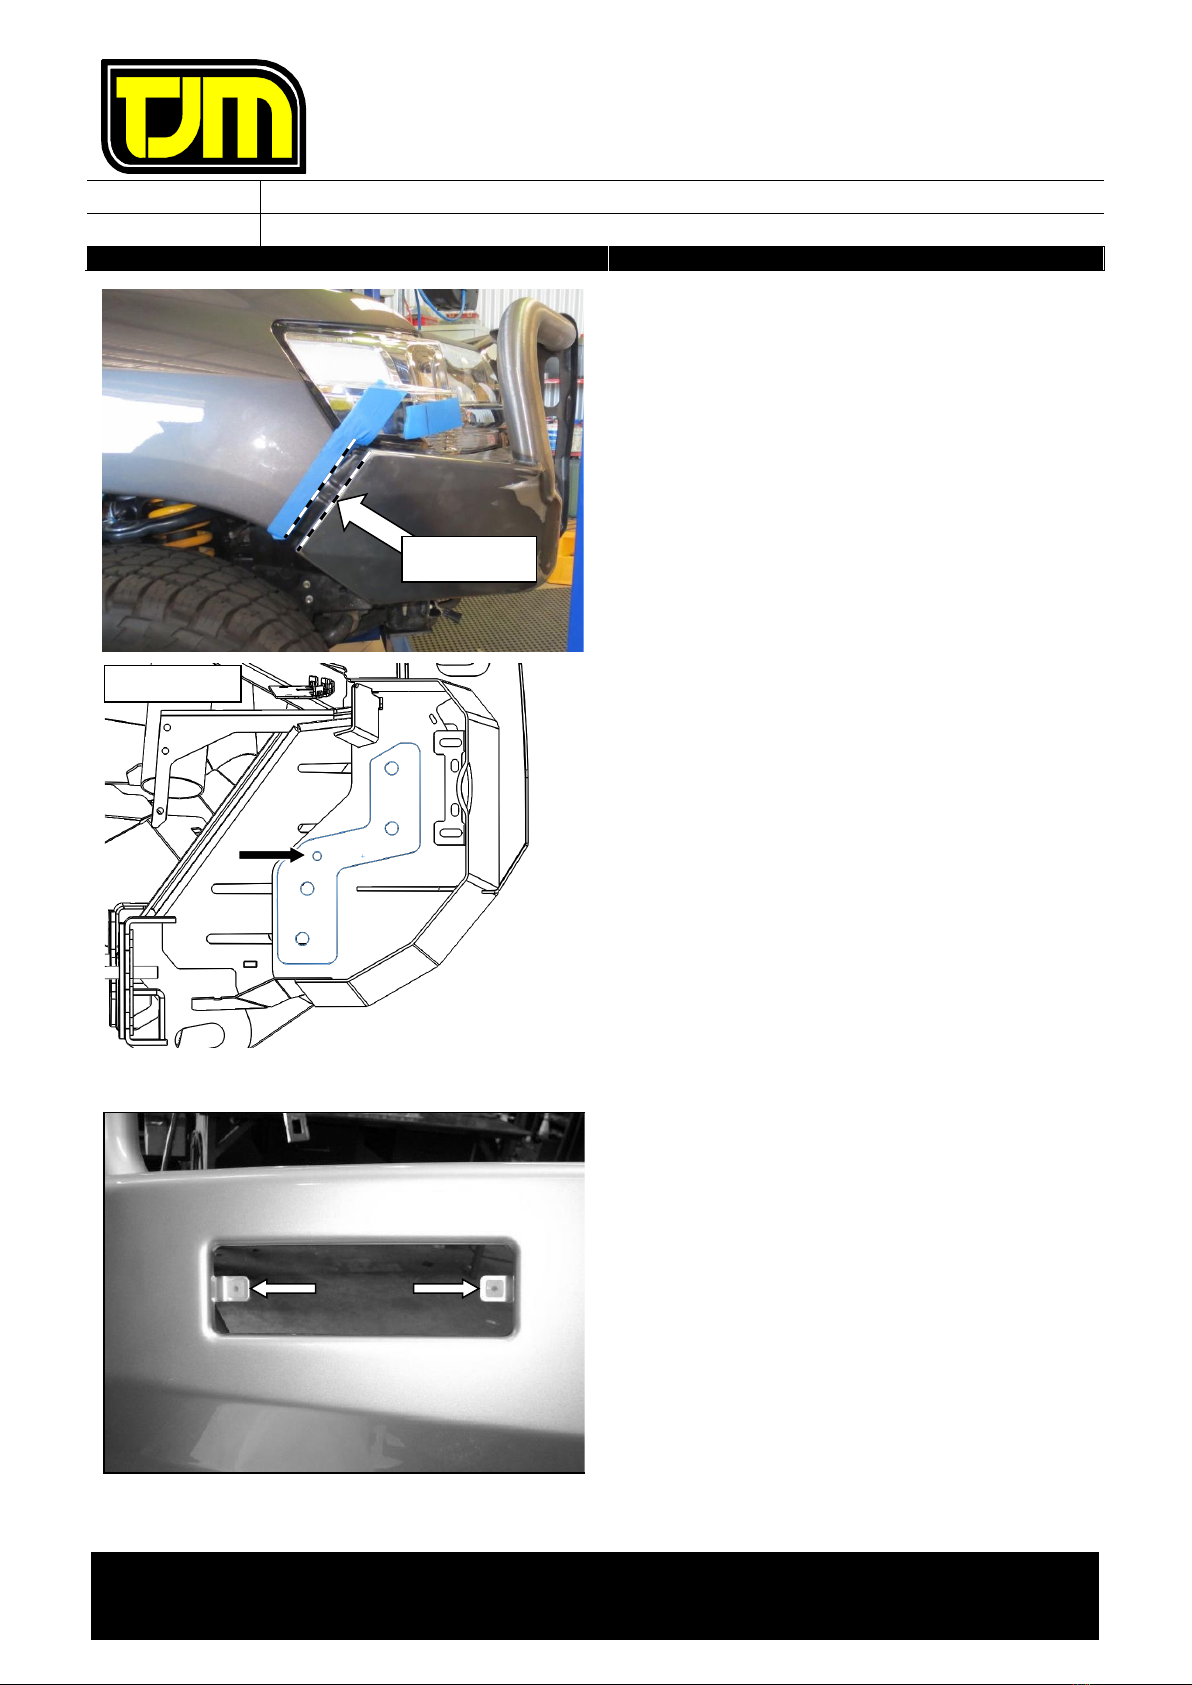
32. Using the new bumper support bracket as
a template, mark the 2 new hole positions
in the radiator support.
Ensure the upper and lower holes
are used.
33. Also, mark the lower section of the
radiator support that requires trimming.
34. Remove (& retain) the grille and the grille
mount bracket in one piece.
35. Remove (& retain) the new bumper
support bracket and fastener. Drill new
hole positions.
36. Trim lower section of the radiator support
marked in step 33.
37. De-burr all new edges, clean any swarf
from the areas and apply rust
preventative to exposed surfaces.
38. Fit new bumper support using M6 x 20
hex bolts (3) M6 x Ø12.5mm flat washers
(3) and flange nuts (3). Tension the
fasteners to the specified torque settings
listed on page 1.
Step 33
Step 32

FITTING INSTRUCTIONS
Product:
T13 Outback Frontal Protection System
Vehicle:
Toyota LandCruiser 200
Part No.
070SB13N82C
For product warranty please refer to our website www.tjm.com.au
File: F-11094.docx
Page 13 of 25
20/10/2022
39. Refer to the winch fitting instructions to
bolt the winch into winch frame.
Note: TJM winch can have control
box mounted in standard position.
Others may have to relocate.
40. Install the grille and bracket to the
vehicle. Fasten in place using M8 x 16mm
hex bolts (3) M8 x Ø24 flat washers (3)
and M8 flange nuts (3).
41. Position the chassis rail mounting block
(F-9132) in the chassis rail through the
rectangular opening as shown.
Ensure that the threaded hole is
positioned away from the center-
line of the vehicle (closest to
outside).
RHS SHOWN
Front

FITTING INSTRUCTIONS
Product:
T13 Outback Frontal Protection System
Vehicle:
Toyota LandCruiser 200
Part No.
070SB13N82C
For product warranty please refer to our website www.tjm.com.au
File: F-11094.docx
Page 14 of 25
20/10/2022
42. Apply Loctite 403 (or an equivalent) to a
40mm length of the M12 x 1.75 x 280mm
threaded rod, 25mm from the end, as
shown.
43. Insert the end that had the Loctite applied to
it through the large hole in the chassis rail
end & secure it into the chassis rail mounting
block that was positioned in step 41.
Ensure that there is 50-55mm of
threaded rod protruding out from the
end of the chassis rail.
44. Repeat steps 41 to 43 for the opposite side
of the vehicle.
45. Fit the chassis end spacers (F-9235) to both
of the chassis ends.
RHS SHOWN
Threaded rod
RHS SHOWN
RHS SHOWN
FITTING INSTRUCTIONS
Product:
T13 Outback Frontal Protection System
Vehicle:
Toyota LandCruiser 200
Part No.
070SB13N82C
For product warranty please refer to our website www.tjm.com.au
File: F-11094.docx
Page 15 of 25
20/10/2022
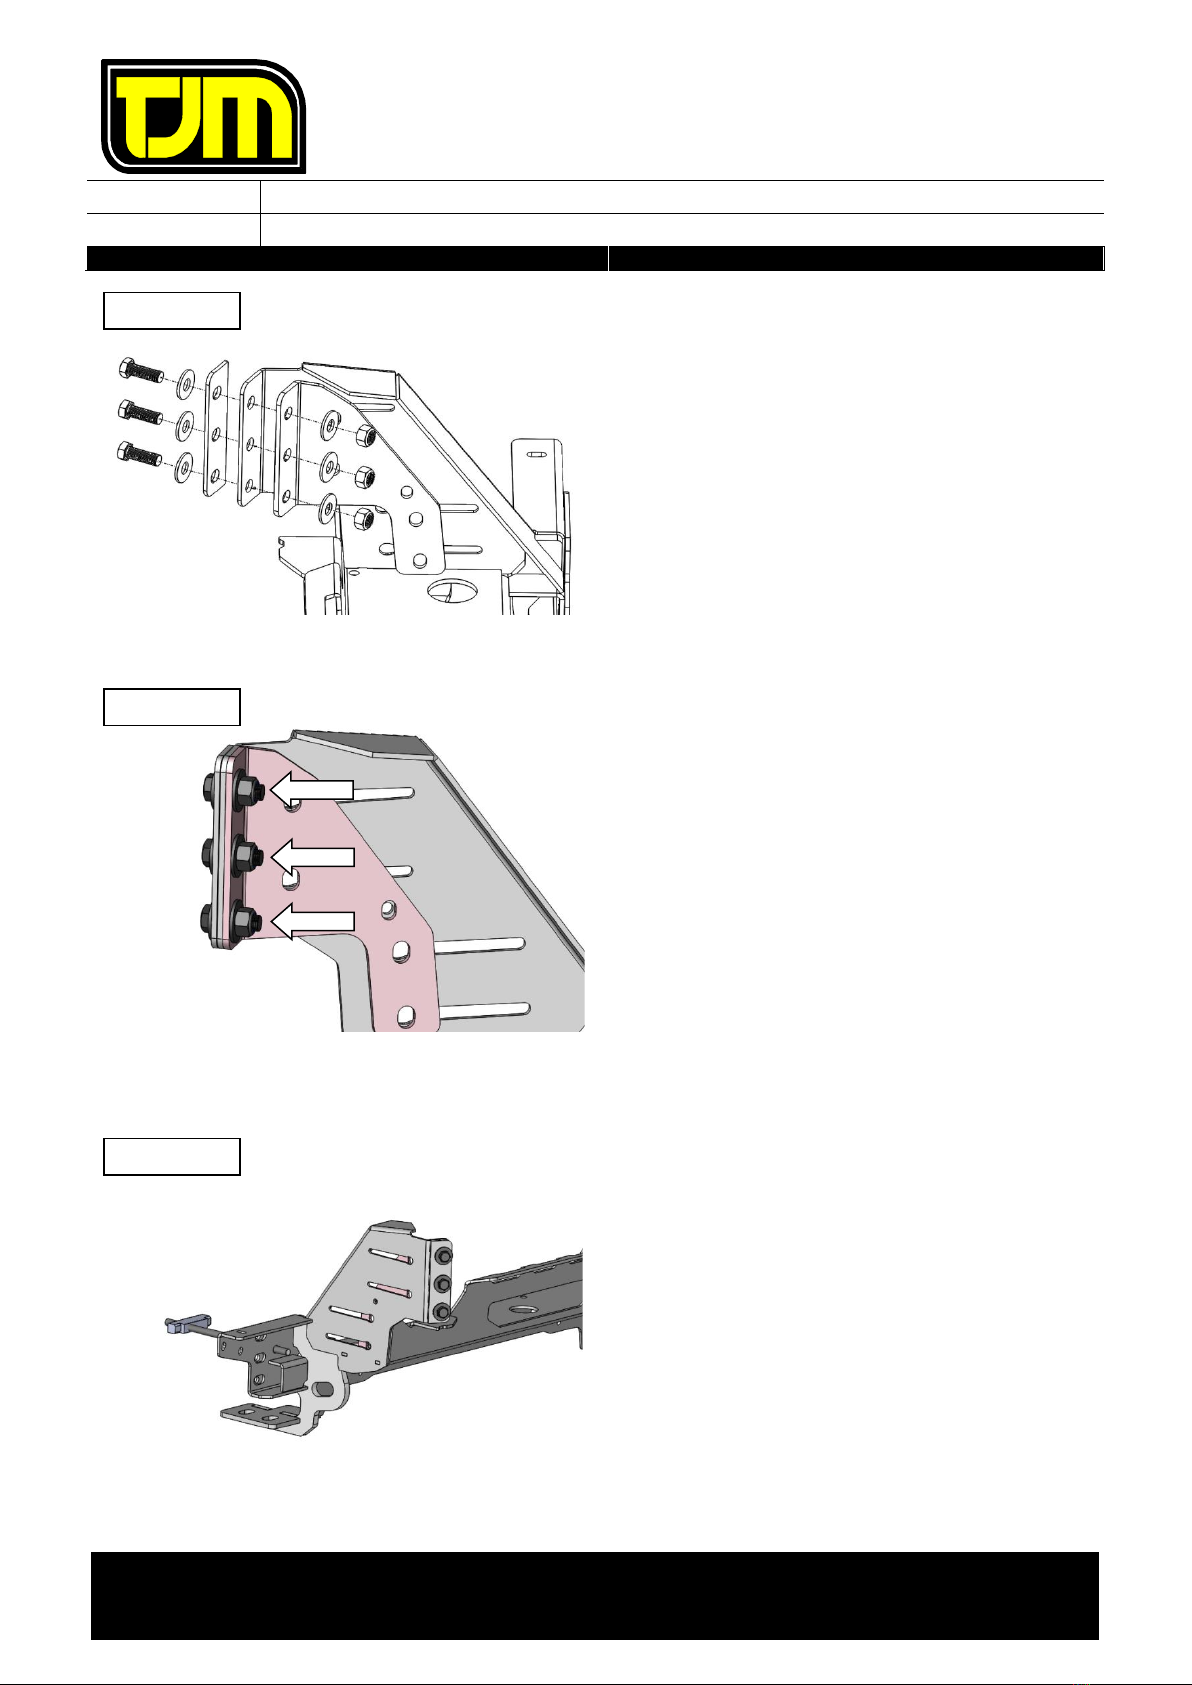
46. Assemble the bending washer plate (F-9791)
and the bending angle (F-9790R) on to the
winch frame (F-9260) as shown. Align edges
of all plates and fasten in place using
M12 x 35mm hex bolts (3), M12 x Ø32mm
flat washers (6) and M12 x 1.25 nyloc
nuts (3).
47. Repeat for the opposite side and tension the
fasteners to the specified torque settings
listed on page 1.
48. Carefully lift the winch frame into position
over the captive studs in the end of the
chassis rail.
Note: If a winch is to be fitted, the
winch must be fitted to the winch
frame before the winch frame is fitted
to the chassis.
RHS SHOWN
RHS SHOWN
RHS SHOWN

FITTING INSTRUCTIONS
Product:
T13 Outback Frontal Protection System
Vehicle:
Toyota LandCruiser 200
Part No.
070SB13N82C
For product warranty please refer to our website www.tjm.com.au
File: F-11094.docx
Page 16 of 25
20/10/2022
49. Secure both sides of the winch frame in place
to the captive studs, using spacer plates
(F-10308) (2) and the flange nuts (6)
retained in step 17. Only finger tighten the
fasteners at this point until the winch frame
has been centralized to the vehicle.
50. Secure the inner stud located on both sides
of the chassis mount using M10 x Ø30mm
flat washers (2) and the remaining flange
nuts (2) retained in step 17.
51. Position the tow point washer plate
(F-11067) on the underside of the chassis
mount, then secure the chassis mount in
place, using M12 x 45mm hex bolts (2), M12
spring washers (2) and M12 x Ø32mm flat
washers (2). Repeat on opposite side.
52. Secure both sides of the chassis mount in
place to the M12 x 1.75 x 280mm threaded
rod, using M12 x Ø24mm flat washer, M12
spring washer & M12 x 1.75mm hex nut.
Repeat on opposite side.
RHS SHOWN
RHS SHOWN
Step 49
Step 50

FITTING INSTRUCTIONS
Product:
T13 Outback Frontal Protection System
Vehicle:
Toyota LandCruiser 200
Part No.
070SB13N82C
For product warranty please refer to our website www.tjm.com.au
File: F-11094.docx
Page 17 of 25
20/10/2022
53. Centralize the winch frame to the vehicle by
measuring diagonally from mount tip to
headlamp corner as shown, equalize
dimensions as close as practical.
54. Tension all fasteners fitted in steps 49 to 52
to the specified torque settings listed on
page 1.
55. Wire winch at this point if being installed.
56. Refit the grille into the grille mount bracket
and fasten using the original bolts (3) along
the top of the grille removed in step 5.
If an optional fog light kit has been purchased,
install it now, referring to the fitting
instructions provided with the kit.
Otherwise, follow the below steps to install
the provided fog light blanking covers.
57. Sandwich the fog light mounting bracket
between the fog light washer plates.
58. Position the fog light blanking cover, as
shown opposite.
59. Using M6 x 1.0 x 20mm hex head screws (4),
M6 x Ø12.5mm flat washers (4), and M6 x
1.0 flange nuts (4), secure the fog light
blanking cover to the fog light mounting
bracket.
60. Repeat the previous three steps for the
opposite side of the vehicle.

FITTING INSTRUCTIONS
Product:
T13 Outback Frontal Protection System
Vehicle:
Toyota LandCruiser 200
Part No.
070SB13N82C
For product warranty please refer to our website www.tjm.com.au
File: F-11094.docx
Page 18 of 25
20/10/2022
61. If headlamp washers are fitted, remove them
from bumper and refit in FPS in the provided
cutouts. If not, fit blanks from supplementary
kit (purchased separately).
To remove washer assemblies:
I. Extend washer by carefully pulling on
front cover.
II. Holding by the stem carefully remove the
cover from the stem.
III. Remove the metal clip shown from the
rear of the washer, slide the housing
apart and gently remove the washer from
the bumper.
62. If parking sensors are fitted, remove them
from bumper and refit in the same
orientation in FPS. If not, fit blanks from
supplementary kit (purchased separately).
63. Remove parking sensor / fog-light wiring
loom and headlight washer tubing from
original bumper if fitted, and fit to FPS. Feed
ends from center outwards through cutouts
provided, to keep plugs and joiners in center
on LH side as shown.
64. Secure the wiring and tubing to the FPS so
no damage can occur and connect the
sensors and washers.
RHS SHOWN
FITTING INSTRUCTIONS
Product:
T13 Outback Frontal Protection System
Vehicle:
Toyota LandCruiser 200
Part No.
070SB13N82C
For product warranty please refer to our website www.tjm.com.au
File: F-11094.docx
Page 19 of 25
20/10/2022
65. If optional pinch weld kit is purchased, fit
now to both sides of the FPS.
66. Fit the fairlead cover plate (F-11096) to the
FPS if a winch has not been fitted; using
M10 x 1.5 x 25mm button head screws (2),
M10 x Ø21mm flat washers (4) and
M10 x 1.5 nyloc nuts (2).
67. With the assistance of another person,
carefully lift the FPS into position on the
chassis mount, then loosely secure it in
place, using the sliding washer plate
(F-9792) and M12 x 40mm hex bolts (4),
M12 x Ø32mm flat washers (8) & M12 x 1.25
nyloc nuts (4) at the indicated locations.
Repeat for the opposite side of the vehicle.
IMPORTANT: SLIDING WASHER
PLATE MUST BE ORIENTATED
CORRECTLY AS SHOWN!
CHAMPHER
TO TOP
FITTING INSTRUCTIONS
Product:
T13 Outback Frontal Protection System
Vehicle:
Toyota LandCruiser 200
Part No.
070SB13N82C
For product warranty please refer to our website www.tjm.com.au
File: F-11094.docx
Page 20 of 25
20/10/2022
68. Adjust the FPS so it is level & that there is a
minimum 20mm gap between the wings and
vehicle guards then tension the fasteners to
the specified torque settings listed on page 1.
The minimum clearance between the
wings and guards must be maintained
to prevent clashing during off-road
driving.
69. Once the bar is set in position. Use the
indicated hole in the sliding washer plate as a
guide and drill an Ø8mm hole through the
mounts in both sides of the vehicle. Try to
keep drill square to align with holes in winch
frame.
70. De-burr all new edges, clean any swarf from
the areas and apply rust preventative to
exposed surfaces.
71. Secure through the holes drilled in step 69
using M8 x 1.25 x 35mm hex screws (2),
M8 x Ø24 flat washers (4) & M8 x 1.25 nyloc
nuts (2).
72. Tension the fasteners to the specified torque
settings listed on page 1.
73. Insert the nylon plugs supplied, into the
square cut-outs for the indicator / park lights
(as shown).
RHS SHOWN
20mm gap
Other manuals for T13
8
This manual suits for next models
1
Table of contents
Other TJM Automobile Accessories manuals


