TJM 070SB13F69G User manual

FITTING INSTRUCTIONS
Product:
Outback & Fleet Frontal Protection System
Vehicle:
Toyota 70 Series 09+
Part No.
Ente 070SB13F69G 070SB13L69G
070SB13O69G
070SB15W69G
070SB15Z69G
For further information contact T.J.M. Head Office on (07) 3865 9999. Distributors Australia wide.
File: 88700
Page 1 of 12
22/08/2017
Australian Standards Relating to Installing Vehicle Frontal Protection Systems (VFPSs): AS 4876.1-2002
a) Do not attach a V.F.P.S. to a vehicle using anchorages not intended for this purpose (e.g. engine mounting bolts), other than those
specified by the V.F.P.S. manufacturer in this instruction.
b) Do not use this product for any vehicle make or model other than those specified by the V.F.P.S. manufacturer (as above).
c) Do not remove any plaques or labels from the V.F.P.S.
d) Do not modify the structure of the V.F.P.S. in any way.
Warranty
1. If any product or part of a product manufactured by TJM is found to be defective during a period of three (3) years after the date of purchase,
TJM shall repair (at TJM’s discretion) the defective product or part.
2. Any defect in a product distributed by TJM, but not manufactured by TJM, shall be dealt with in accordance with, and to the extent of, the
warranty offered by the manufacturer of that product.
3. TJM does not warrant that the products manufactured by it comply with the laws of the place where those products are purchased or used. It is
the sole responsibility of the purchaser to ascertain whether products being purchased, or the affixation of those products to any other object,
comply with local laws.
4. Except to the extent described in this warranty, TJM shall not be liable for any other claims, including claims arising from incorrect fitment,
product or vehicle modification, faulty design, the use of the product on any indirect special or consequential damage or injury to any person,
company or other entity.
5. Modification or alteration to any product manufactured by TJM to enable fitment in conjunction with other vehicle accessories or modifications
(e.g. lift kits) will void any warranty claims.
070SB13L69G SHOWN
Bolt tensions
Dia. (mm)
Nm
ft.lbs
Dia. (inch)
Nm
ft.lbs
All bolt tensions
are as follows
unless otherwise
pecified.
5
5
4
1/4”
9
7
6
9
7
5/16”
22
15
8
22
16
3/8”
33
27
10
44
32
7/16”
55
43
12
77
57
1/2”
86
66
FITTING INSTRUCTIONS
Product:
Outback & Fleet Frontal Protection System
Vehicle:
Toyota 70 Series 09+
Part No.
Ente 070SB13F69G 070SB13L69G
070SB13O69G
070SB15W69G
070SB15Z69G
For further information contact T.J.M. Head Office on (07) 3865 9999. Distributors Australia wide.
File: 88700
Page 2 of 12
22/08/2017
* Left hand and Right hand components are determined as seated in the vehicle.
Description
Fleet
Qty
Part Number
Deluxe
Qty
BOLT KIT
10g x 3/4 Screw
2
K0763
2
M5 x 0.8 x 12 Pan Head Screw
2
K3082
2
M6 x 1.0 x 12mm Pan Head Screw
0
K3273
2
M6 x 1.0 x 16mm Button head bolt
0
K1630
4
M6 x 1.0 x 16mm Hex head bolt
0
K1232
10
M6 x 1.0 x 20mm Hex head bolt
2
K0550
5
M6 x 1.0 Flange nut
0
K3033
11
M6 Spring washer
2
K0915
11
M6 x Ø12.5mm Flat washer
2
K0897
21
M8 X 1.25 X 16 Hex Screw
1
K0767
1
M8 x 19 x 18G ZP Flat Washer
1
K0628
1
M8 x 1.25 Flange Nut
1
K3035
1
M10 x 1.25 x 25mm Hex head bolt
4
K0563
4
M10 x 1.25 x 30mm Hex head screw
6
K0564
6
M10 Spring washer
10
K0621
10
M10 Flat washer (large)
10
WSST-W13
10
M12 x 1.25 x 130mm Hex head bolt
2
K2957
2
M12 x 1.25 Hex nut
2
K0581
2
M12 Spring washer
2
K0977
2
1/2" Flat washer
4
K0623
4
Nylon plug
6
K0665
6
Fog light washer plate
0
88057
2
Fog light angle bracket
0
87706
2
Ø24 x 5mm Spacer (to suit M8)
0
MTST-Q205
1
Relay Bracket
0
F-2392
1
70 Series Kill Switch Bracket
1
F-2715
1
FITTING KIT
Guard
0
88579
1
Fairlead Recess Cover
0
88593
1
Winch cover plate with nutserts
1
F-10694
0
COMPONENT KIT
Fog Light Kit
0
92102
1
Toyota Fog Light Switch
0
92272
1
Indicator / Park Light
2
92600
2
FACTORY FITTED
Winch Slot Cover Insert
1
92106
1

FITTING INSTRUCTIONS
Product:
Outback & Fleet Frontal Protection System
Vehicle:
Toyota 70 Series 09+
Part No.
Ente 070SB13F69G 070SB13L69G
070SB13O69G
070SB15W69G
070SB15Z69G
For further information contact T.J.M. Head Office on (07) 3865 9999. Distributors Australia wide.
File: 88700
Page 3 of 12
22/08/2017
* Check for (and remove) any build up in all captive nuts fitted to the FPS.
1. Read instructions fully before
commencing fitment.
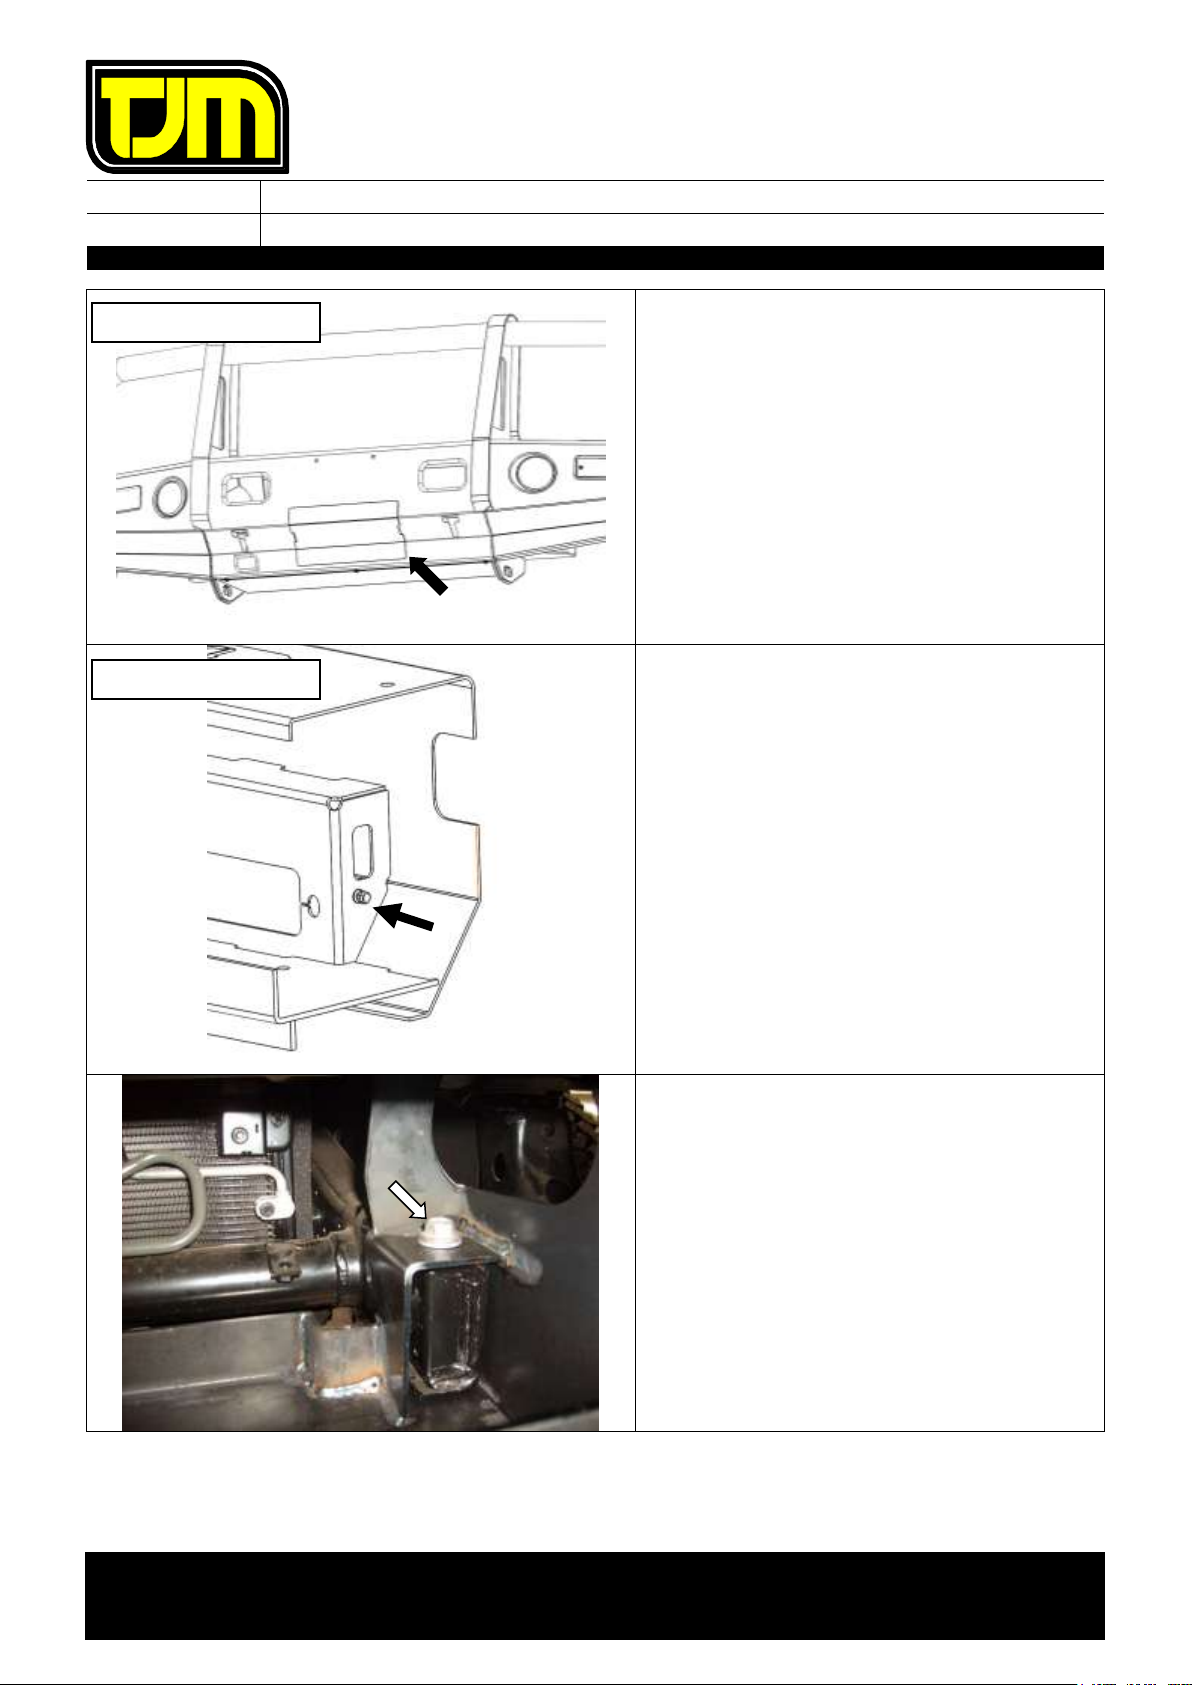
2. To remove the bumper; on the left
hand and right hand side, remove and
discard the main centre bolt which
secures the bumper to the chassis rail.
The centre bolts can be removed
with the bumper in place. To do
this, angle the bolts towards the
front of the bumper whilst lifting the
bolts. If this is unable to be
achieved, disassembly of the
bumper may be required.
3. On the left hand and right hand side,
remove and discard the 4 outer bolts
securing the bumper to the chassis.
4. Remove the bumper.
Step 5 only applies if a Deluxe FPS
is being fitted. If fitting a Fleet FPS,
please proceed to step 6.
5. Remove the tow lug from the vehicle.
Discard the tow lug and fasteners.
Tow Lug
RH SHOWN

FITTING INSTRUCTIONS
Product:
Outback & Fleet Frontal Protection System
Vehicle:
Toyota 70 Series 09+
Part No.
Ente 070SB13F69G 070SB13L69G
070SB13O69G
070SB15W69G
070SB15Z69G
For further information contact T.J.M. Head Office on (07) 3865 9999. Distributors Australia wide.
File: 88700
Page 4 of 12
22/08/2017
6. Insert the nylon plugs supplied into the
square cutouts for the indicators and
also into the square cutouts in the
front face of the FPS for the number
plate.
7. Install the indicator / park light wiring
looms to the vehicle.
Steps 8 through to 18 only apply if a
Deluxe FPS is being fitted. If fitting
a Fleet FPS, please proceed to step
19.
8. Check that all parts for fog light
installation have been supplied.
9. Install the fog light wiring loom and the
Toyota fog light switch to the vehicle.
10.Connect the wiring loom to the fog
lights and check the operation of the
fog-lights, then disconnect and tie up
the loom.
If fitting to a V6 Petrol variant,
secure the Relay Brackets to the
O.E Battery J-Bolt by following
Steps 11-14.
11.Secure each relay to the relay bracket,
using an M6 x 1.0 x 12mm pan head
screw (1), M6 x Ø12.5mm flat washer
(1) & M6 spring washer (1).
070SB13L69G SHOWN

FITTING INSTRUCTIONS
Product:
Outback & Fleet Frontal Protection System
Vehicle:
Toyota 70 Series 09+
Part No.
Ente 070SB13F69G 070SB13L69G
070SB13O69G
070SB15W69G
070SB15Z69G
For further information contact T.J.M. Head Office on (07) 3865 9999. Distributors Australia wide.
File: 88700
Page 5 of 12
22/08/2017
12.Position a Ø24 x 5mm spacer washer
(MTST-Q205) on the top of the battery
tray J-bolt.
13. Position the relay bracket (with relays
attached) on top of the spacer washer,
that was installed in the previous step.
14. Secure the relay bracket in place,
using an M6 x 1.0 flange nut.

FITTING INSTRUCTIONS
Product:
Outback & Fleet Frontal Protection System
Vehicle:
Toyota 70 Series 09+
Part No.
Ente 070SB13F69G 070SB13L69G
070SB13O69G
070SB15W69G
070SB15Z69G
For further information contact T.J.M. Head Office on (07) 3865 9999. Distributors Australia wide.
File: 88700
Page 6 of 12
22/08/2017
15.Attach the fog light angle bracket to
the fog lights using two M6x16mm hex
bolts, M6 x Ø12.5mm flat washers and
M6 flange nuts as shown.
16.Attach the fog light to the bar using
two M6x16mm hex bolts, M6 x
Ø12.5mm flat washers and M6 flange
nuts and one fog light washer plate as
shown. Repeat for the other side.
17.Using two M6x16mm button head
screws, two M6 x Ø12.5mm flat
washers and two M6 spring washers
attach the adjustable side to the bull
bar. Access the button head screws
through the cutout in the mount.
Position washer
plate underneath

FITTING INSTRUCTIONS
Product:
Outback & Fleet Frontal Protection System
Vehicle:
Toyota 70 Series 09+
Part No.
Ente 070SB13F69G 070SB13L69G
070SB13O69G
070SB15W69G
070SB15Z69G
For further information contact T.J.M. Head Office on (07) 3865 9999. Distributors Australia wide.
File: 88700
Page 7 of 12
22/08/2017
18.Adjust the fog lights so they are
positioned in the center of the pressing
and are projecting forward.19
19.Separate the indicator / park light body
from the backing plate.
20.Secure the backing plate to the FPS,
using the screws provided with the
light assemblies.
21.Supporting the backing plate, re-fit
(clip) each indicator / park light body
(ensuring that an adequate seal is
achieved.
22.If a winch is to be fitted, fit it now
following the instructions supplied with
the winch.
During winch installation, refer to
Steps 23-29 for installation of the
specially designed, 70 Series Kill
Switch Bracket (F-2715) and the Kill
Switch (Supplied with Winch).
If a Deluxe FPS is being fitted, use
the 6 holes in the rear of the winch
frame to secure the winch wiring.
23. Carefully remove and retain the TJM
ON/OFF sticker.
070SB13L69G SHOWN

FITTING INSTRUCTIONS
Product:
Outback & Fleet Frontal Protection System
Vehicle:
Toyota 70 Series 09+
Part No.
Ente 070SB13F69G 070SB13L69G
070SB13O69G
070SB15W69G
070SB15Z69G
For further information contact T.J.M. Head Office on (07) 3865 9999. Distributors Australia wide.
File: 88700
Page 8 of 12
22/08/2017
24. Using a Phillips Head Screw Driver,
release and retain the screw securing
the Kill Switch Knob to the Kill Switch.
25. Using a Phillips Head Screw Driver,
release and discard the screws and
bracket fastening the Kill Switch to the
bracket supplied with the winch.
26. Secure the 70 Series Kill Switch
Bracket (F-2715) to the radiator mount
bracket using M8 x 1.25 x 16 Hex
Screw (1), M8 x 19 x 18G Flat Washer
(1) and M8 x 1.25 Flange Nut as
shown.
Tip: Fasten the Flange Nut on
the top side of the bracket.

FITTING INSTRUCTIONS
Product:
Outback & Fleet Frontal Protection System
Vehicle:
Toyota 70 Series 09+
Part No.
Ente 070SB13F69G 070SB13L69G
070SB13O69G
070SB15W69G
070SB15Z69G
For further information contact T.J.M. Head Office on (07) 3865 9999. Distributors Australia wide.
File: 88700
Page 9 of 12
22/08/2017
27. Secure the Kill Switch to the 70
Series Kill Switch Bracket (F-2715)
using M5 x 0.8 x 12 Pan Screws (2).
28. Secure the Kill Switch Knob to the Kill
Switch using the pan head screw
removed previously in Step 24
29. Secure the TJM ON/OFF Sticker to
the Kill Switch Knob using the sticker
previously removed in Step 23.
FITTING INSTRUCTIONS
Product:
Outback & Fleet Frontal Protection System
Vehicle:
Toyota 70 Series 09+
Part No.
Ente 070SB13F69G 070SB13L69G
070SB13O69G
070SB15W69G
070SB15Z69G
For further information contact T.J.M. Head Office on (07) 3865 9999. Distributors Australia wide.
File: 88700
Page 10 of 12
22/08/2017
Step 30 only applies if a Deluxe FPS
is being fitted. If fitting a Fleet FPS,
please proceed to Step 32.
30.If no winch is to be fitted, place the
fairlead cover plate (88593) in position
(as shown) and secure it in place
using M6 x 1.0 x 16mm bolts (2), M6 x
Ø12.5mm flat washers (2) and M6
flange nuts (2).
Step 31 only applies if a Fleet FPS
is being fitted. If fitting a Deluxe
FPS, please proceed to Step 32.
31.If no winch is to be fitted, place the
winch cover plate with nutserts
(F-10694) in position and secure it in
place using M6 x 1.0 x 20mm bolts (2),
M6 spring washers (2) and M6 x
Ø12.5mm flat washers (2) as shown.
32.Slide the FPS over the vehicle's
chassis rails. Then, on the left hand
and right hand side, secure the FPS in
place to the chassis rail using M12 x
1.25 x 130mm bolts, nuts, spring
washers and 1/2" flat washers (finger
tighten only).
Ensure that proper lifting safety
procedures are adhered to when
lifting this product.
070SB13L69G SHOWN
070SB13F69G SHOWN

FITTING INSTRUCTIONS
Product:
Outback & Fleet Frontal Protection System
Vehicle:
Toyota 70 Series 09+
Part No.
Ente 070SB13F69G 070SB13L69G
070SB13O69G
070SB15W69G
070SB15Z69G
For further information contact T.J.M. Head Office on (07) 3865 9999. Distributors Australia wide.
File: 88700
Page 11 of 12
22/08/2017
33.Loosely secure both sides of the FPS
in place, at the indicated positions,
using the fasteners listed below:
33.1. M10 x 1.25 x 30mm hex screws
(4), M10 spring washers (4) &
M10 x Ø30mm flat washers (4).
33.2. M10 x 1.25 x 25mm hex bolts
(4), M10 spring washers (4) &
M10 x Ø30mm flat washers (4).
34.Loosely secure both sides of the FPS
to the chassis rail, at the indicated
positions, using M10 x 1.25 x 30mm
hex screws (2), M10 spring washers
(2) & M10 x Ø30mm flat washers (2).
35.Align the FPS with the vehicle. Once
satisfied, tighten all fasteners.
36.Secure the vehicle number plate to the
FPS through the nylon plugs using
10g x 3/4" screws.
070SB13L69G SHOWN
070SB13L69G SHOWN
STEP 33.1
STEP 33.2

FITTING INSTRUCTIONS
Product:
Outback & Fleet Frontal Protection System
Vehicle:
Toyota 70 Series 09+
Part No.
Ente 070SB13F69G 070SB13L69G
070SB13O69G
070SB15W69G
070SB15Z69G
For further information contact T.J.M. Head Office on (07) 3865 9999. Distributors Australia wide.
File: 88700
Page 12 of 12
22/08/2017
Step 37 only applies if a Deluxe FPS
is being fitted. If fitting a Fleet FPS,
please proceed to Step 38.
37.Place the guard in position (as shown)
and secure it place through the
indicated positions into the captive
nuts using M6 x 1.0 x 20mm bolts, M6
x Ø12.5mm flat washers and M6
spring washers.
38.Connect all wiring looms to the
relevant light assemblies. Place the
winch slot cover in place in the winch
viewing hole.
39.Ensure that all fasteners are tightened
to the appropriate tensions and that,
as a result of fitting the FPS, no
vehicle components are crushed or
will chafe
40.Check the operation of the indicators,
park lights, and winch (if installed) to
ensure that they are functioning
correctly.
070SB13L69G SHOWN
This manual suits for next models
4
Other TJM Automobile Accessories manuals


Popular Automobile Accessories manuals by other brands


Beeper
Beeper RW075LDV User& installer's manual

Thule
Thule Xpress 970 instructions

Federal Signal Corporation
Federal Signal Corporation Legend LGD Installation, operation and service manual

F.lli Menabo
F.lli Menabo NAOS Fitting instructions

Toyota
Toyota PZ420 I0291 ME owner's manual

Hirschmann
Hirschmann AUTA 4000 F 420 L installation instructions


