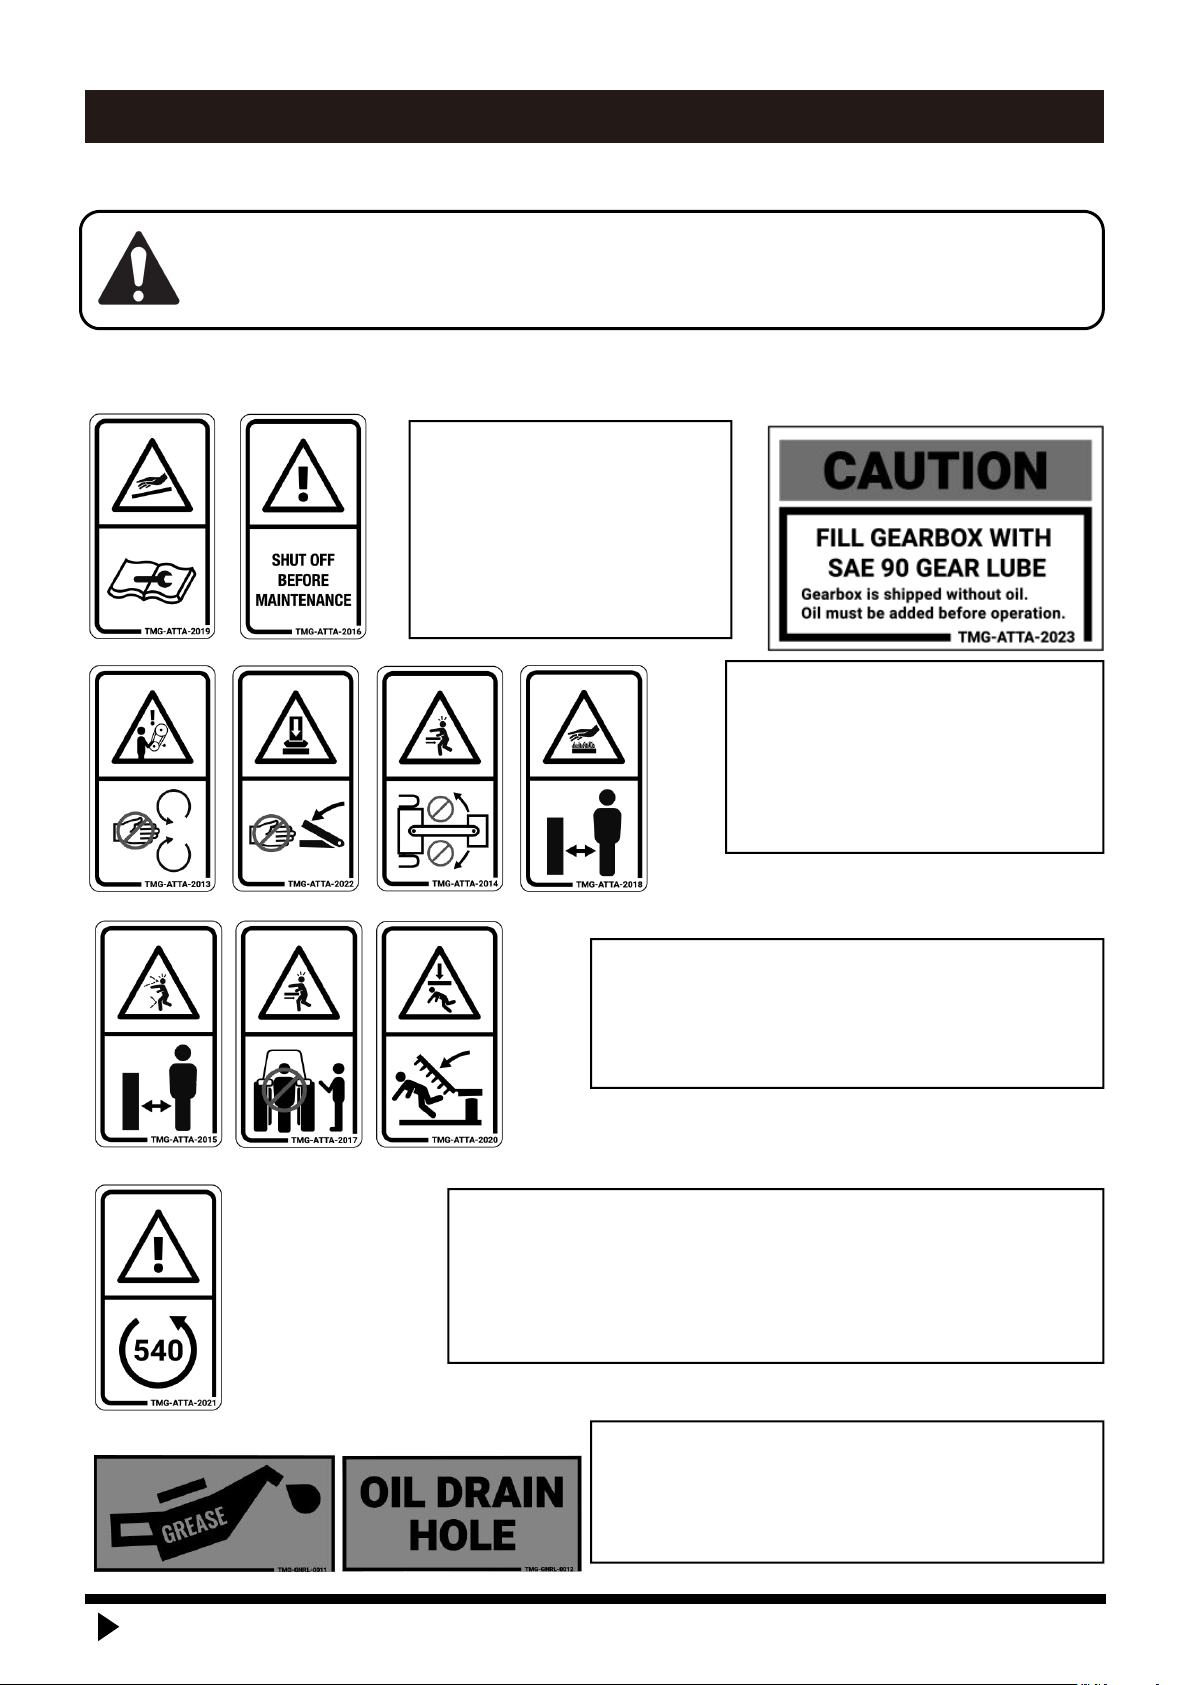
TMG TMG-TSB65 User manual

MODEL TMG-TSB65
65” 3-POINT TRACTOR STONE
BURIER
www.tmgindustrial.com Toll Free:1-877-761-2819
PRODUCT MANUAL
V2022.03.07
Please read and understand the product manual completely before assembly
Check against the parts list to make sure all parts are received
Wear proper safety goggles or other protective gears while in assembly
Do not return the product to dealer. They are not equipped to handle your requests.
Missing parts or questions on assembly?
Please call: 1-877-761-2819 or email: cs@tmgindustrial.com

TABLE OF CONTENTS
SAFETY INSTRUCTIONS ...........................................................................................................................3
OPERATING SAFETY ..............................................................................................................................4
PARTS DESCRIPTION AND FUCTION.........................................................................................................7
PRODUCTS SPECIFICATIONS.....................................................................................................................9
UNPACKING & ASSEMBLY .......................................................................................................................10
CONNECTING TRACTOR ..........................................................................................................................17
CHECK BEFORE OPERATING.....................................................................................................................22
LUBRICATION POINTS SUMMARY ...........................................................................................................23
OPERATING ESSENTIALS .........................................................................................................................24
OPERATION FINISH ..................................................................................................................................25
MAINTENANCE SCHEDULE ............... .......................................................................................................25
TROUBLESHOOTING.................................................................................................................................26
PRODUCT PARTS LIST .............................................................................................................................27
www.tmgindustrial.com 2/35 Toll Free:1-877-761-2819

SAFETY INSTRUCTIONS
WARNING DECALS
⚠Warning!
Read and understand the
operator manual
completely before
operating your rotary tiller.
⚠Caution!
Keep hand, feet, hair and
clothing away from all moving
parts.
⚠Caution!
Keep all bystanders a safe distance away
from machine and tractor.
Before operating the ROTARY TILLER read the following safety instructions.
Failure to comply with these warnings may result in serious injury or death.
⚠Caution!
Before connecting the tractor, make sure that the speed of
the tractor is correct. If the speed is incorrect, the machine
may be damaged or human casualties may occur
⚠Caution!
Keep the driving part of the machine
lubricated
www.tmgindustrial.com 3/35 Toll Free:1-877-761-2819

OPERATING SAFETY
Failure to comply with these warnings may result in serious injury or death!
Read and understand the operator manual before operating, servicing, adjusting,
repairing or removing。
Operating before
⚠Warning
Read the instruction before operation
Failure to understand warning or caution
completely may result in injury before operation.
⚠Warning
Ensure the instruction is placed around the
machine
Don’t operate especially for you don’t know how
to operate and the instruction is not around.
⚠Warning
Don’t operate as following conditions
It may result in accidents when your body is
uncomfortable or not familiar with the
machine.
● Don’t operate as following conditions
● You can’t concentrate to operate because
of over fatigue, sick, under the influence
of drugs and other reasons.
● After drinking.
● Operator who is unskilled.
● Pregnant women and minors.
⚠Warning
Select the appropriate clothing
The uncomfortable clothing worn by operator
will result in serious injury or death.
Please operate according to a hint of clothing
● Not wear a big jacket and trousers
● The sleeves and hems cannot too big.
● Wear safety helmets
● Don’t wear in headscarf or towel .
⚠Warning
Lend out the machine
It’s very important to give operating instructions
to the borrowers and advise detailed information
of warning decals and operating notes.
⚠Warning
Not allow machine modification
Unauthorized modification with device and
component of other companies may weaken the
function and/or safety and could affect the life of
the equipment. Please select and use genuine
parts as per the following part list.
www.tmgindustrial.com 4/35 Toll Free:1-877-761-2819

⚠Warning
Machine start and starting
● Ensure that the rotary hoe is connected to
the tractor by three-point linkage.
● Ensure that the tractor is in neutral when it is
started. Otherwise will cause the machine
out of control and accidents.
● Ensure that PTO is cut off then start engine.
● Otherwise will injure bystanders.
● The tractor head maybe tilt and driver fall as
well as injure bystanders when machine
start under the high speed gear condition.
Please ensure the surrounding is safe, then
start machine under the lower speed gear
condition and forward.
● Keep the ventilation when start tractor
indoors, otherwise tractor exhaust may
cause poisoning.
⚠Warning
Tractor mounting operation
● Keep others away from machine and tractor
when it is running or operating.
● Carry out tractor mounting operation on a
flat or hard ground.
● Install moderate amount of weight loading
according to tractor model and keep a
stable center of gravity prior to carry out
tractor mounting operation.
⚠Warning
PTO using
● Don’t use PTO without plastic cover shell, or
you will be involved in and get injured.
● Cut the engine when dismantle the PTO
● Make sure to fix the plastic casing of chain,
or you will be involved in and get injured
● Turn to page 13 to see the specific
requirements of PTO.
⚠Warning
● Ensure to connect on the left and right brake pedal when working machines moving.
● The driver and people around will be injured if others on the tractor fall off.
● Emergency braking and turning are forbidden.
● Turning until keep the safe distance between people and blocks.
● Move slowly on the ramps and uneven road.
● Use suitable backing board on the terrain with big drop.
● Do not carry people and luggage on the working machine.
● Ensure to cut off the PTO engine when moving.
www.tmgindustrial.com 5/35 Toll Free:1-877-761-2819

⚠Danger
● Stay away from the machine during operation, or you will be injured.
● Operate abide the specified speed, or the PTO will be damaged and people will be injured.
● Do not carry people and luggage on the working machine.。
● Shift down before into the ramps. High-speed moving on the ramps will slip.
● Concentrate during operation.
● Stay away from the machine.
● Do not close to the bevel, the inclined plane operation will cause the tractor turn over, so slow down
the moving and operation speed.
● Cut off the PTO engine and stop the tractor when adjust the machine and remove the debris.
● Park the tractor on the flat field. Cut off the engine after the machine down to the ground.
After Operating
⚠Warning
Make sure to cut off the PTO and tractor
engine before cleaning.
⚠Warning
Bad treatment, Inspection unit, repair
● Maintenance according to the operating
instruction, or the machine will be damaged.
● Working with the tractor on the flat and hard
field.
● Cut off the PTO engine and stop the tractor
when adjust the machine and remove the
debris.
● Make the rack and ancillary shoring before
drilling in.
● Repair and change the hydraulic joint and hose
in time in the condition of without pressure in
the original hose.
● The dismantle protective components in order
to treat bad, instruction unit and repair should
install back. Or they will be involved in the
machine and cause the accident.
⚠Warning
● The problems of the machine will
not be found if regardless of the
inspection unit after operation.
Inspection unit carefully according
to the operating instruction.
● When using 3-point suspension to
raise the machine to do the
inspection, the machine will drop
without attention. Do the
inspection after locking the oil way
of the 3-point suspension.
During operation
www.tmgindustrial.com 6/35 Toll Free:1-877-761-2819

PARTS DESCRIPTION AND FUCTION
www.tmgindustrial.com 7/35 Toll Free:1-877-761-2819
5. Side gearbox
1. Three-point linkage
4. Gearbox
Adjusting rod
6. Net Wheel

1. Three-point linkage
Connect tractor and rotary tiller
2. R&L blade
To tilling
3. Blade axle
Drive blade to rotate.
4. Gearbox
Change the output speed of the tractor and
transmit power to the side gearbox.
5. Side gearbox
Through the driver chain transmit power from
gearbox to the blade axle.
6. Net wheel
To work on the land
Blade axle assembly
Boot
Shaft end
Boot
Spline shaft end
Shaft end
2. Blade axle
3. Blade L
4. Blade R
www.tmgindustrial.com 8/35 Toll Free:1-877-761-2819

(1) Check
Check the appearance of partial assembly and ensure whether it has flaw and damage, blade edge curl. If
has, just replace it.
(2) Assembly parts list
Ensure all parts without loss according to the explosive view.
(3) Assemble shaft end, spline shaft end, boot and blade
Install parts following the order from left to right or right to left, tighten bolt and nut. The both sides of shaft
end are installed priority then the blade.
PRODUCTS SPECIFICATIONS
Model No.
TMG-TSB65
Working width
65”
Tilling depth
4.75”
Blade quantity
32
Rotary flanges
9
Stone diameter
2.5”
PTO rotary speed
540RPM
Rotary shaft speed
208RPM
Tractor power
35-55HP
Type of drive
Chain drive
Shipping Weight
890 lb
Shipping Size
71”x42”x29”
www.tmgindustrial.com 9/35 Toll Free:1-877-761-2819

UNPACKING & ASSEMBLY
1. After unpacking, check the following components
www.tmgindustrial.com 10/35 Toll Free:1-877-761-2819

*All numbers are not part numbers in the drawings. For correct
p
a
r
t
numbers, see explosive
d
i
a
g
r
a
m.
No.
Description
Qty
No.
Description
Qty
1
Host
1
21
Hexagon bolts M12*85
1
2
Extend the lower hanging Weldment (left)
1
22
Hexagon bolts M12*35
4
3
Extend the lower hanging weldment (right)
1
23
Hexagon bolts M12*60
2
4
Left suspension plate weldment
1
24
Hexagon bolts M12*30
2
5
Right suspension plate weldment
1
25
Hexagon bolts M12*45
6
6
Suspension rear connecting plate
1
26
Lock nut M12
13
7
Drive shaft placement plate
1
27
Flat washer Ø12
25
8
Adjust Tie Rod Assembly
2
28
Large washer Ø12
2
9
R pin
4
29
Spring washer Ø12
2
10
Welding parts of left connecting arm of net
wheel
1
30
Hexagon bolts M8*25
2
11
Welding parts of the right connecting arm of
the mesh wheel
1
31
Hexagon bolts M8*50
2
12
Hexagon bolts M14*45
2
32
Flat washer Ø8
2
13
Spring pull plate
2
33
Large washer Ø8
2
14
Scraper welding Parts
1
34
Lock nut M8
2
15
Outer spherical ball bearing with seat
2
35
Ordinary nut M8
2
16
Welded parts of mesh wheel
1
36
PTO drive shaft
1
17
Lower hanging pin
2
37
Hexagon bolts M10*35
2
18
Lock pin
5
38
Flat washer Ø10
4
19
Upper hanging pin
1
39
Lock nut M10
4
20
Upper hanging spacer
1
www.tmgindustrial.com 11/35 Toll Free:1-877-761-2819

2. Installation of the roller assembly
Installation steps:
1. First install the 2 outer spherical ball bearings with seats (E1) on the shaft of the mesh wheel welding part (E9),
and then use bolts(E5), washers(E3) and lock nuts(E4) to fasten the spring pull plate (E2) and the left and right
connecting arms (E11,E12) of the mesh wheel according to the pattern shown in the figure below. pull plate
installation direction.
www.tmgindustrial.com 12/35 Toll Free:1-877-761-2819

2. When the scraper welding parts installed (E10), it is necessary to place the welding parts of the left and right
connecting arms (E11,E12)of the mesh wheel at the same height, then fasten them with bolts(E8), washer(E6), lock
nut(E7), and then install the tension spring(E17) according to the below figure.
3. Install the adjusting rod(E16) according to the style
shown in the figure right, and then fix it with the R pin (E13).
www.tmgindustrial.com 13/35 Toll Free:1-877-761-2819

Importance: All bolts are locked in place without sh
a
k
in
g
.
WARNING:
Once the assembly bolts are not fastened in place, there will be
a
b
n
o
rm
a
l noises when
the machine is
wo
r
k
in
g
.
Parts no.
Description
Specifications
Qty
E1
Outer spherical ball bearing with seat
2
E2
Spring pull plate
2
E3
Flat washer
Ø12
8
E4
Lock nut
M12
4
E5
Hexagon Bolts
M12x45
4
E6
Flat washer
Ø10
4
E7
Lock nut
M10
4
E8
Hexagon Bolts
M10x35
2
E9
Welded parts of mesh wheel
1
E10
Scraper Welding Parts
1
E11
Welding parts of the right connecting arm of the mesh wheel
1
E12
Welding parts of left connecting arm of net wheel
1
E13
R pin
2
E14
Hexagon Bolts
M8x50
2
E15
Ordinary nut
M8
2
E16
Adjusting rod
2
E17
Tension spring
2
3. Install the roller assembly to the host
www.tmgindustrial.com 14/35 Toll Free:1-877-761-2819

Installation steps:
1. Install the assembled roller assembly to the mounting hole on the host and fasten it with the bolts(C13).
2. After adjusting the length of the adjusting rod(E16) so that it can be installed on the hood, use the R pin(E13) to
fix it on the host shaft.
Importance: All bolts are locked in place without shaking.
WARNING: Once the assembly bolts are not fastened in place, there will be abnormal noises when the
machine is working.
Parts no.
Description
Specifications
Qty
C5
Spring washer
Ø12
2
C11
Spacer
2
C12
Large washer
Ø12
2
C13
Hexagon Bolts
M12x45
2
E13
R pin
2
www.tmgindustrial.com 15/35 Toll Free:1-877-761-2819

4. Suspension and dust cover installation
Installation steps:
1. Install the suspension components as shown in the figure
2. Hung the assembled components according to the hanging installation diagram on the hood, install the
suspension components of bolt hole and the gearbox bracket(F18) on the hood welded parts installation hole
alignment, then install the lower hitch-R(F23) and lower hitch-L(F24), install and tighten the bolts, flat washers and
lock nuts in turn, and finally insert the lower hanging pin and lock pin (F25 and F20).
F18
F16
F17
www.tmgindustrial.com 16/35 Toll Free:1-877-761-2819

Note: Paying attention to the different bolt lengths of the hanging weldment and the hanging assembly under
tightening extension (F6 and F5),
Note: Do not reverse the direction of the lower bracket assembly.
Importance: All bolts are locked in place without shaking.
WARNING: Once the assembly bolts are not fastened in place, there will be abnormal noises when the
machine is working.
Parts no.
Description
Specifications
Qty
F2
Suspension rear connecting plate
1
F3
Upper hanging spacer
1
F4
Flat washer
Ø12
6
F5
Full-thread hexagon bolts
M12×35
2
F6
Full-thread hexagon bolts
M12×60
4
F7
Lock nut
M12
3
F10
Hexagon Bolts
M12x30
2
F11
Flat washer
Ø8
1
F12
Large washer
Ø8
2
F13
Lock nut
M8
2
F14
Hexagon Bolts
M8x25
2
F15
Drive shaft placement plate
1
F16
Right suspension plate weldment
1
F17
Left suspension plate weldment
1
F20
Lock pin
1
F21
Hexagon Bolts
M12x85
1
F22
Upper hanging pin
1
F23
Lower hitch-R
1
F24
Lower hitch-L
1
F25
Lower suspension pin
2
F16
www.tmgindustrial.com 17/35 Toll Free:1-877-761-2819
F17

CONNECTING TRACTOR
1. Three-point linkage
Lower lifting pin types
TMG-TSB48
Ⅰ and Ⅱ
2. Connection and adjustment
⚠Caution ! Make sure the tractor is fixed in the process of connection
a. Start the tractor engine, tractor and machine head lower link under suspension corresponds to the
position of the pin, rewind, stop, stop the engine, put up parking stalls.
b. Connect Left towing arm, the left arm on the tractor towing the working machine is left hanging inserted
pin, the locking detent. Right arm pulling the same way.
c. Adjust the towing arms in the same height, as shown below:
If the magnitude of the tractor towing arms is too narrow, adjust the left suspension pin inward as below:
⚠Warning !
In the process of connection, when the tractor is the moving, if there is people between the
tractor and working machine, it may cause injury accident. Be sure no people stand
between the tractor and working machine during the tractor moving.
www.tmgindustrial.com 18/35 Toll Free:1-877-761-2819

d. Adjust angle, to obtain the most appropriate cutting angle, adjust the upon 3-point linkage suspension to
ensure the suitable cutting angle.
Upon 3-point linkage
Handle for tractor
3-point linkage
Adjust
Left suspension pin
Elastic cylindrical
www.tmgindustrial.com 19/35 Toll Free:1-877-761-2819

3. PTO installation
a. Confirm coupling length
The minimum overlap of inner and outer coupling tube 1/2X size should be 220mm, if the size less
than 100mm, please change the coupling
L1: The maximum length of connection to the tractor.
L2: The minimum length of the connection to the tractor
X: The overlap length.
b. The connection of coupling
1. Coupling connect to the rotary hoe end
Coupling with keyway end connect to the rotary hoe input shaft until the lock pin is exposed
to in the original location.
2. Fixed coupling plastic cover
⚠Danger
● If you use no plastic cover to protect the coupling, it is possible to be involved in the occurrence of
injuries. Do not use no plastic casing coupling.
● If you use damaged couplings, injuries may occur entangled.
Couplings if damaged, replace it immediately. Please check if coupling have damage before using.
● When connected to the tractor and rotary hoe, as a third party do not pay attention, inadvertently let
the power output shaft rotation, injuries may occur, after you cut off the power and stop the tractor
engine PTO can be connected to the tractor.
www.tmgindustrial.com 20/35 Toll Free:1-877-761-2819
Table of contents
Other TMG Farm Equipment manuals
Popular Farm Equipment manuals by other brands

Morbark
Morbark TORNADO 13 Safety & Operators & Parts Manual

Woods
Woods 911025 Installation and maintenance instructions

Kverneland
Kverneland 150 Series operating manual

Tatu Marchesan
Tatu Marchesan COP 15 user guide

GREAT PLAINS
GREAT PLAINS 5109 Operator's manual

Heiniger
Heiniger ONE/G Translation of the original instructions