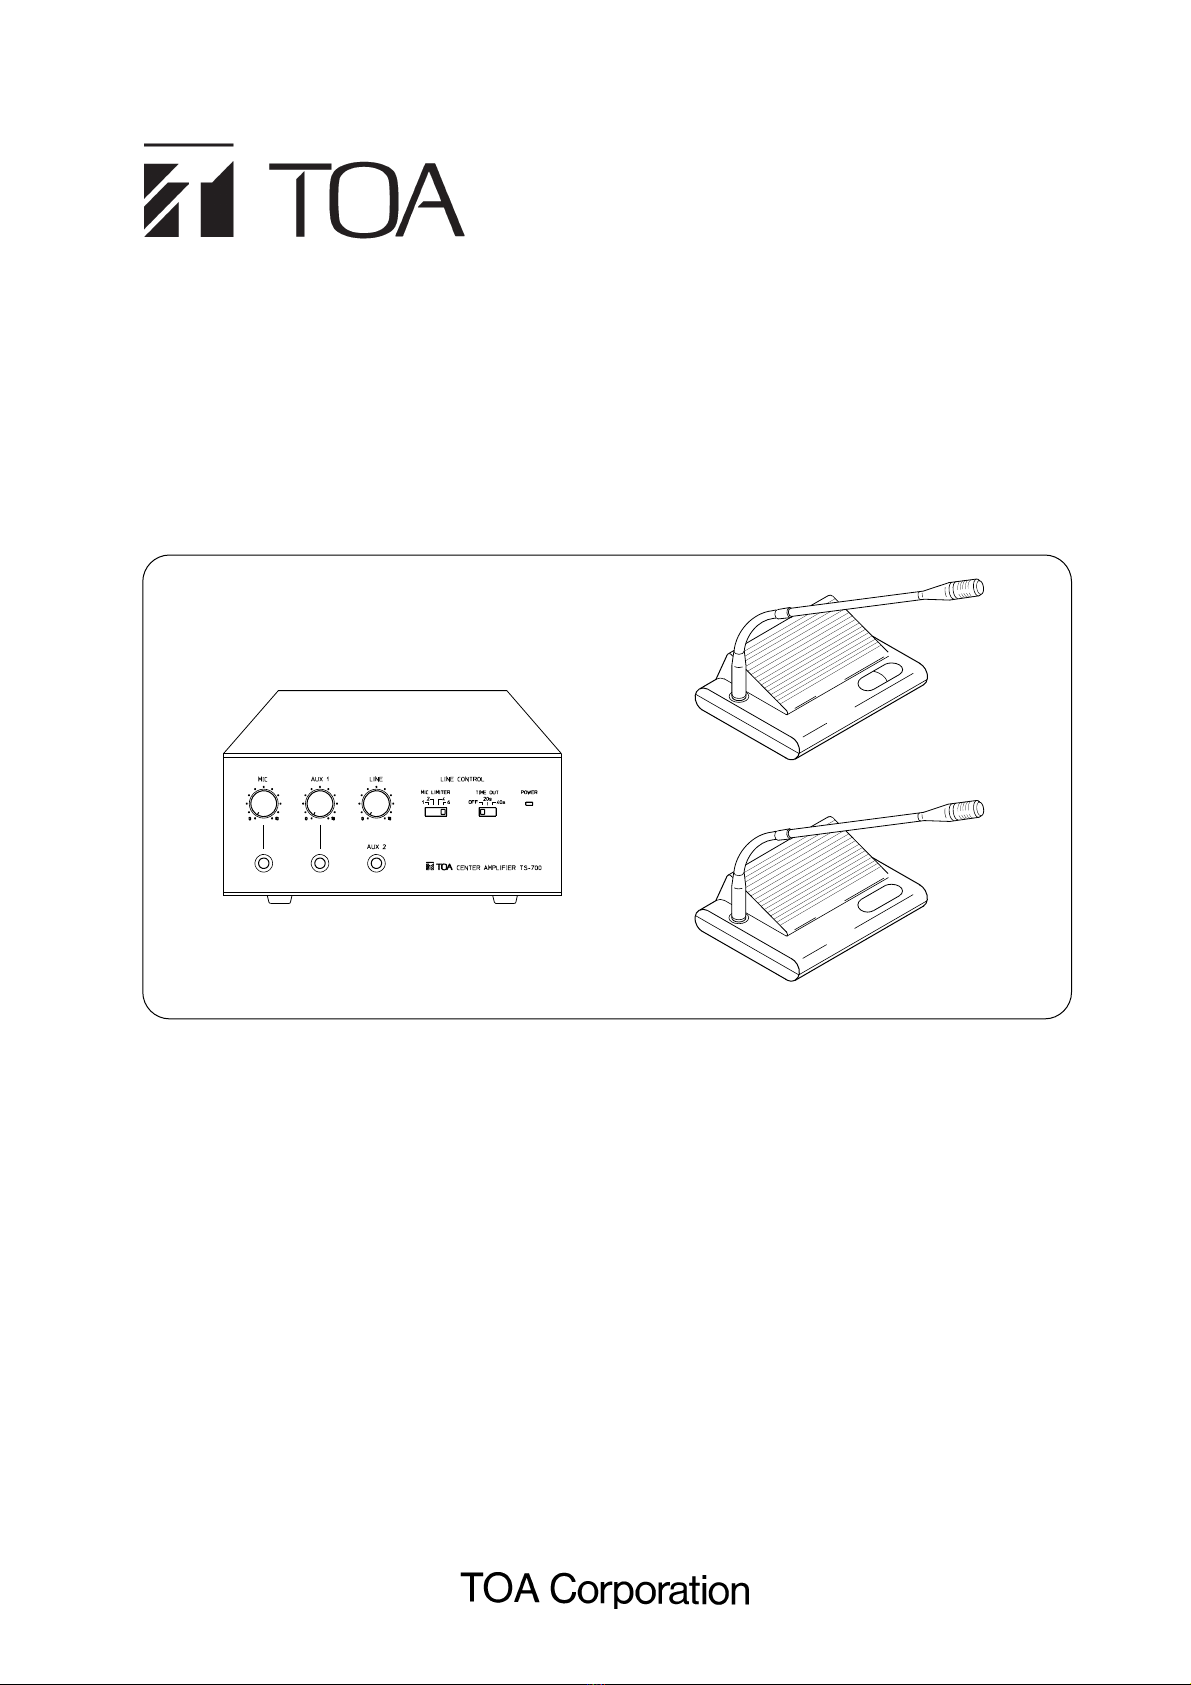
Toa TS-700 User manual

INSTRUCTION MANUAL
CONFERENCE SYSTEM
CENTER AMPLIFIER TS-700
CHAIRMAN UNIT TS-701
DELEGATE UNIT TS-702
TABLE OF CONTENTS
1. SAFETY PRECAUTIONS .............................. 2
2. GENERAL DESCRIPTION ............................ 4
3. FEATURES .................................................... 4
4. NOMENCLATURE
4.1. Center Amplifier TS-700 Front Panel ...... 4
4.2. Center Amplifier TS-700 Rear Panel ...... 5
4.3. Chairman Unit TS-701 Front Panel ......... 5
4.4. Delegate Unit TS-702 Front Panel .......... 6
4.5. Rear Panels of The Chairman Unit
and Delegate Unit ......... 6
5. OPERATIONS
5.1. Using The Conference Unit ..................... 7
5.2. Making Priority Speech
(Chairman Unit TS-701Onry) ................. 7
5.3. Mic-off Function ...................................... 8
5.4. Limiting The Number of Simultaneously
Usable Delegate Units (TS-702) ....... 9
5.5. Recording .............................................. 10
6. INSTALLATIONS AND CONNECTIONS .... 11
7. SYSTEM EXPANSION ................................ 13
8. BLOCK DIAGRAM ...................................... 15
9. SPECIFICATIONS ....................................... 16
10. DIMENSIONAL DIAGRAM ........................ 17
11. TROUBLESHOOTING .............................. 19
Please follow the instructions in this manual to obtain the optimum results from this unit.
We also recommend that you keep this manual handy for future reference.
TS-700
TS-701
TS-702

2
■When Installing the Unit
• Do not expose the unit to rain or an environment
where it may be splashed by water or other liquids,
as doing so may result in fire or electric shock.
• Use the unit only with the voltage specified on the
unit. Using a voltage higher than that which is
specified may result in fire or electric shock.
• Do not cut, kink, otherwise damage nor modify the
power supply cord. In addition, avoid using the
power cord in close proximity to heaters, and never
place heavy objects -- including the unit itself -- on
the power cord, as doing so may result in fire or
electric shock.
• Avoid installing or mounting the unit in unstable
locations, such as on a rickety table or a slanted
surface. Doing so may result in the unit falling
down and causing personal injury and/or property
damage.
■When the Unit is in Use
• Should the following irregularity be found during
use, immediately switch off the power, disconnect
the power supply plug from the AC outlet and
contact your nearest TOA dealer. Make no further
attempt to operate the unit in this condition as this
may cause fire or electric shock.
· If you detect smoke or a strange smell coming
from the unit.
· If water or any metallic object gets into the unit
· If the unit falls, or the unit case breaks
· If the power supply cord is damaged (exposure
of the core, disconnection, etc.)
· If it is malfunctioning (no tone sounds.)
• To prevent a fire or electric shock, never open nor
remove the unit case as there are high voltage
components inside the unit. Refer all servicing to
your nearest TOA dealer.
• Do not place cups, bowls, or other containers of
liquid or metallic objects on top of the unit. If they
accidentally spill into the unit, this may cause a fire
or electric shock.
• Do not insert nor drop metallic objects or
flammable materials in the ventilation slots of the
unit's cover, as this may result in fire or electric
shock.
• Do not touch a plug during thunder and lightning,
as this may result in electric shock.
1. SAFETY PRECAUTIONS
• Be sure to read the instructions in this section carefully before use.
• Make sure to observe the instructions in this manual as the conventions of safety symbols and messages
regarded as very important precautions are included.
• We also recommend you keep this instruction manual handy for future reference.
Safety Symbol and Message Conventions
Safety symbols and messages described below are used in this manual to prevent bodily injury and property
damage which could result from mishandling. Before operating your product, read this manual first so you are
thoroughly aware of the potential safety hazards as well as understand the safety symbols and messages.
WARNING
Indicates a potentially hazardous situation which, if mishandled,
could result in death or serious personal injury.
Indicates a potentially hazardous situation which, if mishandled,
could result in moderate or minor personal injury, and/or property
damage.
WARNING
CAUTION

3
■When Installing the Unit
• Never plug in nor remove the power supply plug
with wet hands, as doing so may cause electric
shock.
• When unplugging the power supply cord, be sure
to grasp the power supply plug; never pull on the
cord itself. Operating the unit with a damaged
power supply cord may cause a fire or electric
shock.
• When moving the unit, be sure to remove its power
supply cord from the wall outlet. Moving the unit
with the power cord connected to the outlet may
cause damage to the power cord, resulting in fire or
electric shock. When removing the power cord, be
sure to hold its plug to pull.
• Do not block the upper panel ventilation slots in the
unit's cover. Doing so may cause heat to build up
inside the unit and result in fire.
• Avoid installing the unit in humid or dusty locations,
in locations exposed to the direct sunlight, near the
heaters, or in locations generating sooty smoke or
steam as doing otherwise may result in fire or
electric shock.
■When the Unit is in Use
• Do not place heavy objects on the unit as this may
cause the unit to fall or break which may result in
personal injury and/or property damage. In
addition, the object itself may fall off and cause
injury and/or damage.
• Do not stand or sit on, nor hang down from the unit
as this may cause the unit to fall down or drop,
resulting in personal injury and/or property
damage.
• Make sure that the volume control is set to
minimum position before power is switched on.
Loud noise produced at high volume when power is
switched on can impair hearing.
• Do not operate the unit for an extended period of
time with the sound distorting. This is an indication
of a malfunction, which in turn can cause heat to
generate and result in a fire.
• Contact your TOA dealer as to the cleaning. If dust
is allowed to accumulate in the unit over a long
period of time, a fire or damage to the unit may
result.
• If dust accumulates on the power supply plug or in
the wall AC outlet, a fire may result. Clean it
periodically. In addition, insert the plug in the wall
outlet securely.
• Switch off the power, and unplug the power supply
plug from the AC outlet for safety purposes when
cleaning or leaving the unit unused for 10 days or
more. A fire or electric shock may result.
The lighting flash with arrowhead within a
triangle is intended to tell the user that
parts inside the product are a risk of
electric shock to persons.
The exclamation point within a triangle is
intended to tell the user that important
operating and servicing instructions are
in the papers with the appilance.
TO REDUCE THE RISK OF ELECTRICAL
SHOCK, DO NOT REMOVE COVER. NO
USER SERVICEABLE PARTS INSIDE.
REFER SERVICING TO QUALIFIED
SERVICE PERSONNEL.
CAUTION
CAUTION
RISK OF ELECTRIC SHOCK
DO NOT OPEN
CAUTION

4
2. GENERAL DESCRIPTION
The conference system can be easily installed by merely connecting the center amplifier (TS-700) to the
conference units (TS-701 chairman unit and TS-702 delegate unit) using the supplied cable. It can be put
away quickly after the conference is finished.
3. FEATURES
• Speech can be amplified by simply connecting the center amplifier to the conference units using the supplied
cables.
• Up to 70 conference units can be connected. (35 units per line x 2 lines)
• The conference unit's microphone is detachable, and storage space can be saved.
• The number of simultaneously-usable delegate units can be limited to avoid unnecessary confusion.
• Wiring can be performed cleanly thanks to TOA's unique wiring method.
• Delegate unit microphones can be made to turn off automatically if a speaker forgets to turn off the
microphone after use.
• The contents of the conference can be recorded using the AR-71B alternate recording machine (optional).
• The center amplifier functions as an expansion amplifier as well. Up to two expansion amplifiers can be
connected per system, and up to 140 conference units connected.
4. NOMENCLATURE
4.1. Center Amplifier TS-700
[Front panel]
①
② ③
④
⑤
⑥
⑦⑧
⑨
①Microphone volume control [MIC]
Adjusts the volume of the microphone connected
to the microphone input jack.
②AUX1 volume control [AUX1]
Adjusts the volume of equipment connected to
AUX1 input jack.
③Line volume control [LINE]
Adjusts the volume of the conference unit's built-in
speaker.
④Power indicator lamp
Lights when the power switch on the rear panel is
set to ON.
⑤Automatic mic-off setting switch [TIME OUT]
Automatically turns off the conference unit's
microphone after speaking.
⑥Speaker restriction switch [MIC LIMITER]
Sets the number of delegate units that can be
used simultaneously.
⑦AUX2 input jack [AUX2]
Connects to a CD or cassette deck. (Adjust the
volume at the connected equipment.)
⑧AUX1 input jack [AUX1]
Connects to a CD or cassette deck.
⑨Mic input jack [MIC]
Connects to a microphone.

5
① ② ③
④
⑤
⑥⑦
⑧
⑨
220V 230V
100V 120V
100-120V
operation
220-230V
operation
4.3. Chairman Unit TS-701 [Front panel]
①
②
③
④ ⑤
①Chime volume control [CHIME]
Adjusts the volume of the chime sounded when
the chairman unit's priority button is pressed.
②LINE1 connection terminal [LINE 1]
Up to 35 conference units can be connected to
this terminal. When using the amplifier as an
expansion amplifier, this terminal is used to
connect the center amplifier.
③LINE2 connection terminal [LINE 2]
Up to 35 conference units can be connected to
this terminal. When using the amplifier as an
expansion amplifier, this terminal is used to
connect the expanded conference units.
④
Recording output terminal [REC OUT] (RCA-pin jack)
Connects to a cassette deck or other recording
machine.
⑤
Recording output terminal [REC OUT] (Phone jack)
Connects to the AR-71B alternating recording
machine, etc.
⑥AC inlet
Connects to the supplied power cord.
⑦Power switch [POWER]
Power is switched on and off with each
depression of this switch.
⑧Voltage selector switch
Set this switch according to the local power voltage.
100 –120V operation: Preset for the 120 V position.
220 –230V operation: Preset for the 230 V position.
⑨Expansion switch (with lock)
Used when converting the center amplifier into the
expansion amplifier.
①Speaker
Outputs the speaker's voice. Adjust the volume with the center
amplifier's LINE volume control. The speaker is temporarily disabled
while the microphone in-use indicator is on.
②Gooseneck microphone
Keep your mouth 10–15 cm away from the microphone when speaking.
Because the orientation of the microphone can be changed, set the
microphone in the best position. The microphone can be removed
when putting unit away.
③Microphone in-use indicator
Lights when the microphone can be used.
④Priority button (press-to-talk type) [PRIORITY]
While this button is pressed, the microphone in-use indicator remains
lit, allowing priority speech to go through. As far as this button is
pressed, no other conference units can be used. When this button is
pressed, a single tone chime is sounded. Adjust the chime volume
withthe chime volume control on the center amplifier.
⑤Talk button [TALK]
Press this button to speak. The microphone in-use indicator lights.
Press this button again to turn off the microphone. The microphone
indicator is extinguished.
4.2. Center Amplifier TS-700
[Rear panel]

6
4.4. Delegate Unit TS-702
[Front panel]
①
②
③
④
4.5. Rear Panels of The Chairman Unit and Delegate Unit
① ②
①Speaker
Outputs the speaker's voice. Adjust the volume with the center
amplifier's LINE volume control. The speaker is temporarily disabled
while the microphone in-use indicator is on.
②Gooseneck microphone
Keep your mouth 10–15 cm away from the microphone when speaking.
Because the orientation of the microphone can be changed, set the
microphone in the best position. The microphone can be removed
when put unit away.
③Microphone in-use indicator
Lights when the microphone can be used.
④Talk button [TALK]
Press this button to speak. The microphone in-use indicator lights.
Press this button again to turn off the microphone. The microphone
indicator is extinguished.
①Recording output jack [REC OUT]
Connects to a recording machine when recording
the contents of the conference.
②Line connection terminal [LINE]
Connects to the supplied cord.

7
5. OPERATIONS
5.1. Using The Conference Unit
1. Press the TALK button.
The microphone in-use indicator lights, and the microphone can be
used.
2. Speak into the microphone.
3. Press the TALK button again after speech completion.
(The microphone in-use indicator is extinguished.)
5.2. Making Priority Speech
(Chairman Unit TS-701 Only)
When wishing to make priority speech while the delegate unit is in use,
this can be accomplished by pressing the PRIORITY button. The
microphone in-use indicator lights, and the chairman unit can be used.
In this event, the speaker is disabled. When the button is pressed, a
single-tone chime is sounded at the remaining conference units.
(Adjust the chime volume with the center amplifier's chime volume
control.)
1. Press the PRIORITY button.
2. Speak while holding down the button.
(None of other conference units can be used while the button is
pressed.)
3. Release the PRIORITY button after speech completion.
The microphone indicator is extinguished, turning on the speaker.
Note
In the system employing two or more chairman units, while one unit is
making priority speech, any other chairman unit can also make priority
speech although a single-tone chime is not sounded.
Any previous speech that has been overridden by the priority speech is
not restored even after priority speech completion. Press the TALK
button again.
TS-702
TS-702
TS-701
TS-701

Example: The mic-off switch is set to 20s position
1. Turn on the microphone, and speak.
2. Leave the microphone on after speaking.
3. The microphone automatically turns off after 20 seconds.
Note
When the mic-off function is selected, any break in speech exceeding the preset time will automatically turn off
the microphone, even if speech is not yet finished. Therefore, for conferences in which long breaks in speech
are expected, set the mic-off setting switch to the OFF position.
In areas with high levels of background noise, the center amplifier may mistake the noise to be speech and
the mic-off function will not operate correctly. In such cases, the mic-off function should be disabled by placing
the switch in the OFF position.
TIMEOUT
OFF 20s 40s
5.3. Mic-off Function
Delegate unit microphones can be set to automatically turn off if a speaker forgets to turn it off after use.
Whenever a break in speech exceeds a specified period of time, the center amplifier presumes speech
completion and automatically turns off the microphone.
The break time can be set for either 20 or 40 seconds using the center amplifier's mic-off setting switch (TIME
OUT). Set the switch to OFF if this function is unnecessary.
8
The OFF position disables
the mic-off function
Set the break time that turns
off the microphone.
Center amplifier (TS-700) front panel
TIMEOUT
OFF 20s 40s
TS-702
TS-702

9
5.4. Limiting The Number of Simultaneously Usable Delegate Units (TS-702)
Using the center amplifier's speaker restriction switch (MIC LIMITER), the number of simultaneously-usable
delegate units (TS-702) can be limited. Set the switch to 1, 2, 4 or 6 depending on the conference scale.
Sets the number of delegate units that
can be used simultaneously.
Center amplifier (TS-700) front panel MIC LIMITER
1246
The MIC LIMITER
switch is set to "2". Delegate unit Delegate unit Delegate unit
Other delegate units cannot be used
even if the TALK button is pressed.
Two delegate units are in use.
Not usable
Center amplifier
(TS-700) front panel
1246
Delegate unit Delegate unit Delegate unit
One more delegate unit can be used.
One delegate unit is in use.
Usable
The MIC LIMITER
switch is set to "2".
Center amplifier
(TS-700) front panel
1246
Example: The speaker restriction switch is set to the "2" position.
Two delegate units can be used simultaneously. Other delegate units cannot be used even if the TALK button
is pressed.
If only one delegate unit is in use, up to one more delegate unit can be used.
The chairman unit can be used at any time regardless of the limitation of the number of usable
delegate units.

10
5.5. Recording
The contents of the conference can be recorded by connecting the AR-71B alternate cassette recorder or
other cassette recorder.
1. Connect the center amplifier's recording output to the recorder's recording input. (The connection cable is
separately needed.)
Center amplifier
(TS-700) rear panel
Recording input
Recording input
Recording output
(REC OUT)
Center amplifier
(TS-700) rear panel
Recording output
(REC OUT)
Alternate recording deck
AR-71B
Other recorder
Monitor output
Alternate recording deck
Cassette recorder
REC OUT
REC IN
Conference unit's rear-mounted
recording output
2. Connect a set of headphones into the recorder's monitor output to confirm that the contents of the
conference are being recorded correctly. Adjust the recorder's recording level control.
For operation of the recorder, refer to the instruction manual attached to the recorder.
The conference unit's rear-mounted recording output can also be used for recording.
Note
It is possible to change the volume of the conference unit's recording output by means of the center amplifier's
line volume control. When only recording and not amplifying speech from the conference unit, the recording
output cannot be used. For such purposes, use the center amplifier's recording output.

11
6. INSTALLATIONS AND CONNECTIONS
1. Connect the center amplifier to all conference units using the supplied connection cords. When connecting,
take care to ensure correct orientation of the cord as shown below.
Note that the system does not operate if the cords are connected in reverse orientation. Space the
conference units 1.5 – 2 m apart.
Center amplifier (TS-700) rear panel
Line connection
terminal
Line connection
terminal
Line 1 terminal and Line 2 terminal
Conference unit rear panel Conference unit rear panel
1 m 1 m
2 m 2 m
Connect a 2 m cord to the
center amplifier. Connect a 2 m cord to the junction box.
Connect a 1m cord
to the conference
unit.
Junction box
Center amplifier (TS-700) front panel
MIC LIMITER
1246
Example: Set to 2
Line volume control (LINE)
Delegate unit
TS-702
Delegate unit
TS-702
Chairman unit
TS-701
Center amplifier
(TS-700)front panel
2. Using the center amplifier's front-mounted switch, set the number of simultaneous speakers. (Refer to p. 9
"5.4. Limiting the Number of Simultaneously Usable Delegate Units (TS-702)".
3. Turn on the chairman unit microphone and those of the delegate units of the number set in Step 2 above.
Speaking into the microphones, adjust the microphone volume using the center amplifier's line volume
control (LINE).

12
4. Confirm that no feedback is produced when each microphone to use is tested. If feedback is produced,
either widen the spacing of conference units or decrease the volume with the line volume control.
5. Press the chairman unit's PRIORITY button to sound a single-tone chime and adjust its volume with the
chime volume control located on the center amplifier rear panel.
Center amplifier (TS-700)
rear panel
Chairman unit TS-701
Chime volume control (CHIME) Priority button
(PRIORITY)
TS-701
Delegate unit
TS-702
Delegate unit
TS-702
Center amplifier (TS-700)
front panel
Microphone
Line output
Background music machine
Center amplifier
(TS-700) rear panel
Center amplifier
(TS-700) rear panel
Recording input
Recording output
(REC OUT)
Recording output
(REC OUT)
Alternate cassette deck
AR-71B
Recording input
Other cassette recorder
6. When connecting a microphone and a background music machine to the center amplifier, adjust their sound
volume with their respective volume controls on the amplifier.
7. To record the contents of the conference, connect the center amplifier's recording output terminal to the
recorder's recording input terminal.

13
7. SYSTEM EXPANSION
By adding the center amplifier as the expansion amplifier, the conference units can be expanded.
An optional extension cord YR-700 is required when connecting the expansion amplifier.
1. Loosen a lock screw on the expansion switch located on the center amplifier rear panel, and change the
setting from the MAIN position to the EXPANSION position. Re-tighten the lock screw after the change.
Expansion switch
Set to the MAIN position.
Expansion switch
Set to the EXPANSION position.
Center amplifier (TS-700) rear panel
(EXPANSION) (EXPANSION)
MAIN
MAIN Lock screw
Lock screw
Center amplifier Expansion amplifier
To line 1 or line 2 To line 1
Extension cord YR-700
MAIN position
(EXPANSION)
MAIN
EXPANSION position
(EXPANSION)
MAIN
2. Using the extension cord, connect the center amplifier's line 1 or line 2 terminal to the expansion amplifier's
line 1 terminal.
3. Set the expansion amplifier as follows:
•Speaker restriction switch
Only the center amplifier's speaker restriction switch is valid.
Place the expansion amplifier's switch in the [1] position.
•Mic-off setting switch
Place the switch in the same position as the center amplifier.
•Chime volume control
Place the expansion amplifier's chime volume control in the [0] position.
Use the center amplifier's chime volume control to adjust the chime volume.

14
4. Connect the conference units. Up to 35 units can be connected per expansion amplifier. One each of the
expansion amplifier can be connected to the center amplifier's line 1 and line 2 terminals.
Expansion amplifier
rear panel
Expansion amplifier
rear panel
Center amplifier
rear panel
To LINE 1 To LINE 2 To LINE 1 To LINE 2
Up to 35 units Up to 35 units Up to 35 units Up to 35 units
Maximum
100 m
A total of 140 conference units can be connected.
Notes on expansion amplifier connections
The use of the expansion amplifier's input and output terminals is restricted as follows:
•MIC, AUX 1, and AUX 2: Can be used in the same manner as the center amplifier.
•Recording output: Cannot be used. When recording, use the recording output on the center amplifier
or conference unit.

15
8. BLOCK DIAGRAM
35 V
Microphone U
Microphone U
Bias
Bias
LED control
LED control
Microphone control
Speaker control
Microphone control
Speaker control
Speech duration Priority control
DC controlDC control
Recording
Speaker
Priority switch
Talk switch
Talk switch
Priority control
Chime
Chairman unit
TS-701
Delegate unit
TS-702
Center amplifire
TS-700
Line
Recording
Speaker
Line
35 V
35 V
35 V
Speech duration
Number of
speakers
AUX1
AUX1
AUX2
Recording output
LINE
Regulator
CHIME
Lines 1 and 2
24 V
Power indicator
MIC
MIC
250 V T800 mA
(220 –230 V operation)
125 V 2 A
(100 –120 V operation)

16
9. SPECIFICATIONS
[TS-700]
Power Source 100 V/120 VAC changeable, 50/60 Hz (100 –120 V operation)
220 V/230 VAC changeable, 50/60 Hz (220 –230 V operation)
Power Consumption Max. 135 W
Input Microphone 600 Ω, –60 dBV, unbalanced
AUX 1 10 kΩ, –20 dBV, unbalanced
AUX 2 600 Ω, 0 dBV, unbalanced
Lines 1 & 2 0 dBV, unbalanced
Output Recording 10 kΩ, –20 dBV, unbalanced
Lines 1 & 2 0 dBV, unbalanced
Control Priority speech chime Single tone
Speaker restriction Number of simultaneously-usable delegate units can be limited to 1, 2, 4,
or 6.
Automatic mic-off Function OFF/20 sec/40 sec (selectable)
Operating Temperature Range 0°C to +40°C
Dimensions 210 (w) X 93 (h) X 316 (d) mm
Finish Colored steel plate, semi-mat black
Weight 3.9 kg
Power Source 35 VDC, under 30 mA supplied from center amplifier
Gooseneck Microphone Unidirectional condenser type with LED (detachable)
Input Line 0 dBV, unbalanced
Output Recording 10 kΩ, –20 dBV, unbalanced
Speaker 130 Ω, 200 mW
Control Microphone switch Microphone/speaker on-off control
Priority switch Chairman unit microphone/speaker on-off, other microphone cutoff, and
(TS-701 only) single-tone chime activation
Operating Temperature Range 0°C to +40°C
Dimensions 170 (w) X 59 (h) X 147 (d) mm
Finish Base : ABS resin, semi-mat black (Munsel N1.0)
Speaker: Metallic brown
Weight 560 g
• Accessories
Power cord .................. 1
[TS-701 and TS-702]
• Accessories
Connection cord of 1 m X 2 m branch (with two 8p DIN plugs and 1 socket) .............. 1
Note: The design and specifications are subject to change without notice for improvement.

17
10. DIMENSIONAL DIAGRAM (Unit: mm)
[Center Amplifier TS-700]
[Chairman Unit TS-701]

18
2m
10m
[Delegate unit TS-702]
[Connection cord] (Supplied with the TS-701 and TS-702)
[Extension cord YR-700] (Option)

Symptom
No output from conference unit
speaker.
Microphone LED does not light
when conference unit's talk
button (TALK) is pressed.
Microphone LED is extinguished
during speech.
Single-tone chime does not
sound when priority button
(PRIORITY) is pressed.
Automatic mic-off function does
not operate.
Cause
Connection cord is not correctly
connected.
Center amplifier's (TS-700) line
volume control (LINE) is set to
minimum position.
Priority speech in progress.
Delegate units (TS-702) of
number set with speaker
restriction switch (MIC LIMITER)
are all in use.
Priority button (PRIORITY) is
pressed.
There is longer break in speech
than time set with mic-off setting
switch (TIME OUT).
Line volume control (LINE)
located on center amplifier's front
panel and chime volume control
(CHIME) on rear panel are both
set to minimum position.
Air-conditioner produces noise.
Remedy
Connect 1 m cable to conference
unit, 2 m cable to center amplifier,
and extension cord to junction box.
Set line volume control to
appropriate position.
Press talk button after priority
speech completion.
Press talk button after one of busy
delegate units is finished.
Press talk button (TALK) again
after priority speech completion.
Set mic-off setting switch to OFF if
long break in speech is expected
in conference.
Set volume controls to appropriate
position.
Automatic mic-off function may
not operate in areas with high
levels of background noise. Either
install conference units in quieter
room or set mic-off setting switch
(TIME OUT) to OFF.
19
11.TROUBLESHOOTING

133-12-497-4B
Other manuals for TS-700
2
This manual suits for next models
2
Table of contents
Other Toa Conference System manuals