tomado TAF5401S User manual

NL Gebruiksaanwijzing
EN Instruction Manual
DE Gebrauchsanleitung
FR Mode d’emploi
TAF5401S
HETELUCHT FRITEUSE |HOT AIR FRYER
HEISSLUFTFRITTEUSE |FRITEUSE À AIR CHAUD

2
NL Gebruiksaanwijzing
EN Instruction manual
DE Gebrauchsanleitung
FR Mode d’emploi
pagina 3-11
page 12-20
Seite 21-29
page 30-38

Lees eerst de gebruiksaanwijzing aandachg en geheel door
voordat u het apparaat gaat gebruiken en bewaar deze
zorgvuldig voor latere raadpleging.
Let op! Vermijd het aanraken van de hete oppervlakken in
het apparaat wanneer dit ingeschakeld is.
Bedek nooit de luchnlaat- en luchtuitlaatopeningen wanneer
het apparaat in gebruik is.
Plaats de te bakken ingrediënten aljd in de mand
om te voorkomen dat ze in contact komen met de
verwarmingselementen.
Vul het apparaat nooit met olie, want dit kan brandgevaar
veroorzaken.
Dompel het apparaat, het snoer of de stekker nooit onder in
water.
• Gebruik dit apparaat uitsluitend voor de in de
gebruiksaanwijzing beschreven doeleinden.
• Sluit het apparaat alleen aan op wisselstroom, op een
randgeaarde wandcontactdoos, met een netspanning
overeenkomsg met de informae aangegeven op het
typeplaatje van het apparaat.
• Het apparaat buiten bereik van kinderen houden. Kinderen
beseen de gevaren niet die kunnen ontstaan bij het omgaan
met elektrische apparaten. Laat kinderen daarom nooit zonder
toezicht met elektrische apparaten werken. Houd het apparaat
en het snoer buiten bereik van kinderen jonger dan 8 jaar.
• Het apparaat kan worden gebruikt door kinderen van 8 jaar en
ouder en door personen met beperkte fysieke, zintuiglijke of
mentale vermogens of gebrek aan ervaring of kennis, wanneer
zij het apparaat onder toezicht gebruiken of zijn geïnstrueerd
over het veilige gebruik ervan en zij de daaruit voortkomende
gevaren begrijpen.
• Kinderen mogen niet met het apparaat spelen.
VEILIGHEIDSVOORSCHRIFTEN - NL
NL - 3

• Het apparaat mag niet door kinderen worden gereinigd of
onderhouden, tenzij dit onder toezicht gebeurt.
• Gebruik het apparaat niet wanneer de stekker, het snoer of het
apparaat beschadigd is, of wanneer het apparaat niet meer
naar behoren funconeert of wanneer het gevallen of op een
andere manier beschadigd is. Raadpleeg dan de winkelier of
onze technische dienst. In geen geval de stekker of het snoer
zelf vervangen. Reparaes aan elektrische apparaten dienen
uitsluitend door vakmensen uitgevoerd te worden.
• Verkeerd uitgevoerde reparaes kunnen aanzienlijke gevaren
voor de gebruiker tot gevolg hebben. Het apparaat nooit
gebruiken met onderdelen die niet door de fabrikant zijn
aanbevolen of geleverd.
• Het netsnoer nooit scherp buigen of over hete delen laten
lopen.
• Sluit het apparaat alleen aan op een geaard stopcontact.
• Controleer aljd of de stekker goed in het stopcontact zit.
• Niet aan het snoer c.q. het apparaat trekken om de stekker uit
de wandcontactdoos te halen. Het apparaat nooit met nae of
vochge handen aanraken.
• Sluit het apparaat nooit aan op een externe mer of een
afzonderlijk afstandbedieningssysteem, om gevaarlijke situaes
te voorkomen.
• Plaats het apparaat nooit in de buurt van apparaten die
warmte afgeven zoals ovens, gasfornuizen, kookplaten, etc.
• Het apparaat op afstand houden van muren of andere
objecten die vlam kunnen vaen zoals gordijnen, handdoeken
(katoen of papier etc.).
• Plaats het apparaat op een stevige, vlakke ondergrond en let
op dat er genoeg ruimte omheen is voor voldoende venlae.
Er is minimaal 15 cm ruimte nodig tussen het apparaat en de
muren. Plaats niets boven op het apparaat.
• Laat het apparaat niet onbeheerd achter indien het apparaat in
werking is.
NL - 4

• Let op! Er komt hete stoom vrij jdens het heteluchrituren
door de uitlaatopeningen. Houd uw handen en gezicht uit de
buurt van de stoom en de uitlaatopeningen. Pas op voor de
stoom met het uitnemen van de mand.
• Na het gebruik is de binnenkant erg heet. Vermijd daarom het
aanraken van de binnenkant.
• Zorg er aljd voor dat het apparaat op een een, vlakke
ondergrond staat en gebruik het uitsluitend binnenshuis.
• Dit apparaat is alleen bedoeld voor huishoudelijk gebruik en
niet voor gebruik in:
- in personeelkeukens, in winkels, kantoren en andere
werkomgevingen;
- door gasten in hotels, motels en andere residenële
omgevingen;
- in Bed&Breakfast type omgevingen;
- boerderijen.
• Indien het apparaat niet gebruikt of gereinigd wordt, zet het
apparaat dan geheel uit en verwijder de stekker uit het
stopcontact.
• Laat het apparaat gedurende 30 minuten aoelen voordat u
het opbergt of schoonmaakt.
• Zorg ervoor dat de ingrediënten die in het apparaat bereid
worden er goudbruin uitkomen en niet donker of bruin.
Verwijder verbrande delen.
• Ga bij storing nooit zelf repareren; het doorslaan van de
beveiliging in het apparaat kan duiden op een defect, dat niet
wordt verholpen door verwijdering of vervanging van deze
beveiliging. Het is noodzakelijk dat er uitsluitend originele
onderdelen gebruikt worden.
• Dit apparaat is uitsluitend geschikt voor huishoudelijk gebruik.
Wanneer het apparaat oneigenlijk gebruikt wordt, kan er bij
eventuele defecten geen aanspraak op schadevergoeding
worden gemaakt en vervalt het recht op garane.
NL - 5

NL - 6
De hetelucht friteuse hee een ingebouwd oververhingssysteem. Als de binnentemperatuur te hoog is, zal het apparaat
door de beveiliging automasch worden uitgeschakeld. Verwijder de stekker uit het stopcontact en laat het apparaat volledig
aoelen. Zodra de hetelucht friteuse afgekoeld is, drukt u het reset knopje in aan de onderzijde.
De reset knop zit in de kleine opening aan de onderzijde van de hetelucht friteuse naast het typeplaatje. Steek een pung
object, zoals een lange smalle schroevendraaier, in de opening om de reset knop in te drukken.
Daarna kunt u de hetelucht friteuse weer gebruiken.
Dit apparaat is voorzien van een mer. Wanneer de mer hee afgeteld tot 0, zal er een piepsignaal klinken en het apparaat
schakelt automasch uit. Om het apparaat handmag uit te schakelen, drukt u eenmaal op de aan- en uit toets om het
frituren te stoppen.
Dit apparaat voldoet aan alle eisen met betrekking tot elektromagnesche velden (EMV).
OVERVERHITTINGSBEVEILIGING
AUTOMATISCHE UITSCHAKELING
ELEKTROMAGNETISCHE VELDEN (EMV)

PRODUCTOMSCHRIJVING
NL - 7
1. Bedieningspaneel
2. Inlegrooster
3. Handgreep
4. Behuizing
5. Mand
6. Luchtuitlaat
7. Elektrisch snoer
1. Aan/uit-toets
2. Menukeuzetoets
3. en 4. Timerinstelling
5. Indicaelampjetemperatuur
6. Indicaelampjemer
7. Indicaelampjevenlator
8. en 9. Temperatuurinstelling
10. Indicaelampjetemperatuur
11. Indicaelampjemer
12.t/m19.Indicaelampjesmenukeuze
VOOR HET EERSTE GEBRUIK
Voordat u het apparaat voor de eerste maal in gebruik neemt, gaat u als volgt te werk. Pak het apparaat voorzichg uit en
verwijder al het verpakkingsmateriaal en eventuele promoonele sckers. Houd de verpakking (plasc zakken en karton)
buiten bereik van kinderen. Controleer na het uitpakken het apparaat zorgvuldig op uiterlijke schade, mogelijk ontstaan jdens
transport. Plaats het apparaat op een stevige, vlakke en warmtebestendige ondergrond.
De bedieningsknoppen zijn ptoetsen. Raak de toetsen voorzichg met een vinger aan om ze te acveren. Bij elke aanraking
van een ptoets klinkt er een geluidssignaal.
STAND-BY
Zodra u de stekker in het stopcontact steekt, klinkt er een geluidssignaal. De stand-bytoets gaat branden. Het apparaat schakelt
automasch in de stand-bystand als:
• u de stekker in het stopcontact steekt;
• u 1 minuut lang geen toetsen aanraakt;
• de ingestelde jd op de mer is verstreken;
• u op de aan/uit-toets drukt terwijl het apparaat in werking is.
56
9 4
8 3
12 19
2 1
13 14 15
11 10
167 17 18
3
2
1
5
4
6
7

NL - 8
AAN/ UIT ZETTEN
Zet het apparaat aan en uit door gedurende enkele seconden op de aan/uit toets te drukken. [1].
Het apparaat funconeert alleen als de mand correct in het apparaat zit.
Zodra er OFF op het display verschijnt, telt de mer opnieuw 20 seconden af. Gedurende die jd blij de venlator draaien om
het apparaat af te koelen. Daarna klinkt er een geluidssignaal.
Houd de aan/uit-toets 2 seconden ingedrukt om het apparaat geheel uit te schakelen. De lichten gaan uit, de venlator stopt.
VOOR HET EERSTE GEBRUIK
Controleer de spanning. Het apparaat werkt alleen veilig op wisselstroom met een spanning die is aangegeven
op het typeplaatje van het apparaat. Steek de stekker van het apparaat alleen in een stopcontact met randaarde.
Het verwarmingselement is voorzien van een beschermlaag. Zet het apparaat aan en laat het zonder voedsel gedurende
10 minuten op de maximumstand werken. Zo brandt u de beschermlaag om het verwarmingselement perfect weg. Tijdens
deze ace kan een beetje rook ontstaan. Zorg daarom voor goede venlae. Als de beschermlaag is verdwenen, schakelt u het
apparaat weer uit.
Trek de stekker uit het stopcontact en reinig het inlegrooster en de mand voordat u het apparaat daadwerkelijk gaat gebruiken.
Was het inlegrooster en de mand af met een sopje of in de vaatwasmachine. Het apparaat zelf kunt u van binnen en van buiten
afnemen met een zachte, vochge doek.
Dit apparaat werkt met hete lucht. Gebruik dus nooit olie, andere vloeistoen of frituurvet om voedsel in te bereiden.
• Plaats het apparaat op een stevige, vlakke en warmtebestendige ondergrond.
• Buig de voetjes van het inlegrooster iets naar buiten zodat deze strak in de mand past en er niet kan uitvallen.
• Plaats het inlegrooster onderin de mand.
• Plaats de mand in het apparaat.
LET OP! Als u de mand niet correct plaatst, funconeert het apparaat niet.
Vul de mand niet met olie of andere vloeistoen. Plaats niets boven op het apparaat.
Bedek nooit de luchnlaat- en luchtuitlaatopeningen. Afgedekte luchtopeningen verstoren de luchtcirculae en hebben een
negaeve invloed op het bakresultaat.
TEMPERATUUR EN TIJD INSTELLEN
Druk op de [+] en [–] aan de linkerkant van het bedieningspaneel om een hogere of lagere temperatuur in te stellen.
De temperatuur verandert in stappen van 5 °C. Als u de toets ingedrukt houdt, verandert de temperatuur snel.
Druk op de [+] en [–] aan de rechterkant van het bedieningspaneel om een langere of kortere jd in te stellen. De jd verandert
in stappen van 1 minuut. Als u de toets ingedrukt houdt, verandert de jdinstelling snel.
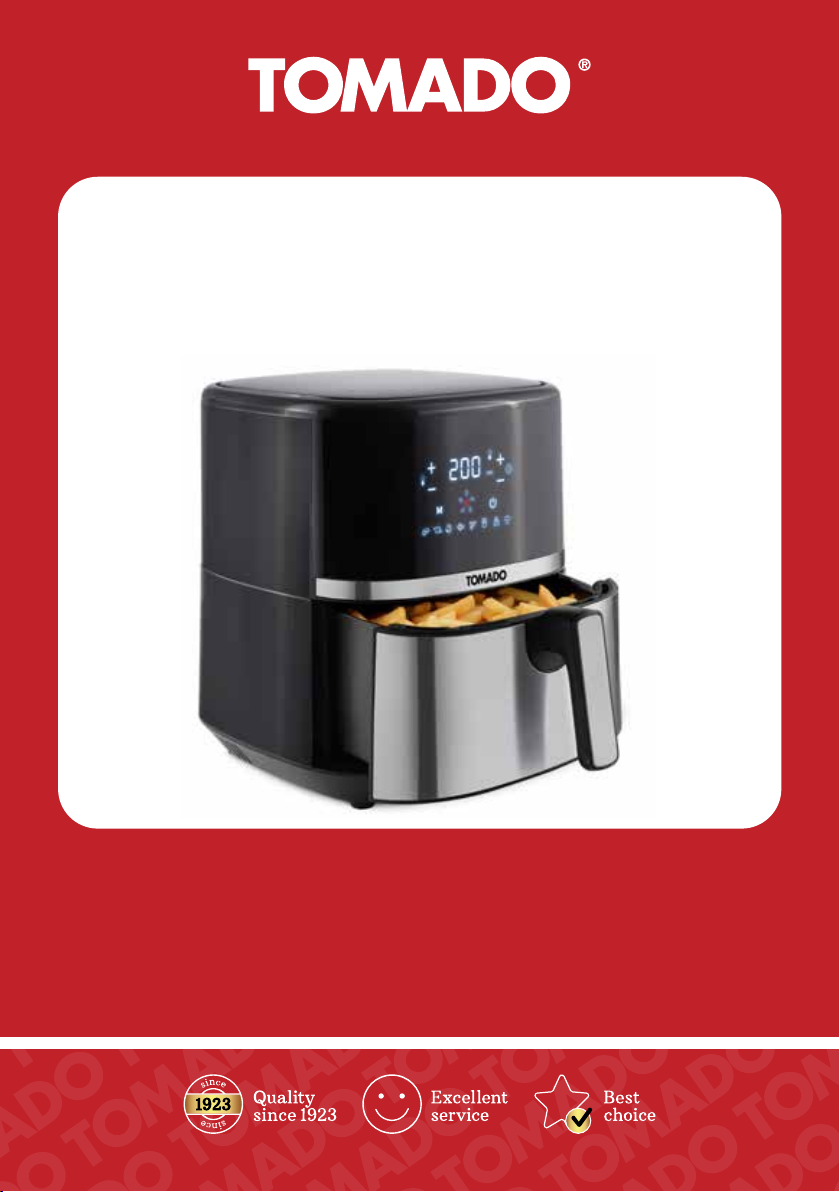
HETELUCHT FRITUREN
Controleer of de netspanning overeenkomt met de spanning die op het typeplaatje staat vermeld. Steek de stekker in een
stopcontact met randaarde. Druk op de aan/uit-toets. Het display wordt verlicht.
Neem de mand met het inlegrooster voorzichg uit het apparaat.
Vul de mand met het voedsel dat u wilt bereiden. Let op de maximale hoeveelheid (zie ook het hoofdstuk met TIPS hieronder).
Gebruik het apparaat nooit zonder inlegrooster. Het inlegrooster is namelijk noodzakelijk voor voldoende luchtcirculae.
Schuif de mand correct terug in het apparaat.
Stel de gewenste temperatuur en jd in, en druk op de aan/uit-toets.
Tip - Voor het beste resultaat moet u sommige producten halverwege de bereidingsjd een keer opschudden. Voor dergelijke
producten stelt u de eerst de hel van de gewenste jd in. Als u het mersignaal hoort, neemt u de mand uit het apparaat,
schudt u het product, plaatst u de mand terug en stelt u de mer opnieuw in.
Tip - Als u het apparaat aanzet, kunt u de aan/uit-toets 2 seconden ingedrukt houden. Het apparaat stelt dan automasch
de temperatuur in op 200 °C en de mer op 15 minuten. U kunt ook een van de automasche menu’s kiezen. Druk op de
menukeuzetoets [2] om door de menu’s heen te lopen en maak uw keuze. Het apparaat stelt dan automasch de ideale
temperatuur en jd in. Zie de tabel “Tijd- en temperatuurinstellingen van de automasche menu’s” hieronder.
Zodra de bereidingsjd is verstreken, klinkt er een geluidssignaal. Neem de mand uit het apparaat en controleer of de
producten klaar zijn. Als ze niet klaar zijn, plaatst u de mand terug en stelt u een paar extra minuten in op de mer.
Tip - Tijdens het bakproces sijpelt er vet en vocht op de bodem van de mand. Dit kan over uw zojuist bereide voedsel lopen als
u de mand omkeert om het voedsel eruit te verwijderen. Schud de ingrediënten daarom voorzichg uit de mand en gebruik
voor grotere ingrediënten een tang.
De mand wordt erg heet jdens het bakproces. Houd de mand alleen vast aan de handgreep.
Aankelijk van het gerecht dat u bereidt, kan er hete stoom uit de mand komen.

De metalen delen in het apparaat worden erg heet. Raak ze nooit aan jdens en direct na gebruik van het apparaat.
Tijd- en temperatuurinstellingen van de automasche menu’s
Steak Gevogelte Garnalen Vis Pizza Frites Gebak Groente
Temperatuur
Tijd
180 °C
16 min
200 °C
25 min
180 °C
12 min
180 °C
18 min
200 °C
20 min
200 °C
20 min
160 °C
17 min
160 °C
17 min
Gewicht min-max gram 100-550 100-550 100-550 100-550 100-550 100-550 100-550 100-550
TIPS
• Kleinere ingrediënten hebben meestal een iets kortere bereidingsjd nodig.
• Een grotere hoeveelheid ingrediënten hee maar iets meer jd nodig en een kleinere hoeveelheid hee iets minder
bereidingsjd nodig.
• Door kleinere ingrediënten meerdere malen gedurende de bereidingsjd te schudden, wordt het eindresultaat beter
en gelijkmager.
• Bereid geen extreem vee ingrediënten zoals worstjes in de heteluchriteuse.
• Snacks die in de oven bereid kunnen worden, kunnen ook in de heteluchriteuse worden bereid.
• De opmale hoeveelheid voor het bereiden van knapperige frites is 800 gram. De maximale hoeveelheid is 1500 gram.
• Gebruik eventueel een oliespray om de ingrediënten licht mee te besproeien om ze nog knapperiger te maken.
• Gebruik kant-en-klaar deeg voor het snel en eenvoudig bereiden van gevulde snacks. Kant-en-klaar deeg is ook sneller klaar
dan zelfgemaakt deeg.
• Plaats een bakblik of ovenschaal in de mand als u een cake of quiche wilt bereiden of als u delicate of gevulde ingrediënten
wilt bereiden.
• De heteluchriteuse kan ook gebruikt worden om ingrediënten opnieuw op te warmen. Zet daarvoor de temperatuur
op 150°C gedurende 10 minuten.
• Voeg 3 minuten toe aan de bereidingsjd als de heteluchriteuse nog koud is.
• Omdat de turbo-heteluchechnologie de lucht direct opnieuw opwarmt in het apparaat, maakt het voor het resultaat niet
uit dat de mand kort uit de heteluchriteuse genomen wordt.
Omdat ingrediënten kunnen verschillen in herkomst, afmeng, vorm en merk kan Tomado niet de opmale instelling aangeven.
REINIGEN EN ONDERHOUD
Maak het apparaat na elk gebruik op de volgende manier schoon.
Laat het apparaat aoelen voordat u het reinigt.
Na het bakken is de metalen binnenzijde heet. Raak de binnenzijde niet aan direct na het bakken.
Gebruik voor de reiniging van de mand en het inlegrooster geen metalen keukengerei of schurende middelen, want dit kan de
anaanbaklaag beschadigen.
Haal de stekker uit het stopcontact en laat het apparaat volledig aoelen voordat u het reinigt.
Aanwijzing: aoelen gaat sneller als u de mand en het inlegrooster uit het apparaat haalt.
Veeg de buitenkant van het apparaat af met een vochge doek.
Reinig de mand en het inlegrooster met heet water waaraan een beetje afwasmiddel is toegevoegd, en een spons. U kunt de
mand en het inlegrooster ook in de vaatwasmachine afwassen.
Aanwijzing: hardnekkig vuil verwijdert u door de mand te vullen met heet water en een beetje afwasmiddel en dit 10 minuten
te laten weken.
Reinig de binnenzijde van het apparaat met een vochge zachte spons die u eerst in heet water hee gedrenkt en uitgeknepen.
Verwijder eventuele voedselresten van het verwarmingselement met een zachte afwasborstel. Wees voorzichg met
afwasmiddel.
Dit kan achterblijven op het verwarmingselement en een bijsmaak geven aan de ingrediënten.
Dompel het apparaat, het snoer of de stekker nooit onder in water of andere vloeistoen.
Alvorens het apparaat op te bergen, moet u het volledig laten aoelen en de stekker uit het stopcontact trekken.
Controleer of alle onderdelen schoon en droog zijn. Berg het apparaat op een schone en droge plaats op.
NL - 9

STORINGEN EN OPLOSSINGEN
Storing Mogelijke oorzaak Oplossing
Het apparaat
funconeert niet.
De stekker zit niet in het stopcontact. Steek de stekker in een geaard stopcontact.
De mand zit niet goed in het apparaat. Schuif de mand goed in het apparaat.
De mer is niet ingesteld Stel de mer in met de [+] of [-] toets rechts op het
bedieningspaneel
De ingrediënten
zijn niet gaar.
Er zien te veel ingrediënten in de mand. Plaats kleinere hoeveelheden in de mand.
Kleinere pores bakken gelijkmager.
De ingestelde temperatuur is te laag. Stel het apparaat in op een hogere temperatuur.
De bereidingsjd is te kort. Stel een langere jd in.
De ingrediënten
zijn niet gelijkmag
gebakken.
Sommige ingrediënten moet
u halverwege de bereidingsjd
opschudden.
Schud ingrediënten die over elkaar heen liggen
(zoals frites), halverwege de bereidingsjd op.
Gebakken snacks
komen niet krokant
uit het apparaat.
De snacks zijn niet geschikt voor een
heteluchriteuse en kunnen alleen in een
oliefriteuse gebakken worden.
Gebruik ovensnacks of bestrijk de snacks met wat olie
voor een krokanter resultaat.
De mand wil niet
goed in het apparaat
schuiven.
De mand zit te vol. Vul de mand niet boven het maximum, maar houd de
geadviseerde hoeveelheden aan.
Het inlegrooster zit niet goed in de mand. Plaats het inlegrooster met de goede kant naar boven
in de mand.
Er komt wie rook
uit het apparaat.
U bent vee ingrediënten aan het
bereiden.
Wanneer u vee ingrediënten in het apparaat bereidt,
kan er veel vet in de mand druipen. Dat vet veroorzaakt
wie rook en de mand kan heter worden dan
anders. Dit hee geen invloed op het apparaat of het
eindresultaat.
De mand bevat nog vetresten van een
vorige bereiding.
Reinig de mand na elk gebruik. Vetresten die warm
worden, kunnen wie rook veroorzaken.
Verse frites komen
niet gelijkmag
gebakken uit het
apparaat.
De soort aardappel is niet geschikt. Gebruik verse aardappelen die iets kruimig aoken.
De frites zijn niet goed afgespoeld voor
het bakken.
Spoel de gesneden frites goed af om zetmeel
te verwijderen.
De verse frites
komen niet krokant
uit het apparaat.
De hoeveelheid olie en water in de frites
bepaalt hoe krokant ze kunnen worden.
Dep de frites goed droog voordat u olie toevoegt.
Snijd de frites jner voor een krokanter resultaat.
Voeg een klein beetje meer olie toe voor een krokanter
resultaat.
NL - 10

Dit symbool betekent dat dit product niet bij het gewone huishoudelijke afval mag worden weggegooid (2012/19/EU).
Volg de geldende regels in uw land voor de gescheiden inzameling van elektrische en elektronische producten.
Als u het product correct afvoert, voorkomt u negaeve gevolgen voor het milieu en de volksgezondheid.
Het verpakkingsmateriaal van dit product is 100% recyclebaar, lever het verpakkingsmateriaal gescheiden in.
RECYCLING
NL - 11

First carefully and fully read the instrucon manual before you
start using the appliance and store it in a safe place for future
reference.
Cauon! Avoid contact with hot surfaces within the
appliance, when it is switched on.
Never cover the air inlet and outlet openings when the
appliance is being used.
Always place the ingredients to be fried in the basket, to prevent
them from making contact with the heang elements.
Never ll the appliance with oil, this could cause a re hazard.
Never submerge the appliance, cord or plug in water.
• Only use this appliance for the purposes described in the
instrucon manual.
• Only connect the appliance to alternate current, to an earthed
wall socket, with a mains voltage that corresponds with the
informaon provided on the informaon plate of the appliance.
• Keep the appliance out of reach of children. Children do not
see the dangers associated with handling electrical appliances.
Therefore, never allow children to operate electrical appliances
without supervision. Keep the appliance and cord out of reach
of children younger than 8 years of age.
• The appliance can be used by children of 8 years and older and
by persons with limited physical, sensory or mental capacies
or lack of experience or knowledge, provided they use the
appliance under supervision or have been instructed about its
safe use and understand the hazards it may involve.
• Children must not play with the appliance.
• The appliance may not be cleaned or maintained by children,
unless this is done under supervision.
SAFETY INSTRUCTIONS - EN
EN - 12

• Do not use the appliance if the plug, cord or appliance are
damaged, or if the appliance no longer funcons properly or if
it is damaged in any other way. If this is the case, consult the
retailer or our maintenance service. Never replace the plug or
cord yourself. Repairs to electrical appliances should only be
performed by skilled persons.
• Incorrect repairs could cause considerable hazards for the user.
Never use the appliance with parts that are not recommended
or supplied by the manufacturer.
• Never bend the power cord sharply or allow it to run across
hot parts.
• Connect the appliance only to an earthed socket.
• Always check that the plug is properly inserted in the socket.
• Do not pull the cord and/or appliance to remove the plug from
the wall socket. Never touch the appliance with wet or damp
hands.
• Never connect the appliance to an external mer or a separate
remote control system, in order to prevent hazardous situaons.
• Never place the appliance near appliances that give o heat,
such as ovens, gas cookers, hotplates, etc.
• Keep the appliance away from walls or other objects that may
catch re, such as curtains, towels (coon or paper, etc.).
• Place the appliance on a sturdy, at surface and make sure
there is enough space around it for sucient venlaon. A
minimum space of 15 cm is required between the appliance
and the walls. Do not place anything on top of the appliance.
• Do not leave the appliance unsupervised if the appliance
is operaonal.
• Cauon! A lot of steam is released via the outlet openings
during hot air frying. Keep your hands and face away from the
steam coming out of the outlet openings. Watch out for the
steam, when removing the basket.
• Aer use, the interior is very hot. Therefore avoid contact with
the interior.
EN - 13

• Always make sure the appliance is placed on an even, at
surface and is only used indoors.
• This appliance is only intended for household use and not for
use:
- in sta kitchens, shops, oces and other work environments;
- by guests in hotels, motels and other residenal environments;
- in Bed&Breakfast type environments;
- farms.
• If the appliance is not being used, or is being cleaned, fully
switch o the appliance and remove the plug from the socket.
• Allow the appliance to cool down for 30 minutes before storing
or cleaning it.
• Ensure that the ingredients being cooked in the appliance
come out golden-brown and not dark or brown. Remove burnt
parts.
• In case of a breakdown, never make repairs yourself; a tripped
safety device in the appliance could indicate a defect that
cannot be remedied by removing or replacing this safety
device. Only original parts should be used.
• This appliance is only suitable for household use. If the
appliance is not used as intended, no compensaon can be
claimed in case of defects or accidents and the warranty will
be invalidated.
EN - 14
The hot air fryer has been provided with an overheang safety system. If the interior temperature is too high, the appliance is
switched o automacally by the safety system. In that case, the appliance can no longer be used. Remove the plug from the
socket, allow the appliance to cool down and contact the service department of Inventum or your retailer.
This appliance has been provided with a mer. Once the mer has counted down to 0, a beep sound can be heard and the
appliance switches o automacally. To switch o the appliance manually, press the on and o key once to stop the frying
process, and then press the on and o key a second me to switch o the display.
This appliance complies with all requirements relang to electromagnec elds (EMF).
OVERHEATING SAFETY SYSTEM
AUTOMATIC DEACTIVATION
ELECTROMAGNETIC FIELDS (EMF)

PRODUCT DESCRIPTION
EN - 15
1. Control panel
2. Insert grille
3. Handle
4. Base unit
5. Basket
6. Air outlet
7. Power cord
1On/okey
2Menuseleconkey
3and4Timerseng
5 Temperature indicator led
6 Timer indicator led
7 Fan indicator led
8and9Temperatureseng
10 Temperature indicator led
11 Timer indicator led
12to19Menuseleconindicatorleds
PRIOR TO FIRST USE
Before using the appliance for the rst me, proceed as follows: Carefully unpack your appliance and remove all
packaging material and possible promoonal sckers. Keep the packaging (plasc bags and cardboard) out of reach of
children. Aer unpacking the appliance, carefully check it for external damage that may have occurred during transport.
Place the appliance on a sturdy, at and heat-resistant surface.
The control keys are touch controls. Carefully touch the controls with a nger to acvate them. At each touch of a touch control,
you can hear a sound signal.
STAND-BY
When the plug is inserted in the socket, a sound signal can be heard. The stand-by key lights up. The appliance automacally
switches to stand-by mode when:
• inserng the plug in the socket;
• no keys are touched for 1 minute;
• the me set on the mer has passed;
• pressing the on/o key while the appliance is working.
56
9 4
8 3
12 19
2 1
13 14 15
11 10
167 17 18
3
2
1
5
4
6
7

EN - 16
SWITCHING ON/OFF
Switch the appliance on or o by pressing the ON/OFF key for a few seconds. [1].
The appliance will only funcon when the basket is in the appliance correctly.
When OFF is shown on the display, the mer counts down 20 seconds once more. During that me, the fan connues to run to
cool the appliance. Aer that, a sound signal can be heard.
Hold down the on/o key for 2 seconds in order to switch the appliance fully o. The leds go out, the fan stops.
PRIOR TO FIRST USE
Check the voltage. The appliance will only work safely on alternate current with a voltage that is indicated on the informaon
plate of the appliance. Only insert the plug of the appliance into a earthed socket The heang element has been provided with
a protecve layer. Switch on the appliance and allow it to operate at maximum level without food for 10 minutes. In this way,
the protecve layer around the heang element is burned o perfectly. A lile bit of smoke may be created during this acon.
Therefore ensure sucient venlaon. When the protecve layer has disappeared, switch o the appliance.
Remove the plug from the socket and clean the insert grille and basket before you actually start using the appliance. Wash the
insert grille and basket with soapy water or in the dishwasher. The inside and outside of the appliance itself can be wiped with
a so, damp cloth.
The appliance works with hot air. This means that you should never use oil, other liquids or frying fat for preparing food.
• Place the appliance on a sturdy, at and heat-resistant surface.
• Bend the feet of the insert grille slightly outwards so that it ts ghtly in the basket and cannot fall out.
• Place the insert grille in the basket.
• Place the basket in the appliance.
CAUTION! If the basket is not placed correctly, the appliance will not funcon.
Do not ll the basket with oil or other liquids. Do not place anything on top of the appliance.
Do not cover air inlet or outlet openings. Covered air openings will disrupt the air circulaon and will have a negave eect on
the frying result.
SETTING TEMPERATURE AND TIME
Press [+] and [–] on the le side of the control panel to set a higher or lower temperature. The temperature changes in steps
of 5 °C. If you hold down the key, the temperature changes quickly.
Press [+] and [–] on the right side of the control panel to set a longer or shorter me. The me changes in steps of 1 minute.
If you hold down the key, the me seng changes quickly.
HOT AIR FRYING
Check that the mains voltage corresponds with the voltage stated on the informaon plate. Insert the plug in an earthed socket.
Press the on/o key. The display lights up.
Carefully remove the basket with insert grille from the appliance.
Fill the basket with the food that you want to prepare. Pay aenon to the maximum amount (also see the secon with TIPS
below). Never use the appliance without the insert grille. The insert grille is necessary for sucient air circulaon.
Slide the basket back in the appliance correctly.
Set the required temperature and me and press the on/o key.
Tip - For the best result, you must shake some products halfway through the cooking me. For such products, you must rst set
the rst half of the required me. When you hear the mer signal, remove the basket from the appliance, shake the product,
place back the basket and set the mer again.
Tip - When switching on the appliance, you can hold down the on/o key for 2 seconds. The appliance will automacally set the
temperature to 200 °C and the mer to 15 minutes. You can also select one of the automac menus. Press the menu selecon
key [2] to go through the menus and make your choice. The appliance automacally sets the ideal temperature and me.
See the “Time and temperature sengs of the automac menus” table below.
When the cooking me has passed, a sound signal can be heard. Remove the basket from the appliance and check if the
products are ready. If they are not ready, place back the basket and set a few extra minutes on the mer.
Tip - During the frying process, fat and moisture will drip on the boom of the basket. This could end up on the food that has
just been cooked, when you turn over the basket in order to remove the food. Therefore carefully shake the ingredients out of
the basket and use tongs to remove larger ingredients.

The basket becomes very hot during the frying process. Only hold the basket by its handle.
Depending on the dish being cooked, hot steam may come out of the basket.
The metal parts in the appliance become very hot. Never touch them when using the appliance and immediately aer using
the appliance.
Time and temperature sengs of the automac menus
Steak Poultry Shrimps Fish Pizza Fries Pastry Vegeta-
bles
Temperature
Time
180 °C
16 min
200 °C
25 min
180 °C
12 min
180 °C
18 min
200 °C
20 min
200 °C
20 min
160 °C
17 min
160 °C
17 min
Weight min-max
grammes
100-550 100-550 100-550 100-550 100-550 100-550 100-550 100-550
TIPS
• Smaller ingredients usually require a slightly shorter cooking me.
• A larger amount of ingredients only requires a lile more me, and a smaller amount requires a lile less cooking me.
• Shaking smaller ingredients several mes during the cooking me results in a beer and more even end result.
• Do not cook extremely fat ingredients such as sausages in the hot air fryer.
• Snacks that can be cooked in the oven, can also be cooked in the hot air fryer.
• The opmum amount for preparing crispy fries is 800 grammes. The maximum amount is 1500 grammes.
• If necessary use an oil spray to lightly oil the ingredients and make them even more crispy.
• Use ready-made dough for a fast and simple preparaon of lled snacks. Ready-made dough also cooks faster than
home-made dough.
• Place a baking n or oven dish in the basket if you want to make a cake or quiche, or if you want to cook delicate or lled
ingredients.
• The hot air fryer can also be used to reheat ingredients. For this, set the temperature to 150°C for 10 minutes.
• Add 3 minutes to the cooking me if the hot air fryer is sll cold.
• As the turbo hot air technology immediately reheats the air in the appliance, briey removing the basket from the hot
air fryer does not have an eect on the end result.
As ingredients can dier in origin, size, shape and brand, Tomado is not able to provide the opmum seng.
CLEANING AND MAINTENANCE
Clean the appliance as follows aer each use.
Allow the appliance to cool down before cleaning it.
Aer frying, the metal interior is hot. Do not touch the interior immediately aer frying.
When cleaning the basket and insert grille, do not use metal kitchenware or abrasive agents, as these could damage
the an-sck coang.
Remove the plug from the socket and allow the appliance to cool down fully before cleaning it.
Instrucon: cooling goes quicker if the basket and insert grille are removed from the appliance.
Clean the exterior of the appliance with a damp cloth.
Clean the basket and insert grille with hot water containing a lile washing-up liquid and a sponge. You can also wash
the basket and insert grille in the dishwasher.
Instrucon: stubborn dirt can be removed by lling the basket with hot water and a lile bit of washing-up liquid and allowing
it to soak for 10 minutes.
Clean the interior of the appliance with a damp so sponge that you have rst soaked in hot water and squeezed out.
Remove any food residues from the heang element using a so washing-up brush. Be careful with washing-up liquid.
This could be le behind on the heang element and give a foreign taste to the ingredients.
Never submerge the appliance, cord or plug in water or other liquids.
Before storing the appliance, allow it to cool down fully and remove the plug from the socket.
Check that all components are clean and dry. Store the appliance in a clean and dry locaon.
EN - 17

BREAKDOWNS AND SOLUTIONS
Failure Possible cause Soluon
The appliance does
not funcon.
The plug is not in the socket. Insert the plug in an earthed socket.
The basket is not properly placed in the
appliance.
Properly slide the basket in the appliance.
The mer is not set Set the mer with the [+] or [-] key on the rights side
of the control panel
The ingredients are
not cooked.
There are too many ingredients in the
basket.
Place smaller amounts of ingredients in the basket.
Smaller porons can be fried more evenly.
The set temperature is too low. Set the appliance to a higher temperature.
The cooking me is too short. Set a longer me.
The ingredients are
not fried evenly.
Some ingredients must be shaken halfway
the cooking me.
Shake ingredients lying on top of one another
(such as fries) halfway the cooking me.
Fried snacks are not
crispy when they
come out of the
appliance.
The snacks are not suitable for a hot air
fryer and should be fried in an oil fryer.
Use oven snacks or cover the snacks with a lile oil for
a more crispy result.
It is not possible
to slide the basket
in the appliance
properly.
The basket is overlled. Do not ll the basket above the maximum, but observe
the recommended amounts.
The insert grille is not properly placed in
the basket.
Place the insert grill in the basket with the correct
side up.
There is white smoke
coming from the
appliance.
You are cooking fay ingredients. When fay ingredients are being cooked in the appliance,
it is possible that a lot of fat drips in the basket. This
fat causes white smoke and the basket can become
hoer than normal. This does not have an eect on the
appliance or on the end result.
The basket sll contains fat residues from
a previous preparaon.
Clean the basket aer every use. Fat residues that
become hot can cause white smoke.
Fresh fries do not
come out of the
appliance evenly
fried.
The type of potato is not suitable. Use fresh potatoes that are a lile oury when cooked.
The fries have not been properly rinsed
prior to frying.
Properly rinse the cut fries to remove starch.
Fresh fries are not
crispy when they
come out of the
appliance.
The amount of oil and water in the fries
determines how crispy they can be.
Dab the fries properly dry before adding oil.
Cut the fries more nely for a crispier result.
Add a lile more oil for a crispier result.
EN - 18

This symbol means that this product should not be disposed of with regular household waste (2012/19/EU).
Observe the rules that apply in your country for the separated collecon of electric and electronic products.
Correct disposal of the product prevents negave consequences for the environment and for public health.
The packaging material of this product can be recycled 100%, return packaging material separately.
RECYCLING
EN - 19

• Lesen Sie die Gebrauchsanweisung vor der ersten Verwendung
des Geräts vollständig und aufmerksam durch und bewahren Sie
diese sorgfälg auf, damit Sie sie auch später noch zurate ziehen
können.
Achtung! Berühren Sie die heißen Oberächen im Gerät
nicht, wenn das Gerät eingeschaltet ist.
Decken Sie niemals die Lueintris- und Luaustrisönungen
ab, wenn das Gerät in Betrieb ist.
Legen Sie die zu frierenden Speisen immer in den Korb. Damit
verhindern Sie, dass diese mit den Heizelementen in Berührung
kommen.
Füllen Sie das Gerät niemals mit Öl, andernfalls besteht
Feuergefahr.
Tauchen Sie das Gerät, das Kabel oder den Stecker niemals in
Wasser ein.
• Verwenden Sie dieses Gerät ausschließlich für die in der
Gebrauchsanleitung beschriebenen Zwecke.
• Schließen Sie das Gerät nur an Wechselstrom an einer Schuko-
Wandsteckdose mit einer Netzspannung an, die der auf dem
Typenschild des Geräts angegebenen Spannung entspricht.
• Sorgen Sie dafür, dass das Gerät für Kinder unzugänglich ist.
Kinder verstehen die Gefahren nicht, die beim Umgang mit
elektrischen Geräten entstehen können. Lassen Sie Kinder
deshalb nie ohne Aufsicht mit elektrischen Geräten haneren.
Sorgen Sie dafür, dass das Gerät und das Kabel für Kinder unter
8 Jahren unzugänglich sind.
• Das Gerät darf nur dann von Kindern ab 8 Jahren und von
Personen mit eingeschränkter körperlicher, sensorischer oder
mentaler Leistungsfähigkeit oder einem Mangel an Erfahrung
oder Wissen verwendet werden, wenn das Gerät von ihnen
unter Aufsicht verwendet wird oder sie über den sicheren
Gebrauch des Gerätes instruiert wurden und die sich aus dem
Gebrauch ergebenden Gefahren verstehen.
SICHERHEITSVORSCHRIFTEN - DE
DE - 20
Table of contents
Languages:
Other tomado Fryer manuals

tomado
tomado TDF3001S User manual

tomado
tomado TAF3202B User manual

tomado
tomado TM-1980 User manual

tomado
tomado TDF5001S User manual

tomado
tomado TM-1988 User manual

tomado
tomado TDF2501B User manual

tomado
tomado TAF5001B User manual

tomado
tomado TDF6001B User manual

tomado
tomado TDF6001S User manual

tomado
tomado TAF3201B User manual
Popular Fryer manuals by other brands

Becken
Becken BAF5437 instruction manual

Chefman
Chefman Auto-Stir AIR FRYER OVEN + quick start guide

Team Kalorik
Team Kalorik TKG FTL 1010 CW manual

HOLSEM
HOLSEM A5 user guide

Princess
Princess 01.183023.01.001 instruction manual

Paula Deen kitchen electrics
Paula Deen kitchen electrics PDAF2 Instructions & recipes