Toro 08751 User manual

FormNo.3370-336RevA
ToothRake
SandPro®3040and5040TractionUnits
ModelNo.08751—SerialNo.310000851andUp
ToregisteryourproductordownloadanOperator'sManualorPartsCatalogatnocharge,gotowww.Toro.com.OriginalInstructions(EN)

Introduction
Readthisinformationcarefullytolearnhowtooperate
andmaintainyourproductproperlyandtoavoidinjury
andproductdamage.Youareresponsibleforoperating
theproductproperlyandsafely.
YoumaycontactTorodirectlyatwww.Toro.comfor
productandaccessoryinformation,helpndinga
dealer,ortoregisteryourproduct.
Wheneveryouneedservice,genuineToroparts,or
additionalinformation,contactanAuthorizedService
DealerorToroCustomerServiceandhavethemodel
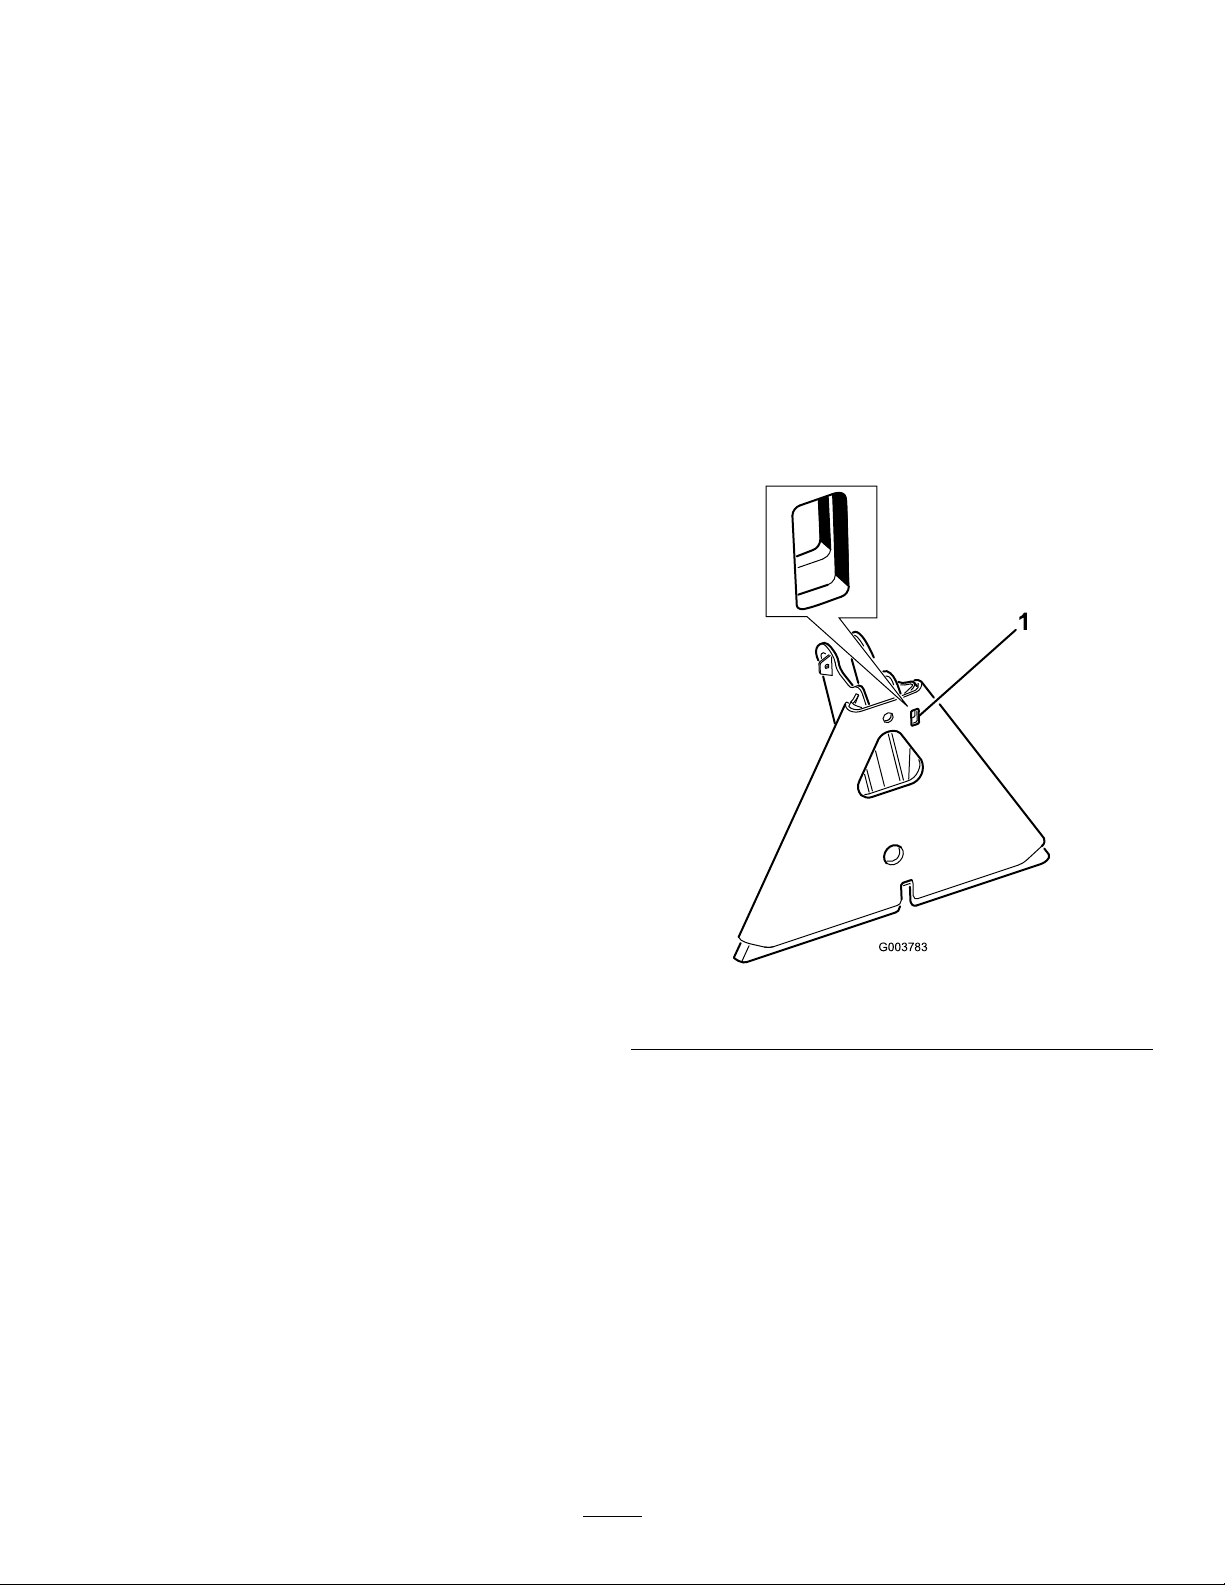
andserialnumbersofyourproductready.Figure1
identiesthelocationofthemodelandserialnumbers
ontheproduct.Writethenumbersinthespace
provided.
G003425
1
Figure1
1.Modelandserialnumberlocation
ModelNo.
SerialNo.
Thismanualidentiespotentialhazardsandhas
safetymessagesidentiedbythesafetyalertsymbol
(Figure2),whichsignalsahazardthatmaycauseserious
injuryordeathifyoudonotfollowtherecommended
precautions.
Figure2
1.Safetyalertsymbol
Thismanualuses2otherwordstohighlightinformation.
Importantcallsattentiontospecialmechanical
informationandNoteemphasizesgeneralinformation
worthyofspecialattention.
Contents
Introduction.................................................................2
Safety...........................................................................3
SafetyandInstructionalDecals.............................3
Setup............................................................................4
1AssemblingtheRake..........................................4
2MountingtheToothRaketotheTraction
Unit..................................................................5
3AdjustingtheLinkAssembly..............................6
4Reading/StoringtheDocumentation..................6
ProductOverview........................................................7
Operation.....................................................................7
TrainingPeriod.....................................................7
GeneralRakingInformation.................................7
RakingPattern......................................................7
EnteringandLeavingtheTrap..............................8
AdjustingtheRakeAngle......................................8
AdjustingtheTrowels...........................................8
UsingDragWeights..............................................9
SettingtheTransportPosition...............................9
InspectingandCleaningtheRakeandTraction
Unit..................................................................9
Maintenance...............................................................10
GreasingtheAttachmentAdapter.......................10
©2011—TheToro®Company
8111LyndaleAvenueSouth
Bloomington,MN554202
Contactusatwww.Toro.com.
PrintedintheUSA.
AllRightsReserved

Safety
SafetyandInstructionalDecals
Safetydecalsandinstructionsareeasilyvisibletotheoperatorandarelocatednearanyareaof
potentialdanger.Replaceanydecalthatisdamagedorlost.
106-5517
1.Warning–DoNottouchthehotsurface.
3

Setup
LooseParts
Usethechartbelowtoverifythatallpartshavebeenshipped.
ProcedureDescriptionQty.Use
Toothrakeassembly1
Shoulderbolt1
Washer3
Jamnut2
Attachmentadapterassembly1
Cotterpin2
Liftarmassembly1
Pivotbar1
Bolt(3/8x1-1/4inches)1
1
Locknut(3/8inch)1
Assembletherake.
Bolt(3/8x2-1/2inches)2
Washer(3/8x7/8inch)4
Spacer2
2Locknut(3/8inch)2
Mountthetoothraketothetractionunit.
3Nopartsrequired–Adjustthelinkassembly.
Operator’sManual1
4PartsCatalog1
Readthedocumentationandstoreitin
asafelocation.
1
AssemblingtheRake
Partsneededforthisprocedure:
1Toothrakeassembly
1Shoulderbolt
3Washer
2Jamnut
1Attachmentadapterassembly
2Cotterpin
1Liftarmassembly
1Pivotbar
1Bolt(3/8x1-1/4inches)
1Locknut(3/8inch)
Procedure
1.Securethepivotassemblytothetoothrakewith
ashoulderbolt,(2)washersand(2)jamnuts,
positioningasshowninFigure3.
Figure3
1.Shoulderbolt4.Toothrakehanger
2.Washer5.Jamnut
3.Pivotassembly
4

2.Aligntheliftarmwiththebracketontheattachment
adapter(Figure4)andconnectthemusingthepivot
barasillustratedinFigure5.
Note:Whenmovingtheattachmentadapter,use
thehandleprovidedonthebackoftheadapter
(Figure4).
Figure4
1.Liftarm2.Attachmentadapter
Figure5
1.Attachmentadapter4.Bolt(3/8x1-1/4inches)
2.Pivotbar5.Locknut(3/8inch)
3.Cotterpins6.Handle
3.Securethepivotbarwith2cotterpinsandabolt
(3/8x1-1/4inches)(Figure5).
2
MountingtheToothRaketo
theTractionUnit
Partsneededforthisprocedure:
2Bolt(3/8x2-1/2inches)
4Washer(3/8x7/8inch)
2Spacer
2Locknut(3/8inch)
Procedure
1.Removeanyattachmentfromtherearofthe
machine.
2.Lowerthetractionunitadapterandbackthetraction
unitintopositioninfrontoftheattachmentadapter.
Note:Makesurethelockingleverispivotedtothe
left(unlockedposition)asviewedfromtherearof
themachine.
3.Slidetheattachmentadapterontothetraction
adapter.
Important:Thelongarmoftheliftarm
assemblymustbeunderthetractionunitrear
frameassembly(Figure6).
CAUTION
Ifyouarenotcareful,youcouldpinchyour
ngersbetweentheattachmentandtraction
unitadapters.
Alwaysliftandmovetheattachmentusingthe
handleonthebackoftheattachmentadapter
(Figure6).
4.Pivotthelockinglevertotherighttolockthe
adapterstogether.
5.Securethetoplinkofeachchaintotheinsideofthe
liftarmusingabolt(3/8x2-1/2inches),2washers
(3/8x7/8inch),aspacer,andalocknut(3/8inch)
(Figure6).
5

Figure6
1.Chain5.Locknut(3/8inch)
2.Spacer6.Tractionunitrearframe
3.Bolt(3/8x2-1/2inches)7.Longarmoftheliftarm
assembly
4.Washer(3/8x7/8inch)
Note:Forproperoperationoftherake,thechains
mustbeslackwhentherakeisinthelowered
(operating)position.
Note:Makesureallthenishingrakesare
overlappingproperly,layingatandnoneofthe
chainsaretangledortwisted.
3
AdjustingtheLinkAssembly
NoPartsRequired
Procedure
1.Withtherakemountedandsecuredonthetraction
unit,raisetheattachment.
2.Measurethegapbetweenthetopwasherandthe
spacerinthelinkassemblyontheattachment
adapterasshowninFigure7.
Note:Thegapbetweenthewasherandthe
shouldershouldbe0.060to0.080inch(.15to.20
cm)(Figure7).
Figure7
1.0.060to0.080inch(.15to
.20cm)
3.Adjustmentnut
2.Jamnut
3.Ifthegapisnotcorrect,loosenthejamnutand
tightenorloosentheadjustmentnutonthelink
assemblyasneededtochangethegap(Figure7).
4
Reading/Storingthe
Documentation
Partsneededforthisprocedure:
1Operator’sManual
1PartsCatalog
Procedure
1.Readthedocumentation.
2.Storethedocumentationinasafeplace.
6

ProductOverview
Figure8
1.Attachmentadapter3.Liftarm5.Prong7.Toothrakehanger
2.Handle4.Finishingrake6.Trowel8.Lockinglever
Operation
Wesuggestthatyoureadthisentiresectiononraking
beforeactuallyrakingatrap.Therearemanyconditions
thatwilldeterminetheadjustmentsnecessary.The
textureanddepthofthesand,moisturecontent,weeds,
theamountofcompaction;alltheseconditionscan
varyfromcoursetocourse,orevenfromtraptotrap
onthesamecourse.Maketheadjustmentsontherake
foroptimumresultsinyourparticulararea.
TrainingPeriod
Practicerakinginoneofthelargeandleveltrapsonthe
course.Practicestartingandstopping,turning,raising
andloweringtherake,enteringandleavingthetrap,
etc.Practiceatamoderateenginespeedandaslow
groundspeed.Thistrainingperiodwillbebenecialto
theoperatoringainingcondenceintheperformance
ofthemachine.
Note:Donotbackupthetractionunitwiththe
attachmentlowered.Damagetotheattachmentwill
occur.
GeneralRakingInformation
Ifthesandisdeepenough,youcanrakerightuptothe
edgeofthetrapinlevelareas.
Ifthesandfeathersouttotheturf,stayfarenoughaway
fromtheedgetoavoiddisturbingtheunderlyingsoil.
Donotraketooclosetoashortsteepbank.Thesand
willmerelyowdownintothebottomofthetrap.
Sometouchupwithahandrakemaybenecessaryon
steepbanks,smallpockets,etc.
RakingPattern
Therecommendedpatternforrakingatrapisshown
inFigure9.Thispatternavoidsunnecessaryoverlap,
holdscompactiontoaminimumandleavesaneat,
attractivepatternonthesand.
Enterthetrapstraightintothelongdimension,where
thebankistheleastsevere.Drivethroughthecenter
ofthetrapalmosttotheend,turntoeitherdirectionas
sharpasyoucan,andcomerightbacknexttotherst
pass.Spiraloutwardasshowninthedrawing,andleave
thetrapatarightangleinalevelarea.
Leavesteep,shortbanksandsmallpocketsfortouch-up
withahandrake.
7

1
2
G003409
Figure9
1.Enteratrapstraightinto
thelongdimensionina
levelarea.
2.Exitatrapatarightangle
inalevelarea.
EnteringandLeavingtheTrap
Whenenteringthetrap,donotlowertherakeuntilthe
rakeisactuallyoverthesand.Thiswillavoidcuttingthe
turfordragginggrassclippingsorotherdebrisintothe
trap.Lowertherakewhilethemachineismoving.
Whenleavingthetrap,startraisingtherakewhenthe
frontwheelleavesthetrap.Asthemachinemovesout,
therakewillbeliftingandwillnotdragsandoutonto
thegrass.
Theoperatorwillsoongain,throughexperienceand
practice,therequiredtimingforenteringandleaving
thetrapproperly.
AdjustingtheRakeAngle
Youcanchangetheangleoftheraketoincreaseor
decreaseitsaggressivenessinthesand.Mounttherake
pivottothebottomholesintheattachmentadapter
brackets(Figure10)forlessaggressiverakingorthe
topholesformoreaggressiveraking.
Figure10
1.Rakepivot3.Moreaggressive
2.Attachmentadapter
brackets
4.Lessaggressive
AdjustingtheTrowels
Youcanadjustthelengthofthetrowelstoincreaseor
decreasetheamountofprongpenetration.
Loosenthetrowelmountingscrews,movethetrowel
upordowntothedesiredposition,andtightenthe
screws(Figure11).
2
1
G00341 1
Figure11
1.Trowel2.Mountingscrews
8

UsingDragWeights
Indamporcoarsesand,orifthereisconsiderable
vegetationordeepfootprintsinthetraps,optional
weightsmaybeboltedtothenishingrakes.Order
weightpartno.18-7570fromyourAuthorizedToro
Distributor.
SettingtheTransportPosition
Completethefollowingproceduretoincreasethe
heightoftherakewhentransporting:
1.Lowertherakeandliftassemblyaslowaspossible.
2.Disconnectthechainsfromtheliftarmsand
reconnectthemhigher.
Note:Toensureproperoperationofrake,thechains
mustbereturnedtotheoriginalslackpositionbefore
commencingoperation.
InspectingandCleaningthe
RakeandTractionUnit
Whentherakingoperationiscompleted,cleanthe
machinethoroughly.Sincethismachineisused
primarilyinsand,andsandisextremelyabrasive,
thesandshouldbeushedoffaftereachuse.Ifthe
machineiscleanedfrequently,(beforethesandhasa
chancetocake),itcanbecleanedwithastreamofwater
fromahosewiththenozzleremoved.Ahighpressure
streamcoulddrivethesandintowearareaswhereit
couldactasagrindingcompound.
Note:Iftheattachmentadapterbecomesstucktothe
tractionunitadapter,insertaprybar/screwdriverinto
thepryslottodisengagetheparts(Figure12).
G003783
1
Figure12
1.Pryslot
9

Notes:
11

TheToroTotalCoverageGuarantee
ALimitedWarranty
ConditionsandProductsCovered
TheToro®Companyanditsafliate,ToroWarrantyCompany,pursuant
toanagreementbetweenthem,jointlywarrantyourT oroCommercial
product(“Product”)tobefreefromdefectsinmaterialsorworkmanship
fortwoyearsor1500operationalhours*,whicheveroccursrst.This
warrantyisapplicabletoallproductswiththeexceptionofAerators
(refertoseparatewarrantystatementsfortheseproducts).Wherea
warrantableconditionexists,wewillrepairtheProductatnocosttoyou
includingdiagnostics,labor,parts,andtransportation.Thiswarranty
beginsonthedatetheProductisdeliveredtotheoriginalretailpurchaser.
*Productequippedwithanhourmeter.
InstructionsforObtainingWarrantyService
YouareresponsiblefornotifyingtheCommercialProductsDistributoror
AuthorizedCommercialProductsDealerfromwhomyoupurchasedthe
Productassoonasyoubelieveawarrantableconditionexists.Ifyouneed
helplocatingaCommercialProductsDistributororAuthorizedDealer,or
ifyouhavequestionsregardingyourwarrantyrightsorresponsibilities,
youmaycontactusat:
CommercialProductsServiceDepartment
ToroWarrantyCompany
8111LyndaleAvenueSouth
Bloomington,MN55420-1196
E-mail:[email protected]
OwnerResponsibilities
AstheProductowner,youareresponsibleforrequiredmaintenance
andadjustmentsstatedinyourOperator’sManual.Failuretoperform
requiredmaintenanceandadjustmentscanbegroundsfordisallowinga
warrantyclaim.
ItemsandConditionsNotCovered
Notallproductfailuresormalfunctionsthatoccurduringthewarranty
periodaredefectsinmaterialsorworkmanship.Thiswarrantydoesnot
coverthefollowing:
•Productfailureswhichresultfromtheuseofnon-T ororeplacement
parts,orfrominstallationanduseofadd-on,ormodiednon-Toro
brandedaccessoriesandproducts.Aseparatewarrantymaybe
providedbythemanufactureroftheseitems.
•Productfailureswhichresultfromfailuretoperformrecommended
maintenanceand/oradjustments.Failuretoproperlymaintainyour
ToroproductpertheRecommendedMaintenancelistedinthe
Operator’sManualcanresultinclaimsforwarrantybeingdenied.
•ProductfailureswhichresultfromoperatingtheProductinan
abusive,negligentorrecklessmanner.
•Partssubjecttoconsumptionthroughuseunlessfoundtobe
defective.Examplesofpartswhichareconsumed,orusedup,during
normalProductoperationinclude,butarenotlimitedto,brakes
padsandlinings,clutchlinings,blades,reels,bedknives,tines,
sparkplugs,castorwheels,tires,lters,belts,andcertainsprayer
componentssuchasdiaphragms,nozzles,andcheckvalves,etc.
•Failurescausedbyoutsideinuence.Itemsconsideredtobeoutside
inuenceinclude,butarenotlimitedto,weather,storagepractices,
contamination,useofunapprovedcoolants,lubricants,additives,
fertilizers,water,orchemicals,etc.
•Normalnoise,vibration,wearandtear,anddeterioration.
•Normal“wearandtear”includes,butisnotlimitedto,damageto
seatsduetowearorabrasion,wornpaintedsurfaces,scratched
decalsorwindows,etc.
Parts
Partsscheduledforreplacementasrequiredmaintenancearewarranted
fortheperiodoftimeuptothescheduledreplacementtimeforthatpart.
Partsreplacedunderthiswarrantyarecoveredforthedurationofthe
originalproductwarrantyandbecomethepropertyofT oro.T orowill
makethenaldecisionwhethertorepairanyexistingpartorassemblyor
replaceit.T oromayuseremanufacturedpartsforwarrantyrepairs.
NoteRegardingDeepCycleBatteryWarranty:
Deepcyclebatterieshaveaspeciedtotalnumberofkilowatt-hoursthey
candeliverduringtheirlifetime.Operating,recharging,andmaintenance
techniquescanextendorreducetotalbatterylife.Asthebatteriesinthis
productareconsumed,theamountofusefulworkbetweencharging
intervalswillslowlydecreaseuntilthebatteryiscompletelywornout.
Replacementofwornoutbatteries,duetonormalconsumption,isthe
responsibilityoftheproductowner.Batteryreplacementmayberequired
duringthenormalproductwarrantyperiodatowner’sexpense.
MaintenanceisatOwner’sExpense
Enginetune-up,lubricationcleaningandpolishing,replacementof
ItemsandConditionsNotCoveredlters,coolant,andcompleting
RecommendedMaintenancearesomeofthenormalservicesToro
productsrequirethatareattheowner’sexpense.
GeneralConditions
RepairbyanAuthorizedT oroDistributororDealerisyoursoleremedy
underthiswarranty.
NeitherTheToroCompanynorToroWarrantyCompanyisliablefor
indirect,incidentalorconsequentialdamagesinconnectionwiththe
useoftheToroProductscoveredbythiswarranty,includingany
costorexpenseofprovidingsubstituteequipmentorserviceduring
reasonableperiodsofmalfunctionornon-usependingcompletion
ofrepairsunderthiswarranty.ExceptfortheEmissionswarranty
referencedbelow,ifapplicable,thereisnootherexpresswarranty.
Allimpliedwarrantiesofmerchantabilityandtnessforusearelimitedto
thedurationofthisexpresswarranty.Somestatesdonotallowexclusions
ofincidentalorconsequentialdamages,orlimitationsonhowlongan
impliedwarrantylasts,sotheaboveexclusionsandlimitationsmaynot
applytoyou.
Thiswarrantygivesyouspeciclegalrights,andyoumayalsohaveother
rightswhichvaryfromstatetostate.
Noteregardingenginewarranty:
TheEmissionsControlSystemonyourProductmaybecoveredby
aseparatewarrantymeetingrequirementsestablishedbytheU.S.
EnvironmentalProtectionAgency(EPA)and/ortheCaliforniaAir
ResourcesBoard(CARB).Thehourlimitationssetforthabovedonot
applytotheEmissionsControlSystemWarranty.RefertotheEngine
EmissionControlWarrantyStatementprintedinyourOperator’sManual
orcontainedintheenginemanufacturer’sdocumentationfordetails
CountriesOtherthantheUnitedStatesorCanada
CustomerswhohavepurchasedT oroproductsexportedfromtheUnitedStatesorCanadashouldcontacttheirT oroDistributor(Dealer)toobtain
guaranteepoliciesforyourcountry,province,orstate.IfforanyreasonyouaredissatisedwithyourDistributor’sserviceorhavedifcultyobtaining
guaranteeinformation,contacttheToroimporter.Ifallotherremediesfail,youmaycontactusatT oroWarrantyCompany.
374-0253RevA
Table of contents
Other Toro Farm Equipment manuals

Toro
Toro ProPass 200 User manual

Toro
Toro ProLine 30139 User manual

Toro
Toro 22472 User manual

Toro
Toro 25531E User manual

Toro
Toro Sand Pro 5040 User manual

Toro
Toro Pro Sneak 360 User manual

Toro
Toro 04482 200000001 User manual

Toro
Toro Outcross 9060 Series User manual

Toro
Toro 41614 User manual

Toro
Toro 99-0281 User manual

Toro
Toro 25464 User manual

Toro
Toro Multi Pro 5800 User manual

Toro
Toro 41622 User manual

Toro
Toro 132-9293 User manual

Toro
Toro Trans Pro 100 User manual

Toro
Toro 08718 User manual

Toro
Toro VS-400 User manual

Toro
Toro Groundsmaster 4500-D User manual

Toro
Toro Reelmaster 33452 User manual

Toro
Toro 2226 Quick start guide