manuals.online logo
Brands
  1. Home
  2. •
  3. Brands
  4. •
  5. Dometic
  6. •
  7. Window Blind
  8. •
  9. Dometic SKYSOL 2 User manual

Dometic SKYSOL 2 User manual

Head rail Brackets
2 Bar Bottom Fixing Blocks
3 Bar Bottom rail Brackets
2 Bar Bottom Fixin
g
Blocks
SKYSOL 2 MANUAL -Installation Instructions
Unpacking and Initial Installation
Check blind is the correct one for the window by measuring the width/drop dimensions – see label on plastic sleeve – as
shaped handed pairs can look similar.
Take off elastic bands and ensure the cords and wires are free from obstruction. Allow blind to open by holding the head rail
and letting the moving rail and/or bottom rail drop.
For a 2 bar blind the cords/guide wires need to run in a straight line centrally through the holes in the fabric. The vast majority
of blinds require the cords/guide wires to be mounted perpendicular to the head rail. Make sure you position the fixing blocks
correctly. Once all brackets are in place clip the head rail into its brackets.
Offer blind up to window to determine the positions for the mounting brackets. The recommended locations for the fixing
brackets are indicated on the back of the head rail (and the inside of the bottom rail on 3 bar blinds) by a round black sticker.
Make sure that there is enough room behind the brackets to be able to access the release clip.
Then clip the bottom rail or bottom fixing blocks in place, make sure that the head rail and bottom rail or fixing blocks are
aligned.
Face Fix MountingTop Fix Mounting
Face Fix Mounting Top Fix Mounting
Head rail - Clipping into Position A Head rail - Clipping into Position B
Clipping into Position Face Fix Clipping into Position Top Fix
© Dometic UK Blind Systems Ltd
Dometic UK Blind Systems Ltd Chichester PO20 0AY England
t: +44 (0)1243 606909 f: +44 (0)1243 608300 www.dometic.com e: [email protected]
CRN 109, Issue 3, May 2009
3 Bar Bottom rail
To alter the cord tension first unclip the head rail.
Before clipping the blind in place replace the plastic capping and endcap that was removed to perform the adjustments.
Remove one endcap from the head rail and slide out the plastic capping to reveal the springs. It is advisable to mark the cord
at the knot to show where the original setting was in relation to the spring. Undo the knot and to increase tension pull the
mark closer to the spring, to decrease tension allow the mark to move away from the spring. Once re-tensioning has been
completed ensure the knots cannot slip.
Check the spring tension of the cords by running the blind up and down. The higher the spring tension the more friction
created and the firmer the moving rail. Too loose and the moving rail will fall under its own weight, too tight and it will not
move.
If you need to adjust the tension you will need to adjust both the cords and the guide wires.
Finally align the head rail with its opposite fixings and clip into position, if the fabric appears to be pinching at one side and
fanning at the other you may need to unclip and re-align the head rail or bottom rail/fixing blocks and then re-check the guide
wire tension. If at this stage the guide wire tension is inadequate then unclip the head rail (if necessary) and repeat the above
Adjusting the Blind Tension
To alter the guide wire tension on a 3 bar blind use the quick tension system on the bottom rail. Do this with the red handle
provided in the spares kit. The red handle is placed over the bottom rail, clipping onto the quick tension unit, slide this handle
to increase/decrease tension on the guide wire. Where possible leave this action until the blind is in its fixing clips so that you
may put tension onto the guide wires without making it difficult to mount. The guide wires are to be as tight as possible to stop
any unwanted movement in the blind.
Check the tension of the blind once more by offering up the head rail to its brackets and re-checking the tension, if necessary
repeat the above process.
Trim over-length guide wire ends (around 75mm [3"] to allow for further re-tensioning if needed) and tuck tails into the head
rail. Excess cord/guide wire at fixing blocks can now be trimmed.
To alter the guide wire tension on a 2 bar blind, remove one endcap from the head rail and slide out the capping strip. Identify
the spring(s) requiring retensioning. Loosen the 2mm grub screw in the barrel clamp next to the spring and pull the loose end
of the guide wire to increase the tension, while under load tighten the grub screw. Now offer the blind to its head rail clips, if
necessary repeat the above process. Replace capping and endcap once the correct tension has been set.
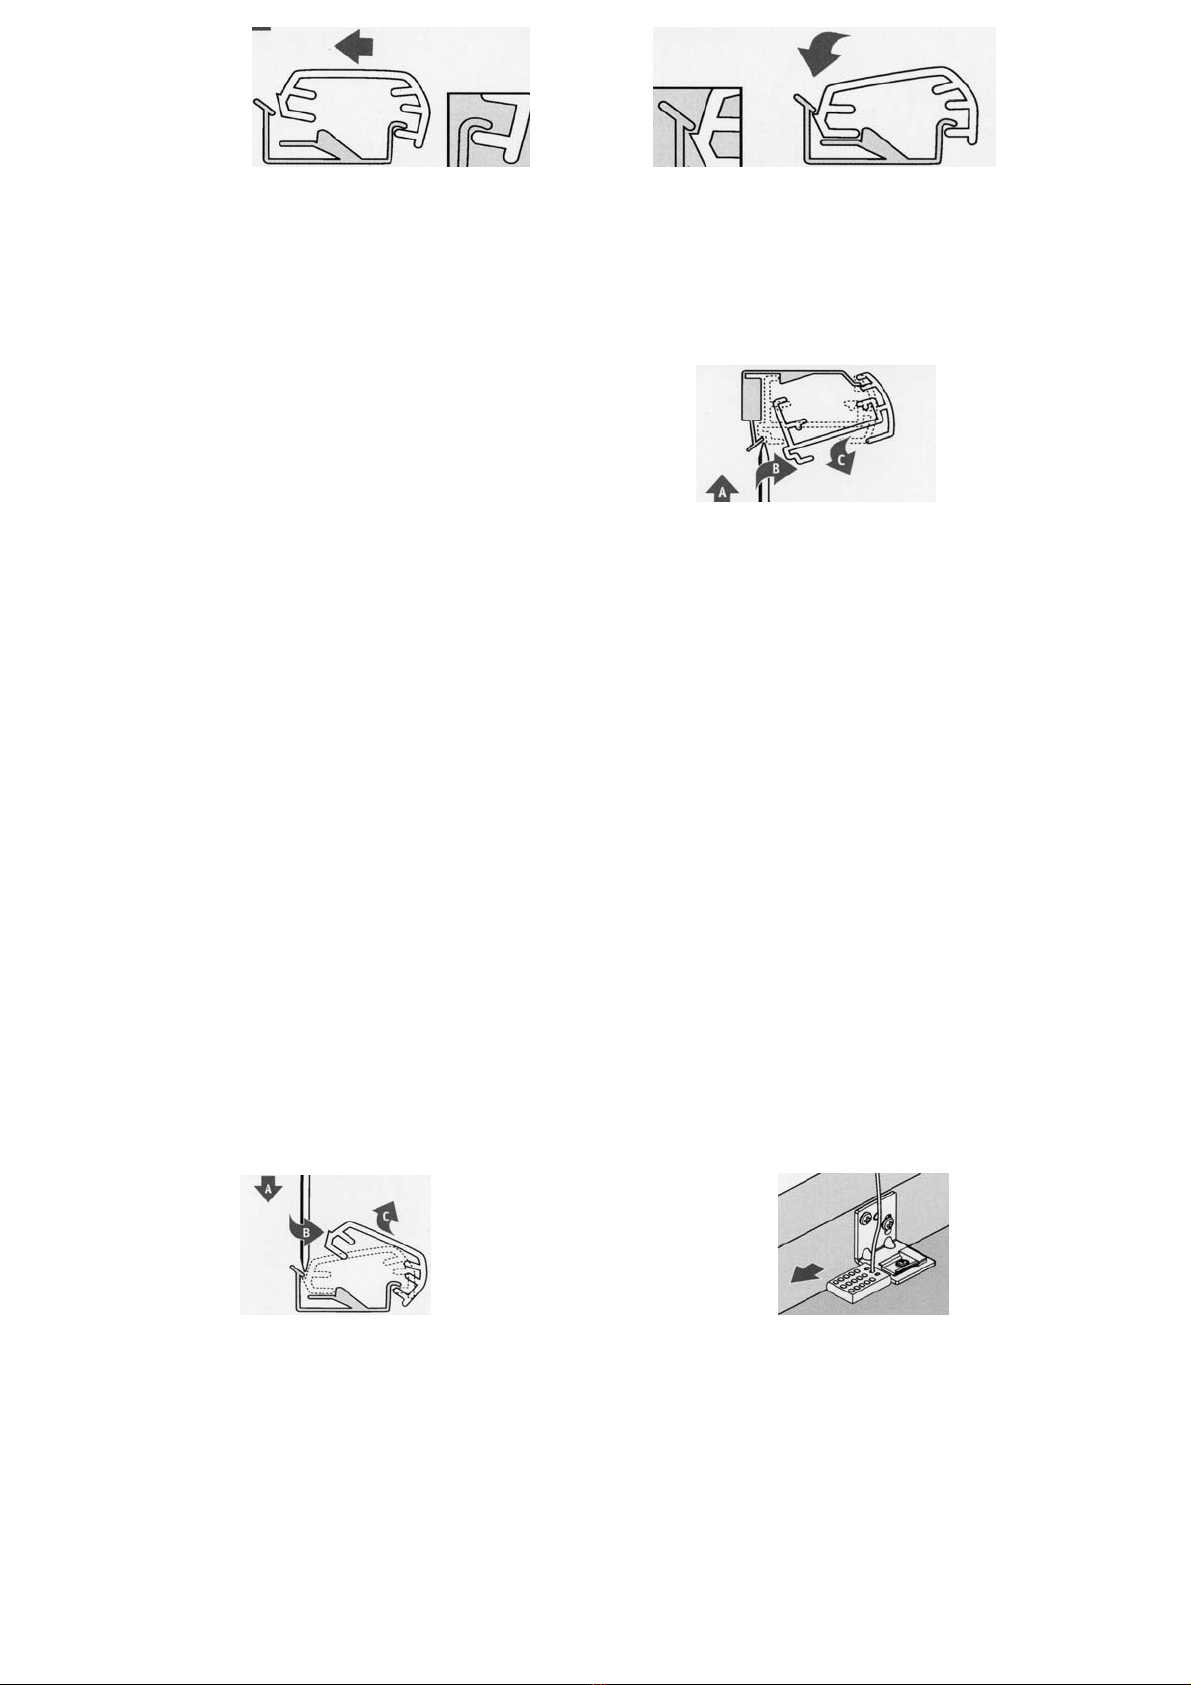
Clipping into Position A Clipping into Position B
Head rail - Removal
Bottom rail - Removal Fixing Block - Removal
© Dometic UK Blind Systems Ltd
General Points
Shaped Blinds – Ensure that there is sufficient space between the edges of the blind and the recess, so that the fabric does
not foul on the recess at any time.
Any puckering of the blind means the blind has not been set up as per the original dimensions given – check the head rail is
in the correct alignment in relation to the bottom rail/fixing blocks. Alternatively the initial measurements were incorrect.
Ensure the fabric is kept clean at all times and take care not to crush the pleats
Dometic UK Blind Systems Ltd Chichester PO20 0AY England
t: +44 (0)1243 606909 f: +44 (0)1243 608300 www.dometic.com e: [email protected]
CRN 109, Issue 3, May 2009
Top StackTop Stack
22mm [7/8"]
12mm [1/2"]
15mm [5/8"]
5mm [1/4"]
Manual, 2 Bar, Top FixManual, 2 Bar, Face Fix
50mm [2"]
Stacking Height
Stacking Height
26mm [1"]
20mm [3/4"]
14mm [1/2"]
26mm [1"]
Headrail
Movingrail
Fixing Block
Spacer For Fixing Block
Valance
Cord/Guide Wire
Moving rail
Head rail
Top StackTop Stack
Headrail
Movingrail
Valance
Cord/Guide Wire
Manual, 3 Bar, Top FixManual, 3 Bar, Face Fix
26mm [1"]
Fixrail
50mm [2"]
Stacking Height
Stacking Height
31mm [1 1/4"]
13mm [1/2"]
26mm [1"]
28mm [1 1/8"] 20mm [3/4"]
20mm [3/4"]
14mm [1/2"]
Head rail
Moving rail
Bottom rail
© Dometic UK Blind Systems Ltd
Dometic UK Blind Systems Ltd Chichester PO20 0AY England
t: +44 (0)1243 606909 f: +44 (0)1243 608300 www.dometic.com e: [email protected]
CRN 109, Issue 3, May 2009
Bottom StackBottom Stack
50mm [2"]
Stacking Height
Stacking Height
26mm [1"]
20mm [3/4"]
14mm [1/2"]
26mm [1"]
22mm [7/8"]
12mm [1/2"]
15mm [5/8"]
5mm [1/4"]
Manual, 2 Bar, Top FixManual, 2 Bar, Face Fix
Headrail
Movingrail
Fixing Block
Spacer For Fixing Block
Valance
Cord/Guide Wire
Moving rail
Head rail
Bottom StackBottom Stack
50mm [2"]
Stacking Height
Stacking Height
31mm [1 1/4"]
13mm [1/2"]
26mm [1"]
28mm [1 1/8"] 20mm [3/4"]
20mm [3/4"]
14mm [1/2"]
26mm [1"]
Manual, 3 Bar, Top FixManual, 3 Bar, Face Fix
Fixrail
Headrail
Movingrail
Valance
Cord/Guide Wire
Bottom rail
Moving rail
Head rail
© Dometic UK Blind Systems Ltd
Dometic UK Blind Systems Ltd Chichester PO20 0AY England
t: +44 (0)1243 606909 f: +44 (0)1243 608300 www.dometic.com e: [email protected]
CRN 109, Issue 3, May 2009

Other Dometic Window Blind manuals

Dometic Rastrollo 3000 User manual

Dometic

Dometic Rastrollo 3000 User manual

Dometic Oceanair Skysol Frame Manual User manual

Dometic

Dometic Oceanair Skysol Frame Manual User manual

Dometic SKYVENETIAN Operating instructions

Dometic

Dometic SKYVENETIAN Operating instructions

Dometic SKYSOL User manual

Dometic

Dometic SKYSOL User manual

Dometic Oceanair Romanblind User manual

Dometic

Dometic Oceanair Romanblind User manual

Dometic FP300 User manual

Dometic

Dometic FP300 User manual

Dometic FlyTec FT100 User manual

Dometic

Dometic FlyTec FT100 User manual

Dometic SKYSOL AB User manual

Dometic

Dometic SKYSOL AB User manual

Dometic Rollerblind Precision BR38 User manual

Dometic

Dometic Rollerblind Precision BR38 User manual

Dometic FR 400 User manual

Dometic

Dometic FR 400 User manual

Dometic FR 400 User manual

Dometic

Dometic FR 400 User manual

Dometic FP200 User manual

Dometic

Dometic FP200 User manual

Dometic SKYSOL CLASSIC User manual

Dometic

Dometic SKYSOL CLASSIC User manual

Dometic Oceanair Skyvenetian User manual

Dometic

Dometic Oceanair Skyvenetian User manual

Dometic Oceanair Rollerblind Powered User manual

Dometic

Dometic Oceanair Rollerblind Powered User manual

Dometic Oceanair Romanblind User manual

Dometic

Dometic Oceanair Romanblind User manual

Dometic Rastrollo 2000 User manual

Dometic

Dometic Rastrollo 2000 User manual

Dometic SKYSCREEN 2 User manual

Dometic

Dometic SKYSCREEN 2 User manual

Dometic Oceanair SKYSCREEN User manual

Dometic

Dometic Oceanair SKYSCREEN User manual

Dometic Rollerblind PrecisionRise User manual

Dometic

Dometic Rollerblind PrecisionRise User manual

Dometic 1302 User manual

Dometic

Dometic 1302 User manual

Dometic FP200 User manual

Dometic

Dometic FP200 User manual

Dometic DB3H User manual

Dometic

Dometic DB3H User manual

Dometic SKYSCREEN POWERED Series User manual

Dometic

Dometic SKYSCREEN POWERED Series User manual

Popular Window Blind manuals by other brands

LuxaFlex Duette UltraGlide Installation & operation

LuxaFlex

LuxaFlex Duette UltraGlide Installation & operation

Betta VEUE installation manual

Betta

Betta VEUE installation manual

SelectBlinds OPEN ROLL Z-125 installation instructions

SelectBlinds

SelectBlinds OPEN ROLL Z-125 installation instructions

FAAC TM2 E manual

FAAC

FAAC TM2 E manual

Velux ZIL installation instructions

Velux

Velux ZIL installation instructions

Jiecang SR Series user manual

Jiecang

Jiecang SR Series user manual

VENETA 65101-10242-G installation instructions

VENETA

VENETA 65101-10242-G installation instructions

Roto ZFA M Mounting instructions

Roto

Roto ZFA M Mounting instructions

Velux Z0V Series manual

Velux

Velux Z0V Series manual

Schenker Storen VSe ZIP Series installation instructions

Schenker Storen

Schenker Storen VSe ZIP Series installation instructions

Hard Head 021573 operating instructions

Hard Head

Hard Head 021573 operating instructions

YewdaleDefiant R20 Fitting instructions

YewdaleDefiant

YewdaleDefiant R20 Fitting instructions

fakro ARZ Z-Wave user manual

fakro

fakro ARZ Z-Wave user manual

Lutron Electronics Sivoia QED Wiring and Programming Guide

Lutron Electronics

Lutron Electronics Sivoia QED Wiring and Programming Guide

Victoria M RAFFROLLO installation instructions

Victoria M

Victoria M RAFFROLLO installation instructions

EkoOkna RAFF-I Assembly instruction

EkoOkna

EkoOkna RAFF-I Assembly instruction

IKEA FYRTUR 100 manual

IKEA

IKEA FYRTUR 100 manual

LuxaFlex Super Nova Mounting instruction

LuxaFlex

LuxaFlex Super Nova Mounting instruction

manuals.online logo
manuals.online logoBrands
  • About & Mission
  • Contact us
  • Privacy Policy
  • Terms and Conditions

Copyright 2025 Manuals.Online. All Rights Reserved.