manuals.online logo
Brands
  1. Home
  2. •
  3. Brands
  4. •
  5. TP-Link
  6. •
  7. Control Unit
  8. •
  9. TP-Link kasa smart KE100 User manual

TP-Link kasa smart KE100 User manual

Smart Thermostatic Radiator Valve
Quick Start Guide
7106509348 REV1.0.0
Install Guide:
Scan QR code or visit
https://www.tp-link.com/support/faq/3404/
1. Set up a Kasa smart hub in the Kasa Smart app if you
haven’t already done so. You can get the Kasa Smart app
from the App Store or Google Play.
If you want to remotely control / manage the valve, you need to add a Kasa smart hub rst. You can adjust temperature manually.
After inserting the batteries, the valve is ready to use.
Rotate the valve to increase / decrease temperature.
OR
2. Use the provided cover-opener to press and hold the
SYNC/RESET button for 5 seconds to reset the valve.
3. Open the Kasa Smart app, tap + and select Smart
Thermostats. Follow the app instructions to pair the valve
and complete setup.
There are two types of valves: Thermostatic and Manual.
Kasa Smart Thermostatic Radiator Valve is only compatible with the thermostatic valve.
If your connector is M30 x 1.5, you can screw the new valve onto the radiator directly.
If not, check whether one of the provided adapters ts the connector. If your none of them t your
connector, please purchase a proper one yourself.
Thermostatic Valve Manual Valve
1. Check existing valve type 2. Check the connector type
01 / Check Compatibility
03 / Install the Valve
04 / Set Up the Valve After Install Don’t Have a Hub?
1. Install the valve rst before powering it up.
2. No need to shut o water before changing the radiator
valve. Water will not leak.
3. Avoid installing the valve in the same room where you
have installed the boiler thermostat.
4. Install the valve within range of your Kasa smart hub if you
wish to control it using the Kasa Smart app.
02 / Install Requirements
1. Unscrew the existing valve.Read the following instructions rst before installing
the new valve:
2. Screw the new valve directly (for M30 x 1.5 connector) or after installing
the proper adapter (for non-M30 x 1.5 connectors). The ▲ at the bottom
of the valve indicates the position of the display.
4. Open the battery cover and insert two AA LR6 Alkaline
batteries. Make sure the positive and negative
terminals face the correct direction.
3. Remove the cover of the valve by rotating
counterclockwise using the provided cover-opener.
*Do NOT use rechargeable batteries or 1.2V AA batteries.
M30 x 1.5
RAVL Adapter
RAV Adapter
RA Adapter
30mm
1.5mm
Vertical InstallationHorizontal Installation
SYNC/RESET
*Images may dier from your actual product.
Frequently Asked Questions (FAQ)
Q1. What should I do if the display shows ?
Q3. Why CAN’T I control my radiator valve?
Q4. Can the radiator valve continue to work if there
is no wireless connection or no internet access?
Check if the valve is installed properly.
Rotate the valve, and then the valve will calibrate
automatically.
TP-Link hereby declares that the device is in compliance with the essential
requirements and other relevant provisions of directives 2014/53/EU,
2009/125/EC, 2011/65/EU and (EU)2015/863.
The original EU declaration of conformity may be found at
https://www.tp-link.com/en/support/ce/
TP-Link hereby declares that the device is in compliance with the essential
requirements and other relevant provisions of the Radio Equipment Regulations
2017.
The original UK declaration of conformity may be found at
https://www.tp-link.com/support/ukca/
Safety Information
• Keep the device away from water, re, humidity or hot environments.
• Do not attempt to disassemble, repair, or modify the device. If you need
service, please contact us.
• Do not use the device where wireless devices are not allowed.
• Please read and follow the above safety information when operating the
device.
• We cannot guarantee that no accidents or damage will occur due to improper
use of the device. Please use this product with care and operate at your own
risk.
• Do not ingest battery, Chemical Burn Hazard
• Keep new and used batteries away from children.
CAUTION!
• Avoid replacement of a battery with an incorrect type that can defeat a
safeguard.
• Avoid disposal of a battery into re or a hot oven, or mechanically crushing or
cutting of a battery, that can result in an explosion.
• Do not leave a battery in an extremely high temperature surrounding
environment that can result in an explosion or the leakage of ammable liquid
or gas; Do not leave a battery subjected to extremely low air pressure that may
result in an explosion or the leakage of ammable liquid or gas.
Wireless:
Operating Frequency / Nominal Operating Frequency / Max Output Power:
863~865MHz / 863.35MHz / 25mW(e.r.p)
863~865MHz / 864.35MHz / 25mW(e.r.p)
868~868.6MHz / 868.35MHz / 25mW(e.r.p)
Need some help?
?
Visit www.tp-link.com/support
for technical support, user guides, FAQs,
warranty & more
Check if the connector is M30 x 1.5. If not, choose a
proper adapter.
If the display shows or , please refer to Q1/Q2.
If the display shows , then the battery power is
running low and the valve can’t work properly. Please
replace the batteries.
You can still manage the valve in the Kasa Smart app
as long as your phone is connected to the same Wi-Fi
network as the valve.
Manual control still works. You can rotate the control
knob to adjust temperature.
The schedules you have set will still activate as long
as the connected hub works properly.
Q5. How can I reset the radiator valve?
Remove the cover of the valve, then use the
cover-opener to press and hold the SYNC/RESET
button for at least 5 seconds to reset the valve.
Open the Kasa Smart app, then remove the valve on
the Home page or in Device Settings. The valve will
reset automatically.
Refer to Q5 to reset the valve and set it up again.
Q2. What should I do if the display shows ?
Re-install the old valve head and open/close it multiple
times to improve the pin’s movement. Then, restart
and remount the new valve.
The valve might be blocked by calcification. Use a
spanner or a similar tool to move the pin in and out to
unblock the valve.
Replace the batteries.
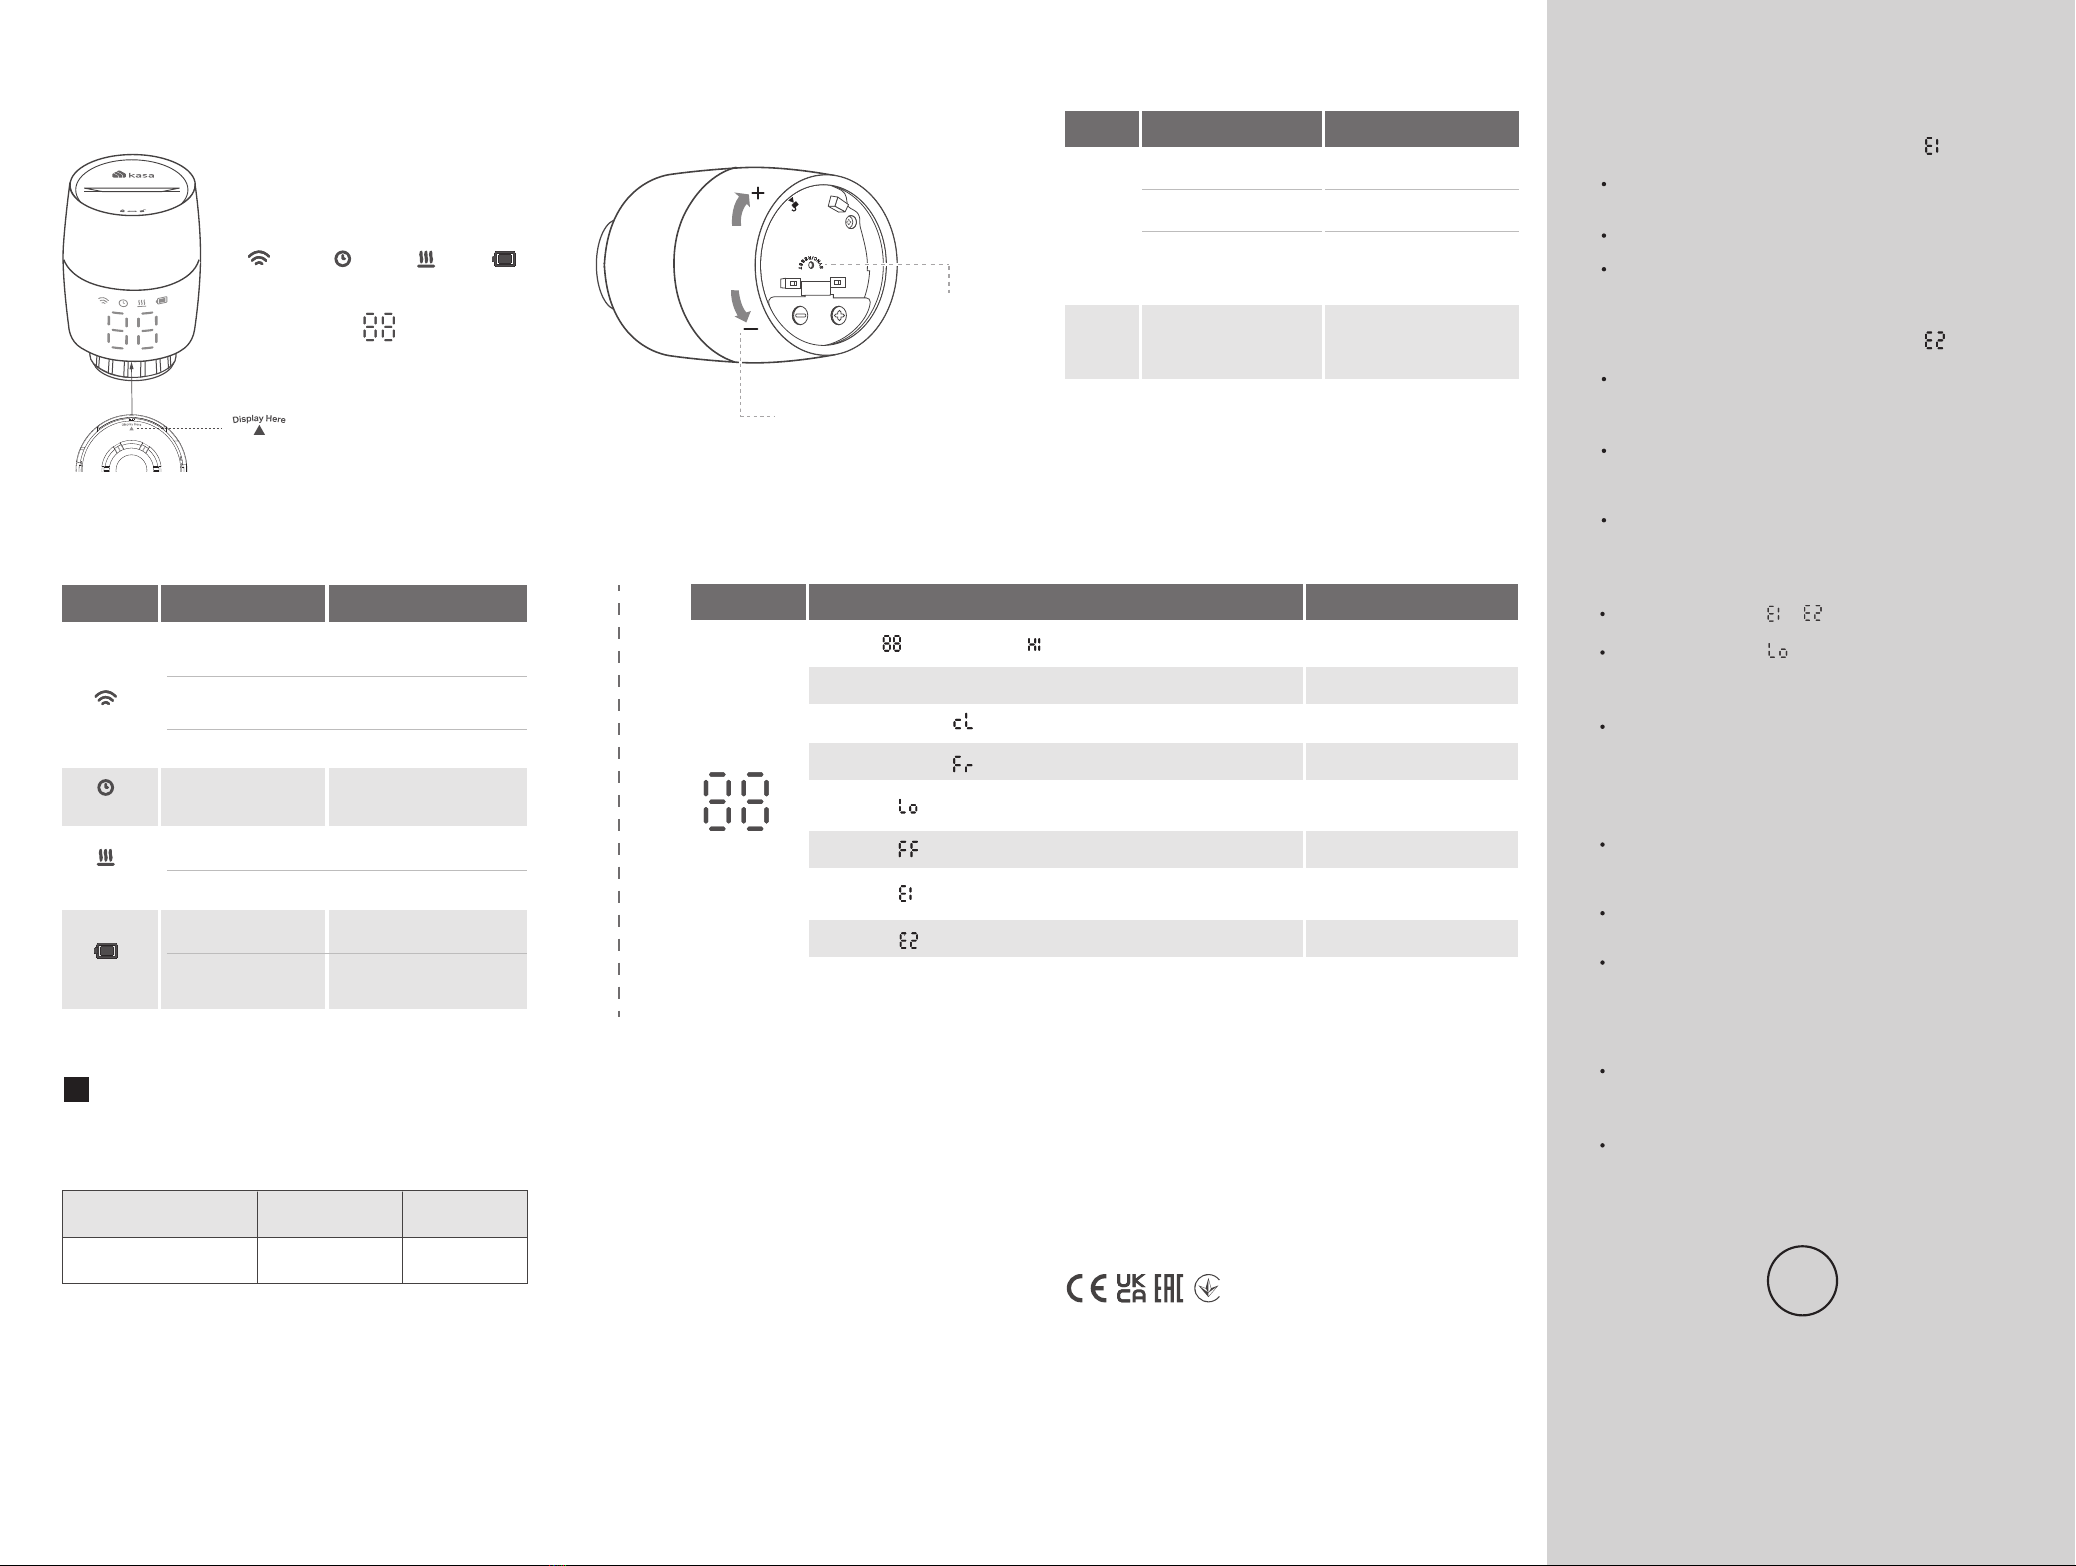
LED
Temperature
Event
Valve blocked by calcification
*You can rotate the LED display 180° in the Kasa Smart app.
Starting up
Calibrating
Frost protection
Low battery:
Valve can’t work properly
Sleep mode
Child lock enabled
No valve detected or valve
not compatible
LED Status
Displaying
Displaying
Moving light, then displaying normal temperature
Blinking twice, then blinking , finally displaying normal temperature
Switching between and the normal temperature
Displaying
Displaying
LED Explanations
Button Operation Result
Control
Knob
SYNC/
RESET
Rotate clockwise
Rotate counterclockwise
Rotate with no shown
display
Lower temperature.
Restore to factory default
settings, and enter pairing
mode.
Activate the display. Then
you can rotate to adjust
the temperature.
Raise temperature.
Press and hold for
5seconds
Button Explanations
LED
Wireless
Schedule
Heating
LED Status
Blinking fast
Solid on
Solid on
Solid on
LED is off
Blinking
Solid on
Battery
Event
Pairing;
Device resetting
Pairing complete
Blinking slowly Ready to be paired;
Offline
Adjust temperature
based on your schedule
Raise temperature
Keep/lower temperature
Low battery
Sufficient battery
power
LEDs:
Temperature
Appearance
Heating Battery
Wireless Schedule
SYNC/RESET
Control Knob
Indicates the position of the display
!Battery Instructions
Compatible Batteries:
Battery Type Battery Voltage Work Temp.
AA LR6 alkaline battery 1.5V 0℃-40℃
Note: Do NOT use rechargeable batteries or 1.2V AA
batteries.
©2022 TP-Link

Other TP-Link Control Unit manuals

TP-Link TL-SM311LS User manual

TP-Link

TP-Link TL-SM311LS User manual

TP-Link TL-SM331T User manual

TP-Link

TP-Link TL-SM331T User manual

TP-Link kasa smart KE100 User manual

TP-Link

TP-Link kasa smart KE100 User manual

TP-Link Kasa Smart KE100 KIT User manual

TP-Link

TP-Link Kasa Smart KE100 KIT User manual

TP-Link TL-SM311 Series User manual

TP-Link

TP-Link TL-SM311 Series User manual

TP-Link TL-SM201 Series User manual

TP-Link

TP-Link TL-SM201 Series User manual

TP-Link TL-SM321A User manual

TP-Link

TP-Link TL-SM321A User manual

TP-Link Omada SM311LS V5 User manual

TP-Link

TP-Link Omada SM311LS V5 User manual

TP-Link TL-SM321A User manual

TP-Link

TP-Link TL-SM321A User manual

TP-Link TL-SM311LS User manual

TP-Link

TP-Link TL-SM311LS User manual

TP-Link TL-SM321A User manual

TP-Link

TP-Link TL-SM321A User manual

TP-Link kasa smart KE100 User manual

TP-Link

TP-Link kasa smart KE100 User manual

TP-Link KLM100 User manual

TP-Link

TP-Link KLM100 User manual

TP-Link TL-SM331T User manual

TP-Link

TP-Link TL-SM331T User manual

TP-Link kasa smart KE100 V1.20 User manual

TP-Link

TP-Link kasa smart KE100 V1.20 User manual

TP-Link ecoNET300 Specification sheet

TP-Link

TP-Link ecoNET300 Specification sheet

TP-Link TL-SM321A User manual

TP-Link

TP-Link TL-SM321A User manual

TP-Link DS-PMA-C+ V1 User manual

TP-Link

TP-Link DS-PMA-C+ V1 User manual

Popular Control Unit manuals by other brands

Harman AMX HPX-AV102-MDP-R quick start guide

Harman

Harman AMX HPX-AV102-MDP-R quick start guide

Coax Quadax Series operating instructions

Coax

Coax Quadax Series operating instructions

Barco Hydra user manual

Barco

Barco Hydra user manual

NXP Semiconductors i.MX8 QM Developer's guide

NXP Semiconductors

NXP Semiconductors i.MX8 QM Developer's guide

ascon TRH03 Engineering manual

ascon

ascon TRH03 Engineering manual

CommScope CMOD installation instructions

CommScope

CommScope CMOD installation instructions

Bang & Olufsen BEOLINK VIDEO Handbook

Bang & Olufsen

Bang & Olufsen BEOLINK VIDEO Handbook

Honeywell SmartValve SV9520H manual

Honeywell

Honeywell SmartValve SV9520H manual

Cloud BT-IFW installation guide

Cloud

Cloud BT-IFW installation guide

Kontron COMe-bKL6 user guide

Kontron

Kontron COMe-bKL6 user guide

Keysight Technologies 34952A user guide

Keysight Technologies

Keysight Technologies 34952A user guide

DMP Electronics 714 installation guide

DMP Electronics

DMP Electronics 714 installation guide

Philips PM 2190 operating instructions

Philips

Philips PM 2190 operating instructions

PICOLAS LDP-AV 4N55-90 user manual

PICOLAS

PICOLAS LDP-AV 4N55-90 user manual

VAT 64246-UEHC-0001 Installation, operating,  & maintenance instructions

VAT

VAT 64246-UEHC-0001 Installation, operating, & maintenance instructions

ITRON ERT 40W manual

ITRON

ITRON ERT 40W manual

Siemens SINAMICS S120 Equipment manual

Siemens

Siemens SINAMICS S120 Equipment manual

Grundfos BM Installation and operating instructions

Grundfos

Grundfos BM Installation and operating instructions

manuals.online logo
manuals.online logoBrands
  • About & Mission
  • Contact us
  • Privacy Policy
  • Terms and Conditions

Copyright 2025 Manuals.Online. All Rights Reserved.