TRAK Airwolf EVO-T Programming manual

Copyright ©2021, Southwestern Industries, Inc. All rights are reserved. No part of this publication may
be reproduced, stored in a retrieval system, or transmitted, in any form or by any means, mechanical,
photocopying, recording or otherwise, without the prior written permission of Southwestern Industries,
Inc.
While every effort has been made to include all the information required for the purposes of this guide, Southwestern
Industries, Inc. assumes no responsibility for inaccuracies or omission and accepts no liability for damages resulting
from the use of the information contained in this guide.
All brand names and products are trademarks or registered trademarks of their respective holders.
TRAK Machine Tools
Southwestern Industries, Inc.
2615 Homestead Place
Rancho Dominguez, CA 90220-5610
Phone 310.608.4422 ▪ Fax 310.764.2668
Service Department
Phone 800.367.3165 ▪ Fax 310.886.8029
Web: www.trakmt.com

i
TRAK Machine Tools
Southwestern Industries, Inc.
Airwolf EVO 3D Printers - Installation, Printing, Maintenance & Troubleshooting Manual
Table of Contents
Printer Model & Serial Number .............................................................................................................1
Buytrakparts.com Login Credentials .....................................................................................................1
1.0 Safety .....................................................................................................................................2
1.1 Safety Publications ...............................................................................................................2
1.2 Safety Labels & Notices as Used in this Manual ......................................................................2
1.3 Safety & Information Labels Used on the EVO-T and EVO22-T ................................................2
1.4 Safety Precautions................................................................................................................3
1.5 Safety Features ....................................................................................................................3
1.5.1. HARDWARE ..................................................................................................................3
1.5.2. SOFTWARE...................................................................................................................3
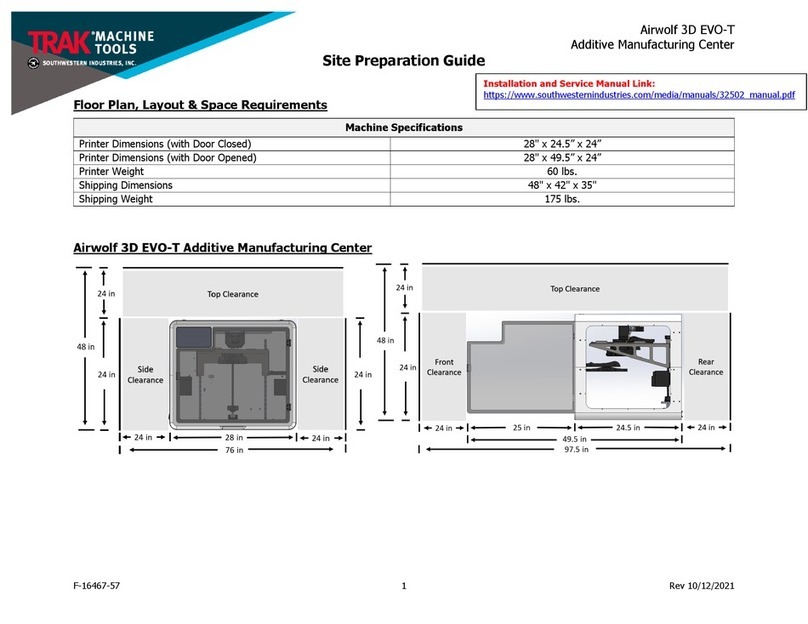
2.0 Site Prep & Requirements.........................................................................................................4
2.1 Printer Specifications ............................................................................................................4
2.2 Floor Plan, Layout & Space Requirements ..............................................................................5
2.2.1. EVO-T ..........................................................................................................................5
2.2.2. EVO22-T.......................................................................................................................6
3.0 Installation Process ..................................................................................................................7
3.1 Lifting, Moving, Uncrating, and Unpacking .............................................................................7
3.2 Packing List..........................................................................................................................9
3.3 Benchmark Part: Euclid Block ..............................................................................................10
3.4 Orientation, Controls & Functions ........................................................................................11
3.5Installation of Additional Components..................................................................................16
3.5.1. Top Cover ..................................................................................................................16
3.5.2. Install Glass onto bed..................................................................................................16
3.5.3. Connecting the Cables, Powering ON ...........................................................................17
3.6 LCD Overview ....................................................................................................................18
3.6.1. Home Menu................................................................................................................18
3.6.2. Print Menu..................................................................................................................19
3.6.3. Preheat Menu .............................................................................................................20
3.6.4. Control Menu ..............................................................................................................21
3.6.5. Settings Menu.............................................................................................................22
3.7 Connectivity .......................................................................................................................25
3.7.1. Connect via Wi-Fi ........................................................................................................25
3.7.2. Connect via Ethernet...................................................................................................25
4.0 Printing .................................................................................................................................26
4.1 Pre-Printing Steps ..............................................................................................................27
4.1.1. Verify all printer maintenance & firmware is up to date .................................................27
4.1.2. Slice your file, and save on a USB Drive .......................................................................27
4.1.3. Verify material type, quantity, and nozzle configuration.................................................28
4.1.4. WolfBite .....................................................................................................................30
4.1.5. Material & Nozzle Change Procedures
(if needed)
.........................................................32
4.2 Printing..............................................................................................................................38
4.3 Post-Printing ......................................................................................................................38

ii
TRAK Machine Tools
Southwestern Industries, Inc.
Airwolf EVO 3D Printers - Installation, Printing, Maintenance & Troubleshooting Manual
4.3.1. Let print cool down .....................................................................................................38
4.4 Post-Processing..................................................................................................................38
5.0 Maintenance ..........................................................................................................................40
5.1 Leveling Nozzles.................................................................................................................40
5.2 Modular Extruder Replacement ...........................................................................................41
5.3 Fan Housing Removal / Replacement...................................................................................43
5.4 Feeder Removal / Replacement...........................................................................................44
5.5 Clean Bed Rails ..................................................................................................................45
5.6 Clean Nozzles.....................................................................................................................45
5.7 Replace HEPA Filters...........................................................................................................46
5.8 Replace Brass Cleaning Brush .............................................................................................46
5.9 Borosilicate Glass Build Plate ...............................................................................................47
5.10 Lubricate Z Stage Ballscrew ................................................................................................47
5.11 Update Touchscreen...........................................................................................................47
6.0 Troubleshooting.....................................................................................................................48
6.1 Running Out of Filament .....................................................................................................48
6.2 Auto-Leveling Errors ...........................................................................................................49
6.3 Print Too Close or Too Far from Bed....................................................................................49
6.4 Layer Shifting.....................................................................................................................50
6.5 Filament Jam .....................................................................................................................50
6.5.1. Additional Filament Jam Procedure...............................................................................51
TRAK Warranty Policy ...................................................................................................................54

1
TRAK Machine Tools
Southwestern Industries, Inc.
Airwolf EVO 3D Printers - Installation, Printing, Maintenance & Troubleshooting Manual
Printer Model & Serial Number
The plate below is for you to write down your model and serial number. Keep this info handy for when
you contact Customer Service.
Serial Number: ____________________________
Buytrakparts.com Login Credentials
Login: ____________________________
Password: ____________________________

2
TRAK Machine Tools
Southwestern Industries, Inc.
Airwolf EVO 3D Printers - Installation, Printing, Maintenance & Troubleshooting Manual
1.0 Safety
The safe operation of the Airwolf 3D Printers depend on its proper use and the precautions taken by each
operator.
•Read and study the Airwolf 3D Printers manual carefully. Be certain that every operator
understands the operation and safety requirements of this printer before its use.
1.1 Safety Publications
Please note that FFF/FDM 3D printing can produce hazardous Ultra-Fine Particles (UFP’s) and Volatile
Organic Compounds (VOCs). Our 3D printers come with a HEPA Filter and enclosed print chamber to help
reduce the amount of UFP and VOC’s you come in contact with. Always close the print chamber door and
make sure the HEPA filter is replaced as recommended.
1.2 Safety Labels & Notices as Used in this Manual
•DANGER - Immediate hazards that will result in severe personal injury or death.
•WARNING - Hazards or unsafe practices that could result in severe personal injury and/or
damage to the equipment.
•CAUTION - Hazards or unsafe practices that could result in minor personal injury or
equipment/product damage.
•NOTE - Call attention to specific issues requiring special attention or understanding.
1.3 Safety & Information Labels Used on the EVO-T and EVO22-T
It is forbidden by OSHA regulations and by law to deface, destroy or remove any of these labels from
the printers.
Burn Hazard
Hot Surface Hazard
Fire Hazard
Risk of Crush
Crush Hazard
Pinch Hazard
Electromagnetic Interference
Hazard
Electrocution Hazard
Toxic Fumes Hazard

3
TRAK Machine Tools
Southwestern Industries, Inc.
Airwolf EVO 3D Printers - Installation, Printing, Maintenance & Troubleshooting Manual
1.4 Safety Precautions
•The heated bed can reach temperatures of 160°C and also generates heat inside the enclosed
chamber of 70°C. The hot end reaches temperatures of 315°C. Never touch the heated bed or
hot end while hot, and keep in mind they may take a long time to fully cool down.
•Recently extruded plastic can stick to the skin and cause burns if not careful. Always wait until
the heated bed or hot end is completely cool before removing unwanted plastic or debris. The
stepper motors can also generate high temperatures and contact with the skin should be
avoided.
•Flammable materials or liquids should never be placed, stored next to, or in the printer.
•The internal electronic components can cause electric shock even when the printer is powered
down or unplugged. Never remove the back panel without consulting TRAK first.
•ALWAYS disconnect ALL power to the printer before performing any repairs.
•Never touch moving parts or place your fingers in or on any of the belts, pulleys or gears while
the printer is operational. Make sure to tie back hair and remove any dangling jewelry.
•For safety, we highly recommend hooking up an external video camera for video monitoring
while printer is unattended.
1.5 Safety Features
1.5.1. HARDWARE
•Main Power: 15-amp dual-pole AC circuit breaker
•GENESIS Microcontroller: (2) 5-amp and (1) 25-amp fuses to cover MOSFETs, heaters, stepper
motors, and logic
•Heated Bed: 180°C thermal fuse
•Hot End: 20W low power consumption heaters & Polyamide insulators
•Power Supply: Short circuit/overload/over voltage/over temperature
1.5.2. SOFTWARE
1.5.2.1. GENESIS Microcontroller
•Hot End: Automatic shut-off on overtemp/overcurrent
•Heat Bed: Automatic shut-off on overtemp/overcurrent
•Chamber Heater: Automatic shut-off on overtemp/overcurrent
•Stepper Motors: Automatic shut-off on overcurrent
•Fans: Automatic shut-off on overcurrent
•Lights: Automatic shut-off on overcurrent
1.5.2.2. Touchscreen
•Hot End: Automatic cool down after non-use
•Heated Bed: Automatic cool down after non-use
•Chamber Heater: Automatic cool down after non-use

4
TRAK Machine Tools
Southwestern Industries, Inc.
Airwolf EVO 3D Printers - Installation, Printing, Maintenance & Troubleshooting Manual
2.0 Site Prep & Requirements
This section includes the printer specifications, site preparation information and requirements. Please
read this section carefully and make sure all requirements are met, in order to ensure that your facility is
effectively and safely prepared for printer installation.
2.1 Printer Specifications
EVO-T
EVO22-T
Printer Specifications
Printer Dimensions (w/ doors closed)
28" x 24.5” x 24”
28" x 24.5” x 36”
Printer Dimensions (w/ doors opened)
28” x 49.5” x 24”
28" x 49.5” x 36”
Weight
60 lbs.
75 lbs.
Shipping Dimensions
48” x 42” x 35”
48” x 42” 36”
Shipping Weight
175 lbs.
200 lbs.
Print Plate Material
Borosilicate Glass
Frame Construction
One-Piece Aluminum Main Frame, Polycarbonate
Network Connectivity
Ethernet, Wi-Fi
Printing Specifications
Build Volume Single Nozzle
12" X 12" X 11"
12" x 12" x 22"
Build Volume Dual Nozzle
12” x 11.25” x 11”
12” x 11.25” x 22”
Recommended Max. Print Speed
80 mm/s
Minimum Layer Height
40 microns
Recommended Layer Height
180+ microns
Max Extruder Temperature
315°C
Max Bed Temperature
160°C
Extruder & Material Specifications
Nozzle Type
Extended-Life (7075 Aluminum–Aircraft Grade)
Print Head
Dual High-Flow AX 2
Nozzle Size
0.35mm, 0.50mm, 0.80mm, 1.0mm
Extruder Configuration
Planetary Direct Drive
Filament Size
2.85mm ± 0.10
Power Requirements
Input
100 –240 V 12.5 A, 50 –60 Hz
Output
221 W Max. 24 V Dc, 9.2 A
Ambient Operating Temperature
+ Humidity
40°F - 100°F
0% - 50%
Storage Operating Temperature
+ Humidity
0°F - 120°F
0% - 50%
Slicer Requirements
Operating System
Windows OS
MAC OSX
System Version
Windows 8 or newer
Mac Version 2013 or later
Display Resolution
1024 x 768
RAM
2GB or higher
8GB onboard memory
Hard Disk Space
500 MB free disk space
Core Processor
Core i3 or higher/AMD
Athelon 64bit or higher
Core i5 or higher

5
TRAK Machine Tools
Southwestern Industries, Inc.
Airwolf EVO 3D Printers - Installation, Printing, Maintenance & Troubleshooting Manual
2.2 Floor Plan, Layout & Space Requirements
This section has dimension information for the EVO-T and EVO22-T.
2.2.1. EVO-T
Front View
Side View

6
TRAK Machine Tools
Southwestern Industries, Inc.
Airwolf EVO 3D Printers - Installation, Printing, Maintenance & Troubleshooting Manual
2.2.2. EVO22-T
Front View

7
TRAK Machine Tools
Southwestern Industries, Inc.
Airwolf EVO 3D Printers - Installation, Printing, Maintenance & Troubleshooting Manual
3.0 Installation Process
In this section we will walk you through the installation process, from the moment your printer arrives, to
the moment that it is powered on and ready to start printing. Do not proceed with this section, or the
following sections until the Site Preparation & Requirements section has been completed.
3.1 Lifting, Moving, Uncrating, and Unpacking
In this section, we will go over getting your printer out of its box safely. The procedure for both printers
is nearly the exact same, except for steps 6-8 due to the way they are packaged.
Lifting/Moving while on a Pallet
oThe best option for lifting the Airwolf EVO-T and EVO22-T 3D Printer is a pallet jack.
oThe second-best option is using four (4) people (so that each person does not carry more
than 50 lbs.).
Lifting & Moving after Uncrating
oOnce the printer has been removed from the pallet, it must be moved by hand. Two (2)
people are recommended to move the printer by hand.
Uncrating & Unpacking
1. Cut off the straps that are holding the main box (which contains the actual Airwolf EVO-T 3D
Printer) and the secondary box (which contains the 3D printer’s accessories) to the pallet.
2. Remove the plastic wrapping that surrounds both the main and secondary boxes together.
3. Remove the secondary box that contains the 3D Printer accessories, and put it aside for now.
4. Cut open the taped flaps that cover the main box by using a box cutter. Be careful not to cut too
deeply as you might risk damaging content inside the main box. In addition, preserve the main
box in the case that it might be needed for returns and/or any possible customer service issues
that might arise regarding the Airwolf EVO-T 3D Printer.
5. In addition to the Airwolf EVO-T 3D Printer, there will be shipping documents that are included
inside the main box. Remove these documents, and put them aside for now.
EVO-T ONLY
6. The Airwolf EVO-T 3D Printer will be standing in an upright position while inside the main box.
Remove the protective foam parts that are covering each of the 3D Printer’s corners prior to
removing the printer out of the box.
7. Pull the printer UP by its straps. Use two (2) people to lift the printer out of the box.
8. Lift the printer on top of a table, stand, or workstation. Cut off the straps around the 3D Printer,
and remove them.
EVO22-T ONLY
6. The Airwolf EVO22-T 3D Printer will be lying horizontally on its side while inside the main box.
Remove the protective foam parts that are covering each of the 3D Printer’s corners prior to
removing the printer out of the box.
7. Tilt the box on its side in order to remove the 3D Printer outside of the box. The Airwolf EVO22-T
should now be standing upright. Use two (2) people to slide the printer out of the box.
8. Lift the printer on top of a table, stand, or workstation.

8
TRAK Machine Tools
Southwestern Industries, Inc.
Airwolf EVO 3D Printers - Installation, Printing, Maintenance & Troubleshooting Manual
EVO-T and EVO22-T (continued…)
9. Remove the protective plastic wrapping that surrounds the 3D Printer.
10. Please note that the 3D Printer’s glass cover (which is wrapped in paper) is taped on the very top
part of the printer itself. Remove the tape holding the glass cover, and put it aside for now.
11. Remove the tape that keeps the 3D Printer door closed, and open the printer door.
12. Remove the two (2) zip ties around the two (2) chamber heaters inside the 3D Printer.
13. Remove both the zip ties and the white clips that are attached to the left and right belts, which
are located on the upper interior surface of the 3D Printer (see image below):
NOTE –When removing the zip ties, be careful not to cut the left and/or right belts, as well as
any internal cords within the 3D Printer. Doing so will cause damage to the printer.
14. Remove the clip attached to the Z Stage Ball screw by pulling on the zip tie that is attached to
the clip.

9
TRAK Machine Tools
Southwestern Industries, Inc.
Airwolf EVO 3D Printers - Installation, Printing, Maintenance & Troubleshooting Manual
3.2 Packing List
Once you have unpacked your printer, and placed it at its final location, it is time to check the packing list
found within your shipment. Below we provided you with a general packing list for reference.
If you are interested in purchasing any additional options or bundles, please contact your local sales
representative.
Standard Packing List for Printers*
*May vary slightly from the list that comes in the box
Assembly Parts
•3 –Heavy Duty Nozzles, 2.85mm, 0.5mm orifice
•1 –Quick Change Modular Hot-end Assembly
•1 –Build Plate –Flex-Resistant Borosilicate
Glass, 4mm
•1 –HEPA & Carbon Filter Set
•1 –Brass Cleaning Brush
•2 –2lb Spool Holders
•1 –5lb Spool Holders
Toolkit
•1 –Allen Wrench Toolkit, Set of 6 Hex ball
Drivers
•1 –Drill Bit Kit for Nozzles
•1 –5” Micro Flush Cutters
•1 –Handheld Brass Brush
•1 –Scraper
Accessory Bag
•1 –Printer Power Cable
•1 –USB Male-to-Male Cord
•1 –TRAK USB Drive
•1 –Benchmark Part, Euclid Block
Materials
•1 –ABS Premium MG94, Natural, 2.85mm, 2.2lb
•1 –WolfBite Original Adhesion Solution for ABS,
2 oz
Standard Packing List for Bundles*
*May vary slightly from the list that comes in the box
Starter Bundle EVO-T
Includes Parts, Toolkit, Accessory Bag & Materials listed
above.
•1 –EVO-T
•1 –Printer Workstation & Extension
•1 –Spare Parts Kit
•1 –ABS Value Pack
Starter Bundle EVO22-T
Includes Parts, Toolkit, Accessory Bag & Materials listed
above.
•1 –EVO22-T
•1 –Printer Workstation & Extension
•1 –Spare Parts Kit
•1 –ABS Value Pack
ABS Value Pack
•1 –ABS Premium MG94, Natural, 2.85mm, 2.2lb
•1 –ABS Premium MG94, Black, 2.85mm, 2.2lb
•1 –ABS Premium MG94, Natural, 2.85mm, 5lb
•1 –ABS Premium MG94, Black, 2.85mm, 5lb
•1 –WolfBite Original Adhesion Solution for ABS,
4 oz
•1 –Hydrofill, Water Soluble Support Material,
2.85mm, 1lb
Polycarbonate Value Pack
•1 –Polycarbonate, Clear, 2.85mm, 2.2lb
•1 –Polycarbonate, Black, 2.85mm, 2.2lb
•1 –Polycarbonate, Clear, 2.85mm, 5lb
•1 –Polycarbonate, Black, 2.85mm, 5lb
•1 –WolfBite Mega Adhesion Solution for PC, 4
oz
•1 –Hydrofill, Water Soluble Support Material,
2.85mm, 1lb
Spare Parts Kit
•1 –Heavy Duty Nozzles, 2.85mm, 0.35mm
orifice
•1 –Heavy Duty Nozzles, 2.85mm, 0.5mm orifice
•1 –Heavy Duty Nozzles, 2.85mm, 0.8mm orifice
•1 –Heavy Duty Nozzles, 2.85mm, 1.0mm orifice
•1 –Quick Change Modular Hot-end Assembly
•1 –Build Plate –Flex Resistant Borosilicate
Glass, 4mm
•1 –HEPA & Carbon Filter Set
•1 –Brass Cleaning Brush
Nozzle Set
•1 –Heavy Duty Nozzles, 2.85mm, 0.35mm
orifice
•1 –Heavy Duty Nozzles, 2.85mm, 0.5mm orifice
•1 –Heavy Duty Nozzles, 2.85mm, 0.8mm orifice
•1 –Heavy Duty Nozzles, 2.85mm, 1.0mm orifice

10
TRAK Machine Tools
Southwestern Industries, Inc.
Airwolf EVO 3D Printers - Installation, Printing, Maintenance & Troubleshooting Manual
3.3 Benchmark Part: Euclid Block
In the accessory box, with your new printer, you will
find a 3D printed part, called a Euclid Block. We
printed it directly from your printer, using MG94
ABS, and the exact same G-Code file that we saved
onto your printer's Internal Drive as "LEFT TRAK".
Purpose
The Euclid Block helps establish a printing baseline
for your printer, which we can reference if/when you
are experiencing any printing issues.
Because 3D printed parts can differ from one
another based on many variables; material type, material care, slicer settings, printer, printer
maintenance, and so on, diagnosing a problem can be difficult to isolate.
Therefore, by using the G-Code we provided, we are controlling the slicer setting variables. By using the
material we provided (make sure its dried!), we are controlling the material variables.
Now we can begin to isolate the problem in a much more controlled manner!
Printing the Euclid Block
When you print it, make sure you follow the requirements below:
•Use MG94 ABS, natural color, and make sure it is DRY.
•Use the exact same G-Code we saved on your internal drive. If you need another copy, call TRAK
Customer Service.
•Make sure you watch the first layer print before walking away from your printer.
Troubleshooting
Once the Euclid Block is printed, you can look at it, and see what it is telling you. Is there warping? Are
the layers delaminating? Are there bubbles on the top layer? Are the top and bottoms layers bigger than
the middle layers? Is the overall print quality bad?
Below is an example of how we can help you start troubleshooting, using the Euclid Block:
Example #1
The first layer of your block did not adhere to the build plate. One potential cause could be the WolfBite.
WolfBite Issues and Solutions
1. Not enough was applied initially. Remove & apply more before restarting the print.
2. Too much was applied initially. Remove & apply again before restarting the print.
3. It did not dry sufficiently, allow 5 minutes the next time you apply it
4. It needs to be replaced, it is either too old or the wrong kind
If the WolfBite suggestions above did not fix the problem, the next steps would be to check if the
chamber heater needs to be on. If that didn’t work, then you would move onto the next potential cause.
Regardless, if your printer has an issue, call TRAK Customer Service to have a Technical Support, or
Applications Specialist walk you through the process –you’re not alone! We’re here to help.

11
TRAK Machine Tools
Southwestern Industries, Inc.
Airwolf EVO 3D Printers - Installation, Printing, Maintenance & Troubleshooting Manual
3.4 Orientation, Controls & Functions
Once you are satisfied with the placement of your printer, and have made sure everything in your
packing list has been received, it’s time to go over your printer’s orientation, controls and functions, so
you can familiarize yourself with it.
EVO-T
EVO22-T

12
TRAK Machine Tools
Southwestern Industries, Inc.
Airwolf EVO 3D Printers - Installation, Printing, Maintenance & Troubleshooting Manual
3.4.1.1. Internal Components

13
TRAK Machine Tools
Southwestern Industries, Inc.
Airwolf EVO 3D Printers - Installation, Printing, Maintenance & Troubleshooting Manual
Component & Description
Images
1. LCD Display –The LCD screen allows
you to control the printer, display printer
information, status, and the different
menus.
2. Print Head –
Is comprised of the fan, its housing,
nozzles, filament sensors, and mounts.
3. Nozzles –
The nozzle is a precision piece of metal,
where melted filament is extruded out
from. The nozzles are interchangeable,
and come in various sizes. The nozzles
heat up to 315°C, and can be found on
the bottom side of the print head.
4. Belts & Pulleys –Control the Print Head
in the XY direction.
5. Glass Build Plate –Where layers of
filament are deposited and your final part
is created. It heats up to 160°C.
6. Print Bed –The print bed is the
horizontal surface that holds and heats
the glass build plate.

14
TRAK Machine Tools
Southwestern Industries, Inc.
Airwolf EVO 3D Printers - Installation, Printing, Maintenance & Troubleshooting Manual
7. HEPA Filter –Helps remove harmful
VOC’s and UFP’s while you print.
8. PTFE Tubes (3) –Used to guide and
feed the filament through the printer, to
the Print Head.
9. Chamber Heaters –There are two
chamber heaters installed to help prevent
your filaments from getting wet, and to
prevent part warping. The chamber
heaters heat up to 70°C.
10. Z Stage Ballscrew –Moves the print
bed in the Z direction with precision
11. Spool Holders (3) –The Spool Holders
are mounted to inside of the printer and
hold the spools of filament.
Filament Spool - Filament Spools can
come with various materials, and in two
sizes: 2.2lbs and 5 lbs.

15
TRAK Machine Tools
Southwestern Industries, Inc.
Airwolf EVO 3D Printers - Installation, Printing, Maintenance & Troubleshooting Manual
3.4.1.2. External Components
Component & Description
Images
Top View
1. Glass Cover –Lays on top of the printer,
and can be removed for better access to
the Print Head, when changing filaments.
Side View
2. Power Switch –Use to power your
printer on/off.
3. LCD (Primary) USB Port –This is
where you insert your USB drive that you
load your G-Code files onto. It can also be
used to transfer new software and
firmware updates, if your printer is not
connected to your network, and can work
as an external hard drive.
NOTE –Although there is an embedded
keyboard, you may also connect your
keyboard here to type.
NOTE - This is NOT the place to plug in
your PC to control the printer (see
below).
Rear View
1. Power Inlet - The Printer Power Cord
plugs in here and connects to the power
supply from the wall.
2. Ethernet Port –Use to connect to the
internet through a wired connection. This
is only for performing updates - there is
no network control available at this time.
3. (Backup) USB Port –The backup USB
port can be used for PC-control, which
means you can stream the G-Code to
print through a PC to the printer.
NOTE –This connection can be
interrupted by a computer freeze, update,
restart, etc., so, it may not be as stable
as using the primary USB, and saving the
file directly to the internal drive.

16
TRAK Machine Tools
Southwestern Industries, Inc.
Airwolf EVO 3D Printers - Installation, Printing, Maintenance & Troubleshooting Manual
3.5 Installation of Additional Components
In this section, you will install the printer’s top cover, the build plate and connect the printer to a power
source and power it on.
3.5.1. Top Cover
Steps
Images
1. Open the front printer door, and put one
hand inside towards the top of the
printer.
2. With your other hand, place one side of
the glass on the two rear support tabs.
3. With the hand inside the printer, use your
finger to support the bottom of the glass.
4. Slowly lower the glass, until the glass is
laying down evenly on all eight (8)
support tabs.
3.5.2. Install Glass onto bed
Steps
Images
1. Using two hands, carefully slide the build
plate into the metal bed brackets located
on both sides of the print bed.
2. Slide the plate all the way in until it is
flush with the back of the print bed.
NOTE –You may push down on the build
plate slightly, to get it to slide smoothly.
This manual suits for next models
1
Table of contents
Other TRAK 3D Printer manuals

TRAK
TRAK 3ntr Series Manual

TRAK
TRAK Airwolf 3D EVO-T Operating instructions

TRAK
TRAK 3ntr Series User manual

TRAK
TRAK 3ntr A2 Programming manual

TRAK
TRAK 3ntr Series User manual

TRAK
TRAK 3ntr Series User manual

TRAK
TRAK 3ntr Series User manual

TRAK
TRAK 3ntr Series User manual

TRAK
TRAK 3ntr Series Programming manual

TRAK
TRAK 3ntr Series User manual
Popular 3D Printer manuals by other brands

3D Fun Printz
3D Fun Printz Cameo 4 Universal Pen Holder instructions

ALVEO3D
ALVEO3D ALVEOPRO - M100 instruction manual

VORON
VORON 2.4 Assembly manual

Geeetech
Geeetech Delta Rostock mini G2S Pro manual

FLASHFORGE 3D PRINTER
FLASHFORGE 3D PRINTER Focus 8.9 quick start guide

Creality
Creality Ender-5 user manual