TSC M 23 User manual

Quick Start Guide
Direct Thermal Portable Printer

ii

iii
Contents
Overview......................................................................................................... 1
Front View....................................................................................................... 1
Rear View........................................................................................................ 2
Installing the Battery........................................................................................ 2
Using the Strap................................................................................................ 3
Loading Media................................................................................................. 3
Loading Continuous Labels for Receipt Paper................................................ 3
Loading Die-cut Labels.................................................................................... 4
Loading Fan-fold Labels.................................................................................. 5
Connecting the Communication Cable............................................................ 5
Using the LCD Display and Control Panel....................................................... 6
Charging the Battery ....................................................................................... 6
Maintenance.................................................................................................... 7
Troubleshooting............................................................................................... 9

1
Overview
Front View
Supply
holder Li-ion
battery
Gap/black mark sensor
Platen
Graphic LCD with
back lit display Peel-off
enabler
Context-sensitive
keys
Paper exit
chute
Front door
release button
Tear plate
(for label) Peel
roller
Peel bar Tear bar
(for liner)

2
Rear View
Installing the Battery
1. Open the supply door by pulling outward on the release buttons located on
either side of the printer. The supply door should swing open.
2. Insert the connector end of the battery into the printer.
3. Close the supply door until the release buttons click into place.
Hinged cable
door
Fan fold paper
entrance chute
Power jack
chute
RS-232
interface
+5V/DTR
switch
USB
interface
Strap button
Li-ion
batter
y
Supply
door
Release
buttons

3
Using the Strap
1. Clip both rings of the hand strap onto the strap buttons by placing each O-ring
over the strap button and gently pulling up on the strap until the strap locks into
place.
Loading Media
Loading Continuous Labels for Receipt Paper
1. Open the supply door by pulling outward on the release buttons on both sides of
the printer.
2. Pull supply holder tabs apart and insert a new roll of media. Make sure the media
is positioned so it unwinds from the top as shown.
3. Pull out enough supply to lie over the exit chute.
4. Close the supply door until the release buttons click into place.
Note: Please calibrate the gap/black mark sensor when changing to different
media.
Strap
button Hand
strap
O-rings
Supply holder tabs
A roll of label

4
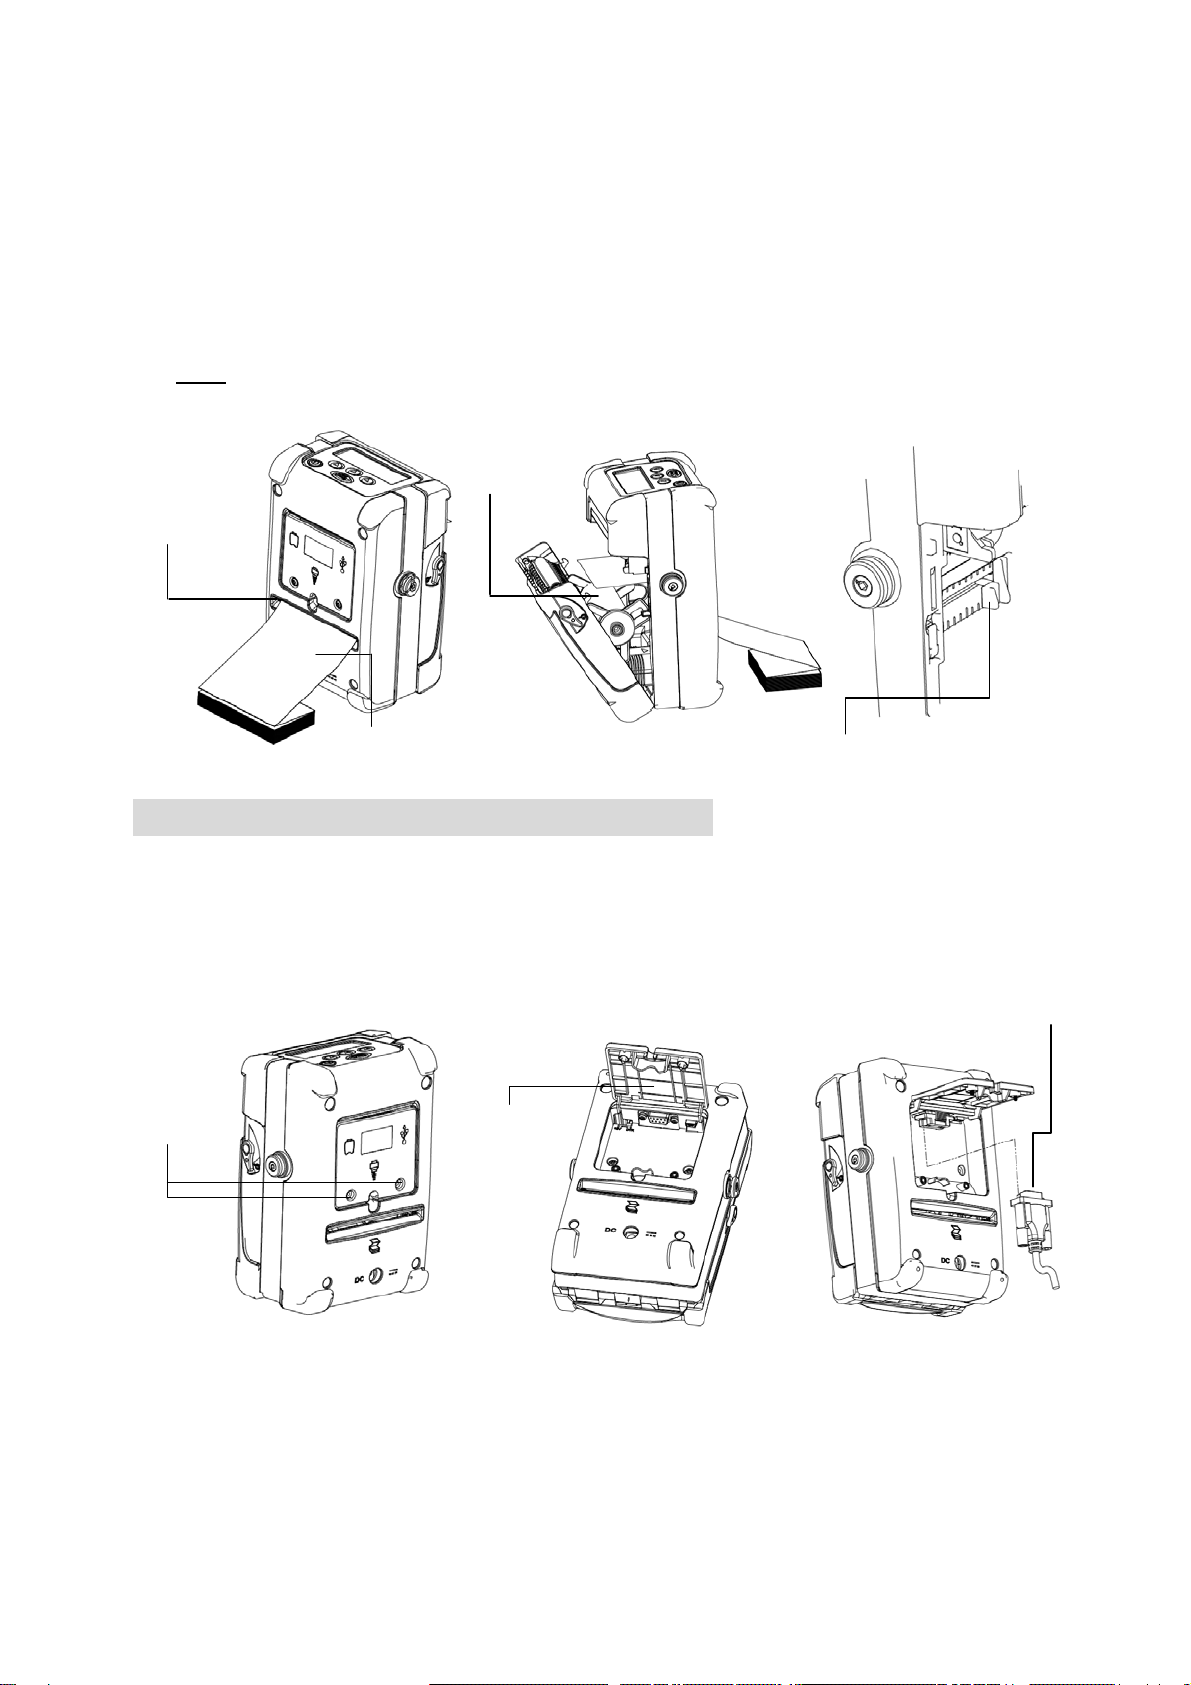
Loading Die-cut Labels
1. Open the supply door by pulling outward on the release buttons on both sides of
the printer.
2. Lift up the peel off enablers on both sides.
3. Pull supply holder tabs apart.
4. Insert a roll of labels. Make sure the supply unwinds from the top as shown.
Note: Calibrate the gap/black mark sensor when changing media. Do not calibrate
the gap/black mark sensor in peeler mode to avoid paper-jams at the peel-off roller.
5. Remove a couple of labels from the liner. Insert the liner through the gap between
peeler bar and peel-off roller.
6. Close the supply door.
7. Press the button once or twice to advance the labels until the liner is
separated from the label.
Peel off enablers Label
Liner
Lift up the peel off enablers
Push down the peel off
enablers
5
Loading Fan-fold Labels
1. Open the supply door by pulling outward on the release buttons on both sides of
the printer.
2. Pull supply holder tabs apart to insert a 3” paper core to keep supply holder wide
open.
3. Insert the fan-fold paper through the fan-fold paper entrance chute and pass over
the paper exit chute.
4. Adjust the paper guides by sliding to fit the paper width.
5. Calibrate the media sensor if necessary.
6. Close the supply door.
Note: Please calibrate the gap/black mark sensor when changing media.
Connecting the Communication Cable
1. Open the hinged cable door by loosening two screws. Lift up on the door.
2. Plug the null modem cable into the RS232 port. (Or plug the USB cable into the
USB port.)
3. Place the cable in the cable cavity.
4. Close the hinged cable door and tighten the screws.
Fan-fold labels Paper guides
Paper
core
Fan-fold
paper
entrance
chute
Screws Hinged
cable
door
Null modem cable

6
Using the LCD Display and Control Panel
Turns the printer on and off.
Advances label or returns the display to the previous menu.
Three buttons for selecting options on the display.
Charging the Battery
1. Open the printer supply door and remove the battery.
2. Insert the battery into the charger station.
Status LED Description
Red Charging battery
Amber Battery is 70% charged
Green (Solid) Battery is completely charged
Green
(Blinking) Charger error
Off No battery
Power LED Description
Red Power is on
Off Power is off
LCD display
On/Off button
Navigation buttons
Feed/Ready button
Charger
station
Status LED
Power LED Battery
7
Note:
It takes 2 to 3 hours to fully charge the battery before the first time usage. The
lifetime of the battery is 300 times for charge/discharge cycles.
Maintenance
1. Please use one of following material to clean the printer.
Cotton swab
Lint-free cloth
Vacuum
100% ethanol
2. The cleaning process is described as following:
Printer Part Method Interval
Print head
1. Always turn off the printer before cleaning the print head.
2. Allow the print head to cool for a minimum of one minute.
3. Use a cotton swab and 100% ethanol to clean the print
head surface.
Clean the print
head when
changing a new
label roll
Platen roller
1. Turn the power off.
2. Rotate the platen roller and wipe it thoroughly with 100%
ethanol and a cotton swab, or lint-free cloth.
Clean the platen
roller when
changing a new
label roll
Peel roller
1. Turn the power off.
2. Rotate the Peel-off roller and wipe it thoroughly with
100% ethanol and a cotton swab, or lint-free cloth.
Clean the peel
roller when
changing a new
label roll
Tear bar/peel
bar Use the lint-free cloth with 100% ethanol to wipe it. As needed
Sensor Compressed air or vacuum Monthly
Exterior Wipe it with water-dampened cloth As needed
Interior Brush or vacuum As needed
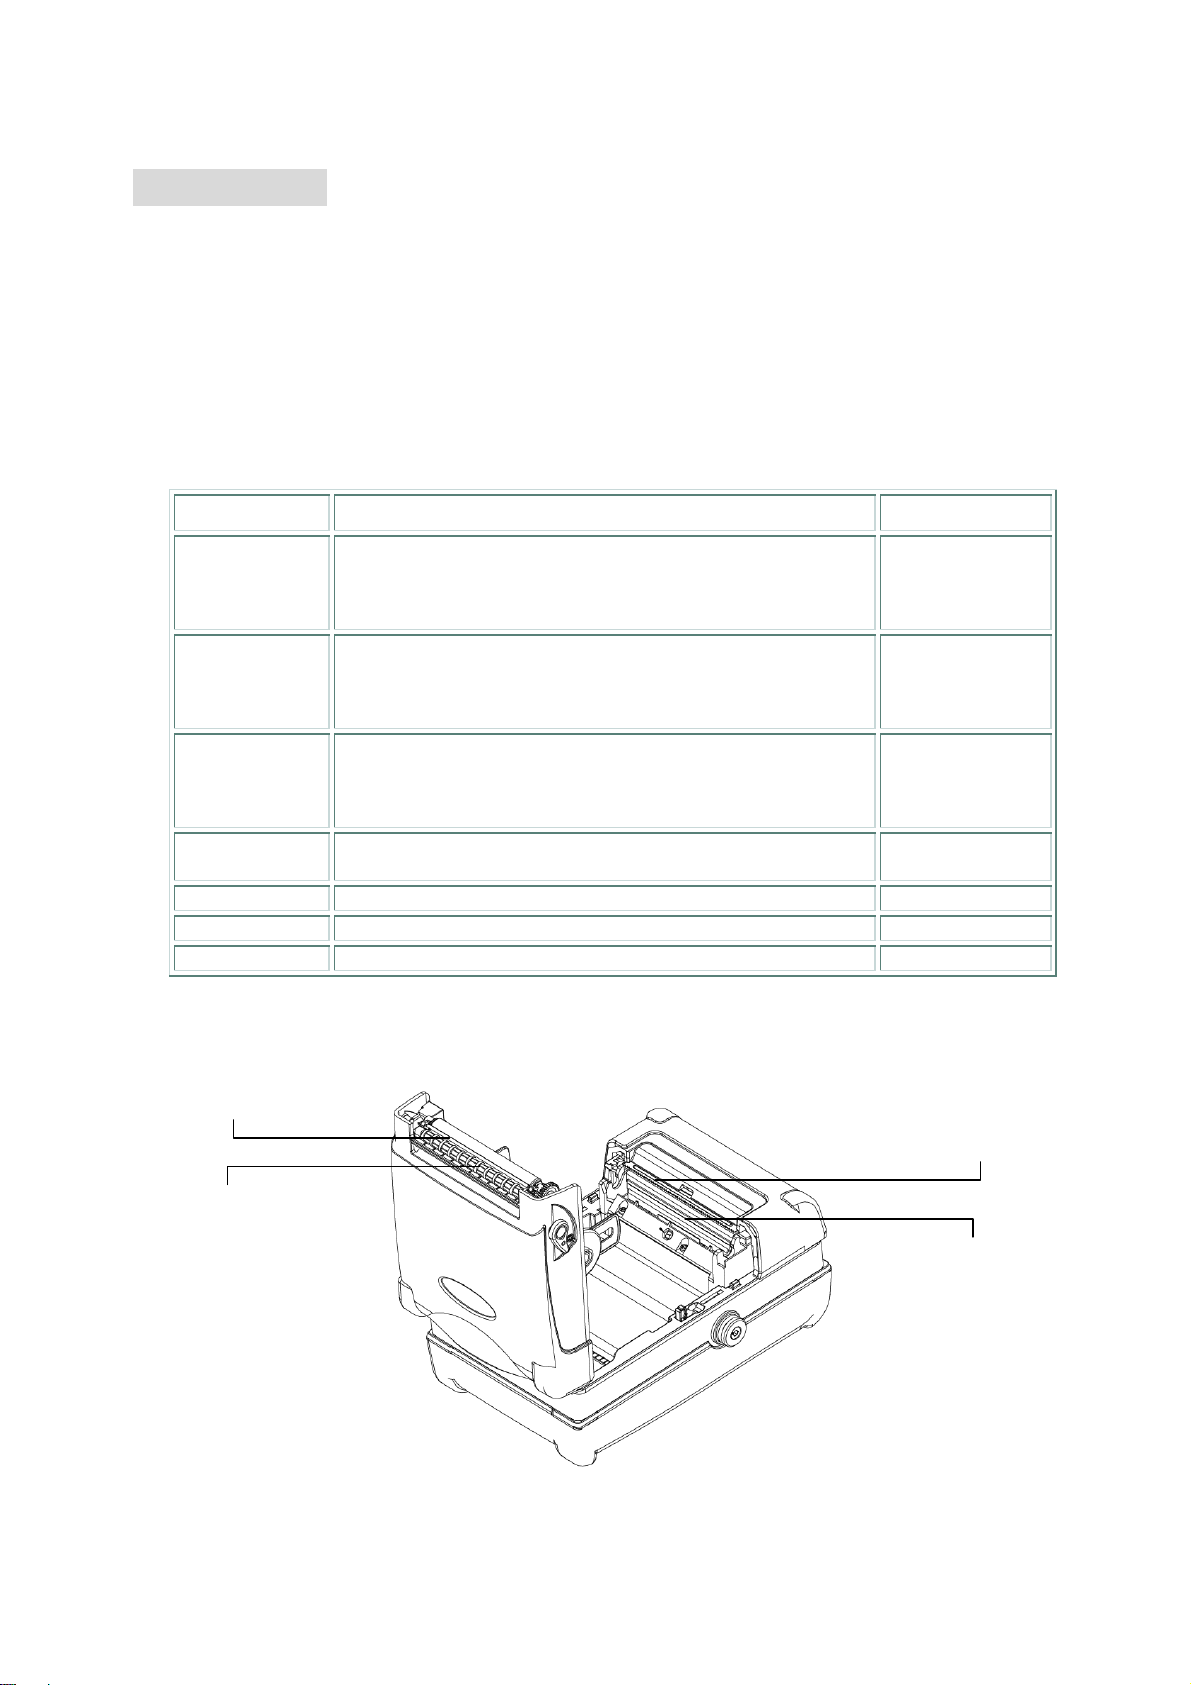
3. Illustration for recommended cleaning parts:
Print head
Peel roller
Tear edge (for label)
Peel bar
This manual suits for next models
1
Table of contents
Other TSC Printer manuals

TSC
TSC TDP-245 Series User manual

TSC
TSC TTP-245 series User manual

TSC
TSC TTP-384M User manual

TSC
TSC MX241P Series User manual

TSC
TSC TTP-2410MT Series User manual

TSC
TSC Alpha-2R Series User manual

TSC
TSC TTP-2410MU Series User manual

TSC
TSC Alpha-3R User manual

TSC
TSC PEX-1120 Series User manual

TSC
TSC MX240P Series User manual

TSC
TSC TTP-286MT Series User manual

TSC
TSC Alpha-3R User manual

TSC
TSC TTP-225 Series User manual

TSC
TSC Alpha-3R User manual

TSC
TSC PRINTONIX AUTO ID TX210 Series User manual

TSC
TSC TTP-245 series User manual

TSC
TSC TTP-248M User manual

TSC
TSC TTP-245 series User manual

TSC
TSC TTP-2410M User manual

TSC
TSC TA210 User manual


