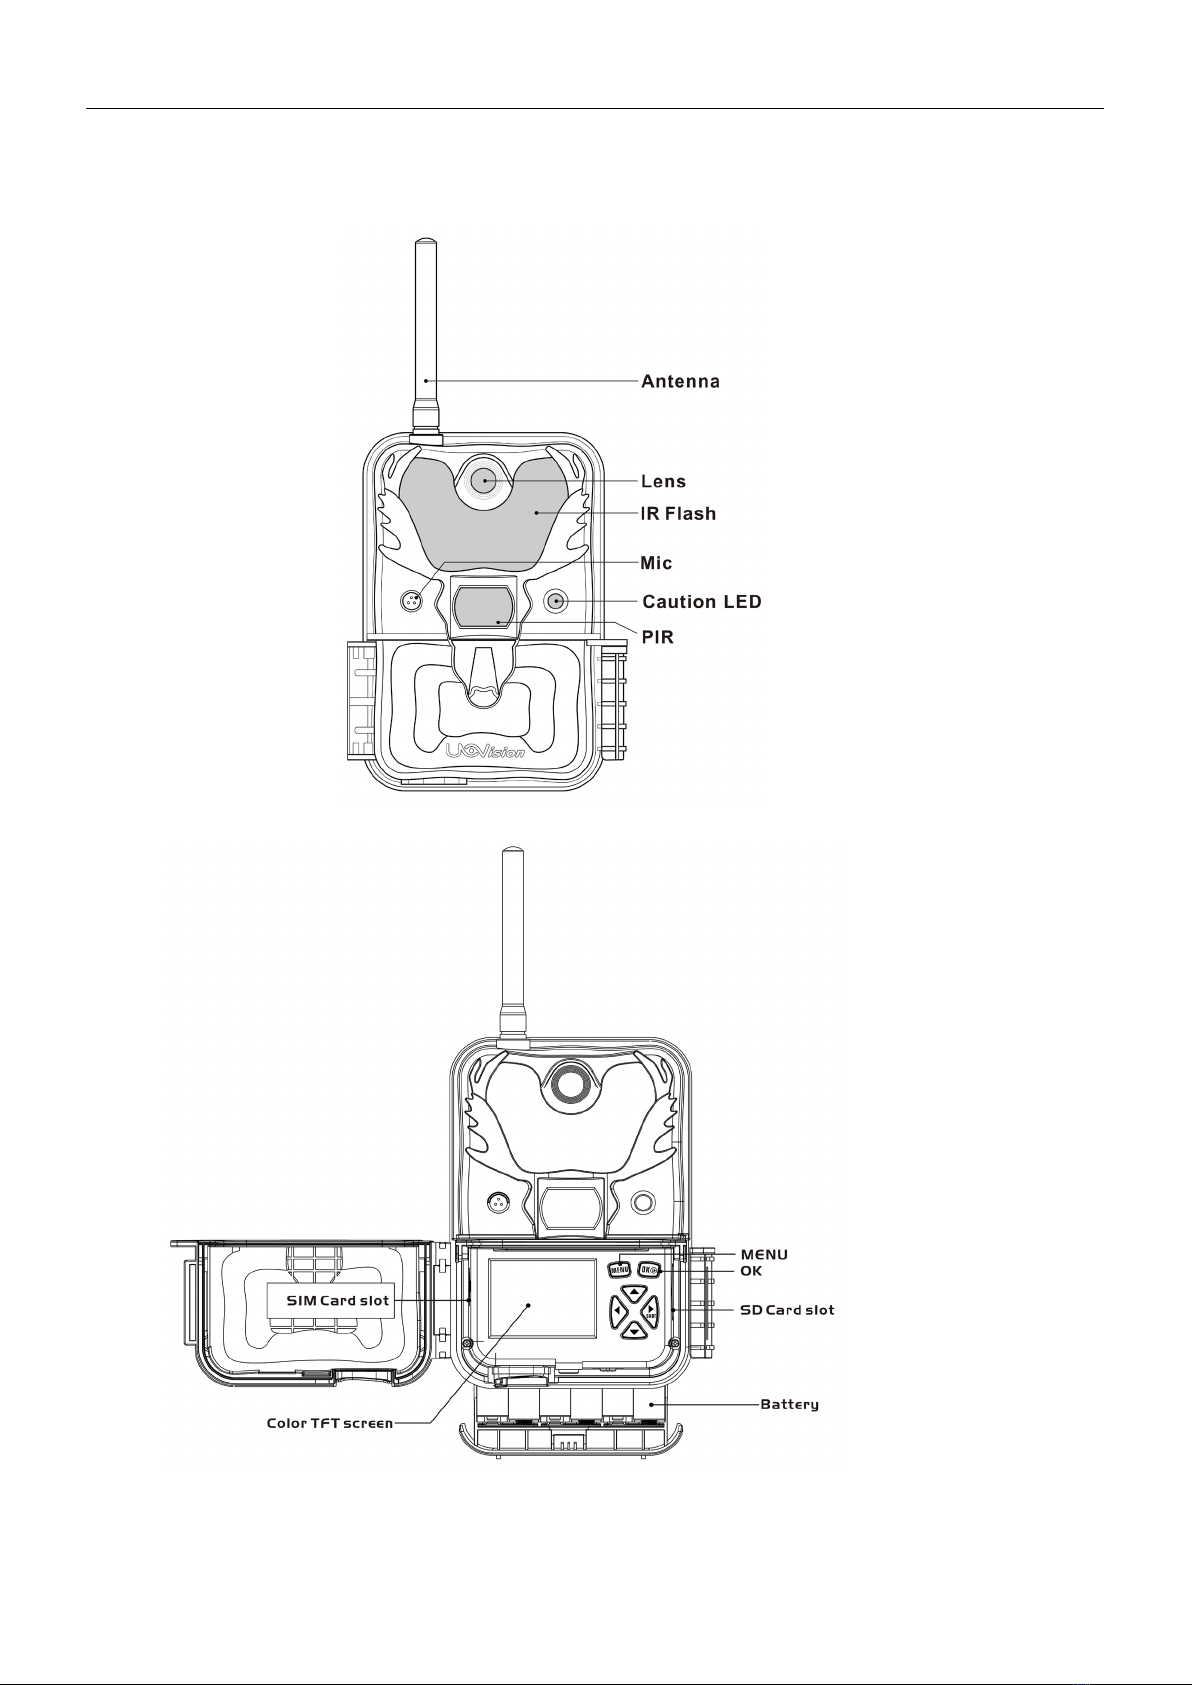
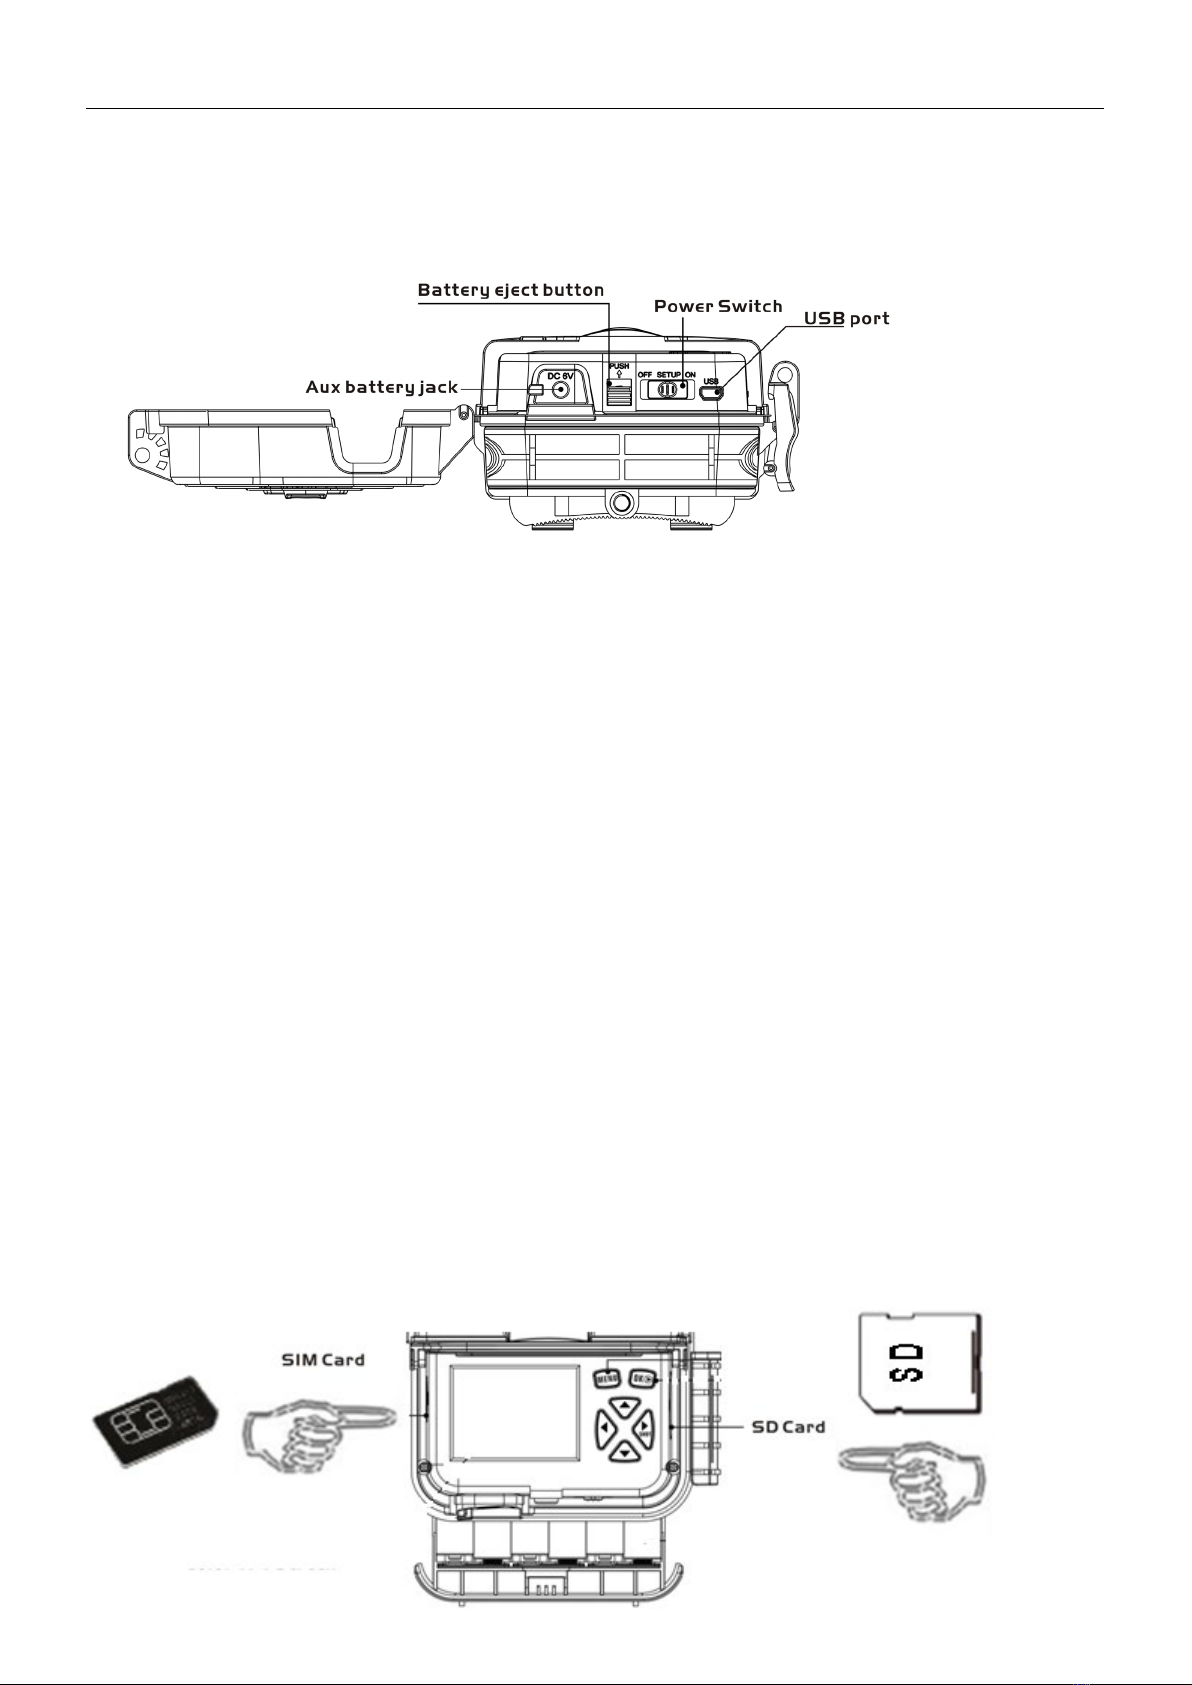
Uovision UM785-HD User manual

User Manual
(BLACK FLASH / NO GLOW) + built-in viewer
UM785-HD CLOUD
Web portal

Contents
1Camera Overview .............................................................................................................1
2 Set power...........................................................................................................................2
3 Installing your SIM card and SD card ..............................................................................2
4Customizing camera settings ............................................................................................4
4.1 Power switch button and menu buttons.................................................................4
4.2 Setting maps...........................................................................................................5
4.3 Send a test photo....................................................................................................8
5 Connecting CAM toLinckEazi Cloud server...................................................................9
5.1 Send a photo toCloud server.................................................................................11
6 Setting CAM with Web Portal or APP.............................................................................11
7 Mounting tips ....................................................................................................................13
Appendix Ⅰ:Technical Specifications. ............................................................................ 14
Appendix Ⅱ: Parts List ..................................................................................................... 15

Page 1
1 Camera Overview
Figure 1 Front View
Figure 2Operation Interface

Page 2
Figure 3 Bottom View
2 Set power
To supply power for the camera, 4, 8 or 12 size AA batteries are needed.
Notice
·Do not mix different types of batteries
·Please do not mix the old batteries with the new batteries
The following batteries can be used:
·High-density and high-performance AA size alkaline or 1.5v Lithium batteries (Recommended)
·Rechargeable 6V external SLA battery (Sealed Lead Acid) or solar panel
·Rechargeable NiMH AA size batteries (at least 2500mAh)
3 Installing your SIM card and SD card

Page 3
Notice
·This product uses UMTS/HSPA+ and GSM/EDGE cellular network frequencies. Be sure that the
PIN Code of the SIM card is disabled.
•Standard size SD and SDHC (High Capacity) cards up to a maximum 64GB capacity are
supported (Micro-SD memory cards with adapters are NOT recommended).
•Using high speed SD cards (SanDisk3 Ultra3 or Extreme3 series or similar) is
recommended if you will use the 1280x720 or 1920x1080 video settings.

Page 4
4 Customizing camera settings
4.1 Power switch button and menu buttons
OFF: power off;
SETUP: setting the CAM;
ON: working mode (the screen will power off).
Toggle the power switch to SETUP. You will see the screen shown below.

Page 5
Press the MENU button. Use▲▼◄ ► buttons for navigation.
►button in the preview can also be directly manual photo. OK button to confirm operation/
playback.
4.2 Setting maps
Note:
Send Mode: Off:disablesthetransmission function. Instant: enablestheinstant
transmission. Max Number of Instant means the numberof photos that the user limits
the camera to send out per day. If you want tocontrol your data flow, set this number. The
number00 means unlimited.
Remote Control: You can remotely control your camera via the LinckEazi App from your
mobile phone or from the LinckEazi web-portal. If you choose Real Time, the camera will
keep 'awake' to listen to any remote commands that are sent to it (battery power is
increased during Real Time).Delay 24H means thecamera will automatically wake upat
least once in 24 hours to execute any remote commands that have been sent to it.

Page 6

Page 7
Note:
Photo Burst: This is the number of pictures taken per triggering. If photo burst is 3, it
means the camera will take 3 pictures every time it's triggered. You also can choose which
one of the pictures will be sent via Send Option.
PIR Interval:This is the time delay of the PIR sensor to set after each trigger &
transmission (for security applications its best to have a short time setting). This setting
prevents the SD card from filling up with too many redundant images.
Time lapse:When you choose time lapse, the camera will automatically take photos or
videos at user-set interval times - even when it is not triggered by the PIR sensor. It’s useful
for the constant monitoring of an area - or for an area that is beyond the range of the PIR
sensor.
Work Time:You can set the camera to automatically work at preset times and on preset
days. Outside of these pre-set times the camera will not work. Work hour: 00:00-00:00
means 24 hours. If the settings is cross the day, for example: Start: 20:00 Stop: 10:00
means 00:00-10:00 am and 20:00-24:00 of the chosen day.
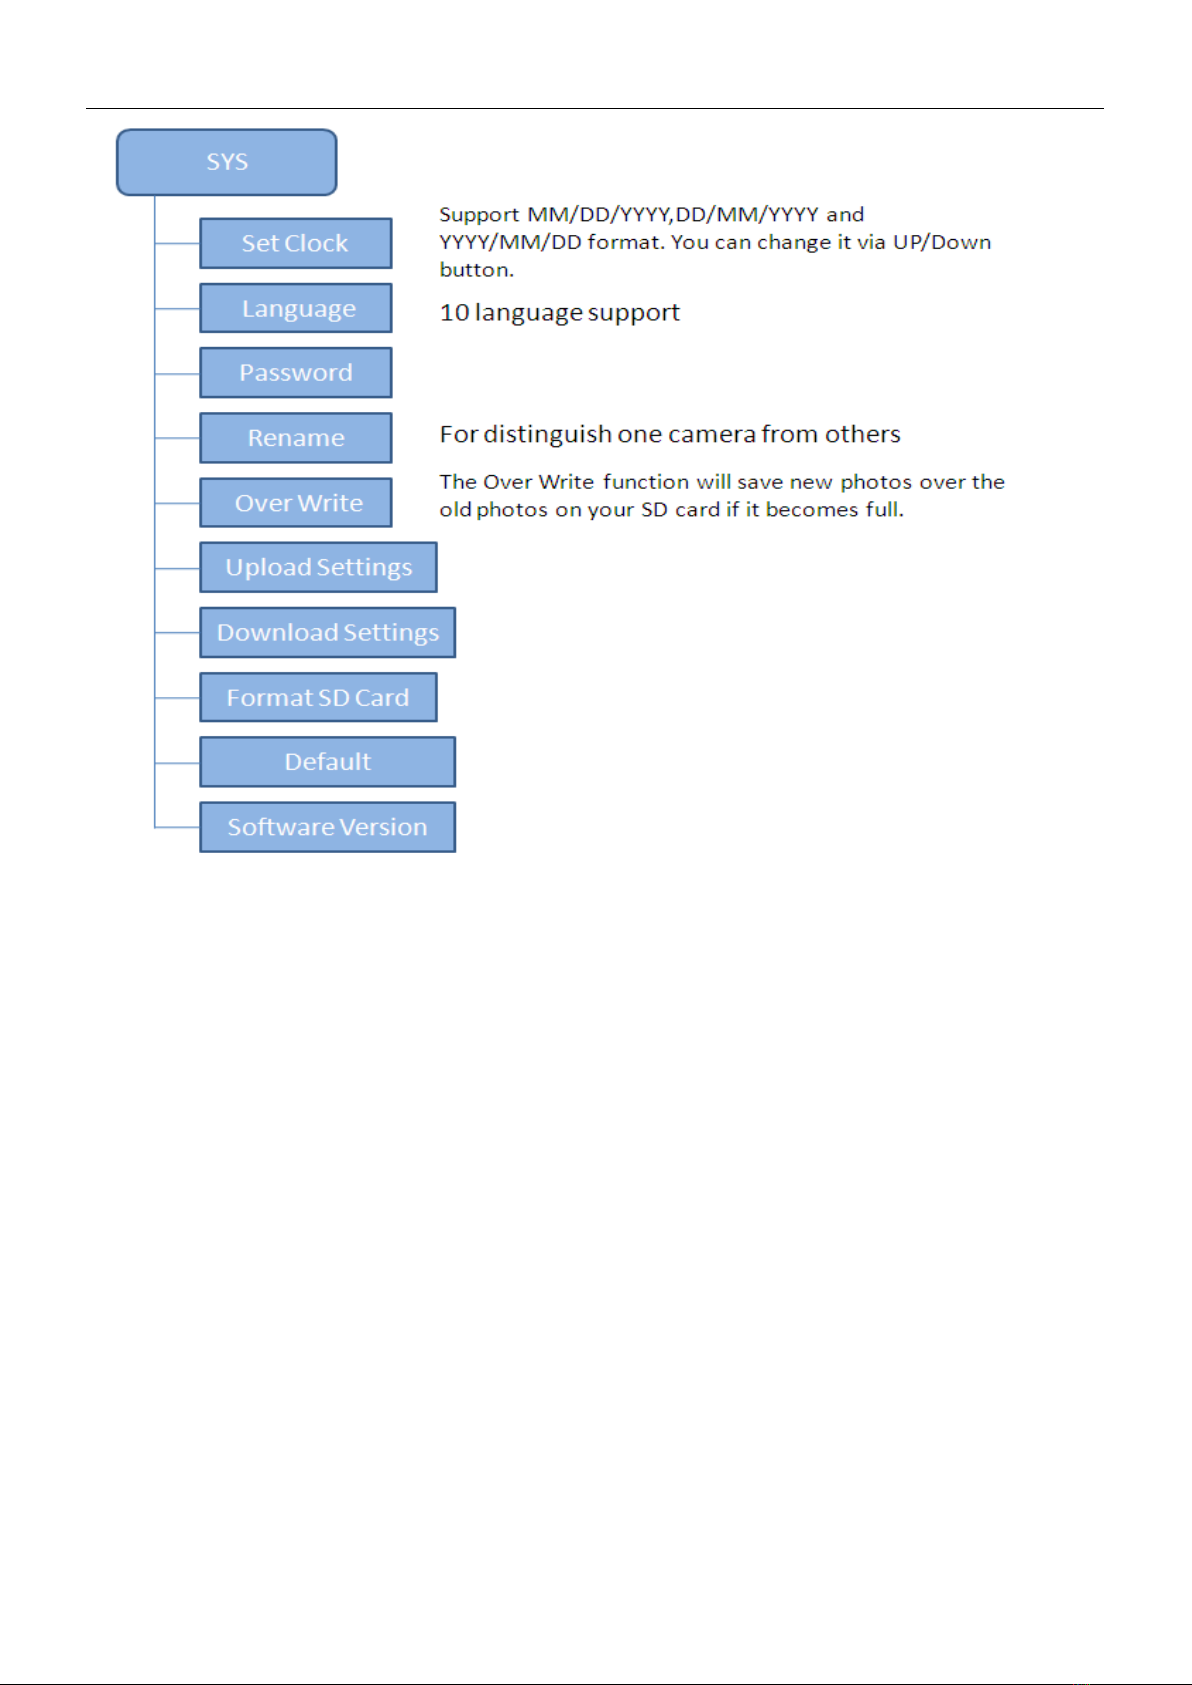
Password:You can set a Password to prevent anyone from accessing the camera menu
options in the field. Make sure you write down your password or save it to your mobile phone
so you can still access your camera if you ever forget your password.

Page 8
4.3 Send a test photo
1) Switch camera to Setup mode, press ► button to take a picture, then press OK button
to check this picture;
2) Press the MENU button, choose send. You will see sending progress shows on the LCD
screen.
Once you see 'SentSuccessfully', check the LinckEazi App on your phone or web-portal
to see if you receivedthe photo.
If the sending failed, choose Diagnose to generate a Logfile and the FAQ will help you with
your Log file.

Page 9
5 Connecting CAM to LinckEazi Cloud server
In order to ‘send’ your photos and video clips to the Free Cloud Server, you need to create
a LinckEazi User Account either via the LinckEazi mobile App on your phone (free
download from Apple iStore or Google Play Store) or on-line via the web portal and then
ADD the camera to your User Account (Please also read LinckEazi APP & LinckEazi
CLOUD User Manuals) - please contact [email protected].
Open website: https://www.linckeazi.com/index.html
Login, if you already have an account, or simply create a new with your e-mail address.

Page 10
Click ‘Add Device’, aform will pop out requesting basic information for your CAM.
Name your CAM, and add location description if necessary, the SN and IMEI can be found
labeledinside CAM or on packaging:
SN labeled at the side of SIM slot
IMEI labeled on the front panel

Page 11
5.1Send aphoto to Cloud server
Choose a picture, press MENU,Select ‘send’, the process of sending photo will present at
screen, and within minutes your cloud account will receive your photo.
If the above test has accomplished, then you can slide power switch to ‘on’ and start using
it take photo or video automatically.
6 Setting CAM with Web Portal or APP
The CAM can be set up conveniently with Cloud server and APP as well.

Page 12
As to APP, Please search“LinckEazi in Apple iStore or Google Play Store (or scan the
applicable QR codes) and install the APK file to your smart phone.
Android APP IOS APP
The adding and setting up process is quite similar to the on-line web-portal setting up option.
Fig 18

Page 13
7 Mounting tips
In some instances, using the forest for
reflection can add more light to your
target area.
Don’t facedirectly towards light
sources as this may result in
'white-out' / over-exposed
footage.
Mount the camera approximately 1.4m
off the ground facing straight forward as
level as possible. For instance, place the
camera 7m-10m from afield edge facing
the woods. If positioning the camera in
a bushy area, position it facing athicket
approximately 7m-10m away.
Recording short video clips is a
good way of minimising the
effect of night-time 'motion-blur'
images if the subject is moving
briskly past the camera. It
provides a constant light source.

Page 14
Appendix Ⅰ:Technical Specifications
Picture Resolution 20MP, 16MP, 12MP, 10MP, 8MP, 3MP
Lens F/NO=2.4 FOV(Field ofView)=52°
Frequency Bands UMTS/HSPA+: 900/2100MHz
GSM/EDGE:850/900/1800/1900MHz
IR-Flash (No glow) (Low) 6m-12m, (High) 12m-25m
Display Screen 2.4” LCD
Memory Card Up to 64GB
Video Resolution WVGA,720P,1080P
PIR Sensor Multi Zone
PIR Sensitivity Adjustable (High/Normal/Low)
Trigger Time High:0.4s / Low:0.6s
Operation/Storage Tem. -30- +60°C / -40 - +80°C
Trigger Interval 0s – 60 min.
Time lapse
3,4,5‐55 min (in 5 min increments);
1-8 hours (in 1 hour increments);
2hours/16 hours/20 hours/24 hours
Photo Burst 1–10
Video Length 5–60s
Power Supply 4×AA, 8×AA or 12AA or 6v external DC
Stand-byCurrent <0.25 mA (<6mAh/Day)
Low Battery Alert LED Indicator; APP alert
Mounting Rope/Belt/Python lock
Dimensions 140 x87 x55 mm
Operation Humidity 5% - 90%
Security authentication FCC, CE,RoHS

Page 15
Appendix Ⅱ: Parts List
Part Name Quantity
Digital Camera One
Mounting Strap One
User Manual One
Quick Start One
Antenna One
Declaration of Conformity to Directive
2014/53/EU
CE Caution:
Hereby, the manufacturer declares that this camera is in compliance with
the essential requirements and other relevant provisions of Directive
2014/53/EU. Pls ask for your distributor for a copy of the
Declaration of Conformity to Directive 2014/53/EU.

Customer Name:
Contact Tel:
Date of Purchase:
Series No:
Fault Description:
Retailer:
The camera manufacturer provides 24 months of warranty
service for this product against manufacturing defects or
malfunctions. If your camera fails to function under normal use
within 2 years, the camera manufacturer will repair or replace the
camera at no charge. The purchase receipt must be included
from an authorized retailer to validate the warranty.
Improper use of the camera resulting in damage is not covered by
this warranty.
The camera manufacturer can provide repair service, after the
warranty expiration. The customer will be responsible for any
charges on parts, labor and shipping costs. Please contact the
manufacturer for more details.
Please contact the area dealer for more details.
Other manuals for UM785-HD
2
Table of contents
Other Uovision Scouting Camera manuals

Uovision
Uovision GLORY LTE CELLULAR User manual

Uovision
Uovision UM565-SMS 12MP User manual

Uovision
Uovision UM785-4G User manual

Uovision
Uovision Illuminator UV567 User manual

Uovision
Uovision UV572 User manual

Uovision
Uovision PANDA UV535 User manual

Uovision
Uovision GLORY LTE User manual

Uovision
Uovision UM595-HD-3GE User manual

Uovision
Uovision Compact LTE 4G 20MP Cloud User manual

Uovision
Uovision UV785-HD User manual