VAPamore MR-1000 Forza User manual

Mode d’emploi et manuel de l’utilisateur

FAILURE TO FOLLOW SAFETY INFORMATION AND WARNINGS MAY
CAUSE PERMANENT DAMAGE AND VOID PRODUCT WARRANTY.
SAFETY INFORMATION
Steam cleaner must be level and on the floor during use.
listed on the label.
supply cord.
!
around water.
Do not leave the steam cleaner on and unattended. Always
switch the steam cleaner off and remove plug from wall
outlet when unattended.
use only with a grounded outlet.
Vapamore in order to prevent a fire hazard.
Only use distiled water. Using hard water can cause
calcium or mineral build up and void the warranty.
Never use additives such as perfumes, stain removers, or
other chemicals in the water tank as they will void the
warranty, cause permanent damage, and be dangerous.
Make sure the water tank cap is fully secured before use.
(See cleaning and storage).
Do not pull or drag steam cleaner using the
steam gun and hose.
Drain water tank prior to shipping, transporting.
storage.

TECHNICAL SPECIFICATIONS
PARTS LIST
PARTS OVERVIEW
Water bottle & holder
Accessory tool adapter
Metal brush small brass x 4
Nylon brush large
Nylon brush medium
Nylon brush grout
Metal brush large brass x 4
Metal brush large stainless steel x 4
Floor head smooth surface
Floor head with bristles
Extension tubes x 2
Cotton cover x 4
x 4
x 4
x 4
x 2
x 2
Bed bug / fabric tool
19
18
25
Model:
Power supply:
Heating element: 1700w - 14AMP
Steam Pressure: 6BAR - 90PSI PEAK
Tank capacity: 4.2LTR - 1.1 GAL
Boiler capacity: 3LTR - .8 GAL
Heating time: 9 MIN.
Boiler temp: 160C - 320F
Steam temp at tip: 140C - 284F PEAK
Power cord length: 25’
Steam hose length: 8’
Gross weight: 20.4 KG - 45LBS
Assembly screws & tools (not shown)
20
21
22
23
Smooth surface squeegee
20
24
Triangle corner brush
Large elbow adapter
19
21
Detail jet tool
22
25
26
24
23

GETTING STARTED
FRONT & REAR WHEEL INSTALLATION
Install the rear wheels using the supplied tool along
with the supplied wheel bolts,and washers.There is
Once unpacked the items that need to be installed are the front & rear wheels, storage
basket with upright handles, front carry handle and cord hooks. All the necessary tools
and hardware are included to install these items.
Fig.1
BASKET & UPRIGHT HANDLES
Fig.2
The basket and handles are secured to the main steamer
using 6 supplied screws and 2 plastic spacers. (NOTE:
There are extra screws provided in the bag for backup).
Align the basket and handle screw hole locations and
insert the supplied screws loosely until all screws are in
place. The lower mount will also use the plastic spacer
between the handle and the steamer.
Once everything is in place secure all the screws with the
supplied Allen tool. (Fig.2)
Install the front wheels using the supplied tool along
with the supplied wheel bolts, and washers. There
are 4 bolts and 4 washers per wheel. (Fig.1)
CARRY HANDLES & CORD HOOKS
Upper Handle Bolt
Spacer Lower Bolt
Attach the carry handles using the two supplied bolts for each handle, then tighten with
the supplied Allen tool. The cord hooks screw onto the studs located on the back of the
machine. Push inward to tighten the cord hooks. The cord hooks rotate by pulling
outward from the steamer then twisting to rotate. Use this rotate function to easily remove
the power cord and to position the hooks for cord storage. Use the Velcro cord strap to
secure the cord during transport. (Fig.3)
Fig.3
Vapamore
!
!
the steam gun trigger down for 15-20 seconds to release the air trapped in the boiler.
Cord
Hook
Cord
Hook
Front Carry Handle
Top Carry Handle
Front Wheel x 4 Bolts
Wheel bolt
Washer
Rear
Wheel
one bolt and one washer per wheel. The rear wheel
bolt threads into the wheel mount. (Fig.1)

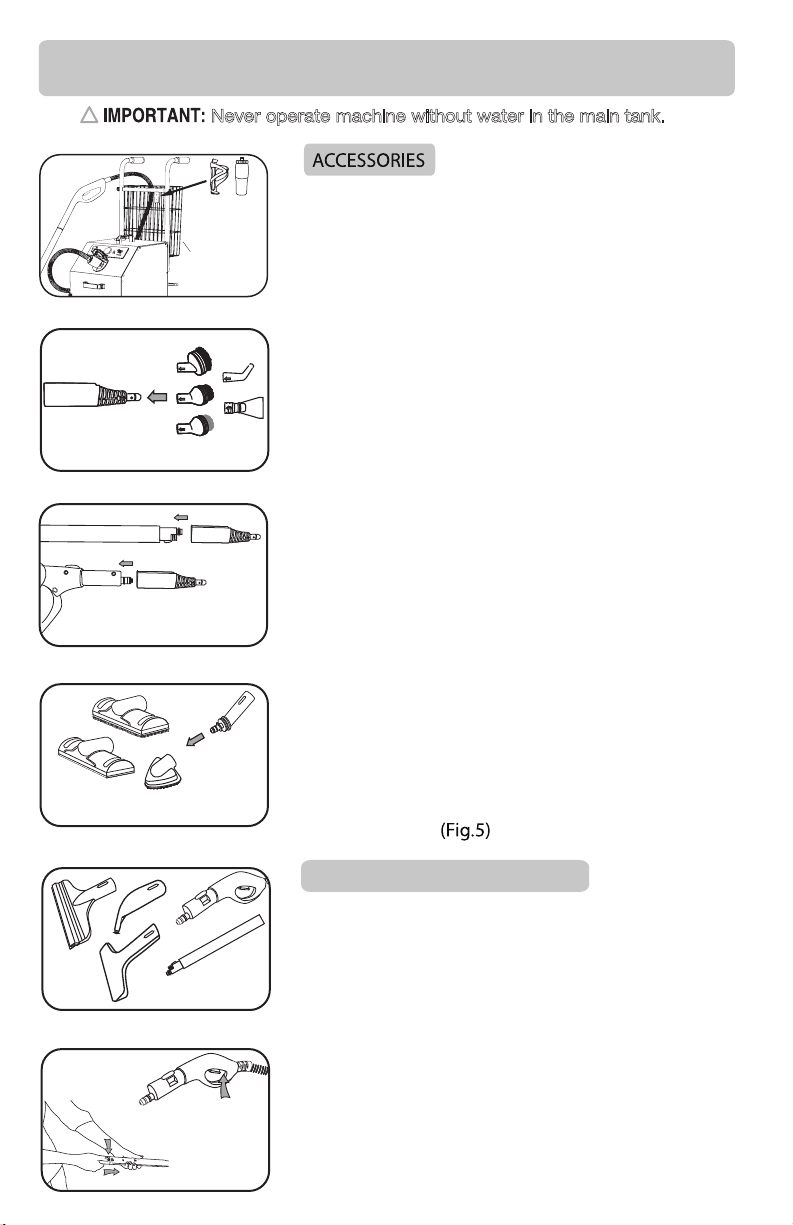
The accessory tool adaptor (#4 on parts overview
page) is required when using the jet nozzle
attachment, detail scraper, and all round detail
brushes (#5-12 on parts overview page). Align the
accessory with the arrow on the accessory tool
adapter and twist to lock into place. The accessory tool
adapter can be used directly on the steam gun or can
be used with the extension tubes.
(Fig.2 and 3)
Accessory
storage
basket
The MR-1000 Forza has an accessory and
tool basket. Once all the accessories and tools have
been unpacked use the accessory storage bag and
basket to carry all the accessories and tools.
(Fig.1)
Accessories twist lock onto
the accessory tool adapter
Accessory tool adapter
attaches to the steam
gun or extension tubes.
(Fig.4)
ACCESSORIES AND TOOLS
Fig.1
Fig.2
Fig.3
Fig.4
Fig.5
Fig.6
!
Never operate machine without water in the main tank.
Water bottle
and holder
The MR-1000 Forza includes a water bottle holder
that can be used for the included water bottle or
most any other drink bottle or cup. The water bottle
holder attaches to the basket using the supplied
mounting screws.
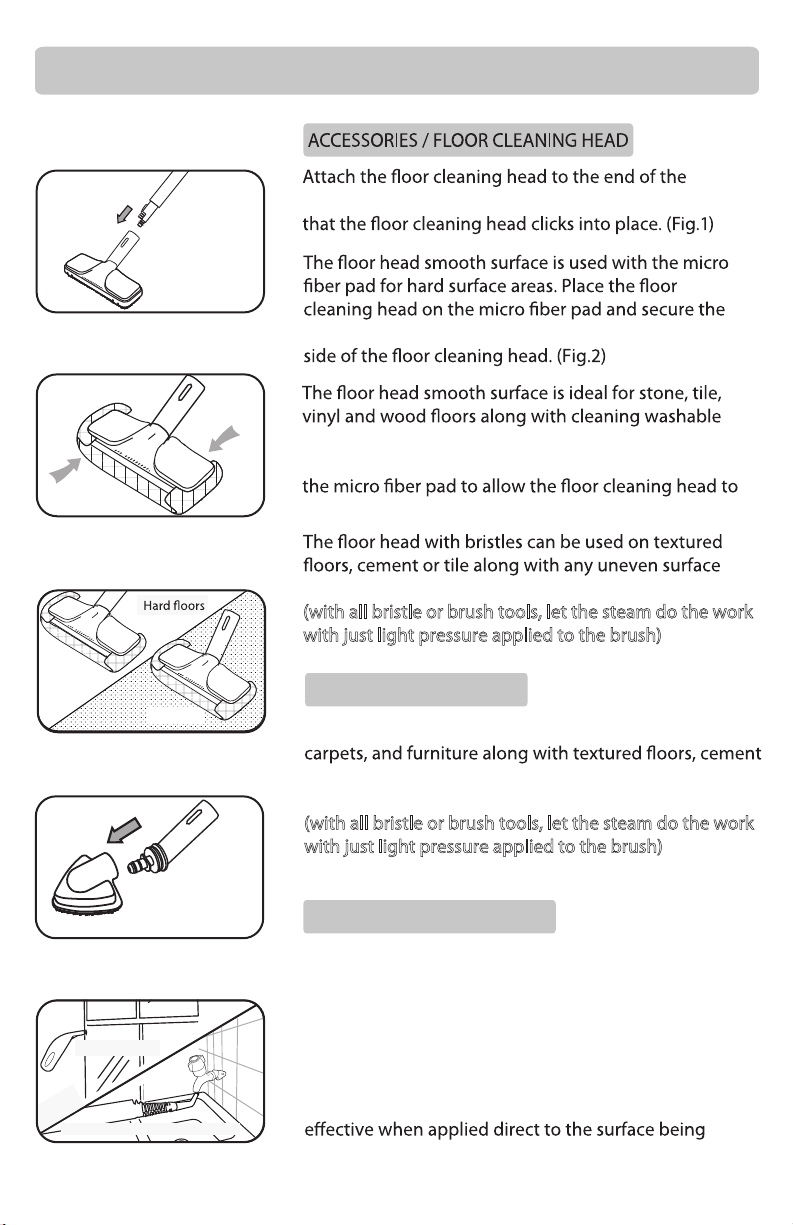
The large elbow adaptor (#14 on parts overview
page) is required when using the floor heads or
triangle corner brush (#15-17 on parts overview page)
With the large elbow adapter facing down, insert
into the floor heads or triangle brush until completely
inserted then rotate up. The adapter will only insert
when facing down and then locks into position and
allows the adapter to rotate when in use. The large
elbow adapter can be used directly on the steam
gun or can be used with the extension tubes.
Use large elbow adapter for
floor heads and triangle brush
The smooth surface squeegee, detail jet tool and the
bed bug / fabric tool (20-22 on parts overview page)
can be connected directly to the steam gun or the
extension tubes.
Use with steam gun
or extension tubes
STEAM GUN / EXTENSION TUBES
The steam gun connects to the steam socket located
on the front panel of the machine. Flip the dust cover
open and push the hose connector firmly into the
socket until both tabs click into place. Remove the
steam hose by pressing in both release tabs while
pulling out.
The steam gun has a trigger (ON) lock located just
behind the trigger. This lock can be used for
continuous steam without having to hold the trigger.
To set the lock, push down the trigger, then while the
trigger is down slide the lock to hold the trigger.
Extension tubes can be used for floors or difficult to
reach areas. The extension tubes push and lock into
place on the steam gun. (Fig.6)
Trigger lock
Extension tubes
lock and release

FILLING & OPERATION
Fig.1
!
er
Do not ov
!
Make sure the steam gun and hose is plugged into the
machine before startup. Plug the machine into a proper
wall outlet and swit
the pump is running hold the steam gun trigger down
for 15-20 seconds to release the air trapped in the boiler.
Once the boiler is full the pump will stop and the red
status light will light up showing the boiler is now
heating the water. Once the boiler is at operating
temperature the status light turns to green indicating
or
GENERAL FUNCTION:
located on the top of the machine and using the
screen. (Fig.1)
Using additives of any kind will void the warranty.
!
.
internal components and can cause failure to internal parts and void the warranty.
without this screen in place. Failure to do so will void the warranty.
Fig.2
er
NOTE:
Do not ov
!
Cold water
tank fill cap
ST ATUS
PRESSURE
FILL
OUTPUT
ON
OFF
+
_
Water fill light
Status light
On / off
switch
the steamer is ready for use. (Initial start up from cold machine is aprox. 9 min) *The
status light will cycle red to green during use as the boiler maintains the temperature.
The Vapamore MR-1000 Forza has an industry high steam burst pressure of 90 psi. For
situations that need a short high pressure steam burst for cleaning, set the the steam
output to maximum pressure. For large cleaning areas that need a maintained steady
output knob from the full open position, counter clockwise approximately 1/2
revolution. The steam output knob can be turned down further for delicate jobs that
require very little pressure such as jewelry, fabrics, furniture, etc. (Fig.2)
Use steam knob to
adjust steam output level

OPERATION
extension tube (use 1 to 2 tubes as desired). Ensure
Fig.1
Fig.2
Fig.3
The detail jet tool can be attached directly to the steam
gun or to any of the extension tubes. The jet nozzle
attachment is used with the accessory tool adapter.
These tools are great for removing soap scum in the bath,
shower, and faucets. Also for cleaning tight areas such as
toilet seat hinges where high pressure steam can reach
and blow out dirt and debris. These tools are most
cleaned. The steam temperature will condense and cool
within 1’’ of the tool tip. (Fig.5)
Fig.5
DETAIL JET TOOL / JET NOZZLE
overhanging material under the clips located on each
walls and any hard surface. It can also be used to sanitize,
deoterize, kill allergens, bed bugs and dust mites. Attach
glide when using on carpet. (Fig.3)
Micro fiber pad
or where extra scrubbing strength is needed.
(with all bristle or brush tools, let the steam do the work
with just light pressure applied to the brush)
Use large elbow
adapter for triangle
brush
TRIANGLE CORNER BRUSH
The triangle corner brush can be used on upholstery,
or tile along with any uneven surface or where extra
scrubbing strength is needed. (Fig.4)
(with all bristle or brush tools, let the steam do the work
with just light pressure applied to the brush)
Fig.4
Detail jet tool
Jet nozzle on accessory tool adapter
Carpets
‘’
CLICK
Tools click into
extension tubes

BRUSHES
There are 6 brush types supplied with the Vapamore
MR-1000 Forza. The brushes attach to the accessory
tool adapter by aligning the arrows and twisting to lock.
Suggested uses (Metal brushes), Oven grills, BBQ grates,
cement stains, machinery, and metal surfaces. (Nylon
medium duty and large nylon brush), used for more
sensitive materials such as blinds, carpet, furniture, air
brush is used for harder less sensitive areas such as
IMPORTANT : With all brushes it is important to not
apply excessive pressure or force. This can cause failure
of the detail adaptor or related parts. When using the
brushes let the steam do the work and the brush to
help agitate the stain or area being cleaned. (Fig.1/2)
OPERATION
Fig.1
BED BUG / FABRIC TOOL
SMOOTH SURFACE SQUEEGEE TOOL
Fig.2
Fig.4
Fig.5
SCRAPER TOOL
The scraper tool can be used to defrost freezers, on
oven walls and cook top surfaces to remove stuck on
food. This tool is also good for removing wall paper,
paint and shelve paperandgum. (Fig.3)
Start by installing the supplied cotton cover on the
Bed bug / fabric tool. Now this tool can
be used for
Using the smooth surface squeegee tool is great for
sanitizing kitchen and bathroom counter tops chemical
free along with smooth surfaces such as stone, granite,
wood, glass, tile and stainless steel. (Fig.5)
Bed bugs, allergens and mold:
Use this tool on bedding, pillows, and furniture by
applying light pressure and slowly passing it along the
surface to kill Bedbugs, dust mites and other allergens.
(See bed bug - dust mite - allergens page for details)
(Fig.4)
Fig.3
steaming and sanitizing along with eliminating odors
in garments, fabrics, furniture, curtains, drapes, etc.
(Fig.4)
Sanitize -
counter tops,
tile, stone,
granite, glass,
stainless steel,
walls, etc. Use
with extension
tubes or direct
on gun.

BEDBUG - DUST MITES - ALLERGENS
Fig.2
Fig.3
The accessory tool adaptor or the detail jet tool can be
used on their own. These tools are great for cracks and
crevices. Make sure to concentrate the steam directly on
the area to be treated with as minimal distance as
not kill pests and their eggs if the jet tip is not directly on
the surface being treated.
The accessory tool adaptor or the detail jet tool can be
attached directly to the steam gun or to any of the
extension tubes. (Fig.4)
WHY USE STEAM?
The Vapamore MR-1000 Forza produces steam with an output temperature between 210˚
to 240˚ degrees. Pests such as bedbugs, dust mites and other allergens along with their
eggs are killed on contact at a temperature of 180˚ degrees. Using steam is an extremely
other bacteria or viruses without leaving any harmful chemical residue behind. The tools
supplied with the Vapamore MR-1000 Forza allow you to treat all areas where these pests
can hide such as bedding, sofas, furniture, pillows, carpet, cracks and crevices that are
ideal hiding places for pests.
BEDDING / FURNITURE
Fig.1 The bed bug / fabric tool with cotton cover is ideal for
treating bedding, furniture, pillows, and carpet areas
around bed posts and base boards. Start by installing
the supplied cotton cover on the clothes - fabric /
smooth surface tool. Apply light consistent pressure and
slowly pass it along the surface (1” per second) to insure
the area being treated has a chance to come to full
temperature killing pests and their eggs. (Fig.1)
great for treating large surface areas such as bedding,
furniture, and carpet areas. Start by installing the
head to glide over fabric or carpet. (Fig.2)
Apply light consistent pressure and slowly pass it along
the surface (1’’ per second) to ensure the area being
treated has a chance to come to full temperature, thereby
killing pests and their eggs. (Fig.3)
Accessory tool
adaptor
Detail jet tool
Fig. 4
Use clips for
Carpet
BEDS

CLEANING / MAINTENANCE
CLEANING /STORAGE
Always ensure before cleaning or maintaining the Vapamore MR-1000 Forza that it is
swit om the wall outlet.
Only clean the outer surface with a water moistened cloth. Do not use any cleaning
agents, abrasives or alcohol
Fig.1
ACCESSORIES
The cold water tank and main boiler tank should be
emptied before storing for any extended period of time
(30 days or more) or every 3 months of use to help remove
any debris that may have collected in the tanks. Make sure
the steamer is unplugged and completely cooled down
before emptying the tanks. The cold water tank has a drain
located on the underside closest to the right rear wheel.
Remove the drain cap to drain the cold water tank then
replace and tighten the cap. Do not overtighten the cap
Parts, extension tubes and accessories can be stored in the supplied accessory storage
bag and the storage basket located on the back of the steamer. The steam gun and hose
can remain plugged into the steamer and also be stored in the storage basket.
Replacement accessories and parts are available to order online at vapamore.com or by
calling Vapamore at 480-951-8900.
STORAGE / TRANSPORTING / SHIPPING
detergents and wash cycle.
on frequency of use to be sure there is no trapped debris in the screen. Remove the screen
!
so can allow debris to enter the system and void the warranty.
Cold water
drain
Boiler
drain
as you may damage the seal. The boiler drain is located on the underside in the center
of the steamer. The steamer MUST be 100% cooled down and have no pressure stored
in the tank to remove this cap. Remove the drain cap to drain the boiler then replace
and tighten the cap. Do not overtighten the cap as you may damage the seal. (Fig.1)
!
Never ship or transport the machine with water in the cold water tank.
The cold water tank MUST be completely emptied prior to shipping or transporting the
machine. Falure to do so can cause water to enter the machines internal parts and void
the warranty.
Make sure all the o-rings are in place on the accessory tools and adapters. A silicon lube
can be used on these o-rings to help maintain a long use life.

PROBLEM?
IMPORTANT :
TROUBLESHOOTING
What do I do if the machine or an accessory becomes damaged or broken?
Visit www.vapamore.com for a complete list of parts and accessories available for
purchase or simply call us at 480-951-8900 or e-mail us at info@vapamore.com to
purchase replacement parts or schedule a repair. “WE ARE HERE TO HELP.”
TROUBLESHOOTING
One of the ETL protection devices has been triggered or the power cord has been
Call us at 480-951-8900 or e-mail us at info@vapamore.com to schedule a repair.
Do not return to the place of purchase for warranty or repairs. Only
damaged.
Vapamore is authorized to facilitate all repairs to keep the highest quality and ETL
standards. Repairs or tampering by any other party will void the Warranty.
The protection circuit breaker has been tripped. Call us at 480-951-8900 or e-mail
The main water tank and boiler are empty.
The steam gun hose socket is not plugged in correctly.
Check and replug in the socket until the two locking tabs click.
The internal parts have been clogged by debris or hard water build up.
Call us at 480-951-8900 or e-mail us at info@vapamore.com to schedule a repair.
Fill tank with water.
-
IMPORTANT :
!
the steam gun trigger down for 15-20 seconds to release the air trapped in the boiler.

TIPS
APPLICATIO
N
STEAM VOLUME ATTACHMEN
T
TECHNIQUE
FLOORS / CHEMICAL FREE CLEANING WITH NO RESIDUE LEFT BEHIND
Vinyl Tile Or Vinyl Sheet Medium - High
Floor Cleaning Head +
Micro fiber + Extension
Tubes + Nylon Brush.
Sweep or vacuum first. Steam mop with
floor cleaning head and micro fiber cover.
Corners and baseboards with nylon brush.
Stone Tile, Slate, Ceramic Tile, Grout High
Floor Cleaning Head +
Micro Fiber + Extension
Tubes + Nylon Brush +
Grout Brush + Nylon Brush
Jet Nozzle
Sweep or vacuum first. Steam mop with
floor cleaning head, heavy stains use
without micro fiber cover. Corners and
baseboards with nylon brush. Grout lines
use grout brush and / or jet nozzle. Finish
with floor cleaning head / micro fiber cover.
Smooth Surface Concrete High
Floor Cleaning Head +
Micro Fiber + Extension
Tubes + Grout Brush +
Nylon Brush + Metal Brush +
Jet Nozzle
Sweep or vacuum first. Steam mop with
floor cleaning head, heavy stains use
without micro fiber cover. Corners and
baseboards with nylon brush. Joint lines
use grout or metal brush and / or jet nozzle.
Finish with floor cleaning head / micro fiber.
w - MediumoLdoowdraH
Floor Cleaning Head +
Micro Fiber + Extension
Tubes
Sweep or vacuum first. Steam mop with
floor cleaning head and micro fiber cover.
CARPETS / SPOT TREATMENT
Wall To Wall, Rugs, Spot Care High Nylon Brush + Jet Nozzle +
Paper Or White Cotton Towel
Vacuum area first then steam using brush
or jet. Use towels to blot stain away.
Chemical cleaner can be used prior to
steam treatment.
WALLS, CEILING
S
Painted, Wood Paneling, Wallpaper Low - Medium
Painted, wood paneling, wallpaper walls
are heat sensitive. Always test small area
first and be careful not to over heat finish.
Use Floor Cleaning head with micro fiber
cover or clothes steamer with cotton cover.
Use nylon brush for corners and stains.
hgiHlavomeRrepapllaW
Nylon Brush, Jet Nozzle,
Extension Tubes + Smooth
Surface Tool + Scraper
Use at full power to soften glue and
remove wallpaper. Wallpaper stripper can
be applied first.
hgiH-muideMstneVriA
Nylon Brush, Jet Nozzle,
Extension Tubes, Cotton
Towel
Clean using brush and jet tip. Wipe down
with clean cotton towel.
UPHOLSTERY / SPOT TREATMENT
Vinyl, Synthetic, Cotton Medium - High
Nylon Brush, Jet Nozzle,
Clothes Steamer, Cotton
Cover
,
Cotton Towel
Test a small area first. Some synthetic
materials will not handle high heat. Use
n
y
lon brush with soft
p
ressure for lar
g
er
stains and jet tip for small stains. Blot with
cotton towel. Use clothes steamer with cotton
cloth to go over all surfaces to deoterize.
woLrehtaeL Clothes Steamer, Cotton
Cover, Cotton Towel
Test a small area first. Steam over stained
area and then blot with cotton towel. Use
clothes steamer with cotton cloth to go
over all surfaces to deoterize.
CARPETS / DEOTERIZE + KILL BEDBUGS - DUST MITES AND ALLERGENS
Wall To Wall, Rugs High
Floor Cleaning Head +
Extension tubes + Micro
Fiber + Jet Nozzle
Vacuum area first then steam using floor
cleaning head with micro fiber cover. Pass
slowley over area to allow heat to kill pests.
Use jet nozzle for corners and cracks.
Floor Cleaning Head +
Extension tubes + Micro
Fiber + Nylon Brush +
Clothes / Fabric tool
with cotton cover.
UPHOLSTERY / KILL BEDBUGS - DUST MITES AND ALLERGENS
Vinyl, Synthetic, Cotton Medium - High Jet Nozzle, Clothes
Steamer, Cotton Cover
Test a small area first. Some synthetic
materials will not handle high heat. Use
clothes steamer with cotton cover and
slowley pass over area to allow heat to
kill pests. Use jet nozzle for cracks and
corners.

TIPS
APPLICATIO
N
STEAM VOLUME ATTACHMEN
T
TECHNIQUE
WINDOW BLINDS
Levolor, Venetian, Horizontal, Vertical Low-Medium
Nylon Brush, Jet Nozzle,
Detail Nozzle, Extension
Tubes, Cotton Towel
Dust area first. Thin plastic blinds may not
be able to handle heat from the steam.
Test a small area first. Use jet or detail
nozzle from 4'' away. Wipe off with cotton
towel.
GLASS
muideMsrorriM,swodniW
Smooth Surface Squeegee,
Extension Tubes, Nylon
Brush, Paper Towels
Pre-steam glass from 6'' away to heat
glass. Use brush for edges and bases.
Finish with window cleaner squeegee. Do
not use if temperature is under 32 degrees
to prevent cracking.
Window Screens, Window Frames Medium -High Detail Nozzle, Nylon Brush,
Extension Tubes
Steam area with detail nozzle. Use brush
for edges and corners.
KITCHENS
hgiH-muideMsnevO,spoTevotS
Nylon Brush, Brass Brush,
Extension Tubes, Paper
towels
Use nylon brush over all surfaces and
brass brush for interior oven grates. Wipe
down with paper towels
muideMsecnailppAllamS Nylon Brush, Detail Nozzle,
Paper towels
Use brush over all areas and detail nozzle
for small corners and seems. Wipe down
with paper towels.
Sinks, Faucets, Drains Medium - High Nylon Brush, Detail Nozzle,
Paper towels
Use brush over all areas and detail nozzle
for small corners and seems. Wipe down
with paper towels.
Counter Tops Low- Medium
Smooth Surface Sqeegee,
Nylon Brush, Detail Nozzle,
Paper towels
Use brush over all areas and detail nozzle
for small corners and seems. Use smooth
surace squeege to sanitize counter tops
by slowly passing over area then wipe area
with paper towel for chemical free cleaning.
BATHROOM
hgiH-muideMtuorG,eliT
Floor Cleaning Head +
Micro Fiber + Extension
Tubes + Grout Brush + Jet
Nozzle
Sweep or vacuum first. Steam mop with
floor cleaning head, heavy stains use
without cotton cover. Corners and
baseboards with nylon brush. Grout lines
use grout brush and / or jet nozzle .Finish
with floor cleaning head with micro fiber.
Porcelain Toilets, Chrome Fixtures Medium - High Nylon Brush, Detail Nozzle,
Paper towels
Use brush over all areas and detail nozzle
for small corners, hinges, and seems. Wipe
down with paper towels.
Shower, Tubs, Doors Medium
Nylon Brush, Detail Nozzle,
Extension Tubes, Paper
towels
Use brush over all areas and detail nozzle
for small corners and seems. Wipe down
with paper towels.
AUTO, MOTORCYCLE, MARINE
hgiH-muideMsaerAroiretnI Nylon Brush, Jet Nozzle,
Clothes Steamer, Cotton
Cover, Cotton Towel
Test a small area first. Some synthetic
materials will not handle high heat. Use
nylon brush with soft pressure for larger
stains and jet tip for small stains. Blot with
cotton towel.
Detailing, Exterior, Engine Medium - High Nylon Brush, Detail Nozzle,
Jet Nozzle
Use brush over all areas and detail nozzle
for small detail areas.
NEED HELP?
Visit www.vapamore.com to see video demonstrations and tips along with full details
or simply call us at 480-951-8900 or E-mail us at info@vapamore.com
WE ARE HERE TO HELP...
(NOTE: HARD WATER AND CALCIUM STAINS CAN ONLY BE REMOVED WITH CHEMICALS.


Fig.1
Fig.2
Fig.3
Aller sur www.vapamore.com pour voir la vidéo d’instructions du MR-1000 Forza
ASSEMBLAGE DU NETTOYEUR VAPEUR
Ouvrir l’emballage. Les pièces à installer sont : les roues avant et arrière, le panier
de rangement avec poignées, la poignée frontale pour le transport, et les attaches
du câble d’alimentation.
Installer les roues avant à l’aide des outils, des boulons
de roue et de inclus. Il y a 4 (quatre) boulons
par roue. (Fig 1). Installer les roues
arrière à l’aide des outils, des boulons de roue, des
rondelles, et des écrous de blocage. Le boulon de roue
doit être insérer dans la roue, puis dans l’attache du
nettoyeur vapeur. Après mise en place, insérer la
et l’écrou de blocage. Bien serrer. (Fig 1)
INSTALLATION DES ROUES AVANT ET ARRIERE
vapeur à l’aide de 6 quatre.
Aligner panier avec emplacements
réservés aux vis, insérer toutes les vis dans les
emplacements (sans visser) ainsi que l’entretoise en
plastique entre le nettoyeur vapeur et le panier
(partie basse). Une fois tout en place, visser fortement
a l’aide le la clé Allen incluse (Fig 2).
PANIER ET POIGNEES VERTICALES
Fixer la poignée de transport frontale à l’aide des 2 boulons inclus, visser à
l’aide la clé Allen incluse. Visser les attaches du cordon d’alimentation aux tétons
d’alimentation. Utiliser la bande Velcro pour sécuriser le câble d’alimentation pendant
le transport. (Fig 3).
POIGNEE DE TRANSPORT FRONTALE ET ATTACHES CORDON D’ALIMENTATION
Une fois la pompe prête à l’utilisation, appuyer 15-20 secondes sur la gâchette du
matériaux, personnes, animaux ou plantes dus à une mauvaise utilisation du nettoyeur
vapeur ou à une intolérance à la vapeur.
Boulon pour le haut
Entretoise pour le bas
Poignée de transport frontale
Poignée de transport
Attache pour câble
d’alimentation
Poignée de
transport
Roue arrière et 4 boulons
Roue arrière et 2 boulons
Roue
arrière

Fig.1
Fig.2
Fig.3
Fig.4
Fig.5
Fig.6
!
Aller sur www.vapamore.com pour voir la vidéo d’instructions du MR-1000 Forza
ACCESSOIRES ET OUTILS
IMPORTANT : Ne jamais utiliser l’appareil à vapeur sans eau dans le réservoir principal.
Le MR-1000 Forza a un panier pour accessoires et outils. Une
fois tous les accessoires et outils sortis de l’emballage, utiliser
le sac et le panier de rangement pour leur transport.
Un support pour une bouteille d’eau est inclus avec le MR-1000
Forza. Il peut être utilisé avec la bouteille incluse ou avec un
grand nombre de différents modeles de bouteilles ou récipients.
Le support s’accroche sur le devant en haut du panier à
accessoires (Fig. 1).
L’embout de fixation (#4 de la liste des accessoires), est
nécessaire pour l’utilisation du tuyau jet, du grattoir, de toutes
les brosses rondes (#5 à 12 de la liste des accessoires). Pour
le fixer, aligner la flèche de l’accessoire avec la flèche de
l’adaptateur et tourner pour mettre en place et bloquer.
L’adaptateur se fixe directement au pistolet à vapeur et peut
aussi être relié aux tubes d’extension (Fig. 2 et 3).
Le grand adaptateur coude (#14 de la liste des accessoires)
est nécessaire pour l’utilisation des accessoires de sols ou de
la brosse triangulaire (#15 - 17 de la liste des accessoires).
Orienter l’adaptateur coude vers le bas, puis l’insérer
complètement dans les accessoires pour les sols ou la brosse
triangulaire. Tourner pour bloquer. L’insertion, le blocage et la
rotation du grand adaptateur coude ne peut s’effectuer que si il
est orienté vers le bas. Le mouvement de rotation s’effectue
pendant l’utilisation. Le grand adaptateur coude peut être utilisé
directement avec le pistolet à vapeur ou avec les tubes
d’extension (Fig. 4).
Le grattoir pour surfaces lisses, le tuyau jet pour détails, et
l’accessoire pour punaises de lit / tissus (#20 - 22 de la liste
des accessoires) peuvent être connectés directement avec le
pistolet à vapeur ou les tubes d’extension (Fig. 5).
ACCESSOIRES
Le pistolet à vapeur se connecte à l’ouverture située sur le
devant du nettoyeur vapeur. Ecarter le protecteur de poussière
et introduire fermement le connecteur du tuyau dans l’ouverture
jusqu'à ce que les deux onglets soient en place et
s’enclenchent par un clic. Pour retirer le tuyau à vapeur,
appuyer sur les deux onglets et tirer pour le sortir de la prise
vapeur.
Le pistolet à vapeur à une gâchette et un loquet de blocage
(ON) situé derrière la gâchette. Ce loquet permet d’avoir un
flot de vapeur en continu sans avoir à garder la gâchette
appuyée. Pour utiliser cette fonction, appuyer sur la gâchette
et faire glisser le loquet en même temps pour maintenir la
gâchette.
Les tubes d’extensions peuvent être utilisés pour les sols ou les
surfaces difficiles d’accès. Les tubes d’extension s’enclenchent
dans le pistolet à vapeur en poussant jusqu’au clic (Fig. 6).
PISTOLET A VAPEUR ET TUBES D’EXTENSION
Bouteille
d’eau et
support
Panier de
rangement
pour accessoires
Tourner et bloquer les accessoires
dans l’embout de fixation (adaptateur)
L’adaptateur se fixe sur le
pistolet à vapeur ou sur les
tubes d’extension
Utiliser l’adaptateur grande taille coude
pour les accessoires pour les sols et la
brosse triangulaire
Utiliser avec pistolet à
vapeur ou tubes d’extension
Blocage gâchette
Fixation et retrait de
tubes d’extension


Other manuals for MR-1000 Forza
2
Table of contents
Other VAPamore Steam Cleaner manuals

VAPamore
VAPamore Primo MR-100 manual

VAPamore
VAPamore Primo MR-100 User manual

VAPamore
VAPamore MP-100 Primo User manual

VAPamore
VAPamore MR-750 OTTIMO User manual

VAPamore
VAPamore MR-75 Amico User manual

VAPamore
VAPamore MR-1000 Forza User manual

VAPamore
VAPamore MR-1000 Forza User manual

VAPamore
VAPamore MR-75 Amico User manual

VAPamore
VAPamore Primo MR-100 User manual

VAPamore
VAPamore Primo MR-100 manual