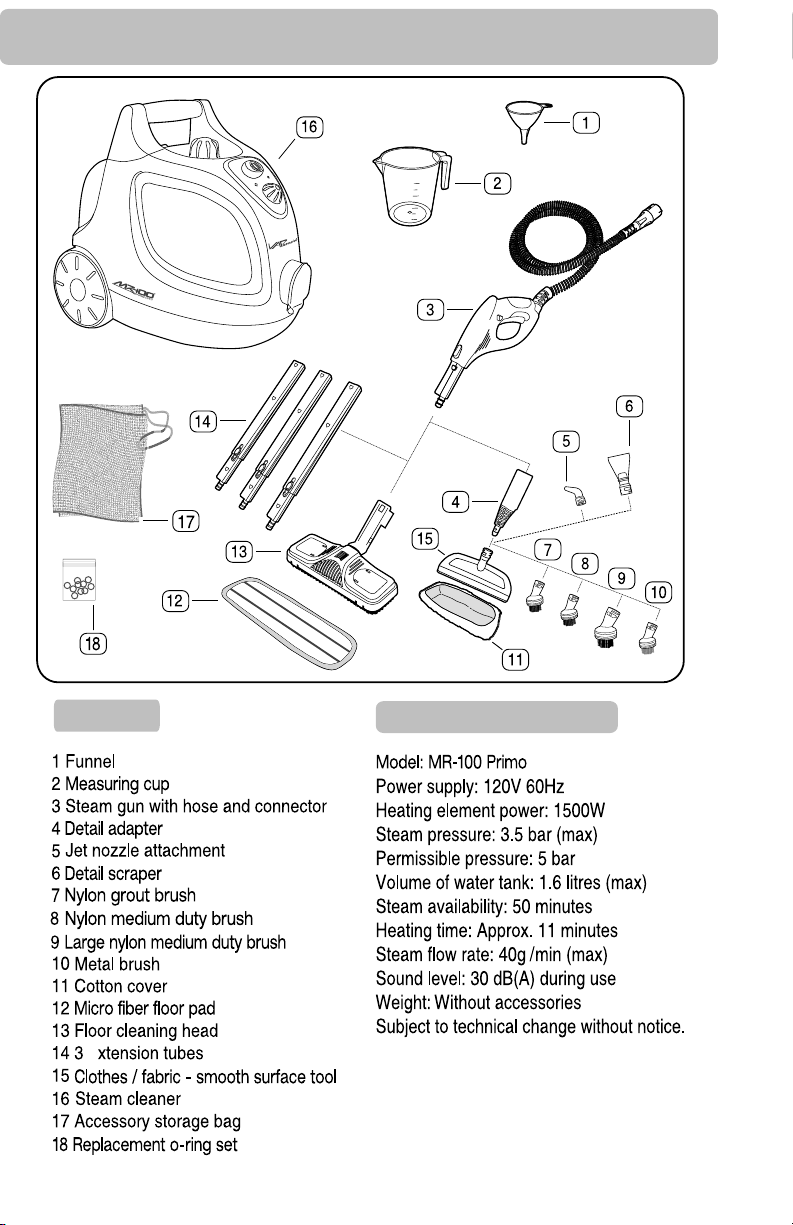
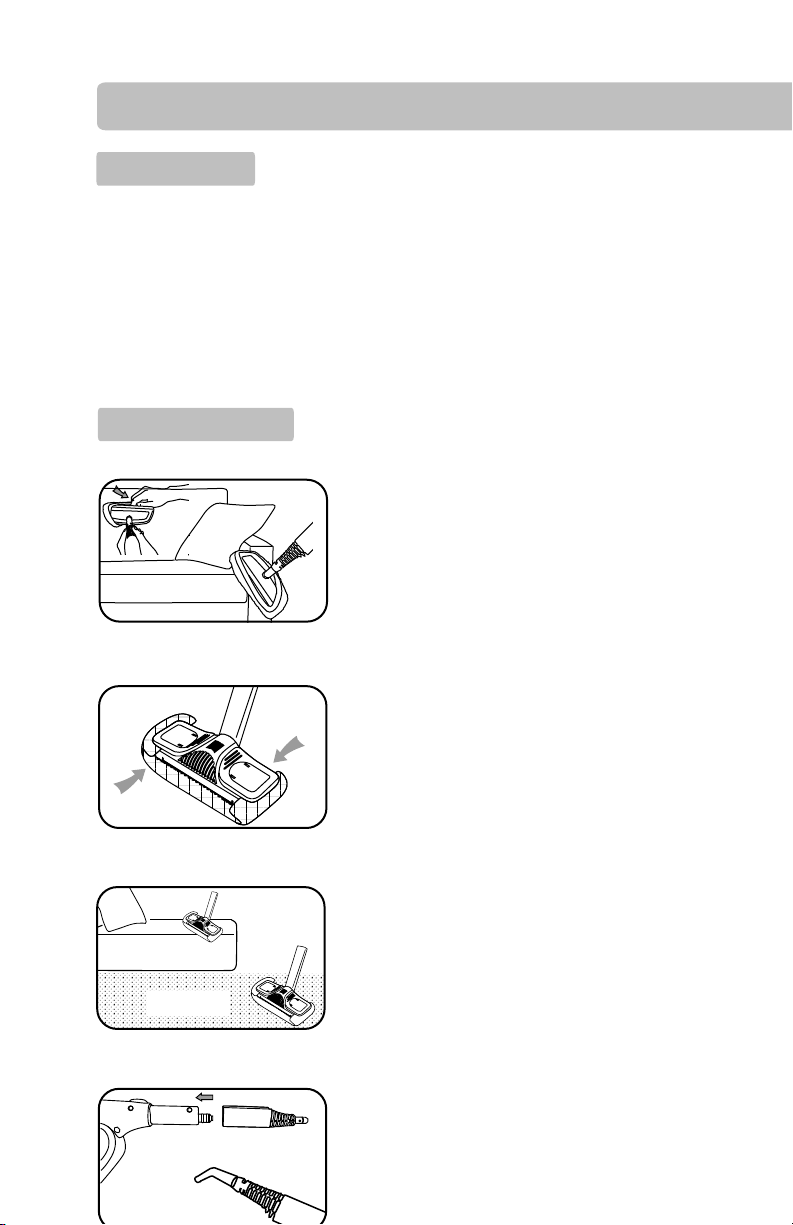
VAPamore Primo MR-100 User manual

Mode d’emploi et manuel de l’utilisateur

SAFETY INFORMATION
GO TO VAPAMORE.COM TO SEE THE MR-100 PRIMO INSTRUCTIONAL VIDEO
39. Do not over extend retractable cord past stopping point.
FAILURE TO FOLLOW SAFETY INFORMATION AND WARNINGS MAY
CAUSE PERMANENT DAMAGE AND VOID PRODUCT WARRANTY.
Steam cleaner must be level and on the floor during use.
listed on the label.
supply cord.
!
Do not leave the steam cleaner on and unattended. Always
switch the steam cleaner off and remove plug from wall
outlet when unattended.
use only with a grounded outlet.
Vapamore in order to prevent a fire hazard.
Only use distiled water. Using hard water can cause
calcium or mineral build up and void the warranty.
Never use additives such as perfumes, stain removers, or
other chemicals in the water tank as they will void the
warranty, cause permanent damage, and be dangerous.
Make sure the water tank cap is fully secured before use.
(See cleaning and storage).
Do not pull or drag steam cleaner using the
steam gun and hose.
Drain water tank prior to shipping, transporting.
storage.
37.*To provide continued protection against risk of electrical
shock, connect to properly grounded outlets only.
38. *Not for space heating purposes.
.

10.5lbs - 4.8kg
E
TECHNICAL SPECIFICATIONS
PARTS LIST
PARTS OVERVIEW
GO TO VAPAMORE.COM TO SEE THE MR-100 PRIMO INSTRUCTIONAL VIDEO

The detail adaptor is required when using all
accessories. Attach by aligning the arrow on the
accessory with the arrow on the detail adapter and
twisting to lock in place. The detail adapter attaches
directly to the steam gun and also can be attached
to the extension tubes.
(Fig. 2 and 3)
Accessory
compartment
The MR-100 Primo has an accessory compartment
that houses the Detail adapter, Jet nozzle
attachment, Clothes / fabric - smooth surface tool,
and all brushes. Open the accessory compartment
by pulling the accessory cover back - away from
the machine. Remove the desired accessory from
the accessory compartment and close the
accessory cover.
(Fig.1)
Accessories twist lock onto the detail adapter
Detail adapter attaches
to the steam gun or
extension tubes.
Connect the steam hose to the steam socket on
the front of the steam cleaner. To do this flip down
the dust cover door and push the connector on the
steam hose firmly into the socket until both tabs
click into place. To remove the steam hose, press
in both release tabs located on the left and right side
of the steam hose connector and pull out to release
from the socket.
(Fig. 4)
STEAM CLEANER ASSEMBLY
Fig. 1
Fig. 2
Fig. 3
Fig. 4
Fig. 5
Fig. 6
!
GO TO VAPAMORE.COM TO SEE THE MR-100 PRIMO INSTRUCTIONAL VIDEO

handle safety latch.
FILLING & OPERATION
Fig. 7
Fig. 8
The red light will illuminate when the power button is
depressed indicating the unit is heating. The green light
will illuminate indicating the unit is fully heated and
ready for use (approximately 11 minutes). The green
light will cycle on and o with the heater to maintain full
temperature during use. (Fig.10)
Fig. 9
Fig. 10
Green
light
Red
light
Fig. 11
Fig. 11
!
er fill
NOTE:
Do not ov
!
!
!
!
Do not over ll
To ll the water tank, switch the steam cleaner o and remove the plug from the wall
outlet. Allow steam cleaner to cool down before removing water tank cap. Unscrew the
water tank cap (Fig.7) by pressing the cap down and simultaneously turning counter
clockwise. Use the supplied funnel and the measuring cup lled to the top line marked
700ml two (2) times to equal 1.4 liters of water. (Fig.8)
Replace the water tank cap by pressing down on the cap
and simultaneously turning it clockwise. Make sure the
cap is fully tight to prevent any steam from leaking out.
If steam leaks from the cap area turn the Vapamore o
and once cooled down tighten cap further.
Do not exceed the maximum of 1.4 liters
of water when lling the water tank. 1.4 liters is equal to
lling the measuring cup to the 700ml mark tow (2) times.
Plug the Vapamore into a proper wall outlet and switch
to the on position by pressing the on / o switch. (Fig.9)
Never aim steam directly at people,
animals, plants, or electrical systems. There is a risk of
scalding or electrical shock.
or
GO TO VAPAMORE.COM TO SEE THE MR-100 PRIMO INSTRUCTIONAL VIDEO

OPERATION
Vapamore
at a
(Fig.12)
Fig.12
the steamer is always
on the oor or at surface when in operation.
A
The red
WARNING: Hot steam may escape when opening the cap if the machine is not
fully cooled o and / or all the remaining pressure is not released.
green lamp turn on.
!
!
!
!
!
GO TO VAPAMORE.COM TO SEE THE MR-100 PRIMO INSTRUCTIONAL VIDEO

‘’
OPERATION
Fig. 17
Attach the oor cleaning head to the end of the
extension tube (use 1 to 3 tubes as desired). Ensure
that the oor cleaning head clicks into place. (Fig.13)
The oor cleaning head can be used with or without the
micro ber cloth depending on the surface to be
cleaned. Place the oor cleaning head on the micro
ber cloth and secure the overhanging material under
the clips located on left and right side of the oor
cleaning head. (Fig.14)
Fig.13
The oor cleaning head is ideal for tile, stone, vinyl, and
wood oors along with cleaning washable walls and
hard surfaces. It can also be used on carpet to sanitize,
deodorize, kill allergens, bedbugs and dust mites.
(Fig. 15) (Attach the micro ber cover to allow the oor
cleaning head to glide when using on carpet).
Fig.14
Fig.15
The detail adaptor can be attached directly to the steam
gun or to any of the extension tubes. (Fig. 16)
Fig. 16
The detail adaptor can also be used on its own as a
straight jet nozzle tool or along with the 90 degree jet
nozzle attachment. These tools are great for removing
soap scum in the bath, shower and around faucets. Also
for cleaning tight areas such as toilet hinges where high
pressure steam can reach and blow out dirt and debris.
This tool is most eective when applied direct to the
surface being treated. The steam temperature will
condense and cool within 1’’ of the jet tip. (Fig.18)
Fig. 18
Use on steam gun
or extension tube
Carpets
Hard oors
CLICK
ACCESSORIES / DETAIL ADAPTOR
Detail adaptor
90 Deg. jet nozzle
GO TO VAPAMORE.COM TO SEE THE MR-100 PRIMO INSTRUCTIONAL VIDEO
The detail adaptor is needed in order to use the brushes,
detail scraper clothes / fabric - smooth surface tool, and
the jet nozzle attachment. To attach any of these
accessories, Push the accessory onto the detail adaptor
aligning the arrow on the accessory with the arrow on
the detail adaptor. Twist the accessory on the detail
adaptor to lock into place. Remove in the reverse order.
(Fig.17)
The steam gun, extension tubes, and oor
cleaning head can be stored (as shown on the cover
page of this instruction manual) by inserting the tab on
the oor cleaning head into the slot located on the side
of the Vapamore.
!

ACCESSORIES / BRUSHES
There are 4 brushes supplied with the Vapamore
MR-100 Primo. The brushes attach to the detail
adaptor by aligning the arrows and twisting to lock.
Suggested uses (Metal brush), Oven grills, BBQ grates,
cement stains, machinery, and metal surfaces. (Nylon
medium duty and large nylon brush), used for more
sensitive materials such as blinds, carpet, furniture, air
brush is used for harder less sensitive areas such as
IMPORTANT : With all brushes it is important to not
apply excessive pressure or force. This can cause failure
of the detail adaptor or related parts. When using the
brushes let the steam do the work and the brush to
help agitate the stain or area being cleaned. (Fig. 19 /20)
OPERATION
Fig. 19
ACCESSORIES / CLOTHES - FABRIC TOOL
ACCESSORIES / SMOOTH SURFACE TOOL
Fig.20
Fig. 21
Fig. 22
Fig. 23
ACCESSORIES / SCRAPER
Sanitize -
counter tops,
tile, stone,
granite, glass,
stainless steel,
walls, etc.
Start by installing the supplied cotton cover on the
clothes - fabric / smooth surface tool. Now this tool can
be used for steaming and sanitizing along with
eliminating odors in garments, fabrics, furniture,
curtains, drapes, etc.
Using the clothes - fabric / smooth surface tool without
the cotton cover acts as a squeegee and is great for
sanitizing kitchen and bathroom counter tops chemical
free along with smooth surfaces such as stone, granite,
wood, glass, tile and stainless steel. (Fig.23)
GO TO VAPAMORE.COM TO SEE THE MR-100 PRIMO INSTRUCTIONAL VIDEO
BEDBUGS AND ALLERGENS
Use this tool on beading, pillows, and furniture by
applying light pressure and slowly passing it along the
surface to kill Bedbugs, dust mites and other allergens.
(Fig.22)
The scraper tool is great for removing stuck on food
or spills on hard smooth surfaces. Also for removing
wall paper, shelve paper and removing gum from
hard ooring / cement. (Fig. 21)

BEDBUG - DUST MITES - ALLERGENS
Fig.26
Fig.27
The detail adaptor can also be used on its own as a
straight jet nozzle tool or along with the 90 degree jet
nozzle attachment. These tools are great for cracks and
crevices. Make sure to concentrate the steam directly on
the area to be treated with as minimal distance as
possible, no more than 1’’ away. The steam will condense
and cool o and not be eective to kill pests and their
eggs if the jet tip is not directly on the surface being
treated. The detail adaptor can be attached directly to
the steam gun or to any of the extension tubes. (Fig. 28)
WHY USE STEAM?
GO TO VAPAMORE.COM TO SEE THE MR-100 PRIMO INSTRUCTIONAL VIDEO
The Vapamore MR-100 Primo produces steam with an output temperature between 210˚
to 220˚ degrees. Pests such as bedbugs, dust mites and other allergens along with their
eggs are killed on contact at a temperature of 180˚ degrees. Using steam is an extremely
eective and chemical free way to kill these pest along with E. Coli, Salmonella, H1N1 and
other bacteria or viruses without leaving any harmful chemical residue behind. The tools
supplied with the Vapamore MR-100 Primo allow you to treat all areas where these pests
can hide such as bedding, sofas, furniture, pillows, carpet, cracks and crevices that are
ideal hiding places for pests.
BEDDING / FURNITURE
Fig. 25
The clothes / fabric tool with the cotton cover is ideal for
treating bedding, furniture, pillows, and carpet areas
around bed posts and base boards. Start by installing
the supplied cotton cover on the clothes - fabric /
smooth surface tool. Apply light consistent pressure and
slowly pass it along the surface (1” per second) to insure
the area being treated has a chance to come to full
temperature killing pests and their eggs. (Fig.25)
The oor cleaning head with micro ber cover is also
great for treating large surface areas such as bedding,
furniture, and carpet areas. Start by installing the
supplied micro ber cover on the oor cleaning head.
The micro ber cover thermal core maintains full
temperature during use and allows the oor cleaning
head to glide over fabric or carpet. (Fig.26)
Apply light consistent pressure and slowly pass it along
the surface (1’’ per second) to insure the area being
treated has a chance to come to full temperature killing
pests and their eggs. (Fig.27)
Carpet
BEDS
Detail adaptor
90 Deg. jet nozzle
Fig.28

CLEANING / MAINTENANCE
IMPORTANT : When storing the Vapamore, turn the machine o and unplug from
the wall outlet. After the machine has cooled (aprox. 15 min), hold the steam gun trigger
down to release the remaining steam pressure.
CLEANING /STORAGE
Always ensure before cleaning or maintaining the Vapamore MR-100 Primo that it is
switched of and unplugged from the wall outlet. Only clean the outer surface with a
slightly, water moistened cloth. Do not use any cleaning agents, abrasives or alcohol
since they may damage the housing nish.
Fig.24
Lubricate the threads on the water tank cap with light oil or lubricating spray such as
WD-40 once every 3 months or when needed.
R
ACCESSORIES
!
or
The tank should be emptied before storing for any
extended period of time (30 days or more). To empty
the tank, make sure the Vapamore is completely cooled
down, remove the water tank cap and ip the Vapamore
upside down to drain any remaining water from the
tank. Leave the water tank cap o until the water tank
is completely dry. (Fig.24)
GO TO VAPAMORE.COM TO SEE THE MR-100 PRIMO INSTRUCTIONAL VIDEO
The steam gun, extension tubes, and oor cleaning head can be stored (as
shown on the cover page of this instruction manual) by inserting the tab on the oor
cleaning head into the slot located on the side of the Vapamore.
!
Parts, extension tubes and accessories can also be stored in the supplied mesh storage
bag.
Replacement accessories and parts are available to order online at vapamore.com or by
calling Vapamore at 480-951-8900.
STORAGE
The included micro ber cover and cotton cover can be machine washed using normal
detergents and wash cycle.

PROBLEM?
IMPORTANT :
TROUBLESHOOTING
GO TO VAPAMORE.COM TO SEE THE MR-100 PRIMO INSTRUCTIONAL VIDEO
What do I do if the machine or an accessory becomes damaged or broken?
Visit www.vapamore.com for a complete list of parts and accessories available for
purchase replacement parts or schedule a repair. WE ARE HERE TO HELP...
TROUBLESHOOTING
One of the ETL protection devices has been triggered or the power cor
d has been
Call us at 480-951-8900 or E-mail us at info@vapamore.com to schedule a repai
r.
Do not return to the place of purchase for warranty or repairs. Only
damaged.
The tank could have a build up of lime scale due to the use of hard water.
The tank must be de scaled by using a chemical de scaler . A
ll chemicals must be
removed from the water tank before the machine is operated. An
ything other than 100%
pure water inside the tank during operation could cause permanent failure of damage
and can be very unsafe to operate.
Vapamore is authorized to facilitate all repairs to keep the highest quality and ETL
standards. Repairs or tampering by any other party will void the Warranty.

TIPS
GO TO VAPAMORE.COM TO SEE THE MR-100 PRIMO INSTRUCTIONAL VIDEO
APPLICATIO
N
STEAM VOLUME ATTACHMEN
T
TECHNIQUE
FLOORS / CHEMICAL FREE CLEANING WITH NO RESIDUE LEFT BEHIND
Vinyl Tile Or Vinyl Sheet Medium - High
Floor Cleaning Head +
Micro fiber + Extension
Tubes + Nylon Brush.
Sweep or vacuum first. Steam mop with
floor cleaning head and micro fiber cover.
Corners and baseboards with nylon brush.
Stone Tile, Slate, Ceramic Tile, Grout High
Floor Cleaning Head +
Micro Fiber + Extension
Tubes + Nylon Brush +
Grout Brush + Nylon Brush
Jet Nozzle
Sweep or vacuum first. Steam mop with
floor cleaning head, heavy stains use
without micro fiber cover. Corners and
baseboards with nylon brush. Grout lines
use grout brush and / or jet nozzle. Finish
with floor cleaning head / micro fiber cover.
Smooth Surface Concrete High
Floor Cleaning Head +
Micro Fiber + Extension
Tubes + Grout Brush +
Nylon Brush + Metal Brush +
Jet Nozzle
Sweep or vacuum first. Steam mop with
floor cleaning head, heavy stains use
without micro fiber cover. Corners and
baseboards with nylon brush. Joint lines
use grout or metal brush and / or jet nozzle.
Finish with floor cleaning head / micro fiber.
w - MediumoLdoowdraH
Floor Cleaning Head +
Micro Fiber + Extension
Tubes
Sweep or vacuum first. Steam mop with
floor cleaning head and micro fiber cover.
CARPETS / SPOT TREATMENT
Wall To Wall, Rugs, Spot Care High Nylon Brush + Jet Nozzle +
Paper Or White Cotton Towel
Vacuum area first then steam using brush
or jet. Use towels to blot stain away.
Chemical cleaner can be used prior to
steam treatment.
WALLS, CEILING
S
Painted, Wood Paneling, Wallpaper Low - Medium
Painted, wood paneling, wallpaper walls
are heat sensitive. Always test small area
first and be careful not to over heat finish.
Use Floor Cleaning head with micro fiber
cover or clothes steamer with cotton cover.
Use nylon brush for corners and stains.
hgiHlavomeRrepapllaW
Nylon Brush, Jet Nozzle,
Extension Tubes + Smooth
Surface Tool + Scraper
Use at full power to soften glue and
remove wallpaper. Wallpaper stripper can
be applied first.
hgiH-muideMstneVriA
Nylon Brush, Jet Nozzle,
Extension Tubes, Cotton
Towel
Clean using brush and jet tip. Wipe down
with clean cotton towel.
UPHOLSTERY / SPOT TREATMENT
Vinyl, Synthetic, Cotton Medium - High
Nylon Brush, Jet Nozzle,
Clothes Steamer, Cotton
Cover
,
Cotton Towel
Test a small area first. Some synthetic
materials will not handle high heat. Use
n
y
lon brush with soft
p
ressure for lar
g
er
stains and jet tip for small stains. Blot with
cotton towel. Use clothes steamer with cotton
cloth to go over all surfaces to deoterize.
woLrehtaeL Clothes Steamer, Cotton
Cover, Cotton Towel
Test a small area first. Steam over stained
area and then blot with cotton towel. Use
clothes steamer with cotton cloth to go
over all surfaces to deoterize.
CARPETS / DEOTERIZE + KILL BEDBUGS - DUST MITES AND ALLERGENS
Wall To Wall, Rugs High
Floor Cleaning Head +
Extension tubes + Micro
Fiber + Jet Nozzle
Vacuum area first then steam using floor
cleaning head with micro fiber cover. Pass
slowley over area to allow heat to kill pests.
Use jet nozzle for corners and cracks.
Floor Cleaning Head +
Extension tubes + Micro
Fiber + Nylon Brush +
Clothes / Fabric tool
with cotton cover.
UPHOLSTERY / KILL BEDBUGS - DUST MITES AND ALLERGENS
Vinyl, Synthetic, Cotton Medium - High Jet Nozzle, Clothes
Steamer, Cotton Cover
Test a small area first. Some synthetic
materials will not handle high heat. Use
clothes steamer with cotton cover and
slowley pass over area to allow heat to
kill pests. Use jet nozzle for cracks and
corners.

TIPS
GO TO VAPAMORE.COM TO SEE THE MR-100 PRIMO INSTRUCTIONAL VIDEO
APPLICATIO
N
STEAM VOLUME ATTACHMEN
T
TECHNIQUE
WINDOW BLINDS
Levolor, Venetian, Horizontal, Vertical Low-Medium
Nylon Brush, Jet Nozzle,
Detail Nozzle, Extension
Tubes, Cotton Towel
Dust area first. Thin plastic blinds may not
be able to handle heat from the steam.
Test a small area first. Use jet or detail
nozzle from 4'' away. Wipe off with cotton
towel.
GLASS
muideMsrorriM,swodniW
Smooth Surface Squeegee,
Extension Tubes, Nylon
Brush, Paper Towels
Pre-steam glass from 6'' away to heat
glass. Use brush for edges and bases.
Finish with window cleaner squeegee. Do
not use if temperature is under 32 degrees
to prevent cracking.
Window Screens, Window Frames Medium -High Detail Nozzle, Nylon Brush,
Extension Tubes
Steam area with detail nozzle. Use brush
for edges and corners.
KITCHENS
hgiH-muideMsnevO,spoTevotS
Nylon Brush, Brass Brush,
Extension Tubes, Paper
towels
Use nylon brush over all surfaces and
brass brush for interior oven grates. Wipe
down with paper towels
muideMsecnailppAllamS Nylon Brush, Detail Nozzle,
Paper towels
Use brush over all areas and detail nozzle
for small corners and seems. Wipe down
with paper towels.
Sinks, Faucets, Drains Medium - High Nylon Brush, Detail Nozzle,
Paper towels
Use brush over all areas and detail nozzle
for small corners and seems. Wipe down
with paper towels.
Counter Tops Low- Medium
Smooth Surface Sqeegee,
Nylon Brush, Detail Nozzle,
Paper towels
Use brush over all areas and detail nozzle
for small corners and seems. Use smooth
surace squeege to sanitize counter tops
by slowly passing over area then wipe area
with paper towel for chemical free cleaning.
BATHROOM
hgiH-muideMtuorG,eliT
Floor Cleaning Head +
Micro Fiber + Extension
Tubes + Grout Brush + Jet
Nozzle
Sweep or vacuum first. Steam mop with
floor cleaning head, heavy stains use
without cotton cover. Corners and
baseboards with nylon brush. Grout lines
use grout brush and / or jet nozzle .Finish
with floor cleaning head with micro fiber.
Porcelain Toilets, Chrome Fixtures Medium - High Nylon Brush, Detail Nozzle,
Paper towels
Use brush over all areas and detail nozzle
for small corners, hinges, and seems. Wipe
down with paper towels.
Shower, Tubs, Doors Medium
Nylon Brush, Detail Nozzle,
Extension Tubes, Paper
towels
Use brush over all areas and detail nozzle
for small corners and seems. Wipe down
with paper towels.
AUTO, MOTORCYCLE, MARINE
hgiH-muideMsaerAroiretnI Nylon Brush, Jet Nozzle,
Clothes Steamer, Cotton
Cover, Cotton Towel
Test a small area first. Some synthetic
materials will not handle high heat. Use
nylon brush with soft pressure for larger
stains and jet tip for small stains. Blot with
cotton towel.
Detailing, Exterior, Engine Medium - High Nylon Brush, Detail Nozzle,
Jet Nozzle
Use brush over all areas and detail nozzle
for small detail areas.
NEED HELP?
Visit www.vapamore.com to see video demonstrations and tips along with full details
or simply call us at 480-951-8900 or E-mail us at info@vapamore.com
WE ARE HERE TO HELP...
(NOTE: HARD WATER AND CALCIUM STAINS CAN ONLY BE REMOVED WITH CHEMICALS.

Lifetime Limited Warranty for the
Vapamore MR-100 Steam Cleaning System
Coverage:
1: Lifetime parts and labor on the boiler, heating element and all internal electronics.
The Vapamore MR-100 Steam Cleaning System boiler tank, heating element and all internal electronic
parts are lifetime warranted to be free from defects in material and workmanship when utilized for
normal household use by the original purchaser only.
2: One (1) year parts and labor on accessories and housing.
The Vapamore MR-100 Steam Cleaning System accessories and housing are warranted to be free from
defects in material and workmanship for a period of one (1) year from the date of purchase when
utilized for normal household use by the original purchaser only. This does not include replacement of
items due to wear including but not limited to the Floor Brush, Nylon Brush, Grout Brush, Metal Brush,
Jet tip, Clothes Steamer Cotton Cover, Floor Brush Cotton / Micro Fiber Cover.
For this warranty to apply the original purchaser must return the warranty registration form (included in
the original packaging or available online at vapamore.com) along with a copy of the original purchase
receipt to Vapamore 7464 East Tierra Buena Ln Suite 108 – Scottsdale, AZ 85260 within 15 days after
the original purchase date.
Should any defect covered by the terms of this lifetime limited warranty be discovered, Vapamore will
repair or replace any defective part provided the unit is returned by the original purchaser on file with the
warranty form information.
The liability under this warranty is limited solely to the cost of the replacement parts or the complete unit
at the discretion of Vapamore. This warranty is void if damage is resulting from accident, misuse,
improper operation, unauthorized repair or alteration, tampering, substance other than distilled water
used in the boiler tank, commercial or other than home use, or damages accruing in transit. This
warranty does not cover any shipping fees to or from our facility.
This warranty is extended to the original purchaser only and excludes all other legal and / or conven-
assumed by it under the terms of the lifetime limited warranty. In no event is Vapamore liable for
incidental or consequential damages of any kind whatsoever.
Customer is responsible for all shipping fees to and from our facility. Carefully pack returning items for
repair to avoid damage in transit. Be sure to include in the box all your contact information including
name, phone number, email address and shipping address along with a prepaid return ship tag from
UPS or FedEx. Vapamore does not ship and will not accept items sent via USPS. Contact Vapamore
for repair or service. Vapamore is not responsible for any shipping cost to or from our facility.
R

39.
!
37.
38.
CONSIGNES DE SECURITE
Aller sur www.vapamore.com pour voir la vidéo d’instructions du MR-100 Primo
ATTENTION : LE NON SUIVI DES CONSIGNES DE SÉCURITÉ ET PRÉCAUTIONS PEUT ENTRAINER
DES DOMMAGES PERMANENTS ET L’ANNULATION DE LA GARANTIE DU PRODUIT.
Ne pas laisser le nettoyeur vapeur sans surveillance lorsqu’il
est branché au mur. Le débrancher quand il n’est pas utilisé.
Ne pas sortir le câble d’alimentation rétractable au-delà
du point d’arrêt
Pour éviter toute électrocution, utiliser avec une prise à
trois fiches.
Ne pas utiliser comme jouet. Une grande attention est
nécessaire lorsque l’appareil est utilisé près d’enfants.
Utiliser uniquement comme indiqué dans le manuel.
Ne pas utiliser avec un câble d’alimentation ou une prise
endommagée. Si le câble d’alimentation et/ou la prise sont
endommagés, les faire remplacer par Vapamore pour éviter
dommages ou risque d’incendie.
Ne pas tirer ou porter l’appareil par le câble d’alimentation,
ne pas l’écraser, ne pas le mettre en contact avec des
surfaces chaudes ou tranchantes.
Ne pas débrancher l’appareil en tirant sur le câble
d’alimentation.
Ne pas toucher l’appareil ni la prise avec les mains
humides.
Ne pas tirer ou trainer l’appareil par le pistolet ou le tuyau.
Utiliser uniquement la poignée pour transporter le
nettoyeur vapeur.
Le nettoyeur vapeur doit être sur une surface plane
pendant l’utilisation.
Ne pas utiliser de rallonge électrique.
Ne pas tenter de déboucher l’appareil avec des objets
pointus qui pourraient causer des dommages.
Ranger le nettoyeur à l’intérieur après utilisation
afin d’éviter tout accident.
Toujours utiliser le voltage approprié pour éviter de causer
des dommages au nettoyeur vapeur et blesser l’utilisateur.
Le voltage approprié est indiqué sur l’étiquette.
Vider le réservoir d’eau avant tout transport ou d’envoyer
l’appareil.
Un incident peut survenir si le nettoyeur vapeur passe
sur le câble d’alimentation.
Les accessoires chauffent pendant l’utilisation. Laisser
refroidir avant manipulation.
Ne jamais immerger le nettoyeur vapeur dans de l’eau
ou autre liquide.
Protéger le nettoyeur vapeur de la pluie et de l’humidité.
L’appareil n’est pas adapté à un usage extérieur.
N’utiliser l’appareil que dans des endroits qui ne contiennent
ni eau ou autre liquide.
Ne pas utiliser l’appareil quand il n’y a pas d’eau dans
le réservoir. Toujours vérifier que le réservoir contient de l’eau.
Utiliser exclusivement de l’eau distillée. L’utilisation de l’eau
du robinet peut entrainer un amas de calcium et minéral qui
annulerait la garantie.
Ne jamais utiliser d’additifs tels que parfums, détachants,
ou autres produits chimiques dans le réservoir. Ils sont
dangereux et peuvent causer des dommages à l’appareil et
annuleraient la garantie.
Toujours débrancher le câble d’alimentation de la prise de
courant et laisser refroidir complètement le nettoyeur vapeur
avant de le ranger.
Ne pas trop remplir le réservoir. Ne pas dépasser le niveau
maximum. Utiliser l’entonnoir fourni.
S’assurer que le bouchon du réservoir est correctement fermé
avant utilisation.
Vider le réservoir si l’appareil est rangé (voir nettoyage et
rangement).
Ne toucher aucune partie chaude de l’appareil. Il est normal
que nettoyeur vapeur chauffe pendant l’utilisation.
Ne pas utiliser le nettoyeur vapeur sur des vêtements pendant
qu’ils sont portés.
La force et la chaleur du nettoyeur vapeur peuvent avoir un
effet adverse sur certains matériaux. Toujours tester
préalablement sur une petite surface l’effet du nettoyeur
vapeur.
Toujours joindre les consignes de sécurité et le manuel
d’instruction en cas de prêt de l’appareil à un tiers.
Ne jamais diriger le nettoyeur vapeur vers des personnes,
animaux ou plantes (risque de brulure) ! Ne pas diriger
l’appareil vers des systèmes électriques.
Ne jamais laisser l’appareil sans surveillance lorsqu’il est en
marche. Toujours éteindre l’appareil et le débrancher de la
prise murale quand il est sans surveillance.
Le nettoyeur vapeur est équipé d’un thermostat et d’une
protection thermique pour la surchauffe.
*Pour éviter toute électrocution, s’assurer de connecter le
nettoyeur vapeur a une prise trois fiches (reliée à la terre).
*Ne pas utiliser comme appareil de chauffage.

Modèle: MR-100 Primo
Alimentation électrique: 120V – 60Hz
Puissance de chauffage: 1500W
Vapeur sous pression: 3.5 bar (max)
Pression admissible: 5 bar
Volume du réservoir d’eau: 1.6 litre (max)
Durée vapeur: 50 minutes
Temps de chauffe: 11 minutes
Débit de vapeur: 40g /min (max)
Niveau sonore : 30 dB(A) pendant l’utilisation
Poids: 4.8Kg – 10.5lbs sans les accessoires
Sous réserve de modification technique
sans notification préalable.
Aller sur www.vapamore.com pour voir la vidéo d’instructions du MR-100 Primo
VUE D’ENSEMBLE DES ACCESSOIRES
Entonnoir
Tasse de mesure
Pistolet à vapeur avec tuyau et connecteur
Embout de fixation des accessoires (adaptateur)
Accessoire tuyau jet
Grattoir pour détails
Brosse en nylon pour joints
Brosse en nylon pour surfaces moyennement encrassées.
Grande brosse en nylon pour surfaces moyennement
encrassées.
Brosse en acier
Applicateur en coton
Chiffon en microfibre pour les sols
Accessoire pour les sols
3 tubes d’extension
Accessoire de surface pour les vêtements - tissus
Nettoyeur vapeur
Sac de rangement des accessoires
Set de joints de remplacement
LISTE DES ACCESSOIRES SPECIFICATIONS TECHNIQUES

Fig. 1
Fig. 2
Fig. 3
Fig. 4
Fig. 5
Fig. 6
!
Assembler les tubes d’extension pour utiliser le
nettoyeur vapeur pour le nettoyage des sols ou des
surfaces difficiles d’accès. Pour cela, introduire
l’extrémité ouverte du tube dans le pistolet à vapeur,
le pousser pour le mettre en place jusqu’au clic.
Ajouter de un à trois tubes d’extension selon
besoin. (fig 5)
Pour retirer les tubes d’extension, presser le bouton de
relâche et tirer sur les tubes vers le bas. (Fig 6)
Aller sur www.vapamore.com pour voir la vidéo d’instructions du MR-100 Primo
MONTAGE DU NETTOYEUR VAPEUR
Ne jamais dévisser le bouchon du réservoir d’eau pendant l’utilisation. Le réservoir est sous pression.
Compartiment
des accessoires
Tourner et bloquer les accessoires
dans l’embout de fixation (adaptateur)
L’adaptateur se fixe sur le
pistolet à vapeur ou sur les
tubes d’extension
ACCESSOIRES
Le MR-100. Primo a un compartiment pour les
accessoires qui contient l’embout de fixation
(adaptateur), le tuyau jet, l‘accessoire de surface
pour les vêtements - tissus, et toutes les brosses.
Ouvrir le compartiment d’accessoires en l’éloignant
de l’appareil. Retirer l’accessoire désiré du
compartiment et refermer. (Fig. 1)
L’embout de fixation (adaptateur) est nécessaire pour
l’utilisation de tous les accessoires. Pour le fixer, aligner
la flèche de l’accessoire avec la flèche de l’adaptateur
et tourner pour mettre en place et bloquer.
L’adaptateur se fixe directement au pistolet à vapeur
et peut aussi être relié aux tubes d’extension.
(Fig. 2 et 3)
Connecter le tuyau de la vapeur au connecteur vapeur
situé sur le devant de l’appareil. Pour cela, ouvrir le
bouchon anti poussière et introduire fermement le
connecteur du tuyau dans l’ouverture jusqu'à ce que
les deux onglets soient en place et s’enclenchent par
un clic. Pour retirer le tuyau à vapeur, appuyer sur les
deux onglets localisés à droite et à gauche du
connecteur du tuyau de la vapeur et tirer pour le sortir
de la prise vapeur. (Fig 4).
TUBES D’EXTENSION

Fig. 7
Fig. 8
Fig. 9
Fig. 10
Green
light
Red
light
Fig. 11
er fill
Do not ov
!
Aller sur www.vapamore.com pour voir la vidéo d’instructions du MR-100 Primo
REMPLISSAGE ET UTILISATION
Ne pas dépasser
la limite de
remplissage
Voyant vert – voyant rouge
Loquet de sécurité
Pour remplir le réservoir d’eau, toujours s’assurer que le nettoyeur vapeur est éteint et
débranché et est froid avant d’enlever le bouchon du réservoir. Dévisser le bouchon du
réservoir (Fig. 7) en appuyant sur le bouchon et le tournant simultanément dans le sens
inverse des aiguilles d’une montre. Utiliser l’entonnoir et la tasse de mesure inclus.
Remplir la tasse de mesure jusqu’à la marque de 700ml deux (2) fois pour totaliser
1.4 litre d’eau. (Fig. 8)
Replacer le bouchon du réservoir en appuyant et tournant
simultanément dans le sens des aiguilles d’une montre.
S’assurer que le bouchon est parfaitement fermé pour éviter
toute fuite de vapeur. Si une fuite de vapeur survient par le
bouchon, éteindre le nettoyeur vapeur, attendre le complet
refroidissement et refermer correctement le bouchon.
IMPORTANT: N’utiliser que de l’eau distillée sans additifs
d’aucune sorte tels que parfum ou détergents. L’utilisation
d’additifs peut causer des dommages et annulerait la garantie.
IMPORTANT: Ne pas dépasser la limite de 1.4 litre d’eau lors du
remplissage.1.4 litre est égal au remplissage de deux tasses de
mesure jusqu’à la marque de 700ml.
Brancher le Vapamore dans une prise murale appropriée et
mettre en position «marche» en appuyant sur le bouton
on/o. (Fig. 9)
Le voyant rouge s’allume quand le bouton on/o est pressé
indiquant que le nettoyeur vapeur chaue. Quand le voyant
vert s’allume, l’appareil est chaud et prêt à l’emploi
(approximativement 11 minutes). Ce voyant peut s’allumer et
s’éteindre pendant l’utilisation selon les cycles de chaue pour
maintenir la température maximum durant l’utilisation. (Fig. 10)
IMPORTANT: Ne jamais diriger le nettoyeur vapeur vers des
personnes, animaux, plantes, ou systèmes électriques. ll y a un
risque de brulure ou d’électrocution. Toujours purger le résidu
d’eau après la première utilisation et que la machine ait eu une
chaue complète ou entre de longs arrêts entre les utilisations.
La purge permet de vider l’eau accumulée dans l’appareil. Pour
purger, maintenir la gâchette appuyée et vider l’eau sur un
chion ou dans un récipient.
Déverrouiller le loquet de sécurité (à l’épreuve des enfants) en
poussant la goupille triangulaire vers la gauche, située sur le
coté droit du pistolet à vapeur (Fig. 11). La vapeur sort quand le
bouton de la vapeur est pressé. Diriger le premier jet d’eau/
vapeur vers un vieux chion jusqu'à ce la vapeur ait un débit
constant. Le nettoyage peut maintenant commencer.

Fig.12
UTILISATION
Aller sur www.vapamore.com pour voir la vidéo d’instructions du MR-100 Primo
NOTE: Toujours tester le nettoyeur vapeur au préalable sur une partie invisible de la
surface ou du matériel à nettoyer pour vérier leur tolérance à la vapeur. La vapeur peut
avoir pour eet éventuel de déteindre les bois vernis ou peints, décolorer les plastiques
brillants. L’acrylique, le velours et le lin réagissent très sensiblement à la vapeur.
NOTE: Vapamore ne peut être tenu responsable pour les dommages d’objets,
matériaux, personnes, animaux ou plantes dus à une mauvaise utilisation du nettoyeur
vapeur ou à une intolérance à la vapeur.
NOTE: Le Vapamore est équipé d’un thermostat et d’une protection thermique pour la
surchaue. Le nettoyeur vapeur s’éteint automatiquement à une température de 250
degrés F pour éviter une surchaue.
Le ot de vapeur peut être régulé et ajusté au niveau
désiré en tournant le bouton de contrôle de la vapeur.
Tourner le bouton de contrôle dans le sens des aiguilles
d’une montre pour diminuer le ot de vapeur, et dans
le sens inverse des aiguilles d’une montre pour
l’augmenter. (Fig. 12)
Ne pas basculer ou incliner le nettoyeur vapeur pendant l’utilisation et s’assurer que
le l’appareil est toujours sur le sol ou sur une surface plane durant le fonctionnement.
Un réservoir d’eau complet permet une utilisation de 50 minutes maximum. Ne jamais
laisser le nettoyeur vapeur sans surveillance lorsqu’il est en marche, et si nécessaire,
utiliser le loquet de sécurité enfants pour bloquer le bouton de vapeur. Pour cela,
pousser la goupille triangulaire de la gauche, vers la droite du pistolet à vapeur.
IMPORTANT: L’appareil et les accessoires chauent pendant l’utilisation. Laisser
refroidir avant de changer d’accessoire. : Ne jamais ouvrir le bouchon du réservoir
pendant l’utilisation/ ou en marche. Le réservoir est sous pression.
Le réservoir doit être rempli quand le débit de la vapeur commence à faiblir. Eteindre le
nettoyeur vapeur et le débrancher de la prise murale. Le voyant rouge va s’éteindre.
Attendre que l’appareil refroidisse (au moins 15 minutes). Appuyer sur la gâchette de
la vapeur pour libérer toute vapeur restante. Ouvrir le bouchon du réservoir en
appuyant et tournant dans le sens inverse des aiguilles d’une montre.
REMPLISSAGE D’EAU
ATTENTION: De la vapeur chaude peut s’échapper à l’ouverture du bouchon si
l’appareil n’est pas totalement refroidi et/ou quand la pression restante n’a pas été
libérée.
Ajouter de l’eau en utilisant la tasse de mesure et l’entonnoir, puis, avec précaution,
refermer le bouchon du réservoir. Le MR-100. Primo peut alors être rebranché et mis
en marche. L’appareil est prêt à l’emploi dès que le voyant vert s’allume.

Fig. 17
Fig.13
Fig.14
Fig.15
Fig. 16
Fig. 18
UTILISATION
Aller sur www.vapamore.com pour voir la vidéo d’instructions du MR-100 Primo
Enclencher
Sols
Tapis
Utilisation avec le pistolet
à vapeur ou les tubes
d’extension
uyau jet incliné à 90 degrés
Embout de xation
(adaptateur)
Fixer l’accessoire pour les sols au bout du tube d’extension
(utiliser de 1 à 3 tubes selon besoin). S’assurer que
l’accessoire soit bien en place (clic). (Fig. 13)
ACCESSOIRES: ACCESSOIRE POUR LES SOLS
L’accessoire pour les sols peut être utilisé avec ou sans les
chions en microbre selon le type de surface à nettoyer.
Placer l’accessoire pour les sols sur le chion microbre,
et placer l’excédent de tissu sous les attaches situées sur
la droite et la gauche de l’accessoire pour les sols. (Fig. 14)
L’accessoire pour les sols est idéal pour le carrelage, la
pierre, le vinyle et les parquets en bois, ainsi que les murs
lavables et les surfaces dures. Il peut aussi être utilisé pour
les tapis pour désinfecter, désodoriser et éliminer les
allergènes, les punaises des lits et les acariens. (Fig. 15).
(Utiliser le chion microbre sur les tapis pour permettre
à l’accessoire des sols de glisser)
NOTE: Le pistolet à vapeur, les tubes d’extension et
l’accessoire pour les sols peuvent être xés (voir page de
garde du manuel de l’utilisateur) au nettoyeur vapeur en
insérant la languette située sur l’accessoire pour les sols
dans la fente située sur le coté du Vapamore.
L’embout de xation (adaptateur) peut être utilisé xé
directement au pistolet à vapeur ou relié aux tubes
d’extension. (Fig. 16)
ACCESSOIRES: EMBOUT DE FIXATION (ADAPTATEUR)
L’embout de xation des accessoires est nécessaire pour
utiliser les brosses, le grattoir, le tuyau jet, les accessoires
de surface pour les vêtements - tissus et sols. Pour le
xer à ces accessoires, pousser l’accessoire dans
l’adaptateur, aligner la èche de l’accessoire avec la
èche de l’adaptateur et tourner pour mettre en place et
bloquer. Faire l’opération inverse pour retirer l’accessoire.
(Fig. 17)
L’embout de xation (adaptateur) peut aussi être utilisé
seul pour un jet direct, ou avec le tuyau jet incliné à 90
degrés. Ces outils sont parfaits pour retirer la couche de
savon dans la baignoire, la douche ou autour des lavabos,
mais aussi pour nettoyer les surfaces étroites telles que
les charnières de toilettes que la vapeur à haute pression
peut atteindre et faire disparaitre saleté et débris. Cet
accessoire est plus ecace si appliqué directement sur la
surface à traiter. La vapeur se condense et refroidit à 2,5cm
de la sortie du tuyau. (Fig. 18)
Other manuals for Primo MR-100
4
This manual suits for next models
1
Table of contents
Languages:
Other VAPamore Steam Cleaner manuals

VAPamore
VAPamore MR-1000 Forza User manual

VAPamore
VAPamore MR-75 Amico User manual

VAPamore
VAPamore MR-1000 Forza User manual

VAPamore
VAPamore MR-750 OTTIMO User manual

VAPamore
VAPamore MR-75 Amico User manual

VAPamore
VAPamore MR-1000 Forza User manual

VAPamore
VAPamore Primo MR-100 User manual

VAPamore
VAPamore Primo MR-100 User manual

VAPamore
VAPamore MR-750 OTTIMO User manual

VAPamore
VAPamore Primo MR-100 manual