Veridian Healthcare ProKit 02-127 Series User manual

INSTRUCTION MANUAL • ENGLISH & ESPAÑOL
Please read this instruction manual completely
before operating this unit.
ProKit™ Combo
with Attaché Case
Model 02-127 Series

2 • ENGLISH
Unassembled,
3-piece
Stethoscope
Gauge
Instruction
Manual
STOP!
PLEASE ENSURE YOU HAVE ALL OF THE
FOLLOWING COMPONENTS BEFORE USING
YOUR PROKIT™COMBO.
IF YOU ARE MISSING ANY PARTS, INCLUDING INSERTS OR
INSTRUCTION MANUALS, DO NOT RETURN TO PLACE OF
PURCHASE. CONTACT CUSTOMER CARE AT 8663261313.
Storage Case
Squeeze Bulb Adult
Arm Cu

ENGLISH • 3
INDEX
Manufactured for
Veridian Healthcare
1175 Lakeside Drive
Gurnee, IL 60031
www.veridianhealthcare.com
Made in China
#93-1335 10/19
©2019 Veridian Healthcare, LLC
Toll-Free Customer Care Help Line: 1-866-326-1313
Monday – Friday 8:30 a.m. – 4:30 p.m. CST
Care & Safety Information.................................................................................................... 4-5
Introduction................................................................................................................................. 6
Getting Started ........................................................................................................................... 7
Features & Assembly.................................................................................................................. 8
Applying Your Blood Pressure Cu......................................................................................... 9
Proper Stethoscope Use and Fit............................................................................................10
Taking Your Blood Pressure Reading .............................................................................11-12
Care & Maintenance.................................................................................................................13
Device & Label Symbols..........................................................................................................14
Sphygmomanometer Warranty............................................................................................15
Stethoscope Warranty.............................................................................................................16
Instrucciones en Español..................................................................................................17-32

4 • ENGLISH
CARE & SAFETY INFORMATION
CAUTION: Failure to read and observe all precautions could result in personal injury or
equipment damage.
Improper care or use of your sphygmomanometer may result in injury, damage to the unit or
ineective treatment. Following these instructions will ensure the device ecacy and long life.
GENERAL CAUTIONS AND WARNINGS
• Measurement results should be discussed with your physician or healthcare
professional; never self-diagnose or attempt treatment as this may be dangerous.
• Intended for adult use only; this device is not approved for neonate, infant or child use.
Not for use by pregnant women.
• Keep out of reach of children.
• The patient is the intended operator of this device.
• Do not use the unit if it has any damaged parts if it has been submersed in water or
dropped.
• If any abnormality occurs, discontinue use until the unit has been examined and repaired.
• Only use included attachments and parts; do not use attachments from other brands or
models as these may not be properly calibrated for use with this device and may result in
measurement error.
• Do not disassemble the unit or attempt to repair it; substitution of a component dierent
from that supplied may result in measurement error and will void manufacturer warranty.
• Always follow local regulations for proper disposal.
• Do not share this device with infected persons where there may be a risk of cross-
contamination.
• Consult with your physician before if the cu may be applied over a wound or inamation
diseases.
• Consult with your physician before use if any of the following conditions are present:
arrhythmia, common arrhythmias such as atrial or ventricular premature beats or atrial
brillation, arterial sclerosis, poor perfusion, diabetes, pre-eclampsia, renal diseases.

ENGLISH • 5
CARE & SAFETY INFORMATION
inammatory diseases, intravascular therapy, arteriovenous shunts or if a mastectomy
has been performed.
• Motion, trembling and shivering may aect measurement reading.
• If you are allergic to plastic or rubber, consult with your medical professional before using
this device.
OPERATING CAUTIONS AND WARNINGS
• Prolonged over-ination may cause congestion, swelling or bruising in some people.
• Too-frequent measurements may cause injury due to blood ow interference.
• Check the circulation of the user before, during and after use.
• If you experience any discomfort or an abnormality occurs, stop using the device
immediately.
• Never use this unit while operating a vehicle or in the bathtub or shower.
STORAGE CAUTIONS AND WARNINGS
• Storage outside of stated storage temperature may result in measurement error or device
malfunction; storage environment temperature is: -50°F – 104°F (-10°C – 40°C); Humidity:
15-85%RH.
• Keep the unit out of reach of children.
CLEANING CAUTIONS AND WARNINGS
• Never immerse the unit in water to clean as it may damage the unit.
• Follow the ‘Care & Maintenance’portion of this manual for instruction on how to clean
and care for your device.

6 • ENGLISH
INTRODUCTION
It is recommended that you rst seek the advice and recommendation of your physician
or healthcare professional when using home diagnostic devices, including blood pressure
monitors.
Thank you for purchasing a ProKit™ Combo. With proper care and use, your kit will provide you
with many years of reliable measurements.
PLEASE READ THIS INSTRUCTION MANUAL
COMPLETELY BEFORE OPERATING THIS UNIT.

ENGLISH • 7
GETTING STARTED
Before Taking a Measurement
1. Your readings should only be interpreted by your physician or healthcare professional
with access to your individual medical history. Regular home blood pressure monitoring
will allow you to track and record your readings for discussion with your physician.
2. Conduct your measurement in a quiet place while seated in a relaxed position. Rest for
15 minutes before taking your reading. If an error occurs or you desire to take a second
reading, allow 15 minutes between readings for your blood vessels to return to normal.
3. Avoid smoking, eating, taking medication, alcohol, physical activity or any other stressful
activity for 30 minutes prior to taking a reading.
4. Always remove any jewelry or constrictive clothing that may interfere with the cu
placement.
5. Remain still during measuring; do not talk during the reading.
6. It is recommended that you take your readings as the same time each day to better
monitor any indications in your results.
7. Record your measurements to share with your physician.

8 • ENGLISH
Arm Cu
Ination Bulb
Ear Tips
Air Release Valve
Binaural
Y-Tubing
Metal D-Ring
FEATURES & ASSEMBLY
Chestpiece
Aneroid
Gauge
Simple Assembly -
Stethoscope: Insert the single end of the “Y” tubing into the stem of the chestpiece; Insert the
ends of the metal binaurals from the polybag and insert the ends into the“Y”tubing.
Cu, Bulb and Gauge: Attach the gauge and bulb to the tubing as shown above.

ENGLISH • 9
APPLYING YOUR BLOOD PRESSURE CUFF
Before applying your blood pressure cu, be sure you have
selected the appropriate size cu:
Adult Cu ts arm circumference 11”- 16.375”(27.9-41.7 cm)
If for any reason you are unable to or should not use your left arm,
please modify the instructions for cu application to your right
arm. Your physician can help you identify which arm is best for
you.
1. Remove any constrictive clothing or jewelry that may
interfere with cu placement.
2. Be seated at a table or desk with your feet at on the oor.
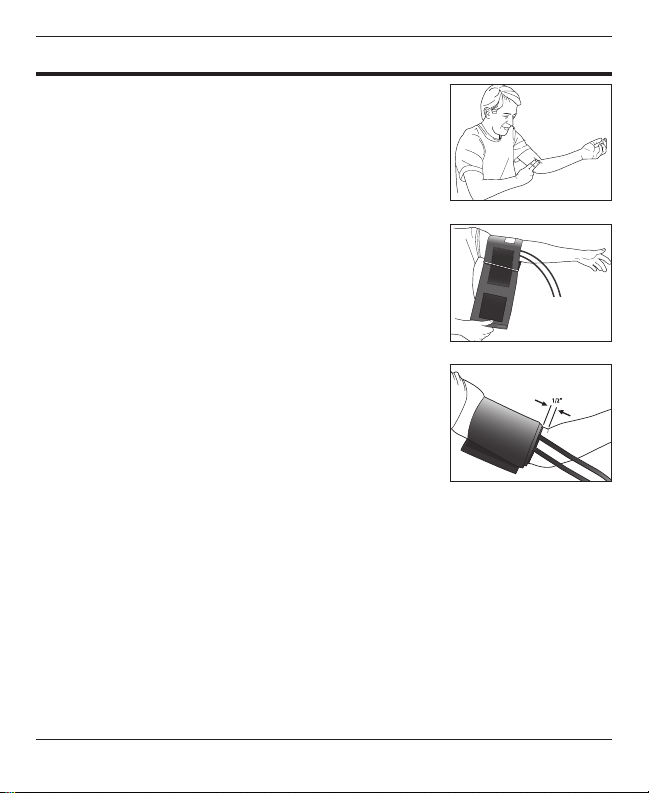
3. Extend your left arm. Find your brachial artery, which is at the
inner aspect (bend) of your elbow, Fig 1. You may be able to
feel your pulse. The artery patch should point to the brachial
artery when the cu is applied.
4. Open the cu creating a circle that you can slide your arm
into; do not extend the cu beyond the metal bar.
5. Insert your left arm into the cu. Position the bottom edge
of the cu approximately one-half inch ABOVE your elbow;
when taking your reading, the stethoscope chestpiece must
directly touch the inside of your arm, over your brachial artery.
6. With your arm extended, palm facing upward and tubes positioned down the center of
your arm, Fig 2-3, use your right hand to pull the end of the cu and secure the hook and
loop material. Make sure that the artery mark is still pointed to your brachial artery.
7. The cu should t comfortably, yet snugly around your arm. You should be able to insert
one nger easily between your arm and the cu.
If you are not comfortable with applying your cu, please seek the assistance of another
member of your household or work with your physician to practice the cu application.
Incorrectly applied cus may result in inaccurate readings.
Fig. 1
Fig. 2
Fig. 3

10 • ENGLISH
PROPER STETHOSCOPE USE & FIT
The earpieces on your stethoscope have been carefully calibrated to provide clear and audible
acoustics. To best hear the sounds to be analyzed, please keep the following tips in mind:
The earpieces should point forward when
in use, Fig1. The earpieces should t in ears
securely but comfortably.
The binaurals may be adjusted to ensure
maximum comfort and ecacy. To increase
the tension, simply squeeze the binaurals just
above the joint where they meet, crossing
the earpieces, Fig 2. Do not apply too much
pressure; apply a minimum of force, slightly
increasing the pressure until the earpieces t
comfortably.
Should the earpieces be too tight, pull the
binaurals apart, grasping them just above the
joint where they meet, Fig. 3. Be gentle so as
not to damage the stethoscope.
Always use caution when adjusting the
binaurals to avoid damage. When bringing
the earpieces closer together, the maximum
tension used should bring the black tubing
on either side within contact. When pulling
the binaurals apart, do not exceed 90 degrees
between the binaurals.
Fig. 1 -
Incorrect Position
Fig. 1 -
Correct Position
Fig. 2
Fig. 3

ENGLISH • 11
Before taking a reading, review the section under Features & Assembly of your unit and ensure
every piece is properly assembled. Reminder, it is important to avoid smoking, eating, taking
medication, alcohol consumption or physical activity 30 minutes prior to taking a reading.
NOTE: For the purposes of these instructions, the individual
taking the reading will be referred to as the CAREGIVER, the
person receiving the reading will be referred to as the PATIENT.
Applying the Cu and Arm Positioning - Patient
1. Apply the cu as instructed earlier in this manual.
2. Rest your elbow on a table with your palm and arm facing
upward. Elevate your hand so that the wrist is at the same level as your
heart, Fig 1. Relax your left hand.
Preparing to Take the Measurement - Caregiver
3. Position yourself in front of the patient, seated at the same level.
4. Place the stethoscope eartips in your ears and place the chestpiece of the
stethoscope on the inside of the patients arm. The chestpiece should be
partially under the cu directly over the brachial artery.
5. Dual-head stethoscopes feature a 2-sided rotating chestpiece, Fig 2.
Flat / larger side—general use
Bell shaped / smaller side—low-pitched sounds, typically used for
detecting irregular heart sounds
Tap the chestpiece; if you are unable to hear the tapping, rotate the chestpiece until an
audible click is heard, ensuring the chestpiece is in the proper position.
6. Either hold the gauge in your hand or position the gauge so it can be read without being
moved, such as clipped to a thick notebook or folded towel in front of you.
7. Hold the ination bulb with your free hand and turn the air release valve clockwise to
close, Fig 3.
TAKING YOUR BLOOD PRESSURE READING
Fig. 1
Fig. 2
Fig. 3
Close Valve

12 • ENGLISH
Fig. 4
Fig. 6
Fig. 5
Open Valve
Note First Sound
Note Last Sound
8. Begin inating the cu slowly and steadily by pumping the
ination bulb until the gauge reads 30 mmHG ABOVE the last
SYSTOLIC measurement. If you do not know the last SYSTOLIC
measurement, inate to approximately 180-200 mmHg. NEVER
INFLATE THE CUFF ABOVE 280 mmHg.
9. When you have reached the proper ination level, slowly and
steadily turn the air valve counter-clockwise at a rate of 2-3 mmHg
per second. You will be able to watch the progress of the release
on the gauge.
10. As the pressure drops, listen closely for the pulse beat while
watching the gauge. Note the rst thumping sound you hear, this
is the SYSTOLIC pressure, Fig 4.
11. Allow the cu to continue to deate.You will hear changes in
the sounds and then no sound at all. When you have heard the
last sound, note the reading measurement, this is the DIASTOLIC
pressure, Fig 5.
12. Quickly turn the valve counter-clockwise to deate the remaining
air, Fig 6. Remove the cu and record the measurement on the
included chart.
IF YOU WISH TO TAKE ANOTHER MEASUREMENT,
WAIT A MINIMUM OF 15 MINUTES BETWEEN
READINGS TO ALLOW FOR THE BLOOD VESSELS
TO RETURN TO NORMAL.
TAKING YOUR BLOOD PRESSURE READING

ENGLISH • 13
CARE & MAINTENANCE
Care & Maintenance
• The stethoscope may be cleaned with either soap and water or isopropyl alcohol. The
earpieces may be removed from the binaurals to facilitate cleaning. After each cleaning,
all parts should be thoroughly rinsed and dried completely. Never immerse any part of
the stethoscope in liquid. Never use solvents, oils or sterilization equipment to clean the
unit.
• The chestpiece may be cleaned with the included cleaning cloth as needed. Soapy water
or sopropyl alcohol may also be used.
• The diaphragm may also be removed and cleaned with soapy water or isopropyl alcohol.
Rinse and dry completely after cleaning.
• The cu may be spot cleaned with a mild-detergent as needed.
• Do not use any liquids on the gauge or cu.
• Never attempt to iron or dry the cu; if the cu becomes wet, allow the cu to air dry
completely before use or storage.
• Do not attempt to remove the tube and bladder from the cu as this may damage the
cu.
• Take care not to forcefully bend or kink the tubing during storage .
• It is recommended to clean the cu every 200 uses.
• Avoid dropping or hitting the surface of the gauge or stethoscope chest piece.
• Only use included attachments and parts; do not use attachments from other brands or
models as these may not be properly calibrated for use with this device and may result in
measurement error.
Storage
• Avoid extreme temperatures.
• Do not store in direct sunlight, dust or excessive humidity.
• Storage conditions for device: Temperature 50°F–104°F (10°–40°C); 15%–85% RH.
When the cu is deated, make sure that the needle on the gauge is within the zero square
range. If the needle is outside of the range, it needs to be recalibrate by a qualied technician.
Consult with the included warranty card for sending your gauge in for calibration.

14 • ENGLISH
DEVICE & LABEL SYMBOLS
These symbols may appear on your device, instructions or packaging and may vary
by make and model.
Read This Manual—All included manuals should be read prior to rst use.
(Background color will be blue; reading symbol will be white)
Warning—Symbol indicates a warning, prohibition or mandatory action that
mitigates a risk that is not necessarily obvious to the device operator.
Type BF Applied Parts—Indicates that a part of this unit comes in contact with the
patient in order to carry out it’s intended function.
Environment Protection—dispose of this product properly; consult with your local
recycling ordinances for proper recycling and disposal.
Keep Dry—This device should be kept dry; never submerge the unit or cu.
Consult with the Care and Maintenance section of this manual for information on
cleaning your monitor.
Symbol Meaning
2012
2012

ENGLISH • 15
Congratulations on your purchase of a Aneroid Sphygmomanometer.Your Blood Pressure unit is covered
by the following warranties commencing upon the date of purchase, and are subject to the following terms
and conditions:
1. This Twenty-Year Limited Calibration Warranty is limited to the accuracy of the manometer gauge only.
During the term of the warranty, Veridian Healthcare will repair or replace (at our option) any gauge
found to be inaccurate due to normal use. This does not include gauges that have been misused or
abused.
2. The two (2) year ination system warranty covers all parts of the ination system including ination
bulb, valve, ination cu and bladder. During the term of the warranty, Veridian Healthcare will repair
or replace (at our option) any ination system component(s) found to be defective in materials or
workmanship.
3. If the manometer gauge, or any part of the ination system fails, return the component that has
failed prepaid to: Attn: Repair Department, Veridian Healthcare 1175 Lakeside Drive, Gurnee, Illinois
60031. The purchaser will be notied of any additional repairs required prior to completing the repair.
Components will be subject to return shipping and handling charges, in addition to parts charges, if
any, and repair charges not covered by this Limited Warranty.
4. This Limited Warranty constitutes Veridian Healthcare’s only responsibility and obligation to repair
and/or replace materials or components. We make no other express or implied warranties, arising
by operation of law or otherwise, or any warranty of merchantability or tness for a particular use or
purpose whether or not the use of purpose has been disclosed to Veridian Healthcare in specications,
drawings or otherwise, and whether or not Veridian Healthcare’s products are specically designed
and/or manufactured by Veridian Healthcare for the buyer’s use or purposes, except for the limited
warranty stated above.
5. Veridian will not be responsible for any indirect, incidental, special, consequential, or punitive
damages or other loss, including, but not limited to damage to or loss of other property or equipment
and personal injuries, whether to purchaser or others. Veridian shall in no event be liable to the
purchaser for any amount in excess the cost or repair and/or replacement of the unit. Some states do
not allow limitations on how long an implied warranty lasts or do not allow the exclusion or limitation
of incidental or consequential damages, so the above limitations or exclusions may not apply to you.
EXCEPT AS PROVIDED FOR IN THIS LIMITED WARRANTY, ALL EXPRESS AND IMPLIED WARRANTIES AND
CONDITIONS ARE DISCLAIMED, INCLUDING, WITHOUT LIMITATION, ANY IMPLIED WARRANTIES AND
CONDITIONS OF MERCHANTABILITY AND FITNESS FOR A PARTICULAR PURPOSE.
SPHYGMOMANOMETER
20-YEAR LIMITED WARRANTY

16 • ENGLISH
STETHOSCOPE
LIFETIME LIMITED WARRANTY
Congratulations on your purchase of a Stethoscope. Your stethoscope is covered by the following warranty
commencing upon the date of purchase, and are subject to the following terms and conditions:
1. This stethoscope lifetime limited warranty covers the stethoscope and component parts. During
the term of this warranty, Veridian Healthcare will repair or replace (at our option) any stethoscope
component(s) found to be defective in materials or workmanship.
2. If any part of the stethoscope fails, return the component that has failed prepaid to: Attn: Repair
Department, Veridian Healthcare 1175 Lakeside Drive, Gurnee, Illinois 60031. The purchaser
will be notied of any additional repairs required prior to completing the repair. Components will be
subject to return shipping and handling charges, in addition to parts charges, if any, and repair charges
not covered by this Limited Warranty.
3. This Limited Warranty constitutes Veridian Healthcare’s only responsibility and obligation to repair
and/or replace materials or components. We make no other express or implied warranties, arising
by operation of law or otherwise, or any warranty of merchantability or tness for a particular use or
purpose whether or not the use of purpose has been disclosed to Veridian Healthcare in specications,
drawings or otherwise, and whether or not Veridian Healthcare’s products are specically designed
and/or manufactured by Veridian Healthcare for the buyer’s use or purposes, except for the limited
warranty stated above.
4. Veridian will not be responsible for any indirect, incidental, special, consequential, or punitive
damages or other loss, including, but not limited to damage to or loss of other property or equipment
and personal injuries, whether to purchaser or others. Veridian shall in no event be liable to the
purchaser for any amount in excess the cost or repair and/or replacement of the unit. Some states do
not allow limitations on how long an implied warranty lasts or do not allow the exclusion or limitation
of incidental or consequential damages, so the above limitations or exclusions may not apply to you.
EXCEPT AS PROVIDED FOR IN THIS LIMITED WARRANTY, ALL EXPRESS AND IMPLIED WARRANTIES AND
CONDITIONS ARE DISCLAIMED, INCLUDING, WITHOUT LIMITATION, ANY IMPLIED WARRANTIES AND
CONDITIONS OF MERCHANTABILITY AND FITNESS FOR A PARTICULAR PURPOSE.

INSTRUCTION MANUAL • ESPAÑOL
Por favor lea este manual de instrucciones completamente
antes de operar esta unidad.
ProKit™ Combinado
con el caso de Attaché
Modelo 02-127 Serie

18 • ESPAÑOL
Estetoscopio de
3 Piezas Indicador
Instruction
Manual
¡ALTO!
ASEGÚRESE DE TENER LA TOTALIDAD DE LOS
SIGUIENTES COMPONENTES ANTES DE USAR SU KIT DE
USO DOMÉSTICO .
SI FALTA ALGUNO DE LOS ELEMENTOS, INCLUIDOS LOS INSERTOS O
LOS MANUALES DE INSTRUCCIONES, NO HAGA LA DEVOLUCIÓN EN EL
LUGAR DONDE EFECTUÓ LA COMPRA. COMUNÍQUESE CON ATENCIÓN
AL CLIENTE AL TELÉFONO 8663261313.
Manual Detallado
Bulbo de
Inado
Brazalete adulto
del brazo

ESPAÑOL • 19
CONTENIDO
Manufactured for
Veridian Healthcare
1175 Lakeside Drive
Gurnee, IL 60031
www.veridianhealthcare.com
Made in China
#93-1335 10/19
©2019 Veridian Healthcare, LLC
Línea de ayuda gratuita de asistencia al cliente: 1-866-326-1313
De lunes a viernes de 8:30 a 16:30 (hora central del Este)
Información Sobre Cuidado y Seguridad .....................................................................20-21
Introducción ..............................................................................................................................22
Cómo Comenzar .......................................................................................................................23
Características y Montaje........................................................................................................24
Colocación del Brazalete ........................................................................................................25
Uso y Ajuste Apropiados del Estetoscopio.........................................................................26
Cómo Tomar la Lectura .....................................................................................................27-28
Cuidado y Mantenimiento .....................................................................................................29
Símbolos de Dispositivo Etiqueta.........................................................................................30
Garantía de Esgmomanómetro..........................................................................................31
Garantía de Estetoscopio........................................................................................................32

20 • ESPAÑOL
INFORMACIÓN SOBRE CUIDADO Y SEGURIDAD
PRECAUCIÓN: Si no se leen y respetan todas las precauciones podrían provocarse
lesiones personales o daños al equipo.
El cuidado o uso del esgmomanómetro puede ocasionar lesiones, daños a la
unidad, o resultar en un tratamiento inecaz. Si sigue estas instrucciones, se
garantizará la ecacia y la vida útil prolongada del dispositivo.
PRECAUCIONES GENERALES Y ADVERTENCIAS
• Consulte los resultados de la medición con su médico o profesional de atención
médica; nunca se auto diagnostique, ni intente un tratamiento, ya que esto
puede ser peligroso.
• Destinado solo para adultos; este dispositivo no está aprobado para recién
nacidos, bebés o uso infantil. No para uso de mujeres embarazadas.
• Mantener fuera del alcance de los niños.
• El paciente es el operador previsto de este dispositivo.
• No use la unidad si tiene alguna parte dañada, si ha sido sumergida en agua o
si el brazalete se ha caído.
• Si ocurre alguna anormalidad, deje de usar hasta que la unidad haya sido
examinada y reparada.
• Utilice solamente los aditamentos y accesorios incluidos; no utilice aditamentos
de otros modelos o marcas.
• No desarme la unidad, ni intente repararla, la sustitución de un componente
diferente al administrado puede provocar error en la medición y anulará la
garantía del fabricante.
• Siga siempre las regulaciones locales para la eliminación adecuada.
• No comparta este dispositivo con personas infectadas donde pueda haber
riesgo de contaminación cruzada.
• Consulte con su médico antes si el brazalete puede aplicarse sobre una
herida o enfermedades inamatorias.
• Consulte con su médico antes de usar si se presenta alguna de las siguientes
condiciones: arritmia, arritmias comunes como latidos prematuros auriculares
o ventriculares o brilación auricular, esclerosis arterial, perfusión deciente,
diabetes, preeclampsia, enfermedades renales. enfermedades inamatorias,
Table of contents
Languages:
Other Veridian Healthcare Medical Equipment manuals

Veridian Healthcare
Veridian Healthcare VH SonicMist User manual

Veridian Healthcare
Veridian Healthcare TENS 22-040 User manual

Veridian Healthcare
Veridian Healthcare 11-50D User manual

Veridian Healthcare
Veridian Healthcare VH Complete User manual

Veridian Healthcare
Veridian Healthcare 11-100 User manual

Veridian Healthcare
Veridian Healthcare ProKit Combo User manual

Veridian Healthcare
Veridian Healthcare 11-50DP User manual

Veridian Healthcare
Veridian Healthcare 11-50DP User manual

Veridian Healthcare
Veridian Healthcare 11-100 User manual