6
USING THE VACUUM CLEANER
Attention! Switch the vacuum cleaner on
only with the dust bin (9) and the HEPA fil-
ter (18) installed in the dust bin. Always
check if the dust bin (9) is assembled and
installed properly.
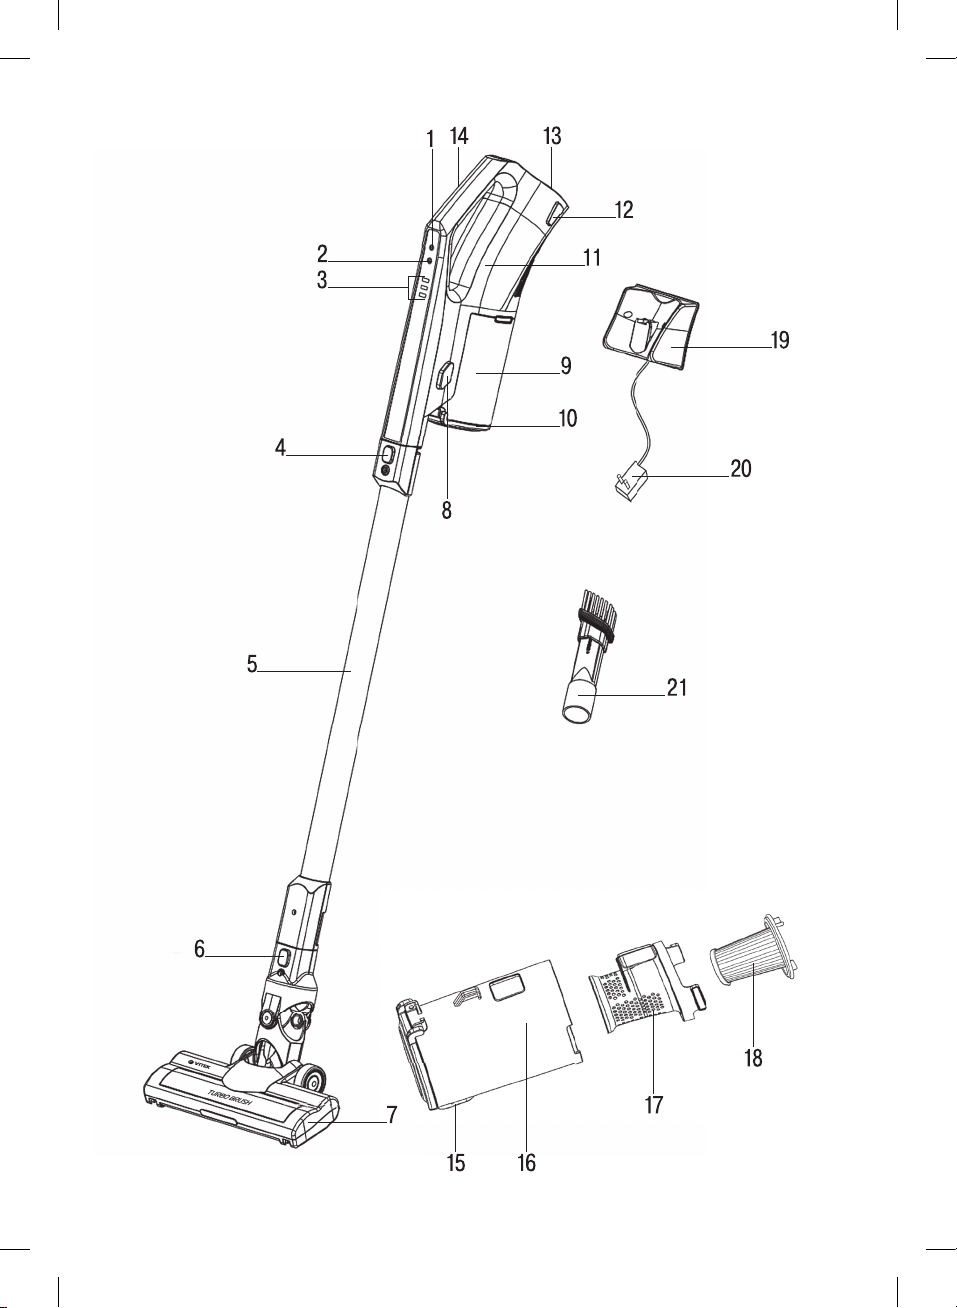
•Use the wall-mounted holder (19) for easy
storing of the vacuum cleaner or battery (13)
charging.
•During the operation or when carrying the
vacuum cleaner hold the unit by the han-
dle (14).
•Press the on/of button (1) « » to switch the
vacuum cleaner on, the vacuum cleaner will
be switched on at the low power level, the
operation/charge indicator (3) will light up and
the indicator (3) segments will show the bat-
tery charging rate.
•During the vacuum cleaner operation you can
select the vacuum cleaner operating modes
by pressing the button (2) «+». The vacuum
cleaner has two operation modes:
– the operation time at the low power level is
approximately 35-40 minutes.
– a charged battery (13) provides approxi-
mately 20 minutes of continuous vacuum
cleaner operation at maximal power;
Note:
– During the vacuum cleaner operation the indi-
cator (3) shows the battery charging rate.
– As the battery runs low, the number of light
segments on the operation/ charge indica-
tor (3) decreases.
– If the battery (13) is low, the first segment
of the operation/charge indicator (3) will be
flashing. In this case it is recommended to
stop operation and put the vacuum cleaner
on the wall-mounted holder (19) for charging
the battery (13).
– If the battery is fully discharged, the vacuum
cleaner will be switched off, in this case you
have to perform the full recharging cycle of
the battery (13).
•Use the handle (14) for carrying the vacuum
cleaner.
CLEANING AND CARE
Attention! Provide that the dust bin (9), prefil-
ter (17) and HEPA filter (18) are always clean,
because the overall performance of the vacuum
cleaner depends on it.
Remove garbage and dust from the dust bin
(9) after each usage of the vacuum cleaner and
clean the dust bin (9), the prefilter (17) and the
HEPA filter (18) regularly.
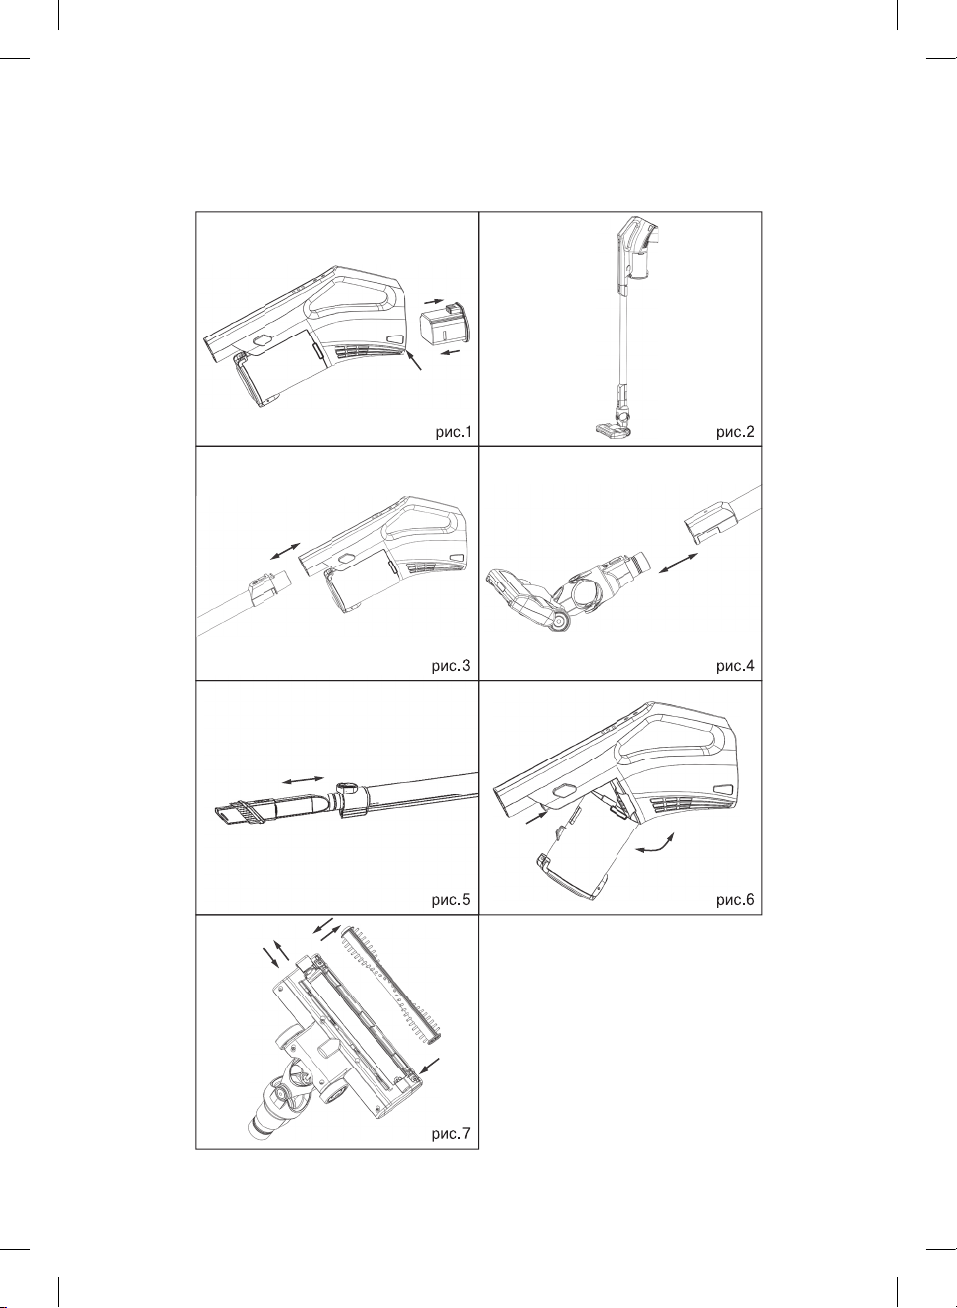
•Remove the dust bin (9) by pressing the but-
ton (8) (pic. 6).
•To remove garbage and dust place the dust
bin (9) above the garbage bin, press the lid
(10) release button (15), remove garbage and
dust and close the lid (10) until the release
button (15) goes off.
Cleaning the dust bin (9)
•Before removing the dust bin (9) remove dust
and garbage from it as described above.
•Remove the HEPA filter (18) from the prefilter
(17) by turning it counterclockwise. Clean the
HEPA filter (18) from dust and garbage.
•Take the ledges of the prefilter (17) and
remove it from the dust bin flask (16). Clean
the prefilter (17) from dust and garbage.
•Wash the dust bin flask (16), prefilter (17) and
HEPA filter (18) under warm running water
jet. Do not wash all removable parts in a dish-
washing machine.
Note:
– Before assembling and installing dry the
dust bin flask (16), prefilter (17) and HEPA fil-
ter (18) thoroughly.
– Do not use heating units, including the haird-
ryer, to dry the removable parts.
– Before assembling the dust bin (9) and install-
ing it to its place make sure that all removable
parts are clean and dry.
Assembling of the dust bin (9)
•Install the prefilter (17) into the dust bin flask
(16), make sure that the ledges of the prefilter
(17) match the grooves on the flask (16).
•Insert the HEPA filter (18) into the prefilter (17)
and turn it clockwise until bumping.
•Install the assembled dust bin (9) to its place
(pic. 6), make sure that the dust bin (9) is fixed.
Cleaning the electric brush (7)
Keep the electric brush (7) clean; as it becomes
dirty, disassemble the brush (7) and clean the
round brush.
•Remove the electric brush (7) from the exten-
sion pipe (5) by pressing the release button (6).
•Move the round brush clamp (pic. 7).
•Take out the round brush and remove threads
and hairs wound up around it.
•Clean the inner and outer surface of the elec-
tric brush (7) body from garbage and dust.
IM VT-8119.indd 6 04.04.2018 9:10:24