8
гие части тела не находились рядом с возду-
хозаборными отверстиями пылесоса.
•
Будьте особенно внимательны при уборке
лестничных площадок.
•
Запрещается использовать пылесос для
сбора растворителей и легковоспламеняю-
щихся жидкостей, таких как бензин; запре-
щается использовать пылесос в местах
хранения таких жидкостей.
•
Запрещается с помощью пылесоса собирать
воду или любые другие жидкости, горящие
или дымящиеся сигареты, спички, тлеющий
пепел, а также тонкодисперсную пыль, напри-
мер, от штукатурки, бетона, муки или золы.
•
Запрещается использовать пылесос, если:
–
не установлен или неправильно установ-
лен пылесборник;
–
не установлены входной и выходной
фильтры.
•
Не погружайте корпус пылесоса в воду или в
любые другие жидкости.
•
Используйте только те аксессуары и насадки,
которые входят в комплект поставки.
•
Проводите регулярную чистку пылесоса.
•
Храните пылесос в сухом прохладном месте.
•
Не используйте пылесос для чистки домаш-
них животных.
•
Будьте особенно внимательны, если побли-
зости от работающего устройства находятся
дети или лица с ограниченными возможно-
стями.
•
Данное устройство не предназначено для
использования детьми. Во время работы и
в перерывах между рабочими циклами раз-
мещайте устройство в местах, недоступных
для детей.
•
Прибор не предназначен для использова-
ния лицами (включая детей) с пониженными
физическими, психическими или умствен-
ными способностями или при отсутствии у
них опыта или знаний, если они не находятся
под контролем или не проинструктированы
об использовании прибора лицом, ответ-
ственным за их безопасность.
•
Осуществляйте надзор за детьми, чтобы не
допустить использования устройства в каче-
стве игрушки.
•
Из соображений безопасности детей не
оставляйте полиэтиленовые пакеты, исполь-
зуемые в качестве упаковки, без присмотра.
Внимание! Не разрешайте детям играть с
полиэтиленовыми пакетами или упаковочной
плёнкой. Опасность удушья!
•
Регулярно проверяйте состояние вилки сете-
вого шнура и сам сетевой шнур на отсутствие
повреждений.
•
Запрещается использовать устройство при
наличии повреждений сетевой вилки или сете-
вого шнура, если устройство работает с пере-
боями, а также после падения устройства.
•
Запрещается самостоятельно ремонтиро-
вать прибор. Не разбирайте прибор само-
стоятельно, при возникновении любых
неисправностей, а также после падения
устройства выключите прибор из электриче-
ской розетки и обратитесь в любой авторизо-
ванный (уполномоченный) сервисный центр
по контактным адресам, указанным в гаран-
тийном талоне и на сайте www.vitek.ru.
•
Перевозите устройство только в заводской
упаковке.
•
Храните устройство в местах, недоступных
для детей и людей с ограниченными возмож-
ностями.
УСТРОЙСТВО ПРЕДНАЗНАЧЕНО ТОЛЬКО ДЛЯ
БЫТОВОГО ИСПОЛЬЗОВАНИЯ В ЖИЛЫХ
ПОМЕЩЕНИЯХ, ЗАПРЕЩАЕТСЯ КОММЕР-
ЧЕСКОЕ ИСПОЛЬЗОВАНИЕ И ИСПОЛЬЗО-
ВАНИЕ УСТРОЙСТВА В ПРОИЗВОДСТВЕННЫХ
ЗОНАХ И РАБОЧИХ ПОМЕЩЕНИЯХ.
ПЕРЕД ПЕРВЫМ ИСПОЛЬЗОВАНИЕМ
После транспортировки или хранения
устройства при пониженной температуре
необходимо выдержать его при комнатной
температуре не менее трёх часов.
–
Извлеките устройство из упаковки, удалите
все упаковочные материалы и рекламные
наклейки, мешающие нормальной работе
пылесоса.
–
Проверьте целостность устройства, при
наличии повреждений не пользуйтесь
устройством.
–
Перед включением убедитесь в том, что
напряжение электрической сети соответ-
ствует рабочему напряжению устройства.
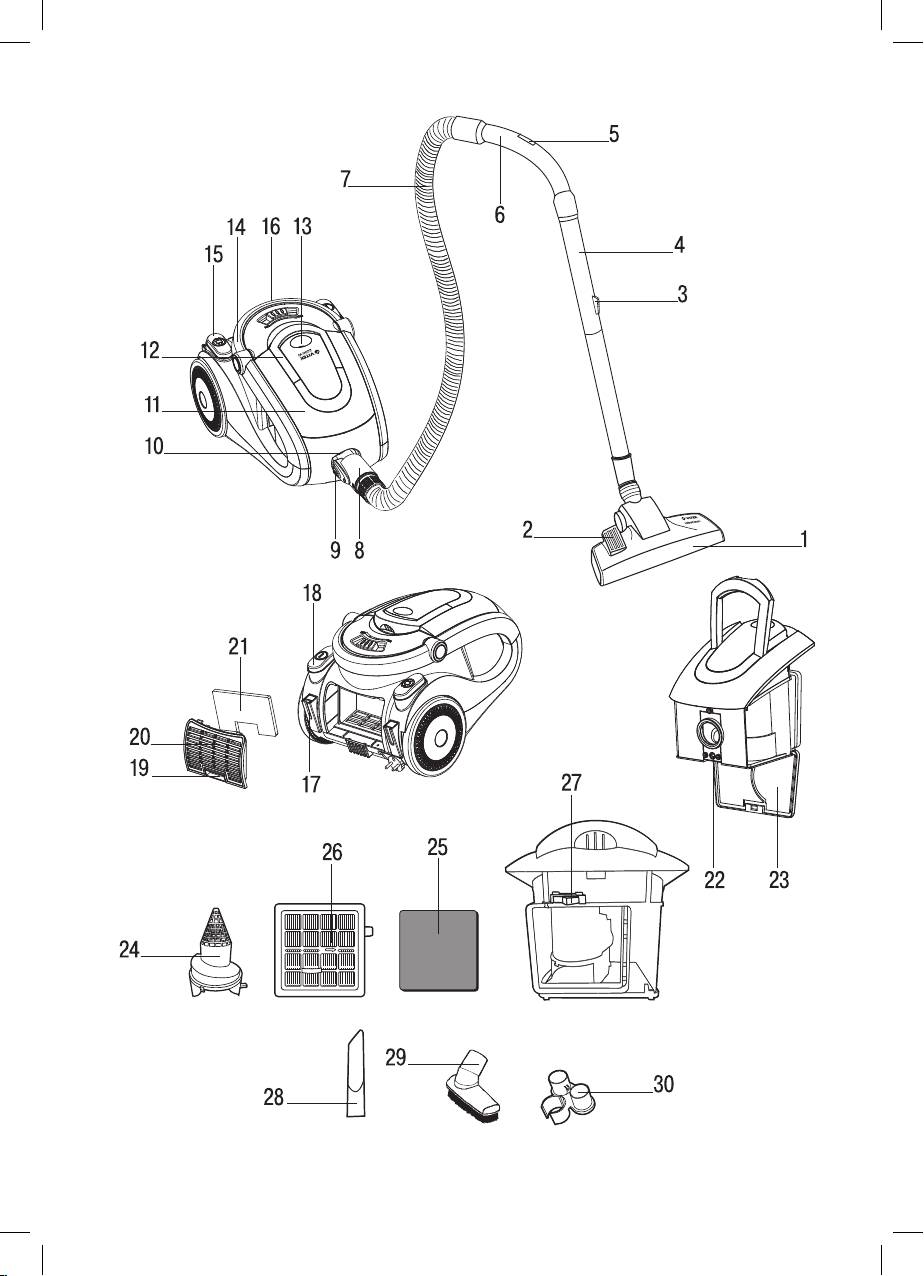
СБОРКА ПЫЛЕСОСА
Подсоединение и снятие гибкого шланга
•
Вставьте наконечник гибкого шланга (8) в
воздухозаборное отверстие (10).
•
Вставляйте шланг с небольшим усилием, до
фиксации.
•
При необходимости снять гибкий шланг
нажмите на фиксатор (9) и отсоедините шланг.
IM VT-8111.indd 8 08.11.2018 9:48:30