VWR VisiScope 200 Series User manual

INSTRUCTION MANUAL
VWR
Version: 1.0
Issued: 23, 12, 2020
Model European Catalogue Number
ML214PL 630-3295
ML224PL 630-3294
BL214PL 630-3292
BL224PL 630-3291
TL224PL 630-3293
BL224PL T1 630-3290
Microscope series 200

2
Legal Address of Manufacturer
Country of origin: ITALY
Europe
VWR International bvba
Researchpark Haasrode 2020
Geldenaaksebaan 464
B-3001 Leuven
+ 32 16 385011
http://be.vwr.com
Table of Contents
1. Warning 3
2. Safety Information 3
3. Package Contents 3
4. Unpacking 3
5. Intended use 3
6. Symbols and conventions 4
7. Productspecications 4
8. Instrument description 5
8.1 ML214PL / ML224PL / BL214PL / BL224PL / TL22PL 5
8.2 BL224PL T1 6
8.3 Assembling the microscope 7
8.3.1 ML214PL/ML224PL/BL214PL/BL224PL/TL22PL 7
8.3.2 BL224PL T1 8
8.4 Polarizing set (optional) 10
9. Use of the microscope 11
9.1 Switching on the microscope 11
9.2 Light intensity adjustment 11
9.3 Coarse focus tension adjustment 11
9.4 Stage 11
9.5 Adjust the interpupillary distance 12
9.6 Diopter adjustment 12
9.7 Use of oil immersion objective 12
9.8 Aperture diaphragm 13
9.9 Use of the polarizer (optional) 13
10. Microphotography 14
10.1 Cameras with projection lens 14
10.2 Reexcamera 14
11. Use of software and digital head 15
12. Micrometric Slide VWR005 15
13. Troubleshooting 16
14. Repair and maintenance 17
15. Technical service 17
16. Warranty 17
17. Compliance with local laws and regulations 17
Disposal 18

3
1. Warning
This microscope is a scientic precision instrument designed to last for many years with a minimum of mainte-
nance. It is built to high optical and mechanical standards and to withstand daily use.
We remind you that this manual contains important information on safety and maintenance, and that it must
therefore be made accessible to the instrument users.
We decline any responsibility deriving from incorrect instrument use that does not comply with this manual.
2. Safety Information
Avoiding Electrical Shock
Before plugging in the power supply, make sure that the supplying voltage of your region matches with the op-
eration voltage of the equipment and that the lamp switch is in o position.
Users should observe all safety regulations of the region. The equipment has acquired the CE safety label. How-
ever, users have full responsibility to use this equipment safely.
Please follow the guidelines below, and read this manual in its entirety to ensure safe operation of the unit.
3. Package Contents
DESCRIPTION QUANTITY
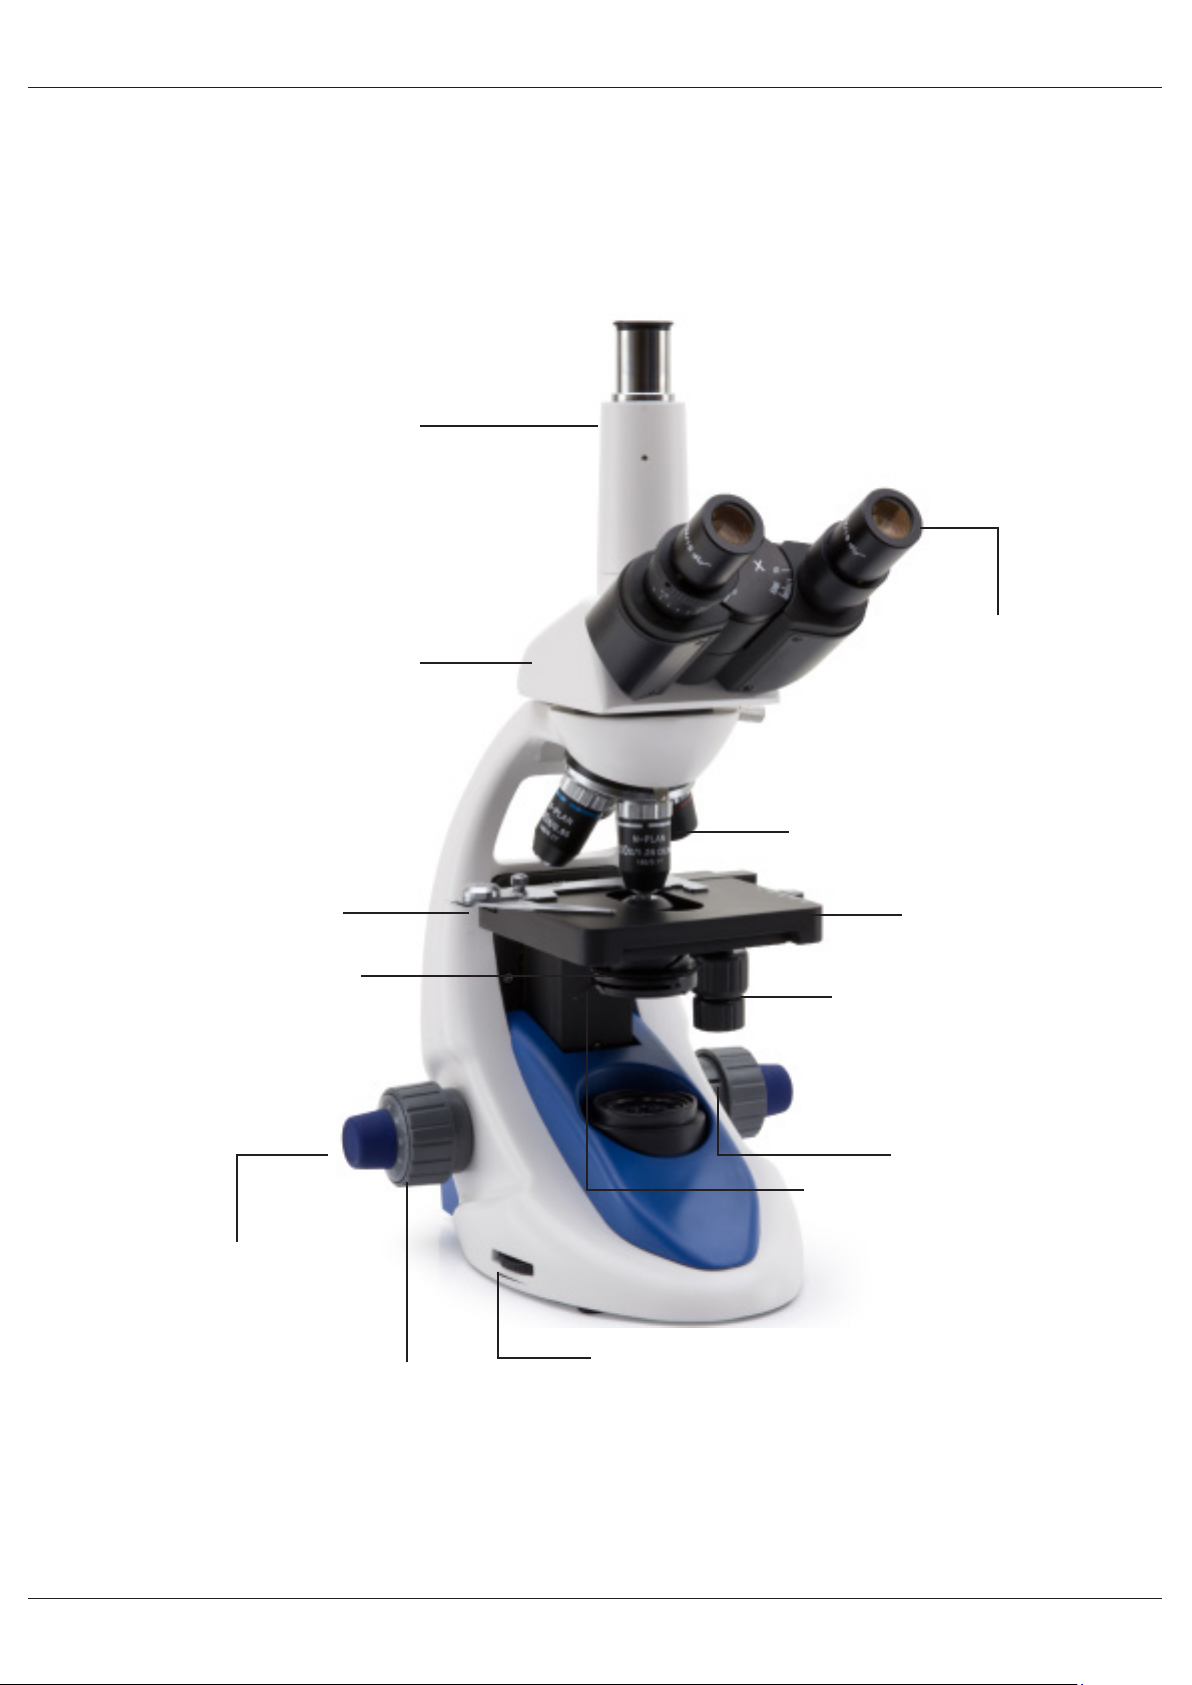
Microscope stand with 4 position nosepiece, stage, condenser 1
Optical head (ML: monocular; BL: binocular; TL: trinocular) 1
Objective 4x 1
Objective 10x 1
Objective 40x 1
Objective 100x
(or Objective 60x for ML214PL and BL214PL) 1
Eyepiece WF10x/18mm 1 (ML SERIES)
2 (BL and TL SERIES)
Objective vials 4
Green lter, 30mm diameter 1
Immersion oil (not in ML214PL and BL214PL) 1
Dust cover 1
Power supply output 6V 1
4. Unpacking
The microscope is housed in a moulded Styrofoam container. Remove the tape from the edge of the container
and lift the top half of the container. Take care to ensure that the optical items (objectives and eyepieces) do not
fall out and get damaged. Using both hands (one around the neck and one around the base), lift the microscope
from the container and put it on a stable desk.
5. Intended use
For research and teaching use only. Not intended for any animal or human therapeutic or diagnostic use.
6. Symbols and conventions
The following chart is an illustrated glossary of the symbols that are used in this manual.
CAUTION
This symbol indicates a potential risk and alerts you to proceed with caution
ELECTRICAL SHOCK
This symbol indicates a risk of electrical shock.

4
7. Productspecications
Model Head Eyepiece(s) Nosepiece Objectives Stage Focusing Illuminator Condenser Power supply
ML224PL Monocular,
360° rotating,
30° inclined
Wideeld
10x/18mm Quadruple,
reversed
N-PLAN
4x/0.10,
10x/0.25,
40x/0.65,
100x/1.25
Double layer,
125x115 mm
with
X-Y 70x30mm
moving range
Coaxial
coarse
and ne
focusing
P-LED2
system with
adjustable
intensity
1.25 N.A.
Abbe type
with adjustable
height and iris
diaphragm
100-240 Vac
50-60 Hz
external power
adapter
6Vdc output
ML214PL Monocular,
360° rotating,
30° inclined
Wideeld
10x/18mm Quadruple,
reversed
N-PLAN
4x/0.10,
10x/0.25,
40x/0.65,
60x/0.85
Double layer,
125x115 mm
with
X-Y 70x30mm
moving range
Coaxial
coarse
and ne
focusing
P-LED2
system with
adjustable
intensity
1.25 N.A.
Abbe type
with adjustable
height and iris
diaphragm
100-240 Vac
50-60 Hz
external power
adapter
6Vdc output
BL224PL
Binocular 360°
rotating,
30° inclined with
adjustable
interpupillary
distance and
dioptric
compensation
Wideeld
10x/18mm Quadruple,
reversed
N-PLAN
4x/0.10,
10x/0.25,
40x/0.65,
100x/1.25
Double layer,
125x115 mm
with
X-Y 70x30mm
moving range
Coaxial
coarse
and ne
focusing
P-LED2
system with
adjustable
intensity
1.25 N.A.
Abbe type
with adjustable
height and iris
diaphragm
100-240 Vac
50-60 Hz
external power
adapter
6Vdc output
BL214PL
Binocular 360°
rotating,
30° inclined with
adjustable
interpupillary
distance and
dioptric
compensation
Wideeld
10x/18mm Quadruple,
reversed
N-PLAN
4x/0.10,
10x/0.25,
40x/0.65,
60x/0.85
Double layer,
125x115 mm
with
X-Y 70x30mm
moving range
Coaxial
coarse
and ne
focusing
P-LED2
system with
adjustable
intensity
1.25 N.A.
Abbe type
with adjustable
height and iris
diaphragm
100-240 Vac
50-60 Hz
external power
adapter
6Vdc output
TL224PL
Trinocular 360°
rotating,
30° inclined with
adjustable
interpupillary
distance and
dioptric
compensation
Wide Field
10x/18mm Quadruple,
reversed
N-PLAN
4x/0.10,
10x/0.25,
40x/0.65,
100x/1.25
Double layer,
125x115 mm
with
X-Y 70x30mm
moving range
Coaxial
coarse
and ne
focusing
P-LED2
system
with
adjustable
intensity
1.25 N.A.
Abbe type
with
adjustable
height and iris
diaphragm
100-240 Vac
50-60 Hz
external power
adapter
6Vdc output
BL224PL T1
Binocular Digi-
tal observation
head, inclined
30° and rotat-
able
360°.
Wide Field
10x/18mm Quadruple,
reversed
,
N-PLAN
4x/0.10,
10x/0.25,
40x/0.65,
100x/1.25
Double layer,
125x115 mm
with
X-Y 76x30mm
moving range
Coaxial
coarse
and ne
focusing
P-LED2
system with
adjustable
intensity
1.25 N.A.
Abbe type
with
adjustable
height and iris
diaphragm
100-240 Vac
50-60 Hz
external power
adapter
6Vdc output

5
8. Instrument description
FINE FOCUS
KNOB
PHOTO TUBE
(ONLY TL224PL)
INTENSITY ADJUSTMENT
DIAL
STAGE
OBJECTIVES
COARSE FOCUS
KNOB
CONDENSER
X/Y MOVEMENT
KNOBS
SLIDE HOLDER
APERTURE DIAPHRAGM
OBSERVATION HEAD
-) MONOCULAR (ML SERIES)
-) BINOCULAR (BL SERIES)
-) TRINOCULAR (TL SERIES)
EYEPIECES
TENSION ADJUSTMENT
RING
8.1 ML214PL / ML224PL / BL214PL / BL224PL / TL22PL

6
INTENSITY
ADJUSTMENT
DIAL
FINE FOCUS
KNOB
COARSE FOCUS
KNOB
STAGE
X/Y MOVEMENT
KNOBS
SLIDE HOLDER
OBJECTIVES
DIGITALHEAD
TABLET PC
EYEPIECES
TENSION ADJUSTMENT
RING
APERTURE DIAPHRAGM
HEADPHONE
MICRO HDMI
USB-C 2.0
(CHARGE / DATA)
USB-C 3.0
(DATA)
MICRO SD
CARD SLOT
8.2 BL224PL T1

7
8.3 Assembling the microscope
8.3.1 ML214PL/ML224PL/BL214PL/BL224PL/TL22PL
1. Remove the dust cap from the microscope frame and
from the bottom of the observation head.
2. Insert the optical head above the stand and tighten the
screw. (Fig. 1)
• Hold the head with one hand during the locking in
order to avoid that the head falls.
3. Insert both eyepieces into the tubes of the optical head.
(Fig. 2)
4. Insert the power supply jack in the socket placed at the
rear side of the microscope. (Fig. 3)
Only for TL224PL
5. Unscrew the protection cap mounted on the photo port
and screw the photo tube. (Fig. 4)
FFig. 1ig. 1
FFig. 2ig. 2
FFig. 3ig. 3
FFig. 4ig. 4

8
8.3.2 BL224PL T1
1. Remove the dust cap from the microscope frame and
from the bottom of the observation head.
2. Insert the optical head above the stand and tighten the
screw. (Fig. 5)
• Hold the head with one hand during the locking in
order to avoid that the head falls.
3. Insert both eyepieces into the tubes of the optical head.
(Fig. 6)
4. Insert the power supply jack in the socket placed at the
rear side of the microscope. (Fig. 3)
5. Fix the rotating part of the junction using the black wing-
nut ①. (Fig. 7)
6. Then hook the Tablet PC onto the 4 screws of the junc-
tion and pull toward down to rmly lock the Tablet PC in
the holder. (Fig. 8)
• To unlock the Tablet PC proceed with the opposite op-
eration: push toward up and remove it from the holder.
FFig. 5ig. 5
FFig. 6ig. 6
FFig. 7ig. 7
FFig. 8ig. 8
①

9
7. Plug one side of the cable named CAMERA CONNEC-
TION (USB + OTG) ②to the digital head and the oth-
er side to the Tablet PC using the connector ③. (Fig.
9-10).
8. Plug the cable named POWER SUPPLY CONNEC-
TION to the Tablet PC for battery recharge using the
connector ④. (Fig. 10)
• The connector ④has a label on the back side of the
Tablet PC ⑤(Fig. 11). This connector is used for
battery recharge and for camera connection.
• The connector ③is used ONLY for the camera
connection.
• DO NOT use the connector ③for battery recharge.
This could cause malfunctions / damages.
• The Tablet has been set with the Rotation function dis-
abled: this prevents any ipping of the Live View in or-
der to get a continuous and as large as possible view
of your slide also when the Tablet is removed from the
holder.
• To enable this function again: you can activate the Ro-
tation by swiping the screen on his bottom right side
and selecting Settings + Screen. Anyway, it’s not sug-
gested to activate the function when the camera is in
Live View mode as it may give troubles when the cam-
era runs at high resolutions.
FFig. 9ig. 9
②
FFig. 10ig. 10
FFig. 11ig. 11
③
④
⑤

10
8.4 Polarizing set (optional)
1. Place the polarizer on the light exit ①at the base of the
microscope. (Fig. 12)
2. Loosen the head xing knob ②and remove the head
from the microscope frame. (Fig. 13)
3. Insert the analyzer into the hole inside the frame ③.
(Fig. 14)
4. Put back the head into its original position and lock the
xing knob.
FFig. 14ig. 14
③
FFig. 12ig. 12
①
FFig. 13ig. 13
②

11
9. Use of the microscope
9.1 Switching on the microscope
Operate on the main switch ①placed in the rear side of the
microscope, moving the selector on “I” (Fig. 15)
9.2 Light intensity adjustment
Operate on the light intensity dial to increase or decrease
the illumination intensity. (Fig. 16)
9.3 Coarse focus tension adjustment
• Adjust the tension using the provided tool.
The coarse knob tension is preset in the factory.
1. To modify the tension according to personal’s needs,
rotate the ring using the provided tool. (Fig. 17).
• Clockwise rotation increases the tension.
• If the tension is too loose, the stage could go lower by
itself or the focus easily lost after ne adjustment. In this
case, rotate the knob in order to increase the tension.
9.4 Stage
Stage accepts standard slides 26 x 76 mm, thickness 1,2
mm with coverslide 0,17 mm. (Fig. 18)
1. Open the spring arm of the slide holder ②and place
the slide from the front on the stage.
2. Gently release the spring arm of the slide holder.
• A sudden release of the spring arm could cause the
falling of the slide.
FFig. 15ig. 15
FFig. 16ig. 16
FFig. 17ig. 17
FFig. 18ig. 18
②
①

12
9.5 Adjust the interpupillary distance
ExceptMLseries
Hold the right and left parts of the observation head using
both hands and adjust the interpupillary distance by turning
the two parts until one circle of light can be seen. (Fig. 19)
• The graduation on the interpupillary distance indica-
tor ①, pointed by the spot “.” on the eyepiece holder,
shows the distance between the operator’s eyes.
The range of the interpupillary distance is 48- 75 mm.
9.6 Diopter adjustment
ExceptMLseries
1. Look into the right eyepiece with your right eye only,
and focus on the specimen.
2. Look into the left eyepiece with your left eye only. If the
image is not sharp, use the diopter adjustment ring ②
to compensate. (Fig. 20)
• The adjustment range is ±5 diopter. The number in-
dicated on the adjustment ring graduation should
correspond to the operator’s diopter correction.
9.7 Use of oil immersion objective
ML224PL / BL224PL / TL22PL / BL224PL T1
1. Focus the specimen with a low power objective.
2. Lower the stage.
3. Put a drop of oil (provided) on the area of the specimen
to be observed. (Fig. 21)
• Make sure that there are no oil bubbles. Air bubbles
in the oil damage the image quality.
• To check for bubbles: remove an eyepiece, fully open
the aperture diaphragm and observe the objective exit
pupil. (The pupil must be circular and bright).
• To remove the bubbles, gently move the nosepiece to
the right and left to move the immersion objective a few
times and allow the air bubbles to move.
4. Insert immersion objective.
5. Return the stage to the upper focusing point and obtain
an optimal focus using the ne focus knob.
6. After use, gently remove the oil with a soft paper towel
or a lightly moistened optic paper with a mixture of ethyl
ether (70%) and absolute ethyl alcohol (30%).
• The immersion oil, if not immediately cleaned,
could crystallize creating a glass-like layer.
In this situation the observation of the specimen
wouldbedicult(evennotimpossible)duetothe
presence of an additional thickness on the objec-
tive.
FFig. 19ig. 19
FFig. 21ig. 21
①
FFig. 20ig. 20
②

13
9.8 Aperture diaphragm
• The Numerical Aperture (N.A.) value of the aperture
diaphragm aects the image contrast. Increasing or re-
ducing this value one can vary resolution, contrast and
depth of focus of the image. Move the diaphragm ring
①(Fig. 22) on the value corresponding to the objective
in use. In this case the optimal setting of the condenser
is achieved.
• With low contrast specimens set the numerical aperture
to about 70%-80% of the objective’s N.A. If necessary,
remove on eyepiece and, looking into empty sleeve,
adjust the condenser’s diaphragm in order to obtain an
image like the one in Fig. 23.
9.9 Use of the polarizer (optional)
1. Remove the specimen from the stage.
2. Looking inside the eyepieces, rotate the polarizer until
the darkest position is achieved.
3. Once the dark is achieved (“extinction” or “Crossed
Nicol” position) it is possible to begin the observation.
FFig. 23ig. 23
APERTURE
DIAPHRAGM
FIELD OF VIEW
30-20%
70-80%
FFig. 22ig. 22
①

14
10. Microphotography
10.1 Cameras with projection lens
1. Remove dust caps from camera and projection lens.
2. Screw the projection lens to camera thread. (Fig. 24)
3. Insert the projection lens into the photo tube. (Fig. 25)
10.2 Reexcamera
1. Screw the “T2” ring (not provided) at the end of the pro-
jection lens (M-173), then install the whole onto the re-
ex camera. (Fig. 26)
2. Insert the projection lens into the photo tube. (Fig. 27)
FFig. 24ig. 24
FFig. 25ig. 25
M1
M1) Screw the Reex adapter to the “T2” ring (provided with the
FFig. 26ig. 26
M2
M3) Properly install the Reex camera’s adapter
on the trinocular port
FFig. 27ig. 27

15
11. Use of software and digital head
The camera inside the digital head is driven by PROVIEW software.
For the instructions about the use of the software, please refer to the specic instruction manual.
For biological microscopes calibration
1 DIV=0.01mm
For stereo microscopes calibration
1 DIV=0.1mm
0 1 2 3 4 5 6 7 8 9 10
12. Micrometric Slide VWR005
Micrometricslide,26x76mm,with2scales
(1mm/100div. for biological microscopes / 10mm/100div. for stereomicroscopes)

16
13. Troubleshooting
Review the information in the table below to troubleshoot operating problems.
PROBLEM CAUSE SOLUTION
I. Optical Section:
LED operates, but eld of view remains
dark. Power supply is unplugged. Connect
Brightness is too low Set brightness to a proper level
Dirt or dust is visible in the eld of view. Dirt/dust on the specimen Clean the specimen
Dirt/dust on the eyepieces Clean the eyepieces
Image looks double Aperture diaphragm is stopped down
too far Open aperture diaphragm
Visibility is poor.
• Image is not good.
• Contrast is poor.
• Details are indistinct.
• Image glares
Revolving nosepiece is in an incorrect
position Move the nosepiece to a click stop
Aperture diaphragm is too closed or to
open Adjust aperture diaphragm
Dust or dirt on lenses (condenser, ob-
jectives, eyepieces and slide) Clean thoroughly
For transmitted light observation, the
coverglass thickness must not exceed
0.17mm
Use a coverglass with thickness
0.17mm
Focus is not even Slide holder is not flat. Move the spec-
imen to a flat position
One side of the image is out of focus. The nosepiece is not in the center of
the light path Turn the nosepiece to a click stop
The specimen is out of place (tilted) Place the specimen at on the stage.
The optical performance of the sample
cover glass is poor Use a cover glass of better quality
II. Mechanical Section:
The coarse focus knob is hard to turn. The tension adjustment collar is too
tight Loosen the tension adjustment collar
The focus is unstable. The tension adjustment collar is too
loose Tighten the tension adjustment collar
III. Electric section:
The LED doesn’t turn on. No power supply Check the power cord connection
The brightness is not enough The brightness adjustment is low Adjust the brightness
The light blinks The power cord is poorly connected Check the power cord
IV. Observation tube:
Field of view of one eye does not match
that of the other. Interpupillary distance is incorrect. Adjust interpupillary distance.
Incorrect diopter adjustment. Adjust diopter.
Your view is not accustomed to micro-
scope observation. Upon looking into eyepieces, try look-
ing at overall field before concentrating
on specimen range. You may also find
it helpful to look up and into distance
for a moment before looking back into
microscope.
V. Microphotography:
Image edge is unfocused To a certain extent it is due to achro-
matic objectives features To minimize the problem, set the aper-
ture diaphragm in a proper position
Bright spots appear on the image Stray light entering in the microscope
through eyepieces or camera viewfind-
er.
Cover eyepieces and viewfinder with a
dark cloth

17
14. Repair and maintenance
Microscopy environment
This microscope is recommended for use in a clean, dry and shock free environment with a temperature of
0-40°C and a maximum relative humidity of 85 % (non condensing). Use a dehumidier if needed.
To think about when and after using the microscope
The microscope should always be kept vertical when moving it so that no moving parts, such as the eyepieces,
fall out. Never mishandle or impose unnecessary force on the microscope.
Never attempt to service the microscope yourself.
After use, turn down the illumination intensity control and turn the light o. Cover the microscope with included
the dust cover, and keep it in a dry and clean place.
Electrical safety precautions
Before plugging in the power supply, make sure that the supplying voltage of your region matches with the op-
eration voltage of the equipment and that the lamp switch is in o-position.
Users should observe all safety regulations of the region. The equipment has acquired the CE safety label. How-
ever, users do have full responsibility to use this equipment safely.
Cleaning the optics
If the optical parts require cleaning rst use compressed air.
If that is not sucient use a soft lint-free cloth with water and a mild detergent.
And as a nal option use the piece of cloth moistened with a 3:7 mixture of ethanol and ether.
• Note: ethanol and ether are highly ammable liquids. Do not use them near a heat source, near
sparks or near electric equipment. Use these chemicals in a well ventilated room.
Remember to never wipe the surface of any optical items with your hands. Fingerprints can damage the optics.
Do not disassemble objectives or eyepieces attempting to clean them.
For the best results, use the VWR cleaning kit.
If you need to send the microscope to manufacturer for maintenance, please use the original packaging.
15. Technical service
Web Resource
Visit the VWR’s website at www.vwr.com for:
• Complete technical service contact information
• Access to VWR’s Online Catalogue, and information about accessories and related products
• Additional product information and special oers
Contact us For information or technical assistance contact your local VWR representative or visit. www.vwr.
com.
16. Warranty
VWR International warrants that this product will be free from defects in material and workmanship for a period
of ve (5) years from date of delivery. If a defect is present, VWR will, at its option and cost, repair, replace, or
refund the purchase price of this product to the customer, provided it is returned during the warranty period. This
warranty does not apply if the product has been damaged by accident, abuse, misuse, or misapplication, or from
ordinary wear and tear. If the required maintenance and inspection services are not performed according to the
manuals and any local regulations, such warranty turns invalid, except to the extent, the defect of the product is
not due to such non-performance.
Items being returned must be insured by the customer against possible damage or loss. This warranty shall be
limited to the aforementioned remedies. IT IS EXPRESSLY AGREED THAT THIS WARRANTY WILL BE IN LIEU
OF ALL WARRANTIES OF FITNESS AND IN LIEU OF THE WARRANTY OF MERCHANTABILITY.
17. Compliance with local laws and regulations
The customer is responsible for applying for and obtaining the necessary regulatory approvals or other authori-
zations necessary to run or use the Product in its local environment. VWR will not be held liable for any related
omission or for not obtaining the required approval or authorization, unless any refusal is due to a defect of the
product.

18
Disposal
This equipment is marked with the crossed out wheeled bin symbol to indicate that this equipment must not be
disposed of with unsorted waste.
Instead it is your responsibility to correctly dispose of your equipment the end of its life cycle by handling it over
to an authorized facility for separate collection and recycling. It is also your responsibility to decontaminate the
equipment in case of biological, chemical and/or radiological contamination, so as to protect from health hazards
the persons involved in the disposal and recycling of the equipment.
For more information about where you can drop o your waste equipment, please contact your local dealer from
whom you originally purchased this equipment.
By doing so, you will help to conserve natural and environmental resources and you will ensure that your equip-
ment is recycled in a manner that protects human health.
Thank you

19

20
Australia
VWR International, Pty Ltd.
Unit 1/31 Archimedes Place
Murarrie, Queensland 4172
Tel.: 1300 727 696
Fax: 1300 135 123
Austria
VWR International GmbH
Graumanngasse 7
1150 Vienna
Tel.: +43 1 97 002 0
Fax: +43 1 97 002 600
E-mail: [email protected].com
Belgium
VWR International bvba
Researchpark Haasrode 2020
Geldenaaksebaan 464
3001 Leuven
Tel.: 016 385 011
Fax: 016 385 385
E-mail: [email protected].com
China
VWR International China Co., Ltd
Rm.219, 2100 Dongming Road
Pudong New District
Shanghai 200123
Tel.: +86-21-5898 6888
Fax: +86-21-5855 8801
E-mail: info_china@vwr.com
Czech Republic
VWR International s. r. o.
Veetee Business Park
Pražská 442
CZ - 281 67 Stříbrná Skalice
Tel.: +420 321 570 321
Fax: +420 321 570 320
E-mail: [email protected].com
Denmark
VWR - Bie & Berntsen
Transformervej 8
2730 Herlev
Tel.: 43 86 87 88
Fax: 43 86 87 90
E-mail: [email protected].com
Finland
VWR International Oy
Valimotie 9
00380 Helsinki
Tel.: 09 80 45 51
Fax: 09 80 45 52 00
E-mail: info@ .vwr.com
France
VWR International S.A.S.
Le Périgares – Bâtiment B
201, rue Carnot
94126 Fontenay-sous-Bois cedex
Tel.: 0 825 02 30 30 (0,15 € TTC/min)
Fax: 0 825 02 30 35 (0,15 € TTC/min)
E-mail: info@fr.vwr.com
Germany
VWR International GmbH
Hilpertstraße 20a
D - 64295 Darmstadt
Freecall: 0800 702 00 07
Fax: 0180 570 22 22*
Email: [email protected].com
*0,14 €/Min. aus d. dt. Festnetz
Hungary
VWR International Kft.
Simon László u. 4.
4034 Debrecen
Tel.: (52) 521-130
Fax: (52) 470-069
E-mail: [email protected].com
India
VWR Lab Products Private Limited
135/12, Brigade Towers, 2nd Floor
Front wing, Brigade Road,
Bengaluru, India – 560 025
Tel.: +91-80-41117125/26 (Bengaluru)
Tel.: +91-2522-647911/922 (Mumbai)
Fax: +91-80-41117120
E-mail: vwr_india@vwr.com
Ireland / Northern Ireland
VWR International Ltd /
VWR International (Northern Ireland) Ltd
Orion Business Campus
Northwest Business Park
Ballycoolin
Dublin 15
Tel.: 01 88 22 222
Fax: 01 88 22 333
E-mail: [email protected].com
Italy
VWR International PBI S.r.l.
Via San Giusto 85
20153 Milano (MI)
Tel.: 02-3320311/02-487791
Fax: 800 152999/02-40090010
E-mail: [email protected].com
The Netherlands
VWR International B.V.
Postbus 8198
1005 AD Amsterdam
Tel.: 020 4808 400
Fax: 020 4808 480
E-mail: [email protected].com
New Zealand
Global Science - A VWR Company
241 Bush Road
Albany 0632, Auckland
Tel.: 0800 734 100
Fax: 0800 999 002
E-mail: [email protected]
Norway
VWR International AS
Haavard Martinsens vei 30
0978 Oslo
Tel.: 02290
Fax: 815 00 940
E-mail: [email protected].com
Poland
VWR International Sp. z o.o.
Limbowa 5
80-175 Gdansk
Tel.: 058 32 38 200 do 204
Fax. 058 32 38 205
E-mail: [email protected].com
Portugal
VWR International -
Material de Laboratório, Lda
Edifício Neopark
Av. Tomás Ribeiro, 43- 3 D
2790-221 Carnaxide
Tel.: 21 3600 770
Fax: 21 3600 798/9
E-mail: [email protected].com
Singapore
VWR Singapore Pte Ltd
18 Gul Drive
Singapore 629468
Tel.: +65 6505 0760
Fax: +65 6264 3780
E-mail: [email protected].com
Spain
VWR International Eurolab S.L.
C/ Tecnología 5-17
A-7 Llinars Park
08450 - Llinars del Vallès
Barcelona
Tel.: 902 222 897
Fax: 902 430 657
E-mail: [email protected].com
Sweden
VWR International AB
Fagerstagatan 18a
163 94 Stockholm
Tel.: 08 621 34 00
Fax: 08 621 34 66
E-mail: [email protected].com
Switzerland
VWR International GmbH
Lerzenstrasse 16/18
8953 Dietikon
Tel.: 044 745 13 13
Fax: 044 745 13 10
E-mail: [email protected].com
Turkey
Pro Lab Laboratuar Teknolojileri Ltd.Şti.
a VWR International Company
Orta Mah. Cemal Gürsel Caddesi
Ördekcioglu Işmerkezi No.32/1
34896 Pendik - Istanbul
Tel.: +90216 598 2900
Fax: +90216 598 2907
UK
VWR International Ltd
Customer Service Centre
Hunter Boulevard - Magna Park
Lutterworth
Leicestershire
LE17 4XN
Tel.: 0800 22 33 44
Fax: 01455 55 85 86
E-mail: [email protected].com
GO TO VWR.COM FOR THE
LATEST NEWS, SPECIAL OFFERS
AND DETAILS OF YOUR LOCAL
VWR DISTRIBUTOR
Other manuals for VisiScope 200 Series
1
This manual suits for next models
11
Table of contents
Languages:
Other VWR Measuring Instrument manuals

VWR
VWR MCT 100 User manual

VWR
VWR avantor OX 4100 L User manual

VWR
VWR MD 8000 H User manual

VWR
VWR 635-0722 User manual

VWR
VWR avantor CO-2500L User manual

VWR
VWR avantor PH-2500L User manual

VWR
VWR pH 1100 H User manual

VWR
VWR OX 4100 H User manual

VWR
VWR avantor 76359-754 User manual

VWR
VWR P4 User manual