Wasp WDT 3200 Installation and operation manual

WDT 3200
Product Reference Guide
Wasp Barcode Technologies

WDT 3200 Product Reference Guide
2
Table of Contents
Chapter 1. WDT3200 Introduction ..................................... 3
Overview........................................................................................................................ 3
Support........................................................................................................................... 3
Warranty ........................................................................................................................ 4
Regulatory ..................................................................................................................... 4
WDT3200 Model Specification................................................................................... 5
WDT3200 Accessories ................................................................................................ 6
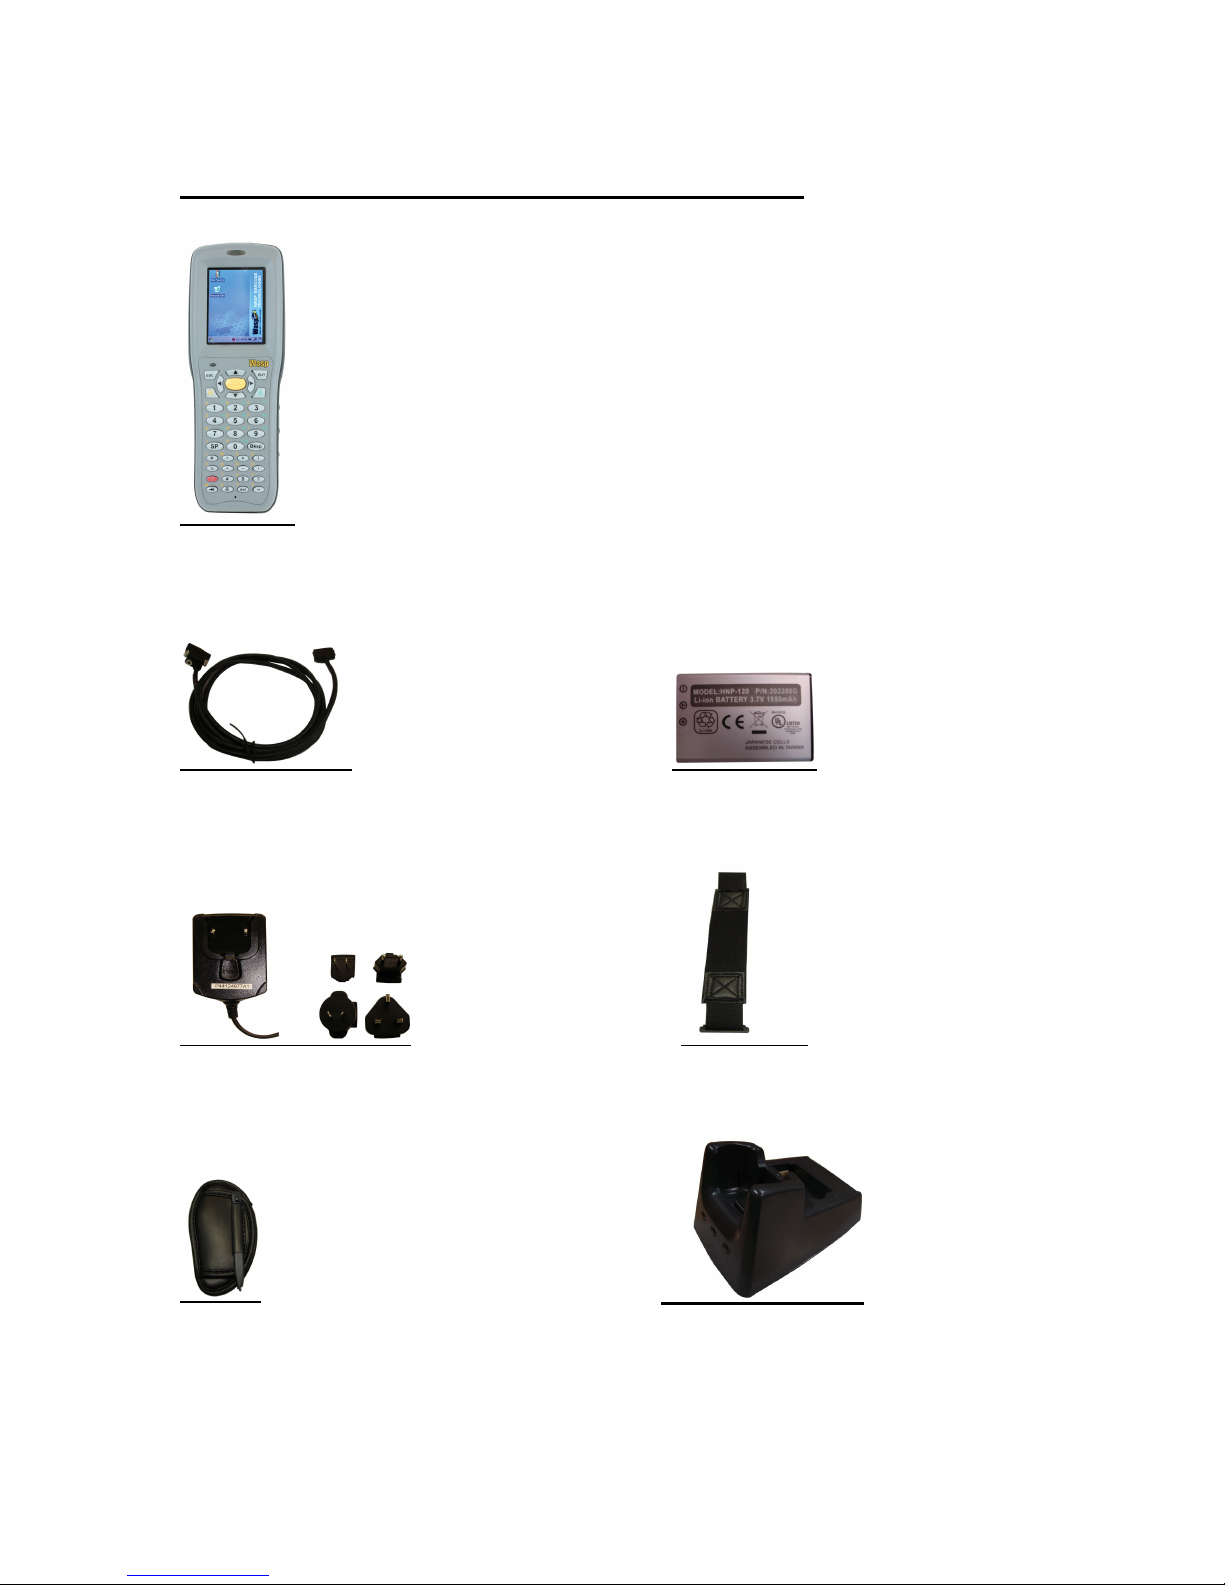
WDT3200 Product Introduction & Accessory Kit..................................................... 7
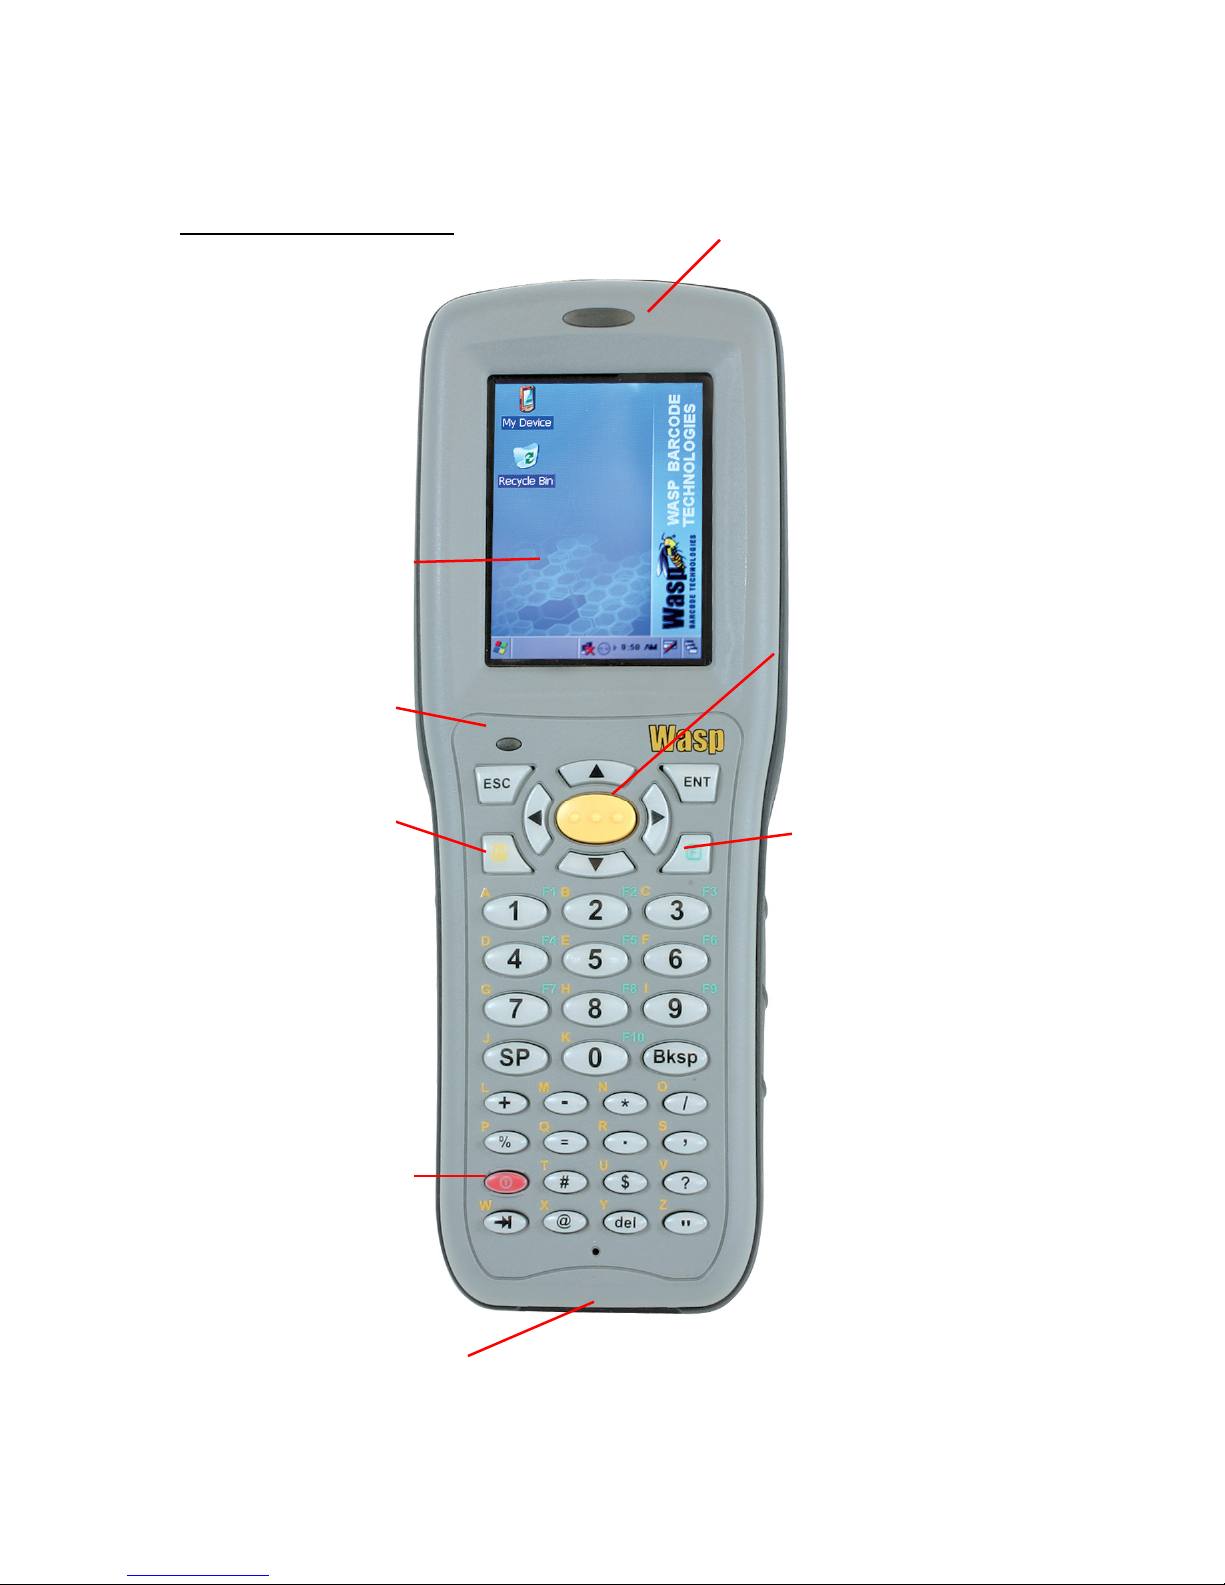
WDT3200 Front View .................................................................................................. 8
WDT3200 Back View................................................................................................... 9
Before You Begin Using Your WDT3200................................................................ 10
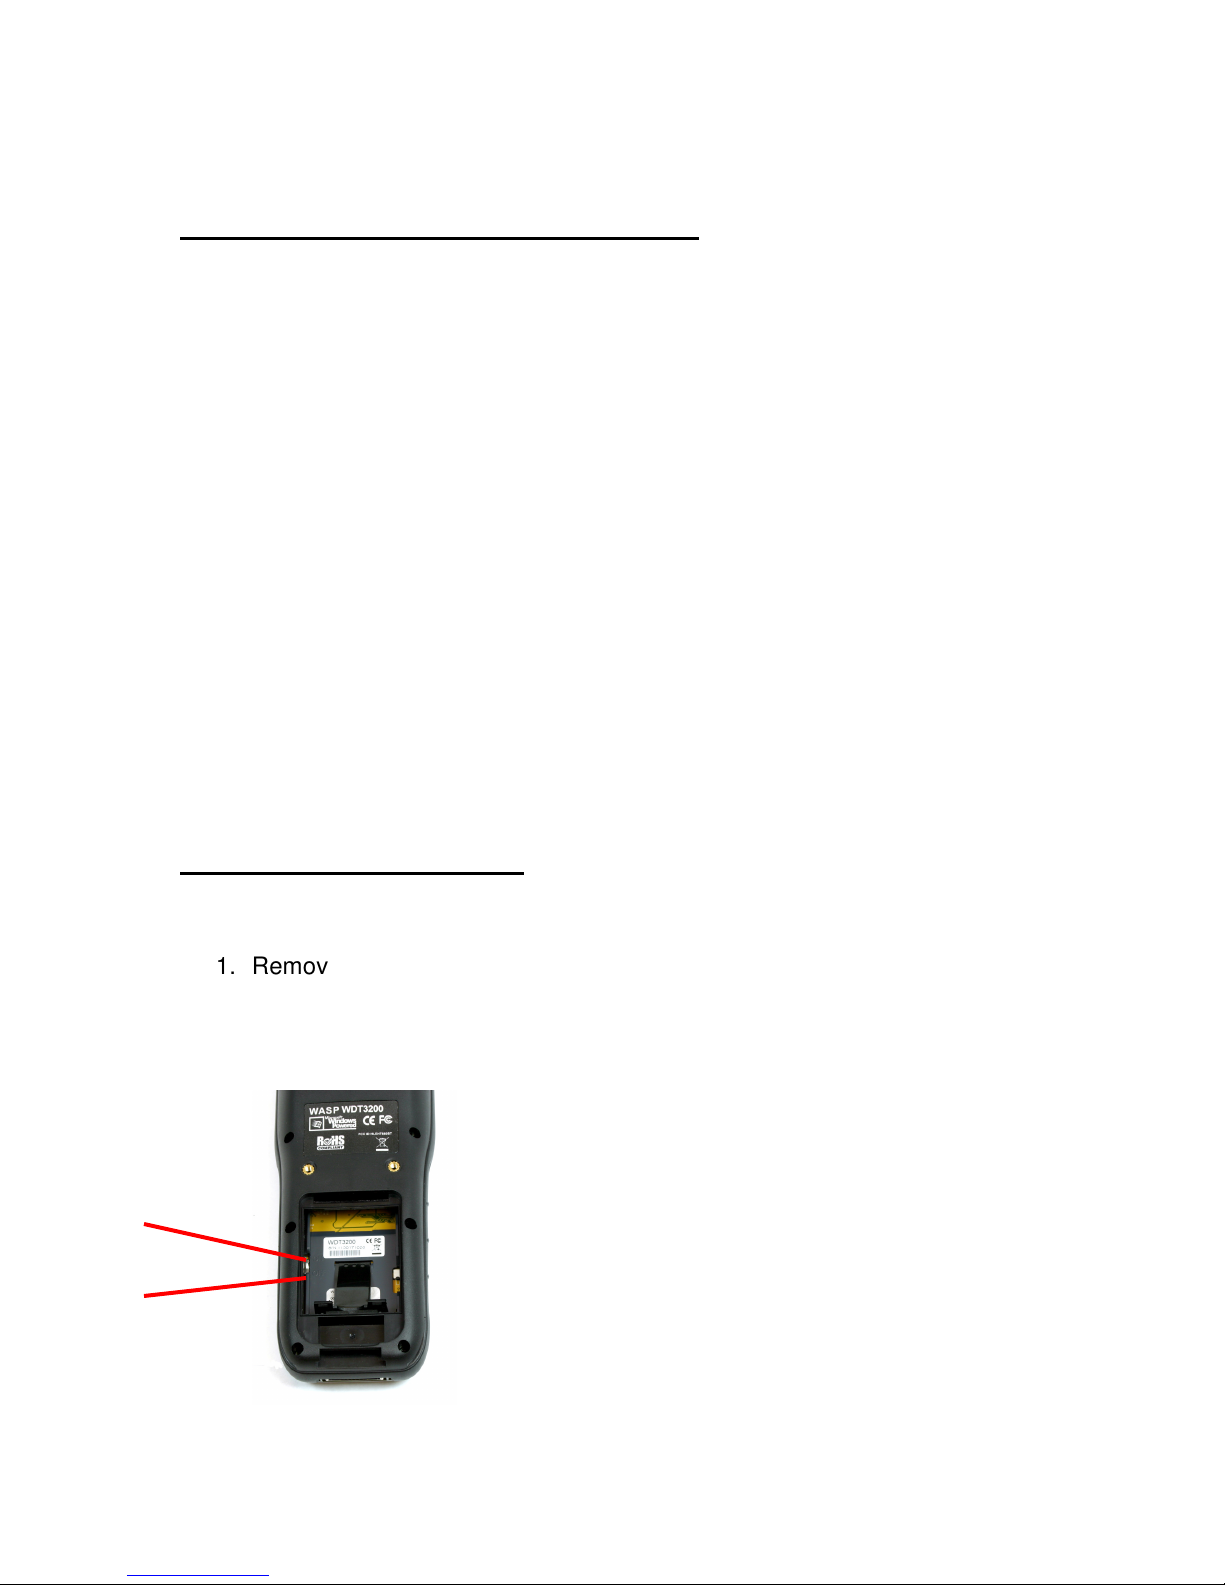
Installing the Battery Pack ........................................................................................ 10
Supplying Power to the WDT3200 ...........................................................................11
Using the WDT3200 for the First Time ....................................................................11
Chapter 2. Using the Keypad and Scanner.................. 14
Keypad......................................................................................................................... 14
WDT3200 HotKeys .................................................................................................... 15
Software Keyboard (Windows CE Keyboard)........................................................ 16
Other Character Support from WinCE Keyboard:................................................. 16
The Bar Code Scanner.............................................................................................. 17
Charging the Lithium-Ion Battery Pack................................................................... 17
Charging the Main and Backup Battery for the First Time................................... 17
Environmental Consideration for Charging ............................................................ 17
Power Status Indication............................................................................................. 18
How to Save Battery Power...................................................................................... 18
Storage and Safety Precautions .............................................................................. 19
Backlight Setting......................................................................................................... 19
Warm Boot / Cold Boot.............................................................................................. 20
Chapter 4. Data Communication...................................... 22
Introduction.................................................................................................................. 22
Connecting the Serial or USB Cable....................................................................... 22
Docking Station........................................................................................................... 23
RF Communication .................................................................................................... 23
Using ActiveSync........................................................................................................ 24
Using the Mobile Devices Window .......................................................................... 25
Changing Communications Settings....................................................................... 26
Chapter 5. Useful Utilities................................................. 27
Introduction.................................................................................................................. 27
Scanner Setting .......................................................................................................... 27
Scan2Key .................................................................................................................... 27
Registry Backup/Restore .......................................................................................... 28

WDT 3200 Product Reference Guide
3
Chapter 1. WDT3200 Introduction
Overview
The WDT3200 is a rugged, compact and ergonomic handheld terminal powered
by the WinCE.NET OS to enable you to work more efficiently. The WDT 3200
incorporates an integral barcode scanning laser device, color LCD with touch
screen, keypad, BT and wireless communication interface capability. It provides
you with a standard Windows-based environment that is easy to operate and
customize
This WDT3200 Product Reference Guide provides simple step-by-step
instructions on how to operate the device, giving you hands-on experience with
your WDT3200.
Support
Wasp Barcode Technologies has a professional support team to quickly answer
your questions or address any technical related issues. Should an equipment
problem occur, please contact Wasp Barcode Technologies using the information
listed below.
Web Address:
www.waspbarcode.com/support
Phone Number:
214-547-4100

WDT 3200 Product Reference Guide
4
Notice
1. This unit is equipped with a battery pack and backup battery. It is possible that
the WDT3200 may not power-on due to battery discharge as a result of
storage. The first time you use your device and in the event of a depleted
battery, attach the WDT3200 to the charging cable and charge the unit for no
less than 12 hours. This length of time ensures the backup battery is fully
charged as well.
2. Under normal conditions, the back-up battery will be charged from external
power or the main battery (if the main battery still has enough power to turn on).
If it is charged for the first time, the back-up battery will charge at the same time
the main battery is charging. Please refer to the Before You Begin Section
in the manual.
Warranty
Wasp Barcode Technologies' Limited Warranty provides for different warranty
periods for different parts and accessories:
Terminal is covered by one-year limited warranty
Docking Station is covered by one-year limited warranty
Cable is covered by one-year limited warranty
Battery is covered by three-month limited warranty
Regulatory
Compliance with RoHS
Certificate includes: CB, CE, CCC, FCC, BSMI, TELEC, VCCI

WDT 3200 Product Reference Guide
5
WDT3200 Model Specification
Model WDT3200 BT WDT3200BT+RF
Rugged/Environment
Drop test 1.5M 1.5M
IP 54 54
Operating Temp. 0°C to 50°C 0°C to 50°C
Storage Temp. -20°C to 60°C -20°C to 60°C
Humidity 5%~95% non-condensing
5%~95% non-condensing
ESD ±8 Contact~ ±12 Air ± 8 Contact~ ±12 Air
Keypads
Full Alphanumeric 36 keys 36 keys
Physical
Weight (g) 360g w/ Battery 360g w/ Battery
Dimension (LxWxH mm) 199.5x72.1x39.6mm 199.5x72.1x39.6mm
Power supply &
Management
Main Battery Type 3.7V / 1950mAH Li-ion 3.7V / 1950mAH Li-ion
Battery Recharging Time 4 hours 4 hours
Battery Life BT--> 12 hours
RF--> 8 hours
BT--> 12 hours
RF--> 8 hours
Backup Battery Type 120AH Li-polymer 120AH Li-polymer
Display
color ( Touch Panel 2.7") Included Included
Display pixels 240x320 pixel 240x320 pixel
Docking Station RS232/USB or Modem RS232/USB or Modem
Barcode Scanner Reader Laser / CCD Laser / CCD
System Architecture
CPU Processor Intel PXA255 Intel PXA255
Operating System WinCE Core WinCE Core
Flash ROM 64MB 64MB
Flash RAM 64MB 64MB
Speaker Included Included
Communication Interface RS232 or USB RS232 or USB
Expansion Memory Slot
SD Slot Included Included
Radio Options
802.11b/g Not Included Included
Bluetooth Included Included

WDT 3200 Product Reference Guide
6
WDT3200 Accessories
Communication and Charging Cradle
RS232/USB Cradle is used for data transmission and charging.
Communication and Charging Cable Kits
Included USB cable and serial cable connects the WDT3200 terminal directly to a
peripheral device for communication and a power source for charging.
Universal Adaptor
AC Power Supply
The AC Power Supply connects the WDT3200 to an electrical power outlet in
order to power the terminal and / or charge the battery pack. The power supply
utilizes either 110 or 220 Volt (100 to 240 VAC, 50 or 60 MHz) electrical outlets
available in most countries.
Holster
The holster holds the terminal for mobile use.
Hand Strap & Stylus
The hand strap is convenient for carrying your WDT3200 and also includes a
stylus attachment.
Li-ion Battery Pack
The 3.7v, 1950mAh Li-ion rechargeable battery pack provides the main power
supply for the WDT3200 terminal.

WDT 3200 Product Reference Guide
7
WDT3200 Product Introduction & Accessory Kit
Terminal
Communication Cable Battery
Adaptor Plugs Hand Strap
Stylus Communication Cradle

WDT 3200 Product Reference Guide
8
WDT3200 Front View
LED
Touch Screen Display
Indicator
RS232 Interface
Trigger
Power
Function
Alpha

WDT 3200 Product Reference Guide
9
WDT3200 Back View
Bar Code ScannerSD Memory Slot
Speaker
Battery Door
Hand Strap &
Stylus

WDT 3200 Product Reference Guide
10
Before You Begin Using Your WDT3200
Before using the WDT3200, please ensure the battery is fully charged.
There are three ways to charge your WDT3200:
Docking Station
RS232/Charging cable or USB/Charging cable
Rechargeable Lithium-Ion battery pack
CAUTION: There is a high risk of data loss if the WDT3200's backup battery is
not fully charged. This data loss can occur if the main battery has been drained
and the unit is not connected to the AC adaptor. For this reason, it is crucial that
before you charge the main battery, you make sure the backup battery switch is
set to ON. For further information on turning on the backup battery switch,
please see the next page.
Wasp Barcode Technologies recommends that you charge the battery at least 12
hours before using for the first time. After the initial charge, a fully drained
battery can be recharged in about 4 hours. While charging the main battery the
backup battery will also be charged if the backup battery switch is set to “ON”.
Installing the Battery Pack
1. Remove the battery door.
2. Move the backup battery switch to the ON position.
On
Off

WDT 3200 Product Reference Guide
11
3. Insert the battery pack so that the contacts on the battery pack line up with the
contacts in the battery compartment. Fully seat the battery.
Supplying Power to the WDT3200
Connect the RS232/Charging Cable or USB/Charging Cable to the WDT3200 and
connect the AC adapter to the cable’s power jack and an electrical outlet.
Alternately you can place the WDT3200 into the Docking Station (first connect the
power supply to the Docking Station).
Using the WDT3200 for the First Time
Pressing the Power ON/OFF Key
When you press the ON key, the WDT3200 Welcome Screen appears. The Wasp
Barcode Technologies screen will appear shortly thereafter.

WDT 3200 Product Reference Guide
12
Align the Screen
When prompted, use the stylus to tap the targets as they appear in order to align
the touch screen.
When you complete the procedure, press any key or press anywhere on the touch
screen to start up the WinCE system. Examples of the align prompts are shown
below:
Adjusting Screen Brightness
To adjust the original default setting of the screen brightness, the backlight setting
will be required. Please refer to page 21 for the new setting procedure.
Setting Time Zone/ Date
Before using the WDT3200 please take a few minutes to set the time and date so
that data can be properly time-stamped.

WDT 3200 Product Reference Guide
13
Setting the Time Zone
1. Tap the location arrow to see a list of cities.
2. Choose your location (or nearest listed one).
3. Select the Daylight Savings Time check box, if necessary.
4. Tap the APPLY button.
5. Select "Automatically adjust clock for daylight saving" for a Daylight
Savings Time zone.
Setting Date/Time
Tap the Left or Right arrows to scroll to the correct year and month.
Or, directly tap the location of the year or month to change the year or month
setting.
To set the time, tap on the Hr/Min/Sec AM/PM to input the Hr/Min/Sec.

WDT 3200 Product Reference Guide
14
Chapter 2. Using the Keypad and Scanner
Keypad
Data can be entered into the WDT3200 via the 36 key keypad. The keypad
includes: 0~9, alpha, function, escape, backspace, enter, scanner trigger, cursor,
and on/off keys.
[ENT] The Enter key confirms data entry.
[FUNC] The Function Key is used in conjunction with specific number keys
to operate as Hotkeys (see next page).
[Bksp] The backspace key erases the character to the left of the cursor.
[ESC] The escape key returns you to a previous page.
[TAB] The Tab key moves the cursor to the next tab or next control on a
form.
[Cursor] The cursor key moves the cursor around the screen.
[Alpha] The Alpha key toggles Alpha mode on and off and Caps mode on
Enter Key
Function Key
Escape Key
Alpha Key
Space Key Backspace Key
On/Off Key
Cursor Key
Scan Key
Tab Key

WDT 3200 Product Reference Guide
15
and off. One press of the Alpha key causes the WDT3200's
keys to input alpha characters, indicated by a blue LED light. A
second press causes the input of upper-case characters,
indicated by a green LED. A third press returns the WDT3200 to
numerical input.
WDT3200 HotKeys
The WDT3200 provides hotkeys for frequently used functions. Press the
Function key and the appropriate numeric key for the following functions listed
below:
Func 6 = Task Manager
Func 7 = Scanner Setting
Func 8 = Power Properties
Func 9 = System Info
Hotkeys can be modified to suit your preferences. To modify hotkeys, follow the
instructions below:
1. Navigate to: Start – Programs – Utilities - RegFuncKey
2. On the RegFuncKey screen, select Edit and the hotkey you want to
change.
3. On the Edit screen, enter a new file name or browse for the correct file.
You can optionally enter a parameter.
4. When you have finished making changes, select Set to save your new
settings.

WDT 3200 Product Reference Guide
16
Software Keyboard (Windows CE Keyboard)
Besides its hardware keypad, the WDT3200 provides a touchscreen keyboard as
an alternative method of character input. This software keyboard replicates the
layout of a standard PC keyboard.
Opening the Windows CE Keyboard:
The Windows CE keyboard can be opened by tapping the “keyboard” icon on the
Task bar. (Refer to picture).
Other Character Support from WinCE Keyboard:
In addition to standard keyboard input, the WDT3200 supports special European
character and symbol input. To enter these characters, tap the [áü] key on the
touch screen keyboard to display the available characters.

WDT 3200 Product Reference Guide
17
The Bar Code Scanner
The WDT3200 has an integrated laser scanner capable of reading all major bar code
labels.
Chapter 3. Power system
Charging the Lithium-Ion Battery Pack
The WDT3200's batteries can be charged via the USB or serial communication
cable, or via the optional docking station - both using the included AC adaptor.
Please charge the battery for at least 4 hours per session to ensure a full charge.
Please note that the first time charge should be for at least 12 hours (see below).
Charging the Main and Backup Battery for the First Time
When first charging the WDT3200, please allow at least 12 hours to fully charge
both the main and backup batteries. When the WDT3200 arrives from the
factory the backup battery switch is in the OFF position in order to protect the
backup battery. Before charging the WDT3200, make sure the backup battery
switch is moved to the ON position. The backup battery switch can be found
inside the main battery compartment. Data loss can occur if the backup battery
is not adequately charged - therefore it is imperative to ensure that the backup
battery switch is in the ON position before charging for the first time.
Note: A properly charged backup battery can store data for up to 72 hours
without power from the main battery. This is not recommended. Please make
sure an adequately charged main battery or AC power is connected. Do not rely
on the backup battery for other than unusual or emergency situations. To
prevent data loss due to backup battery failure (always a slim possibility), please
minimize the amount of time that the backup battery has to operate without the
main battery pack installed or while disconnected from AC power.
Environmental Consideration for Charging
It is important to consider the temperature when you are charging the Lithium-Ion battery
pack. The process is most efficient at normal room temperature or slightly cooler. It is

WDT 3200 Product Reference Guide
18
essential that you charge batteries within the stated range of -5°C to 50°C (23°F to
122°F). Charging batteries outside of the specified range could damage the batteries and
shorten their charging life cycle.
Power Status Indication
When the "Main Batteries Very Low" icon appears, charging the main battery
pack as soon as possible is highly recommended in order to avoid system
shutdown.
When the "Backup Battery Low" icon appears it indicates that the backup battery
is low and needs to be charged.
How to Save Battery Power
Automatic shutdown of the WDT3200
The WDT3200 will enter idle mode when there is no task, or all tasks are waiting
for input. In the default setting, the WDT3200 will automatically turn itself off if it
remains idle for 3 minutes and when there is no external charging power applied.
Pressing the power button will return the WDT3200 to where it was at the time of
automatic shutdown.
Note: Suggestion 1: Turn off wireless mode if you are not using it. This will
conserve battery power.
Suggestion 2: Disable the I/O card if Internet access is not required.

WDT 3200 Product Reference Guide
19
Storage and Safety Precautions
Batteries should be stored in an open environment and should be placed where
there is no risk of accidental shorting or other damage. Although charged Li-Ion
batteries may be left unused for several months, their capacity may be reduced
due to back up and internal resistance. If this happens they will require recharging
prior to use. Li-Ion batteries may be stored at temperatures between -4°F and
158°F (-20°C to 70°C).
Backlight Setting
The backlight for color display is user-defined. There are two tabs – one for
Battery Power and the other for External Power.
Field
Description
Dim Backlight if
device is not
used for:
Select how many minutes you want to elapse before the
backlight dims.
Turn Off
Backlight
If device is not
used for:
Select how many minutes you want to elapse before the
backlight automatically turns off.
Turn on
Backlight
Select this option if you want the backlight to turn on when
the button is pressed or the touch screen is tapped.

WDT 3200 Product Reference Guide
20
Warm Boot / Cold Boot
Warm Boot
Warm Boot is a reset to re-boot the WDT3200 without losing saved data. Perform
a warm boot when:
•The terminal fails to respond
•After installing some software applications
•After making changes to certain system settings, such as network cards
WARNING - Performing a Warm Boot will result in the loss of all unsaved
data!
Warm Boot via Software
To perform a Warm Boot via software, locate the
BootMode program.
Start - Programs - Utlitities – BootMode.
Tap “Warm Boot”. The system will be warm started.
Other manuals for WDT 3200
1
Table of contents
Other Wasp Barcode Reader manuals

Wasp
Wasp WDI9600 User manual

Wasp
Wasp WWS800 User manual

Wasp
Wasp WWS650 Installation and operation manual

Wasp
Wasp WWS450 User manual

Wasp
Wasp WPL618 Series User manual

Wasp
Wasp WWS550i Installation guide

Wasp
Wasp Bar Code Laser Operating instructions

Wasp
Wasp WDI4500 User manual

Wasp
Wasp WWS550SBR User manual

Wasp
Wasp WPL608 User manual

Wasp
Wasp WDI4600 User manual

Wasp
Wasp WWS800 Manual

Wasp
Wasp WWS750 User manual

Wasp
Wasp WLR8900 Operating instructions

Wasp
Wasp N1181 Operating instructions

Wasp
Wasp CCD Scanner Operating instructions

Wasp
Wasp WPL304 User manual

Wasp
Wasp WLR8950 User manual

Wasp
Wasp WLR8950 User manual

Wasp
Wasp WPL25 User manual