WHILL Model A User manual

WHILL%Maintenance%Manual%Rev%B%%%%%%%%
1%
Model A / M
Manual
For Device Maintenance
%
%
%

WHILL%Maintenance%Manual%Rev%B%%%%%%%%
2%
Contents%%
Chapter%1%%
3%WHILL%Maintenance%Overview%
Materials%and%Tools%%
4%WHILL%Model%A/M%Naming%Convention%
%
Chapter%2%%
5%Arm%Cover%A%%
8%Arm%Cover%B%%
9%Arm%Root%
15%Arm%Support%(Model%M%Only)%
17%Batteries%
20%Back%Support%
22%Back%Support%Cover%%
24%Circle%Cover%
29%Directional%Controller%/%Indicator%
34%Joystick%Handle%%
36%Front%Wheel%
38%Rear%Wheel%
41%Tie%Down%Securement%(Model%M%Only)
%
Chapter%3%
42%Additional%Support%%

WHILL%Maintenance%Manual%Rev%B%%%%%%%%
3%
1 Device%Maintenance%at%a%Glance%
WHILL%Maintenance%Overview%%
Materials%and%Tools%%
The%following%tools%are%needed%to%properly%configure%WHILL%device%components:%%
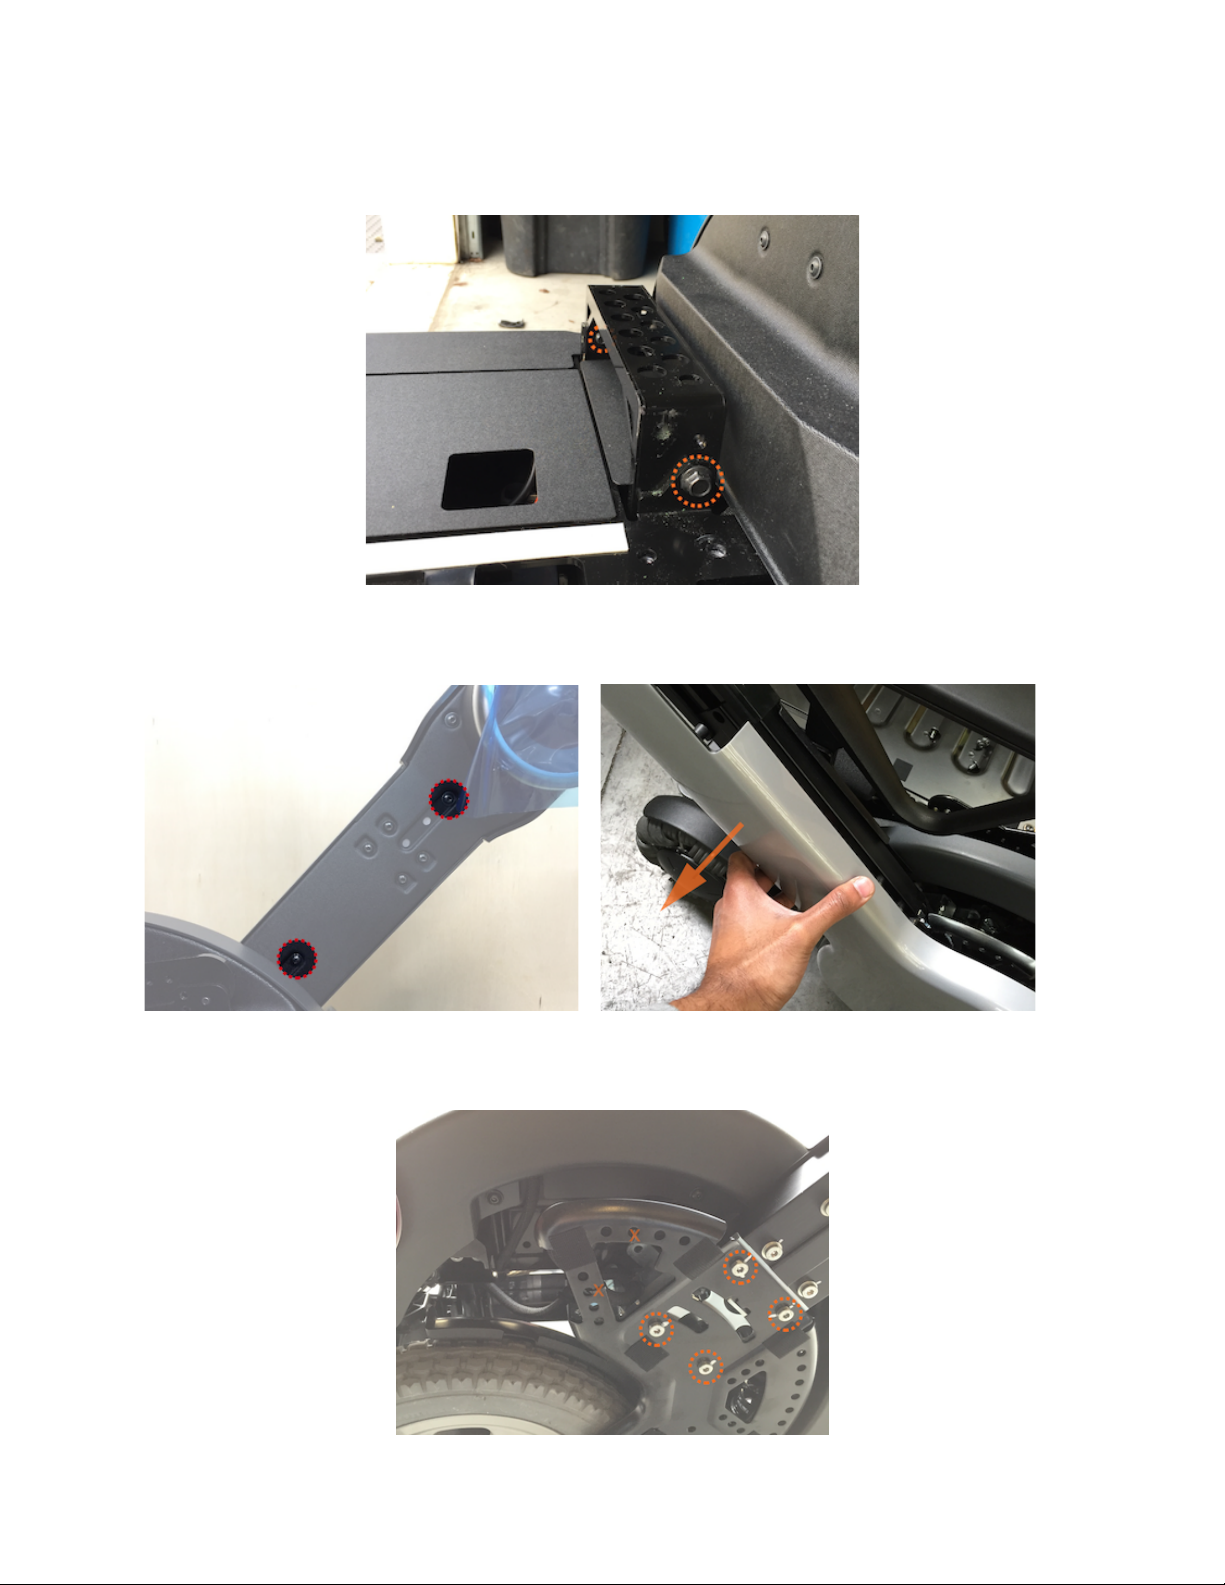
Metric%Allen%key%set.
%Most%of%the%configurations%on%the%device%require%the%loosening%of%hex%
screws.%In%particular,%the%#2.5%#3,%#4,%#5,%and%#6%Allen%keys%are%absolutely%necessary.Note:&For&
metric&tools,&there&are&numbers&associated&with&different&sizes&that&all&refer&to&their&diameter&
(e.g.,&a&hex&wrench&that&reads&“3”&is&a&3mm&diameter&hex&wrench).&&
Socket%ratchet,%metric%socket%set,%and%extensions.%
For%these%tools,%it%is%important%to%have%multiple%
extension%lengths%to%reach%difficult%locations%on%the%device.%The%only%socket%size%required%is%#12%
(12%mm).%If%possible,%use%an%adjustable%torque%wrench%to%properly%fasten%the%bolts%at%a%given%
“optimal”%torque%setting%(to%be%given%later%in%this%document).%
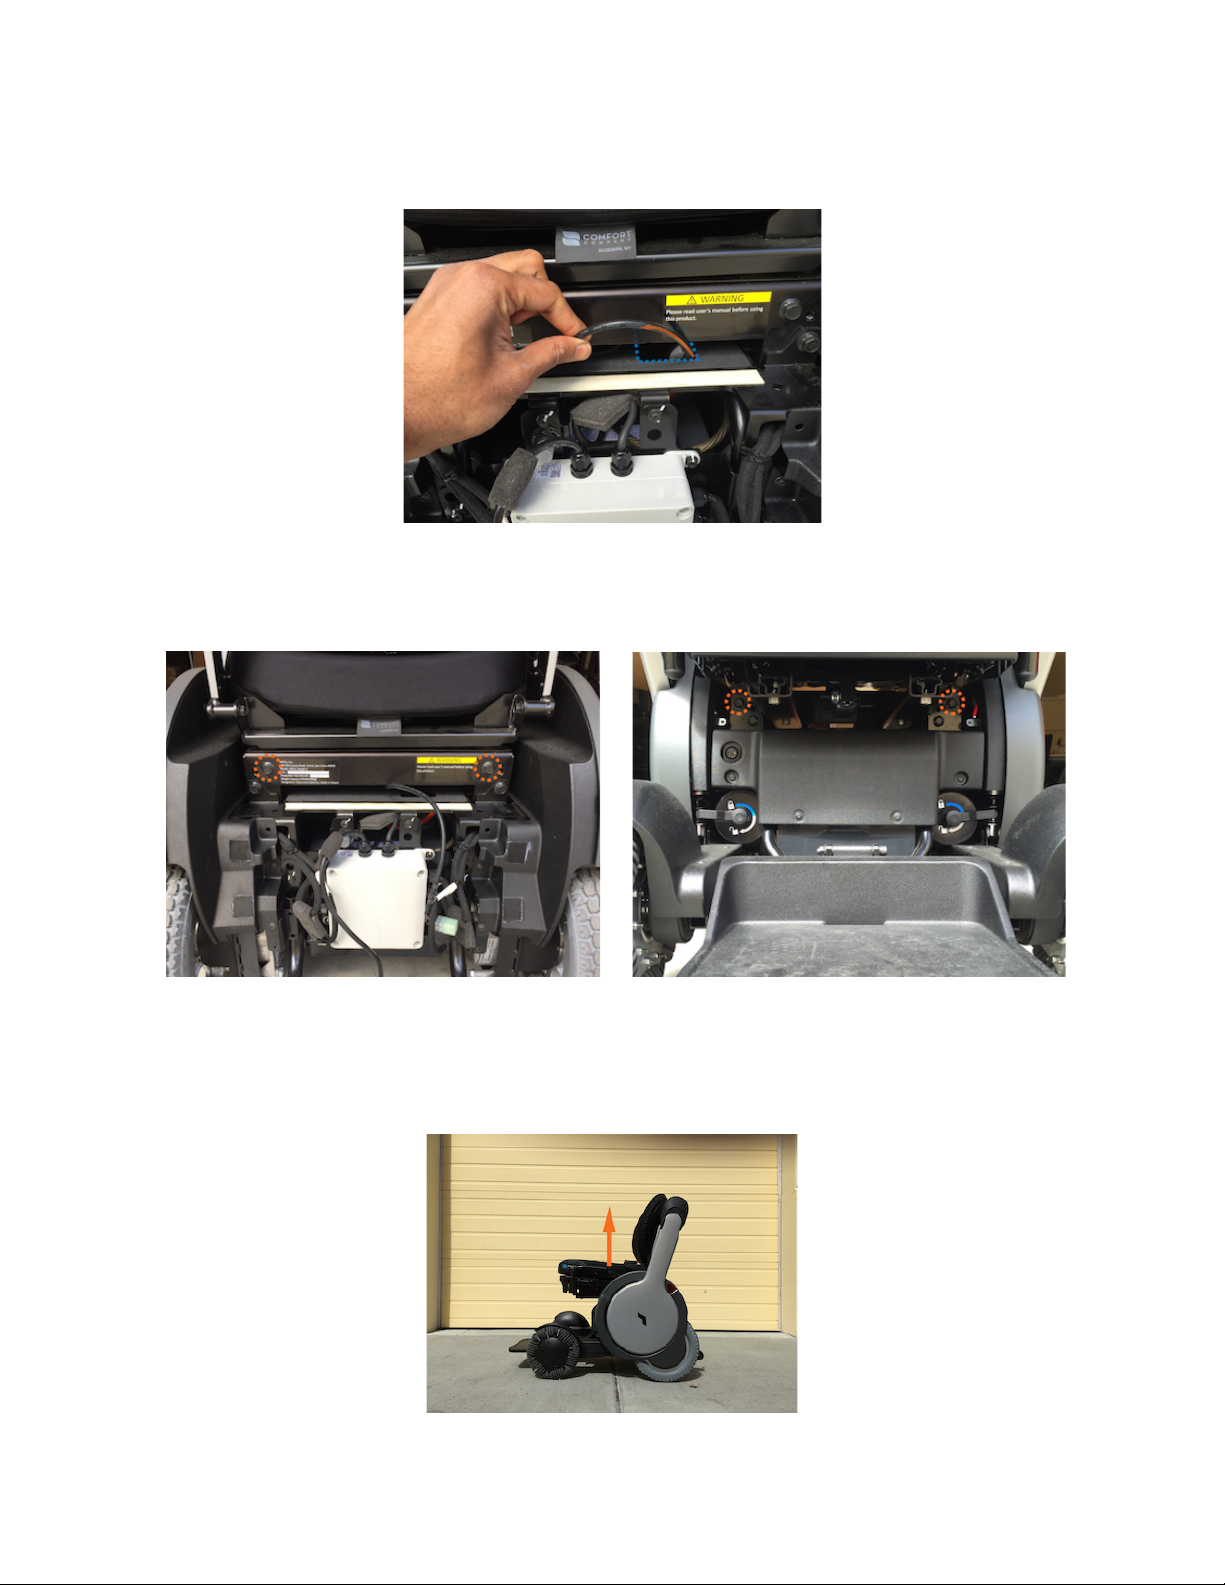
Clippers%and%zip%ties.%
There%are%components%on%the%WHILL%device%that%are%connected%to%each%
other%via%electrical%wiring.%These%zip%ties%prevent%loose%hanging%wires%and%also%provide%some%
measure%of%strain%relief.%When%configuring%or%exchanging%components,%be%sure%to%note%the%
location%of%existing%zip%ties%before%removing%them,%and%replace%them%after%the%configuration%is%
complete.%It%helps%to%work%on%one%side%at%a%time%to%maintain%a%reference.%%

WHILL%Maintenance%Manual%Rev%B%%%%%%%%
4%
Omni Wheel

WHILL%Maintenance%Manual%Rev%B%%%%%%%%
5%
2 Servicing%the%WHILL%Device%%%%%%%%%%%%%%%%%%%%%
%
Arm%Cover%A
%
Materials%Needed%%
#3%Allen%wrench%
%
Procedure%%
Remove%arm%cover%B
.%Remove%the%two%centerline%screws%on%the%inside%of%the%arm.%Then%pull%arm%
cover%B%straight%out.%Note:&first&image&below&does¬&show&Model&M's&arm&supports.%
%%%%%% %%%%%%% %
%
%
%

WHILL%Maintenance%Manual%Rev%B%%%%%%%%
6%
Unscrew%arm%cover%A.
%Unscrew%arm%cover%A%by%first%unscrewing%the%two%inner%bolts%followed%by%
the%single%outer%bolt.%
%
%
Remove%arm%cover%A.
%Pull%the%cover%straight%up%(you%might%have%to%wiggle%it%a%little).%Note:&be&
careful¬&to&snag&the&wiring&underneath.%
%
%
Replace%arm%cover%A
.%Replace%the%cover%by%following%these%steps%in%reverse.%Note:&be&careful&to&
not&damage&the&wiring&or&board&when&sliding&the&cover&back&on.%
%
Replace%arm%cover%B.
%Line%the%two%shafts%on%the%inside%of%the%arm%cover%up%with%the%holes%on%the%
arm,%and%then%slide%it%into%place.%Pat%the%circular%portion%to%attach%the%velcro.%
%
Fasten%arm%cover%B.
%Fasten%the%main%arm%cover%using%the%two%screw%holes%on%the%centerline%of%
the%inside%of%the%arm.%It%is%recommended%to%start%by%hand%to%prevent%cross%threading.%
%

WHILL%Maintenance%Manual%Rev%B%%%%%%%%
7%
Arm%Cover%B%%
Materials%Needed%%
#3%Allen%wrench%
%
Procedure%(Model%A/M)%%
Remove%arm%cover%B.
%Remove%the%two%centerline%screws%on%the%inside%of%the%arm.%Then%pull%arm%
cover%B%straight%out.%
Note:&first&image&below&does¬&show&Model&M's&arm&supports.%
%%%%%%%%%% %
%
Replace%arm%cover%B
.%Line%the%two%shafts%on%the%inside%of%the%arm%cover%up%with%the%holes%on%the%
arm,%and%then%slide%it%into%place.%Pat%the%circular%portion%to%attach%the%velcro.%
%
Fasten%arm%cover%B
.%Fasten%the%main%arm%cover%using%the%two%screw%holes%on%the%centerline%of%
the%inside%of%the%arm.%It%is%recommended%to%start%by%hand%to%prevent%cross%threading.%
%
%
%
%
%
%
%
%
%
%
%
%

WHILL%Maintenance%Manual%Rev%B%%%%%%%%
8%
Arm%Root%%
Materials%Needed%%
#3%Allen%wrench%
#4 Allen wrench
#12 socket
zip ties + clippers
Ratchet with extension
%
Procedure%(Model%A/M)%%
Remove%the%rear%cover.
%Make%sure%the%device%is%powered%down,%then%unscrew%the%two%grip%bolts,%
and%pull%the%cover%off.%
%
%
Unplug%the%seat%actuator
.%Pull%the%seat%actuator%cable%out%from%under%the%device%(top%left%cable).%
Cut%the%zip%tie%and%unplug%the%cable%by%pulling%up%the%small%tab%(orange%arrow)%on%the%outer%plug%
and%pinching%the%rear%plastic%plug%inner%plug%(blue%arrows).%Note:&make&sure&to&pull&on&the&plug&
itself&and¬&on&the&wires.%
% %

WHILL%Maintenance%Manual%Rev%B%%%%%%%%
9%
Thread%the%cable
.%Thread%the%portion%of%the%seat%actuator%cable%connected%to%the%device%through%
the%top%cover%to%ensure%the%cable%is%free%when%you%remove%the%seat.%
%
%
Unscrew%the%seat%assembly
.%To%remove%the%seat,%first%unscrews%the%top%two%bolts%that%attach%the%
seat%assembly%to%the%seat%height%bracket.%Next,%unscrew%the%two%bolts,%in%the%same%location,%on%
the%front%of%the%seat%assembly.%
%%%%%%%%%% %
%
Remove%the%seat%assembly.%
Place%both%arms%to%the%upright%position.%While%making%sure%the%
actuator%cable%doesn’t%snag,%lift%the%seat%assembly%straight%up%and%off%the%device.%When%placing%
the%seat%assembly%down,%make%sure%to%place%the%seat%on%a%flat%surface,%with%the%rear%propped%to%
prevent%the%actuator%cable%from%getting%pinched.%
%

WHILL%Maintenance%Manual%Rev%B%%%%%%%%
10%
Remove%the%seat%height%bracket
.%Unscrew%the%2%bolts%on%each%of%the%seat%bracket%with%a%#12%
socket%(only%the%rear%bolt%circled%in%picture).%
%
%
Remove%arm%cover%B
.%Remove%the%two%centerline%screws%on%the%inside%of%the%arm.%Then%pull%arm%
cover%B%straight%out.%Note:&first&image&below&does¬&show&Model&M's&arm&supports.%
%%%% %
%
Remove%the%circle%frame
.%Cut%the%two%zip%ties,%marked%with%an%x,%and%remove%the%four%bolts,%
circled,%with%a%#4%allen.%
%

WHILL%Maintenance%Manual%Rev%B%%%%%%%%
11%
Remove%arm%frame
.%Remove%the%3%zip%ties,%marked%with%an%x%(2%in%one%spot).%Then%unscrew%the%
four%bolts%with%a%#4%allen,%circled%in%second%picture,%and%pull%the%arm%frame%off%the%arm%root.%
Carefully%rest%the%arm%down%on%something%soft.%
% %
%
%
%
Replace%the%arm%root
.%Unscrew%the%3%circled%screws%with%a%#5%Allen%while%holding%onto%the%arm%
root.%Replace%it%with%the%new%one.%Tighten%the%screws%just%enough%that%it%holds%into%place.%
%

WHILL%Maintenance%Manual%Rev%B%%%%%%%%
12%
Adjust%the%arm%lock
.%Replace%the%arm%framed%removed%previously%by%replacing%the%4%circled%bolts%
with%a%#4%allen.%Next,%check%the%arm%lock%sensitivity%by%locking%and%unlocking%the%arm%at%its%lowest%
position.%If%it%feels%loose%or%tight,%loosen%the%3%arm%root%screws,%reposition%the%arm%root,%and%then%
retighten%the%screws.%Once%it’s%adjusted%properly%(you%can%test%against%the%opposite%arm)%tighten%
the%arm%root%screws%completely.%
%
%
Replace%the%arm%root%zip%ties
.%Replace%all%3%zip%ties%removed,%each%marked%with%an%x,%with%two%in%
one%spot.%
%
%
Replace%the%circle%frame
.%Replace%the%four%circled%bolts%with%a%#4%allen%and%secure%the%cable%by%
replacing%two%zip%ties,%each%marked%with%an%x.%%
%

WHILL%Maintenance%Manual%Rev%B%%%%%%%%
13%
Replace%the%seat%height%bracket
.%Replace%the%bolts%on%the%front%and%rear%of%the%seat%bracket%at%
the%correct%height%setting.%Do%not%completely%tighten.%
%
%
Replace%the%seat%assembly
.%While%holding%the%actuator%cable,%lift%up%the%seat%assembly%and%
carefully%replace%it%onto%the%seat%height%brackets.%Angle%the%back%up,%and%thread%the%cable%
through%the%top%cover.%Replace%all%the%top%four%seat%assembly%bolts%(two%in%the%back%and%two%in%
the%front).%Then%tighten%all%the%seat%height%bracket%screws%from%the%previous%step.%
%%% %%%%%%%% %
%
Replug%the%seat%actuator.
%Replug%the%seat%actuator%cable%and%zip%tie%the%two%cables%for%wire%strain%
relief.%Cut%the%excess%zip-tie.%
%

WHILL%Maintenance%Manual%Rev%B%%%%%%%%
14%
Replace%the%rear%cover
.%Line%up%the%holes%on%the%bottom%of%the%rear%cover%and%main%frame%and%
guide%the%top%of%the%cover%into%place.%Re-insert%and%tighten%the%two%grip%bolts.%
%
%
%
%
%
%
%
%
%
%
%

WHILL%Maintenance%Manual%Rev%B%%%%%%%%
15%
Arm%Support%(Model%M%Only)%%
Materials%Needed%%
#4%Allen%wrench%
#5%Allen%wrench%
8x%M6%18mm%flanged%bolts%
6x%M6%8mm%cheese%head%bolts%
Spare%arm%support%
%
Procedure%%
Slide%the%seat%and%raise%arm
.%Using%the%seat%slide,%move%the%seat%all%the%way%forward%and%raise%up%
the%right%arm.%
%
%
Install%the%angle%adjustment%bracket.%
On%the%inside%of%the%arm,%install%an%angle%adjuster%bracket%in%
the%correct%orientation%on%the%inner%arm%bracket%circled%above%using%4%flanged%M6%bolts.%To%
determine%a%level%starting%position,%use%your%WHILL's%seat%and%arm%angle%with%the%chart%below.%
%

WHILL%Maintenance%Manual%Rev%B%%%%%%%%
16%
%
Install%the%arm%support
.%Install%the%right%arm%support%(recessed%holes%face%towards%user)%using%3%
of%the%smaller%M6%bolts%at%the%desired%height.%Note:&the&bolts&should&sit&flush&in&the&arm&support.%
%
%
Repeat%on%the%left%side
.%Repeat%the%steps%above%on%the%other%side,%matching%the%angle%and%height%
settings%on%the%right%side.%
%
%
%

WHILL%Maintenance%Manual%Rev%B%%%%%%%%
17%
Battery%%
Materials%Needed%%
#4%allen%wrench%
#10mm%socket%wrench%(or%Philips%head%screw%driver)%
2%x%12%V%DC%sealed%lead%acid%batteries%(MK-%ES50-12)
%
Procedure%(Model%A/M)%%
Remove%the%rear%cover
.%Make%sure%the%device%is%powered%down,%then%unscrew%the%two%
grip%bolts
,%
and%pull%the%cover%off.%
%
%
Remove%the%electrical%board%box
.%Use%the%#4%allen%wrench%to%remove%the%four%screws%pictured%
below.%Carefully%pull%the%box%out,%then%up,%making%sure%not%to%damage%the%circuit%breaker%or%any%
wires.%
%%%%%%% %
%
%

WHILL%Maintenance%Manual%Rev%B%%%%%%%%
18%
%
Expose%the%batteries
.%Carefully%pull%out%the%battery%tray%and%expose%the%leads%on%the%two%
batteries.%Be%mindful%of%the%wires%as%you%are%pulling%out%the%tray.%
%
%
Disconnect%the%batteries
.%Slide%up%the%rubber%boots%and%use%a%
10mm%socket%wrench
%(or%Phillips%
head%screwdriver)%to%disconnect%the%battery%terminals.%
%
%
Replace%the%batteries
.%Replace%the%batteries%connecting%the%new%ones%in%the%same%way%(wiring%
diagram%is%also%available%on%the%inside%of%the%rear%cover).%Once%complete,%ensure%the%rubber%
boots%are%covering%all%of%the%leads,%then%carefully%slide%the%tray%back%in.%
%

WHILL%Maintenance%Manual%Rev%B%%%%%%%%
19%
%
Replace%the%board%box%and%rear%cover.%
Reconnect%the%electrical%board%box%via%the%4%bolts%and%a%
#4%allen.%Then%replace%the%rear%cover%using%the%2%grip%bolts.
%
%%% %
%%
%
%
%
%
%
%
%
%

WHILL%Maintenance%Manual%Rev%B%%%%%%%%
20%
Back%Support%%
Materials%Needed%%
Socket%wrench%
12mm%socket%
hex%bit%screwdriver%
#4%hex%bit%
#3%hex%bit
%
Procedure%(Model%A/M)%%
Remove%back%pad%set%screws
.%Using%the%#3%hex%bit,%remove%the%two%set%screws%holding%the%back%
pad%in%place.
%%
%
Remove%back%pad
.%By%hand,%remove%the%back%pad%by%sliding%it%upward%and%out%of%its%brackets%
(shown%below).%
%%%%%%%%% %%%%%%%%%%%% %%
%
%
%
%
%
%
%
%
%
%
Other manuals for Model A
3
This manual suits for next models
1
Table of contents
Other WHILL Wheelchair manuals
Popular Wheelchair manuals by other brands

Invacare
Invacare rea Azalea Series Mounting instruction

Permobil
Permobil ROHO MOSAIC Operation manual

Invacare
Invacare Spectra XTR instruction manual

Drive DeVilbiss Healthcare
Drive DeVilbiss Healthcare DSF 130 Instructions for use

Nuprodx
Nuprodx MULTICHAIR BIG WHEEL Series ASSEMBLY & PACKING INSTRUCTIONS

Breezy
Breezy UniX Directions for use