Wohler VIS 2000 PRO User manual

VIS 2000PRO
DC Monitor
Contents
1. Introduction ............................... 2
2. Components and Controls ... 3
3. Technical Specifications ...... 5
4. Getting Started ......................... 6
5. Using the KEY Menus ............ 7
6. Capturing Images ................... 8
7. Reviewing Images and
Videos....................................... 10
8. Using the Gallery Menu .......... 11
9. Configuring the PRO Monitor 14
10. Transferring Images to a PC 19
11. Troubleshooting ....................... 19
12. Warranty ..................................... 22
q
INNOVATION - QUALITY - VALUE
06.07.2004

VIS 2000PRO DC Monitor
2 Hotline: 919-678-9809 or 919-678-8766
1. Introduction
1.1 About the Wöhler PRO DC monitor
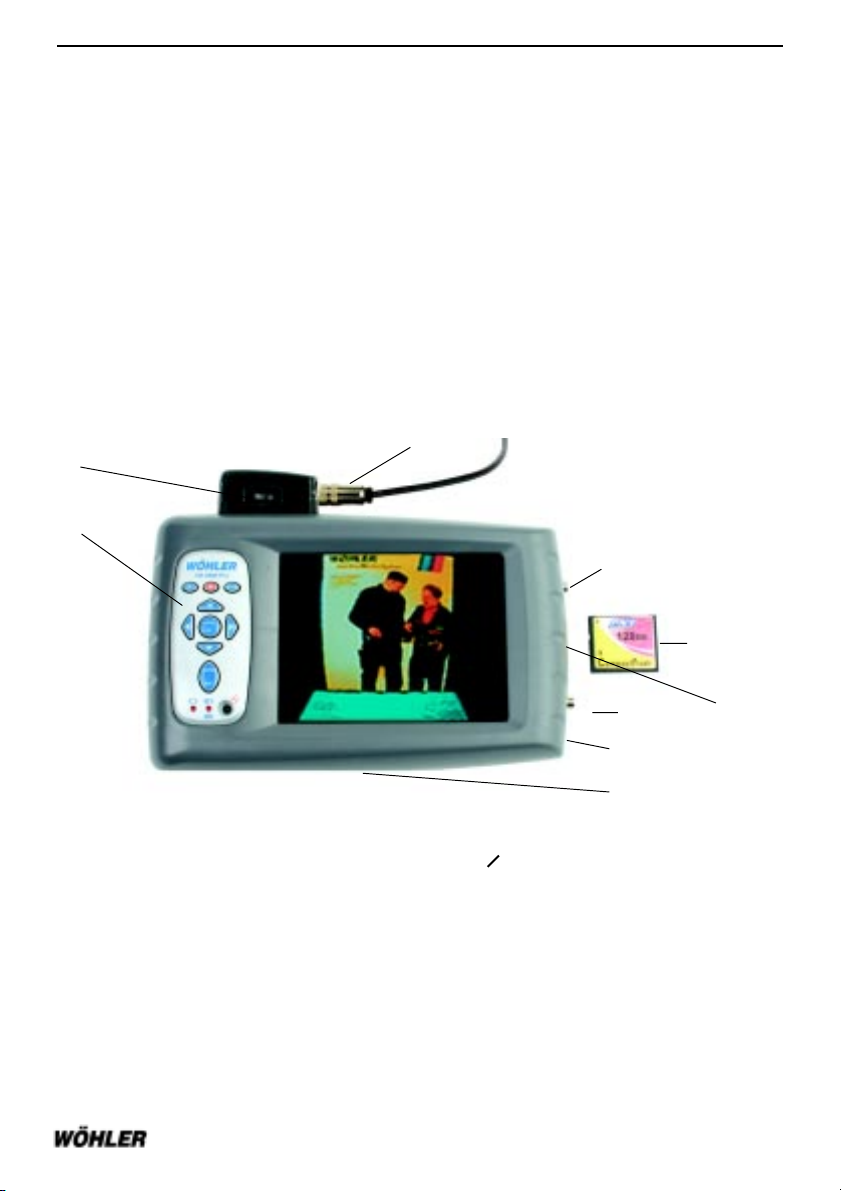
The PRO DC monitor (PRO) is a unique product that provides a convenient way of capturing
still images or video clips to a removable CompactFlash card. It is compatible with both
NTSC and PAL, composite or S-video signals, and a built-in LCD display allows you to
preview the video before saving it to the memory card. Video clips are captured at 12
frames per second at full NTSC or PAL resolution, and stored in Motion-JPEG (MJPEG)
compressed format, allowing approximately 3 minutes of video to be stored on a 128MB
CompactFlash card. Still images are stored in a compressed JPEG format, and over 150
images can be stored on a 128MB CompactFlash card. The storage capacity is limited
only by the size of the CompactFlash card used, and a 1GB card will hold many thousands
of images or approximately 30 minutes of video. Captured images and video clips are
automatically named with the date and a sequence label. Alternatively you can supply a
name using the PRO monitor keypad. Images can be organized into named folders, and
a range of cataloguing functions help in archiving and retrieving images, including the
ability to rename images, delete images, and move or copy images between folders.
The PRO monitor includes a convenient thumbnail gallery feature, which allows you to
search through the library of captured images 12 at a time, and then select one for full
size viewing. Alternatively the images can be uploaded to a PC using the supplied card
reader, where they can be displayed or processed by any suitable image editing software.
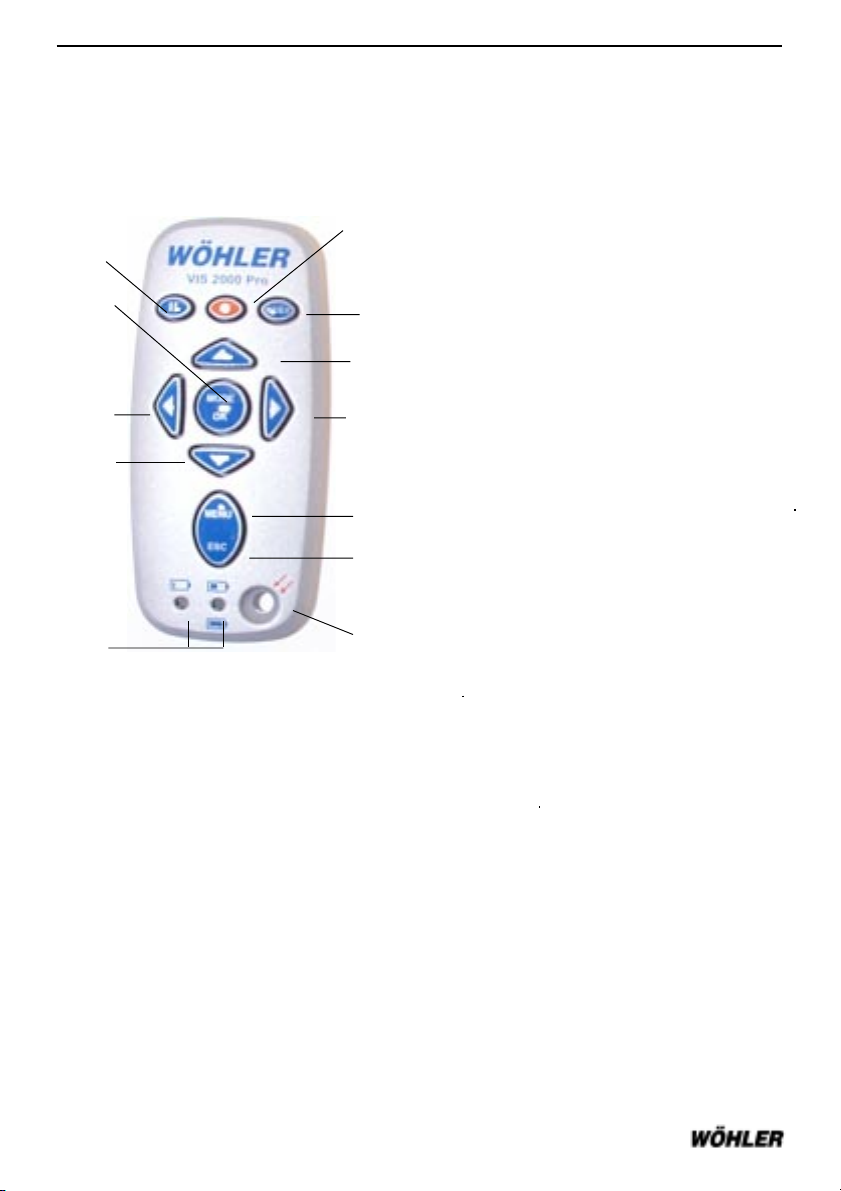
The PRO monitor is simple to operate, using intuitive onscreen displays, and the keypad
can be used even when wearing gloves or protective clothing. For convenience the PRO
monitor display image can also be flipped so the monitor can accommodate either right
or left-handed use. A range of user options allows you to specify how the image files are
named, the display orientation, and video parameters.
The PRO monitor is ideal for any application in which sequences of still images or video
clips need to be captured and stored on site. The PRO monitor is an ideal replacement
for a VCR or computer based video capture system where still images or video clips need
to be captured from a video source. Its rugged construction and the absence of moving
parts make it extremely durable and it is ideal for use in the field.
Typical applications include:
- Chimney, Duct, Vent or pipe inspection and documentation
- Routine maintenance and quality control
- Inspection and fault-finding
- Digital capture from other video/TV sources
The PRO monitor comes standard with a high quality, leather case and strap for protection
1. Introduction

VIS 2000PRO DC Monitor
3e-mail: [email protected] http://www.wohlerusa.com
and ease of transport and has a flip out sun visor for outdoor viewing. The PRO monitor
also comes with a power supply unit (PSU) for recharging the internal batteries or for
direct 120V AC operation. For digital capture the PRO comes with a 128MB CompactFlash
card and a USB 2.0 High Speed CF reader with software. CF cards up to 1 GB can be
used in the PRO monitor.
The PRO monitor can also operate as a secondary monitor for viewing or to capture
images from other analog video sources (ie VCR, TV etc.). Simply plug in the external
analog video source to the Video-In RCA socket (no. 3, fig 1). See Section 6 for details.
Note: The Video-In socket is not active while the camera is attached and live.
2. Components and Controls
2.1 PRO DC Monitor Components and Controls
1 ON/OFF Switch
2 Monitor and camera control pad
3 Video-In
4 Video-Out
2
1
Figure 1: Components and Controls
2. Components and Controls
5 CompactFlash (CF) card
6 CF Card slot/release
7 Video cable connection
8 Camera mount plate (back)
9 Power supply socket
9
3
4
5
7
6
8

VIS 2000PRO DC Monitor
4 Hotline: 919-678-9809 or 919-678-8766
3. Technical Specifications
Display
Type: 6.5" TFT LCD
Resolution: 640 x 480 pixels
Brightness: 300cd/m2
Color depth: 262,144 colors (18-bits)
Video System: Auto selecting NTSC/PAL
Resolution: NTSC – 640 x 480
PAL – 768 x 512
1
2
3
4
5a
5c 5b
5d
6a
78
Pro Monitor controls:
1 Picture index
2 Record picture or video
3 Pause/freeze screen
4 Mode menu
(bright/contrast/color/spot)
5a,b,c,d
5a UP Pan
5b Right Tilt
5c Down Pan
5d Left Tilt
6 Menu/ESC
6a Press top for Menu
6b Press bottom for ESC
7 Charge indicators
8 IR Remote control
(not currently available)
2.2 Front Panel Controls
The diagram below shows the function of each of the PRO monitor front panel controls
and connections:
Figure 2: Front Panel controls
2. Components and Controls
6b

VIS 2000PRO DC Monitor
5e-mail: [email protected] http://www.wohlerusa.com
3. Technical Specifications
Inputs: Auto selecting Composite (CVBS)/
S-Video (Y/C)
Connectors: Camera - 8 pin
Composite – Phono
S-Video – 4-pin mini-DIN
Media:
Flash memory: CompactFlashTM Type I & II cards (128 MB supplied)
Capacity (max.):CompactFlashTM 1GB
File system:
Capacity: Root directory – 256 folders
Folders – Unlimited files
Format: FAT-16 Long filename convention
File formats:
Still image: JPEG, high quality
Video clip: Motion-JPEG (.MOV), 12 fps
Power:
Internal Battery: NiMH 6-cell
Voltage: 7.2V (nominal)
Capacity: 4Ahr (typical operation 1 – 1.5 hrs approx.)
Charger: Internal smart fast charger
Charging indicators
Mounting: threaded insert (standard camera mount)
Approved
CompactFlash cards: Type I: Dane-elec. Please contact WöhlerUSA for details of currently
approved CompactFlash card manufacturers.
Operating temperature: 32 to 104 °F (0 to 40 °C)
Weight: 79 oz. (1300 g)
Dimensions: 10.5 x 8 x 2.5 in. (27 x 20x 6 cm)

VIS 2000PRO DC Monitor
6 Hotline: 919-678-9809 or 919-678-8766
4. Getting Started
This chapter provides a general overview of the PRO monitor to get you started as quickly
as possible. More detailed instructions on the various menu features will be discussed in
following chapters.
NOTE: Please read all instructions fully before using the monitor. Incorrect operation
of the monitor or the system can cause poor performance or damage to the monitor
or other components.
4.1 Battery charger
IMPORTIMPORT
IMPORTIMPORT
IMPORTANTANT
ANTANT
ANT::
::
: Before using the PRO monitor for the first time the internal batteries should
be fully charged by plugging the supplied charger into any 120V AC socket. A full charge
requires approximately 4 hours. The PRO monitor can be operated while the battery is
being recharged. The PRO monitor will operate 1 to 1.5 hours on a fully charged battery
depending on activity and camera. The battery will trickle charge while plugged in and
operating. See Section 11.4 for details.
WW
WW
WARNING:ARNING:
ARNING:ARNING:
ARNING: DO NOT
substitute another charger for the one provided. Using a different
charger could damage the monitor and/or cause a fire hazard. Replacement chargers
are available for purchase by calling Wöhler USA Service during regular business hours
at 919-678-8766.
4.2 Inserting/Removing the CompactFlash Card
The CompactFlash card can be removed or plugged in even while the PRO monitor is
switched on. After plugging in a CompactFlash card the screen will blink for a few seconds
while the PRO reads the data on the card. When finished blinking, you can proceed as
normal. To remove a card press the eject button beside the slot. Care should be taken to
properly align the card during insertion. Otherwise the card could be damaged and data
lost.
4.3 Camera Connection
Connect the video cable (male) to the video socket (female) located on the top of the
monitor (No. 7, fig. 1). You can use either NTSC or PAL Wöhler camera heads as the
monitor automatically detects and adjusts for either format.
4.4 Switching on
Switch the PRO monitor ON by using the switch located on the face of the cable connector
on top of the unit (No. 1, fig. 1). After a brief delay, during which the unit performs an
internal check, the Video Auto-Selector screen will be displayed:
4. Getting Started

VIS 2000PRO DC Monitor
7e-mail: [email protected] http://www.wohlerusa.com
Woehler
( R E V 1 . 00F )
A U T O VIDEO IN
N O V I D E O S I G N A L
N T SC S – V I D E O
N T SC C O M P O S I T E
P A L S – V I D E O
P A L C O M P O S I T E
The PRO monitor will then display the live video signal on the display.
5. Using the Key Menus
The PRO monitor is operated using the nine keys on the touch panel to the left of the
display in conjunction with a series of on-screen menus. The Main Menu and the Mode
Menu are accessed directly from the key pad. The Main Menu has a variety of setup and
file management features and settings accessed via submenus. See Section 9 ( Configuring
The PRO Monitor) for details. The Mode Menu accesses display adjustment features
screen and has the camera’s Hi Beam ON/OFF control.
5.1 To display the Main Menu
°°
°°
° Press menu/esc.
The Main Menu is displayed as an overlay on the current video image:
M A I N M E N U
– – – – – – – – –
V I D E O S T A N D A R D >
I M A G E F R E E Z E >
R E C O R D T I M E >
B A S E F I L E N A M E >
D I S P L A Y O R I E N T A T I O N >
L A N G U A G E >
S E T U P >
F O R M A T >
F O L D E R >
+ F O L D E R >
R E N A M E F O L D E R >
T O P L I N E >
B O T T O M L I N E >
5. Using the Key Menus

VIS 2000PRO DC Monitor
8 Hotline: 919-678-9809 or 919-678-8766
To move between menu options
°°
°°
° Press v or b.
To select an option
°°
°°
° Press n.
To exit from the current menu
°°
°°
° Press menu/esc.
NOTE:NOTE:
NOTE:NOTE:
NOTE: Pressing menu/esc at any stage generally exits from the current function and
takes you back to the previous function.
5.2 To display the Mode Menu
The Mode Menu allows you to adjust the brightness, contrast and color of the screen
display. This is frequently done during the course of any inspection as the quality of the
displayed picture changes due to distance, surface conditions and light levels the camera
experiences. You also turn ON or OFF the camera’s Hi Beams in this menu. You toggle
up or down the numerical options by using buttons 5a5a
5a5a
5a v and 5d5d
5d5d
5d b(Fig 2).
° Press Mode/OK
The Main Menu is displayed as an overlay on the current video image:
MODE M E N U
– – – – – – – – – –
SPOT ( 0 – 1 ) < 0 > “0“ = Off, “1“ = On
C O N T R A S T ( 0 – 9 ) < 5 >
B R I G H T N E S S ( 0 – 9 ) < 5 >
C O L O R ( 0 – 9 ) < 5 >
The default setting for the display is “5” and for the Hi Beam Spot is “0”. The monitor
automatically resets these settings when turned off. NOTE: The Mode Menu cannot be
accessed when there is no video-in signal present.
6. Capturing Images
6.1 Image capacity
The PRO monitor is provided with a preformatted blank 128MB CompactFlash card. To
use other CompactFlash cards with the PRO monitor they should first be formatted as
described in Section 9.41 (To format a CompactFlash card).
6. Capturing Images

VIS 2000PRO DC Monitor
9e-mail: [email protected] http://www.wohlerusa.com
6.2 Freezing an image
To freeze the video image:
°°
°°
° Press II (No. 3 Fig. 2)
When the video image is frozen the display shows:
S T I L L
°°
°°
° Press II again to unfreeze the video image.
6.3 To save the image
While the image is frozen:
°°
°°
° Press • (the red record button) (No. 2 Fig 2)
The FILENAME EDITOR is briefly displayed to show the filename assigned to the image,
and the space remaining:
F I L E N A M E E D I T O R
S t o r e a s :
— 0 1 2 8 0 3 0 V —
F i l e s p a c e l e f t : 0 1 2 6
If the image is in double-field mode a D is displayed in the top right-hand corner of the
FILENAME EDITOR. The first six characters of the filename will be the current date in US
format; for example 012803. Alternatively you can supply a six-character prefix using the
BASE FILENAME option on the Main Menu. To specify the base filename see Section
9.31. The last two characters of the filename are automatically incremented through the
sequence of characters 0-9 and A-Z to ensure that every file is saved with a unique
name. For example, the first few filenames will end in 00, 01, 02 … 09, 0A, 0B … 0Z, 10,
11 … etc.
6.4 Capturing a video clip
To capture a video clip:
°°
°°
° Press • the red record button. (No. 2 Fig 2)
The display shows the maximum length of video clip you can capture, depending on the
amount of space remaining on the CompactFlash card:
R E C O R D I N G
O K (will be highlighted on screen)
C A N C E L
R E C O R D : M M S S
T I M E : 0 2 3 4
6. Capturing Images

VIS 2000PRO DC Monitor
10 Hotline: 919-678-9809 or 919-678-8766
°°
°°
° Press OK and start recording. Alternatively, to cancel video capture press bto highlight
CANCEL and press MODE/OK to select it, or press menu/esc.
While video is being captured the display shows:
R E C O R D I N G
°°
°°
° Press ••
••
• to stop recording.
7. Reviewing Images and Videos
The image gallery allows you to review the still images and video clips you have captured,
and provides commands to help you to organize the images.
7.1 To display the image gallery
°°
°°
° Press index.
The display briefly shows:
I M A G E G A L L E R Y
G A L L E R Y L O A D I N G :
It will then show thumbnail previews of the 12 most recent images you have captured
in the current folder. A flashing filename indicator highlights the most recently captured
image. For video clips the thumbnail shows the first frame, and a play icon n is
displayed in the lower left corner.
7.2 To highlight a thumbnail
°°
°°
° Move the filename indicator with vor
b.
°°
°°
° Hold down either key to move quickly between the images. You can step through the 12
thumbnails in the gallery, and as you highlight each thumbnail the filename indicator
changes to show the full filename of that image or video clip.
7.3 To display the previous page of thumbnails
°°
°°
° Move the filename indicator to the first thumbnail in the top left corner of the image
gallery, and press v. The next page of 12 thumbnails will be displayed. If there are no
more images in the current folder the filename indicator will wrap to the last image in
the lower right corner of the image gallery.
7.4 To display the next page of thumbnails
°°
°°
° Move the filename indicator to the last thumbnail in the lower right corner of the image
gallery, and press b. The next page of 12 thumbnails will be displayed. If you are
6. Capturing Images

VIS 2000PRO DC Monitor
11e-mail: [email protected] http://www.wohlerusa.com
7. Reviewing Images and Videos
already displaying the most recent files in the current folder the filename indicator will
wrap to the first image in the top left corner of the image gallery.
7.5 To display an image at full size, or replay a video clip
°°
°°
° Highlight the thumbnail of the file you want to display.
°°
°°
° Press Mode / OK
The image or video clip will be displayed at full size. To return to the image gallery press
index. While a full size image is being displayed you can use the following keys:
bStep to the next image
vStep to the previous image
°°
°°
° Press MENU
Displays the Retrieval menu to allow you to delete or rename the image
R E T R I E V A L M E N U
– – – – – – – – – – – – – –
D E L E T E > S e l e c t
— — — — — —
C A N C E L (press OK to cancel)
O K (press bthen OK to delete)
R E N A M E > S e l e c t
— — — — — —
C A N C E L (press OK to cancel)
C H A N G E ( press OK to select)
see Section 8.23
While a video clip is playing or paused you can use the following keys to control playback:
II Pause/continue playing
bPlay backwards
vPlay forwards
7.6 To exit from the image gallery
°°
°°
° Press ESC.
8. Using the Gallery Menu
You can manipulate the images displayed in the gallery using the options on the Gallery
menu. The following tables summarize the options:

VIS 2000PRO DC Monitor
12 Hotline: 919-678-9809 or 919-678-8766
Option Description:
MARK Allows you to mark several thumbnails and then apply a function to all the
marked files.
DELETE Deletes the selected file or marked files.
MOVE Moves the selected file or marked files to another folder.
COPY Copies the selected file or marked files to another folder.
RENAME Renames the selected file.
FOLDER Changes the current folder.
+FOLDER Creates a new empty folder.
8.1 To display the Gallery menu
The Gallery menu automatically displays on the left side of the display when you enter
the image gallery. To activate the Gallery menu:
° Press MENU
G A L L E R Y
— — — — — —---
M A R K >
D E L E T E >
M O V E >
C O P Y >
R E N A M E >
F O L D E R >
+ F O L D E R >
The first option on the Gallery menu will be highlighted.
8.2 To mark files in the gallery
°°
°°
° Highlight MARK on the Gallery menu and press OK to select it. The MARK option will
flash to indicate that you are in marking mode.
°°
°°
° Use the vor bkeys to highlight the first thumbnail you want to mark, and press OK to
mark it. The filename indicator will change to show that the file is marked. If necessary
you can unmark a marked file by pressing OK again.
°°
°°
° Mark other files in the gallery the same way. When you have marked the files to work
with:
°°
°°
° Press MENU to return to the Gallery menu.
°°
°°
° Highlight the option you want to apply to the marked files: DELETE, MOVE, or COPY, and
press OK to select it.
8. Using the Gallery Menu

VIS 2000PRO DC Monitor
13e-mail: [email protected] http://www.wohlerusa.com
°°
°°
° Proceed as described in the appropriate section below to perform the operation on the
marked files.
8.2.1 To delete one or more files
°°
°°
° Highlight DELETE on the Gallery menu and press OK to select it. A DELETE menu will be
displayed to allow you to confirm that you want to delete the selected file or marked
files.
°°
°°
° Press b to highlight OK and press OK to select it. Alternatively to cancel the operation
press OK to select cancel.
8.2.2 To move or copy one or more files
°°
°°
° Highlight MOVE or COPY in the Gallery menu and press OK to select it. A menu will
allow you to confirm that you want to proceed.
°°
°°
° Press bto highlight FOLDER and press OK to select it. Alternatively to cancel the
operation press OK when CANCEL highlighted. A SELECT FOLDER menu will be displayed,
showing a list of the names of each folder on the CompactFlash card.
°°
°°
° Highlight the folder you want to use and press OK to select it. The files will be moved or
copied to the folder you specified.
8.2.3 To rename a file
°°
°°
° Highlight RENAME in the Gallery menu and press OK to select it. A RENAME menu will
allow you to confirm that you want to proceed.
°°
°°
° Press bto highlight CHANGE and press OK to select it. Alternatively to cancel the
operation press OK when CANCEL highlighted.
The CHANGE FILENAME EDITOR will be displayed:
C H A N G E F I L E N A M E E D I T O R
S t o r e a s :
— 0 1 2 8 0 3 0 V —
Edit the first six characters of the filename as follows:
° Press v
or bto step between the characters A-Z and 0-9.
° Press OK to step between the six character positions.
° Press OK after editing the sixth character to return to the Gallery menu. You cannot
change the two-character suffix.
8. Using the Gallery Menu

VIS 2000PRO DC Monitor
14 Hotline: 919-678-9809 or 919-678-8766
8.2.4 To change the current folder
°°
°°
° Highlight FOLDER in the Gallery menu and press OK to select it. A SELECT FOLDER
menu will show a list of the names of the folders on the CompactFlash card.
°°
°°
° Highlight the folder you want to use and press OK to select it. The image gallery will be
updated to show the 12 most recent files in the folder you specified.
8.2.5 To create a new folder
°°
°°
° Highlight +FOLDER in the Gallery menu and press OK to select it. The +FOLDER menu
will be displayed.
°°
°°
° Press OK to select DEFAULT and create a folder with the default name FOLDER followed
by a two-character suffix which is automatically incremented through the sequence AA,
AB…AZ, BA… etc. Alternatively, press
bto highlight USER and press OK to select it to
provide a custom folder name, in exactly the same way as renaming a file; see Section
8.23 (To rename a file) above.
9. Configuring the PRO Monitor
This chapter describes the option settings available from the Main Menu to allow you to
configure the PRO monitor to suit the requirements of your application.
9.1 Using the Main Menu
To display the Main Menu
°°
°°
° Press MENU
M A I N M E N U
– – – – – – – – –
V I D E O S T A N D A R D >
I M A G E F R E E Z E >
R E C O R D T I M E >
B A S E F I L E N A M E >
D I S P L A Y O R I E N T A T I O N >
L A N G U A G E >
S E T U P >
F O R M A T >
F O L D E R >
+ F O L D E R >
R E N A M E F O L D E R >
T O P L I N E >
B O T T O M L I N E >
9. Configuring the PRO-Monitor

VIS 2000PRO DC Monitor
15e-mail: [email protected] http://www.wohlerusa.com
To scroll up and down the main menu selections use the v and
bkeys. To enter a
selection and to view the submenu:
° Press n.
9.2 Video settings
The VIDEO STANDARD, IMAGE FREEZE, and RECORD TIME options on the Main Menu
allow you to configure the video operation of the PRO monitor.
9.2.1 To specify the video standard for replaying images
This setting is retained when the PRO monitor is switched off. Normally AUTO is the
recommended setting. With this option the PRO monitor automatically sets the standard
based on the current video source, and retains the settings even when the video source
is disconnected. However, you can only replay images saved with the current video
standard. If you want to replay images on the PRO monitor of either standard, without a
video input connected, set the VIDEO STANDARD option to NTSC or PAL as appropriate.
M A I N M E N U
– – – – – – –
V I D E O S T A N D A R D > S e l e c t
– – – – –
A U T O
N T S C
P A L
°°
°°
° Choose AUTO for auto-detection of the video standard from the current video input,
NTSC to set the standard to NTSC, or PAL to set the standard to PAL.
9.2.2 To specify the image freeze mode
By default the IMAGE FREEZE option is set to FRAME, which captures both frames of the
video image. You can override this on an individual image basis. The FIELD option sets
double-field mode for all images by default. This is useful if most images you capture are
of moving objects.
M A I N M E N U
– – – – – – – –
I M A G E F R E E Z E > S e l e c t
— — — — — —
F R A M E
F I E L D
9. Configuring the PRO-Monitor

VIS 2000PRO DC Monitor
16 Hotline: 919-678-9809 or 919-678-8766
9.2.3 To specify the record time
This option allows you to select the maximum length of video clips. LONG allows maximum
recording time but clips will only replay correctly in half-size image mode under QuickTime.
SHORT limits the recording time to half that of LONG clips, but clips will replay correctly
in any QuickTime mode. The corresponding recording times are displayed when you
press •.
M A I N M E N U
– – – – – – – – –
R E C O R D T I M E > S e l e c t
— — — — — —
L O N G
S H O R T
9.3 Other Menu Options
9.3.1 To specify the base filename
This option allows you to specify a six-character filename prefix instead of the default
date prefix. Selecting DEFAULT saves each file with a six-character prefix, consisting of
the current date in US format, MMDDYY.
M A I N M E N U
– – – – – – – – –
B A S E F I L E N A M E > S e l e c t
— — — — — —
D E F A U L T
U S E R
Selecting USER displays the following dialog box to allow you to enter a six-character
prefix using the v,
b, and enter keys
B A S E F I L E N A M E E D I T O R
S t o r e a s :
— A A A A A —
9.3.2 To rotate the display
This option inverts the display so the PRO monitor can be operated with the keypad on
the right.
The operation of the v
or
bkeys is also reversed, for consistency with the menus.
9. Configuring the PRO-Monitor

VIS 2000PRO DC Monitor
17e-mail: [email protected] http://www.wohlerusa.com
9.3.3 To select the language
This option allows you to select the on-screen menu language. This setting is retained
when the PRO monitor is switched off.
M A I N M E N U
– – – – – – – –
L A N G U A G E > S e l e c t
— — — — — —
E N G L I S H
D E U T S C H
F R E N C H
S P A N I S H
I T A L I A N
9.3.4 System setup
The Setup Menu allows you to set the date and time, and adjust the video display setting:
S E T U P M E N U
– – – – – – – – – –
D a t e – 0 1 2 9 0 3 – M M D D Y Y
T i m e – 1 4 1 6 2 0 – H H M M S S
B E E P (0 – 1)<1> Keypress BEEP (0=No Beep, 1=Beep)
C O N T R A S T (0 – 9)<5>
B R I G H T N E S S (0 – 9)<5>
C O L O R (0 – 9)<5>
To set the date and time
°°
°°
° Press nto highlight the current date. The first digit of the date is highlighted with a
flashing cursor.
°°
°°
° Use v and
bto change the current digit, use n
to move to the next. When you have
edited each digit of the date and time:
°°
°°
° Press OK to exit from editing mode.
To adjust the other settings in the SETUP menu, use the v and bto scroll up or down
through each selection.
9. Configuring the PRO-Monitor
M A I N M E N U
– – – – – – – – –
D I S P L A Y O R I E N T A T I O N > S e l e c t
— — — — — —
N O R M A L
R O T A T E D

VIS 2000PRO DC Monitor
18 Hotline: 919-678-9809 or 919-678-8766
9.4 File System Utilities
The next group of options on the Main Menu allow you to format a CompactFlash card,
and work with the folders on a card.
M A I N M E N U
– – – – – – – –
F O R M A T >
F O L D E R >
+ F O L D E R >
R E N A M E F O L D E R >
9.4.1 To format a CompactFlash card
°°
°°
° Select FORMAT on the Main Menu, and select OK on the submenu. Warning: This will
erase any images already on the CompactFlash card.
After formatting a card there
will be one folder named FOLDERAA.
9.4.2 To Select the Current Folder
°°
°°
° Select FOLDER on the Main Menu.
The SELECT FOLDER menu shows a list of the names of the folders on the CompactFlash
card.
°°
°°
° Use the v or
bkeys to highlight the folder you want to use and press enter to select it.
9.4.3 To Create a New Folder
°°
°°
° Select +FOLDER on the Main Menu, then proceed as described in Section 8.25 (To
create a new folder).
9.4.4 To Rename a Folder
°°
°°
° Select RENAME FOLDER on the Main Menu, then proceed as for renaming a file; see
Section 8.23 (To rename a file).
9.5 Top Line and Bottom Line on Display
The final group of options on the Main Menu allow you to select between showing or not
showing on the top left and bottom left of the screen select information.
M A I N M E N U
– – – – – – – – –
T O P L I N E > Displays next file number that will be assigned on saving
B O T T O M L I N E> Displays the date and time set in the system as well as the
distance measurement if that option is available and
activated.
9. Configuring the PRO-Monitor

VIS 2000PRO DC Monitor
19e-mail: [email protected] http://www.wohlerusa.com
Toggle to the line you wish from the menu.
°°
°°
° Press OK to enter and toggle between ON, OFF using the vor bkeys.
°°
°°
° Use OK to select. The choice will immediately show on the screen and the submenu
will disappear.
10. Transferring Images to a PC
This chapter describes how to install the card reader, software supplied with the PRO
monitor, and use it to copy images between a CompactFlash card and PC, or format new
CompactFlash cards.
10.1 Installing the Card Reader and Software
The PRO Monitor set comes with a high speed, USB 2.0 CompactFlash l/ll reader. PCs
running Windows 2000ME or later should recognize the card reader automatically and
install the appropriate driver when you plug it into the port, in which case you do not
need to perform any installation. If the card reader is working correctly, Windows will
allocate a drive letter, such as D: or E: to the reader. You can then use it just like another
disk drive. Please read the instructions on the back of the Card reader for minimum
system requirements and appropriate installation instructions for your system.
10.2 Copying images to the PC
To copy images from a CompactFlash card to the PC simply drag them from the drive
allocated to the CompactFlash card and copy them to a suitable disk on your PC. The
images are stored in standard JPEG/MOV format and can be edited or printed from any
suitable application, such as Paint Shop Pro.
10.3 Copying images to the CompactFlash card
Images created by the PRO monitor and edited on the PC can be copied back to the
CompactFlash card for subsequent display on the PRO monitor. You can also create
JPEG images on the PC and copy them to the PRO monitor for display. In this case the
JPEG image must be the correct size and aspect ratio for the PAL or NTSC display. In
addition it must comply with the JPEG baseline image specification, and be encoded in
4:2:2 format for correct color rendition.
11. Troubleshooting
This chapter provides answers to typical questions and problems that may arise when
using the PRO monitor.
9. Configuring the PRO-Monitor

VIS 2000PRO DC Monitor
20 Hotline: 919-678-9809 or 919-678-8766
11.1 Why can’t I display images from the gallery?
Images can only be displayed if they were captured using the same video standard as
the current setting of the PRO monitor. Either switch off the PRO monitor, connect an
appropriate video source, and switch it on again so the auto-detection selects the new
video standard, or set the VIDEO STANDARD option to NTSC or PAL; see Section 9.21 (To
specify the video standard for replaying images).
11.2 Why are the images not displayed chronologically after copying them from
a PC?
If image files are copied back onto a CompactFlash card from a PC, the order of the files
will be determined by the PC directory listing order, which is not the same as the order in
which they were captured. Unfortunately there is no way to modify this.
11.3 The frozen image appears to jitter?
If the frozen S T I L L image appears to jitter, due to movement between the two fields of
the full frame image, the PRO monitor allows you to double-up a single field to remove
the jitter:
° Press OK while the image is frozen. S T I L L. One of the two sequential fields is then
doubled up to create a flicker-free image at half the resolution. The display shows Doub-
le-Field Mode to show that only one field will be saved. You can configure the PRO
monitor to save all images in double-field mode; see Section 9.22.
11.4 What do the battery charging indicators mean?
The battery is a 7.2V, 4Ah NiMH six cell rechargeable pack which also contains a thermistor
to monitor the temperature and a self-resetting polyswitch to prevent excessive current.
The battery is recharged automatically whenever the external 12V desktop PSU is
connected and switched on. Charging will continue whether the PRO monitor itself is on/
off. The condition of the battery and/or the charging process is indicated by a beeper
and the two status indicators on the front panel as shown below:
11. Troubleshooting
Table of contents
Other Wohler Measuring Instrument manuals

Wohler
Wohler Smart Connect SC 660 User manual

Wohler
Wohler HBF 420 Installation manual

Wohler
Wohler A 400 User manual

Wohler
Wohler DM 2000 User manual

Wohler
Wohler HF 220 User manual

Wohler
Wohler TA 420 User manual

Wohler
Wohler CM 220 User manual

Wohler
Wohler CM 220 User manual

Wohler
Wohler TI 410 User manual

Wohler
Wohler A 450 User manual

Wohler
Wohler VAMP AC-3/M User manual

Wohler
Wohler RF 220 Hygrotemp User manual

Wohler
Wohler A 500 User manual

Wohler
Wohler iVAM2-2 User manual

Wohler
Wohler Pandora User manual

Wohler
Wohler AMP2-16V Series User manual

Wohler
Wohler DM 2000 User manual

Wohler
Wohler VIS 250 User manual

Wohler
Wohler 3343 User manual

Wohler
Wohler SP 22 User manual