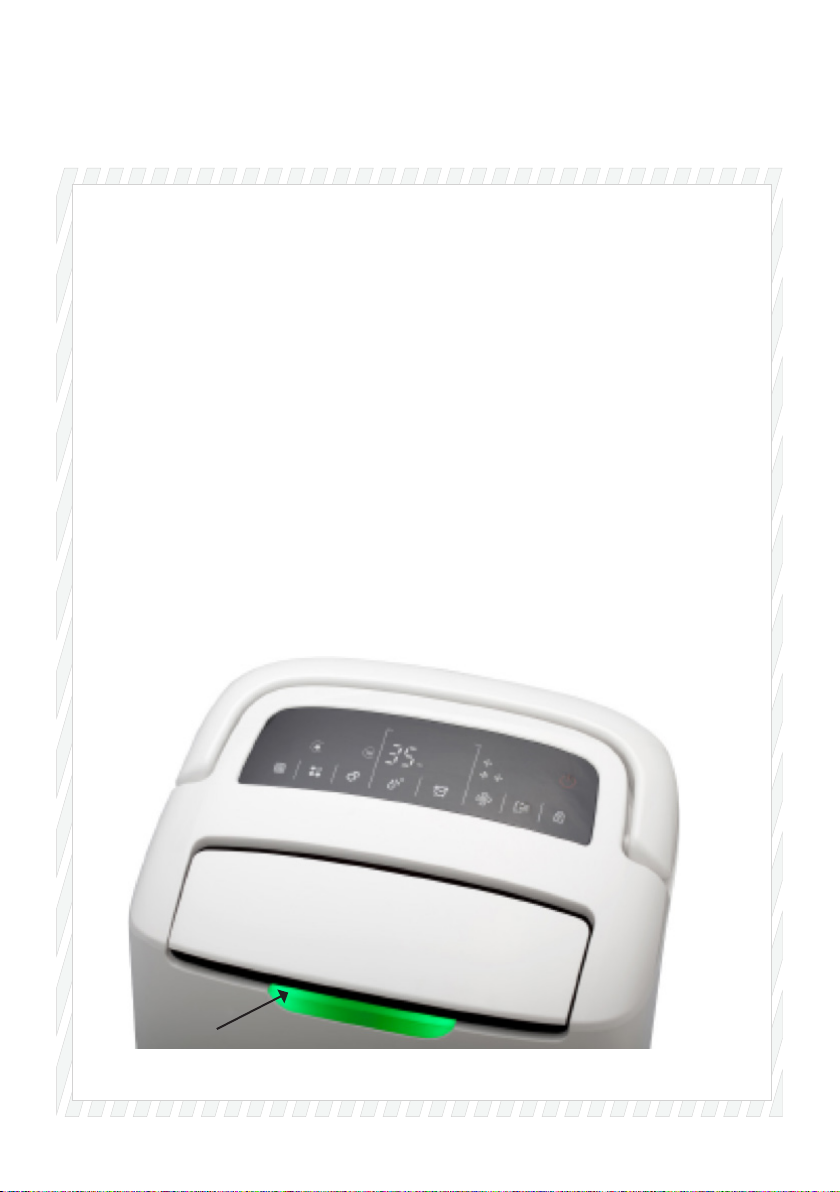
Wood’s AD series User manual

Wood’s hybrid dehumidiers
AD-series
Users manual

2 3
1
2
10 11 12 13 14 15 16 17 18 19 20
3 4 5 6 7 8 9
Control panel
1. Start or stop the unit
2. Reset lter alarm
(press and hold)
3. Activate dehumidication
4. Select mode
5. Set humidity level
6. Set timer for shut off
7. Set fan speed
8. Activate swinging air exhaust
9. Activate child lock
10. Manual mode
11. Automatic mode
12. Dehumidfying active
13. Air cleaning active
14. Clothes dry mode
15. Quiet mode
16. Defrost active
17. Shows set fan speed
18. Water bucket full
19. Ambient / set humidity level
20. Time left until shut off
Kontrollpanel
1. Sätt på / Stäng av
2. Nollställ lteralarmet
(tryck och håll nere)
3. Aktivera avfuktning
4. Välj läge
5. Ställ in fuktighetsnivå
6. Ställ in timer för avstängning
7. Välj äkthastighet
8. Aktivera svingande luftutblås
9. Aktivera barnlås
10. Manuellt läge
11. Automatiskt läge
12. Avfuktning aktiv
13. Luftrening aktiv
14. Tvättläge
15. Tyst läge
16. Avfrostning aktiv
17. Visar vald äkthastighet
18. Full vattentank
19. Aktuell / inställd fuktighetsnivå
20. Tid kvar tills avstängning
Kontrolpanel
1. Start eller stop enheden
2. Nulstil lteralarm
(tryk og hold) /
3. Aktivér affugtning
4. Vælg tilstand
5. Sæt fugtighedsniveau
6. Indstil timer til slukning
7. Sæt ventilator hastighed
8. Aktivér svingende luftudblæsning
9. Aktivér børnesikring
10. Manuel tilstand
11. Automatisk tilstand
12. Affugtning aktiv
13. Luftrensning aktiv
14. Tøjtørringstilstand
15. Stille tilstand
16. Afrimning aktiv
17. Viser indstillet ventilatorhastighed
18. Vandbeholder fuld
19. Omgivende / indstillet luftfugtighed
20. Tid tilbage indtil nedlukning
Technical drawings

3
Kontrollpanel
1. Start eller stopp enheten
2. Reset lter alarm
(Trykk og hold) /
3. Aktiver avfukting
4. Velg modus
5. Sett fuktighetsnivå
6. Sett timer for avstengning
7. Sett viftehastighet
8. Aktiver svingende luftutblåsning
9. Aktiver barnesikringen
10. Manuell modus
11. Automatisk modus
12. Avfukting aktiv
13. Luftrensing aktiv
14. Klær tørke modus
15. Stille modus
16. Defrost aktiv
17. Viser innstilt viftehastighet
18. Vann bøtte full
19. Ambient / sett fuktighetsnivå
20. Tid igjen før stenging
Ohjauspaneeli
1. Laitteen käynnistäminen ja py-
säyttäminen
2. Suodattimen hälytyksen nollaami-
nen / painettuna)
3. Kosteudenpoiston aktivointi
4. Tilan valinta
5. Kosteustason asetus
6. Sammutuksen ajastus
7. Puhaltimen nopeusasetus
8. Ilmanpoistosäleiden käännön
aktivointi
9. Lapsilukon aktivointi
10. Manuaalinen tila
11. Automaattinen tila
12. Kosteudenpoisto aktiivinen
13. Ilmanpuhdistus aktiivinen
14. Vaatteiden kuivaustila
15. Hiljainen tila
16. Sulatus aktiivinen
17. Puhaltimen nopeusnäyttö
18. Vesisäiliö täynnä
19. Ympäristön / asetettu kosteustaso
20. Sammutukseen jäljellä oleva aika
Stjórnborð
1. Ræsa eða stöðva tækið
2. Endurstilla síuviðvörun
(ýtið og haldið)
3. Virkja rakaeyðingu
4. Velja stillingu
5. Stilla rakastig
6. Tímastilling fyrir stöðvun
7. Stilla viftuhraða
8. Virkja sveiandi loftútblástur
9. Virkja barnalæsingu
10. Handvirk stilling
11. Sjálfvirk stilling
12. Rakaeyðing virk
13. Lofthreinsun virk
14. Fataþurrkunarstilling
15. Hljóðlát stilling
16. Afísing virk
17. Sýnir stilltan viftuhraða
18. Vatnsgeymir fullur
19. Umhver / stillt rakastig
20. Tími fram að stöðvun
Bedienäche
1. Ein- bzw. Ausschalten
2. Filteralarm Reset
(gedrückt halten)
3. Entfeuchtung aktivieren
4. Modus wählen
5. Feuchtelevel auswählen
6. Timer für automatische Abschal-
tung
7. Ventilationsgeschwindigkeit
auswählen
8. Rotierende Luftauslassklappe
aktivieren
9. Kindersicherung aktivieren
10. Manueller Bedienmodus
11. Automatischer Modus
12. Entfeuchtung ist aktiv
13. Luftreinigung ist aktiv
14. Wäschetrocknungsmodus
15. Geräuscharmer Modus
16. Enteisung (defrost) aktiv
17. Zeigt die gewählte Ventilationsge-
schwindigkeit
18. Kondenswasserbecken voll
19. Aktueller / gewählter Feuchtelevel
20. Verbleibende Zeit bis zum auto-
matischen Abschalten
PANNEAU DE CONTROLE
1. Power : allumer ou éteindre
l’appareil
2. Réinitialiser le voyant du ltre
3. Bouton d’activation du mode dés-
humidication
4. Bouton « mode » Auto, manuel,
silencieux, sèche linge
5. Sélection du taux d’hygrométrie
6. Minuterie, sélection du temps
d’arrêt
7. Réglage de la vitesse de ventila-
tion
8. Sélection du mode oscillation
9. Activation de la sécurité enfant
10. Voyant mode manuel
11. Voyant mode automatique
12. Voyant déshumidication
13. Voyant puricateur d’air
14. Voyant mode sèche linge
15. Voyant mode silencieux
16. Voyant dégivrage
17. Voyant vitesse de ventilation
18. Témoin réservoir plein
19. Afchage taux d’humidité de la
pièce
20. Afchage du temps restant avant
l’arrêt de l’appareil
Valdymo panelė
1. Įjungti / išjungti prietaisą
2. Filtro perkrovimas (nuspausti ir
laikyti)
3. Įjungti oro sausintuvą
4. Nustatyti pageidaujamos drėgmės
lygį
5. Pasirinkti režimą
6. Pasirinkti laikmatį prietaiso
išjungimui
7. Nustatyti ventiliatoriaus greitį
8. Įjungti oro srauto krypties keitėją
9. Įjungti apsaugą nuo vaikų
10. Rankinis režimas
11. Automatinis režimas
12. Veikia oro sausintuvas
13. Veikia oro valytuvas
14. Drabužių džiovinimo režimas
15. Tylusis režimas
16. Veikia atitirpinimas
17. Parodo nustatytą ventiliatoriaus
greitį
18. Pilnas vandens bakelis
19. Aplinkos / pageidaujamas
drėgmės lygis
20. Likęs laikas iki prietaiso
išsijungimo

4 5
Juhtpaneel
1. Seadme käivitamine või
seiskamine
2. Filtri alarmi lähtestamine (vaju-
tage ja hoidke all)
3. Õhukuivatamise aktiveerimine
4. Režiimi valik
5. Õhuniiskuse taseme seadis-
tamine
6. Väljalülituse taimeri seadis-
tamine
7. Ventilaatori kiiruse seadista-
mine
8. Võnkuva väljalaskeõhu akti-
veerimine
9. Lapseluku aktiveerimine
10. Manuaalne režiim
11. Automaatne režiim
12. Õhu kuivatamine aktiveeritud
13. Õhu puhastamine aktiveeritud
14. Riiete kuivatamise režiim
15. Vaikne režiim
16. Sulatus aktiveeritud
17. Näitab seadistatud ventilaato-
rikiirust
18. Veepaak täis
19. Õhuniiskuse / seadistatud
niiskuse tase
20. Väljalülitamiseni jäänud aeg
Panel de control
1. Encendido y apagado del
aparato
2. Alarma de reposición del ltro
(mantener el botón presionado)
3. Activación de la deshumidi-
cación
4. Selección de modo
5. Programación nivel de
humedad
6. Programación del Timer para
el apagado
7. Programación de la velocidad
8. Activación de la oscilación del
aire expulsado
9. Bloqueo para niños
10. Modo manual
11. Modo automático
12. Deshumidicación activa
13. Limpieza del aire
14. Modo secado ropa
15. Modo silencioso
16. Deshielo automático
17. Indicador de la velocidad del
ventilador
18. Deposito de agua lleno
19. Nivel de humedad ambiente
20. Tiempo restante para el
apagado
Vadības panelis
1. Ieslēgt vai izslēgt ierīci
2. Atiestatīt ltra trauksmi
(nospiediet un turiet)
3. Aktivizēt gaisa sausināšanu
4. Izvēlēties režīmu
5. Iestatīt mitruma līmeni
6. Iestatīt izslēgšanas taimeri
7. Iestatīt ventilatora darbības
ātrumu
8. Aktivizēt pagriežamo gaisa
izplūdi
9. Aktivizēt bērnu drošības
bloķēšanu
10. Manuālais režīms
11. Automātiskais režīms
12. Aktīva gaisa sausināšana
13. Aktīva gaisa tīrīšana
14. Apģērba žāvēšanas režīms
15. Klusas darbības režīms
16. Aktīva atkausēšana
17. Parāda iestatīto ventilatora
ātrumu
18. Pilna ūdens tvertne
19. Apkārtējās vides/iestatītais
mitruma līmenis
20. Līdz ierīces izslēgšanas brīdim
atlikušais laiks
Panoul de control
1. Pornire sau oprire aparat
2. Alarmă schimbare ltru (ţineţi
butonul apăsat) /
3. Pornire dezumidicare
4. Selecţie mod
5. Setare nivel umiditate dorit
6. Setare timp de funcţionare
7. Setare viteză ventilator
8. Activare mod batant pentru
refulare aer
9. Activare mod blocare pentru
copii
10. Modul manual
11. Modul automat
12. Dezumidicare activă
13. Curatarea aerului activă
14. Modul uscare rufe
15. Modul silenţios
16. Degivrare – dezgheţare activă
17. Vizualizare viteză ventilator
18. Rezervor plin
19. Ambiant – setare nivel
umiditate
20. Timpul rămas până la oprire
Bedieningspaneel
1. Het apparaat starten of stoppen
2. Reset lteralarm / (ingedrukt
houden)
3. Ontvochtigen activeren
4. Modus selecteren
5. Luchtvochtigheid instellen
6. Timer instellen voor uitzetten
7. Ventilatorsnelheid instellen
8. Heen-en-weer gaande luchtuit-
laat instellen
9. Kinderslot activeren
10. Handmatige modus
11. Automatische modus
12. Ontvochtiging actief
13. Luchtreinigen actief
14. Modus kleding drogen
15. Stille modus
16. Ontdooien actief
17. Toont ingestelde ventilator-
snelheid
18. Waterreservoir vol
19. Omgeving / luchtvochtigheid
instellen
20. Resterende tijd tot uitschakelen
Πίνακας ελέγχου
1. Έναρξη ή διακοπή λειτουργίας
της μονάδας
2. Επαναφορά ειδοποίησης φίλ-
τρου (πατήστε παρατεταμένα)
3. Ενεργοποίηση λειτουργίας
αφύγρανσης
4. Επιλογή λειτουργίας
5. Ορισμός στάθμης υγρασίας
6. Ρύθμιση χρονομέτρησης για
διακοπή λειτουργίας
7. Ρύθμιση της ταχύτητας του
ανεμιστήρα
8. Ενεργοποίηση λειτουργίας
κίνησης περσίδων
9. Ενεργοποίηση κλειδώματος για
τα παιδιά
10. Χειροκίνητη λειτουργία
11. Αυτόματη λειτουργία
12. Λειτουργία αφύγρανσης ενεργή
13. Καθαρισμός αέρα ενεργός
14. Λειτουργία στεγνώματος
ρούχων
15. Αθόρυβη λειτουργία
16. Λειτουργία απόψυξης ενεργή
17. Εμφανίζει την ρύθμιση της
ταχύτητας του ανεμιστήρα
18. Κάδος νερού γεμάτος
19. Περιβάλλον / Ορισμός στάθμης
υγρασίας
20. Χρόνος που απομένει μέχρι τη
διακοπή λειτουργίας

5
Panel sterowania
1. Uruchomienie lub zatrzymanie
urządzenia
2. Resetowanie alarmu ltra
(naciśnij i przytrzymaj)
3. Aktywacja osuszania
4. Wybór trybu
5. Ustawianie poziomu wilgotności
6. Ustawianie limitu czasu
wyłączenia
7. Ustawianie prędkości obrotowej
wentylatora
8. Aktywacja wahadłowego
wydmuchu powietrza
9. Aktywacja zabezpieczenia
przed dziećmi
10. Tryb ręczny
11. Tryb automatyczny
12. Osuszanie aktywne
13. Oczyszczanie powietrza
aktywne
14. Tryb suszenia ubrań
15. Tryb cichy
16. Rozmrażanie aktywne
17. Przedstawia ustawioną pręd-
kość pracy wentylatora
18. Zbiornik na wodę pełny
19. Poziom wilgotności ustawienia/
otoczenia
20. Czas pozostały do wyłączenia

6 7
PRODUCT DESCRIPTION
Fig A. Fig B.
Fig C. Fig D.

7
PRODUCT DESCRIPTION
Air quality indicator
Luftkvalitetsindikator
Ilman laadun ilmaisin
Gaumljós fyrir loftgæði
Luftqualität Indikator
Indicateur de la qualité de l’air
Õhu kvaliteedi indikaator
Indicator calitate aer
Gaisa kvalitātes indikators
Indicador de la calidad del aire
Luchtkwaliteitsindicator
Δείκτης ποιότητας αέρα
Wskaźnik jakości powietrza

8 9
Please read this manual carefully before installing and using yourWood’s product.
Store the manual in a safe place for future reference and product warranty.
Visit woods.se for more information and updated instruction manuals.
For extended warranty register your product at warranty-woods.com

9
Users manual Wood’s AD-series
Table of contents
2 ................................................................................ Technical drawings
10 ................................................................................ English
16 ................................................................................ Swedish
22 ................................................................................ Danish
28 ................................................................................ Norwegian
34 ................................................................................ Finish
40 ................................................................................ Icelandic
46 ................................................................................ German
52 ................................................................................ French
58 ................................................................................ Spanish
64 ................................................................................ Estoian
70 ................................................................................ Lithuanian
76 ................................................................................ Latvian
82 ................................................................................ Romanian
88 ................................................................................ Dutch
94 ................................................................................ Greek
100 ................................................................................ Polish

10 11
English
F
Flammable material. This
appliance contains R290/
Propane
a ammable refrigerant.
Refer to this manual
for safety information.
R290 refrigerant gas
complies with European
environmental directives.
Do not pierce or burn.
Maintenance and repairs
requiring the assistance of
other qualied personnel
must be carried out under
the supervision of specialists
in the use of inammable
refrigerants.
Refer to this manual for
safety information
Read technical manual
Read operators
manual.
SAFETY INFORMATION
Before the installation
and use of the appliance,
carefully read the
supplied instructions.
The manufacturer is not
responsible if an incorrect
installation and use that
causes injuries and damages.
Always keep the instructions
with the appliance for future
reference.
Children and vulnerable
people safety
WARNING
Risk of injury or permanent
disability.
This appliance can be used
by children aged 8 years
and above and persons with
reduced physical, sensory or
mental capabilities or lack of
experience and knowledge
if they have been given
supervision or instruction
concerning use of the
appliance in a safe way and
understand the hazards
involved.
Do not let children play with
the appliance.
Children of less than 3 years
should be kept away unless
continuously supervised.
Keep all packaging away
from children.
Cleaning and user
maintenance shall not be
made by children without
supervision.
General Safety
This appliance is intended
to be used in household
and similar applications
such as: – bathrooms,
sta kitchen areas in
shops, oces and other
working environments.
The rating plate is located
at the back or the side of
the dehumidier. Keep
ventilation openings clear of
obstruction.
Do not use mechanical
devices or other means to
accelerate the defrosting
process, other than those
recommended by the
manufacturer.
The appliance shall not
be stored in a room with
continuously operating
ignition sources (for
example; open ames, an
operating gas appliance or
an operation electric heater.
Do not pierce or burn.
Be aware that refrigerants
may not contain an odour.
Do not use water spray
and steam to clean the
appliance. Clean the
appliance with a moist
soft cloth. Only use neutral
detergents. Do not use
abrasive products, abrasive
cleaning pads, solvents or
metal objects.
If the supply cord is
damaged, it must
be replaced by the
manufacturer, its Authorised
Service Centre or similarly
qualied persons in order to
avoid a hazard.
SAFETY INSTRUCTIONS
Installation
WARNING
Only a qualied person must
install this appliance.
Remove all the packaging.
Do not install or use a
damaged appliance. The
appliance shall be installed,
operated and stored in
a room with a oor area
R290

11
English
larger than 4m². Obey the
installation instruction
supplied with the appliance.
Always be careful when
you move the appliance
because it is heavy. Always
wear safety gloves.
Make sure the air can
circulate around the
appliance.
Wait at least 4 hours before
connecting the appliance to
the power supply. This is to
allow the oil to ow back in
the compressor.
Do not install the appliance
close to radiators or other
heat sources.
Do not install the appliance
where there is direct
sunlight. This device is only
for indoor use. Ensure that
the unit is placed on a
stable and at surface. If
the surface is not stable
there is a risk that the unit
may be unstable and cause
excessive vibration and that
water will be released.
Electrical connection
WARNING
Risk of re and electrical
shock.
The appliance must be
connected to a grounded
outlet.
Make sure that the electrical
information on the rating
plate matches the power
supply. If not, contact an
electrician.
Always use a correctly
installed shockproof socket.
Do not use multi-plug
adapters and extension
cables.
Make sure not to cause
damage to the electrical
components (e.g. mains
plug, mains cable).
Contact the Authorised
Service Centre or an
electrician to change the
electrical components.
The mains cable must stay
below the level of the mains
plug.
Connect the mains plug to
the mains socket only at the
end of the installation.
Make sure that there is
access to the mains plug
after the installation.
Do not pull the mains cable
to disconnect the appliance.
Always pull at the mains
plug.
Use
WARNING
Risk of injury, burns,
electrical shock or re.
Do not change the
specication of this
appliance.
Be careful not to cause
damage to the refrigerant
circuit. It contains propane
(R290), a natural gas with a
high level of environmental
compatibility. This gas is
ammable.
If damage occurs to the
refrigerant circuit, make sure
that there are no ames and
sources of ignition in the
room. Ventilate the room.
Do not put ammable
products or items that
are wet with ammable
products near or on the
appliance.
Disposal
WARNING
Risk of injury.
Disconnect the appliance
from the mains supply.
Cut o the mains cable and
discard it.
The refrigerant circuit of this
appliance is ozone-friendly.
Contact your municipal
authority for information
on how to discard the
appliance correctly.
Do not cause damage to the
part of the cooling unit that
is near the heat exchanger.
Always see to that the
appliance is kept clean. Do
not cover the unit.

12 13
Thank you
Thank you for choosing a Wood’s
product. You are one of more than
600.000 people who have chosen
Wood’s to prevent damages from
excessive moisture and mould and
to clean the household air. Origi-
nating in Canada in 1950, Wood’s
has more than 60 years experience
of developing and manufacturing
dehumidiers and air cleaners. When
choosing a Wood’s product you’ll get
a unit with great quality, high capacity
and that will extract the most litres
per consumed kWh.
Wood’s AD-series
The Wood’s AD-series are unique
air treatment products that combine
Wood’s high capacity and reliable de-
humidication with a unique ltration
system that clean the household air.
The energy efcient compressor
dehumidier remove excess moistu-
re from the air and releases dry air
in the room. At the same time, the
Swedish made Active ION HEPA l-
ters remove harmful particles - crea-
ting a healthier indoor environment.
1. Security warnings
Please read the security warnings
carefully before installing and using
the appliance. If the security regula-
tions are not followed, it may void the
product warranty and even present a
re hazard:
• Unplug the unit from its power
supply before cleaning, storage or
maintenance of its lter.
• This appliance is not intended for
use by persons (including children)
with reduced physical, sensory or
mental capabilities, or lack of expe-
rience and knowledge, unless they
have been given supervision or
instructions concerning use of the
appliance by a person responsible
for their safety.
• The appliance shall be installed
in accordance with national wiring
regulations.
• If the supply cord is damaged,
it must be replaced by the ma-
nufacturer, its service agent or
similarly qualied persons in order
to avoid a hazard.
• Always keep a safe distance from
water sources.
• The appliance is a heat source. It
is very important that the applian-
ce isn’t covered and that it is kept
away from inammable materials
and other heat sources.
• Do not put ngers or other
objects into air inlet or air outlet.
• Do not stand on the machine.
• Do not cover the appliance.
• Do not to alter or reconstruct the
appliance or its power cable in any
way.
• Always drain the water
according to the instructions.
• The compressor in the unit is lled
with a freon free refrigerant. If there
is a leakage on the refrigerant
system you should stop using the
appliance and contact your retailer.
• Do not use the appliance without its
air lter.
• The unit generates water, always
keep a safe distance from materials
sensitive to water damage, such as
wooden oors.
2. Installation and
placement
Wood’s products are easy to move
around, but bare in mind the fol-
lowing.
• The appliance should not be placed
near radiators or other heat sour-
ces or exposed to direct sunlight,
as it will reduce its performance.
• Keep at least 25 cm distance from
walls and other obstructions to
maximize the air ow.
• For optimum performance, place
the appliance in the middle of the
room.
• Make sure that the air ow from the
inlet and outlet isn’t blocked
Installation:
1. Place the appliance on a at and
solid ground, preferably in the middle
of the room.
2. Close all windows and ventilators
in the room. Otherwise, moist and
dirty air from the outside will continue
to ow into the room.
3. Connect the appliance to a groun-
ded power outlet.
If the appliance is transported
horizontally, oil may have run out of
the compressor and into the closed
piping system. In such a case, let
the appliance stand for a few
hours before being used. It is very
important that the oil runs back into
the compressor, otherwise it may be
seriously damaged.
3. Using the AD-series
Humidistat controlled
The unit will run only when the
ambient humidity exceeds your set
value.
Pollution detection
The unit will detect pollution in the
household air and start air cleaning
automatically.
Automatic restart
In the event of a power failure, the
unit will continue to work according to
your latest settings once the power
returns.
Automatic defrost
When running in dehumidication
mode, the unit will automatically de-
frost when needed. When defrosting,
the defrost icon is illuminated and all
buttons are locked. The dehumidi-
cation will restart when the defrost is
completed.
English

13
A. Operating instructions
Please refer to the technical drawings
on page 2 more information.
Functions
The AD-series are combined units
that will both clean and dehumidify
the indoor air. The air purifying func-
tion is always active as long as the
unit is running. Activate the dehumi-
dication to remove excess moisture.
When dehumidication is active the
compressor starts and the icon is lit.
When set humidity level is reached,
the icon is ashing.
Modes
The unit has 4 different modes;
manual, automatic, quiet or clothes
dry mode (clothes dry mode is only
available when dehumidifying).
Manual mode
Set fan speed manually. Choose
between 4 fan speeds in dehumidi-
cation mode and 5 fan speeds in air
purication mode. If dehumidication
is activated, set desired humidity
level manually.
Quiet mode
The unit works on the lowest fan
speed. Air quality indicator is shut off.
Clothes dry mode
(dehumidication only).
Use this function for the quickest
drying of clothes and laundry. The
unit will work on maximum fan speed
continuously; humidity level and fan
speed cannot be set.
Automatic mode
In air purication mode, the fan
speed is set automatically depending
on the air quality of the room. The air
quality is indicated by the light on the
front of the unit;
• Green: no pollution detected.
Fan works on speed 1.
• Blue: light pollution detected.
Fan works on speed 2.
• Yellow: moderate pollution
detected. Fan works on speed 3.
• Purple: heavy pollution detected.
Fan works on speed 4.
• Red: very heavy pollution detected.
Fan works on speed 5.
If dehumidication is activated the
unit automatically sets fan speed ac-
cording to ambient relative humidity:
• 60% RH or below: dehumidication
stops, fan runs on speed 1
• 60-65% RH: fan runs on speed 2
• 66-70% RH: fan runs on speed 3
• 71% RH or above: fan runs on
speed 4
Set desired humidity level
When set humidity level is reached
the unit stops automatically. Set
humidity level is shown for a few se-
conds in the display. CO means the
unit will run continuously, regardless
of ambient humidity.
Set timer for shut off
Set time for automatic shut off
between 1 and 12 hours. Press the
timer button repeatedly until the timer
display is blank to deactivate. After
set time has passed the unit is shut
off. To restart it, you need to manually
press the Power button.
Select fan speed
There are 4 fan speeds for dehu-
midication and 5 fan speeds for
air purication. A higher fan speed
means quicker air cleaning and
dehumidication. During dehumidify-
ing, when ambient humidity reaches
what you set before, both compres-
sor and fan motor stop for 60mins
rstly, and then, fan motor works for
3mins to detect ambient humidity. If
it is lower than set, both compressor
and motor stop for 60mins, and then
motor works for 3mins again; if it is
higher than set, both compressor
and motor works again, and over and
over again.
Child lock
Press and hold the child lock button
for 3 seconds to activate or deacti-
vate the child lock. When activated,
all buttons are locked.
Show room temperature
Press and hold the mode button to
display room temperature. When
released, the display will return to
showing ambient humidity level.
B. Security functions
Automatic shut off function
As a security function, the unit au-
tomatically shuts off if no button has
been touched for 12 hours. Press
any button to reset the 12-hour
countdown.
To deactivate this function, press and
hold the timer button and child lock
button simultaneously for 5 seconds.
The water full indicator ashes and
a buzzer is heard when the function
is deactivated. Repeat this action to
reactivate the function.
Compressor protection
(dehumidication only)
When shut off, the compressor has a
5-minute delay function before star-
ting again to protect the compressor.
Shut off at low or high temperature
(dehumidication only)
When the temperature is below 3°C
or above 40°C the unit will automati-
cally stop dehumidifying and only the
fan will run. The unit will restart dehu-
midication when the temperature is
within the range of 5°C to 38°C.
Low humidity function
(dehumidication only)
When ambient humidity level is
30% or lower, the display shows LO
and the compressor shuts off. It will
resume when the ambient humidity
is 32% or above. When the ambient
humidity is above 91% the display
shows HI (the unit will run as normal).
Water overow protection
(dehumidication only)
When the water bucket is full, the unit
stops, the water full icon ashes and
a buzzer is heard. Empty the water
bucket to restart the unit (see the
section about the water bucket)
Over heat protection
(dehumidication only)
When the unit is dehumidifying at
high room temperature and ambient
humidity level, the fan speed may
automatically be increased to prevent
the unit from over heating. The fan
speed will be restored to set value
when the ambient humidity level
decreases.
English

14 15
4.Water drainage
The water bucket (FIG A)
When the water reservoir is full, the
dehumidier is shut off automatically
and the indication light is lit.
Once the water reservoir is emptied
the unit will automatically restart.
1.Disconnect the dehumidier from
the power source.
2.Remove the water bucket and
empty it.
3.Put the empty water bucket back
and check that the oat moves
freely.
4.Connect the dehumidier to the
power source.
Connecting a water hose (FIG B)
Remove the plug on the back of the
unit. Attach a water hose to the pipe,
lead the other end to a drain. Hose
diameter is 12 mm (inner diameter).
Make sure that the water is drained
downwards
5.Active ION HEPA lter
The Swedish made, patented Active
ION HEPA lter ensures top quality
ltration, without blocking the air ow.
This means that noise levels and
energy consumption are kept as low
as possible.
The Active ION HEPA lters need
to be replaced regularly to maintain
their high capacity, and to prevent
damages to the unit. The unit also
has a reminder alarm when you need
to replace the lter.
Filter replacement (FIG C & D):
1.Remove the lter cover on the back
of the unit.
2.Remove and dispose the expired
Active ION HEPA lter.
3.Insert a new Active ION HEPA lter.
4.Remove any dust or dirt on the l-
ter cover and put it back. The lter
cover can be cleaned with warm
water and a mild detergent, or with
a vacuum cleaner.
Filter replacement reminder
After 970 hours of use, the unit
controls the status of the Active ION
HEPA lter. When controlling, all
buttons are locked and the air quality
light is ashing. The unit will repeat
this test 4 times, with 10 hours inter-
val. If the lter is too dirty, the repla-
cement indicator is ashing. Replace
the lter and press and hold the rest
button for 5 seconds to deactivate
the alarm. If the lter doesn’t need to
be replaced, the unit will remind you
to replace the lter after 1500 hours
of use.
It is very important that the
lter is replaced regularly;
otherwise the unit might lose
capacity and even be seriously
damaged.
6. Maintenance
• Clean the unit with a soft moist
cloth. Do not use solvents or strong
cleaners as this might damage the
surface of the unit.
• The cooling coils are best cleaned
with a rag and warm water.
7. Service
If the unit requires servicing, you
must rst contact your local retailer.
Proof of purchase is required for all
warranty claims.
8.Warranties
2 years consumer warranty against
production faults. Please note that
the warranty is only valid upon the
production of the receipt. The warran-
ty is only valid if the product is used
in accordance with the instructions
and security warnings expressed
in this manual. The warranty does
not cover any damages caused by
improper handling of the product.
NOTE: The 2 years warranty only
applies for consumers and not for
commercial use of the unit.
This machine complies with EEC
directives 76/889 + 82/499
NOTE! Get a 6-years warranty!
Register at warranty-woods.
com and replace the Active ION
HEPA lter at least once a year.
Please visit woods.se for more
information.
9. Hints
• Sometimes it may be useful to use
a frost guard or heater fan to make
sure that the temperature does
not fall below +10˚C. Even if the
AD-series can dehumidify down
to temperatures as low as +5°C,
their capacity will increase at higher
temperatures as warm air carries
more water.
• For maximum capacity in a room, it
is recommended that the air supply
from outside and from adjoining
rooms is minimized – close doors
and ventilators.
• Expect higher dehumidication
capacity during Autumn / Summer
because the outside air is warmer
and more humid.
• To achieve a safe and reliable pro-
tection against mould and moisture
damage, keep the relative humidity
between 50% and 60%.
• Use a higher fan speed for quicker
dehumidication and air cleaning.
English

15
English
Trouble Cause Solution
The unit
doesn’t work
Is the power cord connected? Connect the unit to a power outlet
Is the room temperature over 35°C
or below 5°C?
Increase or decrease
room temperature
Is ambient humidity level below set value? Decrease set value or choose
continuous dehumidication
The unit
doesn’t start
Is the lter blocked? Clean or replace the lter
Is the air inlet or air outlet jammed? Clear the blockage
No air inlet Is the lter blocked? Clean or replace the lter
Abnormal noise Is the unit inclined? Move the unit to a at and solid
ground
Is the lter blocked? Clean or replace the lter
Error code C1 Is the room temperature above
50°C or below 0°C?
Increase or decrease
the room temperature.
Malfunction of defrost sensor Contact your retailer
Error code C2 Is the room temperature above
50°C or below 0°C?
Increase or decrease
the room temperature.
Malfunction of humidity or
temperature sensor
Contact your retailer
Error code C8 Refrigerant leakage Contact your retailer
Trouble shooting
If you are having trouble with your Wood’s product, please refer to below trouble shooting.
If nothing of the below works, please contact your retailer for servicing of your product.
This marking indicates that this product should not be disposed with other household wastes throughout the EU. To prevent
possible harm to the environment or human health from uncontrolled waste disposal, recycle it responsibly to promote the
sustainable reuse of material resources. To return your us device, please use the return and collection systems or contact the
retailer where the product was purchased.They can take this product for environmental safe recycling.

16 17
Brännbart ämne. Denna
maskin innehåller R290/
Propan – ett brännbart
köldmedium.
Se bruksanvisning.
Läs
serviceinstruktion
Läs
bruksanvisning.
SÄKERHETSINFORMATION
Läs den medföljande
bruksanvisningen noggrant
innan installation och
användning av produkten.
Tillverkaren är ej ansvarig för
person- och egendomsskador
som uppstår på grund
av felaktig installation
eller användning. Spara
bruksanvisningen för
framtida behov.
SÄKERHET FÖR BARN OCH
HANDIKAPPADE
VARNING!
Risk för skador och
permanent invaliditet.
Denna produkt kan användas
av barn från 8 års ålder och
uppåt och av personer med
nedsatt fysisk, sensorisk
eller mental förmåga samt
personer med bristande
erfarenhet och kunskap, om
de övervakas eller instrueras
beträande hur produkten
används på ett säkert
sätt och förstår de risker
som är förknippade med
användningen. Låt inte barn
leka med produkten.
Barn under 3 år ska inte vistas
i närheten av produkten utan
ständig uppsikt.
Håll förpackningsmaterial
utom räckhåll för barn.
Rengöring och
användarunderhåll ska inte
utföras av barn utan tillsyn.
ALLMÄN SÄKERHET.
Denna produkt är avsedd att
användas i hushållsliknande
tillämpningar såsom: - källare,
badrum, pentryn i butiker,
på kontor och liknande
arbetsmiljöer. Produktens
märkskylt är placerad bakom
kondensvattenbehållaren.
Håll produktens
ventilationsöppningar fria
från hinder.
Använd ej andra metoder för
avfrostning eller rengöring
än de som rekommenderas
av tillverkaren. Produkten
ska inte förvaras i ett rum
där kontinuerligt använda
tändkällor nns (till exempel;
öppen eld, gasvärmare
eller elektriska värmare).
Kylkretsen får ej punkteras
eller utsättas för öppen
låga. Köldmediet kan vara
luktlöst. Spraya inte vatten
eller ånga på produkten för
att rengöra den. Använd
en fuktad mjuk trasa vid
rengöring tillsammans med
rengöringsmedel. Undvik
att använda slipande medel
eller metallföremål. Om
nätsladden är skadad måste
den bytas av tillverkaren eller,
en av tillverkaren auktoriserad
verkstad eller liknande
kvalicerad person för att
unndvika framkallande av
fara.
SÄKERHETSINSTRUKTIONER
INSTALLATION
VARNING!
Endast kvalicerade
personer får installera
denna produkt. Avlägsna
allt förpackningsmaterial.
Installera eller använd
inte en skadad produkt.
Produkten ska installeras,
användas och förvaras i ett
rum med en golvyta större
än 4m2. Följ den bifogade
installationsanvisningen
noga. Iakktag alltid försikghet
om produkten ska ytttas
eftersom den är tung. Använd
alltid skyddshanskar. Tillse
att luft kan cirkuera runt
produkten. Vänta minst 4
timmar innan produkten
ansluts till nätspänning i
syft att låta kopressorns
smörjmedel rinnan tillbaka
till kompressorn. Installera
inte produkten i närheten
av raditorer eller andra
värmekällor. Installera inte
produkten i dirket solljus.
Svenska
R290

17
ELEKTRISK ANSLUTNING
VARNING!
Risk för brand och elektriska
stötar. Produkten måste
anslutas till ett jordat eluttag.
Kontrollera att märkskyltens
elektriska information
överensstämmer med
nätspänningskällan. Om
så inte är fallet, kontakta
en elektriker. Använd
alltid ett korrekt installerat
stötsäkert och jordat eluttag.
Använd inte grenuttag eller
förlängningssladdar. Vid
skadad anslutningssladd (t.ex.
stickpropp eller nätsladd)
kontakta en av tillverkaren
auktoriserad verkstad eller
en elektriker om en elektrisk
komponent behöver bytas.
Nätsladden ska benna
sig nedanför stickproppen
efter installation.
Anslut nätsladden sist i
installationen. Tillse att
nätsladdens stickpropp är
åtkomlig efter installationen.
Dra inte i nätsladden för
att koppla loss produkten
från eluttaget. Drag alltid i
stickproppen.
ANVÄNDNING
VARNING!
Risk för personskador,
elektriska stötar eller brand.
Produktens specikation
får inte ändras. Iakttag
försiktighet för att
inte skada produkten
kylkrets. Produkten
innehåller propan (R290),
ett naturligt köldmedel
med låg miljöpåverkan.
Köldmediegasen är
brandfarlig.
Om kylkretsen skadas
tillse att öppen låga eller
andra tändkällor inte nns
i rummet. Vädra utrymmet.
Placera inte brännbara
ämnen eller föremål dränkta i
brännbara ämnen i närheten
av, eller på produkten.
Produkten får inte täckas
AVYTTRING
VARNING!
Risk för skador.
Koppla loss produkten
från eluttaget. Klipp av
nätsladden nära produkten
och kassera den.
Köldmediet i kylkretsen
på denna produkt är
miljövänligt. Kontakta de
lokala myndigheterna för
information angående
korrekt avyttring av
produkten. Skada inte
kylenheten närmast
förångaren då kylmedia kan
läcka ut.
Svenska

18 19
Tack!
Tack för att du valt en produkt från
Wood’s. Du är en av mer än 600.000
människor som har valt Wood’s
avfuktare för att förebygga skador
orsakade av fukt och mögel, och för
att rena inomhusluften från skadliga
partiklar. Wood’s startade i Kanada år
1950 och har mer än 60 års erfa-
renhet av att utveckla och tillverka
avfuktare. När du väljer en Wood’s
avfuktare kan du vara säker på att
du får en avfuktare av bästa kvalitet,
hög kapacitet och som kommer att
avfukta est liter vatten per kWh.
Wood’s AD-serie
Wood’s AD-serie är unika luftvårds-
produkter som kombinerar Wood’s
pålitliga och effektiva avfuktning med
ett unikt ltreringssystem som renar
inomhusluften.
Den energieffektiva kondensavfuk-
taren tar bort överödig fukt from
luften och blåser ut torr luft i rummet.
Samtidigt renar de svensktillverkade
Active ION HEPA ltren luften från
skadliga partiklar och skapar ett häl-
sosamt inomhusklimat.
1. Säkerhetsföreskrifter
Läs dessa varningar noggrant innan
du använder avfuktaren. Om säker-
hetsföreskrifterna inte följs kan det
leda till att garantin blir ogiltig och
även innebära en säkerhetsrisk.
• Dra alltid ut strömsladden innan
underhåll, förvaring och lterrengö-
ring.
• Håll alltid ett behörigt avstånd från
vattenkällor.
• Denna apparat är inte avsedd att
användas av personer (inklusive
barn) med försämrad fysisk, men-
tal, eller psykisk förmåga eller brist
på erfarenhet eller kunskap, om de
inte övervakas eller getts instruktio-
ner om användning av apparaten
av en person som är ansvarig för
dess säkerhet.
• Apparaten måste installeras i
enlighet med nationella kopplings-
föreskrifter.
• Apparaten är en värmekälla. Den
får därför inte övertäckas eller kom-
ma i kontakt med andra värmekäl-
lor eller brandfarliga ämnen.
• Om strömsladden är skadad,
måste den bytas ut av tillverkaren,
dess serviceagent eller liknande
kvalicerad personal för att undvika
skador.
• Stick inte in ngrar eller andra ob-
jekt i luftintaget eller luftutblåset.
• Ändra inte eller bygg om avfuktaren
eller dess strömsladd på något sätt.
• Det är mycket viktigt att ltret hålls
rent. Kontrollera ltret regelbun-
det och byt ut eller rengör det vid
behov.
• Dra aldrig i strömsladden för att
koppla ur den från eluttaget.
• Kompressorn är fylld med ett fre-
onfritt kylmedia. Om det blir ett läc-
kage på kylsystemet ska du sluta
använda avfuktaren och kontakta
din återförsäljare.
• Använd inte maskinen utan dess
lter.
• Stå inte på avfuktaren.
• Dränera alltid vattnet enligt instruk-
tionerna.
• Avfuktaren avger vatten. Håll alltid
ett säkert avstånd från material
som är känsliga för vattenskador,
t.ex. trägolv.
2. Installation & placering
Wood’s avfuktare är enkla att ytta
runt, men tänk på följande.
• Avfuktaren ska inte placeras nära
element eller andra värmekällor då
det kan sänka avfuktaren kapacitet.
• Håll minst 25 cm avstånd från
väggar och andra hinder för att
maximera luftödet.
• För bästa kapacitet, placera avfuk-
taren i mitten av rummet.
• Se till luftintaget och luftutblåset
inte blockeras.
Installation:
1. Placera avfuktaren på ett plant
och stabilt underlag, helst i mitten av
rummet.
2. Stäng alla fönster och ventiler i
rummet. Annars fortsätter fuktig luft
utifrån att strömma in i rummet.
3. Anslut avfuktaren till ett jordat
eluttag.
Om avfuktaren transporterats liggan-
de kan det hända att olja runnit ut
från kompressorn och in i det slutna
rörsystemet. Låt då avfuktaren stå i
några timmar innan den tas i bruk.
Det är mycket viktigt att oljan hin-
ner rinna tillbaka in i kompressorn,
annars kan avfuktaren ta allvarlig
skada.
3.Användning
Hygrostatstyrd
Avfuktaren arbetar bara när luftfuktig-
heten överstiger ditt tillåtna värde.
Luftkvalitetsensor
Luftrenaren känner av föroreningar i
luften och startar automatiskt att rena
luften vid behov.
Automatisk omstart
Vid strömavbrott kommer avfuktaren
att fortsätta arbeta enligt dina inställ-
da värden när strömmen återvänder
Automatisk avfrostning
När du använder produkten som en
avfuktare kommer den automatiskt
att avfrosta vid behov. När produkten
avfrostar tänds symbolen i displayen
och alla knappar är låsta. Avfukt-
ningen startar automatiskt igen när
avfrostningen avslutas.
Svenska

19
A.Användarinstruktioner
Se ritningarna på sida 2 för mer
information.
Funktioner
AD-serien är kombinerade enheter
som båda renar luften och avfuktar.
Luftrenarfunktionen är alltid aktiv så
länge produkten är påslagen. Aktive-
ra avfuktning för att ta bort överödig
fukt från luften. När avfuktningen
är aktiv lyser symbolen i displayen.
När önskad luftfuktighet är uppnådd
blinkar symbolen.
Lägen
Produkten har 4 olika lägen; manu-
ellt, automatiskt, tyst och torka-tvätt
läge (torka-tvätt läget är bara tillgäng-
ligt under avfuktning).
Manuellt läge
Välj äktläge manuellt. Det nns 4
äktlägen för avfuktning och 5 lägen
för luftrening. Om avfuktning är akti-
verat ställer du in önskad luftfuktighet
manuellt.
Tyst läge
Produkten arbetar på lägsta äktlä-
get. Luftkvalitetsindikatorn stängs av.
Torka-tvätt läge
(endast under avfuktning).
Använd detta läge för att snabbast
torka tvätt och kläder. Avfuktaren
arbetar på högsta äktläget kontinu-
erligt; fuktighetsnivå och äktlägen
kan inte ändras.
Automatiskt läge
Under luftrening ställs äktläget in
automatiskt beroende på rummets
luftkvalitet. Rummets luftkvalitet indi-
keras av lampan på framsidan:
• Grön: ingen luftförorening.
Fläkten arbetar i läge 1.
• Blå: lättare luftförorening.
Fläkten arbetar i läge 2.
• Gul: måttlig luftförorening.
Fläkten arbetar i läge 3.
• Lila: kraftig luftförorening.
Fläkten arbetar i läge 4.
• Röd: mycket kraftig luftförorening.
Fläkten arbetar i läge 5.
Om avfuktning är aktiverat kommer
produkten automatiskt ställa in äkt-
läge beroende på rummets aktuella
relativa luftfuktighet:
• 60% RF eller lägre: avfuktning
stannar, äkten går i läge 1
• 60-65% RF: Fläkten går i läge 2
• 66-70% RF: Fläkten går i läge 3
• 71% RF eller högre: äkten går i
läge 4
Ställ in önskad luftfuktighet
När önskad luftfuktighet är uppnådd
stannar avfuktningen automatiskt.
Inställd luftfuktighet visas i displayen
under ett par sekunder. CO betyder
att avfuktaren arbetar kontinuerligt,
oberoende av rummets luftfuktighet.
Ställ in timer för avstängning
Ställ in tid för avstängning mellan 1
och 12 timmar. Tryck på timer knap-
pen upprepade gånger tills timerdis-
playen är tom för att avaktivera. Efter
inställd tid passerat stängs produkten
av. Tryck på Power knappen för att
starta produkten igen.
Välj äktläge
Det nns 4 äktlägen för avfuktning
och 5 lägen för luftrening. Ett högre
äktläge innebär snabbare avfuktning
och luftrening. Vid avfuktning, när
inställd fuktnivå är uppnådd, stannar
både kompressorn och äktmotorn i
60 minuter.
Efter 60min kommer äkten att starta
och gå i 3minuter för att känna av
omgiven fuktnivå. Har inte fuktnivån
ökat kommer maskinen fortsätta att
stå still i 60min för att sedan starta
äkten i 3min.
Barnlås
Tryck och håll nere barnlåsknappen
i 3 sekunder för att sätta på eller
stänga av barnlåset. När barnlåset är
aktiverat är alla knappar låsta.
Visa rummets temperatur
Tryck och håll nere lägesväljarknap-
pen för att visa rummets temperatur.
När du släpper knappen återgår
displayen till att visa rummets relativa
luftfuktighet.
B. Säkerhetsfunktioner
Automatisk avstängning
Som en säkerhetsfunktion stängs
produkten av om ingen knapp har
tryckts på 12 timmar. Tryck på valri
knapp för att nollställa nedräkningen.
Du kan avaktivera funktionen genom
att hålla nere timer- och barnlåsk-
nappen samtidigt under 5 sekunder.
Symbolen för full vattentank blinkar
och ett pip hörs när funktionen är
avaktiverad. Upprepa för att aktivera
funktionen igen.
Kompressorskydd
(endast under avfuktning).
När du stänger av avfuktningen har
kompressorn en 5 minuters fördröj-
ning innan den startar igen.
Avstängning vid låg eller hög
temperatur (endast avfuktning)
Vid temperaturer under 3°C eller
över 40°C stannar avfuktningen och
endast äkten arbetar. Avfuktningen
starar igen när temperaturen är inför
intervallet 5°C till 38°C.
Funktion vid låg luftfuktighet
(endast under avfuktning)
När rummet luftfuktighet är 30% eller
lägre visar displayen LO och av-
fuktningen stannar. Den startar igen
när rummets luftfuktighet är högre
än 32%. När rummets luftfuktighet
är högre än 91% visar displayen HI
(avfuktningen pågår som normalt).
Avstängning vid full vattentank
(endast under avfuktning)
När vattentanken är full stannar av-
fuktningen, symbolen för full vatten-
tank visas och ett pip hörs. Töm vat-
tentanken för att starta avfuktningen
igen (se kapitlet om vattentanken).
Överhettningsskydd
(endast under avfuktning)
När avfuktaren arbetar vid hög tem-
peratur och hög luftfuktighet kan pro-
dukten automatiskt öka äktläget för
att förhindra överhettning. Fläktläget
återgår till inställt värde när luftfuktig-
heten sjunker.
Svenska

20 21
Svenska
4.Vattenavledning
Vattentanken (FIG A)
När vattentanken är full stannar av-
fuktningen och symbolen tänds.
Töm vattentanken för att starta av-
fuktningen:
1.Dra ut strömsladden.
2.Dra försiktigt ut vattentanken och
töm den.
3.Sätt tillbaka vattentanken och
kontrollera att ottören är fri.
4.Sätt tillbaka strömsladden.
Anslut en slang för direkt
vattenavledning (FIG B)
Ta bort proppen på baksidan av
produkten. Anslut en vattenslang och
led den andra änden till ett avlopp.
Innerdiameter på slangen är 12 mm.
Se till att vattnet kan rinna nedåt och
att inget blockerar vattenödet
5.Active ION HEPA lter
De svensktillverkade, patenterade
Active ION HEPA ltren säkerställer
förstklassig ltrering utan att blockera
luftödet. Det innebär att ljudnivåer
och energiförbrukning hålls så låga
som möjligt.
Active ION HEPA ltren behövs bytas
ut regelbundet för att behålla sin
höga kapacitet och för att undvika
skador på produkten. Produkten har
också ett påminnelsealarm när det är
dags att byta lter.
Filterbyte (FIG C & D):
1.Ta bort lterlocket på baksidan av
produkten.
2.Ta bort och släng det förbrukade
Active ION HEPA ltret.
3.Sätt i ett nytt Active ION HEPA lter.
4.Ta bort allt damm och smuts från
lterlocket. Vid behov kan lterlock-
et rengöras med varmt vatten och
rengöringsmedel. Filterlocket kan
också dammsugas.
Påminnelsealarm för lterbyte
Efter 970 timmars användning kon-
trollerar produkten Active ION HEPA
ltrens status. När ltren kontrolleras
är alla knappar låsta och luftkva-
litetsindikatorn blinkar. Produkten
upprepar testet 4 gånger med 10
timmars intervall.
Om ltret behöver bytas ut blinkar
symbolen för lterbyte. Byt ut ltret
och håll nere resetknappen i 5 sek-
under för att stänga av alarmet. Om
ltret inte behöver bytas ut påminner
produkten om lterbyte igen efter
1500 timmars användning.
Det är mycket viktigt att ltret
byts ut regelbundet, annars kan
enheten tappa kapacitet och till
och med bli allvarligt skadad.
6. Underhåll
- Rengör produkten med en fuktig
trasa. Undvik lösningsmedel och
starka rengöringsmedel då det kan
skada avfuktarens yta.
7. Service
Om produkten behöver service ska
du först kontakta din återförsäljare.
Inköpskvitto krävs vid alla garantian-
språk.
8. Garantier
2 års konsumentgaranti gentemot
produktionsfel. Notera att garantin
bara är giltig mot uppvisande av
kvitto. Garantin är giltig enbart om
produkten är använd i enlighet med
de instruktioner och säkerhetsföre-
skrifter som uttrycks i denna manual.
Garantin täcker inte eventuella skad-
or som uppkommit av ovarsamt eller
felaktigt handhavande av produkten.
OBS: 2 års garanti gäller enbart för
konsumenter och inte för näringsid-
kare och/eller professionell använd-
ning av produkten.
Denna produkt överensstämmer med
EEC direktiven 76/889 + 82/499
OBS! Få 6 års garanti! Regist-
rera din produkt på warran-
ty-woods.com och byt ut Active
ION HEPA ltret minst en gång
per år. Besök woods.se för mer
information.
9.Tips
Det kan ibland vara bra att använda
en värmeäkt för att hålla temperatu-
ren över +10˚C. Även om AD-serien
klarar att avfukta ner till +5°C kom-
mer dess kapacitet öka vid högre
temperaturer då varm luft kan bära
mer vatten.
För bästa kapacitet, se till att minime-
ra luftinödet utifrån - stäng fönster
och ventiler.
Förvänta dig högre kapacitet under
sommaren och hösten då utomhus-
luften är varmare och fuktigare.
För att uppnå ett säkert och pålitligt
skydd mot fukt och mögel, håll den
relativa fuktigheten mellan 50% och
60%.
Använd en högre äkthastighet för
snabbare avfuktning och luftrening.
Other manuals for AD series
2
Table of contents
Languages:
Other Wood’s Dehumidifier manuals

Wood’s
Wood’s DSC95 User manual

Wood’s
Wood’s MRD14 User manual

Wood’s
Wood’s MRD20 Silent User manual

Wood’s
Wood’s DS12F User manual

Wood’s
Wood’s DSC-90ES User manual

Wood’s
Wood’s WCD2 Pro User manual

Wood’s
Wood’s DS-40FS User manual

Wood’s
Wood’s AD series User manual

Wood’s
Wood’s AD series User manual

Wood’s
Wood’s MRD20 Silent User manual

Wood’s
Wood’s MDK21 User manual

Wood’s
Wood’s MDX14 User manual

Wood’s
Wood’s MRD25GW User manual

Wood’s
Wood’s MRD25G User manual

Wood’s
Wood’s MRD10 User manual

Wood’s
Wood’s MRD9 User manual

Wood’s
Wood’s WP-200AP User manual

Wood’s
Wood’s WCD6HGM User manual

Wood’s
Wood’s MDK11 User manual

Wood’s
Wood’s MRD20GW User manual