ZAPTEC Go User manual

Zaptec Go
User Manual
Start your
adventure today
Zaptec


Zaptec Go
works with
any car
No matter what you drive or where
you’re going, Zaptec Go is the surest
way to power your journey. Built
on leading edge Norwegian green
tech, we’ve created a charger, that’s
as smart on the inside as it is simple
on the outside.

4 5
Important information
Before using or maintaining this product, it is important to
read the following safety instructions. Failure to follow and
apply all the instructions and procedures covered in this quick
guide will invalidate the guarantee and cause Zaptec Charger
AS and direct partners towaive all liability and claims for
compensation.
WARNING!
!Read through the instructions carefully and familiarize yourself with the equipment
before you start using it.
!This equipment must only be installed, repaired, and maintained by qualified
personnel. Repairs must be carried out by Zaptec or a pre-approved workshop.
!All applicable local, regional, and national laws and regulations must be followed
when installing, repairing, and maintaining the product.
!Do not install or use a product which is damaged in any way. See the information
in the chapter on Support and Repairs.
!Only use approved cabling for the installation.
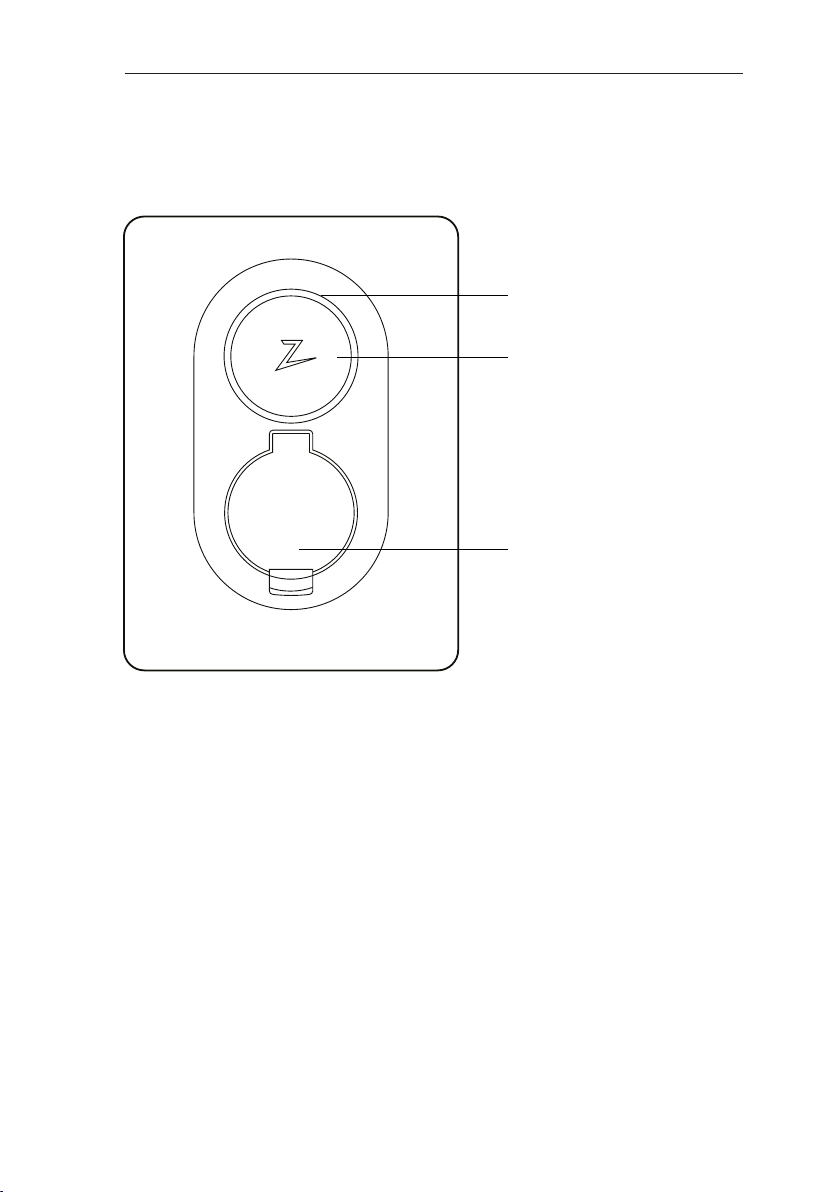
!Do not insert foreign objects into the Type 2 socket.
!Do not use high-pressure washers to clean the charger station.
Follow the instructions in the chapter Storage and Maintenance.
!Avoid installing the charger in a location which is exposed to direct sunlight.
!Adapters are permissible – A conversion adapter from the charger outlet must only
be used if specified and approved by the vehicle manufacturer or charger producer
!Read the guarantee at zaptec.com/guarantee or contact Zaptec support
and request a copy.
English

4 5
Get to know Zaptec Go
Status light
Type 2 socket
Charge card
authentication (RFID)
English

6 7
Activate and connect your charger to the Zaptec App
Zaptec
To activate and connect to a charger:
1. Open the Zaptec App
2. Click “Add Zaptec Product”.
3. Scan the QR code on the Zaptec Go charger to start
connecting the charger
4. Remove the QR code sticker after first connection.
We suggest you place this sticker in your fuse box in
case you need to reconnect with the charger in the future.
English

6 7
This app will give you access to the
complete Zaptec experience! In the app,
you can monitor your charging session
and speed, lock the cable to the charger,
schedule charging, control access for
friends and family and keep track of your
charging history.
Once your authorized electrician has
finished the installation, you can create
your Zaptec user account and register
your charger. Download the app in App
Store or Google Play Store.
Need help to connect
your charger to the app?
Watch our how-to-video
step by step.
English

8 9
Add more chargers to your address
You can connect up to three Zaptec
chargers per address. To connect an
additional charger, make sure you´re
logged in the Zaptec app.
1. From the Home,
tap the symbol
2. Scan the QR code
on the Zaptec Go charger
to start connecting the
second charger.
3. If you are adding a third
charger, repeat from step 1.
English

8 9
Status light indicator
No light
Updating firmware.
This normally takes a few minutes.
Error detected. Unplug vehicle and restart
the charging station. If this does not clear
the red light, contact your installer.
Waiting to be configured by an authorized
installer.
Waiting for authentication.
Authenticate with your app or key fob.
Charging complete or charging is waiting
for scheduled start.
Charging.
Standby.
Check charger power.
Purple
Red
Orange
Yellow
Green
Blue
White
English

10 11
Start/stop charging
Start charging.
Connect your charging cable to
the vehicle and then connect
the cable to the charger.
When the status light changes
to pulsating blue, the car is charging.
If the indicator is green, this means
that charging is paused according
to the schedule.
Stop charging
You can pause charging via the app.
Alternatively, you can also stop charging
by simply removing the plug from your
electric vehicle.
Please note that attempting to remove
the cable from the Zaptec Go while
charging will not be possible until
charging has finished or has been
stopped by the car.
English

10 11
Be in control of who can use your charger
You can give permissions to multiple
users to access your Zaptec go via
the App.
This is an option if you would like to
keep your charger private. You would
then avoid having uninvited guests
charging from your charger without your
permission. This setting can be switched
on and off whenever you need it.
Anyone who has access can start
charging by creating their own account
in the Zaptec App and use the app as an
authenticator.
You can use a device that is equipped
with RFID technology to start charging
as well, such as a Zaptec Key. Any RFID
enabled device can be easily added to
an account using the Zaptec App.
English

12 13
Over-the-air software updates.
We
got you
covered
Being connected at all times means we will provide you with software updates.
As well as having these smart charging features available, we have got you covered
with free 4G LTE-M. If your charger is located in a place where 4G LTE-M is not available,
you can connect the charger to Wi-Fi in the Zaptec App.
English

12 13
Scheduled charging
Smart charging
Scheduled charging helps the
environment by avoiding electricity
use at peak times. It also lets you take
advantage of lower tariffs.
In accordance with UK Smart Charging
legislation, your charger is supplied pre-
configured with a schedule that prevents
charging between 8am and 11am and
4pm and 10pm on weekdays. During
these times, charging will be paused.
Adjusting the charging schedule
From the Advanced settings page in
the Zaptec App, you can easily disable
scheduling, or alternatively you can set
the charging schedule to your preferred
time.
English

14 15
Storage and Maintenance
• Wipe down the charging station
with a damp cloth.
• Check that the charging connector
is free of all foreign materials.
• Check that the charging station
has no external, physical damage.
In the case of publicly accessible
installations, an annual inspection
must be carried out by qualified
personnel in accordance with
Norwegian legislation and regulations.
In the case of publicly accessible
installations, an annual inspection
must be carried out by qualified
personnel in accordance with local
legislation and regulations.
The product must be kept in a dry room with a stable temperature.
The following periodic maintenance is recommended:
Every Zaptec charger is designed to provide the highest possible level of security.
Your charger is configured with a security PIN to control access to certain functions.
You should keep this PIN safe and not reveal it to anyone you do not trust.
To ensure your charger remains secure, Zaptec will continue to provide software
updates for your charger for a minimum of five years from the date of purchase.
You can check for updates and install them using the Zaptec app or Zaptec portal.
If you have any concerns or problems regarding the security of your charger,
or wish to request the removal of any personal data, then please notify us by
visiting https://zaptec.com/help
Keeping you secure
English

14 15
Technical specifications
Mechanical and installation
PARAMETER TEST CONDITION MIN TYP MAX UNIT
Dimensions H: 242
W: 180
D: 75
mm
Weight 1.3 kg
Altitude 2000 m
Input wire cross section 1.5 6 mm2
Input cable diameter 9 18,5 mm
Degree of protection IP54
Charging mode Mode 3, case B
Mechanical strength IK08
Pollution degree Installation environment 4
Support for ventilation According to EN IEC
61851-1 6.3.2.2
No
Access According to EN IEC
61851-1 5.4
Restricted and non-restrict-
ed access
English

16 17
Technical specifications
Connectivity
PROTOCOL SUPPORTED STANDARDS
4G LTE Cat M1
Wi-Fi 802.11b/g/n (2.4 GHz)
Bluetooth Bluetooth v4.2 (BR/EDR/BLE)
RFID
ISO/IEC 14443 A (Type A, 13.56 MHz)
ISO/IEC 15693 Type A (Mifare Classic, 13.56 MHz)
OCPP 1.6J Core (cloud to cloud)
Integrated energy meter
PARAMETER TEST CONDITION MIN TYP MAX UNIT
Accuracy Line voltage, current, and power factor +/-3 %
General
PARAMETER TEST CONDITION MIN TYP MAX UNIT
Rated voltage (Un)
Phase-Neutral 207 230 253
V
Phase-Phase 360 400 440
Rated current (In) 32 A
Rated frequency 50 Hz
Standby power consumption ´ 2 W
Ambient operating temperature -30 40 oC
Maximum charging power TN 1 phase @ 32 A 7.4 kW
Protection class I
Overvoltage category III
English

16 17
Technical specifications
Integrated RDC-DD
PARAMETER SYMBOL MIN TYP MAX UNIT
Residual DC operating current IΔdc 0.006 A
Operating characteristics RDC-DD according to IEC 62955
Making and breaking capacity Im 500 A
Residual making and breaking
capacity
IΔm 500 A
Rated conditional short- circuit
current
Inc 3 kA
Rated conditional residual
short-circuit current
IΔc 3 kA
Upstream circuit breaker and RCD
PARAMETER SYMBOL MIN TYP MAX UNIT
Residual operating current IΔn 0.03 A
Rated current In 40 A
Operating characteristics Curve C with RCD Type A according
to IEC/EN 61008-1 / 61009-1
Integrated open PEN fault detection
PARAMETER SYMBOL MIN TYP MAX UNIT
Operating characteristics According to BS 76712018
Amendment 12020 clause 722.411.4.1 (iv)
Operating voltage Phase-neutral 207 253 V
English


© Zaptec Charger AS 28.10.2022. All rights reserved. ZM000908
Zaptec Charger AS
Professor Olav Hanssens vei 7A
4021 Stavanger
Norway
Made in Norway
zaptec.com
Other manuals for Go
8
Table of contents
Other ZAPTEC Automobile Accessories manuals

ZAPTEC
ZAPTEC Pro User manual

ZAPTEC
ZAPTEC Column Standard User manual

ZAPTEC
ZAPTEC Pro User manual

ZAPTEC
ZAPTEC Go User manual

ZAPTEC
ZAPTEC Go User manual

ZAPTEC
ZAPTEC Pro User manual

ZAPTEC
ZAPTEC ZapCharger Portable C1 User manual

ZAPTEC
ZAPTEC Go User manual

ZAPTEC
ZAPTEC Pro User manual

ZAPTEC
ZAPTEC Go User manual