Zipper Mowers CLIPPER II User manual

Instruction Manual
Setting up and maintaining your machine

2ZIPPER CLIPPER II INSTRUCTION MANUAL
Introduction
These instructions must be read by any person intending to use or service
the machine.
Purpose of use
This equipment is expressly designed and intended for use for the clipping
of sheep, goats and animals of the Camelidae family.
The machine should be used in a tidy, dry environment.
Essential operator skills
• The operator must be the trained in the safe use of the machine.
• The operator must be experienced in handling the animals to be
clipped.
Contents
Electrical Safety ______________________________________________________ 3
Sacricial gear safety feature_________________________________________ 3
Circuit breaker _______________________________________________________ 4
Operation ___________________________________________________________ 4
Fitting the blades ____________________________________________________ 5
When to change the blades __________________________________________ 6
Lubrication __________________________________________________________ 6
Tension adjustment __________________________________________________ 7
Cleaning the air lter _________________________________________________ 7
Storage_______________________________________________________________ 7
Technical Diagram & Spares List _____________________________________ 8

3ZIPPER CLIPPER II INSTRUCTION MANUAL
Electrical safety
Warning: to reduce the risk of re or electric shock, do not expose this
appliance to rain or moisture.
Caution: to reduce the risk of electric shock, do not attempt to open
the plastic casing of this machine. The machine carries dangerously
high voltages inside even when switched o and disconnected from
the electrical socket. There are no user-serviceable parts inside. Refer
servicing to qualied service personnel.
• Use only on a 220-240 volt AC 50 Hz electricity supply.
• Use a Circuit Breaker (RCD) with this machine.
• Use a 3 amp fuse in the plug.
• Never insert the plug into a damaged socket.
• Keep the electric lead up, out of the way of animals.
• Switch o and unplug the machine before changing the blades and
before any maintenance.
• Never use the machine if you suspect it of having been in contact with
liquids.
• Check the machine body and electrical cable for defects before use.
•
Sacricial gear safety feature
This machine incorporates a sacricial gear which is designed to strip in
the event of the machine jamming or encountering an obstruction, e.g.
foreign objects, improper blade setup (see page 5) or lack of oiling.

4ZIPPER CLIPPER II INSTRUCTION MANUAL
Circuit breaker
• This machine is tted with a built-in circuit breaker to protect it from
damage in the case of electrical overload.
• When tripped, a small dowel will be ejected and will protrude from the
rear of the machine. To reset the circuit breaker, push the dowel back
into the machine until it locks into place.
• The circuit breaker may be caused to trip by excessive heat in
the working environment, by extreme tension set by the tension
adjustment nut (see section "Tension adjustment before clipping"),
by an incorrectly set up blades, or by an obstruction of the cutter. If
the circuit breaker trips without any of the above causes, the machine
should be referred to a qualied service person.
• This circuit breaker does not take the place of, nor reduce the need
for, an external socket-mounted RCD circuit breaker, which should
always be used with any shearing machine.
Operation
• Switch: Position I- the power is ON. Position O– the power is OFF.
• Switch to o (position O) before plugging into, or disconnecting from,
the power supply.
• Always disconnect the power supply before changing the blades.
• Never wrap the power cable around the machine.
• Keep away from all liquids.
• Never shear wet animals.
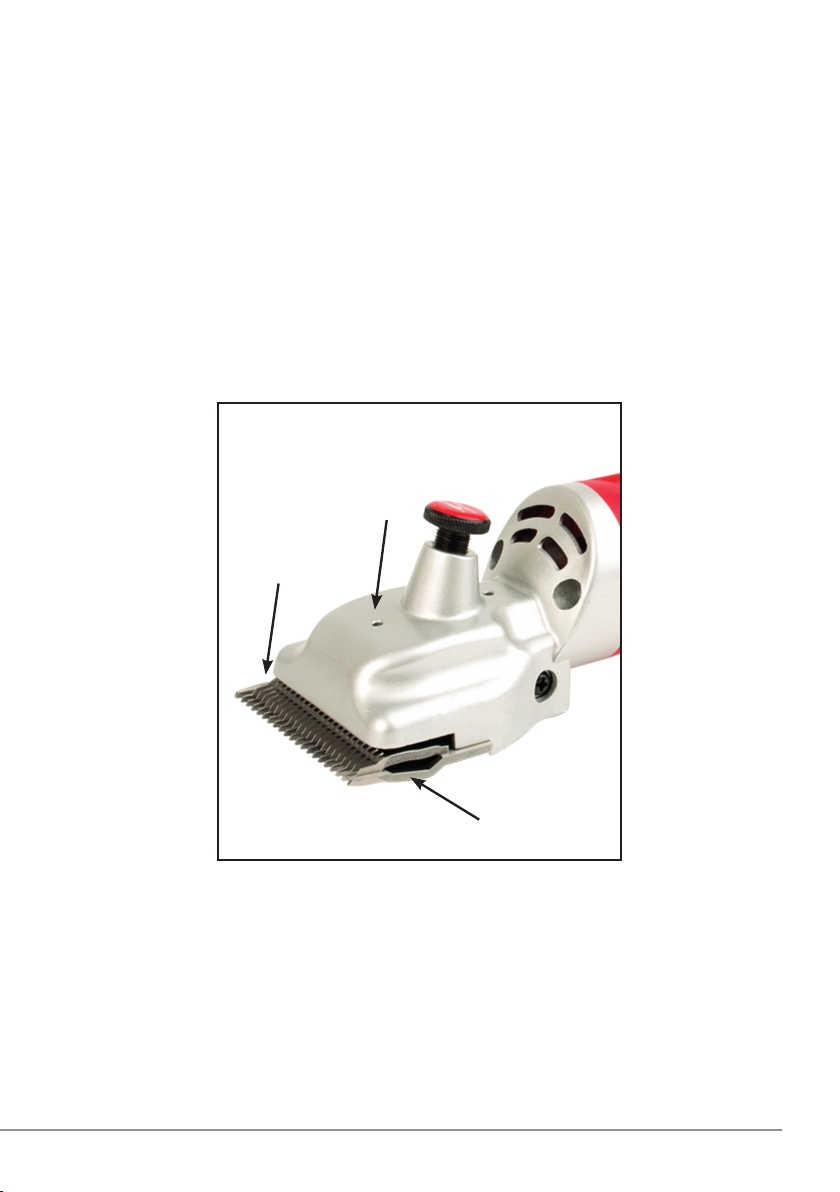
• Do not use blades with missing or broken teeth.
• Look out for wire, etc. in the eece and remove before clipping.
• Keep clear of ear tags.
• Keep children away from the working area and store the machine out
of their reach.
• Sharpen blades on a lapping machine.
• All persons using this machine must be trained in its safe use
• Operating instructions should be kept in the storage case and should
be accessible at all times.

5ZIPPER CLIPPER II INSTRUCTION MANUAL
Fitting the blades
• Disconnect the machine from the power supply.
• Loosen the tension nut, slacken o the blade screws and remove the
old blades.
• Make sure the new blades are clean and undamaged.
• The sharp surface of the blade must sit on the sharp side of the blade.
• Holding the machine upside down, place the new cutter in the conical
pins of the blade yokes.
• Push the new blade between the loosened screws.
Semi-tighten the blade screws.
• Tighten the blade screws. Tighten the tension nut until the cutter is
pressed against the blade and you can feel a slight resistance.
• Always check that both conical pins are still in the holes of the cutter
before using.

6ZIPPER CLIPPER II INSTRUCTION MANUAL
Lubrication
• At least every 3 minutes. Place a few drops of oil across the blades
(illustration 1), points 1 and 2.
• Every 10 minutes place a few drops of oil into the lubrication hole on
the clipping head (illustration 1, point 2).
• Lack of oiling causes the head to overheat and causes excessive wear.
• Inadequately oiled blades will get hot and go blunt quickly.
Illustration 1 - Oiling Points
The Zipper Clipper does not slow down or sound
dierently when in need of oil, so
it must be oiled frequently.
2
1
3
Points 1 & 3 - oil every 3 minutes
Point 2 - oil every 10 minutes

7ZIPPER CLIPPER II INSTRUCTION MANUAL
Tension adjustment before clipping
While the machine is switched o, ensure that the conical pins on the
blade yoke sit exactly into the positioning holes in the cutter.
Tighten the tension nut until resistance is felt (illustration 2). Do not
over-tighten.
If it is not cutting properly at the very start of clipping, add a little more
tension.
Do not slacken o tension while the machine is running.
If tension is not sucient, hair may collect between the blades.
If there is too much tension, the blade will wear prematurely and the
machine will be put under excess strain.
Illustration 2 - Tension
Cleaning the air lter
• Clean the air lter with a dry soft brush frequently.
• The machine must never be operated without the air lter element.
Storage
Store the machine in a clean and dry place, out of the reach of children.
Turn clockwise to tighten

1 - Tension Retaining Screw - H13-016 22 - Switch Actuator - H12-015
2 - Tension Nut - H13-017 23 - O-Ring - H12-016
3 - Tension Spring - H13-018 24 - Rotor - H12-017
4 - Bare Head - H13-019 25 - Magnet Housing - H12-018
6 - Pressure Piece - H13-020 26 - O-Ring - H12-051
7 - Screw - H13-021 27 - Circuit Board - H12-019
8 - Blade Yoke - H13-022 28 - Carbon Brush (each) - H12-020
10 - Blade Screw - H13-023 29 - Carbon Brush Spring - H12-021
11 - Lock Screw - H13-024 30 - Brush Holder - H12-022
12 - Laminated Spring Screw - H13-025 31 - Head Retaining Nut (each) - H12-034
13 - Crank Block - H13-026 32 - Casing Bottom Half - H12-035
14 - Laminated Spring (each) - H13-027 33 - Air Filter Right - H12-036
15 - Crank Spindle - H13-028 34 - Cable Grip - H12-038
16 - Crank Spindle Bush - H13-029 35 - Cable Grip Screw (each) - H12-037
17 - Gear - H13-030 36 - Cable Support - H12-039
18 - Circlip - H13-031 37 - Electric Flex and 3 Pin Plug - H12-040
20 - Thumb Plate - H12-013 38 - Electric Flex and Euro Plug - H12-041
21 - Casing Top Half - H12-014 39 - Zipper Clipper Casing Screw (each) - H12-043
8
Lane Side • Grindleton Road • West Bradford • Clitheroe • BB7 4QH • U.K.
1
2
3
4
5
6
7
8
9
10
14
13
12
11
15 16 17 18
19
2021
22
35
34
33
3231
36
3938
37
23 24 25 26
28
29
30
27
Table of contents
Other Zipper Mowers Farm Equipment manuals