manuals.online logo
Brands
  1. Home
  2. •
  3. Brands
  4. •
  5. Zte
  6. •
  7. Cell Phone
  8. •
  9. Zte R259 User manual

Zte R259 User manual

Other manuals for R259

1

Other Zte Cell Phone manuals

Zte Score X500 User manual

Zte

Zte Score X500 User manual

Zte AVID 828 User manual

Zte

Zte AVID 828 User manual

Zte ZTE-U X720 User manual

Zte

Zte ZTE-U X720 User manual

Zte R550 User manual

Zte

Zte R550 User manual

Zte Z837VL User manual

Zte

Zte Z837VL User manual

Zte ATLAS W User manual

Zte

Zte ATLAS W User manual

Zte Grand X User manual

Zte

Zte Grand X User manual

Zte A1 User manual

Zte

Zte A1 User manual

Zte AT&T Avail 2 User manual

Zte

Zte AT&T Avail 2 User manual

Zte Optus X Wave P609 User manual

Zte

Zte Optus X Wave P609 User manual

Zte Aio Prelude User manual

Zte

Zte Aio Prelude User manual

Zte GR830 User manual

Zte

Zte GR830 User manual

Zte MTAG 281 User manual

Zte

Zte MTAG 281 User manual

Zte F100 User manual

Zte

Zte F100 User manual

Zte nubia Z11 User manual

Zte

Zte nubia Z11 User manual

Zte WARP 7 User manual

Zte

Zte WARP 7 User manual

Zte AVID TRIO Original instructions

Zte

Zte AVID TRIO Original instructions

Zte V817 User manual

Zte

Zte V817 User manual

Zte Savvy Z750C User manual

Zte

Zte Savvy Z750C User manual

Zte blade III pro User manual

Zte

Zte blade III pro User manual

Zte C330 User manual

Zte

Zte C330 User manual

Zte KIS PLUS User manual

Zte

Zte KIS PLUS User manual

Zte Acqua User manual

Zte

Zte Acqua User manual

Zte Joey Fit Selfie 4.5 User manual

Zte

Zte Joey Fit Selfie 4.5 User manual

Popular Cell Phone manuals by other brands

Nokia 6700 classic user guide

Nokia

Nokia 6700 classic user guide

LG L34C user guide

LG

LG L34C user guide

Ericsson T60d manual

Ericsson

Ericsson T60d manual

Sony Xperia Z1 Compact Startup guide

Sony

Sony Xperia Z1 Compact Startup guide

AT AT-Q5 user manual

AT

AT AT-Q5 user manual

Vingtor ACM-M-A-V2 Installation/configuration

Vingtor

Vingtor ACM-M-A-V2 Installation/configuration

Olitech EasyFlip 2 Quick setup guide

Olitech

Olitech EasyFlip 2 Quick setup guide

Alcatel IDEAL manual

Alcatel

Alcatel IDEAL manual

switel M222 user manual

switel

switel M222 user manual

LG LG-P503 user guide

LG

LG LG-P503 user guide

LG F2410 user guide

LG

LG F2410 user guide

Argom E500 manual

Argom

Argom E500 manual

Hisense U30 user manual

Hisense

Hisense U30 user manual

Argom Tech E401 user manual

Argom Tech

Argom Tech E401 user manual

Nokia 3595 - Cell Phone - GSM Manual Del Usuario

Nokia

Nokia 3595 - Cell Phone - GSM Manual Del Usuario

Nokia iSkoot 6600 user guide

Nokia

Nokia iSkoot 6600 user guide

Nokia RM-14 DISASSEMBLY AND REASSEMBLY INSTRUCTIONS

Nokia

Nokia RM-14 DISASSEMBLY AND REASSEMBLY INSTRUCTIONS

honor 8X user guide

honor

honor 8X user guide

manuals.online logo
manuals.online logoBrands
  • About & Mission
  • Contact us
  • Privacy Policy
  • Terms and Conditions

Copyright 2025 Manuals.Online. All Rights Reserved.

LEGAL INFORMATION
Copyright © 2014ZTE CORPORATION.
All rights reserved.
No part of this publication may be excerpted, reproduced,
translated or utilized in any form or by any means, electronic
or mechanical, including photocopying and microfilm, without
the prior written permission of ZTE Corporation.
The manual is published by ZTE Corporation. We reserve the
right to make modifications on print errors or update
specifications without prior notice.
Version No.: R1.0
Edition Time: 2014.10.15
1
Key Functions
2
Function Description
Left soft key Performs the function indicated at
the left bottom of the screen.
Right soft key Performsthe function indicated at the
right bottom of the screen.
Center key Press to confirm actions and make
selections.
4-Way
Navigation keys
These keys (UP, DOWN, LEFT and
RIGHT) allow for navigation through
menu options and quick access to
some function menus.
Send key
Press to dial a phone number or
answer a call, or view the call history
in the standby mode.
End/Power key Press to exit to the idle mode.
Hold to switch on/off the phone.
QWERTY keyboard Press to enter characters 0-9, the
alphabets from a-z and symbols.
Facebook key hold to enter facebook.
Note:
In this User Manual, “press a key” means to press
the key and release it immediately, while “hold a key”
means to press the key for at least two seconds and then
release it.
3
Locking and Unlocking the Keypad
In idle screen, hold key to lock the keypad.
To unlock the keypad, press the Left soft key and then press
Key.
Locking the keypad can prevent unintentional operations on it.
You can answer an incoming call with the regular operation
when the keypad is locked.
Status Bar Icons
Indicator
What it means
Indicator
What it means
Signal strength General
Battery status Silent
Missed call Alarm clock set
New SMS Bluetooth
New MMS Keypad locked
Battery
The lithium ion battery of the mobile phone can be
immediately used after unpacking.
4
Installing and removing the battery
1. Make sure that your phone is off and remove the battery
cover.
2. Insert the battery by aligning the metal contacts with the
contacts in the battery slot. And then push down the
upper section of the battery until it clicks into place.
To remove the battery, pull it up and remove it from the
mobile phone.
3. Replace the battery cover and close it gently until you hear a
click.
Remove the battery cover Push down the battery
Replace the battery cover Push up the battery from here
Headset jack
Charger interface
4-Way Navigation
keys and Center key
Left soft key
Send key
Right soft key
End/Power key
QWERTY keyboard
Facebook key
Earpiece
R259
5
Charging the battery
Your phone is pow ered by a rechargeable battery. For
maximum battery performance, it is recommended that you
first use up the battery power and then charge it completely.
A new battery’s full performance is achieved only after three
complete charge and discharge cycles.
1. Connect your travel adapter to the right side of your
mobile phone as shown in the diagram.
2. Connect the other end of the travel adapter to the mains
socket.
3. When the battery is being charged, the display will show the
animation of a battery being filled up.
4. When the battery is fully charged, disconnect the charger.
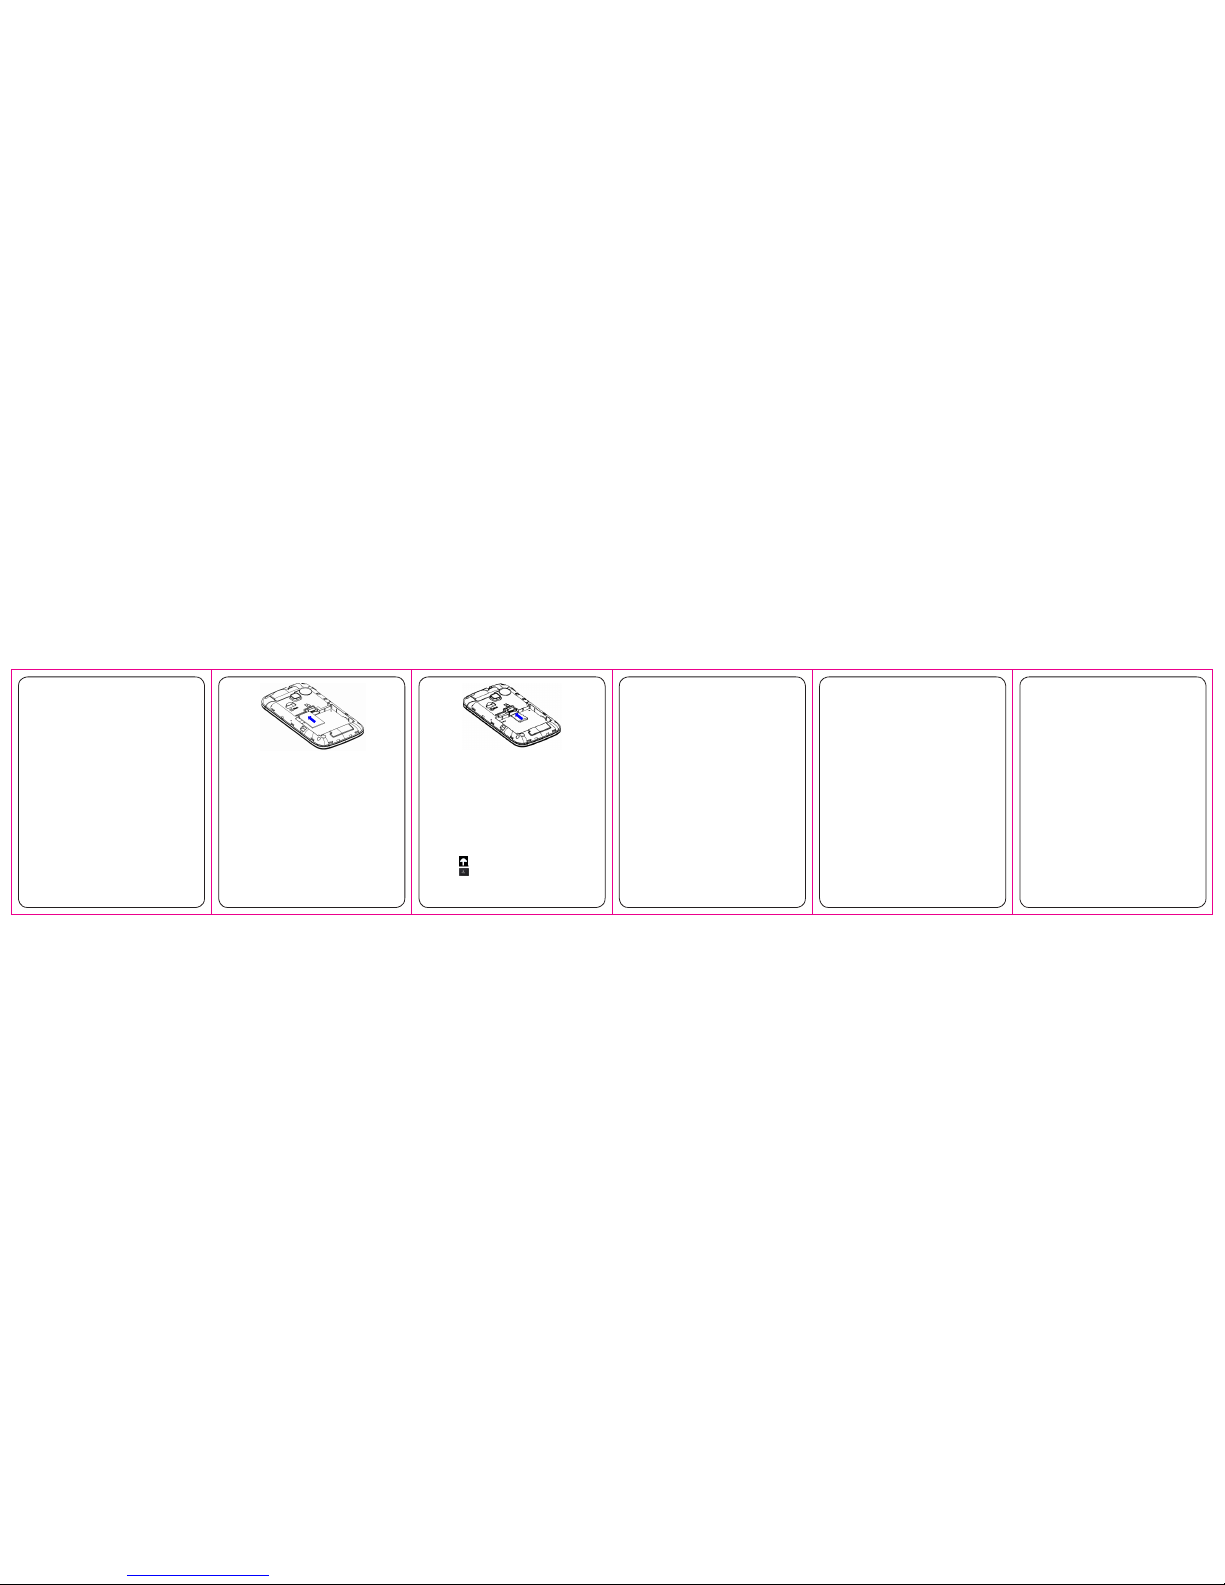
Inserting the SIM card
Insert the SIM1card as follows.
1. Make sure that the pho ne is switched off and the charger is
disconnected from the phone.
2. Turn the phone over and remove the battery cover.
3. Remove the battery if it is already installed.
4. Hold your SIM card with the cut corner oriented as shown
and then slide it into the card holder with the metal
contacts facing downwards.
5. Replace the battery first.
6. Replace the battery cover.
6
Insert the SIM card
SIM card (Subscriber Identity Module) is a micro-chip that
holds your personal information such as names and phone
numbers. Your phone won’t work without it. If you already
have contacts on your SIM card, they can be transferred in
most cases.
Inserting the Memory Card
You can use a memory card to expand the storage of the
phone. You can store or copy files such as photos, music,
videos and so on.
Do not take out the card or switch off the phone while
transmitting or storing data, which may cause data loss or
damage to the phone or the card.
Insert the memory card as follows.
Open the battery cover. Insert the card with the metal
contacts facing downwards until it clicks to the right position.
7
Insert the Memory card
Powering your phone on/off
Make sure that your SIM card is in your mobile phone and that
the battery is charged.
Hold the End/Power key to power on/off the phone. The
phone will automatically search for the network when
switched on.
Writing Text
Enteri ng l etters
Press A ~ Z to enter desired characters.
It does not work
in numeric (123) mode.
Press to switch between uppercase and lowercase.
Press to enter a space.
Press Right soft key to delete l etters left of the cursor.
8
Entering numbers
In numeric mode, use the numeric keys to enter numbers.
Entering Symbols
Press Options→Input method→Insert symbol, then
select desired symbol.
Adding Contact to the Phonebook
There are some numbers that you may want to call agai n and
again,so it makes sense to add these numbers to your
Phonebook. You can then access these numbers quickly and
easily.
1. Go to Menu→Phonebook→Add new contact.
2. Select to save the number to SIM or phone.
3. Edit the information and save it.
You can also save a number right after you’ve made or
received a phone call or a message from someone who is
not yet in your Phonebook list.
To delete someone from your Phonebook list, first select
the name, then select Options→Delete.
Making and receiving calls
The most basic way to make a call is to input the number in
the standby mode and press the Send key. You can also
make a call from the Phonebook list.
To call someone: Go to Menu→Phonebook. Use the
Up/Down keys to find the name of the person you want to call.
9
You can also type in the first letter of the name of the person
you want to call to find the right name, and then press the
Send key.
To receive a call, press the Send key.
To end a call, press the End/Power key.
To reject a call, press the End/Power key.
Make sure that you are in an area with sufficient signal
coverage to make calls. The strength of the network signal is
indicated on the Status Bar of the screen.
How to view Call history
Go to Menu→Call center→Call history.
Dialled calls, Received calls and Missed calls are saved in Call
history. If the records are f ull, the earliest saved records will
be deleted.
Also, you can delete call logs in Call history.
How to configure Call settings
Go to Menu→Call center→Call settings.
You can set Call waiting, Call divert and Call barring and so on.
Sending and receiving messages
You can use your mobile phone to send and receive
messages.
10
Write a new message
1. Go to Menu Messaging Writ→ → e message→
Text/Multimedia message.
2. Write your message. For more information on input
method, see section ‘Writing Text’. When you write an
SMS, press Options Send to, and edit the recipient.→
When you write an MMS, you can edit Subject and
content. In content field, yo u can select Options and
then choose add picture, sound, video, subject and so
on.
3. When you finish writing an SMS/MMS, select Options to
send or save the message.
View messages
Upon receiving a message, the mobile phone will alert you
with a ringtone, prompt, or a new message icon.
1. Press View to open the Inbox. You can also go to
Inbox to read the message.
2. Use the Up/Down keys to view the message.
3. While the message is open, use Options to reply,
delete or forward the message. You can also call
back the sender.
Facebook
In idle screen hold Alt key,or go to Menu→Fun→
Facebook . Facebook is a social network service
website .You can find friends, and also chat with friends
through the facebook.