5th Wheel M2 User manual

The text and logo of 5TH WHEEL are trademarks or registered trademarks of enterprises affiliated with Invanti. Other company, product or service names mentioned may be trademarks or registered trademarks of their respective owners.The illustrations and function descriptions in this user manual are for illustration purposes and reference only, and the products are subject to the real product. The mentioned technical performance indicators are based on the specific experimental environment, and the actual indicators may vary depending on the setting and environment. This product needs to be used with mobile phones or other smart devices. The realization of all functions of this product requires network support, with the network fee being subject to the supplier’s service rate. This product is only used to assist safety management and cannot replace other safety measures. Do not use this product for any illegal purpose. Some services are provided and supported by third parties, which may change at any time. Invanti does not provide any guarantee for third-party services. Please read the terms of the third-party service and privacy policy carefully before use.User's Manual of 5th Wheel Electric Scooter M2The picture is for reference only. Before using the product, please read this manual.V1.0IMPORTANT! Read carefully and keep for future reference. Original InstructionsUse Camera or QR Scanner to ScanOr Visit: https://5thwheel.afterservice.vip© 2021 Invanti (Beijing) Technology Co., Ltd all rights reserved.

Contents1.Safety Precautions2.About the Product3.Product Display4.Assembly Guide5.Unfolding/Folding/Carrying6.Riding and Parking7.Control System8.Indication Descriptions9.About Charging10.About the Battery and Charger11.App Descriptions12.Care & Maintenance13.Troubleshooting14.Product Specifications15.Authentication2911121316172022222426272930WelcomeThank you for choosing the 5TH WHEEL electric scooter 5LCHM02 (hereinafter referred to as M2). Enjoy the pleasure brought by M2. 1
* Please read and know the instructions described in the user manual carefully before using the electric scooter and keep it for future reference.

Please read the following instructions carefully before use.1 Safety Precautions21.M2 is designed for and can only be used by adults. Besides, do not ride it with anyone else, including children.3.Please ride M2 in accordance with the local laws. And do not ride it in unsafe or illegal places.
4.Please practice riding M2 in the open space for the first use and avoid riding it on the traffic line. After knowing its operation completely, you can ride it on the road in accordance with the local laws.
2.Please wear a safety helmet and other protective equipment when riding M2.
5.Do not engage in any dangerous actions or ride M2 withoutboth hands gripping the handles. And keep your feet on the scooter.
8.Do not ride it in an environment below 23℉.
6. Do not try to cross bumps higher than 3cm (0.39inch) directly, which may overturn M2 and cause injury to the user or damage to the scooter. And avoid riding through potholes lower than 3cm (0.39inch) as far as possible.7.For your riding safety, please control the speed within 15.5mph. Please try to avoid riding at night. If you are riding at night, please turn on the lights and control the speed at 9.3mph or below.
-5℃3cm3

45
11.
Do not immerse M2 in puddles deeper than 4cm (1.57 inches) to avoid damages to the electrical part due to water inflow.
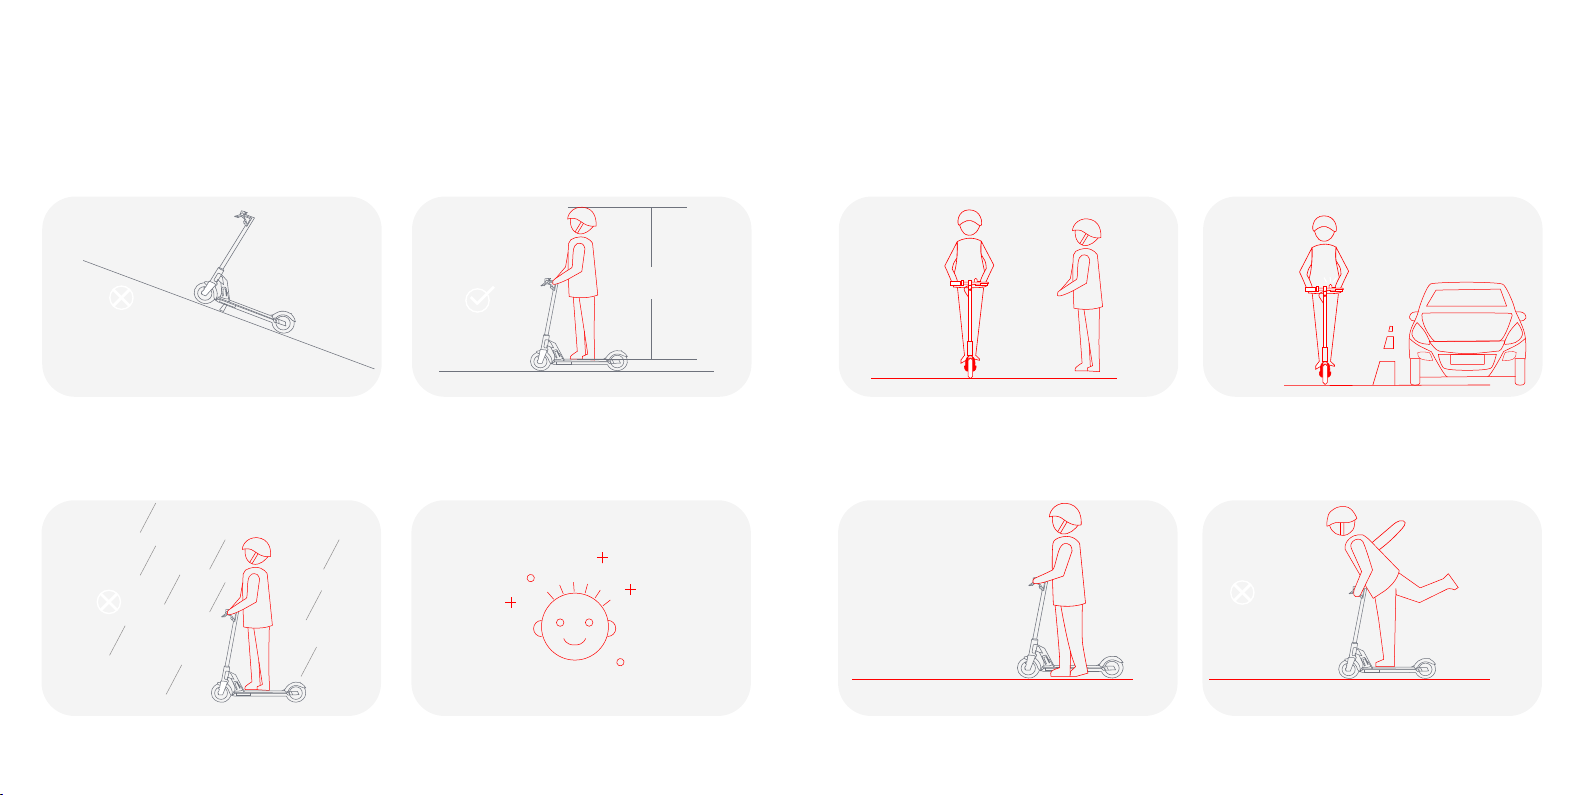
10. Do not ride it on slippery roads (such as roads covered with ice, oil, etc.).
9.When riding on the uneven road surface or poor road condition, please slow down and ride carefully or get off the scooter to pass through.
12.In rainy, snowy, windy and other bad weather, please do not ride it to avoid damages caused by unnecessary factors.
16.
Do not any load attached to the handlebar which will affect the stability of the vehicle.
15.M2 is a special riding product. Please ride it on a flat road without potholes.
13.The user should ride it in accordance with the relevant instructions described in the user manual. Anything placed on the product should not be heavier than the max weight capacity of M2.14.Please avoid riding it or placing it in an environment with too high or too low temperature. Please do not place M2 near combustibles, so as to avoid fires under accidental circumstances.
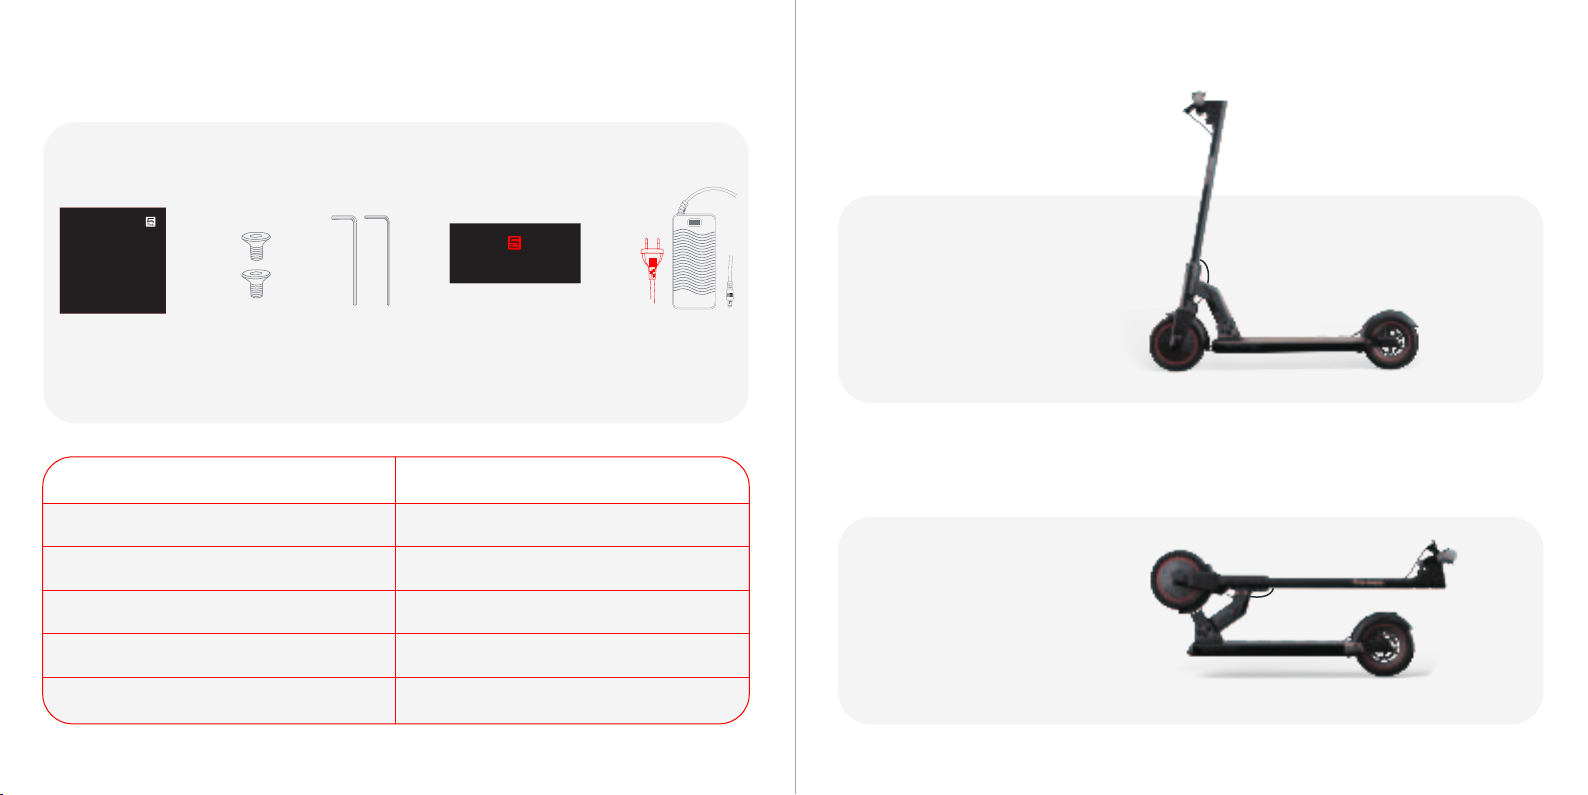
220lbs
Watch forfires

67
17.Engage the kickstand when the vehicle is not in use;Flip up the kickstand before use; Do not park the vehicle on the slope.
20.WARNING Keep plastic covering away from children to avoid suffocation.
18.The minimun height of the user is 1.4m, while the maximun height is no more than 2.2m; the maximun age of the user is 70 years old, while the minimun age is no less than 13 years old.19.Braking performance and friction between the tire and road deteriorates in wet conditions, so it is harder to control the speed and easier to lose control. Slow down and brake early when it is raining.
22.Notify your presence when approaching a pedestrian or cyclist when you are not seen or heard.Avoid high traffic areas or overcrowded areas.
21.The user shall take the time to learn the basics of the practice to avoid any serious accident that can take place in the first month.23.Cross the protected passages while walking.In all cases, take care of yourself and others.24.Do not divert the use of the vehicle,This vehicle is not intended for acrobatic use.≥1.4m

89Instrument displayFolding fastenerBuilt-in shock absorption system Front wheelBuilt-in shock absorption systemBuilt-in lithium batteryCharging portLED headlightDisc brake leverBellRight thumb acceleratorPower/gear/headlight ON/OFF button*The accessories and any additional items which are not approved by the manufacturer shall not be used.28. In any case, anticipate your trajectory and your speed while respecting the code of the road, the code of the sidewalk and the most vulnerable. If any, local special laws and regulations should be observed during riding of this product.26.Eliminate any sharp edges caused by use.
Do not modify or transform the vehicle, including the steering tube and sleeve, stem, folding mechanism and rear brake.25.Caution, the brake may become hot in use. Do not touch after use.
27.The user has the obligation to always wear shoes when riding.2 About the Product1. Product Overview

Upright StateFolded State3 Product Display11User ManualScrews Fastening ToolTool KitPower Adapter14111Product ContentsQuantity10AccessoriesManualScrew *4ScrewdriverPower adapterCommissioning tool kitPlease carefully check whether the items in the packing box are complete and intact. User's Ma nual of 5th Whee l Electric S cooter M2The picture is for reference only. Before using the pro duct, pleas e read this manua l (including the w arranty ca rd).V1.0IMPORTANT! Read carefully and keep for future reference. Original Instruction s
5th Wheel Scooter M2 Tool kit

5 Unfolding/Folding/Carrying13
4 Assembly Guide(Refer toUnfolding Operations)1.Unfold the scooter and put the kickstand down.2.Pull the spring to bring out the lower main line connector.3.Connect the main line and attach the handlebar to the stem.124.Tighten the screws with the tools included in the package and press the power button to check if it works normally.Pull the lock catch upwards.Pull the folding handle downwards.a. Pull out the spring from the stem before installation; b. Pull the spring up to 7-10cm to bring out the lower main line connector; c. Do not touch the main line interface during the pulling process.Strictly follow the arrow marks to align the slots and install the handlebar, and make sure that the spring is put back to its original position after the wiring is completed.Use the tool included in the package to tighten the screws. Check the power button after the completion of assembly.3.Lift the head of the scooter.4.Close the folding handle upwards.1.Push up the shackle.2.Pull the folding handle downwards and outwards.

142. Folding Operations3. About Carrying15Note: After folding it, carry the scooter with one or both hands.Note: For your safety, it is recommended to perform the folding operation after the scooter is powered off.1.Push up the shackle.2.Pull the folding handle downwards and outwards.3.Lower the head of the scooter to be horizontal.4.Close the folding handle upwards.

25
0155
km/h
123
7 Control SystemPower Switch Gear IndicatorThrottleBrake ControlLED DisplayBell16 17
6 Riding and Parking1.Choose a suitable place for riding the scooter.2.Unfold the scooter by following the instructions described in the user manual and wearing protective equipment.1.Press the Power switch to turn on the scooter.2.Stand on the pedal with one foot on the ground.3.Slide the scooter forward and press the throttle gently downward. And the scooter will move forward slowly. When riding it smoothly, stand on the pedal with both feet. The greater you press the throttle downward, the faster the speed.Note: For safety, M2 is designed with a non-zero start. The throttle will take effect only after the scooter slides forward for a certain distance.1.Under normal circumstances, by pressing the left brake, the scooter will stop moving immediately. The greater you press the left brake downward, the greater the braking force.2.In an emergency, you can step on the rear brake with your foot to reach the front wheel electronic brake and the rear wheel friction brake at the same time.Preparations before Riding the ScooterStarting Riding the ScooterParking

18 19Short press the Power switch for 1 second to turn on the scooter, and long press the Power switch for 3 seconds to turn it off.Press the power button twice quickly to switch the gear. The gear can be set to Level 1 (max. 6 km/h,The pedestrian mode), Level 2 (max. 16 km/h), and Level 3 (max. 25 km/h).After switching on the scooter, click the LED headlight switch to turn it on.Power SwitchGear SettingLED Headlight SwitchHold the left brake lever to brake. The greater the holding force, the greater the braking force. The indicator will blinkinng under the condition of braking.
When riding the scooter at a speed faster than 3km/h (1.86 mph), the throttle will get started and take effect. Bypressing the throttle, the user can control the riding speed. (Speed Range: 1-25km/h / 0.62-15.53 mph)
Speed controlBrake controlTyre pressureEmergency BrakingNoise emissionThe A-weighted emission sound pressure level of the vehicle in operation is less than 70 dB(A).When encountering an emergency, step on the rear brake with your foot. At this time, the rear wheel friction brake and the front wheel electromagnetic brake can work at the same time. Under normal circumstances, do not use emergency braking vigorously during high-speed driving, so as to avoid the riding risk or damage to the rear wheel. The company is not responsible for the damage.Before riding, please make sure the tyre pressure is no less than 2.8KPA. Otherwise, the mileage will decrease each time. The tyre pressure may also be under the standard value, if the scooter is unused for a long time. (This is applicable for the scooters equipped with pneumatic tires.)Cruise controlThe scooter is not initially configured with the cruise control speed. If necessary, open the mini program and select the cruise control speed. When the scooter is running at the constant cruise control speed, the cruise control will be enabled. After the cruise control is enabled, you can release the thumb accelerator, and the scooter will automatically run forwards at a constant speed. Hold the left brake lever to disable the cruise control. When the speed of the scooter reaches the set cruise control speed, the cruise control will be enabled again.You can set the status of no cruise in the mini program to disable the cruise control function.LED DisplayT1HeadlightAlertCruiseControlWirelessConnectionT2T3T4T5T6T7T8M1M2M3M4M5Real-Time SpeedSpeed UnitGear 2Gear 1Battery IndicatorTotal MileageGear 3The pedestrian mode

LED Power IndicationEach LED indicator represents 20% of power. When the battery power is below 10%, M5 flashes.Cruise Control IndicationM5 flashes >80% >60% >40% >20% <10%Turn OnTurn OffM1-M5 light upM3-M5 light upM4-M5 light upM5 light upWhen the cruise control is turned on, the indicator light will stay on.When the cruise control is turned off, the indicator light goes out.T3 lights upT3 goes outHeadlight IndicationTurn OnTurn OffWhen the headlight is turned on, the indicator light will stay on.When the headlight is turned off, the indicator light goes out.T1 lights upT1 goes outGear Indication Gear 1Gear 2Gear 3Gear 1 is enabled.Gear 2 is enabled.Gear 3 is enabled.T6 lights up,T7 & T8 go outT7 lights up,T6 & T8 go outT8 lights up,T6 & T7 go out21
20Error IndicationIf there is anything abnormal about the scooter, the warning indicator will flash, with the flashing value E1-E6 displayed.ErrorsCodeSolutionsCommunication FaultE1Brake failureE2Throttle FailureMotor FaultE3E4Controller failureE5Overheated MotorE6FlashingPlease check whether the brake is pressed.Please check whether the throttle is pressed.Check whether the motor and controller wire is connected correctly.Press and release the brake to reset the brake.If it is open-circuit or short-circuited, please replace the connecting wire.Replace the brake handle.Replace the throttle.Press and release the throttle to reset the throttle. If it is open-circuit or short-circuited, replace the connecting wire.If it is not connected correctly, please adjust and connect the motor and the controller correctly.If the motor temperature is too high, please wait for the motor to cool to the appropriate working temperature.If the motor temperature is normal, check whether the connecting wire of the controller is short-circuited. If it is short-circuited, please replace the connecting wire.If the controller is damaged, please replace the controller.Check whether the motor temperature is too high.Over-speed alertReduce the riding speed.Please check whether the taillight is on. If it is off, it means that the power supply is insufficient. Please replace the controller or the LED display. If it is on, please check whether the connecting wire between the controller and the LED display is open-circuit.f not, please check whether the connecting wire between the brake and the LED display is short-circuited or open-circuit.If not, please check whether the connecting wire between the throttle and the LED display is short-circuited or open-circuit.If it is connected correctly, please disconnect the connecting wire and measure whether the internal resistance between the three-phase wires of the motor is within a reasonable range, generally within 0.1Ω-1Ω. If it exceeds the range, the motor needs to be replaced.8 Indication Description

2322The lithium battery provided by the company can be recharged for at least 800times, and more than 1,000 times under normal circumstances. Please charge full battery for the first time before using it. The battery can be charged at anytime, and there is no any damage to charge it frequently. Meanwhile, please don’t forget to charge it per 3 months if you don’t use it for along term.BatteryThe dedicated charger provided by the company has a function of charging protection .When the battery is 100% charged, the charger will be powered off automatically. The charging time is about 4-5 hours. Damage to the battery arising from water, collision and other abnormal factors is excluded from the warranty policy.1. Open the rubber and insert the plug into the hole;2. Insert another plug of the charger into the electric outlet;3. When the indicator lamp is red, it shows the battery being charged; When the lamp turns green, the battery is finished charging.4. Please shut down and keep away from water before charging.5. Only use the specified charger for charging.6. Warning: Please be careful not to get electric shock.ChargerPress the brake in the running process to enable the kinetic energy recovery system and convert part of kinetic energy into electrical energy to be stored and used. The kinetic energy recovery system can enhance the experience of emergency braking. At the same time, the recovered kinetic energy can help increase the endurance. Changes in the power are displayed simultaneously.Kinetic energy recoveryCharging instructions③Insert the rubber plug and fix it after charging.②Plug in the charger. Step 1. Open the rubber plug and insert the charger into the charging port on the scooter.Step 2. Insert another end of the charger into the power outlet.Step 3. When charging, the red indicator on the charger will light up. When the indicator turns green, it means that the scooter is now fully charged.①Open the rubber plug. 9 About Charging10 About the Battery and ChargerM2 electric scooter is equipped with a special lithium battery and a special smart charger. The scooter and its accessories have a special number. Do not use chargers of other brands, nor should other types of products be charged with the charger of our company. The company will not be responsible for the accessories damaged by misuse.

24 25
11 Instructions for APP②Please turn on the scooter before the connection.③Finish the connection by following the instructions.Scan the QR code to download the App.①.Downloading the App ④Register account using your Email. A PIN code is sent and needed in this procedure. Scan the bar code under the scooter and bind the vehicle.Connection statusReal time speedBattery indicatorGearLock switchVehicle self inspectionElectronic brake strengthSpeed unitLED display backlight adjustmentCruise controlTotal mileage电子刹车强度 *The actual content shall be subject to the app display interfaceSpecial note: about the locking function,It can only ensure that the vehicle cannot run normallyDue to the light weight of the whole vehicle andThe whole vehicle is composed of mechanical partsIt can be removed with corresponding toolsTo ensure that the vehicle is not stolen,Please park your vehicle in sightEnclosed or added machinery and Fixtures

12 Care & Maintenance13 Troubleshooting26 271.The display screen is black.If there is any problem with the scooter, please try to solve it in the following ways.Cause: The exposure time in the sun is too long.Solution: Please place the scooter in a dark environment for a period of time and it will return to normal.2.The value is inconsistent with the actual value.Cause: The parameter setting is incorrect or missing.Solution: Long press the Power switch to shut down the scooter, and then short press the Power switch to restart it.3.The displayed value is dim.Cause: The battery connection is loose, or there is no battery power left.Solution: Turn off the scooter and restart it. If the problem remains, please contact the customer service via https://5thwheel.afterservice.vip6.Braking Distance 2.5mThe braking distance of this product is measured under the conditions of 75kg loading, 24℃ temperature, 55%-65% humidity, 2.9 bar tire pressure and asphalt pavement.4.The product cannot work normally.a. Please make sure that it is powered on.b. Check whether there is battery power left by viewing the display screen.c. Check whether the left brake and rear brake are in place.d. Check whether all ports and power cables are connected accurately.If all the above steps are checked and the product still cannot work normally, please contact us viahttps://5thwheel.afterservice.vip5.The screw at the junction of the handlebar and the stem is loose.Cause: The loose screw is a spare locking screw, which is loose by default in the factory setting, without affecting normal use. Solution: The user can adjust and lock by the screw if necessary.As shown in the figureThe mechanical vibrations transmitted by the Electric Scooterare less than 2.5 m/s2. The uncertainty of measurement is.For maintenance, add a small amount of white grease or lubricant to the folded part once every six months. Check the scooter once every three months for screw loosening. Tighten the loose screw.If you see stains on the scooter's body, wipe them off with a damp cloth. If the stains won't scrub off, put on sometoothpaste, and brush them with a toothbrush, then wipe them off with a damp cloth. Do not clean the scooter with alcohol, gasoline, kerosene or other corrosive and volatile chemical solvents toprevent dire damage. Do not wash the scooter with a high-pressure water spray. During cleaning, make sure that the scooter's turned off, the charging cable is unplugged, and the rubber flap is closed as water leakage may result in electric shock or other major problems.Avoid leaving scooter under direct sunlight or in severly humind places for a long time.Keep the scooter clean.Regularly check the tightening of the various bolted elements, in particular the wheel axles, the folding system, the steering system and the brake shaft.LubricationStorage and daily maintenanceCleaning RecommendationsWhen you get the electric scooter for the first time, please fully charge the battery before using the scooter. The battery can be charged at any time to ensure the power supply. It will not be damaged during charging. When not in use, the battery needs to be charged once every three months.Battery*Laboratory dataRoutine Inspection1. Before riding, please confirm the folding mechanism is locked;2. Please check whether the tires are badly worn. Please contact the local authorized dealer if they needs to be replaced;3. Please check whether the wear condition of the brake pad affects the use of the brake system. If so, please contact the local authorized dealer to deal with the problem;4. The screws used in this product are self-tightened screws. Please note that the effect may be gone after several times of tightening.

29
2814 Product SpecificationsParameterDimensionWeightStatusApprox. 43 x 43 x 20 inchesMain parametersMotor brake + Disc brake + Foot brake4-5h16-19miles (Depends on factors such as environment, angle, speed, driving habits, etc.)Approx. 43 x 16 x 28 inchesTravel DistanceApplicable TerrainStable and smooth road surface, with bumps less than2cm and depressions less than 3cmSpring Damping + Concealed Damping + Tire Damping8.5-Inch Honeycomb TireDamping SystemIP54Approx. 14°Speed, Mileage, GearLED high-brightness headlight350WParameters about Charging 36V-7.5AHCharger Rated Input Voltage100V-240VAC 50/60HzFolded: L x W x HMax Load220lbsMax SpeedAbout 15.5mphTiresNet weightUpright: L x W x HProduct nameDustproof and Waterproof GradeBraking SystemLED displayLighting systemMotor powerCharging timeLithium batteryApprox. 33lbs5th Wheel Scooter M2Model 5LCHM02Max Incline(Tire pressure range:2.1-2.8Kpa)Handlebar commissioningDisc brake commissioning(Note: The hexagon wrench is provided in the commissioning tool kit.)(Note: The hexagon wrench is provided in the commissioning tool kit.)After repeated use of electric scooter, screws may become loose, which may cause the vertical rod to shake. If the vertical rod is shaking when riding, use the hexagon wrench to tighten the hexagon screw under the left side of the handlebar clockwise as shown in the figure.If the brake is too loose, use the hexagon wrench to tighten it clockwise. If the brake is too tight or the brake disc is abnormal, use the hexagon wrench to loosen it counter-clockwise. (The aforesaid screw is on the right side of the rear tire, which needs to be tightened or loosened from the left side of the rear tire through the hub.)If the braking problem is still not resolved after in strict accordance with the commissioning method as shown in the left figure, please use the hexagon wrench to loosen the screws on the tension disc as shown in the figure above, and adjust the brake by controlling the length of the exposed end of the brake cable.Torque:6-10N·mTorque:6-10N·mTorque:6-10N·m

3130WEEE needs to properly dispose of and recycle the product. This sign indicates that the product should not be disposed of together with other domestic waste throughout the EU.Therefore, in order to prevent possible harm of uncontrolled waste treatment to the natural environment or human health, it is necessary to recycle it and promote the sustainable reuse of material resources. To recycle the used product, use the return and collection system or contact the retailer who can use the product for environmentally safe recycling.Batteries or battery compartments are marked in accordance with the European Directive 2006/66/EC and the amendment 2013/56/EU on batteries and accumulator cells and scrap batteries and accumulator cells.The directive applies to the recycling framework of waste batteries and accumulator cells throughout the EU. The label on the battery indicates that the battery should not be discarded, but recycled at the end of its service life according to the directive.According to the European Directive 2006/66/EC and the amendment 2013/56/EU, batteries and accumulator cells are labeled to indicate that they will be collected separately and recycled at the end of their service life. The label on the battery may also contain the chemical symbols of the relevant metals in the battery (Pb, Hg and Cd). Users should not dispose of batteries and accumulator cells as garbage, but use the collection framework available to customers to recycle and dispose of batteries and accumulator cells. With the engagement of users, it is important to minimize any potential impact of batteries and accumulator cells on the environment and human health due to the presence of potentially hazardous substances.Before placing electrical and electronic equipment (EEE) into a waste collection stream or waste collection facility, users of equipment containing batteries and/or accumulator cells must remove these batteries and accumulator cells for separate collection.5TH WHEEL is a registered trademark of Invanti (Beijing) Technology Co., Ltd (hereinafter referred to as "Invanti"), which is authorized to be used by Solowii (Beijing) Technology Development Co., Ltd. Android and Google Play are trademarks of Google Inc. and the App Store is the service mark of Apple Inc. Their respective owners reserve the trademark rights mentioned in this user manual.The products involved in the registered trademark of 5TH WHEEL are protected by relevant patent laws. For relevant patent information, please visit the website: http://www.invanti.com.In this user manual, we make our utmost to describe all the instructions and functions of the M2 electric scooter. With constant updates and iteration, the M2 electric scooter received may be slightly different from the product features shown in this manual. For more information, please visit the Apple App Store (iOS) to download the App.Please note that Invanti has developed products with many functions and different models of products, and some of the functions mentioned here may not be applicable to the product or equipment received. The manufacturer reserves the right to change the design and function of the M2 electric scooter and documents without notice.2021 Invanti (Beijing) Technology Co., Ltd all rights reserved.If you encounter any problems when using the product, please feel free to contact us through the following methods or scan the QR code to get a quick response and a satisfactory solution.Amazon Platform: “Contact Seller”Email Address: 5thwheel@afterservice.vipRestriction of Hazardous Substances in Electrical and Electronic Equipment (RoHS) Directive.The products and parts (cables, wires, etc.) of Invanti (Beijing) Technology Co., Ltd comply with the requirements of directive 2011/65/EU on restricting the use of certain hazardous substances in electrical and electronic equipment ("RoHS recasting" or "RoHS 2")15 AuthenticationContact UsApplicable model: M2The EU Compliance Statement is as follows:EU Battery Recycling Information:Trademark and Legal StatementsThe product has passed the ANSI/CAN /UL-2272 certification of the CSA.The battery complies with the UN/DOT 38.3.According to the Federal Communications Commission (FCC) Compliance Statement as follows:The product complies with part 15 of the FCC rules, and the operation must meet the following two conditions: (1) the product should not cause harmful interference, and (2) the product must accept any received interference, including interference that may lead to accidental operation. Any change or modification not expressly approved by the responsible party may make void the user’s right to operate the product.Get 24/7 Customer Service Use Camera or QR Scanner to ScanOr Visit: https://5thwheel.afterservice.vip

Other manuals for M2
1
This manual suits for next models
1
Table of contents
Other 5th Wheel Scooter manuals