ADE HANSE Series User manual

Series HANSE
Hanse-180522-Rev007-UM-en
IMPORTANT
FOLLOW THE USER GUIDE
PLEASE KEEP FOR FUTURE REFERENCE

CONTENTS
1. PREFACE.................................................................................................................................................2
1.1 Introduction...............................................................................................................................................2
1.2 Usage.......................................................................................................................................................2
2. COMISSIONING.......................................................................................................................................3
2.1 Opening the package ...............................................................................................................................3
2.2 Installation ................................................................................................................................................3
2.3 Electrical supply........................................................................................................................................3
2.4 Operation..................................................................................................................................................4
3. OPERATING FUNCTIONS AND SAFETY REQUIREMENTS................................................................4
3.1 Operating Functions.................................................................................................................................4
3.2 Mechanical Safety Devices ......................................................................................................................4
3.3 Acceptance test........................................................................................................................................4
4. USING THE MEAT SLICING MACHINE..................................................................................................5
4.1 Operating procedure ................................................................................................................................5
5. SERVICING AND MAINTENANCE OF THE MEAT SLICING MACHINE...............................................6
5.1 Cleaning ...................................................................................................................................................6
5.2 Lubrication................................................................................................................................................6
6. BLADE SHARPENING PROCEDURE.....................................................................................................7
6.1 Grinding the blade....................................................................................................................................7
7. TRAINING ................................................................................................................................................8
8. CLEANING AND SERVICING..................................................................................................................8
9. WARRANTY.............................................................................................................................................8
10. TECHNICAL DATA ..................................................................................................................................9
11. CE Marking and Declaration of Conformity..............................................................................................9
12. CIRCUIT DIAGRAMS.............................................................................................................................10
13. EXPLODED VIEW..................................................................................................................................12
14. SPARE PARTS LIST..............................................................................................................................14

1. PREFACE
This manual has been written to comply with the requirements of the current version of the European Ma-
chinery Directive.
This manual is provided by the manufacturer as a means of informing the customer about the basic work-
ing principles, maintenance requirements and safety devices of the machine in a clear and easily under-
stood form.
Although these meat slicing machines being continually improved, these developments will not affect the
validity of the instructions and information provided in this manual.
This manual must have been thoroughly read before the meat slicing machine is taken into operation.
If this manual should become worn with use or lost then a copy is to be ordered from the manufacturer as
quickly as possible.
As the majority of accidents and injuries occurring when these machines are being used result from insuf-
ficient knowledge, the instructions and information contained in this manual should be read without fail be-
fore starting to work with the machine.
1.1 Introduction
These meat slicing machines are designed to meet the requirements of the current safety standards. This is
signified by the "CE" marking placed on each of our meat slicing machines to indicate its conformity with the
above-mentioned standards.
1.2 Usage
These meat slicing machines are intended for cutting cooked and raw sausage, warm or cold meat, cheese
and bread. The maximum cut thickness is 15 mm.
The machines are suitable for up to 60 guests (Hanse 250) or up to 100 guests (Hanse 300). These numbers
should be seen as recommendations, based on experience and may vary depending on the exact use to
which the machines are put. The maximum duty cycle is 40 % (i.e. 24 minutes in 1 hour). After this time has
elapsed the motor must be allowed to cool down. Correspondingly shorter cool-down intervals are required
when the machine is switched on for shorter periods.
These machines may only be used in their original condition or when equiped with original spare parts. The
safety devices may not be removed. A machine must immediately be taken out of operation in the event of
one of its safety devices being damaged and ADE then informed of the replacement and/or spare part re-
quirement.
These meat slicing machines may not be used under any conditions to cut deep-frozen products,
meat or sausages with bones or stone fruit.
Failing to observe these instructions may result in machines being seriously damaged and the ne-
gation of any entitlement to guarantee.

2. COMISSIONING
Ensure that on receipt of the package containing the meat slicing machine there is no sign of any damage
having occurred during transport.
2.1 Opening the package
•Open the carton and remove the machine.
•Inspect the contents of the package and that they correspond with those listed on the delivery note.
Packaging materials are potentially recyclable and may not be disposed of in the normal household
rubbish. Enquire at your local authority about the possibilities for proper disposal.
Note that local regulations must be observed when disposing of the packaging.
Under no condition may the packaging be disposed of in the open countryside!
2.2 Installation
The voltage and frequency of the electrical supply must be compared with those specified on the
machine type plate before the machine is connected to the electrical supply.
Should the voltages and frequencies not correspond then the machine may not be connected under
any circumstances as this could lead to damage to the machine and to fire.
Place the meat slicing machine on a level, smooth and vibration-free surface, with sufficient stability to safely
carry the weight of the machine. The adjustable machine foot can be used to compensate foot minor irregu-
larities. Ensure that when positioning the at least 200 mm free space is left around the motor ventilator.
The machine should be positioned so that the operating controls (the on-/off switches and the cutting thick-
ness adjustment knob) face the operator and the blade and motor face in the opposite direction.
There must be sufficient space around the machine so that it can be operated, cleaned and maintained with-
out difficulty. At least 300 mm free space is considered suitable here.
The machine is guaranteed to to operate correctly up to a relative humidity of 80 % and with a heat source in
its immediate vicinity no warmer than 30 °C.
2.3 Electrical supply
Insert the plug in the electrical socket and check that the electrical supply is equipped with a suitable fuse or
circuit breaker. For the maximum security a fuse of 0.5 A is recommended for the distributor box, plug or
socket.
Machines for 400 V three-phase supplies are equipped with red CEEE plugs (16 A) as standard. Replace-
ment of the plug may only be carried out by a certified electrician.
The cutting blade must rotate in an anti-clockwise direction when looking at the machine from the side of the
blade guard (from top to bottom when seen from the front of the machine).
Two of the three wires in the plug must be exchanged if the blade of a three-phase (400 V) machine should
rotate in the opposite direction.

2.4 Operation
This meat slicing machine is only to be used for its intended purpose. Under no circumstances may the oper-
ator hold the product to be cut in their hand. Instead, it must be secured using the handling carriage holder.
Hands are to be kept away from the cutting blade at all times. Only the handling carriage, carriage arm or the
handle intended for this purpose may be used to move the carriage back and forwards.
3. OPERATING FUNCTIONS AND SAFETY REQUIREMENTS
3.1 Operating Functions
These meat slicing machines are operated by two electrical press-buttons: a green operate button marked "I"
and a red stop button marked "O".
In addition they are equipped with a yellow indicating lamp mounted in the green operate button to indicate
"Cutting blade in operation".
The meat slicing machines are also equipped with a safety switch within the cutting blade guard which is
released when the supply voltage is interrupted (no voltage release).
The "I" operating button must be pressed each time after the supply voltage has been interrupted in order to
restart the machine.
3.2 Mechanical Safety Devices
The cutting blade is completely protected by a rigidly mounted guard, except for the region actually used
for cutting.
The handling carriage can only be removed when the cutting thickness adjuster is covering the blade and
the adjustment knob set to "0" (null) or has been to rotated to its end position (beyond "0").
The cut thickness adjuster can only be opened using the adjustment knob when the handling carriage is in
its normal operating position
The cutting blade can be removed using either chain mail gloves or the optionally deliverable blade re-
moval tool. In either case particular care and attention must be exercised to avoid injury.
All safety devices are permanently mounted on the machine and may not be removed. Scrapping or mak-
ing unauthorised modifications to the machine can result in its becoming a danger to others. Under no cir-
cumstances can the manufacturer accept liability for any accidents or injuries that may occur in such
situations.
3.3 Acceptance test
Ensure that all components have been correctly mounted on the slicing machine.
Determine whether the handscrew securing the cutting blade guard is blocked.
Press the operate button and check whether the machine can actually be switched on and off.
Check that the handling carriage and holder slide freely.
Check that the sharpening tool works correctly.
Ensure that the cut thickness adjustment arm opens correctly.

4. USING THE MEAT SLICING MACHINE
4.1 Operating procedure
1) Set the graduated rotating knob "A" to "0" (null).
2) Pull the handling carriage using the carriage arm "B" as far as possible towards the operator.
3) Lift the holder "C" using grip "D", which is intended for this purpose. Ensure that the machine is
switched off before laying the product to be cut on the carriage and lowering the holder onto or behind
the product.
Note that for safety reasons the holder is fixed to the machine. If the product being cut is too long for
the holder to be correctly positioned behind it then the holder should be laid on top of the uncut prod-
uct. If the product is too short for the holder to firmly hold it the holder should never the less be posi-
tioned behind the product.
4) Set the required cut thickness using the rotating knob "A": it being possible to infinitely vary the thick-
ness between 0 and 15 mm.
5) Press the operating button "E" to switch on the machine.
6) Use either grip "D" or grip "B" on the carriage arm (only Hanse 300 model) to move the holding car-
riage backwards and forwards and thereby start slicing.
7) Switch off the machine after slicing has been completed using the red stop button "F" before rotating
the cutting thickness adjusting knob "A" back to "0".

5. SERVICING AND MAINTENANCE OF THE MEAT SLICING MACHINE
For hygienic reasons meat slicing machines must be kept clean at all times. They must be disassembled and
cleaned both at the end of each working day and each time the type of product being cut is changed (e.g.
from fresh to cooked meat).
5.1 Cleaning
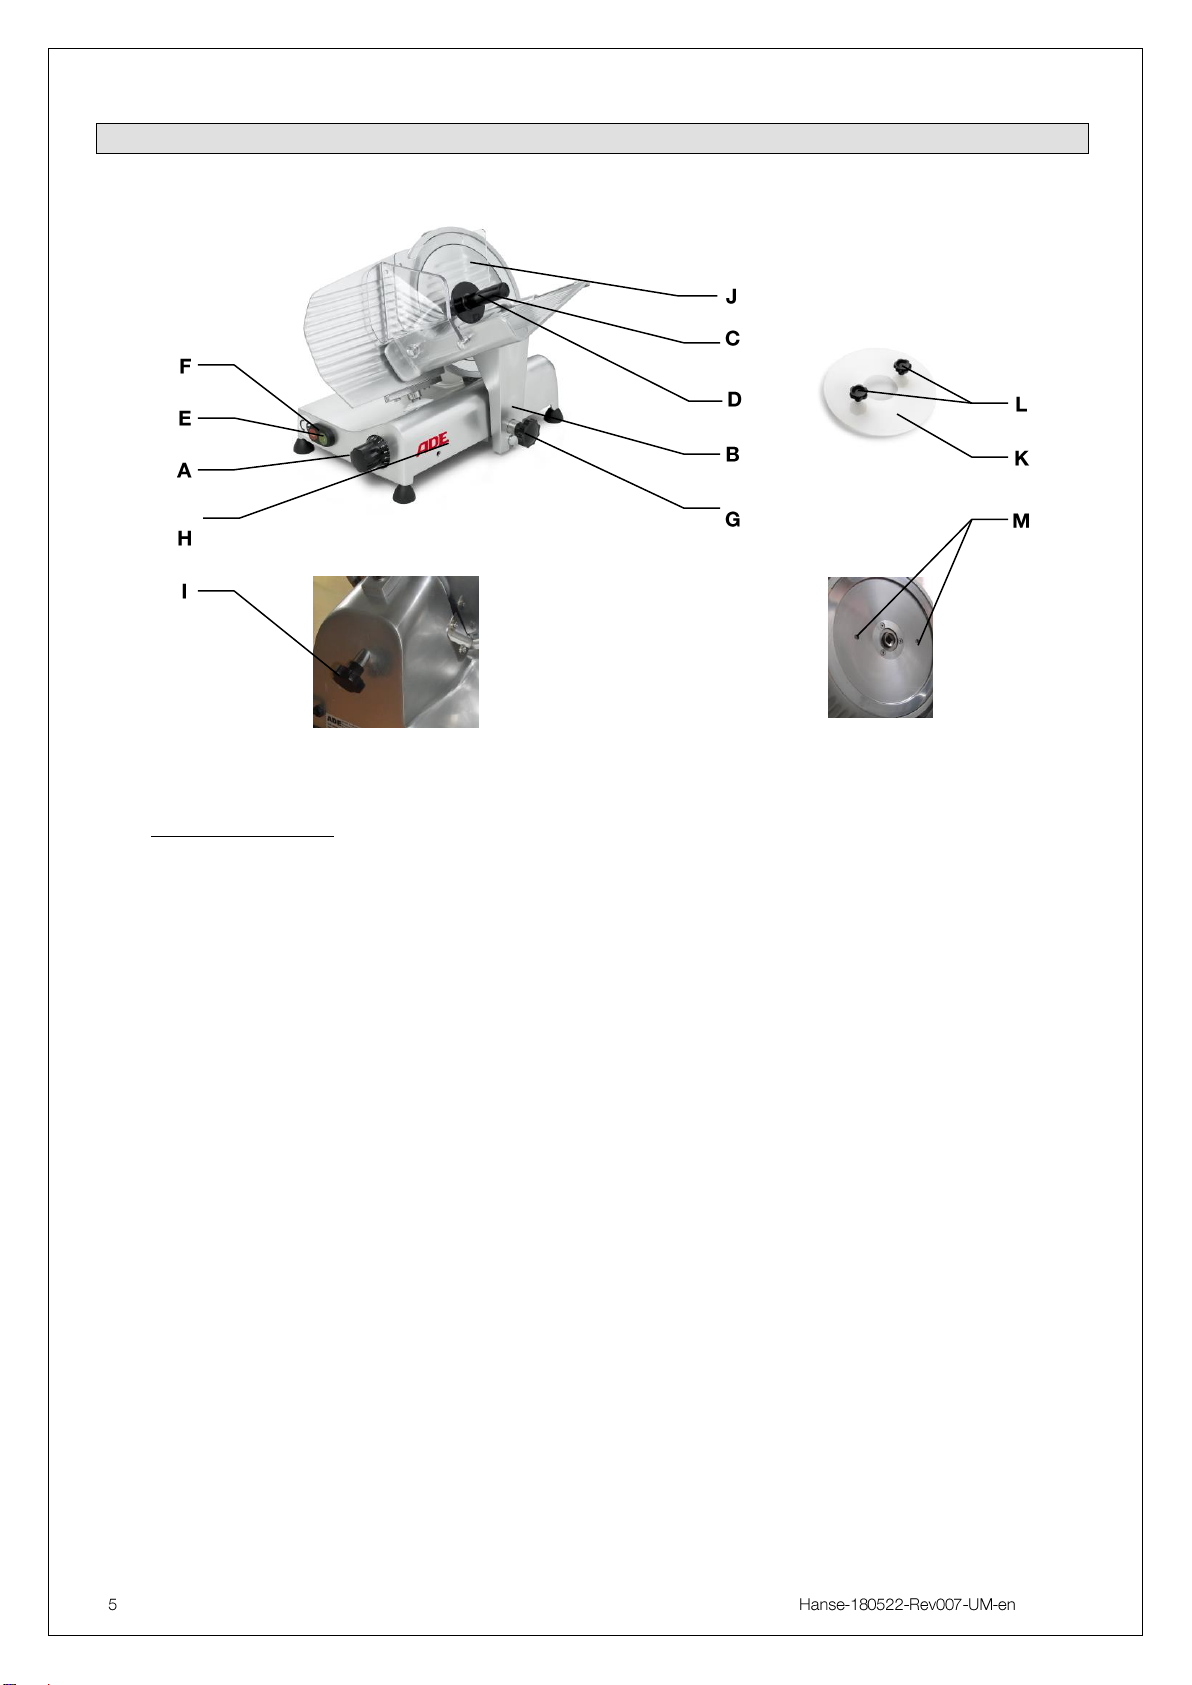
1) Remove the plug from the socket in order to disconnect the machine from the electrical supply. Note that
pressing the red stop button on the machine "F" can in no way be considered adequate disconnection of
the machine.
2) Set the thickness setting knob "A" to "0" (null) or its end position before removing the carriage.
3) Completely unscrew the handwheel "G", regardless of its position.
4) Use light pressure to pull the holding carriage back to its end stop "H", releasing the blocking unit lock.
The holding carriage can now be lifted vertically upwards from its guides, with the cut adjustment knob
remaining locked at position "0".
Like all other removable parts of the machine, the carriage may not be cleaned in a dishwasher!
5) Completely unscrew the hand screw "I" and remove the blade protecting plate "J" using suitable protec-
tive clothing, such as, for example chain mail gloves.
6) If the optional blade removal tool has been purchased:
Position the blade removal tool "K" over the holes "M", provided in the blade and fasten the two together
by screwing the two thumbscrews "L" into the threads.
7) Undo the screws holding the blade using a screwdriver and remove the complete blade using both
thumbscrews.
8) Once dismounted, wash the cutting blade with warm water and a liquid cleaner, rinse with clean water,
allow to dry and then disinfect using, for example, alcohol. The machine base and the other components
must always be cleaned with warm water and liquid cleaner and a non-scratching cloth. These parts
should also be rinsed with clean water, allowed to dry and then be disinfected, for example, using alco-
hol. Under no circumstances should abrasive cleaners or bleaches (i.e. cleaners based on sodium hypo-
chlorite) be used as these would permanently damage the machine surface.
9) Assembly of the machine is to be carried out in the reverse order to that described above.
Ensure that when cleaning the blade water does not enter the blade hub as this can lead to damage
to the bearings, motor and other components in the machine. In addition, note that water can cause
rusting when not allowed to dry off properly.
Under no circumstances may either the machine or its components be cleaned using a water jet or
high pressure cleaner.
Neither the carriage. the blade cover plate nor other removable parts may be cleaned in a dish-
washer!
The cutting blade guard is a particularly important protective device and may only be removed when
the blade is secured in its normal position with screws.
5.2 Lubrication
The slicing machine holding carriage and holder guides must be regularly lubricated in order to ensure that
they always slide freely. Only high quality acid and resin-free vaseline oil (e.g. ESSO MARCOL 82 or
BERGOIL WHITE OIL 105) should be used; this type of lubrication should be carried out regularly using small
quantities of lubricant.

6. BLADE SHARPENING PROCEDURE
The cutting blade must always be kept well sharpened in order to ensure problem-free operation of the ma-
chine. It should be noted that regular 'short' sharpening is to be preferred over more extensive operations.
Always ensure that before starting with this type of operation, the graduated knob for adjusting the cut thick-
ness has been set to "0".
Sharpening is only to be carried out on smooth blades; toothed blades for bread cutting machines
must be sharpened by specialist companies.
Cutting blades should only be sharpened when they are clean and completely free of grease, as
grinding a blade which has grinding waste stuck to it can not only cause damage to the sharpening
machine but also its grinding wheels.
Any dirt deposits remaining on the grinding wheels after sharpening a blade should be removed. In addition,
any grains of sand remaining on a cutting blade or on the machine must be removed using a cloth dipped in
alcohol.
6.1 Grinding the blade
1) Clean both sides of the cutting blade with the stop plate closed (Graduated knob "A" turned to position 0
or further).
2) Switch off the machine and turn the cutting thickness adjustment knob "A" to the left until it reaches its
end position (fully opened).
3) Secure the sharpening tool on the stop plate.
Note that only sharpening tools of the type delivered with our machines may be used.
In order to be able to open the stop plate to its maximum extent, pull the carriage "B" as far towards the
operator as possible and either tip up holder "C" or disassemble it by removing it from the guides . Se-
cure the sharpening tool to the stop plate using the knurled screw on the tool's upper surface. Here the
protrusion on the sharpening tool is inserted in the hole in the stop plate nearest to the blade and the
knurled screw inserted in the second hole on the plate. The metal part of the sharpening tool is to be po-
sitioned in front of the blade and point downwards, with the bend in the metal part pointing towards the
operator. This provides additional protection against injury.
4) Switch on the meat slicing machine. Carefully move the grinding disc towards the rotating blade by turn-
ing the thickness adjustment knob to the right slowly and with little force. Contact must cause the grind-
ing disc to rotate with the blade. Generally, only a few seconds are sufficient to sharpen the blade.
5) The blade must be deburred after being sharpened. This is done by pressing the sprung button on the
sharpening tool for approx. 2-3 seconds, until the burrs have been removed.
6) Switch off the meat slicing machine after sharpening has been completed and then remove the sharpen-
ing tool by reversing the steps described for its installation before setting the cut thickness adjustment
control to "0".
7) Remove all deposits remaining from the grinding operation from the blade and the product holder shaft
with a cloth.
Note that sharpening of the cutting blade may only be carried out by authorised and trained person-
nel.
Under no circumstances should the blade be cleaned when the machine is in operation (i.e the
blade is rotating).
The blade can no longer be sharpened once the blade diameter has been worn down by more than
6 mm.

7. TRAINING
Operators must have come of age must be sufficiently instructed in the operation, cleaning, maintenance of
the meat slicing machine and in sharpening the blade whilst the machine is being installed. In particular, they
must be informed about the dangers that may result from improper use of the machine.
Training must be carried out by the person installing the machine. This person should also have sufficient
knowledge of the relevant European mechanical engineering standards.
8. CLEANING AND SERVICING
Meat slicing machines may only be cleaned by trained personnel.
Remove the plug from the socket. Note that switching off a machine by pressing the red stop button can in
no way be considered adequate disconnection of the machine.
At least two persons are required to set up the machine, with the four feet serving as reference points.
The cutting blade must be replaced once the distance between the cutting blade guard and the blade
reaches 6 mm.
Take particular care of the sharp blade when doing so.
Note that the electrical cable may only be replaced by authorised and trained personnel.
Cleaning meat slicing machines with cleaners that could be harmful to the health of either the operator or
of customers is expressly forbidden. Only products with a Ph of 7-8 may be used for cleaning.
9. WARRANTY
ADE will repair or replace this product within a period of 2 year from date of delivery applying to defects oc-
curred due to poor material or workmanship (invoice is necessary).
All moveable parts are excluded. The warranty does not include natural ear, damages caused by incorrect or
negligent handling, overuse or unsuitable or improper storage.
The manufacturer refuses each direct or indirect responsibility of the following circumstances:
Disregarding of instruction
Usage by untrained personnel that is not familiar with the instruction
Usage that does not correspond to the valid prescriptions
Non authorized modification or repair
Usage of equipment and accessories that is not from manufacturer’s origin
The legal rights of the customer are not hindered by the agreement of this warranty.
In case of registering a complaint, contact the dealer that has sold the product.

10. TECHNICAL DATA
Model Hanse 250-230 Hanse 300-230 Hanse 300-400
Blade Ø 250 mm 300 mm 300 mm
Cutting thickness range 0-15 mm 0-15 mm 0-15 mm
Cutting area 210 x 185 mm 235 x 220 mm 235 x 220 mm
Dimensions approx. 410 x 475 x 340 mm 475 x 580 x 440 mm 475 x 580 x 440 mm
Power 0.14 kW 0.23 kW 0.23 kW
Weight approx. 16 kg 23.5 kg 23.5 kg
Electrical supply 230 V 230 V 400 V
Options:
Blade removal tool H4020-051 H4050-106 H4050-106
11. CE Marking and Declaration of Conformity
Declaration of conformity by the manufacturer
This product has been manufactured in accordance with the harmonised European standards. They con-
form to the regulations of the EC-directives listed below:
−Machinery Directive 2006/42/EG
−EMC Directive 2014/30/EU regarding electromagnetic compatibility
−Low Voltage Directive 2014/35/EU
−RoHS Directive 2011/65/EG
in the currently valid versions.
This declaration loses its validity if modifications are made to the machine without our approval.
Hamburg, May 2018
ADE GmbH & Co.
Hammer Steindamm 27 –29
D-22089 Hamburg

12. CIRCUIT DIAGRAMS
HANSE 250 / 300 - 230V / 50 Hz
Block circuit diagram
HANSE 250 300 - 230V / 50 Hz
Circuit diagram
KEY
L
LIVE WIRE
N
NEUTRAL WIRE
RI
SWITCHING RELAY
ri
CONTACT SWITCHING RELAY
Y
THERMAL RELAY
Y
CONTACT THERMAL RELAY
Li
LED SWITCH
M
MOTOR
Pm
ON SWITCH
Pa
OFF SWITCH
C
CAPACITOR

HANSE 250 / 300 –230V / 60 Hz
Block circuit diagram
HANSE 250 / 300 - 230V / 60 Hz
Circuit diagram
KEY
L
LIVE WIRE
N
NEUTRAL WIRE
RI
SWITCHING RELAY
ri
CONTACT SWITCHING RELAY
Y
THERMAL RELAY
Y
CONTACT THERMAL RELAY
Li
LED SWITCH
M
MOTOR
Pm
ON SWITCH
Pa
OFF SWITCH
C
CAPACITOR

HANSE 300-400V 50/60 Hz
Circuit diagram
13. EXPLODED VIEW
HANSE 250-230V
KEY
R1= RELAY
TR= TRANSFORMER
SL= LIGHT SIGNAL
O
OFF BUTTON
1
ON BUTTON
M
MOTOR
Sr*
OUTPUT CONTACT
BLUE
\ ERO
RED
Transformation 220V 3 ph. / 380V 3 ph.
STOP
START
BLUE
BLACK
RED

HANSE 300-230V
HANSE 300-400V

14. SPARE PARTS LIST
HANSE 250-230 V
NO.
DESCRIPTION
Hanse 250
QTY.
PART NO.
130
Cutting thickness adjuster
1
H4090-011
140
Suction foot
1
H4090-005
373
Circular blade, smooth
1
H4090-011
373
Circular blade, smooth, Teflon coated
1
H4090-0141
373
Circular blade, toothed
1
H4090-021
373
Circular blade, toothed, Teflon coated
1
H4090-0211
162
Carriage rear wall
1
H4090-001
197
Grease remover
1
H4090-030
296
Switch
1
H4090-053
297
Relay
1
H4090-066
490
Blade cover plate
1
H4090-006
326
Protective plate for holder
1
H4090-002
365-370-371-378
Blocking unit
1
H4090-031
378
Locking knob for blocking unit
1
H4090-0311
516
Base plate
1
H4090-008
777
Holding bar with grip for blade cover plate
1
H4090-026
861
Drive belt
1
H4090-004
926
Blade sickle guard
1
H4090-015
954
Stop plate
1
H4090-007
9240
Switch with relay
1
H4090-0031
298
Hand grip for holder
1
H4090-0201
424
Motor 230 V/50 Hz
1
H4090-024
700345
Motor 230 V/60 Hz
1
H4090-0241
709205
Holder, complete
1
H4090-028
9269
Sharpening tool, complete
1
H4090-016
9199
Blade hub
1
9379
Carriage slideways
1
H4090-037
Carriage, complete
1
H4090-0542
Blade removal tool
1
H4020-051

HANSE 300-230 V
NO.
DESCRIPTION
Hanse 250
QTY.
PART NO.
375
Circular blade, smooth
1
H4090-019
375
Circular blade, smooth, Teflon coated
1
H4090-0191
375
Circular blade, toothed
1
H4090-022
375
Circular blade, toothed, Teflon coated
1
H4090-0221
162
Carriage rear wall
1
H4090-001
296
Switch
1
H4090-053
297
Relay
1
H4090-066
403
Blade cover plate
1
H4090-025
407
Protective plate for holder
1
H4090-032
430-431-432
Blocking unit
1
H4090-071
432
Locking handle for blocking unit
1
H4090-0711
627
Hand grip for holder
1
H4090-045
628
Suction foot
1
H4090-038
631
Cutting thickness adjuster
1
H4090-044
635
Drive belt
1
H4090-035
768
Base plate
1
H4090-034
770
Blade sickle guard
1
H4090-058
777
Holding bar with grip for blade cover plate
1
H4090-026
782
Stop plate
1
H4090-080
784
Grease remover
1
H4090-051
709267
Holder, complete
1
H4090-029
9469
Blade hub
1
H4090-049
681
Motor 230 V
1
9695
Carriage arm complete with blocking unit
1
H4090-0332
9694
Carriage slideways
1
Carriage complete with holder
1
H4090-033
Carriage complete with carriage arm
1
H4090-0331
Blade removal tool
1
H4020-106

HANSE 300-400 V
NO.
DESCRIPTION
Hanse 250
QTY.
PART NO.
375
Circular blade, smooth
1
H4090-019
375
Circular blade, smooth, Teflon coated
1
H4090-0191
375
Circular blade, toothed
1
H4090-022
375
Circular blade, toothed, Teflon coated
1
H4090-0221
162
Carriage rear wall
1
H4090-001
9683
Switch with relais
1
297
Relay
1
H4090-066
403
Blade cover plate
1
H4090-025
407
Protective plate for holder
1
H4090-032
430-431-432
Blocking unit
1
H4090-071
432
Locking handle for blocking unit
1
H4090-0711
627
Hand grip for holder
1
H4090-045
628
Suction foot
1
H4090-038
631
Cutting thickness adjuster
1
H4090-044
635
Drive belt
1
H4090-035
768
Base plate
1
H4090-034
770
Blade sickle guard
1
H4090-058
777
Holding bar with grip for blade cover plate
1
H4090-026
782
Stop plate
1
H4090-080
784
Grease remover
1
H4090-051
709267
Holder, complete
1
H4090-029
9469
Blade hub
1
H4090-049
1032
Motor 400 V
1
H4090-0361
9695
Carriage arm complete with blocking unit
1
H4090-0332
9694
Carriage slideways
1
Carriage complete with holder
1
H4090-033
Carriage complete with carriage arm
1
H4090-0331
Blade removal tool
1
H4020-106


Supplier:
This manual suits for next models
3
Table of contents
Other ADE Kitchen Appliance manuals
Popular Kitchen Appliance manuals by other brands

Maxi-matic
Maxi-matic Elite Cuisine EPB-2572 instruction manual

Silvercrest
Silvercrest Z31498 Operation and safety notes

gourmetmaxx
gourmetmaxx 02733 instruction manual

Greenlife
Greenlife WAFFLE AND SANDWICH DUO Instruction booklet

V-ZUG
V-ZUG Combair V600 operating instructions

Goldmedal
Goldmedal 2404SC Cleaning instructions