ADE VICTORIA Series User manual

VICTORIA series
Victoria-180518-Rev002-UM-en
ADE GmbH & Co.
Hammer Steindamm 27–29
22089 Hamburg/GERMANY
+49 (0) 40 432776-0
Fax +49 (0) 40 432776-10
E-mail: info@ade-hamburg.de
OPERATING MANUAL
Slightly sloped slicer

1
Victoria
-
180518
-
Rev002
-
UM
-
en
TABLE OF CONTENTS
1.1 Introduction
1.2 Use
1.3 Residual risks
2.1 Installation
2.2 Electrical connection
2.3 Mechanical fuses
2.4 Electrical fuses
2.5 Inspection test
2.6 Precautions
2.7 Functional principle
3.1 Structure of the machine
3.2 Operating features
3.3 Switching on
3.4 Inserting the product
3.5 Adjusting the cutting thickness
4.1 Sharpening the blade
5.1 Cleaning
5.2 Lubrication

Victoria
-
180518
-
Rev002
-
UM
-
en
2
1. INTRODUCTION
This manual has been written in accordance with the specifications of the Machinery Directive as amended.
Thus, the manufacturer wants to inform the customer about the basic operating principles, maintenance
requirements and safety devices of the machine in a clear and easily understandable form to ensure a long
service life and reliable operation of the machine.
The slicing machines are subject to continuous improvements, but this does not affect the instructions and
information given in this manual.
Read this manual carefully before operating the slicing machine.
If this manual becomes worn out or gets lost over time, immediately request a copy of the manual from the
manufacturer.
The majority of accidents and injuries that occur when using the machine is due to insufficient knowledge of
its functions and safety devices. Therefore, the instructions and information contained in this manual should
be read carefully before starting work with the machine.
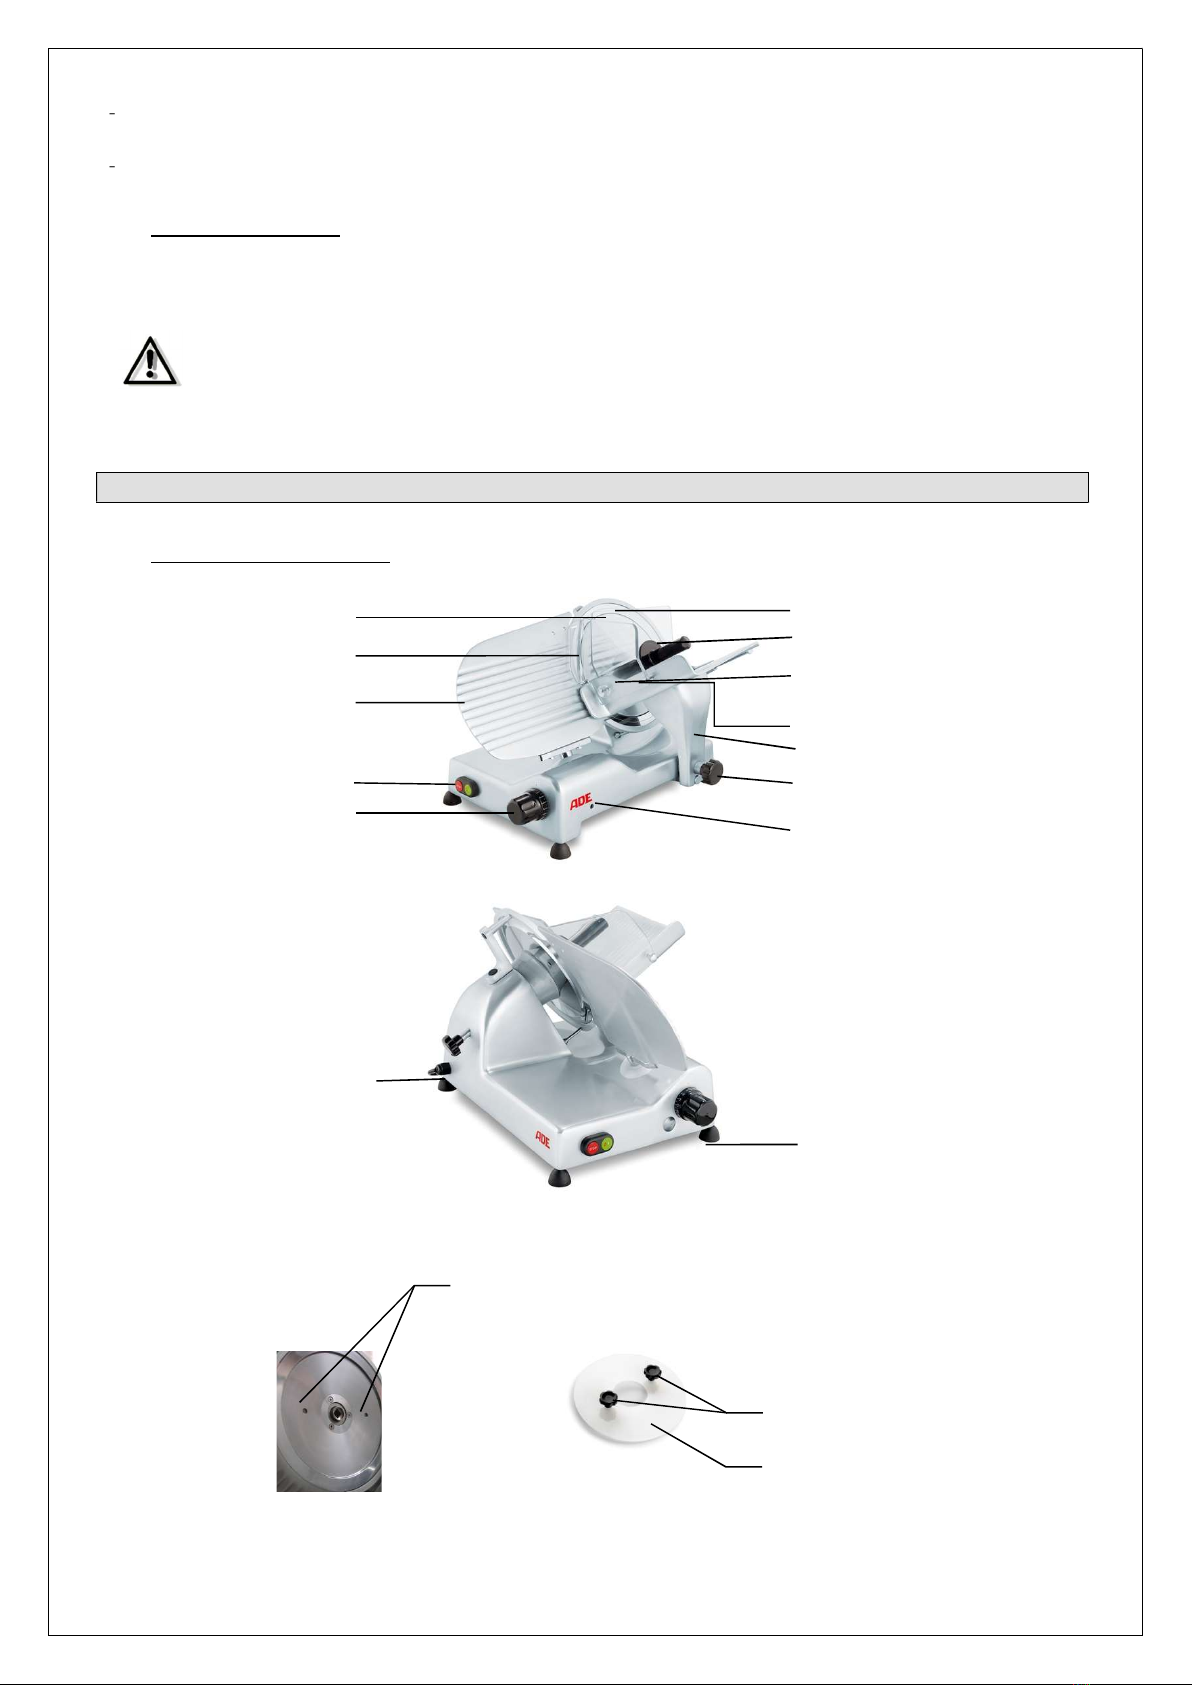
1.1 Introduction
The slicing machines are designed according to applicable safety standards. For this reason, you will find the
“CE” label on each of our slicing machines, which certifies compliance with the above-mentioned
requirements.
The housing as well as carriage, feed plate and blade protection sickle are made of anodised aluminium. This
allows for easy cleaning. The blade drive is ensured by a motor with V-belt drive with a noise level of <70dB
measured at a distance of 1 metre at the height of 1.60 metres.
The total vibration of parts coming into contact with hand and arm is <2.5m/s².
1.2 Use
This slicing machine is used for slicing cooked and raw sausages, hot or cold meat, cheese and bread
depending on the blades used. By default, the machine is equipped with a smooth blade. It is recommended
to cut cheese using a Teflon coated blade as well as a temperature of the product being cut of 7-10°C. For
cutting bread, optional long-toothed blades with and without Teflon coating are available. The machine is not
suitable for cutting some types of hard cheese and bread. A cutting thickness up to 15 mm can be set.
Under no circumstances may the slicing machine be used for slicing frozen products,
meat or sausage products with bone, fruit and vegetables or non-food products.
Failure to observe these instructions can seriously damage the machine and, where
applicable, void existing warranty claims.
The machine is suitable for catering approx. 60 persons (Victoria 250) or approx. 100 persons (Victoria 275
and Victoria 300). These values are merely recommendations that are based on empirical values and can
differ depending on the application. The maximum switch-on duration is 40% (based on 1 hour = 24minutes).
Thereafter, a corresponding cooling time for the motor must be taken into account. At shorter switch-on
times, the cooling intervals are also correspondingly shorter.
The machine may only be used in its original condition and with original parts. Disassembling the protective
equipment is not allowed. In case of damage to protective equipment, the machine must be immediately put
out of operation and ADE must be informed for the purpose of renewal or replacement.
1.3 Residual risks
Despite extensive safety precautions on the machine, residual risks remain for the operator in the daily work
with the machine. These occur in particular when the operator tries to push the product being cut by hand to
the blade. The built-in leftover holder must always be used to feed the product. During the cutting process,
the operator's hands must not be in the carriage area.

3
Victoria
-
180518
-
Rev002
-
UM
-
en
2. START-UP
The slicing machine comes as a complete product. Please remove the packaging material, remove the machine
from the box and ensure that the contents of the packaging correspond to the information on the delivery note.
In addition, make sure that the machine does not show any damage occurred during transport.
If the slicing machine is damaged, this must be reported in writing to the transport company within three days
from the date of the accompanying documents, detailing the damage found.
Packaging materials are valuable materials and must not be disposed of in household
waste. Check with your local authorities for proper disposal options.
Local regulations must be followed during disposal.
Never dispose of packaging materials in nature!
2.1 Installation
Place the slicing machine on a flat, smooth and vibration-free surface that provides sufficient strength and
stability to ensure adequate safety, taking into account the machine's own weight. The recommended table
height should be approx. 70cm and may vary with the height of the operator. Any unevenness can be
corrected using the adjustable feet. When installing the machine, make sure that there is at least 200 mm
clearance in the motor vent area.
Before connecting to the power supply, make sure that the local power supply and current
frequency comply with the data indicated on the machine nameplate.
The machine must not be connected in the event of non-compliance, otherwise this may
cause damage to the machine and fire!
The controls (On/Off switch and slice thickness setting) point towards the operator, the blade and the motor in
the opposite direction.
To ensure a pleasant and trouble-free operation, cleaning and maintenance of the machine, it is required to
have a free space of 4m².
The correct operation of the machine is guaranteed at a relative humidity of at most 80% and at an ambient
temperature of +8°C to a maximum temperature of +38°C.
2.2 Electrical connection
The slicing machine has a Schuko plug.
Check that the existing power supply is equipped with a suitable circuit breaker and insert the plug into the
socket.
Unless otherwise stated, the slicing machine must always be connected to a voltage
below 400V!
It is essential to make sure that the local power supply corresponds to the information on
the nameplate!
When connecting, make sure that the connection cable is routed so that there is no risk of
tripping or falling.

Victoria
-
180518
-
Rev002
-
UM
-
en
4
2.3 Mechanical fuses
- The cutting blade is completely protected by a rigidly attached cover, except for the area affected by
the cutting process.
- The food carriage can only be removed if the cutting thickness selector covers the cutting blade and
the graduated turning handle is set to “0” (zero) or even more up to the stop.
- The slice thickness selector can only be opened using the knob when the food carriage is in its
normal operating position.
- The cutting blade can be removed using safety gloves or a blade removal device (optionally
available). In any case, the user must exercise particular caution and care.
All fuses are mounted on the machine and must not be removed. Scrapping or
unauthorised modifications to the machine make it a dangerous device. In such cases, the
manufacturer cannot be held liable for any accidents or injuries.
Use the device only for its intended purpose. Improper use and operation of the device for
purposes other than those specified herein can cause risks to the safety and health of
persons and material damage.
The manufacturer assumes no liability for damage caused by improper use of the device,
failure to comply with the information in this operating manual, as well as manipulation or
modifications of the device without its formal approval.
2.4 Electrical fuses
- The slicing machine stops automatically in the case of power failure. Restart the machine as soon as
the power failure is resolved.
2.5 Inspection test
Check whether all the components of the slicing machine were correctly assembled.
Check whether the crank wheel to secure the cutting blade guard is locked.
Press the green and red operating buttons and check that the machine can actually be turned on and off.
Check the sliding motion of the food carriage and remnant holder.
Check the operation of the blades of the grinder.
Check the opening of the slice thickness selector.
Check whether the food carriage can only be removed using the turning handle to position “0” and the
handle remains blocked afterwards.
If you detect malfunctions, put the machine immediately out of operation, mark it in a
clearly visible manner as “DEFECTIVE” and inform your service partner!
2.6 Precautions
The slicing machine may only be operated by previously trained personnel.
Care must be taken to ensure that the device is not operated by children, disabled persons and untrained
personnel.
It is forbidden to operate the machine under the influence of alcohol or drugs.
Never press the product against the blade by hand during operation.
Never leave the machine unattended during operation.
Disconnect the machine from the mains for any kind of maintenance work (exception: blade grinding).
Never clean the machine under running water or in a water basin.
If you notice unusual noises or odours emanating from the machine, switch it off immediately, disconnect it
from the mains and inform your customer service.

5
Victoria
-
180518
-
Rev002
-
UM
-
en
Cutting thickness setting
Green: On-/
Red: Circuit breaker/
White: Operating light
Product slider
Leftover holder with slide
protection plate
Product carriage
Blade cover plate
Stop plate
Thumb protection
Finger protection
Carriage locking screw
Food carriage arm
Blocking unit
Star knob for locking the
blade cover plate
Cutting thickness setting
Never use the machine with a damaged plug or cable. If a defect is found, stop the machine immediately
and have it repaired by the manufacturer or one of its authorised service partners.
The mains cable must only be replaced by authorised and trained persons.
2.7 Functional principle
Use the slicing machine only for the purpose for which it was designed.
The food carriage is inclined so that the product to be cut automatically slips due to its weight to the blade.
Do not hold the food carriage with your hands during slicing!
Always keep your hands away from the blade and use only the carriage, carriage arm or
leftover holder to move the carriage back and forth.
3. USING THE SLICING MACHINE
3.1 Structure of the machine
Blade removal device (optional)
Screws
Drill holes for blade removal device

Victoria
-
180518
-
Rev002
-
UM
-
en
6
3.2 Operating features
The slicing machine is operated electrically by means of two buttons: a green power button to switch on and
a red stop button to switch off the machine.
The machine also has a white control light between the two operating buttons to indicate “Cutting blade in
operation”.
After each interruption of machine operation due to a voltage drop, the green power button must be pressed
again to switch it on.
3.3 Switching on
To switch on, press the green button. The white operating light between the start and stop switches indicates
active operation.
3.4 Inserting the product
The product is inserted only when the machine is switched off. For safety reasons, the leftover holder is firmly
connected to the machine. If the material to be cut is longer than the movement range of the leftover holder, it
is placed loosely on the product. If the length of the product falls below the movement range of the leftover
holder, then it is placed behind the end of the product being cut. Use the product slider or the carriage arm to
move the carriage back and forth in a speed appropriate to the product being cut.
3.5 Adjusting the cutting thickness
Selection of slice thickness can be infinitely variable between 0 and 15 mm. The adjustment is made by the
knob located above the control unit with a scale in units of 1 mm. As a result, the position of the stop plate is
adjusted. After finishing the cutting process, the setting must always be turned back to position “0” for safety
reasons.
4. PROCEDURES FOR BLADE SHARPENING
To ensure trouble-free operation of the slicing machine, the cutting blade must be always well-sharpened. It
should be taken into account that regular short sharpening of the cutting blade is preferable over an extensive
sharpening process.
Please note that the blade has a high performance and therefore must be sharpened only
when the cutting performance visibly decreases!
Before starting any such work, it is important to make sure that the graduated cut thickness is set to “0”.
Sharpening is only suitable for blades with a smooth cutting edge. Serrated blades for
bread slicing machines must be sharpened by a specialist.
Only sharpen the cleaned and completely grease-free cutting blade, since sharpening a
cutting blade with food residues can damage both the grinding device and its grinding
wheels.
After sharpening, remove any dirt deposits from the grinding wheels. In addition, sand grains that may adhere
to the cutting blade or to the machine must be removed using a cloth soaked with some alcohol.
4.1 Sharpening the blade
1) Thoroughly clean the blade before cutting, making sure that the blade is completely free of grease.
2) Switch off the machine.
3) Attach the separate grinder through the two holes on the stop plate. For attachment, use the cutting
thickness selector to open the stop plate as much as possible, pull the carriage on the carriage arm all
the way to the operator and fold the leftover holder up. Unscrew the knurled screw at the top of the
grinder and secure the grinder to the stop plate. For this purpose, the pin on the grinder is guided
through the hole closer to the blade on the stop plate and the knurled screw is screwed through the

7
Victoria
-
180518
-
Rev002
-
UM
-
en
second hole of the stop plate in the grinder. The metal part on the grinder is positioned in front of the
blade and faces down with the metal part bending towards the operator. It provides additional protection
against injury.
Only supplied grinders and grinders of same type may be used.
4) Switch on the slicing machine. Using a slight clockwise rotation of the slice thickness selector, pull the
grinding wheel to the rotating blade carefully and with little effort. The contact must be made in such a
way that the grinding wheel rotates. A few seconds are typically enough to sharpen the blade.
5) Deburr the blade after the grinding process. To do this, press the spring-loaded knob on the grinder for
approx. 2-3 seconds so that the burr is removed from the blade.
6) After completing the grinding process, switch off the slicing machine, dismantle the grinder in the reverse
order and set the cutting thickness selector to “0” again.
7) Thoroughly clean the blade and the remnant holder shaft of adhering grinding chips with a cloth.
Sharpening of the cutting blade may only be carried out by authorised and trained
personnel.
The blade can no longer be sharpened if the wear of the blade diameter is more than 6
mm.
5. CLEANING
For hygienic reasons, the slicing machine must always be kept clean. It must be removed and cleaned at the
end of each working day and each time the type of product to be cut (for example, from fresh meat to roasted
meat) is changed.
All parts and cavities that come into contact with meat and where deposits can form must be cleaned.
Cleaning of the slicing machine is exclusively reserved for persons trained for this purpose. Pay attention to
the particularly sharp cutting blade edge.
The machine must be moved by two persons, using the four feet as a guide.
5.1 Cleaning
To clean the machine, disconnect the power plug and disconnect the machine from the mains. The carriage
is removable. Never use force to avoid any damages and be sure to observe the following points:
- Close the cutting thickness adjustment handle by turning clockwise until it stops.
- Completely loosen the carriage locking screw at the lower end of the carriage arm by turning it counter-
clockwise.
- Pull the carriage to the operator side with a slight jerk.
- The cutting thickness adjustment is now locked and must not be forcibly opened.
- The carriage with carriage arm can now be lifted for cleaning.
- After cleaning the carriage and housing, proceed in reverse order: The carriage arm is pushed over the
carriage arm holder and fastened again with the locking screw. This releases the cutting thickness lock
and allows the carriage to move freely again.
When cleaning, make sure that no water gets into the blade hub, as damage may
otherwise occur to the ball bearing, motor and machine interior. In addition, there is a risk
of formation of flash rust if it is not sufficiently dried.
Never clean the slicing machine or the parts (such as carriage) in the dishwasher!

Victoria
-
180518
-
Rev002
-
UM
-
en
8
If the blade is cleaned when it is removed or removed to clean the machine body, it must only be removed by
trained personnel. Special precautions are necessary to prevent injury. Unless ordered, we recommend the
purchase of a safety glove or a blade removal device. It is an accessory that allows a safe removal of the
blade, as the blade and the dangerous blade edge are completely covered by a plastic disc and the blade
must be touched during handling at any time and at any point by hand. If the optional blade removal device
has been purchased, the blade removal device must be positioned on the drill holes provided in the blade
and screwed to the threaded holes using the two screws. Unscrew the screws of the cutting blade using a
screwdriver and then remove the entire cutting blade using two crank wheels.
Use a damp cloth (preferably a soft brush for some parts) and approx. 60°C warm water for cleaning. For
cleaning and disinfecting, choose only products or accessories that are food-grade and approved for this
purpose. Please note the instructions for use of this product. After such treatment, rinse with clean drinking
water and allow to dry thoroughly.
Under no circumstances may the machine or its parts be cleaned with a water jet or high-
pressure cleaner!
Never use abrasive or hypochlorous acidic soda-based cleaners, as this can permanently
damage the surface of the machine.
It is strictly prohibited to clean the slicing machine with products that can damage the
health of the operator or the customer. When cleaning, use only products with a pH value
of 7-8.
Never clean the cutting blade while the machine is in operation (i.e., while the cutting
blade is running).
After cleaning, the machine is installed in reverse order.
5.2 Lubrication
In order to guarantee an always perfect sliding movement of the sliced product and leftover holder, the slicing
machine must be lubricated at regular intervals in different places: Carriage guide, carriage arm, blade hub.
Use only vaseline (e.g. MARCOL 82 ESSO or WHITE OIL 105 BERGOIL). Such lubrication should be done
often but only in small quantities.
6. TRAINING
During installation of the slicing machine, the adult operator of the machine must be adequately trained in the
areas of use - cleaning - maintenance - sharpening of the cutting blade, taking particular account of the dangers
arising from improper use.
Training must be carried out by a person who has been entrusted with the installation of the machine and who
has sufficient knowledge of the EC standards in mechanical engineering.
7. DISPOSAL
At the end of its life of use, never throw the machine into the normal household waste. Electrical
equipment and machinery must be disposed of in accordance with statutory regulations.
Check with your city or local government for ways of environmental and proper disposal.

9
Victoria
-
180518
-
Rev002
-
UM
-
en
8. WARRANTY
ADE will repair or replace this product if it has failed within 2 years from the date of purchase (proof of purchase
is required) due to lack of workmanship or defective material.
All moving parts, such as blades, grinders, food carriages, etc., are excluded from this warranty. Warranty does
not apply to normal appearance of usage or sign of wear or any damages caused by accidents or misuse.
The warranty will not apply for devices that have been opened by unauthorised persons.
This warranty agreement does not affect the customer's legal rights in any manner.
The dealer from whom the machine was purchased is responsible for complaints.
9. TECHNICAL DATA
Model
Victoria
250
-
230
Victoria 275
-
230
Victoria 300
-
230
Blade Ø
250mm
275mm
300mm
Slice thickness selector
0-15mm
0-15mm
0-15mm
Cutting range (W x D)
180 x 160mm
180 x 170mm
215 x 180mm
Dimensions (WxDxH)
440 x 530 x 360mm
440 x 560 x 380mm
480 x 600 x 390mm
Power
0.23kW
0.23kW
0.23kW
Tare weight approx.
19kg
20kg
22kg
Current type
230V
230V
230V
Optional:
Blade removal device H4020-051 H4050-106 H4050-106
Cut-resistant gloves M size: T6113
XL size: T6114
Circular blades, smooth with Teflon coating (e.g. for cheese):
H4090-0141 H4084-0011 H4090-0191
Circular blades, long-toothed (e.g. for bread):
H4090-021 H4084-002 H4090-022
Circular blades, long-toothed with Teflon coating (e.g. for bread):
H4090-0211 H4084-0021 H4090-0221

Victoria
-
180518
-
Rev002
-
UM
-
en
10
10. CE MARKING AND DECLARATION OF CONFORMITY
Declaration of conformity by the manufacturer
This product has been manufactured in accordance with the harmonised European standards. They conform
to the regulations of the EC-directives listed below:
- Machinery directive 2006/42/EC
- EMC Directive 2004/108/EC regarding electromagnetic compatibility
- Low voltage directive 2006/95/EC
- RoHS Directive 2011/65/EC in the currently valid versions.
The declaration will be void if a change that was not agreed with us has been made on the machine.
Hamburg, November 2015
ADE GmbH & Co.
Hammer Steindamm 27–29
D-22089 Hamburg
11. CIRCUIT DIAGRAMS
VICTORIA 250/VICTORIA 275/VICTORIA 300-230 V/50 Hz
Block diagram
Circuit diagram
DE EN

11
Victoria
-
180518
-
Rev002
-
UM
-
en
L L
LINIE LINE
N N
NEUTRAL NEUTRAL
Ri Ri
RELAIS SCHAL TER SWITCH RELAY
ri ri
RELAIS SCHALTER KONTAKT CONTACT SWITCH RELAY
Y Y
WARMER RELAIS WARM RELAY
y y
WARMER RELAIS KONTAKT CONTACT WARM RELAY
Li Li
LED SCHALTER LED SWITCH
M M
MOTOR MOTOR
Pm Pm
EINSCHALTKNOPF ON SWITCH
Pa Pa
AUSSCHALTKNOPF OFF SWITCH
C C
KONDENSATOR
CONDENSER
VICTORIA 250/VICTORIA 275/VICTORIA 300-230 V/60 Hz
Block diagram
Circuit diagram
DE EN
LEGENDE LEGEND
L L
LEITUNG CABLE
N N

Victoria
-
180518
-
Rev002
-
UM
-
en
12
NULLLEITER NEUTRAL
Ri Ri
SCHALTERRELAIS SWITCHING RELAY
ri ri
KONTAKT SCHALTRRELAIS CONTACT SWITCH RELAY
Y Y
WARMERELAIS WARM RELAY
y y
KONTAKT WARMERELAIS CONTACT WARM RELAY
Li Li
LED SCHALTER LED SWITCH
M M
MOTOR MOTOR
Pm Pm
EIN-SCHALTER ON SWITCH
Pa Pa
AUS-SCHALTER OFF SWITCH
C C
KONDENSATOR CONDENSER

13
Victoria
-
180518
-
Rev002
-
UM
-
en
12. EXPLOSION SIGNS
VICTORIA 250
VICTORIA 275

Victoria
-
180518
-
Rev002
-
UM
-
en
14
VICTORIA 300

15
Victoria
-
180518
-
Rev002
-
UM
-
en
13. SPARE PARTS LIST
VICTORIA 250
NO. DESCRIPTION
VICTORIA 250
QUANTITY
ITEM NO.
130 Slice thickness selector 1 H4090-011
140 Suction foot 1 H4090-005
151 Barrier for leftover holder 1
162 Food carriage rear panel 1 H4090-001
285 Switch Cap 1 H4090-0231
296 Switch 1 H4090-053
297 Relay 1 H4090-066
325 Latch for leftover holder 1
326 Protective plate for leftover holder 1 H4090-002
373 Cross blades, smooth 1 H4090-014
379 Eccentric screw 1 H4090-012
490 Blade cover plate 1
509 Bush for leftover holder 1
623 Screws for grease removers 2
633 MF10 condenser 1 H4090-056
803 Carriage plate 1
807 Bracket for feed plate 1
816 Honing wheel for grinder 1
827 Mandrel for leftover holder 1
871 Grinding wheel for grinder 1 H4090-017
885 Plastic cover for blade holder 1 H4090-0701
895 Leftover slide shaft 1
926 Protective sickle 1 H4090-015
1515 Drive belts 1
1519 Handrail with handle for blade cover plate 1
1537 Locking knob for blocking unit 1
1542 Base plate 1
1547 Grease removers 1
1553 Feed plate 1
1641 Sealing ring 1
1696 Motor 230 V/50 Hz 1
9102 Complete blade hub 1
9168 Complete grinder 1
9171 Connection cable (Schuko) 1
700298 Handle for leftover holder 1 H4090-0201
700446 Locking screw on the back panel of the carriage
2
700623 Blocking button for leftover slide shaft 1
701506 Complete carriage arm 1
709205 Complete leftover holder 1 H4090-028
801501 Blocking unit 1
801542 Protective housing for motor 1

Victoria
-
180518
-
Rev002
-
UM
-
en
16
VICTORIA 275
NO. DESCRIPTION
VICTORIA 275
QUANTITY
ITEM NO.
130 Slice thickness selector 1 H4090-011
140 Suction foot 1 H4090-005
151 Barrier for leftover holder 1
162 Food carriage rear panel 1 H4090-001
285 Switch Cap 1 H4090-0231
296 Switch 1 H4090-053
297 Relay 1 H4090-066
325 Latch for leftover holder 1
326 Protective plate for leftover holder 1 H4090-002
374 Cross blades, smooth 1 H4084-001
379 Eccentric screw 1 H4090-012
491 Blade cover plate 1
509 Bush for leftover holder 1
623 Screws for grease removers 2
633 MF10 condenser 1 H4090-056
803 Carriage plate 1
816 Honing wheel for grinder 1
827 Mandrel for leftover holder 1
871 Grinding wheel for grinder 1 H4090-017
885 Plastic cover for blade holder 1 H4090-0701
895 Leftover slide shaft 1
937 Protective sickle 1
1515 Drive belts 1
1519 Handrail with handle for blade cover plate 1
1534 Bracket for feed plate 1
1537 Locking knob for blocking unit 1
1546 Grease removers 1
1552 Feed plate 1
1641 Sealing ring 1
1696 Motor 230 V/50 Hz 1
9102 Complete blade hub 1
9168 Complete grinder 1
9171 Connection cable (Schuko) 1
700298 Handle for leftover holder 1 H4090-0201
700446 Locking screw on the back panel of the carriage
2
700623 Blocking button for leftover slide shaft 1
701510 Complete carriage arm 1
701542 Base plate 1
709205 Complete leftover holder 1 H4090-028
801501 Blocking unit 1
801542 Protective housing for motor 1

17
Victoria
-
180518
-
Rev002
-
UM
-
en
VICTORIA 300
NO. DESCRIPTION
VICTORIA 300
QUANTITY
ITEM NO.
130 Slice thickness selector 1 H4090-011
140 Suction foot 1 H4090-005
151 Barrier for leftover holder 1
162 Food carriage rear panel 1 H4090-001
285 Switch Cap 1 H4090-0231
292 Threaded bush on the leftover holder 1
296 Switch 1 H4090-053
297 Relay 1 H4090-066
325 Latch for leftover holder 1
375 Cross blades, smooth 1 H4090-019
379 Eccentric screw 1 H4090-012
403 Blade cover plate 1
407 Protective plate for leftover holder 1
411 Insert for threaded rod 1
553 Carriage plate 1
612 Leftover slide shaft 1
623 Screws for grease removers 2
627 Bush for leftover holder 1
633 MF10 condenser 1 H4090-056
641 Grinding wheel for grinder 1
770 Protective sickle 1
816 Honing wheel for grinder 1
827 Mandrel for leftover holder 1
885 Plastic cover for blade holder 1 H4090-0701
1515 Drive belts 1
1519 Handrail with handle for blade cover plate 1
1534 Bracket for feed plate 1
1536 Grease removers 1
1537 Locking knob for blocking unit 1
1542 Base plate 1
1551 Feed plate 1
1641 Sealing ring 1
1696 Motor 230 V/50 Hz 1
9102 Complete blade hub 1
9171 Connection cable (Schuko) 1
9471 Complete grinder 1
700446 Locking screw on the back panel of the carriage
2
701510 Complete carriage arm 1
709267 Complete leftover holder 1
801501 Blocking unit 1
801542 Protective housing for motor 1

Victoria
-
180518
-
Rev002
-
UM
-
en
18
Distributor:
This manual suits for next models
3
Table of contents
Other ADE Kitchen Appliance manuals
Popular Kitchen Appliance manuals by other brands

Hofland
Hofland RDS-57HU MANUAL & STARTERS GUIDE

Dura-Bake
Dura-Bake CURTIS STONE RECIPES AND USAGE INSTRUCTIONS

Staheli West
Staheli West DewPoint 6110 troubleshooting guide

Cannon
Cannon PEMBROKE 10692G Use and Installation Instructions

Fritel
Fritel SL 3657 instruction manual

Nebula
Nebula BOOST instruction manual