2 of 6
AvalonN Add a Plate
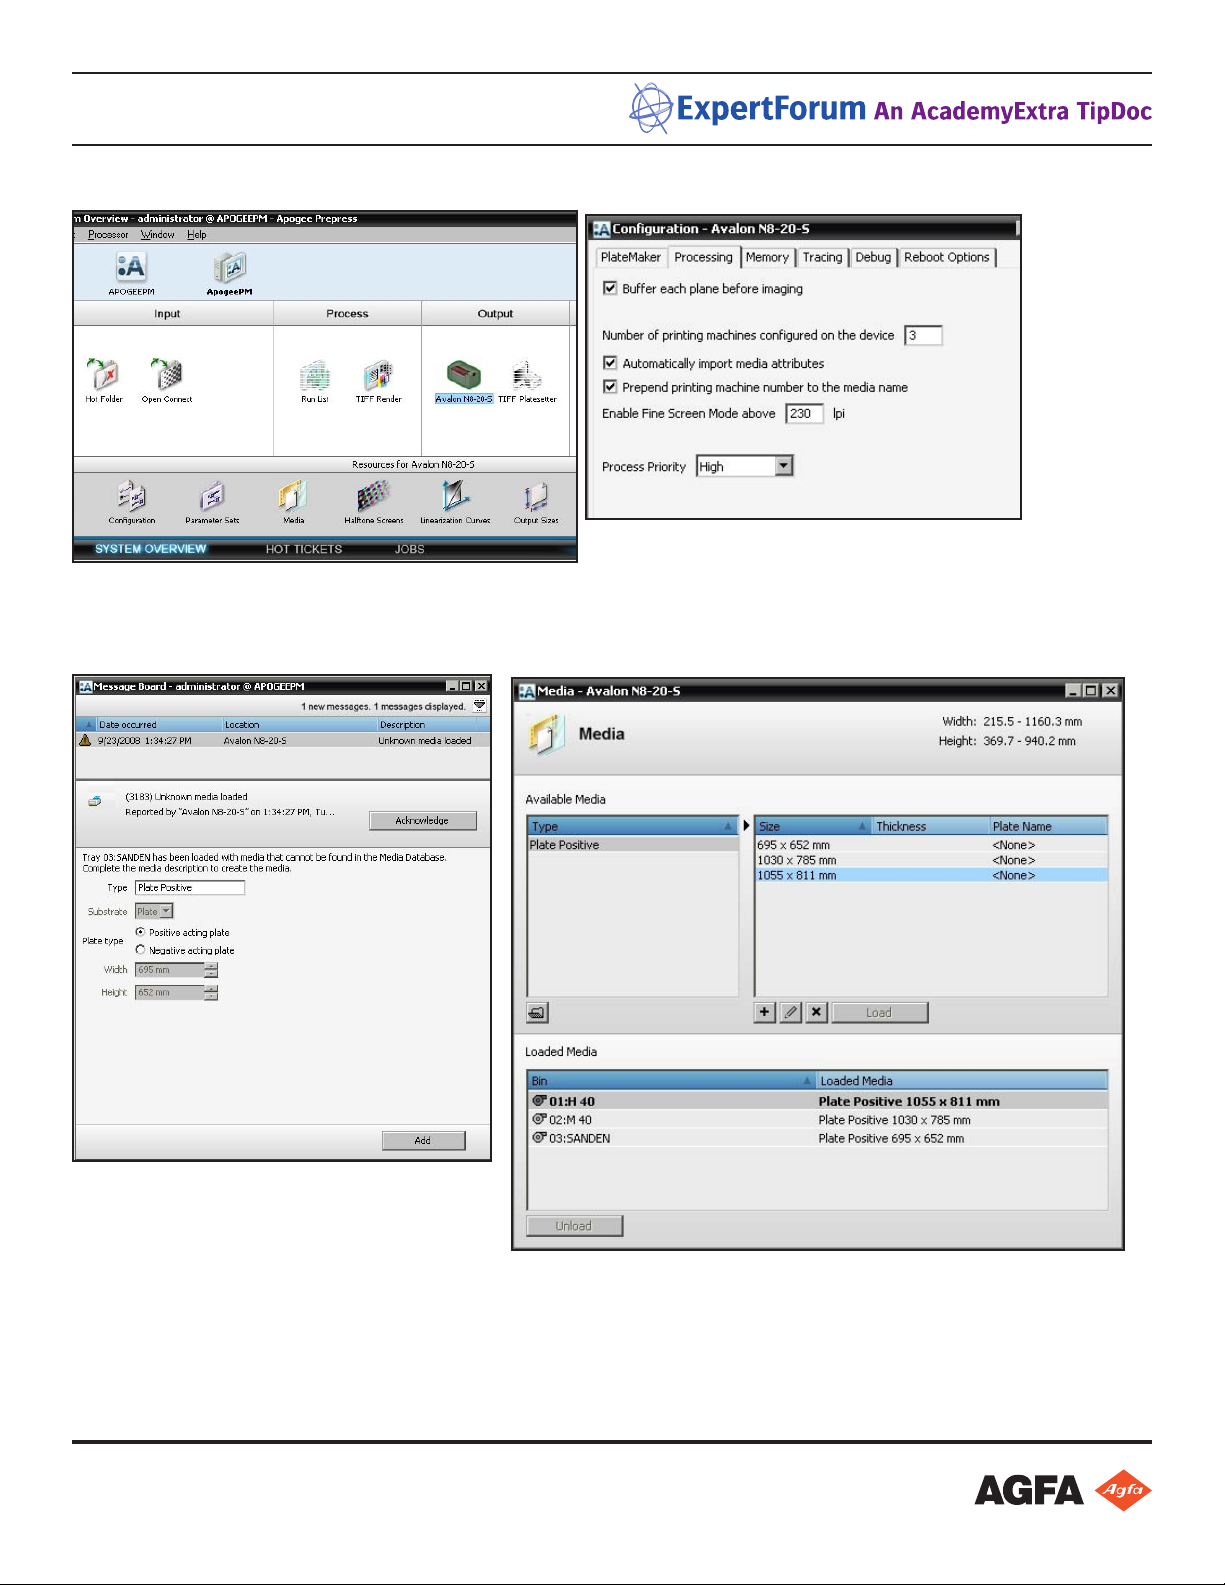
Congure Apogee Prepress for a new plate size
Add the Printing Machine to the AvalonN engine
At the main menu, press Set Printing Machine and OK. Click on the next printing machine and OK.
PT-R8300/PT-R8600 USERS MANUAL
5-2
5.1 Offline mode
5.1.1 Overview of the offline mode screen
Press [OFFLINE] in the [ONLINE] screen to display the offline screen.
The offline screen hierarchy is shown below. Press [ESC] in any of these screens to
return to the previous screen. Press [ONLINE] to return to the online screen.
User maintenance
Set exposure mode
Set media type
Set plate
OK NEXTONLINE
Set printing machine
Service
Set punch name
Information
OK NEXTONLINE
Pressing [NEXT].
Cont. on next page
5
4
3
2
OK NEXTESC
1Plate 1
Plate 2
Plate 3
Plate 4
Plate 5
5
4
3
2
OK NEXTESC
1Printing machine 1
Printing machine 2
Printing machine 3
Printing machine 4
Printing machine 5
5
4
3
2
OK NEXTESC
1Media Type 1
Media Type 2
Media Type 3
Media Type 4
Media Type 5
Select [Set printing machine] and
press [OK].
Select [Set plate] and press [OK].
Select [Set media type] and
press [OK].
PT-R8300/PT-R8600 USERS MANUAL
5-4
5.1.2 Description of buttons
The buttons available in the online screen, such as [NEXT] and [ESC], are described
below.
[NEXT]
If the displayed screen consists of multiple pages, the [NEXT] button is displayed.
Press the [NEXT] button to display the next page.
5
4
3
2
OK NEXTESC
1Printing machine 1
Printing machine 2
Printing machine 3
Printing machine 4
Printing machine 5
->
10
9
8
7
OK NEXTESC
6Printing machine 6
Printing machine 7
Printing machine 8
Printing machine 9
Printing machine 10
[ESC]
Press [ESC] to return to the previous screen (level up in the hierarchy).
[OK]Press [OK] to confirm your entry and move to the next screen.
[Comment]
Press [Comment] to display the keyboard screen. Enter a comment into the icon for
the keyboard window and press [ENT]. The previous screen appears and the com-
ment inputted will be displayed under the [Comment] button.
:Switch through the entry
screens for upper case
letters, lower case letters, and
symbols/numbers.
:Move the cursor indicating the
entry position.
BS
: Delete the letter to the left of the
cursor.
CLR
: Clear the entered comment.
SPC
: Enter a space.
OK
Comment
Plate
Copy from
ESC
Printing machine 1
Plate 1
Comment
Click Comment. Enter the printing machine name using the touchpad. Use the < > arrow keys to change
screens of characters. Press ENT after each new entry. Choose the Plate dened before. OK past Fine Screen.
PT-R8300/PT-R8600 USERS MANUAL
5-2
5.1 Offline mode
5.1.1 Overview of the offline mode screen
Press [OFFLINE] in the [ONLINE] screen to display the offline screen.
The offline screen hierarchy is shown below. Press [ESC] in any of these screens to
return to the previous screen. Press [ONLINE] to return to the online screen.
User maintenance
Set exposure mode
Set media type
Set plate
OK NEXTONLINE
Set printing machine
Service
Set punch name
Information
OK NEXTONLINE
Pressing [NEXT].
Cont. on next page
5
4
3
2
OK NEXTESC
1Plate 1
Plate 2
Plate 3
Plate 4
Plate 5
5
4
3
2
OK NEXTESC
1Printing machine 1
Printing machine 2
Printing machine 3
Printing machine 4
Printing machine 5
5
4
3
2
OK NEXTESC
1Media Type 1
Media Type 2
Media Type 3
Media Type 4
Media Type 5
Select [Set printing machine] and
press [OK].
Select [Set plate] and press [OK].
Select [Set media type] and
press [OK].
PT-R8300/PT-R8600 USERS MANUAL
5-8
5.2.3 Grip direction and leading/trailing gripper settings
Set the plate grip direction and the length of the leading and trailing grip amount
(amount of offset from the edge of the plate to the printed area).
OKESC
Spiral/Step
Grip direction
:Select horizontal gripping (at the top and bottom) of the plate.
: Select vertical gripping (at each side) of the plate.
1)Select the grip direction and then press [OK]. The following screen appears.
Vertical grip screen Horizontal grip screen
NOTE
• The leading/trailing grip position changes depending on the grip direction set in Step 1.
2)Enter the leading grip margin and then press [ENT]. The highlight will move to the
trailing grip margin setting.
3)Enter the trailing grip margin and then press [ENT].
4)After input is complete, press [OK].
(Cont. on “5.2.4 Setting the image centering method”)
ESC
Grip [
OKESC
Grip [mm]/
After Grip
0.0 mm
0.0 mm
CLR
7 8 9
4 5 6
1 2 3
0
ENT
These keys also move
the highlight.
Leading grip margin
Trailing grip margin
5-9
Chapter 5 User menu
5.2.4 Setting the image centering method
The image centering function is used to center the image data in the center of the
print area minus the leading and trailing grip margins. (The following screen illustra-
tion assumes that the grip direction has been set to horizontal gripping.)
OKESC
Centering
Primary scanning direction (vertical) :centering OFF
Secondary scanning direction (horizontal) :centering ON
Primary scanning direction (vertical) :centering ON
Secondary scanning direction (horizontal) :centering ON
Primary scanning direction (vertical) :centering OFF
Secondary scanning direction (horizontal) :centering OFF
Primary scanning direction (vertical) :centering ON
Secondary scanning direction (horizontal) :centering OFF
Select the centering method and then press [OK].
(Cont. on “5.2.5 Setting the image offset”)
()
()
()
()
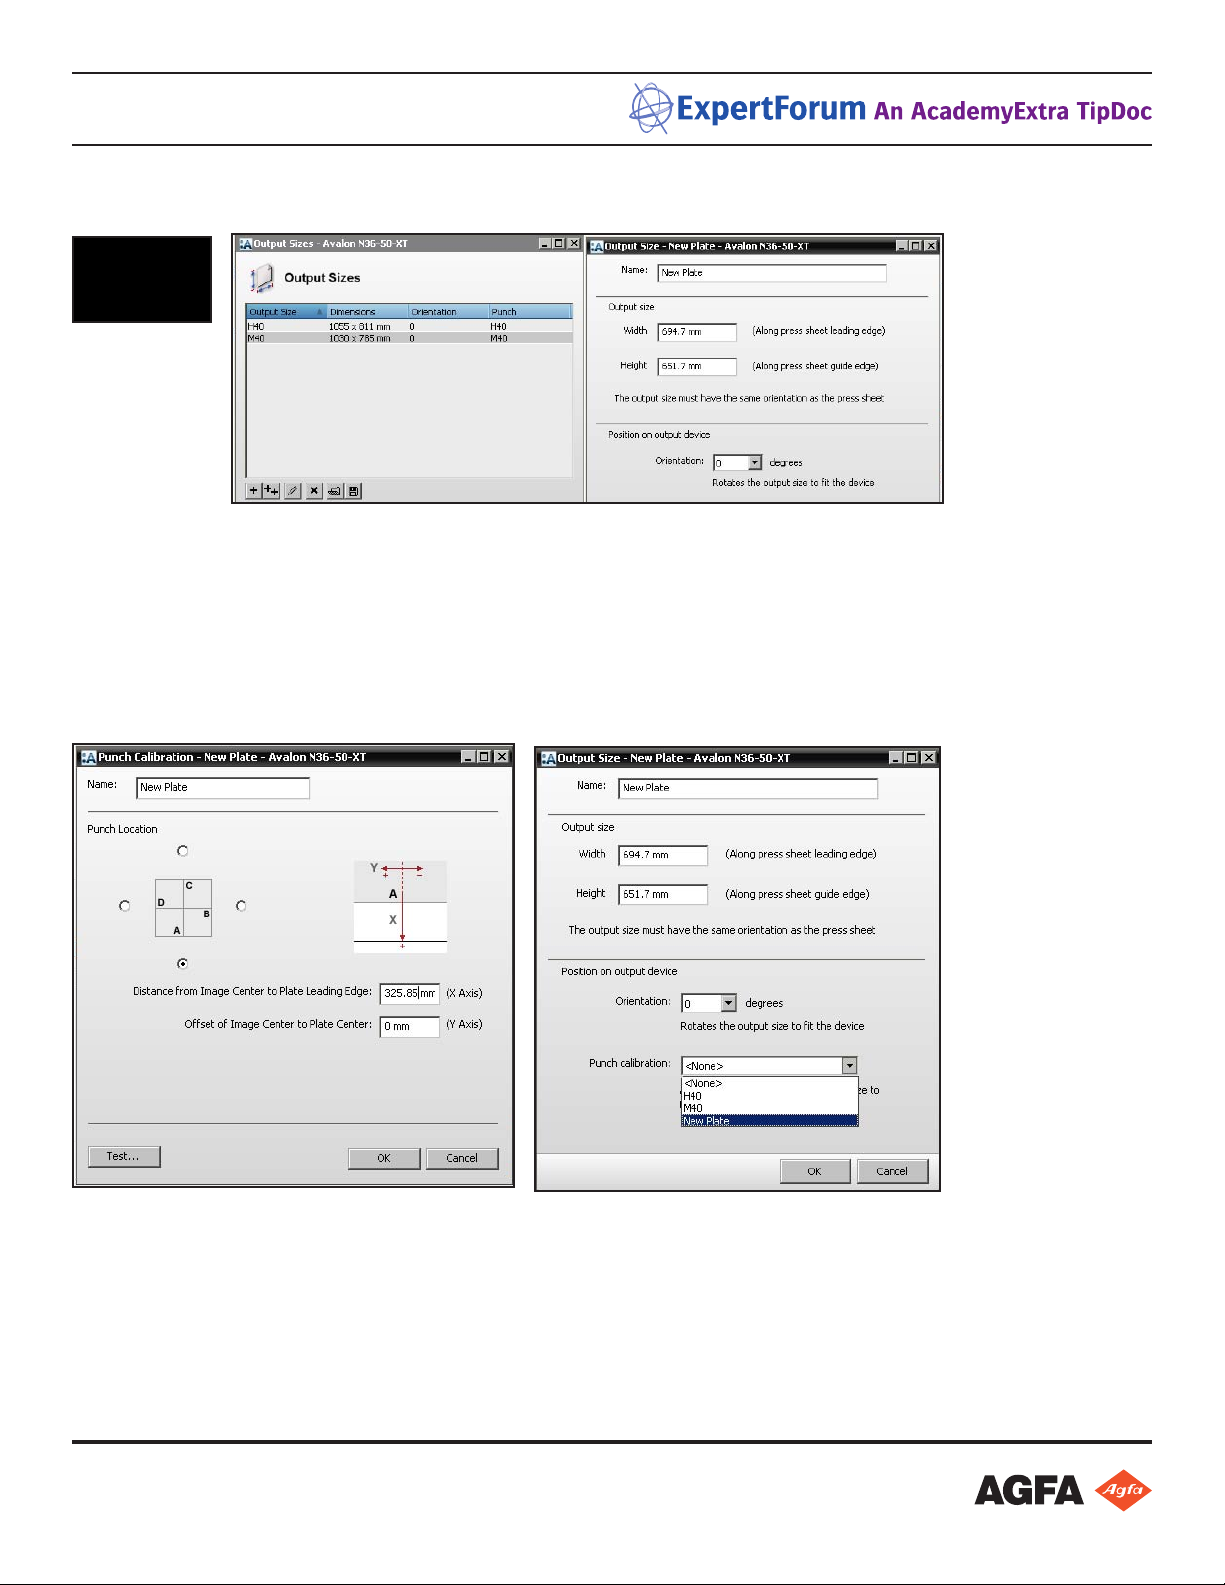
Enter the Grip direction and OK, then enter the Grip and After Grip in mm and ok.
Any Grip/After Grip must be subtracted from the Output Size in Apogee Prepress. Zero is recommended and
gives you the most exibility for placing borders from Apogee Prepress.
Press ENT after each entry. Select the rst centering option (center across media, push to bottom). OK past
offsets to get to the Punch dialog.
PT-R8300/PT-R8600 USERS MANUAL
5-12
5.2.6 Punch
Set the punch type and hook punch.
OKESC
Hook punch
OFF
Punch
ON
Plate positioning Home
1)Setting the punch
Press [Punch]. The following screen appears.
NOTE
• If [OFF] is selected, the plate will not be punched.
2)Select the desired punch type from the registered punch types and then press
[OK]. The punch type will be linked to printing machine 1, and you will return to
the punch setting screen.
NOTE
• For the procedure for registering punch types, refer to “5.8 Setting the punch name.”
3)Setting the hook punch
Select whether or not the hook punch should punch. This selection will determine
the effective exposure area and drum rotation speed.
5-15
Chapter 5 User menu
5.2.8 Fine adjustment of the image position
Perform fine adjustment (shifting the print area) of the image output position on the
plate.
These keys also move the highlight.
Shift amount in the secondary
scanning (horizontal) direction
Shift amount in the primary
scanning (vertical) direction
1)Enter the desired shift in the secondary scanning (horizontal) direction and then
press [ENT]. The highlight will move to the shift setting in the primary scanning
direction.
2)Enter the desired shift amount in the primary scanning (vertical) direction and
then press [ENT].
3)After input is complete, press [SAVE]. The save confirmation screen appears.
OK
YES NO
ESC
Save Data ?
4)Press [YES] and then [OK] to save all the information you set as printing machine
1 data. The data is saved and the screen returns to the first screen in “5.3 Set
plate”.
SAVEESC
Paper Position H
Paper Position V
0.0 mm
0.0 mm
R
R
CLR
7 8 9
4 5 6
1 2 3
0
ENT
The Hook Punch registers the plate in the AvalonN and is usually turned On (unless setback is less that
12mm). An optional plate punch can be selected if installed and available. Skip past the ne adjustment
screens and choose Yes to save the data. Put the AvalonN back online.
If a new plate punch is purchased it needs to be installed and congured by Agfa Service.