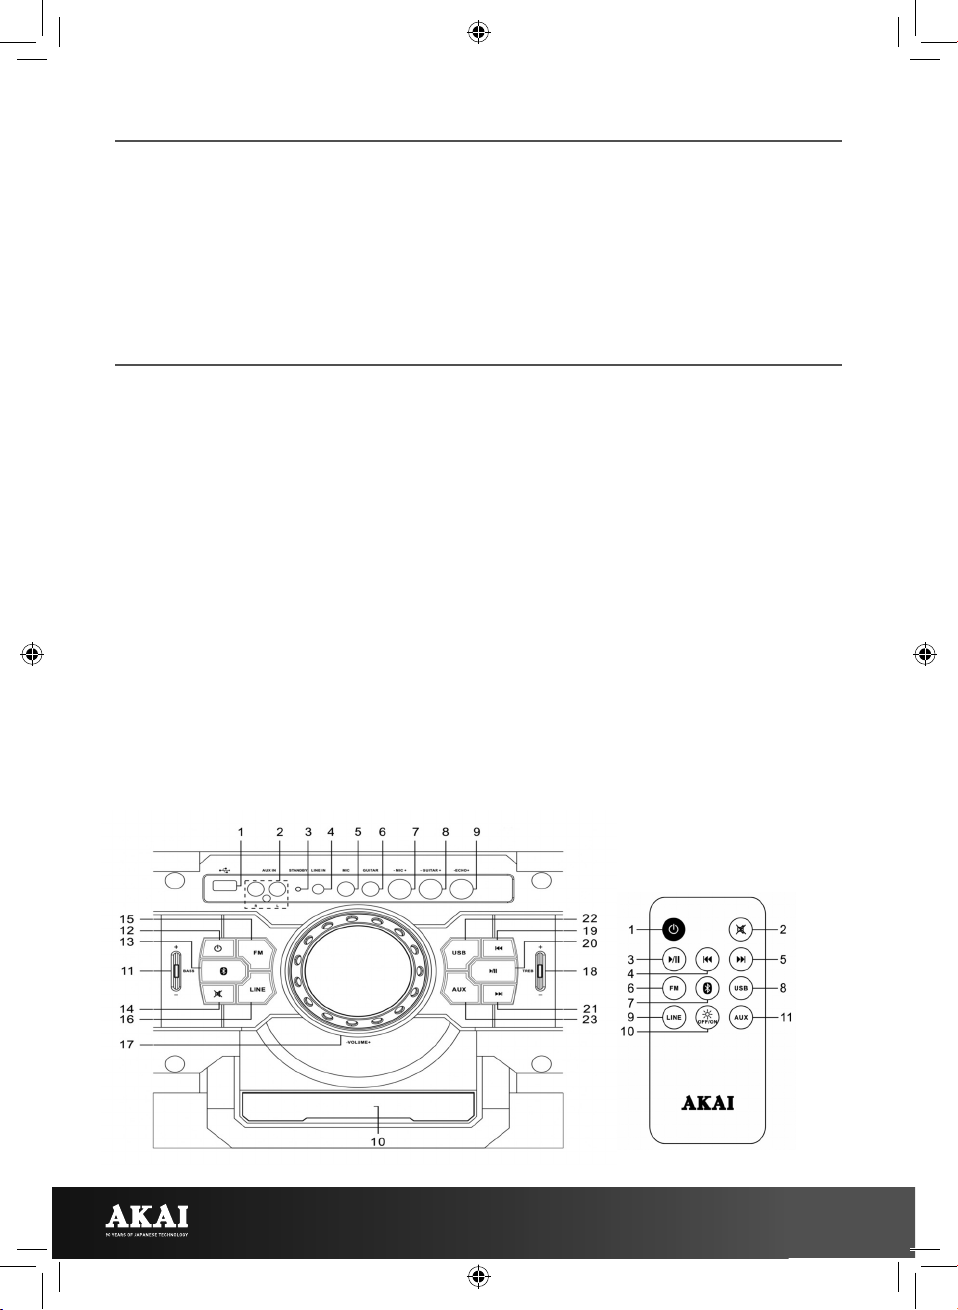
Akai A58097 User manual

INSTRUCTION MANUAL
PARTY SPEAKER
WITH LED MULTICOLOURED LIGHTING EFFECTS
MODEL: A58097
NEED HELP?
FOR ADVICE, SPARES AND RETURNS.
CALL:+44 (0)333 220 6042
8.30AM TO 6.00PM MONDAY-FRIDAY
VISIT: WWW.AKAIONLINE.CO
90 YEARS OF JAPANESE TECHNOLOGY
100W Output
Wireless
Connectivity
FM Radio
Easy To UseŁ
Remote
Microphone
Function
Mains Operated
6.3mm Jack
Supports USB Input

2
We declare that this product conforms to the following product legislation in accordance
with the following directive(s):
2014/30/EU Electromagnetic Compatibility Directive.
2014/35/EU Low Voltage Directive.
2011/65/EU Restriction of Hazardous Substances Directive.
2014/53/EU Radio Equipment Directive.
RK Wholesale LTD Quality Assurance.
DECLARATION OF CONFORMITY
TECHNICAL DATA
GUARANTEE
This product is guaranteed for 12 months
from the date of the original purchase.
If any defect arises due to faulty materials
or workmanship, the faulty product must be
returned to the place of purchase.
Refund or replacement is at the discretion
of the retailer.
The following conditions apply:
The product must be returned to the retailer
with the proof of purchase.
The product must be installed and used in
accordance with the instructions contained
in this instruction guide.
This item is for domestic purposes only.
This guarantee does not cover wear and
tear, damage, misuse or consumable parts.
RK Wholesale LTD has limited responsibility
for incidental or consequential loss or
damage.
Valid in the UK and Eire only.
MODEL NO: A58097
INPUT: AC 230V~ 50HZ 100W
SPEAKERS: 100W

3
IMPORTANT INFORMATION - RETAIN FOR FUTURE USE
SAFETY INFORMATION
Important safety instructions – read carefully before use.
It is important that this instruction manual should be retained
with the appliance player for future reference. These warnings
have been provided in the interest of safety. You MUST read them
carefully before installation or use.
WARNING
• Check that the voltage
of the main circuit
corresponds with the
rating of the appliance
before operating.
• Please ensure that the
appliance is used on a
stable, level, and heat
resistant surface.
• DO NOT immerse cords,
plugs or any part of the
appliance in water or any
other liquid.
• DO NOT leave the
appliance unattended
while it is operating.
• Close supervision is
necessary when any
appliance is used by or
near children or pets.
• This appliance can be
used by children aged
from 8 years and above
and persons with reduced
physical, sensory or
mental capabilities or
lack of experience and
knowledge if they have
been given supervision or
instruction concerning use
of the appliance in a safe
way and understand the
hazards involved.
• Children shall not play with
the appliance.
• Cleaning and user
maintenance shall not be
made by children without
supervision.
• Switch off at the wall
socket then remove the
plug from the socket
when not in use or before
cleaning.
• If the supply cord or
appliance is damaged,
stop using the appliance
immediately and
seek advice from the
manufacturer or its
service agent or a similarly
qualified person.

4
• DO NOT let the cord hang
over the edge of a table
or counter or let it come
into contact with any hot
surfaces.
• The use of accessory
attachments is not
recommended by the
appliance manufacturer,
apart from those supplied
with this product. DO NOT
use extension cords with
the appliance.
• DO NOT pull the plug out
by the cord as this may
damage the plug and/or the
cable.
• DO NOT use this product
for anything other than its
intended use.
• This appliance is for
household use only.
• DO NOT carry the appliance
by the power cord.
• DO NOT block any
ventilation openings and
install in accordance
with the manufacturer’s
instructions.
• DO NOT install near any
strong magnets or heat
sources such as radiators,
heat registers, stoves, or
other appliances (including
amplifiers) that produce
heat.
• Unplug this appliance
during lightning storms
or when unused for long
periods of time.
• If the appliance is not going
to be used for a period of
time please ensure that it is
fully disconnected, from the
mains power.
• If the appliance is brought
directly from a cold place
to a warm one, moisture
may condense inside the
appliance which will cause
malfunction. Should this
occur, leave the appliance
off for a few hours until the
moisture evaporates.
• DO NOT place anything
heavy on to the appliance.
• Never attempt to
disassemble the appliance.
There probably would be a
risk of electric shock and/
or harm by exposure.
• CAUTION! To reduce the
risk of electric shock, DO
NOT cover the back of the
speaker. There are NO
user-serviceable parts
inside. Refer all servicing
to the manufacturer or
qualified service personnel.

5
• WARNING! DO NOT expose
the appliance to rain or
moisture to reduce the risk
of electric shock or fire.
• WARNING! DO NOT
immerse the product in
water or any other liquid.
• In the unlikely event the
appliance develops a fault,
stop using it immediately
and seek advice from the
service department:
+44 (0) 333 220 6042

6
1. USB port
2. RCA AUX-IN jack
3. Standby indicator
4. Line-In jack (3.5mm)
5. Microphone input
(6.3mm)
6. Guitar input (6.3mm)
7. Microphone volume
control dial
8. Guitar volume control
dial
9. Microphone echo
control dial
10. LED display
11. Bass lever
12. Power On/Off button
13. Bluetooth mode
14. Mute
15. FM mode
16. Line-In mode
17. Volume control
18. Treble lever
19. Back/Previous button
20. Play/Pause button
21. Forward/Next button
22. USB mode
23. AUX-IN mode
REMOTE CONTROL
1. Power On/Off
2. Mute
3. Play/Pause
4. Back/Previous
5. Forward/Next
6. FM mode
7. Bluetooth mode
8. USB mode
9. Line-In mode
10. Light On/Off
11. AUX mode
PACKAGE CONTENTS
FEATURES AND CONTROLS
INSTRUCTION MANUAL
PARTY SPEAKER
3.5MM AUX CABLE
REMOTE CONTROL
WIRED MICROPHONE

7
USING YOUR APPLIANCE
BEFORE FIRST USE:
1. Remove the product from the box.
2. Remove any packaging from the
product.
3. Please retain all packaging until you
have checked and counted all the parts
and the contents against the parts list.
4. Your appliance is now ready for normal
use.
MOVING AND PLACING THE UNIT:
1. This unit is equipped with carry handles
and castor wheels, for easy portability.
Grip the handles on either side of the
unit’s control panel and push it along
the floor to carry, move and place the
unit.
2. Alternatively, the unit can be lifted off
the floor and carried or moved in this
manner. If carrying the unit this way,
ensure you have a firm grip on each
handle before attempting to lift it, to
prevent damage or malfunction.
TURNING THE UNIT ON AND OFF:
1. To turn the unit on, begin by plugging it
into an active mains socket. The Standby
indicator will turn red to indicate the
unit is plugged in.
2. Once the unit has been plugged into the
mains, press the Power On/Off button
on the remote control or the unit’s
control panel to turn the unit on. The
LED effect light on the unit’s control
panel will light up to indicate the unit is
turned on.
3. Short-press the Power On/Off button on
the remote control or the unit’s control
panel while the speaker is in operation
to return it to Standby mode.
4. To turn the unit off completely, unplug it
from the mains or turn the power outlet
off at the socket.
TURNING THE LED EFFECT ON/OFF:
1. This unit is equipped with a multi-
coloured LED lamp, which produces an
eye-catching light effect whenever the
unit is in operation. The LED light will
automatically come on whenever the
unit is taken out of Standby mode.
2. To turn the LED on or off manually,
press the Light On/Off button on the
unit’s remote control. Press this button
when the light effect is on to turn it off,
and press it again when the light effect
is de-activated to turn it back on.
PLUGGING IN AN EXTERNAL DEVICE:
1. This unit supports wired connectivity
with external devices such as
microphones, musical instruments or
portable CD or MP3 players.
2. Use the Mic jack to connect the included
wired microphone to the unit, the Guitar
jack to plug an amplified instrument to
the unit, or the ‘Line In’ jack to connect
a portable music player to the unit.
NOTE: When attempting to use the unit’s
included microphone, ensure the On/Off
switch on the microphone itself is flicked to
the ‘On’ position; otherwise, no sound will
emit from the microphone or the unit’s main
speaker.
3. Once an external device has been
plugged into the unit, press the ‘Line’
button on the remote control or the
unit’s control panel to activate the Line-
Out function. The text ‘Line’ will appear
on the unit’s LCD display to indicate this
option has been selected.
4. Once the Line function is in operation,
use the control panel to control
playback and volume or to add or
reduce sound effects, as described in
the sections below.

8
CONTROLLING THE VOLUME:
1. To control the volume using the unit’s
control panel, rotate the volume dial,
located around the outside of the LED
effect lamp. Turn this dial clockwise
to increase the volume, or counter-
clockwise to decrease it.
2. The unit can also be muted altogether.
Press the Mute button on the remote
control or the unit’s control panel to
mute the volume entirely.
CONTROLLING THE EFFECTS:
1. This unit is equipped with adjustable
Treble, Bass, Echo, Mic and Guitar
volume settings.
2. To adjust the Treble or Bass levels
of the unit’s audio output, slide the
corresponding levers up or down as
required. Slide each of these levels
upwards to increase the treble or bass
levels, or push them down to decrease
each setting.
3. To adjust the output volume of a
plugged-in microphone or musical
instrument, turn the corresponding
dials as required. Turn each of these
dials clockwise to increase the
corresponding volume, or counter-
clockwise to decrease it.
4. To adjust the echo effect when using a
microphone, turn the corresponding dial
as required. Turn this dial clockwise to
increase the corresponding volume, or
counter-clockwise to decrease it.
PLAYING MODES:
This speaker can reproduce audio files
through Bluetooth, FM Radio, from a USB
device, or from an external source through
the Line-In or AUX-IN ports. Press the
corresponding button on the remote control
or the unit’s control panel to select each
playing mode.
BLUETOOTH MODE:
1. This unit allows for wireless streaming
via Bluetooth. Press the Bluetooth
button on the remote control or the
unit’s control panel to activate the USB
function. The text ‘BT’ will appear on
the unit’s LCD display to indicate this
function has been selected.
2. Once the Bluetooth function is active,
turn on the Bluetooth function in your
external device and look for “A58097”.
3. Select the speaker name and pair it with
your device. If a password is required,
press “0000”.
4. You will hear a sound to indicate the
speaker has successfully paired with
your device.
5. If pairing is unsuccessful, restart both
devices and repeat the steps above.
6. Select the audio file you wish to play
and press the Play/Pause button on
the external device, the remote control
or the unit’s control panel to start
playback.
7. Once the selected media file is playing,
use the media controls on the external
device, the remote control or the unit’s
control panel to control playback and
volume.
8. If using the unit’s remote control or
control panel to adjust playback, press
the Play/Pause button to start or pause
playback, the Forward/Next button to
skip to the next track on the playlist, or
the Back/Previous button to return to
the start of the currently selected track.
Press the Back/Previous button again
once the track has started over to skip
to the previous track on the playlist.
9. Short-press the Power On/Off button on
the remote control or the unit’s control
panel at any time to return the unit
to Standby mode, or press any other
button to choose a different playing
mode.
USING YOUR APPLIANCE

9
USB MODE:
1. To play audio files using a USB
connection or external memory device,
first insert the USB connector on the
device or the Micro USB end of a USB
connecting cable (not included) into the
corresponding slot in the unit’s control
panel. If using a cable, insert the other
end into the USB port on your external
device.
2. Short-press the Power On/Off button on
the remote control or the unit’s control
panel to turn the unit on. The LED effect
light on the unit’s control panel will light
up to indicate the unit is turned on.
3. When the unit is turned on, press the
USB button on the remote control or the
unit’s control panel to select the USB
function The text ‘USB’ will appear on
the unit’s LCD display to indicate this
function has been selected.
4. Once the USB function has been turned
on, select the desired media file on the
source device.
5. When the selected media file is playing,
use the media controls on the external
device, the remote control or the unit’s
control panel to control playback and
volume.
6. If using the unit’s remote control or
control panel to adjust playback, press
the Play/Pause button to start or pause
playback, the Forward/Next button to
skip to the next track on the playlist, or
the Back/Previous button to return to
the start of the currently selected track.
Press the Back/Previous button again
once the track has started over to skip
to the previous track on the playlist.
7. Short-press the Power On/Off button on
the remote control or the unit’s control
panel at any time to return the unit
to Standby mode, or press any other
button to choose a different playing
mode.
AUX MODE:
1. Use the included 3.5mm AUX cable to
connect external devices to this unit.
Plug one end of the cable into the AUX-
Out jack on the source device, and the
other end into the AUX-IN jacks on the
unit’s control panel.
2. Once the external device has been
plugged into the speaker, short-press
the Power On/Off button on the remote
control or the unit’s control panel to
turn the unit on. The LED effect light on
the unit’s control panel will light up to
indicate the unit is turned on.
3. Press the ‘AUX’ button on the remote
control or the unit’s control panel to
select AUX mode. The text ‘AUX’ will
appear on the unit’s LCD display to
show this mode has been selected.
4. Turn your external device on and use
the media controls to select your
desired media file.
5. Once the selected file is playing, use the
media controls on the external device,
the remote control or the unit’s control
panel to control playback and volume.
6. If using the unit’s remote control or
control panel to adjust playback, press
the Play/Pause button to start or pause
playback, the Forward/Next button to
skip to the next track on the playlist, or
the Back/Previous button to return to
the start of the currently selected track.
Press the Back/Previous button again
once the track has started over to skip
to the previous track on the playlist.
7. Short-press the Power On/Off button on
the remote control or the unit’s control
panel at any time to return the unit
to Standby mode, or press any other
button to choose a different playing
mode.

10
FM RADIO MODE:
1. This unit is equipped with an FM radio
function. Press the ‘FM’ button on the
remote control or the unit’s control
panel to listen to live music through
the radio. The text ‘FM’ and the band
frequency indicator will appear on the
unit’s LCD display to show radio mode
has been selected.
2. Once the radio function has been
activated, use the media controls on
the remote control or the unit’s control
panel to scan and select your desired
radio station.
3. Short-press the Forward/Next or Back/
Previous buttons to go one point forward
or one point back across the FM band.
Repeatedly short-press either button to
manually scan the band in this way.
4. Long-press either of these buttons to
launch the auto-scan feature. When
this feature is selected, the unit will
automatically scan the frequency and
stop at the first available radio station.
5. Press the Forward/Next or Back/
Previous buttons again when the radio
is tuned to a radio station to re-start the
manual or automatic scanning process.
Repeat this process as many times as
necessary until you find your desired
radio station.
6. Short-press the Power On/Off button on
the remote control or the unit’s control
panel at any time to return the unit
to Standby mode, or press any other
button to choose a different playing
mode.
USING YOUR APPLIANCE

11
TROUBLESHOOTING THE APPLIANCE
PROBLEM POSSIBLE CAUSE SOLUTION
The unit will not
turn on/No power Unit not plugged
in. Connect the unit to an active mains socket.
The LED light effect
is not working. LED function
turned off. Turn the LED effect on by pressing the Light
On/Off button on the remote control or the
unit’s control panel.
No sound. Volume not
adjusted. Adjust the volume level using the Previous/
Vol- and Next/Vol+ buttons on the unit’s
control panel.
Wrong audio
source or function
selected.
Select the correct audio source and function.
Source device not
turned on. Turn the source device on.
Unit not turned
on. Turn the speaker on by pressing the On/Off
button on the remote control or the unit’s
control panel.
Volume is set too
low. Adjust the output volume using the Previous/
Vol- and Next/Vol+ buttons on the unit’s
control panel.
Audio file is
paused. Press the Play/Pause button on the unit’s
control panel to resume playback.
Sound is distorted. Volume level is
set too high. Adjust the output volume using the media
controls on the source device or the Previous/
Vol- and Next/Vol+ buttons on the unit’s
control panel.
The unit becomes
warm after
extended play at
high volume.
This is normal. Turn the unit off for some time or lower the
volume.
The microphone
is not working /
no sound on the
microphone.
Microphone not
plugged in. Plug the microphone into the Mic jack on the
unit’s control panel.
Line-In mode not
selected. Select Line-In mode by pressing ‘Line’ on the
remote control or the unit’s control panel.
Microphone not
turned on. Turn the microphone on by flicking the On/Off
switch on the handle to the On position.
Microphone
muted. Unmute the microphone by flicking the switch
on the handle from the middle position to the
On position.
There is an echo
when using the
microphone.
Echo level too
high. Adjust the echo level by turning the ‘Echo’ dial
on the unit’s control panel.

12
ELECTRICAL SAFETY
WARNING:
This appliance is double insulated.
Do not connect any wire to the earth terminal.
IMPORTANT
As the colours in the mains lead of this
appliance may not correspond with
the coloured markings identifying the
terminals in your plug, please proceed as
follows:
The wires in the mains lead are coloured in
accordance with the following code:
Blue neutral [N] Brown live [L]
Plug Fitting Details (Where Applicable).
The wire coloured blue is the neutral and
must be connected to the terminal marked
[N] or coloured black.
The wire coloured brown is the live wire
and must be connected to the terminal
marked [L] or coloured red.
On no account must either the brown or
the blue wire be connected to the [EARTH]
terminal .
Always ensure that the cord grip is
fastened correctly.
The plug must be fitted with a fuse of the
same rating already fitted and conforming
to BS 1362 and be ASTA approved.
If in doubt consult a qualified electrician
who will be pleased to do this for you.
Non-Rewireable Mains Plug.
If your appliance is supplied with a non-
rewireable plug fitted to the mains lead
and should the fuse need replacing,
you must use an ASTA approved one
(conforming to BS 1362 of the same
rating).
If in doubt, consult a qualified electrician
who will be pleased to do this for you.
If you need to remove the plug – disconnect
it from the mains – and then cut it off of
the mains lead and immediately dispose of
it in a safe manner. Never attempt to reuse
the plug or insert it into a socket outlet as
there is a danger of an electric shock.
Fuse
Neutral
(Blue)
Live
(Brown)

13
CLEANING AND CARE
1. Clean the unit with a soft, damp
cloth. Never use chemicals or hard
abrasives.
2. Keep this unit away from wet or damp
surroundings.
3. Store in a clean, dry place.
4. Do not expose the unit to extremely
high or low temperatures as this will
shorten the life of electronic devices,
destroy the battery and distort certain
plastic parts.
5. Don’t dispose of the unit in fire as it
will result in an explosion.
6. Don’t expose the unit to contact
with sharp objects as this will cause
scratches and damage.
7. Don’t let the unit fall to the floor. The
internal circuit might get damaged.
8. Don’t attempt to disassemble the unit
yourself, as it may get damaged.
CAUTION: Never leave the speaker
in direct sunlight or in hot, humid or
dusty places. Keep the speaker away
from heating appliances and sources of
electrical noise, such as fluorescent lamps
and motors.
RECYCLING
DISPOSAL OF THE UNIT:
Appliances bearing the symbol shown here may not be disposed of in domestic
rubbish.
You are required to dispose of old electrical and electronic appliances like this
separately.
Please visit www.recycle-more.co.uk or www.recyclenow.co.uk for access to information
about the recycling of electrical items.
Please visit www.weeeireland.ie for access to information about the recycling of
electrical items purchased in Ireland.
The WEEE directive, introduced in August 2006, states that all electrical items must be
recycled, rather than taken to landfill.
Please arrange to take this appliance to your local Civic Amenity site for recycling, once it
has reached the end of its life.

14
NOTES

15
NOTES

*REGISTER YOUR PRODUCT ONLINE AT WWW.AKAIONLINE.CO
AND ENJOY 3 YEARS PEACE OF MIND
AKAI CUSTOMER SUPPORT TEAM
+44 (0) 333 220 6042
NEED HELP?
FOR ADVICE, SPARES AND RETURNS.
CALL: +44 (0)333 220 6042
8.30AM TO 6.00PM MONDAY-FRIDAY
VISIT: WWW.AKAIONLINE.CO
DISTRIBUTED THROUGHOUT THE UK BY RK WHOLESALE LTD
0919.V2
90 YEARS OF JAPANESE TECHNOLOGY
Table of contents
Other Akai Speakers manuals
Popular Speakers manuals by other brands

JBL
JBL OnBeat aWake Quick setup guide

Bose
Bose COMPANION 20 quick start guide

Sony
Sony XS-L120P5H Installation/connections

Ground Zero
Ground Zero URANIUM Series owner's manual

Grimani Systems
Grimani Systems Alpha Installation and operation manual

Tema Telecomunicazioni
Tema Telecomunicazioni AD630S Programming manual