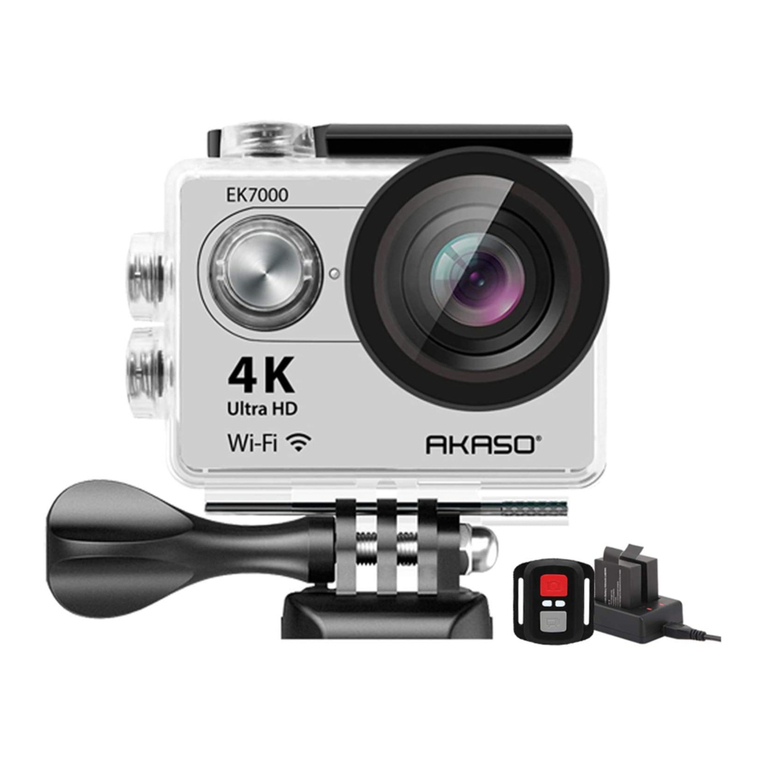
Akaso EK7000 User manual

USER
MANUAL
EK7000 Action Camera

Your EK7000
Getting Started
Overview of Modes
Customizing Your EK7000
Connecting to The iSmart DV APP
Playing Back Your Content
Deleting Videos and Photos on Your EK7000
Offloading Your Content
Reformatting Your Micro SD Card
Maintenance Your Camera
Maximizing Battery Life
Battery Storage and Handling
Remote
Mounting Your Camera
Contact US
1
3
4
7
9
9
10
11
12
12
12
13
13
16
17
CONTENTS

YOUR EK7000
1. Shutter / Select Button
2. Working / WiFi Indicator
3. Power / Mode / Exit Button
4. Charging Indicator
5. Micro SD Slot
6. Micro USB Port
7. Micro HDMI Port
8. Lens
9. Screen
10. Up Button
11. Down / WiFi Button
12. Battery Door
Note: Camera does not record sound when it is in the waterproof case.
01 02
5
146
7
1
2
4
3
8
9
11
10
1412

GETTING STARTED
Welcome to your new EK7000. To capture video and photos, you need a micro SD card
(sold separately).
OVERVIEW OF MODES
There are 5 modes: Video, Photo, Burst Photo, Time Lapse and Setting.
Video Mode
Video Mode is the default mode when you turn on the camera.
In Video Mode, press Shutter button, the camera starts recording video. Press Shutter
button to stop recording video.
MICRO SD CARDS
Use brand name memory cards that meet these requirements:
• Micro SD, Micro SDHC, or Micro SDXC
• Class 10 or UHS-I rating
• Capacity up to 32GB (FAT32)
Note:
1. Please format the micro SD card first in this camera before using. To keep your Micro SD
card in good condition, reformat it on a regular basis. Reformatting erases all of your
content, so be sure to offload your photos and videos first.
2. FAT32 format Micro SD card stops recording when the storage of each file is over 4 GB
and starts to record again on a new file.
POWERING ON + OFF
To Power On:
Press and hold the Mode button for three seconds. The camera beeps while the camera
status lights light. When information appears on the LCD display or the camera status
screen, your camera is on.
To Power Off:
Press and hold the Mode button for three seconds. The camera beeps while the camera
status lights is off.
SWITCHING MODE
To Switch Mode:
Press the Mode button to switch the mode.
To Exit Mode:
Press the Mode button to exit mode.
TURNING ON / OFF Wi-Fi
To turn on Wi-Fi
Turn on camera, press Down button to turn on Wi-Fi.
To turn off Wi-Fi
Press Down button to turn off Wi-Fi.
03 04
00:07:26 / 01:52:34
10/21/2018 13:20:15

Photo Mode
Press Mode button once to switch to Photo Mode after you turn on camera.
In Photo Mode, press Shutter button, the camera takes a photo.
Burst Photo Mode
Press Mode button several times to switch to Burst Photo Mode. In Burst Photo Mode,
press Shutter button, the camera takes 3 photos per second.
Settings
Press Mode Button several times to switch to settings mode. Press UP or Down button to
cycle through options and press Shutter Button to select desired option.
Time Lapse Photo Mode
Press Mode button several times to switch to Time Lapse Photo Mode. In Time Lapse
Photo Mode, press Shutter button, the camera takes a serial of photos at 3s / 5s / 10s
intervals.
05 06
0004 | 30297
12MP
WIDE
0004 | 30297
12MP
WIDE
0004 | 30297
12MP
WIDE
SETTINGS
Video Resolution
Loop Video
Time Stamp
Exposure

Settings
1. Video Resolution: 1080P 60FPS, 1080P 30FPS, 4K 25FPS, 2.7K 30FPS, 1080P 60FPS,
720P 120FPS, 720P 60FPS
Default setting is 1080P 60FPS.
2. Looping Record: Off / On
Default setting is off.
Using Looping Record, you can continuously record video, but save only the moments that
you want.
3. Time Stamp: Off, Date, Date & Time
Default setting is Date & Time.
If you turn on Time Stamp, this camera adds time stamp to the videos or photos you take.
If you select Off, this camera will not add time stamp to the videos or photos you take.
4. Exposure: -2.0, -1.7, -1.3, -1.0, -0.7, -0.3, 0.0, +0.3, +0.7, +1.0, +1.3, +1.7, +2.0
Default setting is 0.0.
By default, your camera uses the entire image to determine the appropriate exposure level.
However, Exposure lets you select an area that you want the camera to prioritize when
determining exposure. This setting is particularly useful in shots where an important region
might otherwise be over- or underexposed.
When you change this setting, the LCD display immediately shows you the effect on your
image. If you change modes, the camera returns to using the entire scene to determine
the correct level of exposure.
5. Photo Resolution: 12MP, 8MP, 5MP, 4MP
Default setting is 12MP.
6. Burst Photo: 3 Photos
Burst captures up to 3 photos in 1 second, so it is perfect for capturing fast-moving activities.
7. Time Lapse: 2s, 3s, 5s, 10s, 20s, 30s, 60s
Default setting is 3s.
CUSTOMIZING YOUR EK7000 Time Lapse Photo captures a series of photos at specified intervals. Use this mode to
capture photos of any activity, then choose the best ones later.
8. Continuous Lapse: OFF / ON
Default setting is Off.
Turn on Continuous Lapse, this camera takes continuous lapse photo.
9. Power Frequency: 50Hz, 60Hz, Auto
Default setting is 50Hz.
10. Language: English, 繁體中文, Italiano, Español, Português, Deutsch, Dutch, Français,
Čeština, Polski, Türk, Pyccкий, Romaña, 日本語, Thai,
Default setting is English.
11. Date & Time: YY / MM / DD HH: MM
Note: If you replace the battery, the date and time will reset.
12. Sounds Indicator
Shutter: On / Off Start-up: On / Off
Beep: On / Off Default setting is on.
Sets the volume of your EK7000's alerts.
Volume: 0, 1, 2, 3
Default setting is 3.
This option lets you adjust the volume. Press Shutter button to adjust the volume.
13. Upside Down: Yes / No
Default setting is No.
This setting determines the orientation of your video or photos to help you prevent upside
down footage.
14. Screen Saver: OFF, 1min, 3min, 5min
Default setting is 1min.
Turns off the LCD display after a period of inactivity to save battery life. To turn on the
LCD display again, press any button on the camera.
07 08
15. Power Save: OFF, 1 min, 3 min, 5 min
Default setting is 3 min.
Powers off your EK7000 after a period of inactivity to save battery life.
16. Format: No / Yes
To keep your micro SD card in good condition, reformat it on a regular basis. Reformatting
erases all of your content, so be sure to offload your photos and videos first.
To reformat your card, press the mode button several times to enter Camera Setting, then
press down button several times to enter Format and select Yes.
17. Reset: No / Yes
This option resets all settings to their default values.
18. Version
You can check the model and updated time of your EK7000.
The iSmart DV app lets you control your camera remotely using a smartphone or tablet.
Features include full camera control, live preview, playback and sharing of content.
1. Download iSmart DV app to your mobile device from the Apple App Store or Google Play.
2. Turn on the camera, then press Down button to turn on Wi-Fi.
3. Turn on Wi-Fi of your mobile device, connect to the Wi-Fi SSID ‘iCam-AKASO’.
4. Enter the password: 1234567890.
5. Open the app iSmart DV.
6. Tap ‘Add new camera’.
7. Tap ‘Wi-Fi Connect’
Note: Press Down button if you want to turn off Wi-Fi.
CONNECTING TO THE ISMART DV APP
VIEWING VIDEOS AND PHOTOS ON YOUR EK7000
1. Turn on camera to enter Video or Photo mode.
2. Press Up button in video or photo mode to enter playback mode. If you press Up
button in playback mode, the camera will exit playback mode.
3. Press Down button, then Shutter button to open video or photo in full-screen view.
4. Press Up or Down button to playback photos. Press Up or Down button, then Shutter
button to playback videos.
5. To exit the video or photo files, press Mode button.
Note: If your micro SD card contains a lot of content, it might take a minute for it to load.
You can play back your content on the camera’s LCD display, your computer, TV, or
smartphone / tablet.
You can also play back content by inserting the micro SD card directly into a device, such
as a computer or compatible TV. With this method, playback resolution depends on the
resolution of the device and its ability to play back that resolution.
PLAYING BACK YOUR CONTENT
1. Turn on camera to enter Video or Photo mode.
2. Press Up button in video or photo mode to enter playback mode. If you press Up button
in playback mode, the camera will exit playback mode.
3. Press Down button, then Shutter button to open video or photo in full-screen view.
4. Press Up or Down button to locate the file you want to delete.
5. Press and hold the Shutter button for 3 seconds. The screen shows ‘Delete this file? Yes No’
6. Press Up button, then Shutter button, the selected file will be deleted.
DELETING VIDEOS AND PHOTOS ON YOUR EK7000
09 10
Photos Videos
Media on My iPhone
Add New Camera
Add New Camera
Add New Camera
Photos Videos
Media on My iPhone
Add New Camera
Add New Camera
iCam-AKASO
Cancel Add new camera
When you already connect to camera by Wi-Fi
For new camera, and the camera supports bluetooth
low energy.
Wi-Fi Connect
Bluetooth Pair

To keep your micro SD card in good condition, reformat it on a regular basis. Reformatting
erases all of your content, so be sure to offload your photos and videos first.
1. Turn on camera.
2. Press Mode button four times, then Shutter button to enter Camera Setting.
3. Press UP or Down button to locate the ‘Format’ option.
4. Press Shutter button, the screen shows ‘No/Yes.’
5. Press Down button then Shutter button. The screen shows ‘Waiting’ then ‘Completed’.
Then you format your micro SD card successfully.
REFORMATTING YOUR MICROSD CARD
Follow these guidelines to get the best performance from your camera:
1. For best audio performance, shake the camera or blow on the mic to remove debris
from the microphone holes.
2. To clean the lens, wipe it with a soft, lint-free cloth. Do not insert foreign objects around
the lens.
3. Don’t touch the lens with fingers.
4. Keep the camera away from drops and bumps, which may cause damage to the parts
inside.
5. Keep the camera away from high temperature and strong sunshine to avoid being
damaged.
MAINTENANCE YOUR CAMERA
OFFLOADING YOUR CONTENT TO A COMPUTER
To play back your video and photos on a computer, you must first transfer these files to a
computer. Transferring also frees up space on your micro SD card for new content.
To offload files to a computer using a card reader (sold separately) and your computer’s
file explorer, connect the card reader to the computer, then insert the micro SD card. You
can then transfer files to your computer or delete selected files on your card. Note that
you must use a card reader to offload photos or audio files.
OFFLOADING YOUR CONTENT TO SMARTPHONE OR TABLET
1. Connect to the iSmart DV app.
2. Open the iSmart DV app.
3. Tap ‘iCam-AKASO’ at the top of the screen.
4. Tap file icon at the left corner of the bottom screen.
5. Tap ‘Choose’
OFFLOADING YOUR CONTENT
16M
Preview
ChooseDone Albums
Photos (2) Videos (2)
6. Tap the files you want to save.
7. Tap at the right corner of the bottom screen. The screen shows ‘Confirm Download’.
8. Tap ‘Confirm Download’.
9. Tap ‘Save Images’.
Note:
1. If you cannot offload videos or photos to iPhone or iPad, please enter Setting -> Privacy
-> Photos , find "iSmart DV" and select "Read and Write".
2. You cannot download 4K or 2.7K video to iPhone and iPad via Wi-Fi app. Please offload
4K or 2.7K videos via card reader.
11 12

The camera contains sensitive components, including the battery. Avoid exposing your
camera to very cold or very hot temperatures. Low or high temperature conditions may
temporarily shorten the battery life or cause the camera to temporarily stop working
properly. Avoid dramatic changes in temperature or humidity when using the camera, as
condensation may form on or within the camera.
Do not dry the camera or battery with an external heat source such as a microwave oven
or hair dryer. Damage to the camera or battery caused by contact with liquid inside the
camera is not covered under the warranty.
Do not store your battery with metal objects, such as coins, keys or necklaces. If the battery
terminals come in contact with metal objects, this may cause a fire.
Do not make any unauthorized alterations to the camera. Doing so may compromise safety,
regulatory compliance, performance, and may void the warranty.
WARNING: Do not drop, disassemble, open, crush, bend, deform, puncture, shred,
microwave, incinerate or paint the camera or battery. Do not insert foreign objects into the
battery opening on the camera. Do not use the camera or the battery if it has been
damaged - for example, if cracked, punctured or harmed by water. Disassembling or
puncturing the battery can cause an explosion or fire.
BATTERY STORAGE AND HANDLING
VIDEO
To record Video, verify the camera is in Video mode.
To start recording:
Press the Grey Video Button. The camera will emit one beep and the camera light will
flash while recording.
To stop recording:
Press the Grey Video Button again. The camera will emit one beep and the camera light
will stop flashing while recording.
PHOTO
To capture a photo, verify the camera is in Photo mode.
To take a photo:
Press the Red Photo Button. The camera will emit a camera shutter sound.
CR2032 BATTERY REPLACEMENT FOR VISION 4 REMOTE
1. Use a 1.8mm Phillips tip screwdriver to remove the 4 screws on the back cover of the
remote, allowing you to open it.
13 14
A message appears on the touch display if the battery drops below 10%. If the battery
reaches 0% while recording, the camera saves the file and powers off.
To maximize battery life, follow these guidelines when possible:
• Turn off Wireless Connections
• Capture video at lower frame rates and resolutions
• Use Screen Saver setting.
MAXIMIZING BATTERY LIFE REMOTE
Photo Button
Video Button
Splashproof only, not waterproof

2. Remove another 4 screws on PCB board.
3. Lift the PCB board and slide out the battery, as shown in the picture.
Note: Do NOT rotate the PCB board to avoid reversing the camera and video button functions.
4. Install the new battery, keeping the “+” pole facing up.
5. Install all 4 screws back onto the PCB board.
6. Install all 4 screws back into the cover.
Attach your camera to helmets, gear and equipment.
MOUNTING YOUR CAMERA
15 16

CONTACT US
For any inquiries, issues or comments concerning our products, please send E-mail to the
address below or call us. We will respond as soon as possible.
E-mail: [email protected]
Tel: (888) 466-9222(US) Mon-Fri 9am-5pm(EST)
Brand web: www.akasotech.com
17 18
Was ist in der Box
GRUNDKENNTNISSE
Nach oben/Wiedergabe-Taste
Lautsprecher
Nach unten/Wi-Fi-Taste
Batterietürverriegelung
Batterietür
Bildschirm
20
Auslöser/Auswahl-Taste
Ladestatusleuchte
Strom-Taste
Micro USB-Port
Linse Micro HDMI-Port
Mikrofon
MicroSD Schlitz

Drücken Sie die Auslöser/Auswahl-Taste, um das Auswahlmenü zu öffnen. Drücken Sie mehrmals
auf die Strom/Modus-Taste, um die Optionen anzuzeigen und drücken Sie dieAuslöser/
Auswahl-Taste, um die gewünschte Option zu wählen. Oder benutzen Sie die Nach oben/Wiedergabe
oder Nach unten/Wi-Fi-Taste, um die verschiedenen Optionen anzuzeigen.
ZUM ANFANG
EINSTELLUNGEN
HALLO
Herzlichen Glückwunsch zu Ihrer neuen Kamera! Dieses Bedienerhandbuch hilft beimVerständnis
der Grundkenntnisse, wie man die unglaublichsten Momente des Lebens aufzeichnen kann!
Zum EINSCHALTEN:
Drücken Sie die Strom/Modus-Taste.
Zum AUSSCHALTEN:
Drücken und halten Sie die Strom/Modus-Taste.
Endlos Video: Aus/Ein
Zeitangabe: Aus/Datum/Datum und Zeit
Belichtung: + – 2.0 /+ – 1.7/+ –1.3/+ -1.0/+ – 0.7/+ – 0.3/0
Foto-Auflösung 12: M/8 M/5 M/4M
Burst-Fotos: 3 Fotos
Zeitraffer: 2 s/3 s/5 s/10 s/20 s/30 s/60 s
Ständiger Zeitraffer: Aus/Ein
Stromfrequenz: 50 Hz/60 Hz/ Auto
Sprache:Englisch/Traditionelles Chinesisch/Italienisch/Spanisch/Portugiesisch/Deutsch/
Holländisch/Französisch/Tschechisch/Polnisch/Türkisch/ Russisch/Japanisch/Thailändisch
Datum und Zeit: MM/TT/JJ, TT/MM/JJ, oder JJ/MM/TT
Tonanzeige: Auslöser Ein/Aus, Start 1/2/3 Kein, Piepton Ein/Aus Lautstärke 0/1/2/3
Auf Kopf gestellt: Ein/Aus
Bildschoner: Aus/1 Min/3 Min/5 Min
Energiesparen: Aus/1 Min/3 Min/5 Min
Format: Nein/Ja
Neustart: Nein/Ja
Version
Um Video aufzuzeichnen, prüfen Sie, ob die Kamera im Video-Modus ist. Falls das Video Symbol nicht
auf dem LCD Bildschirm Ihrer Kamera erscheint, drücken Sie mehrmals auf die Strom/Modus-Taste,
bis es erscheint.
Zum Beginn der Aufzeichnung:
Drücken Sie die Auslöser/Auswahl-Taste. Die Kamera gibt einen Piepton ab und die Kamera-Status-
Leuchte blinkt während der Aufzeichnung.
Zum Beenden der Aufzeichnung:
Drücken Sie die Auslöser/Auswahl-Taste. Die Kamera-Status-Leuchte blinkt nicht mehr und die
Kamera gibt einen Piepton ab, um das Ende der Aufzeichnung anzuzeigen.
Diese Kamera stoppt die Aufzeichnung automatisch, wenn die Batterie leer ist. Ihr Video wird
gespeichert, bevor sich die Kamera AUSSCHALTET.
Optionen:
Video Auflösung: 1080p 60/1080p 30/4K 25/2.7K 30/ 720p 120/ 720p 60
VIDEO-MODUS
Um ein Foto aufzunehmen, prüfen Sie, ob die Kamera im Foto-Modus ist. Falls das Foto Symbol auf
dem LCD Bildschirm nicht erscheint, drücken Sie mehrmals auf die Strom/Auswahl-Taste,
bis es erscheint.
Ein Foto aufnehmen:
Drücken Sie die Auslöser/Auswahl-Taste. Die Kamera gibt einen Kamera-Auslöser-Ton ab.
FOTO-MODUS
BATTERIE
Aufladen der Batterie
Um die Batterie zu laden:
1. Verbinden Sie die Kamera mit einem Computer oder einem USB-Netzgerät.
2. Die Ladestatusleuchte ist EINGESCHALTET, während die Batterie geladen wird.
3. Die Ladestatusleuchte schaltet AUS, wenn die Batterie voll geladen ist.
* Ladedauer: 3-5 Stunden
WASSERDICHTES GEHÄUSE
Strom-Taste
Nach unten/Wi-Fi-Taste
Nach oben/Wiedergabe-Taste
Riegel
Auswahl/Auslöser-Taste
2221

Um eine Burst-Foto-Serie aufzunehmen, prüfen Sie, ob die Kamera im Burst-Foto-Modus ist. Falls
das Burst-Foto-Symbol nicht erscheint, drücken Sie mehrmals auf die Strom/Modus-Taste, bis es
erscheint. Im Burst-Foto-Modus nimmt Ihre Kamera 3 Fotos in 1,5 Sekunden auf.
Um eine Burst-Foto-Serie aufzunehmen:
Drücken Sie die Auslöser/Auswahl-Taste. Die Kamera gibt Kamera-Auslöser-Töne ab.
Um eine Zeitraffer-Serie aufzuzeichnen, prüfen Sie, dass die Ständiger-Zeitraffer-Modus
EINGESCHALTET ist und die Kamera im Zeitraffer-Modus ist. Falls das Zeitraffer Symbol nicht auf
dem LCD Bildschirm der Kamera erscheint, drücken Sie mehrmals die Strom/Modus-Taste, bis es
erscheint. Im Zeitraffer-Modus nimmt Ihre Kamera eine Fotoserie mit einem Zeitintervall von 2, 3,
5, 10, 20, 30 oder 60 Sekunden auf.
Zur Aufnahme von Zeitraffer:
Drücken Sie die Auslöser/Auswahl-Taste. Die Kamera beginnt das Countdown und gibt bei jedem
Foto einen Kamera-Auslöser-Ton ab.
BURST-FOTO-MODUS
ZEITRAFFER-MODUS
WIEDERGABE
Videos und Fotos wiedergeben
Zum Öffnen des Wiedergabe-Menüs:
1. Prüfen Sie, ob die Kamera in Kamera-Modi ist.
2. Drücken Sie die Nach oben/Wiedergabe-Taste, um das Wiedergabe-Menü zu öffnen.
3. Drücken Sie mehrmals die Strom/Modus-Taste, um im Video und Foto zu suchen.
4. Drücken Sie die Auslöser/Auswahl-Taste, um die gewünschte Option zu wählen.
5. Benutzen Sie die Nach oben/Wiedergabe-Taste oder die Nach unten/Wi-Fi-Taste, um die
verschiedenen Optionen zu suchen.
6. Drücken Sie die Auslöser/Auswahl-Taste.
7. Um zum Wiedergabe-Menü zurückzukehren, drücken Sie die Strom/Modus-Taste.
8. Zum Beenden, halten Sie die Nach oben/Wiedergabe-Taste für 2 Sekunden.
SPEICHER/MICROSD KARTEN
Diese Kamera ist kompatibel mit 8 GB, 16 GB und 32 GB Kapazität microSD, microSDHC und micro
SDXC Speicherkarten. Sie müssen eine microSD Karte mit einer Geschwindigkeitsklasse 10 benutzen.
Wir empfehlen den Gebrauch von Marken-Speicherkarten für eine maximale Zuverlässigkeit unter
starken Vibrationsbedingungen.
KAMERA APP
Verbinden mit der iSmart DV App
Mit der iSmart DV App kontrollieren Sie Ihre Kamera aus der Ferne mithilfe eines Smartphones oder
eines Tablets. Die Merkmale umfassen eine vollständige Kamerasteuerung, Live Vorschau, Foto-
Wiedergabe und Teilen von ausgewähltem Inhalt und mehr.
1. Laden Sie die iSmart DV App auf Ihr Smartphone oder Tablet bei Google Play oder im Apple App
Store.
2. Drücken Sie die Strom/Modus-Taste, um die Kamera EINZUSCHALTEN.
3. Stellen Sie sicher, dass die Kamera in den Kamera-Modi ist.
4. Drücken Sie die Nach unten/Wi-Fi-Taste, um das Wi-Fi einzuschalten.*
5. In den Wi-Fi Einstellungen Ihres Smartphones oder Tablets, verbinden Sie mit dem
Netz ''ICAM-H9R''/ ''ICAM-AKASO'' / ''ICAM-W9'' und einer Nummern-Reihenfolge.
6. Geben Sie das Kennwort “1234567890” ein.
7.Öffnen Sie die iSmart DV App auf Ihrem Smartphone oder Tablet.
* Drücken und halten Sie die Nach unten/Wi-Fi-Taste für 3 Sekunden,
um das Wi-Fi AUSZUSCHALTEN.
Die iSmart DV App ist kompatibel mit den unten aufgeführten Smartphones und Tablets.
24
23

Qué hay en la caja
INFORMACIÓN BÁSICA
Botón Arriba/Reproducir
Altavoz
Botón Abajo/Wi-Fi
Cierre de la tapa el
Compartimento de las Pilas
Tapa del Compartimento
de las Pilas
Pantalla
Pulse el Botón Obturador/Seleccionar para entrar en el menú de ajustes. Presione repetidamente el
Botón Encendido/Modo para navegar por las opciones y presione el Botón Obturador/Seleccionar
para elegir la opción que desee. O use los botones Arriba/Reproducir o Abajo/Wifi para ver las
distintas opciones.
COMENZANDO
AJUSTES
HOLA
¡Felicidades por su nueva cámara! ¡Este manual de usuario le ayudará a aprender los conceptos
básicos de capturar los momentos de la vida más increíbles!
Para ENCENDER:
Pulse el Botón de Encendido/Modo.
Para APAGAR:
Pulse y mantenga el Botón de Encendido/Modo.
BATERÍA
Cargar la batería
Para cargar la batería:
1. Conecte la cámara a un ordenador o a una fuente de alimentación USB.
2. La Luz de Estado de Carga permanece ENCENDIDA mientras la batería se carga.
3. La luz de Estado de Carga se apagará cuando la batería este completamente cargada.
*Tiempo de carga: 3-5 horas
Español
CARCASA RESISTENTE AL AGUA
Botón Encendido/Modo
Botón Abajo/Wi-Fi
Botón Arriba/Reproducir
Cierre
Botón Seleccionar/Obturador
26
25
Botón Obturador/Seleccionar
Luz es Estado
de Carga
Botón Encendido/Modo
Puerto Micro USB
Lente
Puerto Micro HDMI
Micrófono
Ranura Micro SD

Vídeo en Bucle: Off/On
Sello de tiempo: Off/Fecha/Fecha y Hora
Exposición: +-2.0/+-1.7/+-1.3/+-1.0/+-0.7/+-0.3/0
Resolución de la foto: 12M/8M/5M/4M
Foto en Ráfaga: 3 Fotos
Time Lapse: 2s/3s/5s/10s/20/30/60s
Lapso Contínuo: Off/On
Potencia eléctrica: 50Hz/60Hz/Auto
Idioma: Inglés/Chino tradicional/Italiano/Español/Portugués/Alemán/ Holandés/Francés/
Checo/Polaco/Turco/Ruso/Japonés/Koreano/Tailandés
Fecha y Hora: MM/DD/AA, DD/MM/AA, o AA/MM/DD
Indicador de sonido: Obturador On/Off, Inicio 1/2/3/Ninguno, Bip On/Off, Volumen 0/1/2/3
Invertido: On/Off
Salvapantallas: Off/1 min/3 min/5 min
Ahorro de energía: Off 1 min/3 min/5 min
Formato: No/Sí
Resetear: No/Sí
Versión
Para grabar un Vídeo, compruebe que la cámara está en modo Vídeo. Si el icono de vídeo de la
pantalla LCD de su cámara no se muestra, pulse el Botón Encendido/Modo repetidamente hasta que
aparezca.
Para comenzar a grabar:
Pulse el Botón Obturador/Seleccionar. La cámara emitirá un bip y las Luces de Estado de la Cámara
parpadearán mientras graba.
Para parar de grabar:
Pulse el Botón Obturador/Seleccionar. Las Luces de Estado de la Cámara dejan de parpadear y la
cámara emite un bip para indicar que ha dejado de grabar.
Esta cámara deja de grabar automáticamente cuando se acaba la batería. Su Vídeo se guardará antes
de que la cámara se APAGUE.
Opciones:
Resolución de Vídeo: 1080p 60/1080p 30/4K 25/2.7K 30/ 720p 120/ 720p 60
MODO DE VÍDEO
Para tomar una Foto, compruebe que la cámara está en modo Foto. Si el icono de Foto no aparece en
la pantalla LCD de su cámara, pulse el Botón Encendido/Modo repetidamente hasta que aparezca.
Para tomar una foto:
Pulse el Botón Obturador/Seleccionar. La cámara emitirá un sonido de obturador.
MODO DE FOTO
Para tomar una serie de Fotos en Ráfaga, compruebe que la cámara está en Modo Ráfaga. Si el icono
de Ráfaga de Fotos no aparece en la pantalla LCD de su cámara, pulse el Botón Encendido/Modo
repetidamente hasta que aparezca. En modo Ráfaga, su cámara toma 3 fotos en 1.5 segundos.
Para tomar una serie en Ráfaga:
Pulse el Botón Obturador/Seleccionar. La cámara emitirá un sonido de obturador.
Para tomar una serie en Time Lapse, compruebe que el Lapso Continuo está ENCENDIDO y la cámara
está en modo Time Lapse. Si el icono de Time Lapse no aparece en la pantalla LCD de su cámara,
pulse el Botón Encendido/Modo repetidamente hasta que aparezca. En el modo Time Lapse, su
cámara captura series de fotos en intervalos de 2,3,5,10,20,30, o 60 segundos.
Para capturar en Time Lapse:
Pulse el Botón Obturador/Seleccionar. La cámara comenzará la cuenta atrás y emitirá un sonido de
obturador cada vez que tome una foto.
MODO DE FOTOS EN RÁFAGA
MODO DE TIME LAPSE
REPRODUCIR
ReproducirVídeos y Fotos
Para entrar en el menú de Reproducir:
1. Compruebe que la cámara está en modos de Cámara.
2. Pulse el Botón Arriba/Reproducir para entrar en el menú Reproducir.
3. Pulse repetidamente el Botón Encendido/Modo para navegar en Vídeo y Foto.
4. Presione el Botón Obturador/Seleccionar para elegir la opción deseada.
5. Use el Botón Arriba/Reproducir o Abajo/Wi-Fi para navegar por las distintas opciones.
6. Pulse el Botón Obturador/Seleccionar.
7. Para volver al menú Reproducir, pulse el Botón Encendido/Modo.
8. Para salir, mantenga pulsado el Botón Arriba/Reproducir durante dos segundos.
ALMACENAMIENTO/TARJETAS MICRO SD
Esta cámara es compatible con tarjetas de memoria microSD, micro SDHC, y micro SDXC de 8GB,
16GB y 32 GB de capacidad. Debe usar una tarjeta micro SD con velocidad de transmisión de Clase
10. Le recomendamos que use tarjetas de memoria de marca para mayor fiabilidad en actividades
de altas vibraciones.
2827

APLICACIÓN DE CÁMARA
Conectando a la Aplicación iSmart DV
La Aplicación iSmart DV le permite controlar su cámara de forma remota utilizando un smartphone
o tableta. Características como control total de la cámara, vista previa en directo, reproducción de
fotos y compartir o seleccionar contenido y más.
1. Descargar la Aplicación iSmart DV a tu smartphone o tableta en Google Play
o Apple App Store.
2. Pulse el Botón Encendido/Modo para encender la cámara.
3. Asegúrese de que la cámara está en modos de Cámara.
4. Pulse el Botón Abajo/Wi-Fi para encender el Wi-Fi*.
5. En los ajustes de Wi-Fi de su smartphone o tableta, conéctese a la red llamara
''ICAM-H9R''/ ''ICAM-AKASO'' / ''ICAM-W9'' seguida de una serie de números.
6. Introduzca la contraseña “1234567890”.
7. Abra la Aplicación iSmart DV en su smartphone o tableta.
*Presione y mantenga el Botón Abajo/Wifi durante tres segundos para APAGAR el Wifi.
La Aplicación iSmart DV es compatible con smartphones y tabletas siguientes.
Qu'y a-t-il dans la boite
ENCASTREMENT WATERPROOF
Bouton Haut / Playback
Haut-parleur
Écran
Bouton Bas / Wi-Fi
Loquet du fermoir de la batterie
Fermoir de la batterie
Español
3029
Bouton Vitesse d’Obturation / Sélectionner
Lumière de
Chargement
en cours
Bouton Power / Mode
Port Micro HDMI
Objectif
Port Micro USB
Microphone
Fente MicroSD

Appuyez sur le Bouton Vitesse d’Obturation / Sélectionner pour entrer dans le menu des
paramètres. Appuyez à plusieurs reprises sur le bouton Power / Mode pour naviguer à travers les
options, et appuyez sur le Bouton Vitesse d’Obturation / Sélectionner pour sélectionner l’option
choisie. Ou utilisez le Bouton Haut / Playback ou Bas / Wi-Fi pour naviguer à travers les
différentes options.
POUR COMMENCER
PARAMÈTRES
BONJOUR
Félicitations pour votre nouvel appareil photo ! Cette notice d’utilisation vous aidera à apprendre
les bases pour capturer les moments les plus incroyables de la vie !
Pour ALLUMER :
Appuyez sur le Bouton Power / Mode
Pour ÉTEINDRE :
Appuyez sur le Bouton Power / Mode
Looping Vidéo : Off / On
Time Code : Off / Date / Date & Heure
Exposition : +-2.0 /+-1.7/+-1.3/+-1.0/+-0.7/+-0.3/0
Résolution Photo: 12M/8M/5M/4M
Rafale : 3 Photos
Retardement :2S/3S/5S/10S/20S/30S/60S
Temps Continu : Off / On
Fréquence de la Puissance : 50Hz/60Hz/Auto
Langues : Anglais / Chinois traditionnel/ Italien / Espagnol / Portugais / Allemand / Néerlandais /
Français / Tchèque / Polonais /Turque / Russe / Japonais / Coréen /Thaï
Date & Heure : MM/JJ/AA, JJ/MM/AA, ou AA/MM/JJ
Indicateur Sonore : Vitesse d’Obturation On / Off, Début à Partir de 1/2/3,
Bip On / Off, Volume 0/1/2/3
À l’Envers : On / Off
Économiseur d’Écran : Off/1 min/3 min/5 min
Économiseur d’Énergie : Off/1 min/3 min/5 min
Format : Non / Oui
Réinitialiser : Non / Oui
Versio
Pour enregistrer une vidéo, vérifiez que l’appareil photo est en mode Vidéo. Si l’icône Vidéo sur l’écran
LCD de votre appareil photo ne s’affiche pas, appuyez sur le Bouton Power / Mode à plusieurs reprises
jusqu’à son apparition.
Pour commencer à enregistrer :
Appuyez sur le Bouton Vitesse d’Obturation / Sélectionner. L’appareil photo émettra un bip et la
Lumière de l’Appareil Photo flashera durant l’enregistrement.
Pour arrêter l’enregistrement :
Appuyez sur le Bouton Vitesse d’Obturation / Sélectionner. La Lumière de l’Appareil Photo cessera
de flasher et l’appareil photo émettra un bip pour indiquer que l’enregistrement est arrêté.
Cet appareil photo arrête automatiquement d’enregistrer lorsque la batterie est vide. Votre Vidéo
sera sauvegardée avant que l’appareil photo ne s’éteigne
Options:
Résolution Vidéo : 1080p 60/1080p 30/4K 25/2.7K 30/ 720p 120/ 720p 60
MODE VIDÉO
Pour prendre une Photo, vérifiez que l’appareil photo est en mode Photo. Si l’icône Photo sur l’écran
LCD de votre appareil photo ne s’affiche pas, appuyez sur le Bouton Power / Mode à plusieurs reprises
jusqu’à son apparition.
Pour prendre une photo :
Appuyez sur le Bouton Vitesse d’Obturation / Sélectionner. L’appareil photo émettra un son pour la
vitesse d’obturation.
MODE PHOTO
ENCASTREMENT WATERPROOF
Bouton Power / Mode
Bouton Haut / Playback
Fermoir
Bouton Vitesse
d’Obturation / Sélectionner
Bouton Bas / Wi-Fi
BATTERIE
Recharger la Batterie
Pour recharger la batterie :
1. Connectez l’appareil photo à un ordinateur ou une connexion USB.
2. La Lumière de Recharge reste sur ON lors de la recharge de la batterie.
3. La Lumière de Recharge s’éteint lorsque la batterie est pleine.
*Temps de Recharge : 3-5 heures
32
31

Pour prendre des séries en Mode Rafale, vérifiez que l’appareil photo est en Mode Rafale. Si l’icône
Rafale sur l’écran LCD de votre appareil photo ne s’affiche pas, appuyez sur le Bouton Power / Mode
à plusieurs reprises jusqu’à son apparition. En Mode Rafale, votre appareil photo prend 3 photos en
1.5 secondes.
Pour prendre des séries en Rafale :
Appuyez sur le bouton Vitesse d’Obstruction / Sélectionner. L’appareil photo émettra le son de la
vitesse d’obstruction.
Pour prendre des séries en Mode Retardement, vérifiez que Le temps continu est Actionné que
l’appareil photo est en Mode Retardement. Si l’icône Retardement sur l’écran LCD de votre appareil
photo ne s’affiche pas, appuyez sur le Bouton Power / Mode à plusieurs reprises jusqu’à son apparition.
En Mode Retardement, votre appareil photo prend des séries de photo à 2, 3, 5, 10, 20, 30 ou 60
secondes d’intervalle
Pour prendre des séries en retardement :
Appuyez sur le bouton Vitesse d’Obstruction / Sélectionner. L’appareil Photo commencera un compte
à rebours et émettra le son de la vitesse d’obstruction à chaque prise.
MODE RAFALE
MODE RETARDEMENT
PLAYBACK
Revoir des Photos et desVidéos
Pour entrer dans le menu Playback :
1. Vérifiez que l’appareil photo est sur Modes Appareil Photo.
2. Appuyez sur le Bouton Haut / Playback pour entrer dans le menu Playback.
3. Pressez à plusieurs reprises le Bouton Power / Mode pour naviguer dans les Photos et Vidéos.
4. Appuyez sur le Bouton Vitesse d’Obturation / Sélectionner pour sélectionner l’option désirée.
5. Utilisez le Bouton Haut / Playback u Bas / Wi-Fi pour naviguer à travers les différentes options.
6. Appuyez sur le Bouton Vitesse d’Obturation / Sélectionner.
7. Pour retourner au menu Playback, appuyez sur le bouton Power / Mode.
8. Pour sortir, appuyez sur le Bouton Haut / Playback pendant deux secondes.
MÉMOIRE / CARTES MICROSD
Cet appareil photo est compatible avec les cartes mémoires microSD, microSDHC, et microSDXC de
capacité de 8GB, 16GB et 32GB. Vous devez utiliser une carte microSD avec une Class 10 speed. Nous
recommandons d’utiliser les cartes mémoires de marque pour une fiabilité maximale lors d’activités
à hautes vibrations.
APP APPAREIL PHOTO
Connecter à l’App iSmart DV
L’App iSmart DV vous permet de contrôler votre appareil photo à distance avec un smartphone ou une
tablette. Elle inclut un contrôle total de l’appareil photo, l’aperçu live, la lecture de photo et le partage
de contenu sélectionné, et plus.
1. Téléchargez l’App iSmart DV sur votre smartphone ou tablette sur Google Play ou Apple App Store.
2. Appuyez sur le Bouton Power / Mode pour allumer l’appareil photo.
3. Assurez-vous que l’appareil photo est sur les modes de l’appareil photo.
4. Appuyez sur le Bouton Bas / Wi-Fi pour allumer le Wi-Fi*.
5. Dans les paramètres de votre smartphone ou tablette, connectez le réseau appelé
''ICAM-H9R''/ ''ICAM-AKASO'' / ''ICAM-W9'' suivi d’une suite de chiffres.
6. Entrez le mot de passe “1234567890”.
7. Ouvrez l’App iSmart DV sur votre smartphone ou votre tablette.
*Appuyez et Maintenez le Bouton Bas / Wi-Fi pendant 3 secondes pour éteindre le Wi-Fi.
L’App iSmart DV est compatible avec les smartphones et tablettes listées ci-dessous.
34
33
Other manuals for EK7000
13
Table of contents
Other Akaso Action Camera manuals

Akaso
Akaso V50 Pro SE User manual

Akaso
Akaso V50X User manual

Akaso
Akaso V50 Elite User manual

Akaso
Akaso EK7000 Plus User manual

Akaso
Akaso BRAVE 4 PRO User manual

Akaso
Akaso V50X User manual

Akaso
Akaso Brave 8 User manual

Akaso
Akaso Brave 4 User manual

Akaso
Akaso V50 Elite User manual

Akaso
Akaso V50X User manual

Akaso
Akaso Brave 4 User manual

Akaso
Akaso Brave 4 User manual

Akaso
Akaso Brave 7 User manual

Akaso
Akaso EK7000 User manual

Akaso
Akaso EK5000 User manual

Akaso
Akaso EK7000 User manual

Akaso
Akaso Brave 8 User manual

Akaso
Akaso V50 Elite User manual

Akaso
Akaso V50 Pro SE User manual

Akaso
Akaso Brave 7 User manual