Altrad Lescha BX 135 User manual

BX 135
Originalbetriebsanleitung
(Seite 1 – 6 und 15 – 18)
Original instructions
(Page 1 – 2, 7 – 10 and 15 – 18)
Originální návod k použití
(Str. 1 – 2 a 11 – 18)

Technische Änderungen vorbehalten!
Technical modifications reserved!
Technické změny vyhrazeny!

2
Bedeutung der Symbole
Meaning of the symbols
Význam symbolů
Vor Öffnen des Gehäuses Netzstecker ziehen! Der Mischer darf nur mit vollständig geschlossener Verkleidung betrieben werden!
Pull the plug before opening the case! Run the mixer only when the covering is completely closed!
Před otevřením krytu odpojte od elektr. sítě vytažením zástrčky ze zásuvky. Míchačka smí být provozována jen se všemi
namontovanými kryty.
Achtung! Drehrichtung beachten! Rotierendes Mischwerkzeug! Nicht in die laufende Mischtrommel greifen! Ausreichenden
Sicherheitsabstand zum Mischer einhalten. Jeglichen Kontakt zu drehenden oder bewegten Maschinenteilen verhindern.
Warning! Observe direction of rotation! Rotating mixing apparatus! Keep hands away from rotating mixing drum! Observe enough
safety distance to the concrete mixer. Prevent any contact to rotating or moving parts of the machine.
Pozor! Dbejte správného směru otáčení bubnu!Rotující míchací zařízení! Nesahejte a nezasahujte do běžícího bubnu! Dodržujte
dostatečný odstup! Zamezte všem dotykům s rotujícími či pohyblivými částmi stroje!
Achtung! Maschine Klasse ΙΙ.
Warning! Class ΙΙ Machine.
Pozor! Ochranná třída II.
Maschine ist gegen Spritzwasser geschützt.
This machine is protected against splash water.
Stroj je chráněný proti tlakové vodě.
Das Produkt entspricht den produktspezifisch geltenden europäischen Richtlinien.
This product complies with European regulations specifically applicable to it.
Výrobek je v souladu s evropskými směrnicemi platnými pro specifiku těchto produktů.

3
Sie haben mit dem Kauf dieses Betonmischers ein hochwertiges,
ausgereiftes und leistungsstarkes Gerät erworben.
Bewahren Sie die Bedienungsanleitung für künftige Verwendun-
gen auf.
Bevor Sie das Gerät in Betrieb nehmen,
müssen Sie diese Bedienungsanleitung
gelesen und alle angegebenen Hinweise
beachtet und verstanden haben.
Inhalt
Bedeutung der Symbole
2
Symbole Bedienungsanleitung
3
Bestimmungsgemäßer Gebrauch
3
Restrisiken
3
Betriebszeiten
3
Sicherheitshinweise
3
Inbetriebnahme
4
Das Mischen
5
Transport
5
Lagerung
5
Reinigung
5
Wartung
6
Instandsetzung
6
Betriebsstörungen
6
Garantie
6
Zahnspiel einstellen
15
Technische Daten
15
EG-Konformitätserklärung
16
Ersatzteile
17
Symbole Bedienungsanleitung
Drohende Gefahr oder gefährliche Situation. Das
Nichtbeachten dieser Hinweise kann Verlet
zungen zur
Folge haben oder zu Sachbeschädigung führen.
Wichtige Hinweise zum sachgerechten Umgang. Das
Nichtbeachten dieser Hinweise kann zu Störungen füh-
ren.
Benutzerhinweise. Diese Hinweise helfen Ihnen, alle
Funktionen optimal zu nutzen.
Montage, Bedienung und Wartung. Hier wird Ihnen
genau erklärt, was Sie tun müssen.
Bestimmungsgemäßer Gebrauch
•Der Betonmischer ist einsetzbar bei Heim- und Profiarbeiten
zum Mischen von Beton und Mörtel.
•Zum bestimmungsgemäßen Gebrauch gehört auch die Ein-
haltung der vom Hersteller vorgeschriebenen Betriebs-, War-
tungs- und Instandsetzungsbedingungen und die Befolgung
der in der Anleitung enthaltenen Sicherheitshinweise.
•Jeder weiter darüberhinausgehende Gebrauch insbeson-
dere das Mischen von brennbaren oder explosiven Stoffen
(Feuer- und Explosionsgefahr) und der Einsatz im Lebensmit-
telbereich gilt als nicht bestimmungsgemäß. Für hieraus resul-
tierende Schäden jeder Art haftet der Hersteller nicht das
Risiko trägt allein der Benutzer.
•Eigenmächtige Veränderungen an der Maschine schließen
eine Haftung des Herstellers für daraus entstehende Schäden
jeder Art aus.
•Das Gerät darf nur von Personen gerüstet, genutzt und ge-
wartet werden, die damit vertraut und über die Gefahren un-
terrichtet sind. Instandsetzungsarbeiten dürfen nur durch uns
bzw. durch von uns benannte Kundendienststellen durchge-
führt werden.
Restrisiken
Auch bei bestimmungsgemäßem Gebrauch können trotz Einhal-
tung aller einschlägigen Sicherheitsbestimmungen aufgrund der
durch den Verwendungszweck bestimmten Konstruktion noch
Restrisiken bestehen.
Restrisiken können minimiert werden, wenn die Bedienungsanlei-
tung, die „Sicherheitshinweise“ und die „Bestimmungsgemäße
Verwendung“ beachtet werden.
Rücksichtnahme und Vorsicht verringern das Risiko von Perso-
nenverletzungen und Beschädigungen.
•Verletzungsgefahr der Finger und Hände, wenn Sie mit der
Hand in die laufende Mischtrommel greifen. Ein Schutz gegen
die Gefahr des Erfassens oder Aufwickelns durch die umlau-
fenden Rührgitter ist nicht praktikabel (siehe EN 12151).
•Gefährdung durch Strom, bei Verwendung nicht ordnungsge-
mäßer Anschlussleitungen.
•Berührung spannungsführender Teile bei geöffneten elektri-
schen Bauteilen.
Desweiteren können trotz aller getroffenen Vorkehrungen nicht
offensichtliche Restrisiken bestehen.
Betriebszeiten
Gemäß der Maschinenlärmschutzverordnung vom September
2002 dürfen Betonmischer in reinen, allgemeinen und besonde-
ren Wohngebieten, Kleinsiedlungsgebieten, Sondergebieten, die
der Erholung dienen, Kur- und Klinikgebieten und Gebieten für
die Fremdenbeherbergung sowie auf dem Gelände von Kranken-
häusern und Pflegeanstalten an Sonn- und Feiertagen sowie an
Werktagen von 20.00 bis 7.00 Uhr nicht in Betrieb genommen
werden.
Bitte beachten Sie auch die regionalen Vorschriften zum
Lärmschutz.
Sicherheitshinweise
Beachten Sie die nachfolgenden Hinweise, um sich
selbst und andere vor möglichen Gefahren und
Verletzungen zu schützen.
•Im Arbeitsbereich die örtlichen Unfallverhütungsvorschriften
und Sicherheitsbestimmungen beachten.
•Zement oder Zusätze nicht berühren, einatmen (Stau-
bentwicklung) oder einnehmen. Beim Füllen und Entleeren
der Mischtrommel persönliche Schutzkleidung (Handschu-
he, Schutzbrille, Staubschutzmaske) tragen.
•Den Betonmischer nur auf festem, ebe-
nem (kippsicherem) Untergrund aufstel-
len und betreiben.
•Standplatz von Stolpergefahren freihalten.
•Es ist für ausreichende Lichtverhältnisse zu sorgen.

4
•Der Bedienende ist im Arbeitsbereich gegenüber Dritten
verantwortlich.
•Den Mischer nicht unbeaufsichtigt betreiben.
•Kinder vom Betonmischer fernhalten.
•Jugendliche unter 16 Jahren dürfen den Betonmischer nicht
bedienen.
•Mischer nur für die unter „Bestimmungsgemäßer Gebrauch“
aufgeführten Arbeiten einsetzen.
•Maschine oder Teile an der Maschine nicht verändern.
•Defekte bzw. beschädigte Teile an der Maschine unverzüg-
lich austauschen.
•Inbetriebnahme des Mischers nur mit vollständigen und
unbeschädigten Schutzvorrichtungen.
•Nicht in die laufende Mischtrommel
greifen ( rotierendes Mischwerkzeug).
Ausreichenden Sicherheitsabstand zum
Mischer einhalten. Jeglichen Kontakt zu drehenden oder be-
wegten Maschinenteilen verhindern.
•Nur bei laufendem Motor die Mischtrommel füllen und entlee-
ren.
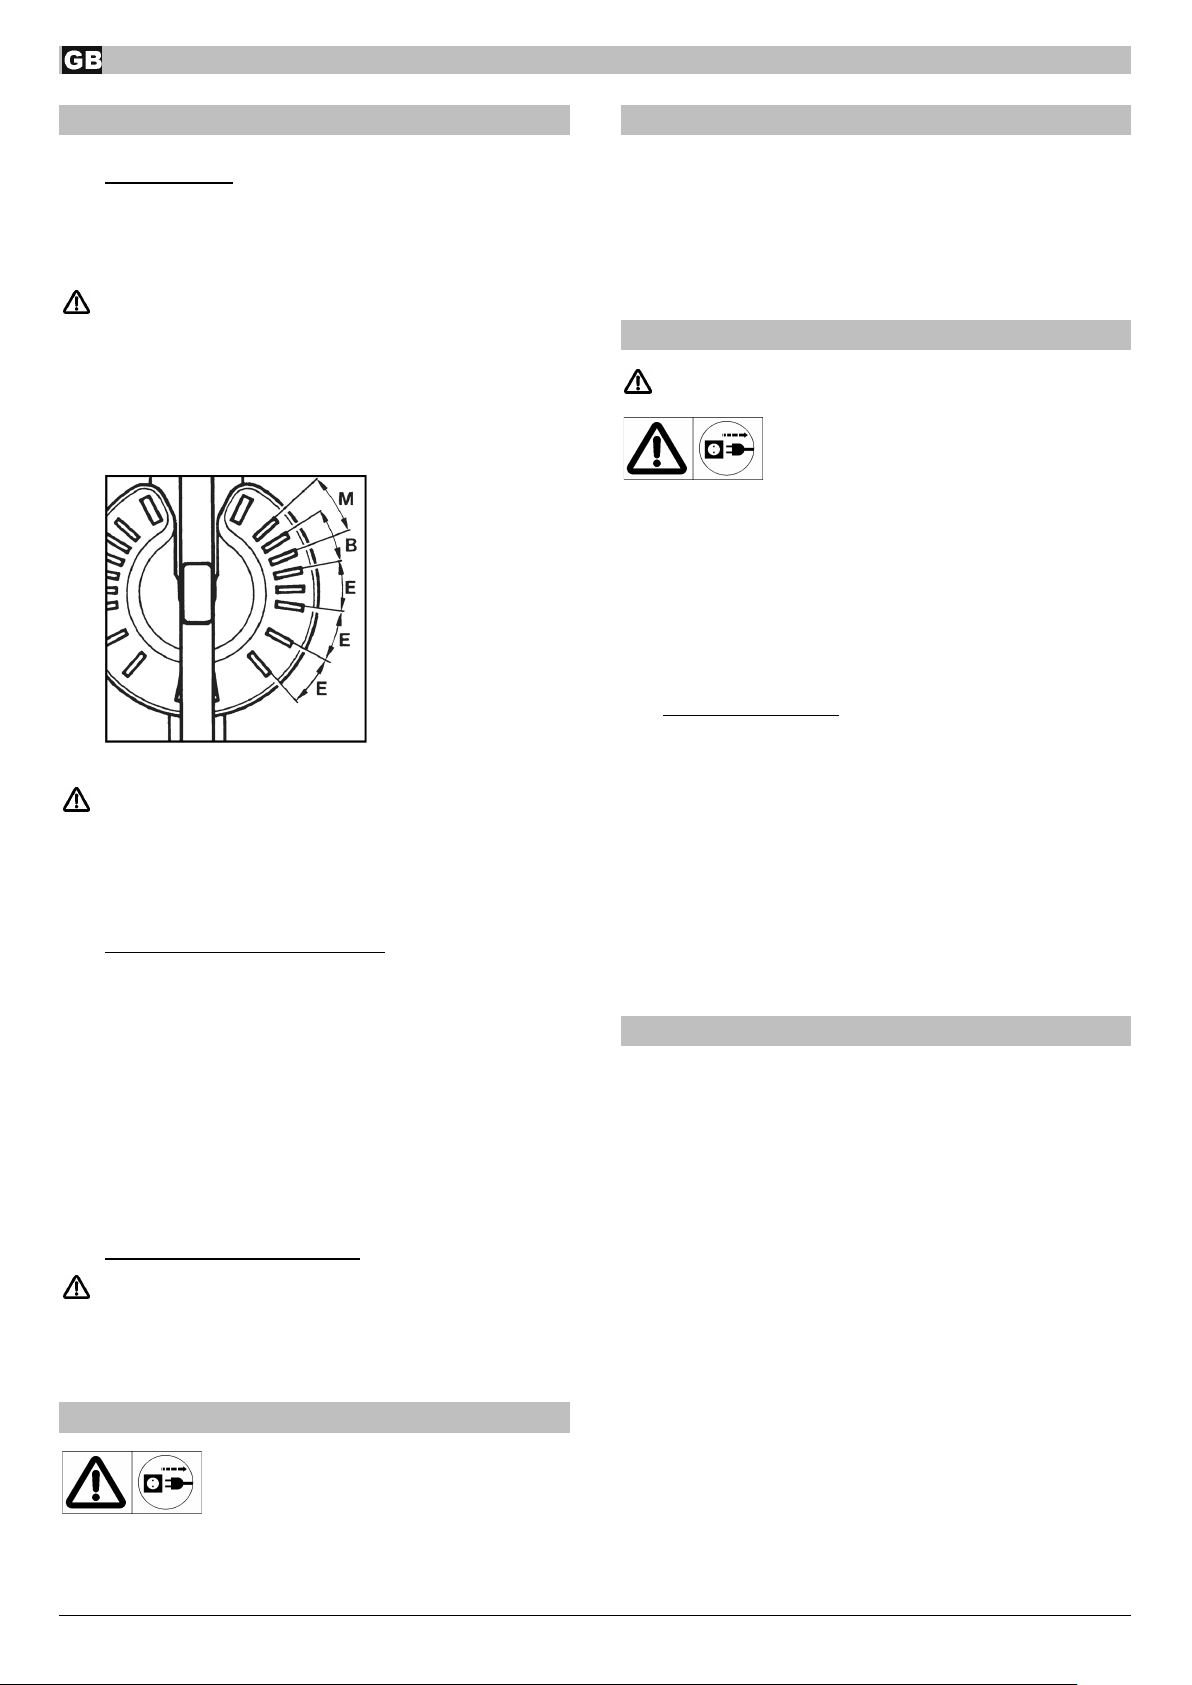
•Drehrichtung der Mischtrommel beachten.
•Drehzahl des Motors nicht ändern, denn diese regelt die
sichere maximale Arbeitsgeschwindigkeit und schützt den Mo-
tor und alle sich drehenden Teile vor Schaden durch übermä-
ßige Geschwindigkeit.
•Betonmischer, die vom Hersteller nicht für Anhängerbetrieb
vorgesehen sind, nur im Handzug fahren.
•Unbedingt Netzstecker ziehen vor:
−Versetzen und Transport
−Reinigungs-, Wartungs- und Instand-
setzungsarbeiten
−Beseitigung von Störungen
−Überprüfungen der Anschlussleitungen, ob diese ver-
schlungen oder beschädigt sind
−Verlassen (auch bei kurzzeitigen Unterbrechungen)
•Überprüfen Sie die Maschine auf eventuelle Beschädigun-
gen:
−Vor weiterem Gebrauch des Gerätes müssen Schutzvor-
richtungen sorgfältig auf ihre einwandfreie und bestim-
mungsgemäße Funktion untersucht werden.
−Überprüfen Sie, ob die beweglichen Teile einwandfrei
funktionieren und nicht klemmen oder ob Teile beschädigt
sind. Sämtliche Teile müssen richtig montiert sein und alle
Bedingungen erfüllen, um einwandfreien Betrieb des Ge-
rätes sicherzustellen.
−Beschädigte Schutzvorrichtungen und Teile müssen
sachgemäß durch eine anerkannte Fachwerkstatt repa-
riert oder ausgewechselt werden, soweit nichts anderes in
der Gebrauchsanweisung angegeben ist.
−Beschädigte oder unleserliche Sicherheitsaufkleber sind
zu ersetzen.
•Bewahren Sie unbenutzte Geräte an einem trockenen, ver-
schlossenen Ort außerhalb der Reichweite von Kindern auf.
Schutzisolierter Betonmischer
(Schutzklasse
ΙΙ
)
•Inbetriebnahme nur mit vollständiger und fest verschlossener
Verkleidung.
•Schutzklasse II bleibt nur erhalten, wenn bei Reparatur
Originalisolierstoffe/-teile verwendet und Isolationsabstände
nicht verändert werden.
Elektrische Sicherheit
Bei Nichtbeachtung besteht Lebensgefahr!
•Ausführung der Anschlussleitungen nach IEC 60245-4:1980
(DIN 57 282) mit der Kennzeichnung H 07 RN-F oder gleich-
wertige Bauarten. Aderquerschnitt mindestens 3 x 1,5 mm²
bis max. 25 m Länge. Über 25 m Länge Aderquerschnitt min-
destens 2,5 mm².
•Nur Anschlussleitungen mit einer spritzwassergeschützten
Gummisteckvorrichtung für erschwerte Bedingungen
benutzen.
•Lange und dünne Anschlussleitungen erzeugen einen Span-
nungsabfall. Der Motor erreicht nicht mehr seine maximale
Leistung, die Funktion des Gerätes wird reduziert.
Bei Verwendung einer Kabeltrommel das Kabel vollständig
abwickeln.
Anschlussleitungen nicht für Zwecke verwenden, für die es
nicht bestimmt ist. Schützen Sie das Kabel vor Hitze, Öl und
scharfen Kanten. Anschlussleitung nicht zum Herausziehen
des Steckers aus der Steckdose verwenden.
•Anschlussleitungen vor Gebrauch auf defekte Stellen oder
Alterung untersuchen.
•Niemals defekte Anschlussleitungen verwenden.
•Beim Verlegen der Anschlussleitung darauf achten, dass sie
nicht gequetscht, geknickt und die Steckverbindung nicht nass
wird.
•Keine provisorischen Elektroanschlüsse einsetzen.
•Schutzeinrichtungen niemals überbrücken oder außer Be-
trieb setzen.
•Gerät nur über einen Fehlerstrom-
Schutzschalter anschließen: 30 mA.
Der Elektroanschluss bzw. Reparaturen am Elektro-
anschluss hat durch einen konzessionierten Elektro-
fachmann zu erfolgen, wobei die örtlichen Vorschriften
insbesondere hinsichtlich der Schutzmaßnahmen zu
beachten sind.
Reparaturen an elektrischen Teilen der Maschine
haben durch den Hersteller bzw. von ihm benannte Fir-
men zu erfolgen.
Nur Originalersatzteile verwenden. Durch den Gebrauch
anderer Ersatzteile können Unfälle für den Benutzer
entstehen. Für hieraus resultierende Schäden haftet der
Hersteller nicht.
Inbetriebnahme
Alle Sicherheitshinweise beachten.
Aufstellen der Maschine:
•Den Betonmischer nur auf festem, ebe-
nem (kippsicherem) Untergrund aufstel-
len und betreiben.
•Ein Einsinken der Maschine in den Boden ist zu verhindern.
Unfallverhütungsvorschriften beachten (Kippgefahr).
•Beachten Sie beim Aufstellen der Maschine, dass ein unge-
hindertes Entleeren der Mischtrommel gewährleistet ist.

5
Ein- und Ausschalten
Vergewissern Sie sich,
−dass alle Schutzeinrichtungen des Mischers vorhanden und
vorschriftsmäßig montiert sind.
−dass alle Sicherheitshinweise beachtet wurden.
•Der Ein- und Ausschalter befindet sich am Motorhaus. Den
Motor nur am Schalter ein- und ausschalten.
•Bei Stromausfall schaltet die Maschine automatisch ab. Zum
Wiedereinschalten den Schalter erneut betätigen.
Motorschutz
Der Motor ist mit einem Temperaturwächter ausgerüstet. Der
Temperaturwächter schaltet bei Überlastung (Überhitzung) den
Motor selbsttätig ab. Die Maschine kann nach einer Abkühlpau-
se wieder eingeschaltet werden.
Das Mischen
Mischerstellung:
Für die Beton- oder Mörtelherstellung muss die Mischtrommel in
einer bestimmten Mischstellung eingerastet sein. Nur die richtige
Mischstellung sichert beste Mischergebnisse und gewährleistet
einen störungsfreien Arbeitsablauf.
Handrad beim Schwenken gut festhalten.
Lösen Sie die Schwenkvorrichtung.
Schwenken Sie die Mischtrommel bis zu der Ihrem Mischgut
entsprechenden Ausnehmung.
Schwenkvorrichtung einrasten lassen.
Zusätzliche Sicherheitshinweise
•Füllen und entleeren der Mischtrommel nur bei laufendem
Motor.
•Standfestigkeit des Mischers überprüfen.
Mischgut herstellen:
1. Wasser und einige Schaufeln Zuschlagstoffe (Sand, Kies, ...)
einfüllen.
2. Einige Schaufeln Bindemittel (Zement, Kalk, ...) zugeben.
3. Punkt 1 und 2 solange wiederholen bis das erforderliche
Mischverhältnis erreicht ist.
4. Mischgut gut durchmischen lassen.
Für die Zusammensetzung und Güte des Mischgutes holen
Sie den Rat eines Fachmannes ein.
Entleeren der Mischtrommel:
Handrad beim Schwenken gut festhalten.
1. Schwenkvorrichtung entriegeln betätigen.
2. Mischtrommel langsam kippen.
Transport
Vor jedem Transport Netzstecker ziehen.
Stellen Sie die Öffnung der Mischtrommel beim Trans-
portieren oder Lagern nach unten.
Lagerung
Um die Lebensdauer eines Betonmischers zu verlängern
und ein leichtgängiges Bedienen zu gewährleisten sollte dieser
vor einer längeren Lagerung an der Schwenkvorrichtung mit
einem umweltfreundlichen Sprühöl behandelt werden.
Reinigung
Zusätzliche Sicherheitshinweise
Vor jeder Reinigung Netzstecker ziehen.
•Maschine ausschalten und Netzstecker ziehen. Während der
Reinigungsarbeiten (mit Bürste, Schaber, Lappen etc.) die
Maschine nicht in Betrieb nehmen.
•Zum Reinigen entfernte Schutzeinrichtungen müssen unbe-
dingt wieder ordnungsgemäß angebracht werden.
•Motor und Schalter, sowie Zu- und Abluftöffnungen des Mo-
torgehäuses nicht direkt mit einem Wasserstrahl abspritzen.
Hinweise zum Reinigen:
•Vor einer längeren Arbeitspause und nach Arbeitsende den
Betonmischer innen und außen reinigen.
•Die Mischtrommel nicht mit harten Gegenständen (Hammer,
Schaufel usw.) abklopfen. Eine verbeulte Mischtrommel be-
einträchtigt den Mischvorgang und lässt sich zudem schwer
reinigen.
•Zum Reinigen des Trommelinneren einige Schaufeln Kies mit
Wasser umlaufen lassen.
•Beton- und Mörtelreste an den Zähnen des Antriebskegel-
rades und Zahnkranzsegmenten sofort entfernen.
Wartung
Der Betonmischer ist weitgehend wartungsfrei.
Mischtrommel und Antriebswelle haben Kugellagerungen mit
Dauerschmierung.
Den Zahnkranz niemals schmieren!
Zur Werterhaltung und einer langen Lebensdauer den Mischer
wie unter „Transport und Lagerung“ beschrieben behandeln.
Zudem sollte der Betonmischer regelmäßig auf Verschleiß und
Funktionsmängel überprüft werden. Dies gilt besonders für be-
wegliche Teile, Schraubverbindungen, Schutzvorrichtungen und
elektrische Teile.
B Beton
M
Mörtel
E
Entleeren

8
Instandsetzung
Vor jeder Instandsetzung Netzstecker zie-
hen.
•Maschine ausschalten und Netzstecker ziehen, wenn Instandsetzungsarbeiten erforderlich sind. Während des Instandsetzens die
Maschine nicht in Betrieb nehmen.
•Zum Instandsetzen entfernte Schutzeinrichtungen müssen unbedingt wieder ordnungsgemäß angebracht werden.
•Instandsetzungsarbeiten an elektrischen Teilen der Maschine oder an Teilen, die den elektrischen Einbauraum betreffen, haben durch
den Hersteller bzw. von ihm benannte Firmen zu erfolgen.
•Nur Original-Ersatzteile verwenden und diese nicht verändern. Sonst keine Haftung!
•Zahnspiel einstellen (falls möglich) siehe Seite 15.
Betriebsstörungen
Störung
mögliche Ursache
Beseitigung
Motor läuft nicht an
⇒Netzspannung fehlt
⇒Anschlussleitung defekt
⇒Temperaturwächter ist ausgelöst
Auslöseursache:
−Motor überlastet
−Motor bekommt nicht genug Luft, weil die
Zu- und Abluftöffnungen verschmutzt sind
⇒Absicherung überprüfen
⇒überprüfen lassen bzw. erneuern (Elektrofachmann)
⇒Motor abkühlen lassen und mögliche Auslöseursa-
che finden und beseitigen
Motor brummt, läuft aber
nicht an
⇒Zahnkranz blockiert
⇒Kondensator defekt
⇒Maschine abschalten, Netzstecker ziehen und die
Zahnkranzsegmente reinigen bzw. austauschen
⇒Maschine zur Reparatur an Herstel
ler bzw. von ihm
benannte Firma
Gerät läuft an, blockiert
jedoch bei geringer
Belastung und schaltet
evtl. automatisch ab
⇒Verlängerungskabel zu lang oder zu kleiner
Querschnitt.
⇒
Steckdose zu weit vom Hauptanschluss und
zu kleiner Querschnitt der Anschlussleitung.
Verlängerungskabel mindestens 1,5 mm² bei maximal
25 m Länge.
Bei längerem Kabel Querschnitt mindestens 2,5 mm².
Garantie
Garantie wird für 2 Jahre gewährt und erstreckt sich nur auf Material bzw. Herstellungsfehler. Schäden, die durch unsachgemäße Behand-
lung oder Nichtbeachtung der Bedienungsanleitung, sowie durch Verwendung von nicht Original-Ersatzteilen entstehen, sind von der Ga-
rantieleistung ausgeschlossen. Weitere Haftung und Kosten werden nicht übernommen.
Die Rechnung mit dem Rechnungsdatum gilt als Nachweis für Garantieansprüche. Dazu ist auch die auf dem Typenschild eingeprägte
Serien-Nummer des Gerätes anzugeben.

7
By purchasing this mixer, you have acquired a high-quality,
perfected and efficient machine.
Keep these instructions in a safe place for later reference.
Be sure that you have carefully read
and fully understood these instructions
before you start the
machine, and
adhere to all of them.
Contents
Meaning of the symbols
2
Symbols in the operating manual
7
Proper use
7
Residual risks
7
Operating times
7
Safety instructions
7
Start-up
8
Mixing
9
Transport
9
Storage
9
Cleaning
9
Maintenance
9
Repair
10
Equipment failures
10
Guarantee
10
Adjust teeth play
15
Technical data
15
EC Declaration of Conformity
16
Spare parts
17
Symbols in the operating manual
Potential hazard or hazardous situation. Failure to
observe this instruction ma
y lead to injuries or cause
damage to property.
Important information on proper handling.
Failure to
observe this instruction may lead to faults.
User information.
This information helps you to use all
the functions optimally.
Assembly, operation and servicing.
Here you are
explained exactly what to do.
Proper use
•This concrete mixer can be used for mixing concrete and
mortar both professionally and non-professionally.
•Proper use includes adherence to the operating, maintenance
and repair instructions of the manufacturer and observance of
the safety instructions they contain.
•Any other utilisation counts as improper use, especially mixing
combustible or explosive materials (fire and explosion hazard)
and use with foodstuffs. The manufacturer is not liable for
damages resulting from improper use, the user alone
shall bear the risk.
•Unauthorised modifications on the device exclude a liability of
the manufacturer for damages of any kind resulting from it.
•Only persons who are familiarised with the device and
informed about possible risks are allowed to prepare, operate
and service this device. Repair works may only be carried out
by us or by a customer service agent nominated by us.
Residual risks
Even if used properly, residual risks can exist even if the relevant
safety regulations are complied with due to the design determined
by the intended purpose.
Residual risks can be minimised if the “Safety instructions” and
the “Intended usage” as well as the whole of the operating
instructions are observed.
Observing these instructions, and taking proper care, will reduce
the risk of personal injury or damage to the equipment.
•Risk of injury to fingers and hands when reaching with the
hand into the running mixing drum. Providing protection
against the danger of getting caught in the rotating stirring
grating would not be practicable (please refer to EN 12151).
•Risk from electricity when using improper electrical
connections.
•Touching live parts of opened electrical components.
In addition, in spite of all the precautionary measures taken, non-
obvious residual risks can still exist.
Operating times
Please observe as well the regional regulations for noise
protection.
Safety instructions
Take note of the following instructions to protect
yourself and others from hazards and injuries.
•Observe local accident prevention and safety regulations in
the work area.
•Do not touch, inhale (dust development) or eat the
cement or additives. Wear personal, protective clothing
(gloves, goggles and a dust mask) when filling and emptying
the mixing drum.
•Set up and run the concrete mixer on a
solid, level base only (where it will not tip
over).
•Make sure that there is no danger of tripping near the mixer.
•Be sure that there is enough light.
•The operator is responsible for third parties in the work area.
•Keep children away from mixer.
•Persons younger than 16 years of age are not allowed to
operate the mixer.
•Only use the mixer for the functions listed in "Proper use".
•Do not alter the machine or any of its parts.
•Replace defective or damaged parts on the machine
immediately.
•Only start up the mixer if the protective devices are complete
and undamaged.

8
•Do not reach into mixer when it is
running ( rotating mixing apparatus).
Observe enough safety distance to the
concrete mixer. Prevent any contact to rotating or moving
parts of the machine.
•Fill or empty the mixing drum only when the motor is running.
•Observe the mixer's direction of rotation.
•Do not alter the revolution speed of the motor, since this
controls the safe maximum operating speed, and protects the
motor and all rotating parts against damage due to excess
speed.
•Concrete mixers which the manufacturer has not intended for
towed vehicle operation may only be run by means of a hand
wire pull.
•Be absolutely sure to pull the plug before:
−moving or transport
−cleaning, maintenance or repair work
−eliminating faults
−checking connecting lines, whether these are knotted or
damaged
−leaving unattended (even during short interruptions)
•Check the machine for possible damage:
−Before further use of the machine the safety devices must
be checked carefully for their proper and intended
function.
−Check whether movable parts function perfectly and do
not stick or whether parts are damaged. All parts must be
correctly installed and fulfil all conditions to ensure perfect
operation of the machine.
−Damaged safety devices and parts must be properly
repaired or exchanged by a recognized, specialist
workshop; insofar as nothing else is stated in the
instructions for use.
−Damaged or illegible safety labels have to be replaced.
•Store unused equipment in a dry, locked place out of the
reach of children.
Shockproof concrete mixers
(Protection Class II)
•Only start the machine when the panelling is complete and
fully closed.
•Protection Class II applies only if original insulating material
is used for repairs and insulation clearances are not altered.
Electrical safety
Danger to life and limb if not observed!
•Connecting attachments must be designed in conformance
with IEC 60245-4:1980 (DIN 57 282) and marked H 07 RN-F,
or comparable models. Cross section of wires at least 3 x 1.5
mm² up to a maximum length of 25 m. Wire cross-section at
least 2.5 mm² for lengths of more than 25 m.
•Use only connecting attachments with a rubber plug device
for severe requirements that is protected against
spraying water.
•Long and thin connection lines result in a potential drop.
The motor does not reach any longer its maximal power;
the function of the device is reduced.
•Unwind the cable completely when using a cable drum.
•Do not use the power cords for purposes they are not
intended for. Protect the cable against heat, oil and sharp
edges. Do jerk on the power cable when pulling the plug from
the socket.
•Check connecting attachments for defects or ageing before
using them.
•Never use defective connecting attachments.
•When laying the connecting attachments, be sure that they
do get crushed or bent, and that the plug-and-socket
connection does not get wet.
•Do not use any provisional electrical connections.
•Never bridge over protective devices or put them out of
operation.
•Only hook up the machine by means of a
fault-current circuit breacker: 30 mA!
A licensed professional electrician must make all electrical
connections and repairs, and observe local regulations in
doing so, especially those regarding protective measures.
The manufacturer or a company designated by the
manufacturer must attend to the repair of all electrical
parts on the machine.
Use only original spare. Accidents can arise for the user
through the use of other spare parts. The manufacturer is
not liable for any damage or injury resulting from such
action.
Start-up
Observe all safety instructions.
Setting up the machine:
•Set up and run the concrete mixer on a
solid, level base only (where it will not tip over).
•Keep the machine from sinking into the ground or floor.
Adhere to accident prevention regulations (danger of
tipping).
•When setting up the machine, make sure that the mixing
drum can be emptied without obstruction.
Switching on and off
Be sure that
−all protective devices are on the mixer and properly mounted.
−all safety instructions are adhered to.
•The on/off switch is located beneath the motor housing.
Switch the motor on and off only at the switch.
•In the event of a power failure, the machine will switch off
automatically. Press the switch again to restart the machine.
Motor protection
The motor is equipped with a thermostat. The thermostat
switches the motor off automatically in the event of overload
(overheating). The machine can be restarted after a cooling-off
period.

9
Mixing
Mixer setting:
To make concrete or mortar, the mixing drum must be locked in a
specific position. Only the proper mixer setting ensures optimal
mixing results and smooth operation.
Hold rotating lever or handwheel tightly while rotating.
Loosen the rotating mechanism.
Rotate the mixing drum up to the appropriate recess for the
material you are mixing.
allow rotating mechanism to lock into place.
Additional safety instructions
•Only fill or empty the mixing drum when the motor is running.
•Check the stability of the mixer.
Preparing material for mixing:
1. Pour in water and few shovels full of aggregate (sand, gravel,
...).
2. Add a few shovels full of binding agent (cement, lye, ...).
3. Repeat steps 1 and 2 until you reach the proportions required
for mixing.
4. Allow material to mix thoroughly.
Have a professional advise you regarding the composition
and quality of the material being mixed.
Emptying the mixing drum:
Hold the rotating lever or handwheel tightly
1. Unlock rotating mechanism or step on brake
2. Slowly tilt mixing drum
Transport
Pull plug each time before transport.
Point the opening of the mixing drum downwards during
transport or storage.
Storage
In order to increase the service life of the concrete mixer
and operate it without glitches, the rotating mechanism
should be treated with an environmentally compatible spray
oil before the mixer is put into storage for unusually long
periods.
Cleaning
Additional safety instructions
Pull plug each time before cleaning.
•Switch off machine and pull plug if you have to touch the
machine (with hand, brush, scraper, rag, etc.) while cleaning
it.
•Protective devices removed for cleaning must be properly
remounted before starting the machine.
•Do not spray water directly on the motor or the switch, nor on
the ventilation apertures in the motor housing.
Notes on cleaning:
•Before taking a break and after finishing work, clean the
concrete mixer inside and out.
•Do not pound on the mixing drum with hard objects
(hammer, shovel, etc.). A dented mixing drum impairs mixing
operations and is difficult to clean, besides.
•To clean the inside of the drum, put in some water and a few
shovels full of gravel and set the drum to revolving.
•Remove any concrete or mortar left sticking to the teeth of
the axle-drive bevel gear or the crown gear segments
immediately.
Maintenance
The concrete mixer requires practically no maintenance.
The mixing drum and drive shaft are bedded on ball bearings with
permanent lubrication.
Never grease the ring gear!
To preserve the value of the mixer and increase its service life,
handle it as described in "Transport and storage". Furthermore,
the concrete mixer should be checked regularly for signs of wear
and tear or functional deficiencies. This applies especially to
moving parts, screw connections, protective devices and
electrical parts.
B
Concrete
M
Mortar
E
Emptying

10
Repair
Pull plug each time before doing repair
work.
•Switch off machine and pull plug if repair work should be necessary. Do not start machine during repair work.
•Protective devices removed for repairs must be properly remounted before starting the machine.
•Only the manufacturer or companies authorised by the manufacturer may perform repair work on electrical parts or on parts which
affect the space needed to mount electrical equipment.
•Use only unaltered original spare parts. Otherwise, the manufacturer will assume no liability.
•Adjust tooth play (if possible) see P. 15.
Equipment failures
Malfunction
Possible cause
Remedy
Motor does not start up
⇒no mains voltage
⇒defective cable
⇒check fuse protection
⇒have checked or replaced (electrician)
⇒thermostat is triggered
reason:
−motor overload
−
motor not getting enough air owing to
clogged ventilation apertures
⇒allow motor to cool and then find and eliminate
whatever caused the thermostat to respond
Motor hums but does not start
up
⇒blocked crown gear
⇒defective condenser
⇒switch off machine, pull plug and clean or
replace the crown gear segments
⇒send machine to manufacturer or a company
designated by the manufacturer for repairs
Machine starts up, but
becomes blocked at low load
and may switch off auto-
matically
⇒extension cord is too long or its cross-section
is too small
⇒socket is
too far from mains connection and
the connecting wire's cross section is too small
⇒extension cord must be at least 1.5 mm² for a
maximum length of 25 m; the cross-section of
longer cables must be at least 2.5 mm²
Guarantee
The manufacturer will supply a 2 year warranty for faults in material and/or workmanship. Damage due to improper handling and/or non-
observance of operating will be excluded from the warranty. The warranty will only apply if original spare parts are used. Further liability and
costs are not assumed.
The invoice with the invoice date is proof of warranty claims. The serial number of the device stamped on the rating plate must also be
specified.

11
Koupí této míchačky jste získali kvalitní,technicky vyzrálý a
výkonem silný stroj.
Tento návod uschovejte pro případné další použití.
Před uvedením míchačky do provozu si
návod pečlivě prostudujte tak,abyste všem
uvedeným pokynům porozuměli a mohli je
v provozu uplatňovat.
Obsah
Význam symbolů
2
Symboly v návodu
11
Okruh použití míchačky
11
Zbytková rizika
11
Provozní čas
11
Bezpečnostní pokyny
11
Uvedení do provozu
12
Míchání
13
Přeprava
13
Skladování
13
Čištění
13
Údržba
14
Opravy
14
Možné poruchy
14
Záruka
14
Nastavení pastorky hra
15
Technická data
15
ES-Prohlášení o shodě
16
Náhradní díly
17
Symboly v návodu
Hrozící nebezpečí nebo nebezpečná situace.
Nedbání těchto pokynů může přivodit zranění obsluhy
nebo zapřičinit věcné škody.
Důležité pokyny pro správné užívání stroje.
Zanedbání těchto pokynů může zapřičinit poruchy stroje.
Uživatelské pokyny. Tyto pokyny Vám pomohou
optimálně stroj provozovat.
Montáž, ovládání a údržba. Zde je přesně vysvětleno,
co musíte, z těchto hledisek, udělat.
Okruh použití míchačky
•Míchačka je určena pro míchání betonu nebo malty v
domácím i profesionálním použití.
•Do kapitoly Okruh použití míchačky patří i dodržování
výrobcem předepsaných pokynů pro provoz, údržbu a opravy
a dodržení v návodu uvedených bezpečnostních pokynů.
•Každé jiné použití míchačky,které přesahuje rozsah zde
uvedený, zejména míchání hořlavých nebo explozivních látek
nebo míchání potravin, nepatří do okruhu použití stroje. Za
takto způsobené škody nenese výrobce žádnou
zodpovědnost. Veškerá rizika v těchto případech jdou na
vrub uživatele.
•Svévolné změny na stroji vylučují zodpovědnost výrobce, za
takto způsobené škody všeho druhu.
•Stroj smějí sestavovat, užívat a udržovat pouze osoby, které
jsou poučeny a seznámeny s event. nebezpečím nebo
ohrožením. Opravy náležejí pouze výrobci nebo
autorizovanému servisu.
Zbytková rizika
I při správném použití míchačky, z hlediska jejího okruhu použití a
při dodržení všech bezpečnostních podmínek a pokynů, nelze,
vzhledem ke konstrukci stroje a jeho účelu, vyloučit určitá
zbytková rizika.
Tato rizika lze minimalizovat pouze dokonalým seznámením s
návodem k použití, dodržením všech bezpečnostních předpisů a
pokynů a dodržením účelu použití (Okruh použití míchačky).
Ohleduplnost a pozornost při práci snižují riziko zranění osob či
věcných škod.
•Nebezpečí zranění prstů či ruky při situaci, kdy zasahujete
rukou dovnitř běžícího bubnu míchačky. Neexistuje ochranný
prostředek proti nebezpečí zachycení či návinu lidské
končetiny míchacím zařízením v běžícím bubnu (viz EN
12151). Jedinou ochranou je se takového konání vyvarovat.
•Ohrožení úrazem el. proudu při použití nepředpisových el.
spojení a vedení.
•Ohrožení úrazem el. proudem při dotyku odkrytých el.
součástí stroje.
I při dodržení všech bezpečnostních opatření, nelze další
zbytková rizika zcela vyloučit.
Provozní čas
Žádáme Vás abyste dodržovali Vaše místní předpisy o
ochraně před hlukem, které jsou ve Vaší zemi platné.
Bezpečnostní pokyny
Dbejte následujících pokynů, abyste ochránili sebe
a další osoby před možným zraněním.
•Na pracovišti dodržte místně platný soubor předpisů o
zamezení úrazům a bezpečnostních podmínek.
•Cementu a jeho přísad se nedotýkejte holýma rukama,
nenadýchejte se či nepožívejte (tvorba prachu). Při plnění a
vyprazdňování bubnu noste osobní ochranné pomůcky
(pracovní oděv, brýle, rukavice a masku proti prachu).
•Míchačku stavte a provozujte pouze na
pevné, rovné (bez nebezpečí překlopení)
podlaze.
•Pracoviště udržujte tak, aby bylo bez překážek, o které byste
mohli klopýtnout.
•Postarejte se o dostatečné osvětlení pracoviště.
•Obsluha na pracovišti je zodpovědná vůči třetím osobám.
•Nikdy nenechte míchačku pracovat bez dozoru.
•Děti nesmějí mít k míchačce přístup.
•Mladiství pod 16 let nesmějí míchačku obsluhovat.
•Míchačku používejte pouze pro práce uvedené v kapitole
Okruh použití míchačky.
•Na stroji nebo jeho součástech nedělejte změny.
•Vadné resp. poškozené součásti na stroji neprodleně
vyměňte.

12
•Uvedení míchačky do provozu je možné pouze se všemi
úplnými a nepoškozenými ochrannými prvky.
•Nezasahujte do běžícího bubnu míchačky ( uvnitř rotuje
míchací zařízení). Dodržujte dostatečný
bezpečnostní odstup a zamezte
jakémukoliv kontaktu s točícími se nebo
pohyblivými částmi stroje.
•Míchačku plňte a vyprazdňujte pouze za chodu motoru.
•Dbejte na správný směr otáčení bubnu.
•Neměňte otáčky motoru – tyto jsou nastaveny na bezpečnou
maximální pracovní rychlost a chrání motor a všechny
otáčející se součásti před škodami způsobenými přehnanou
rychlostí.
•Míchačku,která není od výrobce vybavena vlečným
zařízením,lze přesunovat pouze ručně.
•Bezdpodmínečně odpojte míchačku
od sítě el. energie před:
−Přemístěním a dopravou
−Čištěním,údržbou nebo opravou na stroji
−Odstraněním poruch
−Kontrolou el. Vedení (přípoje) zda není zamotané či
poškozené.
−Opuštění stroje (i při krátkém přerušení prací).
•Kontrolujte míchačku z hlediska event. poškození:
−Před každým použitím míchačky kontrolujte všechny
ochranné prvky na stroji, zda bezvadně fungují a plní
svůj účel.
−Přezkoušejte,zda všechny pohyblivé součásti stroje
fungují, nedřou a plní svou funkci a zda nejsou
poškozené. Všechny pohyblivé části míchačky musí být
správně namontovány a splňovat všechny podmínky pro
bezchybný provoz.
−Poškozené ochranné prvky je třeba neprodleně nechat
vyměnit nebo opravit v odborném servisu, pokud není v
návodu jinak uvedeno.
−Poškozené a nečitelné bezpečnostní samolepky
neprodleně vyměňte.
•Nepoužívanou míchačku skladujte na suchém a uzavřeném
místě, kam děti nemají přístup.
Míchačka s ochrannou izolací
(třída ochrany II)
•Uvedení do provozu pouze s úplnými a pevně uzavřenými
kryty.
•Izolační třída II zůstane zachována jen když při opravách na
el. částech jsou užity originální izolační látky a součásti a
izolační odstupy nejsou změněny.
Elektrická bezpečnost
Při zanedbání těchto pokynů hrozí nebezpečí smrti.
•Provedení přípojných vedení je podle IEC 60245-4:1980 (DIN
57 282) s označením H 07 RN-F nebo srovnatelného stejně
hodnotného způsobu. Příčný kabelový průřez je nejméně
3 x 1,5 qmm do maximální délky kabelu 25 m. Při délce
kabelu přes 25 m je třeba volit kabel s příčným průřezem
nejméně 2,5 qmm.
•Přívodní vedení musí být odolné proti tlakové vodě a
spoje provedené v gumě pro ztížené podmínky .
•Příliš dlouhé a tenké kabely způsobují snížení napětí až
výpadky proudu v síti. Motor nemůže dosáhnout svého
maximálního výkonu a funkce míchačky je redukována.
Při použití kabelového bubnu, kde je kabel navinut, je třeba jej
plně odvinout.
Kabely nepoužívejte pro jiné účely, než přívod el. proudu.
Chraňte kabely před horkem, olejem a ostrými hranami.
Nepoužívejte kabel pro vytahování zástrčky ze zásuvky
(netahejte za něj).
•Přívodní kabely vždy před použitím zkontrolujte z hlediska
poškození a zestárnutí.
•Poškozené přívodní kabely nikdy nepoužívejte.
•Při kladení přívodních kabelů vždy dbejte na to, aby nebyly
pokroucené, přiskřípnuté a jejich napojení (které musí být
odolné proti tlakové vodě) nebylo vlhké či mokré.
•Nikdy nepoužívejte provizorní el. spojení.
•Ochranné prvky na stroji nikdy nepřemosťujte a nevyřazujte
z funkce.
•Míchačku zapojte vždy pouze přes
ochranný spínač 30 mA.
El.zařízení resp. jejich opravy smí provádět pouze
autorizovaný servis, který splňuje i místní předpisy z
hlediska ochranných opatření.
Opravy na el. částech míchačky provede buď výrobce,
nebo autorizovaný servis.
Při opravách je nutné vždy použít pouze originální náhradní
díly. Použití jiných než originálních náhradních dílů
mohou pro uživatele znamenat nebezpečí úrazu. Za takto
způsobené škody výrobce nepřebírá zodpovědnost.
Uvedení do provozu
Dbejte všech bezpečnostních pokynů.
Stanoviště stroje:
•Míchačku postavte a provozujte pouze na
pevném a rovném podkladu (podlaze),
kde se nemůže překlopit.
•Učiňte rovněž opatření proti sesmeknutí nebo proboření
míchačky do podkladu. Dbejte na soubor pokynů o
úrazech (překlopení stroje).
•Při výběru místa pro míchačku dbejte na to, aby její
vyprazdňování šlo provádět snadno a bez překážek.
Zapnutí a vypnutí stroje
Ujistěte se, že
−všechny ochranné prvky na stroji jsou řádně namontovány a
funkční.
−veškeré bezpečnostní pokyny můžete a budete respektovat.
•Hlavní spínač se nachází na krytu motoru. Motor zapínejte a
vypínejte vždy pouze tímto spínačem.
•Při výpadku proudu se stroj automaticky vypne. Po obnovení
přívodu musíte opět míchačku spínačem zapmout.

13
Ochrana motoru
Motor je vybaven teplotním vypínačem.Tento vypínač se uvede
v činnost při přetížení motoru (přehřátí) a motor samočinně
vypne. Míchačku potom můžete opět zapnout po ochlazovací
přestávce.
Míchání
Nastavení míchačky
Při výrobě betonu nebo malty musí být buben míchačky při
provozu aretován v určité poloze. Pouze správná poloha bubnu
zajistí nejlepší míchací efekt a bezporuchový průběh práce.
Ovládací kolo při manipulaci vždy pevně držte.
Uvolněte zarážku ovládacího zařízení.
Naklopte buben do správné polohy odpovídající tomu, co
chcete míchat.
Nechte zarážku ovládacího zařízení opět zapadnout a
tak fixujete polohu bubnu.
Dodatečné bezpečnostní pokyny
•Plnění a vyprazdňování bubnu vždy jen při běžícím motoru.
•Přezkoušejte stabilitu míchačky.
Výroba hmot (beton, malta)
1. Plňte vodu a několik lopat žádoucích hmot (písek, štěrk).
2. Přidejte několik lopat pojidla (cement, vápno atd.)
3. Body 1. a 2. několikrát opakujte až dosáhnete žádoucího
poměru směsi.
4. Nechte důkladně promíchat.
Pro správný poměr komponent a konzistenci směsi si
vyžádejte radu specialisty.
Vyprázdnění bubnu
Ovládací páku resp. ovládací kolo při vyprazdňování
pevně přidržujte.
1. Ovládací zařízení (páka, kolo) uvolněte resp. užijte brzdový
pedál (u míchačky s nožní brzdou).
2. Buben pomalu sklápějte.
Přemístění, transport
Před každým přemístěním či transportem
míchačky je třeba ji odpojit od sítě
vytažením zástrčky ze zásuvky.
Před transportem nebo před uskladněním stroje sklopte
buben otvorem kolmo k zemi.
Skladování
Abyste udrželi Vaši míchačku dlouhodobě v dobrém stavu a
zachovali snadné její ovládání je třeba pouze, před delším
uskladněním, ošetřit sklápěcí zařízení ekologickým olejovým
sprejem.
Čištění
Dodatečné bezpečnostní pokyny.
Před každým čištěním odpojte stroj od
sítě el. energie vytažením zástrčky ze
zásuvky.
•Míchačku vypněte a vytáhněte zástrčku ze zásuvky.
•Jestliže jste potřebovali pro čištění odstranit některé
ochranné prvky a zařízení, potom je třeba je opět řádně
namontovat a vyzkoušet jejich funkci.
•Motor a spínač, stejně jako odvětrávací otvory na krytu
motoru, nesmíte čistit přímým proudem vody.
Pokyny k čištění
•Před delší pracovní přestávkou a po skončení práce je třeba
míchčku zevnitř i zvenčí očistit.
•Na míchací buben nepoužívejte tvrdé předměty pro
vyklepání zbytků (kladivo, lopaty atd.). Deformovaný buben
ztěžuje běh míchání a je pak i obtížně čistitelný.
•Pro vyčištění vnitřních stěn bubnu použijte několik lopat
štěrku aspolu s vodou nechte míchačku nějaký čas běžet.
•Zbytky betonu či malty na zubech pohonného zubového kola
a na věnci je třeba ihned odstranit.
Údržba
Míchačka je prakticky bezúdržbová.
Míchací buben a pohonná hřídel mají kuličková ložiska s
dlouhodobým mazáním.
Zubový věnec nikdy nemažte!
Pro udržení dlouhé životnosti a hodnoty Vaší míchačky ji ošetřujte
tak, jak je popsáno v kapitole Přeprava a skladování. Navíc je
ještě třeba ji pravidelně kontrolovat z hlediska opotřebení a
funkčnosti. Toto platí zejména pro pohyblivé části stroje,
šroubová spojení, ochranné prvky na stroji a el. části.
B Beton
M
Malta
E
Vyprazdňování

8
Opravy
Před každou opravou míchačky ji odpojte
od sítě el.energie vytažením zástrčky ze
zásuvky.
•Míchačku vypněte a vytáhnětete zástrčku ze zásuvky. V průběhu opravy míchačku neuvádějte do provozu.
•Jestliže jste museli v rámci opravy odstranit některé ochranné prvky, potom je třeba je po opravě opět řádně namontovat a vyzkoušet
jejich funkčnost.
•Opravy na el. částech stroje a na částech, které s elektrikou souvisí, smí provádět pouze autorizovaný servis.
•Při opravách použijte pouze originálních náhradních dílů. V jiném případě se výrobce zříká veškerých záruk.
•Nastavení souhry zubů poh. kola a věnce (je-li to možné) viz. str. 15.
Možné poruchy provozu
Porucha
Možná příčina
Odstranění
Motor neběží
⇒Výpadek proudu
⇒Poškozený přívod proudu
⇒Teplotní jištění motoru vypnuté Příčina
−Přetížení motoru
−K motoru se nedostává dostatek vzduchu protože
větrací otvory jsou zanesené.
⇒Kontrola jištění
⇒nechat provést kontrolu resp. opravit (elektro-
servis)
⇒Motor nechat vychladnout a po nalezení
možnou příčinu odstranit
Motor „bručí“,ale neběží
⇒Zubový věnec je zablokován
⇒Poškození kondensátoru
⇒Vypnout stroj,odpojit od porudu a jednotlivé
segmenty věnce vyčistit nebo vyměnit
⇒nechat opravit v autorizovaném servisu
Stroj běží, ale při
sebemenší zátěži vypne
⇒Prodlužovací kabel je příliš dlouhý nebo má příliš
malý příčný průřez
⇒Přípojná zásuvky je příliš vzdálena od hlavního zdroje
el. energie a kabel má příliš malý průřez.
Prodlužovací kabel musí mít příčný průřez
nejméně 1,5 qmm do 25 m délky kabelu.
Při delším kabelu (nad 25 m) musí mít kabel
příčný průřez nejméně 2,5 qmm.
Záruka
Výrobce poskytuje na betonovou míchačku záruku v délce 24 MĚSÍCŮ od data zakoupení. Tato záruka zajišťuje bezplatnou výměnu
vadných kusů v důsledku konstrukční vady nebo vady materiálu. Výrobce si vyhrazuje právo posouzení vadných kusů. Záruka se
nevztahuje na závady způsobené nevhodnou manipulací se strojem, nesprávným používáním, použitím náhradních dílů od jiné firmy nebo
špatnou údržbou stroje.
Objednávky náhradních dílů prosím adresujte na smluvního prodejce. V objednávce uveďte typ a typové číslo betonové míchačky
(viz typový štítek na krytu motoru) a požadovaný počet, název výrobku a číslo výrobku.

15
Zahnspiel einstellen
Adjust teeth play
Nastavení pastorky hra
Einstellung des Zahnspiels zwischen Ritzel und Zahnkranz
Die beiden waagerechten Schrauben/Muttern „S“ lösen, welche die Zahnkranz-
abdeckung halten. Hängt die Trommel „T“ nun, wie auf der Skizze dargestellt, un-
ter dem Bügel „B“, rutscht dieser nun ab und vergrößert das Zahnspiel, wird die
Trommel „T“ aber mit dem Handrad „H“ geschwenkt, so dass diese über dem
Bügel „B“ steht, verringert sich das Zahnspiel. Falls, aufgrund von Hemmung,
keine Bewegung stattfindet, kann durchaus mittels leichter Schläge eines Gum-
mihammers auf Trommel oder Bügel nachgeholfen werden.
Das optimale Zahnspiel beträgt 0,5 – 1,5 mm in radialer Richtung. Dies wird ge-
prüft, in dem man bei ausgeschalter und ausgesteckter Maschine die Trommel
von Hand hin und her bewegt.
Adjustment of distance of teeth between pinion and gear ring
Loosen the 2 screws/nuts „S“ which hold the gear ring protection. If the drum „T“
is positioned under the frame „B“ (see drawing), the frame slides off and increas-
es the distance. If you turn the drum „T“ by means of the hand wheel „H“ so that it
is positioned over the frame „B“, the distance will be decreased. If there is no mo-
tion, due to a blocking, use a rubber hammer for light strokes on drum or frame.
The optimal distance is 0.5 – 1.5 mm in radial direction. This is checked by moving the drum back and forth by hand with the machine
switched off and unplugged.
Povolte 2 šrouby/matice „S“.
Přitiskněte traverza "B" s bubnem "T" nahoru nebo dolů, dokud není pastorky hra optimálně nastavena.
Optimální pastorky hra 0,5-1,5 mm radiální.
Pravidelně kontrolujte a upravujte.
Technische Daten
Technical data
Technická data
Motor
Schutz-
klasse
Schutzart
maximale
Füllmenge
Nennfüll-
menge
Drehzahl
Mischtrommel
Schalldruck-
pegel
Schalleistungspegel
gemessen/garantiert
Gewicht
(ca.)
Abmessun
gen (ca.)
Motor Protection
class
Protection
type
maximum un-
mixed batch
capacity
nominal
unmixed batch
capacity
Rotational
speed mixing
drum
Sound energy
flux level
Measured / guaranteed
level of the acoustic
output
Weight
(approx.)
Dimen-
sions
(approx.)
Motor Třída
ochrany
Typ
ochrany max. náplňJmenovitý
náplň
Otáčky
bubnu
Hladina
akustickéo
tlaku
Měřená a zaručená
hladina
Hmotnost
(cca.)
Rozměry
(cca)
230 V
P1 = 500 W
230 V∼
50 Hz
2,4 A
1400 min-1
II IP 44 125 l * 95 l * 26 min-1 LPA
77,3 dB (A)
LWA
92,5
dB (A)
LWA
94,5
dB (A)
54 kg
A = 1130
mm
B = 1330
mm
C = 715
mm
* = ±7%

16
EG-Konformitätserklärung
entsprechend der Richtlinie: 2006/42/EG
EC Declaration of Conformity
according to Directive: 2006/42/EC
ES-Prohlášení o shodě
podle směrnice ES :
2006/42/ES
Hiermit erklären wir
We herewith declare
De a tímto prohlašujeme
Altrad Lescha Atika GmbH
Josef-Drexler-Str. 8, 89331 Burgau, Germany
in alleiniger Verantwortung, dass das Produkt
Betonmischer BX 135
konform ist mit den Bestimmungen der o. a. EG-Richtlinie, sowie mit den Bestimmungen folgender weiterer Richtlinien:
under our sole responsibility, that the product
Concrete mixer BX 135
is conform with the above mentioned EC directives as well as with the provisions of the guidelines below:
na vlastní zodpovědnost, že výrobek
Míchačky na beton BX 135
odpovídá ustanovením EU-směrnicím, rovněž ustanovením následných směrnic:
2014/30/EU; 2011/65/EU; 2000/14/EG
Folgende harmonisierte Normen wurden angewandt:
Les normes harmonisées suivantes ont été appliquées:
De volgende geharmoniseerde normen werden toegepast:
EN 12151:2007; EN 60204-1:2006+A1; EN 55014-1:2006+A1:2009+A2:2011;
EN 55014-2:1997+A1:2001+A2:2008; EN 61000-3-2:2014; EN 61000-3-3:2013
Konformitätsbewertungsverfahren: 2000/14/EG - Anhang V. Schalleistungspegel LWA gemessen / garantiert:
Conformity assessment procedure: 2000/14/EC - Appendix V. Sound power level LWA measured / guaranteed:
Hodnoty shody se řídí podle:2000/14/ES - Příloha V. Hladina akustického výkonu LWA naměřená / zaručená:
92,5 / 94,5 dB (A)
Bevollmächtigter zur Zusammenstellung der technischen Unterlagen:
Duly authorised person for the complilation of technical documents:
Zplnomocněná osoba pro tvorbu technických podkladů:
Altrad Lescha Atika GmbH, Technisches Büro
Josef-Drexler-Str.8, 89331 Burgau, Germany
Burgau, 10.12.2019

17
Ersatzteile
Spare parts
Náhradní díly
Bezugsquelle ist der Hersteller bzw. Händler. Für eine richtige Ersatzteillieferung sind folgende Angaben erforderlich:
Bestell-Nr., Benennung des Teils, Stückzahl, Baujahr, Serien-Nr. (siehe Typenschild) und Mischer-Bezeichung. Ersatzteillieferung erfolgt möglichst
sofort per Nachnahme zu unseren Verkaufs-, Lieferungs- und Zahlungsbedingungen. Porto und Verpackung gehen zu Lasten des Bestellers.
Order from the manufacturer or dealer. Be sure to include the following information to ensure correct delivery: order number, name of part, number
of units, year of manufacture, serial-no. (see rating plate) and designation of mixer. The parts will be delivered as soon as possible according to our
Terms and Conditions of Sales, Delivery and Payment. Postage and packaging will be charged to the orderer.
Zdrojem je výrobce resp.importér. Pro snadné a rychlé dodání užijte následných pokynů: Objednací číslo, pojmenování dílu, počet.rok výroby, číslo
serie, a název typu míchačky. Dodávka náhradních dílů následuje ihned po obdržení objednávky dle našich obchodních, dodacích a platebních
podmínek. Balení a poštovné jde tíži objednatele.
Bestell-
Nr.
part-no
Benennung
name of part
12131
Lagerbügel
21202
Mischschaufel
(inkl. Befestigung)
34796
Zahnrad
42244
Kunststoffrad
(inkl. Befestigung)
44500
Druckfeder
46976
Kegelrad (inkl.
Befestigung)
53069
Mischtrommellagerung
kpl.
58764
Handrad
(inkl. Befestigung +
44500)
58766
Schelle (inkl.
Befestigung)
58772
Ritzelschutz
(inkl. Befestigung)
58780
Lüfterrad
59194
Kondensator
59310
Antriebswelle kpl.
59359
Gehäusedeckel kpl.
(inkl. Befestigung +
59360)
59360
Zuluftdeckel
(inkl. Befestigung)
59362
Isolierkonsolen kpl.
59363
Motorritzel
70433
Motor 230 V
(inkl. 59362 + 59194 +
59363)
100038
Fahrgestell
400346
Dichtring
401050
Schalter-Stecker-
Einheit
401262
Mischtrommel kpl.
650428
Mischtrommel


401767
Table of contents
Languages:
Other Altrad Mixer manuals

Altrad
Altrad ATIKA AKM 130 User manual

Altrad
Altrad TUBMIX 50 User manual

Altrad
Altrad Lescha Euro-Mix 125 User manual

Altrad
Altrad LIV MLZ NG Series User manual

Altrad
Altrad PROMIX 1600-V User manual

Altrad
Altrad LB 140 User manual

Altrad
Altrad BELLE PREMIER PREMIER XT User manual

Altrad
Altrad PROMIX 1400 Guide

Altrad
Altrad ECOMIX User manual

Altrad
Altrad ABM P 135L User manual

Altrad
Altrad BET ECOMIX 150 User manual

Altrad
Altrad Belle Maxi 140 User manual

Altrad
Altrad PROMIX 1600 User manual

Altrad
Altrad Balde Descarga 300 User manual

Altrad
Altrad MK-130 User manual

Altrad
Altrad B 130 User manual

Altrad
Altrad ATIKA Compact 140L User manual

Altrad
Altrad BELLE MINIMIX 150 User manual