Altrad TUBMIX 50 User manual

- Spare Parts Book
- Manuale dei ricambi
- Pièces détachées
- Ersatzteilhandbuch
- Libro Despiece
Operators Manual
Manuale Dell'Operatore
Manuel De L'Opérateur
Bedienungshandbuch
Manual del Operador
GB 2
35
TUBMIX 50
I
F
D
E
7
12
17
22

Power supply: 115V 50Hz.~ 230V 50Hz.~
Max. absorbed power: 1200W
Max. active power: 750W
Capacitor (230V~50Hz.): 20 µF
Capacitor (115V~50Hz.): 85 µF
Weight: 25 Kg.
Basket capacity: 50 Kg.
Allowed functioning:
S1
continuous load
Rotation Speed: 55 min-1
IP Degree: 44
Recommended use:
TILE ADHESIVES, CEMENT, PLASTER, PAINTS,
VARNISH AND EPOXY RESINS.
The noise level of the machines has been
measured in compliance with standard ISO3745-77.
Lw 76,6 [dBW(A)]
Lw 62,7 [dB(A)]
Before using the machine read the safety
instruction chapter carefully.
All machines have been thoroughly tested and
checked before leaving our factory.
BELLE works for a continuous development of
the machines the company manufactures,
therefore the company reserves the right to
modify its models. No rights can be claimed as
far as the data and the pictures of this manual
are concerned.
The TUBMIX is a mixing machine for tile adhesives,
cement, plaster, paints, varnish and epoxy resins.
•The manufacturer declines any liability for the
use of the TUBMIX with tools and materials
other than the original ones and not indicated in
the paragraph "RECOMMENDED USE".
•The TUBMIX is designed to work exclusively
according to the admissible working conditions
indicated.
•Never introduce foreign objects or tools into the
tub during operation with the agitator in rotating.
Assemble the top frame and the transporting handle
as shown in Fig. 1.
Insert the connecting pin fixing it with the safety clip,
paying attention to the mechanical block.
Insert all the different parts in the order shown in
Fig. 2, then lock everything in place using the
22 mm hexagon spanner provided.
GB
2
2. Precautions
1. Use
Technical data
3. Installation
11
CAUTION !
CAUTION !
22
BETUBMIX.qxd 31/05/2004 10.31 Pagina 2

Screw the agitator tightly into the motor shaft.
The full locking of this part will take place when the
machine is in motion.
Insert the tub into the lower frame, making sure to
insert one of the four transport handles in the metal
tang provided.
This will prevent the rotation of the basket during
mixing.
Insert the agitator by positioning it as shown in
Fig. 5.
Lower the motor head in working position.
MAKE SURE THE LOCKING DEVICE IS IN
LOCKED POSITION WHEN THE MACHINE IS
CLOSED (Fig. 6).
At this point, the TUBMIX is ready for use.
Switch off the TUBMIX when the mixture is
completed. The agitator must be positioned inside
the basket as showed in Fig. 5
The TUBMIX has been designed to permit the
opening of the motor head only when the agitator is
in this position.
Keep with one hand release the locking device and
with the other one lift the motor head as showed in
Fig. 7.
The plastic protection shield must never be
removed. This is a safety device prescribed by
law to prevent accidents.
GB
3
33
44
55
CAUTION !
66
77
4. Basket removing
CAUTION !
BETUBMIX.qxd 31/05/2004 10.31 Pagina 3

The machine is easy to move. Lift the handle and
move the machine on its wheels, as shown in Fig. 8.
Make sure that the switch is turned off before
inserting the plug.
The machine is to be connected to the power supply
by a residual current circuit breaker (RCCB) or class
II isolation transformer with the following
characteristics:
RCCB Transformer
230V In 10 A Id 20 mA 230 V 50 Hz 1500 W
Cont. duty
115V In 20 A Id 20 mA 115 V 50 Hz 1500 W
Cont. duty
N.B. To ensure correct functioning, periodically
check the efficiency of the RCCBs by pressing
the push-button on the front of the same.
Prior to connecting the machine to the power
supply, make sure that the voltage is the same as
indicated on the machine data plate. The machine
must be connected to an effective earth wire. In
case of doubt, do not connect the machine.
Please be aware that when the mixing head and
agitator are raised out of the mixing tub an
automatic safety switch is engaged preventing the
operation of the motor.
THE MOTOR SHOULD ONLY BE RUN IN THE
MIXING POSITION WITH THE AGITATOR
POSTIONED WITHIN THE MIXING TUB.
The TUBMIX are provided also with overheat
protection with manual reset. This intervenes in the
event of the agitator jamming. In the event of it
jamming, before resetting the thermal protection,
disconnect the machine from the mains electricity
supply and empty the basket partially.
Proceed as follows to prepare the mixture:
•Always start the machine only when it is empty.
•Proceed as follows or as directed for the type of
material to be mixed.
Adhesive for floor and wall tiles
A) Carefully read the instructions on the glue sack
you are going to use.
B) Pour in the tub the quantity of water necessary
to prepare the desired adhesive quantity
following the manufacturer's instructions.
C) Start the TUBMIX 50, then tip the first 25 kg of
powder at a speed of 10 kg/min directly on the
plastic protection, which will centrifuge the
material to obtain an appropriate mixture.
Continue with this operation in a continuous and
uniform manner with the second sack (25 kg)
and wait for the whole product to be properly
mixed. In this way the mixture will be free from
lumps.
GB
4
88
99
5. Transport
6. Connecting to power supply
7. Preparation of the mixture
CAUTION !
INFORMATION
BETUBMIX.qxd 31/05/2004 10.31 Pagina 4

•If necessary, allow the adhesive to rest for 5-15
minutes and then mix it again for few minutes.
The machine may be moved to the position
where the adhesive is to be used.
Cement
•The mixing machine is suitable for preparing
mortar and plaster containing lime, cement,
gypsum and fine sized aggregates. It is not
suitable for mixing concrete or mortar
containing medium-large sized gravel or
aggregates.
•For the preparation of mortar for plaster,
proceed as for adhesive for floor and wall tiles.
•As the mortar is a highly hygroscopic
preparation, in order to prevent excessive
hardening of the compound, a great deal of
attention must be paid to the addition of lime,
cement, gypsum or aggregates when nearing
the end of the mixing process.
Epoxy resins
•For mixing epoxy resin, check the viscosity and
the density of the products to be prepared, so
that the mixer motor is not overloaded.
•Pour into the tub the quantity of resin, hardener
and any powders indicated by the product
supplier.
•Mix carefully to prevent bubbles or lumps
forming in the mixture.
Paints
•Pour the paint to be mixed into the mixer drum
and add the necessary amount of water
required for the solution.
! The use of chemical products or solvents
may affect the properties of the tub, made of
high density polyethyiene PET.
! Check the compatibility of the products to be
mixed with the properties of the machine
before use.
The machine's reduction unit is lubricated with
semi-fluid type synthetic grease suited for the
lubrication of enclosed gears in casings.
When changing the grease, use only products with
the characteristics listed below:
NLGI Degree: 0
Dropping point: °C 115
Thickening agent SODIUM SOAPS
To change the grease, contact your local dealer.
•In the event of the tub becoming worn or
damaged, it must be disposed of in accordance
with the methods laid down by current
legislation.
•In the event of scrapping the complete machine,
it must be disposed of in accordance with the
methods laid down by current legislation.
Electric Motor
Aluminium AL
Steel AC
Copper CU
Poiyamide PA
Machine’s Framework
Steel AC
Poiyamide PA
Tub
Polyethylene PET
GB
5
8. Maintenance
CAUTION !
9. Disposal
CAUTION !
BETUBMIX.qxd 31/05/2004 10.31 Pagina 5

GB
6
Fault
The machine does not function.
Machine is difficult to start.
Unusual noise coming from the
reduction gear.
Cause
The power supply cable is
damaged or not properly
connected.
No voltage in the socket.
The thermal protection has been
activated.
Internal emergency switch has
been damaged.
Mixture too hard.
The agitator is encountering
obstacles whilst rotating (stones
or lumps).
Start capacitor is damaged.
Bearings or bushings of reduction
gear are damaged.
Reduction gear damaged.
Remedy
Press the plug firmly into the
power socket.
Have the socket checked.
Remove the power supply cable
from the main socket and reset
the thermal protection. In case
this is not possible, wait a few
minutes to allow it to cool.
Consult local dealer.
Remove part of the mixture from
the basket, than try to start the
machine.
Remove the stones which are too
big or the lumps. Proceed as
above indicated.
Consult local dealer.
Switch off the machine
immediately and contact your
local dealer.
10. Troubleshooting
HAVE YOUR TOOL REPAIRED BY A QUALIFIED PERSON
This electric tool complies with the relevant safety rules. Repairs should only be carried out by
qualified persons using original spare parts, otherwise this may result in considerable danger to the
user.
BETUBMIX.qxd 31/05/2004 10.31 Pagina 6

Alimentazione: 115V. 50Hz.~ 230V. 50Hz.~
Potenza max. assorbita: 1200W
Potenza max. resa: 750W
Condensatore (230V~50Hz.): 20 µF
Condensatore (115V~50Hz.): 85 µF
Peso: 25 Kg.
Capacità secchio: 50 Kg.
Tipo di funzionamento consentito:
SERVIZIO S1
carico continuo
Velocità di rotazione: 55 min-1
Grado IP: 44
Uso consigliato:
ADESIVI PER PIASTRELLE, CEMENTO, VERNICI,
RESINE EPOSSIDICHE.
Il rumore emesso da queste macchine è stato
misurato secondo la norma ISO3745-77.
Lw 76,6 [dBW(A)]
Lw 62,7 [dB(A)]
Prima di ogni impiego leggere attentamente il
capitolo relativo alla sicurezza.
Ogni macchina è stata sottoposta ad una serie
di collaudi ed è stata minuziosamente
controllata prima di lasciare la nostra fabbrica.
La BELLE lavora costantemente per lo sviluppo
delle sue macchine; perciò si riserva di
apportare modifiche. Non potranno quindi
essere vantati diritti sui dati e sulle illustrazioni
di questo manuale.
Il TUBMIX è una macchina adatta per mescolare
adesivi per piastrelle, cemento, vernici, resine
epossidiche.
•Il costruttore declina ogni responsabilità per
l'impiego del TUBMIX con utensili diversi e con
materiali non specificati nel paragrafo "USO
CONSIGLIATO".
•Il TUBMIX è costruito per operare
esclusivamente nelle condizioni di tipo di
funzionamento consentito.
•Durante l'uso, con la frusta in rotazione, non
inserite corpi estranei o utensili nel secchio.
Disponete il telaio superiore ed il manico di
trasporto come indicato in foto 1.
Inserire il perno di collegamento assicurandolo con
la clips di sicurezza, facendo attenzione al blocco
meccanico.
Inserite i componenti in sequenza come indicato in
figura 2, bloccando il tutto con la chiave esagonale
da 22 mm. in dotazione.
I
7
2. Precauzioni
1. Impiego
Dati tecnici
3. Installazione
11
ATTENZIONE !
ATTENZIONE !
22
BETUBMIX.qxd 31/05/2004 10.31 Pagina 7

Avvitate fino in fondo la frusta sul corpo motore.
Il bloccaggio definitivo avverrà alla messa in moto
della macchina.
Inserite il secchio nel telaio inferiore avendo cura di
alloggiare una delle quattro maniglie di trasporto
nella linguetta metallica predisposta.
In questo modo si eviterà la rotazione del secchio
durante la miscelazione del prodotto.
Inserite la frusta e disponetela come in foto 5.
Abbassare la testa motore in posizione di lavoro.
ASSICURARSI CHE A MACCHINA CHIUSA IL
MECCANISMO DI BLOCCAGGIO SIA IN
POSIZIONE DI BLOCCO (foto 6).
A questo punto il TUBMIX è pronto per l'uso.
A miscelazione ultimata spegnere la macchina.
Posizionare la frusta all’interno del secchio come
indicato in foto 5.
La macchina è progettata per permettere l’apertura
della testa motore solo in tale posizione della frusta.
Con una mano mantenere disimpegnato il
meccanismo di bloccaggio e con l’altra alzare la
testa motore come indicato in foto 7.
É assolutamente necessario che la protezione in
plastica non venga mai rimossa dalla macchina.
Essa assolve infatti alla protezione
antinfortunistica della frusta prevista dalla legge.
I
8
33
44
55
66
77
ATTENZIONE !
4. Estrazione del secchio
ATTENZIONE !
BETUBMIX.qxd 31/05/2004 10.31 Pagina 8

La macchina è facilmente trasportabile. Sollevate la
maniglia e trasportate la macchina tramite le ruote,
come indicato nella foto 8.
La macchina deve essere collegata alla rete
elettrica tramite un interruttore differenziale o un
trasformatore di isolamento in classe II, avente le
caratteristiche seguenti:
Differenziale Trasformatore
230V In 10 A Id 20 mA 230 V 50 Hz 1500 W
Servizio continuo
115V In 20 A Id 20 mA 115 V 50 Hz 1500 W
Servizio continuo
N.B. Per la corretta utilizzazione degli interruttori
differenziali non bisogna dimenticare il periodico
controllo della loro efficienza, attuabile tramite
l’apposito pulsante posto sul frontale del
dispositivo stesso.
Prima di collegare la macchina alla presa di
corrente, assicuratevi che il voltaggio della linea sia
lo stesso di quello indicato sulla targhetta della
macchina. Collegate la macchina solo ad una linea
con cavo di messa a terra efficiente. In caso di
dubbio, non collegate la macchina.
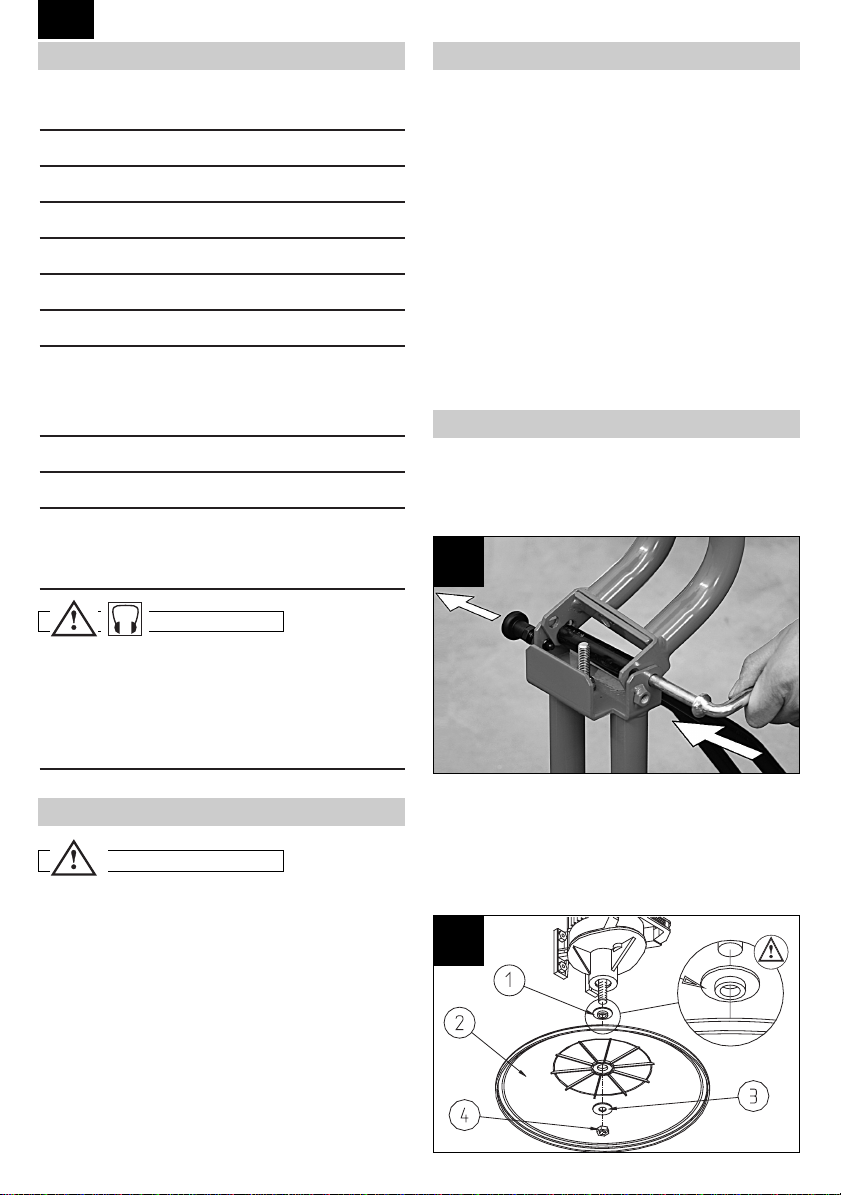
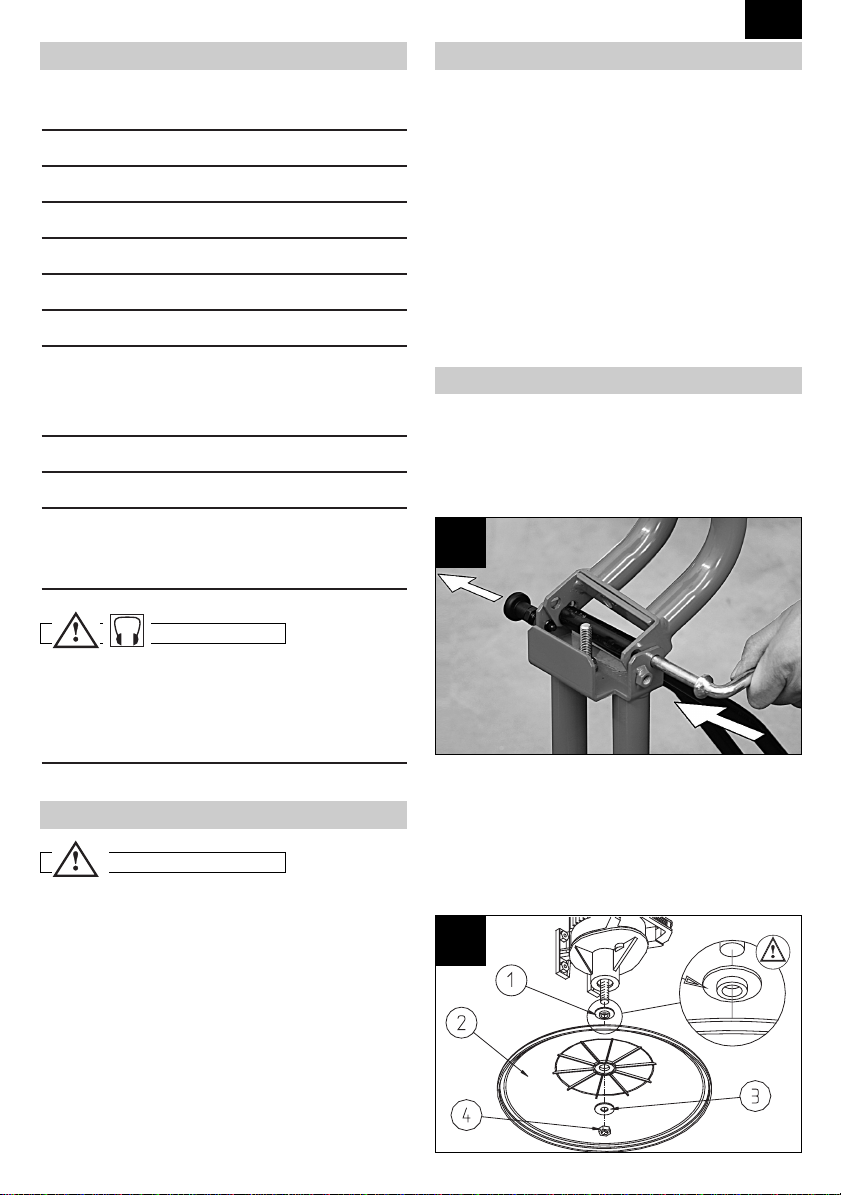
A testa motore sollevata un interruttore di sicurezza
automatico non permette il funzionamento del
motore.
IL MOTORE PUÒ ESSERE AVVIATO SOLO CON
LA FRUSTA IN POSIZIONE DI LAVORO DENTRO
IL SECCHIO.
Il TUBMIX è dotato di protezione termica a riarmo
manuale. Essa interviene in caso di bloccaggio della
frusta. In caso di bloccaggio, prima di riarmare il
protettore, scollegate la macchina dalla rete elettrica
e svuotare parzialmente il secchio.
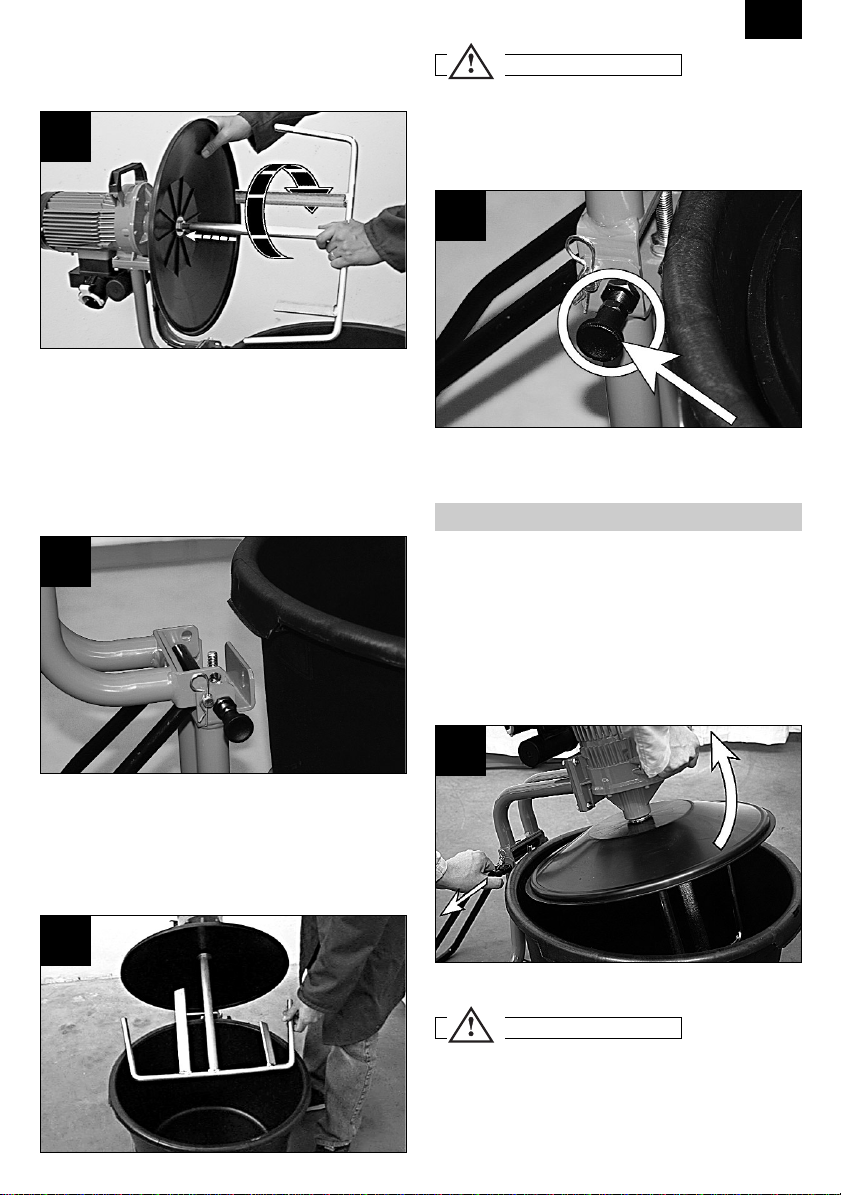
Per procedere con la preparazione dell'impasto:
•Avviate la macchina sempre a vuoto.
•In base al tipo di componente che si vuole
utilizzare procedete come segue:
Colla per piastrelle per pavimenti e rivestimenti
A) Leggete attentamente le istruzioni scritte sul
sacco della colla che state per utilizzare.
B) Versate nel secchio tutta l'acqua che serve per
preparare la quantità di colla come indicato dal
produttore.
C) Accendete il TUBMIX 50, quindi versate il primo
sacco da 25 Kg. di polvere ad una velocità di 10
Kg. per minuto, direttamente sulla protezione in
plastica, la quale provvederà a centrifugarla per
una corretta miscelazione.
Procedete in questa operazione in modo
continuo ed uniforme con il secondo sacco da
25 Kg, poi attendete la completa miscelazione
del prodotto fino ad ora versato, in questo modo
non si avranno grumi nell'impasto.
I
9
88
99
5. Trasporto
6. Allacciamento alla rete elettrica
7. Preparazione dell’impasto
ATTENZIONE !
INFORMAZIONI
BETUBMIX.qxd 31/05/2004 10.31 Pagina 9

•Se necessario, far riposare la colla da 5 a 15
minuti e provvedete ad una successiva
miscelazione per qualche minuto.
La macchina, come indicato nei paragrafi
precedenti è trasportabile direttamente sul
luogo d'uso della colla.
Cemento
•Il miscelatore è adatto alla preparazione di
malte da intonaco composte da calce, cemento
e inerti a pezzatura fine. Non è adatto alla
miscelazione di calcestruzzo o di malte
comprendenti ghiaia o inerti a pezzatura medio-
grossa.
•Per la preparazione di malte per intonaco, si
procede come al paragrafo precedente: colla
per piastrelle.
•Essendo la malta una preparazione fortemente
igroscopica, porre molta attenzione all'aggiunta
di calce, cemento o inerti alla fine della
miscelazione, per prevenire un eccessivo
indurimento del composto.
Resine epossidiche
•Per la miscelazione di resine epossidiche,
verificate la viscosità ed il peso specifico dei
prodotti da preparare, al fine di non
sovraccaricare il gruppo motore del
mescolatore.
•Versare nel secchio le quantità di resina,
indurente ed eventualmente polveri indicate dal
fornitore dei prodotti.
•Mescolate con cura per prevenire bolle o grumi
nella preparazione.
Vernici
•Versate la vernice da miscelare nel secchio del
mescolatore ed aggiungete la necessaria
quantità d'acqua utile alla soluzione.
! L'uso di prodotti chimici o solventi, potrebbe
alterare le caratteristiche del secchio,
realizzato in polietilene ad alta densità PET.
! Verificate, prima dell'uso, la compatibilità
dei prodotti da miscelare con le
caratteristiche della macchina.
Il riduttore della macchina è lubrificato con grasso
sintetico di tipo semifluido adatto per la
lubrificazione di ingranaggi in carter.
In caso di sostituzione, usate un prodotto con
caratteristiche simili qui riportate:
Grado NLGI 0
Punto di goccia, °C 115
Addensante SAPONI SODIO
Per la sostituzione del grasso di lubrificazione,
rivolgersi al riveditore di fiducia.
•In caso di deterioramento del secchio della
macchina, esso andrà smaltito secondo i modi
indicati dalla legislazione vigente.
•In caso di rottamazione dell'intera macchina,
essa andrà smaltita secondo i modi indicati
dalla legislazione vigente.
Motore elettrico
Alluminio AL
Acciaio AC
Rame CU
Poliammide PA
Telaio macchina
Acciaio AC
Poliammide PA
Secchio
Polietilene PET
I
10
8. Manutenzione
ATTENZIONE !
ATTENZIONE !
9. Smaltimento
BETUBMIX.qxd 31/05/2004 10.31 Pagina 10

I
11
Problema
La macchina non funziona
La macchina parte con difficoltà
Rumore insolito proveniente dal
riduttore della macchina.
Causa
Il cavo di alimentazione è mal
collegato o danneggiato
Non c'è tensione alla presa di
corrente
Il protettore termico è intervenuto.
L’interruttore di sicurezza interno
si è danneggiato.
Impasto da mescolare troppo
duro.
La frusta incontra qualche
ostacolo durante la rotazione
(sassi o materiale raggrumato).
Il condensatore di avviamento è
danneggiato.
Cuscinetti o boccole danneggiate
nel riduttore della macchina.
Riduttore danneggiato.
Rimedio
Spingete a fondo la spina nella
presa, verificate il cavo di
alimentazione
Verificate o fare verificare la
presa di corrente.
Staccate il cavo di alimentazione
dalla presa di corrente e riarmate
il protettore termico. Nel caso che
non si riarmi, attendete qualche
minuto per farlo raffreddare.
Rivolgersi al rivenditore di fiducia.
Togliete parte del materiale dal
secchio e provate di fare ripartire
la macchina.
Rimuovete i sassi troppo grossi o
il materiale raggrumato.
Procedete come al rimedio
precedente.
Rivolgetevi al riveditore di fiducia.
Fermate subito la macchina e
rivolgetevi al rivenditore di
fiducia.
10. Localizzazione guasti
L’UTENSILE DEVE ESSERE RIPARATO DA PERSONALE QUALIFICATO.
Questo utensile elettrico è conforme alle relative norme di sicurezza. Le riparazioni devono essere
eseguite solo da personale qualificato che utilizzi parti di ricambio originali, altrimenti ciò può
provocare un considerevole pericolo per l’utilizzatore.
BETUBMIX.qxd 31/05/2004 10.31 Pagina 11

Alimentation: 115V. 50Hz.~ 230V. 50Hz.~
Puissance max. absorbée 1200W
Puissance max. exercée 750W
Condensateur (230V~50Hz) 20 µF
Condensateur (115V~50Hz) 85 µF
Masse en service 25 Kg.
Capacité Bol 50 Kg.
Type de fonctionnement admis:
SERVICE S1
Chargement continu
Vitesse de rotation: 55 min-1
Degré IP: 44
Usage conseillé:
ADHESIFS DESTINES AUX CARRELAGES,
CIMENT, VERNIS, RÉSINES ÉPOXYDES.
Le bruit émis par cette machine a été mesuré, selon
la norme ISO3745-77.
Lw 76,6 [dBW(A)]
Lw 62,7 [dB(A)]
Avant d'utiliser cette machine, veuillez lire
attentivement le chapitre concernant la sécurité.
Toutes nos machines sont soumises à de
nombreux essais et minutieusement contrôlées
dans leurs moindres détails avant de quitter l'usine.
BELLE oeuvre constamment a l'amélioration
des ses machines; par conséquent, elle se
réserve le droit d'y apporter des modifications. Il
ne pourra donc être avancé aucun droit sur les
informations et les illustrations figurant dans le
présent manuel.
Le mélangeur TUBMIX est une machine pour
mélanger les adhésifs destinés aux carrelages, le
ciment, les vernis, les résines époxydes.
•Le fabricant décline toute responsabilité
touchant l'utilisation du TUBMIX avec outils et
matériaux non spécifiés au paragraphe "TYPES
D'OUTILS CONSEILLES".
•La machine TUBMIX est fabriquée pour
fonctionner exclusivement dans les conditions
de fonctionnement admis indiquées.
•Pendant l'utilisation, lorsque le fouet est en
rotation, ne pas introduire de corps étrangers
ou d'outils dans le bol.
Disposer le châssis supérieur et le manche de
transport comme indiqué sur la fig. 1.
Introduire la broche de liaison en l'assurant avec le
clips de sécurité, en faisant attention au mécanisme
de blocage.
Introduire, en séquence, toutes les composantes
comme indiqué sur la fig. 2 et bloquer l'ensemble en
agissant sur l'écrou au moyen de la clé pour vis à
six pans 22 mm fournie avec l'appareil.
F
12
2. Précautions
1. Utilisation
Caractéristiques techniques
3. Installation
11
ATTENTION !
ATTENTION !
22
BETUBMIX.qxd 31/05/2004 10.31 Pagina 12

Visser à fond le fouet sur le corps moteur.
Le blocage définitif se fera lors de la mise en
marche de l'appareil.
Introduire le bol dans le châssis inférieur en veillant
à loger l'une des quatre poignées de transport dans
la languette métallique prévue à cet effet. De cette
façon, on évitera la rotation du bol pendant le
mélange du produit.
Insérer le fouet comme indiqué dans la figure 5.
Abaisser la tête moteur en position de travail.
AVEC LA MACHINE ARRÊTÉE, S'ASSURER
QUE LE MÉCANISME DE BLOCAGE EST EN
POSITION DE BLOCAGE (FIG. 6).
Le TUBMIX est prêt pour être utilisé.
Une fois le mélange terminé, arrêter la machine.
Positionner le fouet à l'intérieur du bol de la façon
indiquée sur la fig. 5.
Le TUBMIX est conçu pour permettre l'ouverture de
la tête du moteur seulement si le fouet est dans
cette position.
Avec une main, maintenir le mécanisme de blocage
débloqué et, avec l'autre main, soulever la tête
moteur comme indiqué sur la fig. 7.
Il est absolument nécessaire que la protection
en plastique n'est jamais enlevée de l'appareil,
car elle protège les utilisateurs contre les
éventuels accidents, conformément aux
dispositions de la loi.
F
13
55
4. Extraction du bol
33
44
66
77
ATTENTION !
ATTENTION !
BETUBMIX.qxd 31/05/2004 10.31 Pagina 13

La machine est facilement transportable. Soulever
la poignée et déplacer la machine à l'aide des
roues, comme indiqué dans la figure 8.
La machine doit être branchée sur le secteur au
moyen d'un disjoncteur différentiel ou d'un
transformateur d'isolation de classe II présentant
les caractéristiques suivantes:
Différentiel Transformateur
230V In 10 A Id 20 mA 230 V 50 Hz 1500 W
Service continu
115V In 20 A Id 20 mA 115 V 50 Hz 1500 W
Service continu
N.B. Pour bien utiliser les disjoncteurs
différentiels, il est recommandé de contrôler
périodiquement leur état de marche en agissant
sur le bouton-poussoir prévu à cet effet sur la
face de l'appareil.
Dans tous les cas, avant de brancher la machine,
assurez-vous que le voltage de la ligne correspond
à celui indiqué sur la plaque de la machine.
Ne raccordez la machine qu'à une ligne de mise à
la terre efficace. En cas de doute, ne branchez pas
la machine.
Quand la tête moteur est soulevée, un interrupteur
de sécurité automatique empêche le
fonctionnement du moteur.
LE MOTEUR NE PEUT ÊTRE MIS EN MARCHE
QU'AVEC LE FOUET EN POSITION DE TRAVAIL
DANS LE BOL.
Les TUBMIXs sont dotés d'une protection thermique
à réarmement manuel. Celle-ci intervient en cas de
blocage du fouet. En cas de blocage et avant de
réarmer la protection, débrancher la machine et vider
partiellement le bol.
Pour préparer la pâte procéder de la façon suivante:
•Démarrer l'appareil à vide.
•Sur la base du type d'ingrédient utilisé,
procéder de la façon suivante:
Colle pour carreaux de pavage et revêtements
A) Lire attentivement le mode d'emploi figurant sur
le sachet.
B) Verser dans le bol toute l'eau nécessaire pour
préparer la quantité de colle suivant les
indications du fabricant.
C) Mettre sous tension le TUBMIX 50, puis verser
le premier sac de 25 kg de poudre à raison de
10 kg par minute, directement sur la protection
en plastique, laquelle centrifugera la poudre en
vue de la mélanger.
Continuer cette opération de façon continue et
uniforme avec le deuxième sac de 25 kg, puis
attendre le mélange complet du produit déjà
versé. De cette façon, on évite la formation de
grumeaux.
•Si besoin est, faire reposer la colle de 5 à 15
minutes puis mélanger de nouveau pendant
quelques minutes.
F
14
88
99
5. Transport
6. Branchement
7. Préparation de la pâte
ATTENTION !
INFORMATIONS
BETUBMIX.qxd 31/05/2004 10.31 Pagina 14

Ainsi qu'on l'a déjà indiqué dans les
paragraphes qui précèdent, la machine est
transportable directement sur le lieu d'utilisation
de la colle.
Ciment
•Le mélangeur est adapté à la préparation de
mortiers pour enduit composés de chaux, de
ciment et d'éléments inertes à structure fine. Il
n'est pas adapté au mélange de béton ou de
mortier comprenant du gravier ou des matières
inertes à structure moyenne ou grosse.
•Pour la préparation de mortier pour enduit,
procéder comme au paragraphe précédent:
Colle pour carreaux de pavage et revêtements.
•Le mortier est une préparation fortement
hygroscopique: il convient faire grande attention à
l'adjonction de chaux, de ciment ou de matières
inertes à granulométrie fine dans le mélange de
manière à prévenir un durcissement excessif du
produit obtenu.
Résine époxydes
•Pour le mélange de résines époxydes, vérifier
la viscosité et le poids spécifique des produits à
préparer de manière à ne pas surcharger le
groupe moteur du mélangeur.
•Verser dans le bol les quantités de résines, de
durcisseur et, éventuellement, de poudres
indiquées par le fabricant des produits.
•Mélanger avec précaution de manière à
empêcher la formation de bulles d'air ou de
grumeaux dans la préparation.
Vernis
•Verser le vernis à mélanger dans le bol du
mélangeur et ajouter la quantité nécessaire
d'eau utile à la solution.
! L'utilisation de produits chimiques ou de
solvants pourrait altérer les caractéristiques du
bol, réalisé en polyuréthanne haute densité PET.
! Avant l'utilisation, vérifier la compatibilité des
produitsàmélangeraveclescaractéristiquesde
la machine.
Le réducteur de l'appareil est lubrifié au moyen de
graisse synthétique de type semi-fluide conçue
pour la lubrification d'engrenages en carter.
En cas de remplacement, utiliser un produit ayant
des caractéristiques semblables.
Degré NLGI 0
Point de goutte, °C 115
Agent épiât SAVONS DE SODIUM
En cas de remplacement, adressez-vous à votre
revendeur habituel.
•En cas de détérioration du bol de la machine,
celui-ci sera mis au rebut selon les méthodes
indiquées par les législations en vigueur.
•En cas de bris de la machine tout entière, celle-
ci sera mise au rebut conformément aux
méthodes indiquées par la législation en
vigueur.
Moteur électrique
Aluminium AL
Acier AC
Cuivre CU
Poiyamide PA
Chássis de la machine
Acier AC
Poiyamide PA
Bol
Polyéthylène PET
F
15
8. Mises en garde concernant l’entretien
ATTENTION !
ATTENTION !
9. Mise au rebut
BETUBMIX.qxd 31/05/2004 10.31 Pagina 15

F
16
Problèmes
La machine ne fonctionne pas.
La machine démarre avec
difficulté.
Bruit insolite émanant du
réducteur de la machine.
Causes
Le câble d'alimentation est mal
raccordé ou endommagé.
Il n'y a pas de tension à la prise
de courant.
La protection thermique est
intervenue.
L'interrupteur de sécurité interne
est endommagé.
La pâte à mélanger est trop dure.
Le fouet rencontre un obstacle
pendant la rotation (Cailloux ou
grumeaux).
Le condensateur de démarrage
est endommagé.
Les roulements ou les bagues du
réducteur de la machine sont
endommagés.
Le réducteur est endommagé.
Remèdes
Enfoncez à fond la fiche dans la
prise, vérifiez le câble d'alimentation.
Vérifiez ou faites vérifier la prise
de courant.
Débrancher le câble d'alimentation
et réarmer la protection. S'il n'est
pas possible de la réarmer,
attendre quelques minutes de
manière à la laisser refroidir.
Adressez-vous à votre revendeur
habituel.
Oter une partie du matériel du bol
et essayer de faire redémarrer la
machine.
Enlever les cailloux trop
volumineux ou les grumeaux de
produit. Procéder comme pour le
remède précédent.
Adressez-vous à votre revendeur
habituel.
Adressez-vous à votre revendeur
habituel.
Arrêter la machine immédiatement
et s'adresser au revendeur
habituel.
10. Recherche des pannes
L'OUTIL DOIT ETRE REPARE PAR DU PERSONNEL QUALIFIE
Cet outil est conforme aux normes de sécurité en vigueur. Toute réparation doit être effectuée
uniquement par du personnel qualifié utilisant des pièces de rechange originales sinon cela peut
provoquer des dangers considérables pour l'utilisateur.
BETUBMIX.qxd 31/05/2004 10.31 Pagina 16

Stromversorgung: 115V 50Hz.~ 230V 50Hz.~
Max. Leistungsaufnahme 1200W
Max. Endleistung 750W
Kondensator (230V~50Hz) 20 µF
Kondensator (115V~50Hz) 85 µF
Betriebsgewicht 25 Kg.
Fassungsvermögen des Eimers 50 Kg.
Erlaubte Funktionsweise: S1
Kontinuierliche Belastung
Drehzahl: 55 min-1
IP-GRAD: 44
Empfohlener Einsatzbereich:
FLIESENKLEBER, ZEMENT, FARBEN, LACKE
UND EPOXIDHARZE.
Der Geräuschpegel dieser Maschinen wird nach
den Vorgaben der ISO3745-77 Norm gemessen.
Lw 76,6 [dBW(A)]
Lw 62,7 [dB(A)]
Vor jedem Einsatz der Maschinen lesen Sie den
Kapitel bezüglich der Sicherheit aufmerksam durch.
Bevor unsere Maschine das Werk verlassen,
durchlaufen Sie aufwendige und mit peinlichster
Genauigkeit durchgeführte Endkontrollen.
Die Fa. BELLE arbeitet ständig an der
Entwicklung Ihrer Maschinen, deshalb behält
Sie sich das Recht vor, Veränderungen
vorzunehmen. Aus diesem Grund kann kein
Anspruch auf Daten und Abbildungen dieser
Gebrauchsanweisung erhoben werden.
Der TUBMIX ist ein Mischer für Fliesenkleber,
Zement, Farben, Lacke und Epoxidharze.
•Der Hersteller weist jede Verantwortung für die
Verwendung des TUBMIXs mit andersartigen
Werkzeugen oder Materialien als im Absatz
"EMPFOHLENE WERKZEUGTYPEN"
angegeben von sich.
•Der TUBMIX ist so ausgelegt, daß er nur unter
den angeführten zulässigen
Betriebsbedingungen eingesetzt werden darf.
•Während des Betriebs bei laufendem Rührwerk
keine Fremdkörper oder Werkzeuge in den
Eimer geben.
Bauen Sie den oberen Rahmen und den
Transportgriff entsprechend der Abbildung 1
zusammen.
Setzen Sie den Anschlußstift ein und befestigen Sie
ihn mit Sicherheitsklammern.
Die Komponenten entsprechend der in Abbildung 2
dargestellten Reihenfolge einsetzen, dann alles mit
dem mitgelieferten 22-mm-Inbusschlüssel
festziehen.
D
17
2. Sicherheitsmaßnahmen
1. Einsatzbereich
Technische Daten
3. Installation
WICHTIG !
WICHTIG !
11
22
BETUBMIX.qxd 31/05/2004 10.31 Pagina 17

Das Rührwerk fest an den Motorkörper schrauben.
Bei Inbetriebnahme der Maschine wird es definitiv
blockiert.
Den Eimer in den unteren Rahmen einsetzen und
dabei darauf achten, daß eine der vier Griffe die
eigens hierfür vorgesehene Metallasche zentriert.
Auf diese Art und Weise wird vermieden, daß sich
der Eimer während des Mischen des Produkts
dreht.
Das Rührwerk einsetzen (siehe Abb. 5).
Den Zylinderkopf in Arbeitsstellung bringen.
SICHERSTELLEN, DASS SICH DER
SPERRMECHANISMUS BEI GESCHLOSSENER
MASCHINE IN DER SPERRSTELLUNG
BEFINDET (Abb. 6).
An diesem Punkt ist der TUBMIX betriebsbereit.
Nach erfolgter Mischung, die Maschine abstellen.
Das Rührwerk in den Eimer legen, wie in Abbildung
5 gezeigt.
Die Maschine wurde so konzipiert, dass die Öffnung
des Zylinderkopfes nur dann möglich ist, wenn sich
das Rührwerk in dieser Stellung befindet.
Mit einer Hand den Sperrmechanismus entriegelt
halten und mit der anderen den Zylinderkopf - wie in
Abbildung 7 gezeigt - anheben.
Die Kunststoffabdeckung darf auf gar keinen
Fall von der Maschine entfernt werden.
Sie dient dem gesetzlichen Unfallschutz des
Rührwerks.
D
18
WICHTIG !
WICHTIG !
33
44
55
66
77
4. Herausziehen des Eimers
BETUBMIX.qxd 03/06/2004 8.54 Pagina 18

Die Maschine ist leicht zu befördern. Heben Sie den
Griff und fahren Sie die Maschine auf den Rädern,
wie in der Abb. 8 gezeigt.
Die Maschine ist über einen Differentialschalter
oder einer Transformator (Isolationsklasse II) mit
folgenden Merkmalen an das Stromnetz
anzuschließen:
Differentialschalter Transformator
230V In 10 A Id 20 mA 230 V 50 Hz 1500 W
Dauerbetrieb
115V In 20 A Id 20 mA 115 V 50 Hz 1500 W
Dauerbetrieb
Merke: Für einen korrekten Einsatz der
Differentialschlater ist eine regelmäßige
Kontrolle ihrer Leistungsfähigkeit mittels der
Taste an der Vorderseite der Vorrichtung selbst
erforderlich.
In jedem Fall ist vor dem Anschluß der Maschine an
die Steckdose sicherzustellen, daß die Spannung
der Stromleitung mit dem Wert auf dem Typenschild
der Maschine übereinstimmt. Die Maschine nur an
eine Leitung mit wirksamer Erdung anschließen. Im
Zweifelsfalle die Maschine nicht anschließen.
Bei angehobenem Zylinderkopf verhindert ein
Schutzschalter den Motorbetrieb.
DER MOTOR KANN NUR BEI IM EIMER IN
ARBEITSSTELLUNG BEFINDLICHEM
RÜHRWERK GESTARTET WERDEN.
Die TUBMIX sind mit einem Überhitzungsschutz
ausgestattet, der von Hand wieder eingeschaltet
wird. Er schaltet nach dem Festfahren des
Rührwerks ab. In diesem Fall, so muß die Maschine
von der Stromzufuhr getrennt und der Eimer
teilweise entleert werden, bevor der
Überhitzungsschutz wieder eingeschaltet wird
Die Mischung folgendermaßen vorbereiten:
•Die Maschine immer in leerem Zustand starten.
•Je nach Art der einzusetzenden Komponente
folgendermaßen vorgehen:
Kleber für Boden und Wandfliesen
A) Die Anweisungen auf dem Klebersack, den Sie
benutzen wollen, aufmerksam lesen.
B) Gießen Sie in den Eimer die vom Kleberhersteller
vorgeschriebene Wassermenge ein, um die
gewünschte Klebermenge vorzubereiten.
C) Starten Sie den TUBMIX 50, dann schütten Sie
den ersten Pulversack (25 Kg) bei einer
Geschwindigkeit von 10 Kg/min unmittelbar in
den Kunststoffschutz. Die Mischarme werden
das Produkt rühren.
Fahren Sie mit diesem Arbeitsvorgang in
beständiger, gleichmäßiger Weise auch für den
zweiten Sack (25 Kg) fort und dann darauf
warten, daß das bis jetzt eingeschüttete
Produkt vollkommen gemischt wird. Auf diese
Weise werden Klumpenbildungen in der Masse
vermieden.
D
19
88
99
5. Transport
6. Anschluß an das Stromnetz
7. Vorbereitung der Mischung
HINWEISE
WICHTIG !
BETUBMIX.qxd 31/05/2004 10.31 Pagina 19

• Bei Bedarf lassen Sie den Kleber 5 bis 15
Minuten lang ruhen, und anschließend mischen
Sie erneut einige Minuten lang.
Wie oben erwähnt, kann die Maschine
unmittelbar dorthin gefahren werden, wo der
Kleber benötigt wird.
Zement
•Der Mischer eignet sich für die Zubereitung von
Verputzmörtel mit feinem Kalk, Zement und
Zuschlagstoffen. Er ist für das Mischen von
Beton oder Mörtel mit mittelgroßem Kies oder
Zuschlagstoffen nicht geeignet.
•Für die Zubereitung von Verputzmörtel gehen
Sie entsprechend der Beschreibung im obigen
Absatz "Kleber für Boden und Wandfliesen " vor.
•Da der Mörtel ein stark wasseraufsaugender
Stoff ist, muß im Hinblick auf ein übertriebenes
Abhärten der Mischung sorgfältig auf die
beigegebenen Mengen von Kleber, Zement
oder Zuschlagstoffen entsprechend der
gewünschten Mischung geachtet werden.
Epoxidharze
•Zur Mischung von Epoxidharz sind die
Viskosität und das spezifische Gewicht der
vorzubereitenden Produkte zu prüfen, um eine
Überlastung des Mischermotors zu vermeiden.
•Schütten Sie die vom Hersteller der Produkte
angegebenen Mengen Harz, Härter und Pulver
in den Eimer.
•Mischen Sie die Produkte sorgfältig, um Blasen
oder Klumpenbildung zu vermeiden.
Farben
•Gießen Sie die Farbe in den Mischereimer und
fügen Sie die für die Lösung erforderliche
Wassermenge hinzu.
! Die Verwendung von chemischen Produkten
oder Lösungsmitteln kann die Eigenschaften
des Eimers, der aus hochdichtem PET
hergestellt ist, beeinträchtigen.
! Prüfen Sie vor der Benutzung, ob die zu
mischenden Produkte mit den Eigenschaften
der Maschine vereinbar sind.
Das Untersetzungsgetriebe der Maschine wird mit
halbflüssigem, für die Schmierung des Getriebes im
Gehäuse geeignetem, synthetischem Fett
geschmiert.
Bei Fettwechsel ein Produkt mit ähnlichen
Merkmalen wie nachstehend aufgeführt verwenden:
NLGI-Grad 0
Tropfpunkt, °C 115
Verdichtmittel NATRIUMSEIFEN
Bei Fettwechsel, wenden Sie sich an Ihren
Fachhändler.
•Falls der Eimer der Maschine verschlissen ist
oder beschädigt wurde, muß er entsprechend
der gesetzlich vorgeschriebenen Methode
entsorgt werden.
•Falls die gesamte Maschine verschrottet wird,
muß sie entsprechend der gesetzlich
vorgeschriebenen Methode entsorgt werden.
Elektromotor
Aluminium AL
Stahl AC
Kupfer CU
Polyamid PA
Maschinenrahme
Stahl AC
Polyamid PA
Eimer
Polyäthylen PET
D
20
8. Wartungshinweis
WICHTIG !
WICHTIG !
9. Entsorgung
BETUBMIX.qxd 31/05/2004 10.31 Pagina 20
Table of contents
Languages:
Other Altrad Mixer manuals

Altrad
Altrad LIV MLZ NG Series User manual

Altrad
Altrad BELLE PREMIER PREMIER XT User manual

Altrad
Altrad Balde Descarga 300 User manual

Altrad
Altrad ECOMIX User manual

Altrad
Altrad ABM P 135L User manual

Altrad
Altrad BELLE MINIMIX 150 User manual

Altrad
Altrad BET ECOMIX 150 User manual

Altrad
Altrad Lescha BX 135 User manual

Altrad
Altrad PROMIX 1600 User manual

Altrad
Altrad Belle Maxi 140 User manual