Ameda Mya Breast Pump User manual

EN Instructions for use |Page 1
FR Mode d’emploi |Page 31
ES Instrucciones de uso |Page 59
Breast Pump |Tire-Lait |Sacaleche
TM

Breast Pump |Tire-Lait |Sacaleche
TM
Noscomplace ayudarla a cumplirconsusobjetivos de lactanciaen el transcurso dela experiencia
de amamantar a su bebé. Con nuestra bomba de extracción Mya puede extraer y recolectar
su leche materna de manera segura y efectiva. Si tiene alguna pregunta con respecto a la
bomba de extracción Mya, contamos con un equipo de servicio de atención al cliente certificado
ParentCare disponible para ayudarla. Tenga a la mano su bomba de extracción y las piezas
cuando llame. ParentCare está disponible durante el horario de atención comercial los días
com para obtener los horarios de disponibilidad actualizados. Para obtener más información
sobre lactancia, bombas de extracción o productos de Ameda, visite www.ameda.com. Para
obtener más información o comentarios sobre productos en otros países, visite www.ameda.
com y consulte la lista de distribuidores fuera de los Estados Unidos.
We are excited to help you meet your breastfeeding goals along your breastfeeding journey
with your baby. With our Ameda Mya breast pump, you can express and collect your breast
milk safely and effectively. If you have any questions regarding your Ameda Mya breast pump,
we have a certified ParentCare team available to help you. Have your breast pump and parts
nearby when you call. ParentCare is available by phone during business hours on weekdays
at 866.992.6332 or ParentCare@ameda.com. Please check www.ameda.com for up-to-date
available times. For more information about breastfeeding, breast pumping or Ameda products
visit www.ameda.com. For more product information or feedback in other countries, visit www.
ameda.com for a list of distributors outside of the United States.
Nous sommes ravis de pouvoir contribuer àce que votre allaitement soit réussi et de vous
accompagner pendant que vous allaitez votre bébé. Grâce à votre tire-lait Mya, vous pouvez
pomper et recueillir le lait maternel de manière sûre et efficace. Si vous avez des questions
à propos du tire-lait Mya, les spécialistes certifiés de notre équipe de service à la clientèle
ParentCare sont disponibles pour vous aider. Avant de nous appeler, placez à portée de main
votre tire-lait et les accessoires. ParentCare est à votre écoute du lundi au vendredi, durant
www.ameda.com pour vous renseigner sur les heures ouvrables en vigueur.Pour en savoir plus
sur l’allaitement,l’utilisation du tire-lait ou les produits Ameda, visitez le www.ameda.com. Pour
obtenirdes renseignements sur nos produits ou de la rétroaction dans d’autres pays, visitez le
www.ameda.com pour consultez la liste des distributeurs situés à l’extérieur des États-Unis.
Congratulations on the birth of your baby!
Toutes nos félicitations pour la naissance de votre bébé!
¡Felicitaciones por el nacimiento de su bebé!

3
1. Introduction.......................................................................................................................................4
1.1. Intended Use (Indications of Use) ....................................................................................... 4
1.2. Contraindications For Use..................................................................................................... 4
1.3. Explanation of Symbols.......................................................................................................... 5
2. Warnings and Cautions...............................................................................................................6
3. Product Description......................................................................................................................9
4. Start-up Procedure and Operation.....................................................................................10
4.1. Before First Use: Cleaning The Milk Collection Kit ....................................................10
4.2. How to Assemble Instructions...........................................................................................11
4.3. How to Use the Single and Dual Pump Options.......................................................13
4.4. Inspecting Before Pumping................................................................................................13
4.5. Pumping Guide..........................................................................................................................14
4.6. Getting Started.........................................................................................................................14
4.7. How Long Can I Store Breast Milk? .................................................................................17
4.8. After Each Use: Cleaning the Milk Collection Kit ..................................................... 18
4.9. How Do I Thaw and Use Stored Breast Milk?........................................................... 19
4.10. Button Control ........................................................................................................................ 19
4.11. Battery Information............................................................................................................. 20
5. Troubleshooting............................................................................................................................21
6. Maintenance and Service........................................................................................................22
7. Disposal............................................................................................................................................24
8. Technical Information ...............................................................................................................24
9. Electromagnetic Compatibility.............................................................................................25
10. Additional Information...........................................................................................................28
10.1. Limited Warranty .................................................................................................................. 28
10.2. Description of IP Classification...................................................................................... 29
10.3. Ameda Mya Accessories and Spare Parts............................................................. 30
TABLE OF CONTENTS

4
1. INTRODUCTION
1.1. Intended Use (Indications of Use)
Ameda Inc.
485 Half Day Road
Suite 320
Buffalo Grove, IL 60089
Manufacturer
Please read this document completely and follow the instructions
exactly. You should always keep it within reach. To prevent personal
injury and material damage, please observe the warning and safety
information provided in this document.
The Ameda Mya is a single-user, powered breast pump intended to express and
collect milk from the breasts of lactating women.
Can lead to serious injury or deathWarning
Can lead to minor injuryCaution
Can lead to material damageImportant
Useful breastfeeding and/or product informationNotice
1.2. Contraindications For Use
There are no known contraindications for use with this product.
5
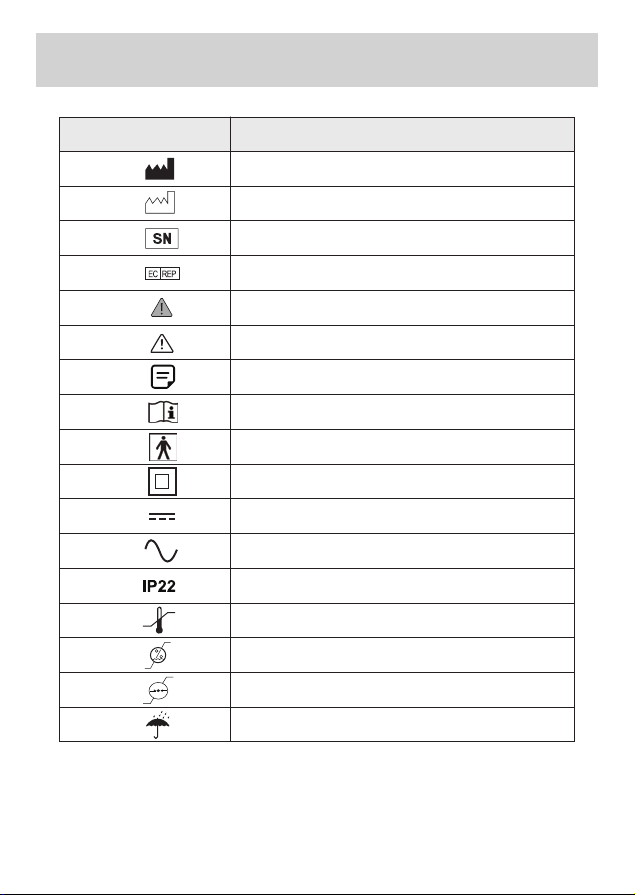
1.3. Explanation of Symbols
Description
SymbolNo
Manufacturer
1
Date of manufacture
2
Serial Number
Authorized Representative in the European Community
General warning sign
Caution
Note
Refer to Instruction Manual
Type BF Applied Part
CLASS II Equipment
DC
Alternating current
Degree of protection against harmful ingress of water or
particulate matter
Temperature Limitation
Humidity Limitation
Atmospheric Pressure Limitation
Keep Dry
3
4
5
6
7
8
9
10
11
12
13
14
15
16
17

6
Description
SymbolNo
Fragile
18
Waste Electrical and Electronic Equipment
19
Battery Status
Power On/Off
Suction Level Adjustments
Massage Mode
20
21
22
23
2. WARNINGS AND CAUTIONS
WARNING: To reduce the risk of electrocution
WARNING: To avoid fire, electrocution, or serious burns
• DO NOT disassemble or modify the product. The product has no user-serviceable parts.
• ALWAYS unplug electrical product immediately after use.
• DO NOT use while bathing, showering or swimming.
• DO NOT place or store product where it can fall or be pulled into a tub, sink or pool.
• DO NOT place or drop into water or other liquid.
• DO NOT reach for electrical product if it has fallen into water. Immediately unplug
from electrical outlet.
• NEVER leave the product unattended when plugged into an electrical outlet.
• Close supervision is necessary when this product is used near children or persons with
disabilities.
• Place product out of reach of children.
• Use the product only for its intended use as described in this manual.
DO NOT use parts not recommended by the manufacturer.
• NEVER operate this product if it has a damaged cord or plug; if it is not working
properly; if it has been dropped or damaged, or dropped or becomes wet.
• Keep cord away from heated surface.
• NEVER use while sleeping or when drowsy.
• NEVER drop or insert any object into any opening or tubing.
• DO NOT use outdoors, or operate where aerosol (spray) products are being used, or
where oxygen is being administered.

7
WARNING: To avoid fire, electrocution, or serious burns
WARNING: To avoid health risk and reduce the risk of injury
• ALWAYS inspect battery pack and power adapter wires prior to use for damage or
exposed wire. If damage is found, immediately discontinue use of power adapter or
battery pack and call AMEDA ParentCare at.866.992.6332 or your local distributor.
• The Ameda Mya should not be positioned so that it is difficult to operate the adapter.
• If you are a mother who is infected with Hepatitis B, Hepatitis C or Human
Immunodeficiency Virus (HIV), pumping breast milk will not reduce or remove the risk
of transmitting the virus to your baby through your breast milk.
• Before each use visually inspect the individual components for cracks, chips, tears,
discoloration or deterioration. If damage to the device is observed, please discontinue
use until the parts have been replaced.
• This product is intended for use by a single user only and should not be shared
between users.
• DO NOT drive while pumping.
• Pumping can induce labor. DO NOT use while pregnant unless approved by your
breastfeeding specialist or healthcare professional.
• Clean and sanitize all parts that come in contact with your breast and breast milk prior
to first use.
• Wash all parts that come in contact with your breast and breast milk after every use.
• DO NOT wash or boil tubing, it does not come in contact with your breast or breast milk
because of the back-flow protector. Tubing needs to remain dry to avoid any potential
mold contamination.
• Inspect all appropriate pump components before each use. Check the parts for cracks,
chips tears or wear. DO NOT use, contact Ameda ParentCare at 866.992.6332 or
your local distributor immediately.
• DO NOT continue pumping for more than 2 consecutive pumping sessions if no results
are achieved.
• DO NOT thaw frozen breast milk in a microwave or in a pan of boiling water.
• Microwaving can heat liquids unevenly. Both microwaving and boiling water can result
in possible burns.
This product is a personal care item and intended for use by only one user. This product
should not be shared between users or resold or given from one user to another.
STRANGULATION HAZARD: Keep tubing and cords out of reach of children.
CHOKING HAZARD: Small parts, NOT for children under 3 years.
8
IMPORTANT: To avoid material damage
• DO NOT wrap cord around adapter body.
• Use ONLY the power adapter that comes with the breast pump.
• Pump ONLY with the breast pump in an upright position and on a horizontal flat surface.
• DO NOT shorten tubing or modify breast pump kit.
• Make sure the voltage of the power adapter is compatible with the power source.
• Plug the power adapter into the breast pump first and then into the wall socket.
• Remove power adapter from power source before wiping outside of pump base clean
with a damp cloth.
• Keep away from dust, lint and direct sunlight, as damage may occur to breast pump
where speed and suction may be reduced.
• DO NOT attempt to remove the breast flange from your breast while pumping.
• Turn the breast pump off and break the seal between your breast and breast flange
with your finger, then remove breast flange from your breast.
• If pumping is uncomfortable or causing pain, turn the unit off, break the seal between
the breast and the breast flange with your finger and remove the breast flange from
your breast.
• Take appropriate care in handling bottles and parts.
• DO NOT use the breast milk if bottle or parts become damaged.
• DO NOT use antibacterial or abrasive cleaners/detergents when cleaning breast pump
or breast pump parts.
• NEVER put breast pump motor unit in water or a sterilizer, as you can cause permanent
damage to the breast pump.
• Plastic bottles and component parts become brittle when frozen and may break when
dropped.
• DO NOT over-fill bottles. Replace bottles before they overflow.
• Bottles and component parts may become damaged if mishandled, e.g. dropped,
over-tightened or knocked over.
• ALWAYS check bottles or breast pump kit parts prior to pumping.
• DO NOT use the breast milk if bottles or components become damaged.
CAUTION: To avoid minor injury

9
3. PRODUCT DESCRIPTION
⑩
⑪
①
②
③④⑤
⑥
⑦
⑧
⑨
No Contents Description of Material
1Pump Unit Powered Breast Pump
2Breast
Flange
Kit
Tubing Silicone
Back-flow Protector Case Top Polypropylene
Back-flow Protector Silicone Silicone Hardness 60 L.S.R
Back-flow Protector Case Bottom Polypropylene
Breast Flange Polypropylene
Silicone Valve Silicone Hardness 60 L.S.R
Bottle Polypropylene
Bottle Locking Ring Cap Polypropylene
Bottle Locking Disc Polypropylene
3Power Adapter AC 12V, 2A

10
4. STARTUP PROCEDURE AND OPERATION
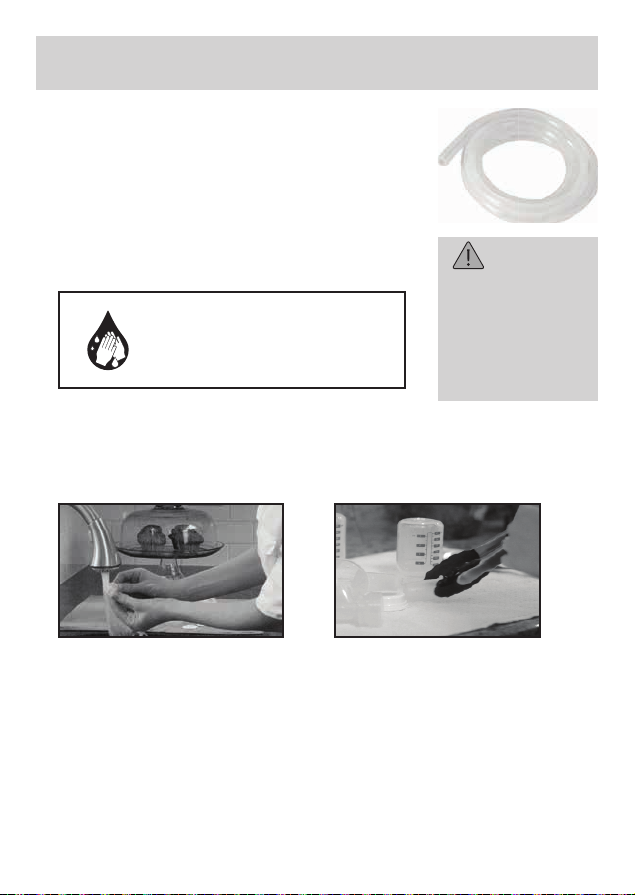
4.1. Before First Use: Cleaning the Milk Collection Kit
Cleaning: Cleaning by Boiling
Before first use, unless otherwise directed by your
healthcare provider, prepare the product for use as follows:
1. Remove tubing from the back-flow protector
2. Set aside tubing, it does not need to be washed before
first use or after each use—milk does not come into direct
contact with it.
Take apart the remaining parts: the flange(s), valve(s),
back-flow protector(s), separating out the top, silicone and
bottom pieces, and milk storage bottle(s), including locking
ring(s) and locking disc(s).
DO NOT wash or
boil tubing. Tubing
needs to remain
dry to avoid any
potential mold
contamination.
• BOIL a pot of clean
water
• Put flange(s),
valve(s), back-flow
protector top(s),
locking ring(s)
and locking disc(s)
into pot for 20
MINUTES.
• WASH your hands • REMOVE the parts
carefully with
clean tongs
• Air DRY on a clean
surface
Remove parts carefully from boiling water to avoid burning. Boiled water
and steam from boiled water can cause severe burns, so use caution
when boiling parts in water and removing parts from boiling water.
WARNING
WARNING: Do Not Leave Boiling Parts Unattended
ALWAYS wash
hands well with
soap and water
1 2 3 4
DO NOT allow
boiling parts to
contact bottom of
pot. It may cause
damage to parts. * Parts may vary
11
4.2. How to Assemble Instructions
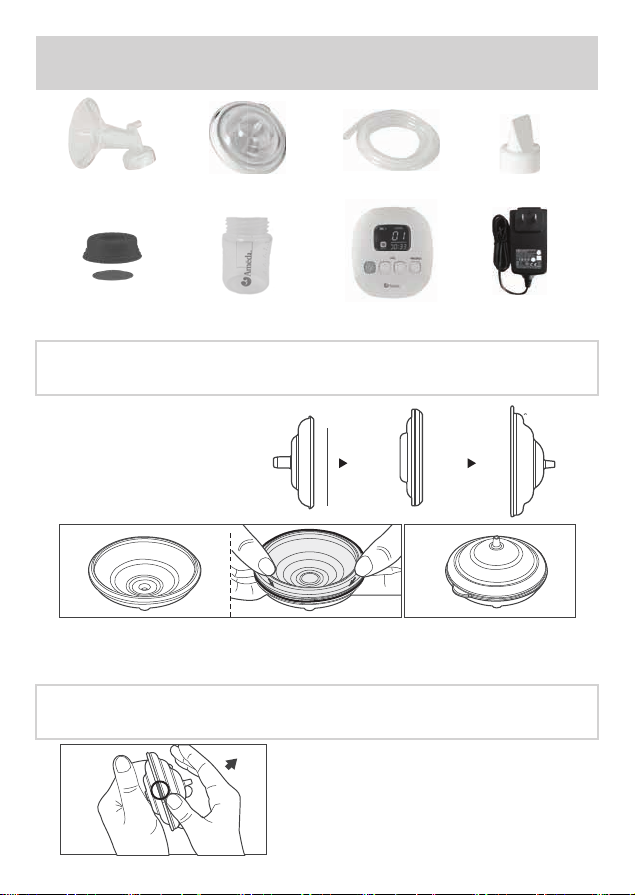
4.2a. How to Assemble the Back-flow Protector
4.2b. How to Disassemble Back-flow Protector
1. Insert silicone membrane into the top (smaller) case of the protector.
2. Snap-on the top case with the bottom (larger) case to complete assembly.
As shown in the picture, hold the top (smaller)
case of the Back-flow Protector in one hand and
place thumb of other hand on tab (circled) on
bottom (larger) case. Pull the bottom (larger)
case in the direction of the arrow to disassemble.
Locking Ring/Disc Breast Milk Bottle Pump Unit
Breast Flange Back-flow Protector Tubing Silicone Valve
12V AC Adapter
Back-flow Protector
①②
①②
12
5
7
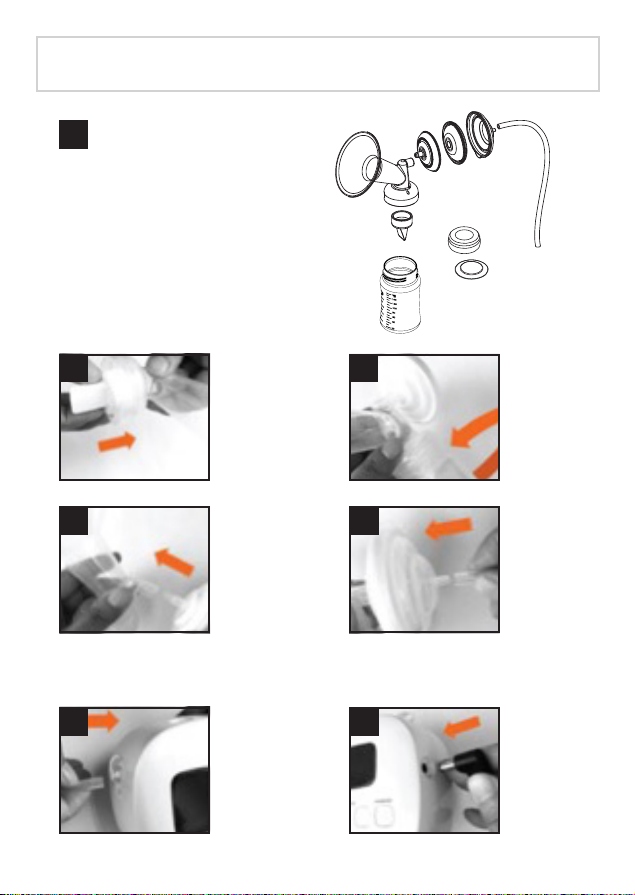
4.2c. How to Assemble the Milk Collection Kit
1
2
4
6
3
1. Silicone Tubing
2. Back-flow Protector Case Bottom
3. Back-flow Protector Silicone
4. Back-flow Protector Case Top
5. Breast Flange
6. Silicone Valve
7. Bottle
8. Locking Ring
9. Locking Disc
①
②
③
④
⑤
⑥
⑦
⑧
⑨
HOLD by the
rim or thicker
sides of the
valve.
CONNECT
the back-flow
protector(s) to
the top of the
flange.
* It is important that the inside of the back-flow
protector is completely DRY to avoid moisture
from forming in the tubing.
CONNECT
the tubing to the
pump.
ATTACH and
TIGHTEN the
bottle(s).
CONNECT
the back-flow
protector to
the tubing.
CONNECT
the power
adapter to
the pump.

13
To use the Dual Pump Mode,
remove the suction port cover
from the suction port and
connect the tubing from the
extra breast flange kit.
When Dual Pumping, both ports
are connected to tubing.
Note: if changing back to Single
Pump mode, make sure the suction
port cover not being used is inserted
firmly over the suction port.
IMPORTANT: Before using the Ameda Mya and milk collection kit, check the
parts for cracks, chips, tears, or wear. They can affect the function of the kit.
If parts need replacing due to defects, please call your local distributor or
the location where you purchased the pump. Do not use damaged parts. For
a listing of distributors in your country, please visit www.ameda.com
4.3. How to use the Single and Dual Pump Options
4.4. Inspecting Before Pumping
Suction Port
Suction Port
Cover
Single Pump
Dual Pump
Suction Port
Suction Port
Cover
Single Pump
Dual Pump
14
4.5. Pumping Guide
4.6. Getting Started
1. Gently massage your breasts or apply warm compresses from the back of the
breast toward the nipple before using.
2. Express milk from each breast for 10-15 minutes. It is recommended to pump
frequently rather than pumping for a long duration. (Every 2-3 hours, 8 times a day)
1. Before first use, charge the breast pump battery fully with the power adapter OR
plug power adapter into a standard electrical outlet.
2. Center the breast flange on your breast so that the nipple is drawn into the flange.
It’s important that breast flange is positioned properly before pumping begins
to avoid any pain that may result due to rubbing or twisting of your nipple onto
the side of the flange. If double pumping, position the second breast flange as
instructed above.
IMPORTANT: When the power adapter is plugged in the LCD screen will light
up and the battery will be charged. The battery status will be displayed.
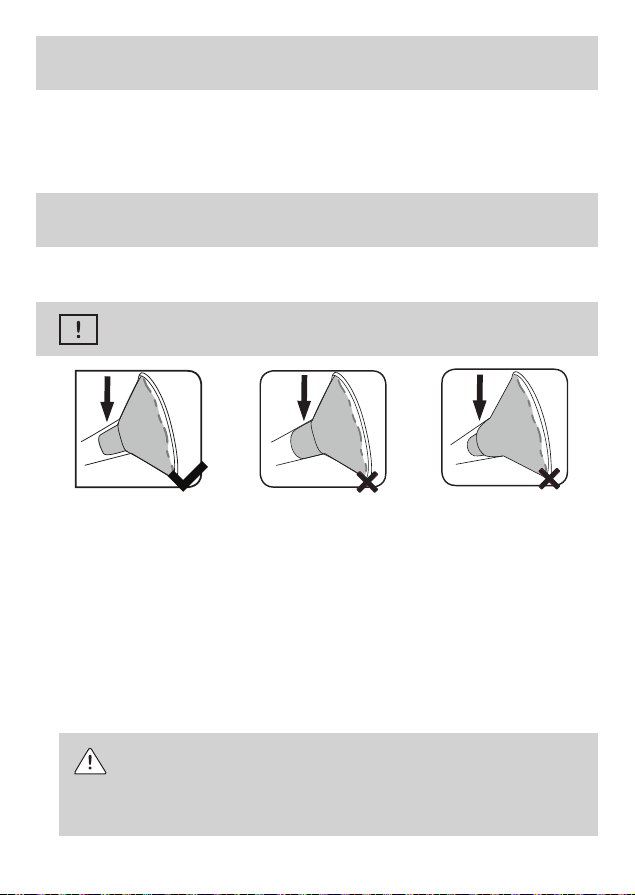
While some discomfort may be felt when first using a breast pump, using a
breast pump should not cause pain. If you are unsure about breast flange
sizing, please contact a healthcare professional or AMEDA representative
who can help you get a proper flange fit.
GOOD FIT
During pumping. your nipple
moves freely in the breast
flange tunnel. You see space
around the nipple. Not much
areola is drawn into the
tunnel with the nipple.
TOO LARGE
During pumping. more areola
is drawn into the breast flange
with your nipple. Your areola
may rub against the side of
the breast flange tunnel.
TOO SMALL
During pumping. some or all
of your nipple rubs against
the sides of the breast flange
tunnel.

15
LEVEL MASSAGE
LEVEL MASSAGE
3. Press the Power button
The device will power ON and begin in
Expression Mode. Switch to Massage
Mode to help facilitate a faster let-down.
After the first pumping session, the
device will automatically start pumping
in the last setting used.
4. Press the Massage/Expression
button to change to expression mode once
your milk starts flowing. If milk flow slows,
try for another let-down by switching back
to massage mode until milk flow increases,
then switch back to expression mode to
resume pumping. Repeat as needed.
The device will power ON and begin in Expression mode. After the first
pumping the device will begin pumping at the last setting used. To switch
between massage and expression mode, press the massage button. Switch to
massage mode to help with faster let-down.
LCD Screen
Massage mode
(Massage mode symbol turns off when using expression mode)
Timer Display
(Automatically turns it off after 30 minutes for your safety)
Suction (Vacuum) Level
Remaining Battery Power

16
LEVEL MASSAGE
LEVEL MASSAGE
5. Adjust vacuum using
“LEVEL” buttons to preferred comfort level.
(Never set to uncomfortable level)
6. When you wish to stop expressing, first
press the Power button, then remove
milk collection kit from
your breast.
Start off with the suction low, and then gradually increase the suction setting to your
comfort level. You may find that the level of suction that you are comfortable with
varies from day to day, during the day and even during the same expression session.
Breast Pump Settings/Modes
The suction level on your breast pump refers to the vacuum strength, or how strongly
the pump sucks. This is measured in mmHg. When you are using your Ameda Mya, you
will usually find that expressing is most effective on the highest suction level that you are
comfortable with.
However, it’s important not to set suction level so high that it makes you uncomfortable.
Suction Settings
Adjust the suction level by pressing the buttons.

17
Suction pattern with fast speed and low suction to start milk flowing.
Suction pattern with slower speed and higher suction to express more
milk gently and efficiently.
Make sure to not overfill bottles. If you plan on freezing bottles, fill only up to ¾ full,
as milk expands with freezing. After milk has been pumped into Ameda storage
bottles, close by placing locking disc on top of bottle (make sure circular raised middle
part of disc is facing up). Tighten locking ring onto bottle. Label bottle with date and
time that milk was pumped. Use storage chart provided as a guideline.
Guidelines for Storing and Thawing Human Milk
* Storage times may vary for premature or sick babies. Sources: Jones, F. Best Practice for Expressing,
Storing and Handling Human Milk in Hospitals, Homes and Child Care Settings. Raleigh, NC: Human
Milk Banking Association of North America, 2011.
You can adjust the speed and suction level in expression mode to best suit your body.
The maximum comfort suction is the highest suction setting where a mother still feels
comfortable during pumping. It is different for every mother.
Massage and Expression Modes
Massage Mode
Expression Mode
4.7. How long can I store breast milk?
Storage
Time for
Human
Milk*
Deep Freeze
(0˚F / -18˚C)
Refrigerator
(39˚F / 4˚C)
Refrigerator
(39˚F / 4˚C)
Color with
Frozen Ice
Packs
(59˚F / 15˚C)
Room Temperature
Fresh 12 Months 3-4 Months 8 Days 24 Hours 6-10 Hours 4 Hours
Frozen,
Thawed
in Fridge
Do Not
Refreeze
Do Not
Refreeze
24 Hours Do Not Store 4 Hours 4 Hours
Thawed,
Warmed,
Not Fed
Do Not
Refreeze
Do Not
Refreeze
4 Hours Do not Store Until
Feeding
Ends
Until
Feeding
Ends
Warmed,
Fed
Discard Discard Discard Discard Until
Feeding
Ends
Until
Feeding
Ends
(66˚F - 72˚F)
(19˚C - 22˚C)
(72˚F - 79˚F)
22˚C 26˚C
18
4.8. After Every Use: Cleaning the Milk Collection Kit
1. Remove tubing from the back-flow protector
2. Set aside tubing, it doesn’t not need to be washed after
each use— milk does not come into direct contact with it.
Take apart the remaining parts: the flange(s), valve(s),
back-flow protector(s), separating out the top, silicone and
bottom pieces, and milk storage bottle(s), including locking
ring(s) and locking disc(s).
DO NOT wash or
boil tubing. Tubing
needs to remain
dry to avoid any
potential mold
contamination.
WARNING
ALWAYS wash hands well
with soap and water.
After every use, unless otherwise directed by your healthcare provider, prepare
the product for use as follows:
CLEANING: Cleaning with warm, soapy water.
1. RINSE any milk from pump parts with
cool water.
2. Hand WASH with warm, soapy
water, the flange(s), back-flow
protector(s), valve(s) and (if applies)
bottle(s), locking ring(s) and locking
disc(s). Wash valve(s) and back-flow
protector(s) silicone gently.
3. RINSE with warm, clean water the
flange(s), back-flow protector(s),
valve(s) and (if applies) bottle(s), locking
ring(s) and locking disc(s).
4. Air DRY each part on a clean surface.
*Pump parts may vary.

19
4.9. How Do I Thaw and Use Stored Breast Milk?
4.10. Button Control
1. ALWAYS make sure to check the date on the milk’s container before using. DO NOT
use undated milk, or milk that has been stored too long.
2. Thaw frozen milk in the refrigerator or under cool, running water.
3. Heat the milk under warm, running water and gently swirl the container to mix the milk.
4. If warm water is not available, heat a pan of water on the stove. Once the water is
warm, not boiling, remove the pan from the stove and place milk container in the
pan. NEVER warm the milk container directly on the stove.
5. NEVER microwave breast milk because microwaves can cause dangerous hot spots
that could burn you or a baby.
6. ALWAYS test the temperature of the milk on the inside of your wrist before feeding
it to a baby. The milk should feel warm, not hot.
7. After thawing, milk should be stored in the refrigerator for no more than 24 hours.
8. NEVER refreeze thawed milk. Throw away thawed, previously frozen milk that is not
used within 24 hours.
•Unscrew grey locking ring from bottle.
•Place bottle on table or flat surface.
•Hold the bottle with one hand.
•With same hand, place thumb on edge of grey locking disc.
•Push upwards.
Adjust Suction (Vacuum) Level
Power On/Off Button Massage Mode/Expression Mode
LEVEL MASSAGE
20
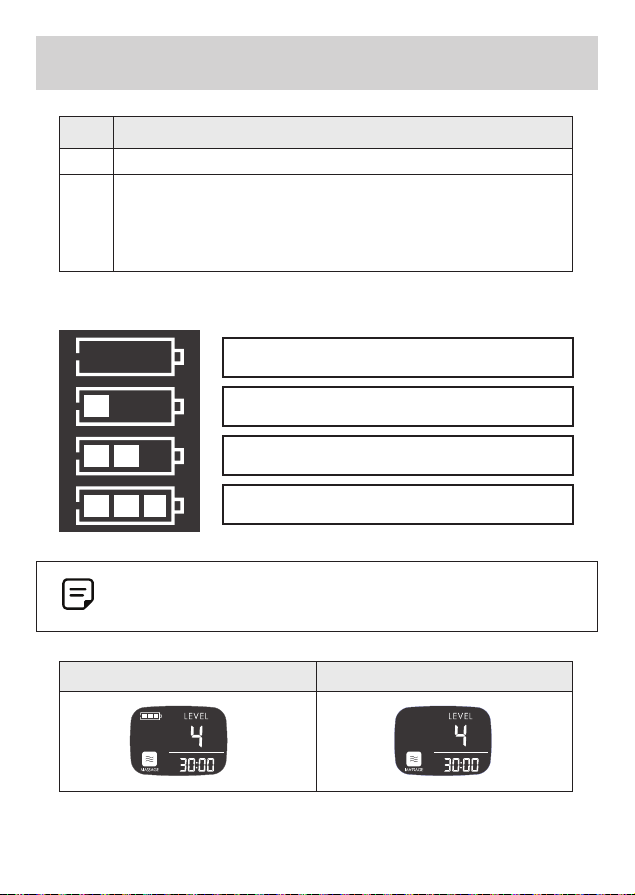
4.11. Battery Information
No Description
1Operating time: Approx. 2 Hours
2 Battery status indicator on LCD Screen
- Under charging: Flashing
- Fully-charged: ON
- Non-charged: OFF
Battery Icon - Different Levels of Change
Low Battery
1/3 Charge Remaining - Connect AC Adapter Soon
2/3 Charge Remaining
Full Charge
Battery Power (Pumping) AC Adapter (Pumping)
The LCD screen will only show the battery icon when running on battery
power (pumping without an AC adapter) and when it is charging with an AC
adapter (but not during pumping with AC adapter).
Table of contents
Languages:
Other Ameda Breast Pump manuals

Ameda
Ameda Mya Joy User manual

Ameda
Ameda Lactaline Personal User manual

Ameda
Ameda Elite User manual

Ameda
Ameda Pearl User manual

Ameda
Ameda Elite User manual

Ameda
Ameda Elite User manual

Ameda
Ameda Elite User manual

Ameda
Ameda MyaJoy User manual

Ameda
Ameda Purely Yours User manual

Ameda
Ameda Elite Series Configuration guide

Ameda
Ameda HygieniKit User manual

Ameda
Ameda Platinum 17803 User manual

Ameda
Ameda MyaJoyPlus User manual

Ameda
Ameda Platinum User manual

Ameda
Ameda Purely Yours User manual

Ameda
Ameda Elite Configuration guide

Ameda
Ameda Finesse User manual

Ameda
Ameda Pearl User manual

Ameda
Ameda HygieniKit User manual

Ameda
Ameda MyaJoyPlus User manual


