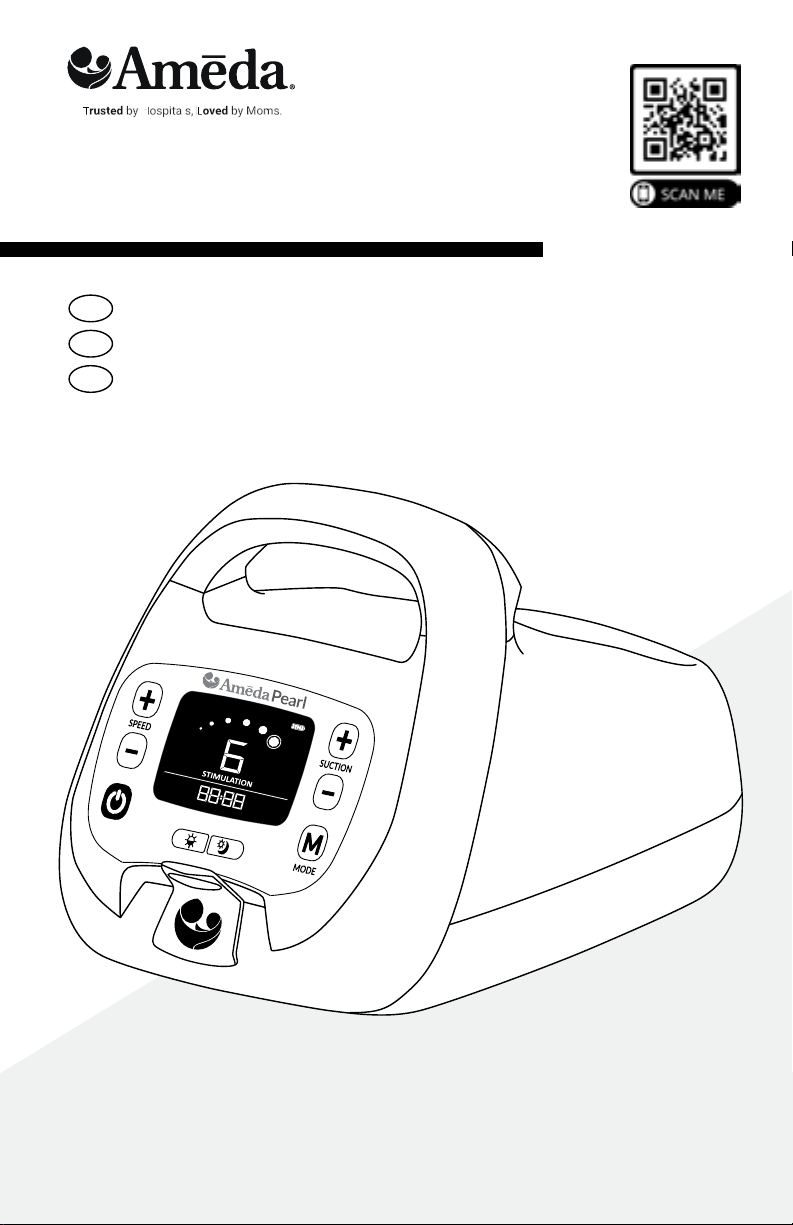
Ameda Pearl User manual
Instructions for use | Page 4
Mode d’emploi | Page 32
Instrucciones de uso | Page 57
Ameda Pearl Electric Breast Pump
Tire-lait électrique Pearl d'Ameda
Bomba para pechos eléctrica Ameda Pearl
EN
FR
ES

| 3
We are excited to help you meet your breastfeeding goals along your breastfeeding journey with your baby.
If you have any questions regarding your Ameda breast pump, our certified ParentCare team is available by
phone during business hours on weekdays at 866.992.6332.
For more information about breastfeeding, breast pumping and other Ameda products visit www.ameda.com.
For more product information or feedback in other countries, visit www.ameda.com for a list of distributors
outside of the U.S.
Congratulations on joining the Ameda family!
Nous sommes heureux que vous nous ayez choisis pour vous aider dans votre parcours d’allaitement avec
votre bébé.
Si vous avez des questions concernant votre tire-lait Ameda, notre équipe certifiée ParentCare est à votre
disposition pour vous aider par téléphone pendant les heures de bureau en semaine au 866-992-6332.
Pour en savoir plus sur l’allaitement, l'utilisation du tire-lait et d’autres produits Ameda, consultez le site
www.ameda.com. Pour obtenir davantage de renseignements ou des commentaires sur les produits dans d’autres
pays, visitez le site www.ameda.com pour obtenir une liste des distributeurs à l’extérieur des États-Unis.
Bienvenue dans la famille Ameda !
Será un placer ayudarle con sus objetivos de lactancia materna mientras esté dando el pecho a su bebé.
Si tiene alguna pregunta con respecto a su bomba para pechos de Ameda, nuestro equipo certificado de
ParentCare está disponible durante el horario de atención comercial, los días laborables, en el número telefónico
866.992.6332.
Para obtener más información sobre el amamantamiento, el bombeo de pechos y otros productos de Ameda,
visite www.ameda.com. Para obtener más información o comentarios sobre productos en otros países, visite
www.ameda.com para obtener una lista de distribuidores fuera de los EE. UU.
¡Bienvenida a la familia Ameda!
4 | ENGLISH
1. WARNINGS & CAUTIONS..........................................................................7
2. INTENDED USE ...................................................................................9
3. CONTRAINDICATIONS ............................................................................9
4. PRODUCT DESCRIPTION .........................................................................10
5. "$҃&"$!&$" ..........................................................................11
5.1 Cleaning and Disinfecting the HygieniKit ...................................................11
5.2 Assembling the HygieniKit Milk Collection System ............................................12
6. INSPECTING BEFORE PUMPING...................................................................13
7. OPERATING INSTRUCTIONS ......................................................................14
7.1 Plug into Power Source....................................................................14
7.2 Button Control ...........................................................................14
7.3 LCD Icons & Modes .......................................................................15
7.4 To Begin Pumping ........................................................................16
7.5 How to Fit Your Flange ....................................................................18
7.6 Breast Milk Storage Guidelines .............................................................19
8. AMEDA PEARL ELECTRIC BREAST PUMP TROLLEY..................................................20
9. CARRY CASE.....................................................................................21
10. CLEANING THE PUMP............................................................................21
11. MAINTENANCE ..................................................................................21
12.1 Breast Pump Valve and Diaphragm Check....................................................21
12.2 Storing & Transporting ....................................................................21
12. TROUBLESHOOTING.............................................................................22
13. WARRANTY .....................................................................................23
14. TECHNICAL DATA ...............................................................................24
14.1 Specifications ............................................................................24
14.2 Electromagnetic Compatibility ..............................................................25
14.3 Product Disposal..........................................................................29
15. OPERATIONAL & STORAGE CONDITIONS .........................................................29
16. TRAVEL .........................................................................................29
17. AMEDA ACCESSORIES & SPARE PARTS ............................................................30
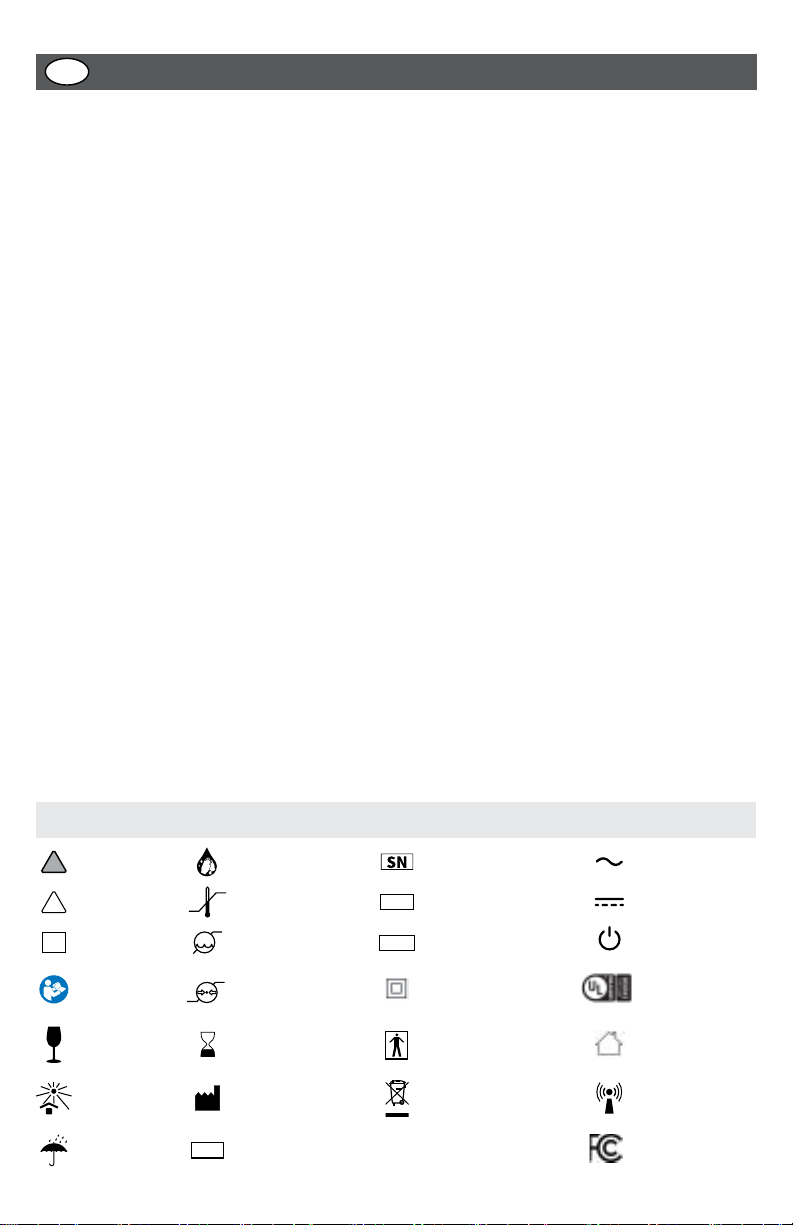
18. SYMBOLS REFERENCE............................................................................31
Icon Glossary
TABLE OF CONTENTS
Waste electrical and
electronic equipment 13
rbu-ঞom
Temperature range 4
Humidity range 5
-ঞom
!
Fragile, handle
with care ƈ
Protect from
sunlight 2
Keep dry Ɗ
Warning
Important
!
Manufacturer 7
Catalogue number 10
Unit of measure
REF
UoM
Serial number 9
Class II electrical
appliance
(Double insulated) 11
Type BF applied part 12
Wash hands
Follow
bmv|u1ঞomv
for use
IP22 "oѴb7r-uঞ1Ѵ;ņѴbtb7
bm]u;vv1Ѵ-vvbC1-ঞom
%
Atmospheric
pressure range ҙ
kPa
LOT Batch Code 8
UL Safety
;uঞC1-ঞom
Mark
For indoor
use only 17
Non-ionizing
Ѵ;1|uol-]m;ঞ1
!-7b-ঞom18
Ѵ|;um-ঞm]1uu;m|14
Direct current 15
mņ@0om16
!
EN
FCC Compliance

FRANÇAIS | 5
1. AVERTISSEMENTS ET MISES EN GARDE ..........................................................32
2. USAGE PRÉVU. .................................................................................34
ƒĺ$!҃$" .........................................................................34
4. DESCRIPTION DU PRODUIT .....................................................................35
5. INSTRUCTIONS D’INSTALLATION................................................................36
5.1 Nettoyage et désinfection de l'HygieniKit .................................................36
5.2 Assemblage du système de collecte de lait HygieniKit......................................37
6. INSPECTION AVANT D’EXPRIMER SON LAIT ........................................................38
7. INSTRUCTIONS D’UTILISATION ....................................................................39
7.1 Branchez l'appareil sur une source d'alimentation.........................................39
7.2 Bouton de commande ................................................................39
7.3 Modes et icônes LCD . . . . . . . . . . . . . . . . . . . . . . . . . . . . . . . . . . . . . . . . . . . . . . . . . . . . . . . . . . . . . . . . . 40
7.4 Pour commencer à exprimer son lait ....................................................41
7.5 Ajustement de la téterelle .............................................................43
7.6 Conservation du lait maternel .........................................................44
Ѷĺ !$&!$!҃$ݽ$! &!ŝ ..........................................45
9. MALLETTE DE TRANSPORT ......................................................................46
ƐƏĺ $$+&҃$&! .................................................................46
11. ENTRETIEN . . . . . . . . . . . . . . . . . . . . . . . . . . . . . . . . . . . . . . . . . . . . . . . . . . . . . . . . . . . . . . . . . . . . . . . . . . . . . . . . . . . . . . . . 46
11.1 Vérification de la valve et du diaphragme du tire-lait......................................46
11.2 Stockage et transport.................................................................46
12. DÉPANNAGE ......................................................................................47
13. GARANTIE.........................................................................................48
ƐƓĺݽ"$ &" ...........................................................................49
14.1 Spécifications........................................................................49
14.2 Compatibilité électromagnétique.......................................................50
14.3 Mise au rebut ........................................................................54
15. CONDITIONS D’UTILISATION ET DE STOCKAGE ....................................................54
16. UTILISATION EN VOYAGE ..........................................................................54
17. ACCESSOIRES ET PIÈCES DÉTACHÉES AMEDA ......................................................55
18. RÉFÉRENCE DES SYMBOLES .....................................................................56
Glossaire des icônes
TABLE DES MATIÈRES
Déchets d’équipements
électriques et électroniques
rbu-ঞom
Plage de température 4
Plage de taux
d'humidité 5
Mise en garde
!
Fragile, manipuler
-;1ru࣐1-ঞomƈ
Protéger de
la lumière du
soleil 2
Garder au sec Ɗ
;uঞvv;l;m|
Important
!
Fabricant 7
Numéro de catalogue 10
Unité de mesure
REF
UoM
Numéro de série 9
Ѵ-vv;ņo0Ѵ;
bvoѴ-ঞom 11
-uঞ;-rrѴbt࣐;
de type BF 12
Se laver les mains
Suivez le mode
d'emploi
IP22 Ѵ-vvbC1-ঞom7;r࣐m࣐|u-ঞom
7;vѴbtb7;vņr-uঞ1Ѵ;vvoѴb7;v
%
Plage de pression
atmosphérique ҙ
LOT Code de lot 8
Marque de
1;uঞC1-ঞom
de sécurité UL
Pour usage intérieur
uniquement 17
Rayonnement
࣐Ѵ;1|uol-]m࣐ঞt;
non ionisant 18
ou-m|-Ѵ|;um-ঞ=14
ou-m|1omঞm15
Bouton
l-u1_;ņ-uu࣑|16
!
kPa
FR
Conformité FCC

6 | ESPAÑOL
1. AVISOS Y PRECAUCIONES .......................................................................57
2. USO PREVISTO .................................................................................59
3. CONTRAINDICATIONS ..........................................................................59
4. DESCRIPCIÓN DEL PRODUCTO ..................................................................60
5. PREPARACIÓN..................................................................................61
5.1 Limpieza y desinfección del HygieniKit......................................................61
5.2 Montaje del set de recogida de leche HygieniKit .............................................62
6. INSPECCIÓN PREVIA A LA EXTRACCIÓN . . . . . . . . . . . . . . . . . . . . . . . . . . . . . . . . . . . . . . . . . . . . . . . . . . . . . . . . . . 63
7. INSTRUCCIONES DE EMPLEO ....................................................................64
7.1 Enchufe el dispositivo a la fuente de alimentación............................................64
7.2 Control mediante botones ................................................................64
7.3 Modos e iconos LCD .....................................................................65
7.4 Comienzo de la extracción ................................................................66
7.5 Cómo se ajusta el embudo ................................................................68
7.6 Pautas para el almacenamiento de leche materna ............................................69
8. CARRITO PARA BOMBA PARA PECHOS ELÉCTRICA AMEDA PEARL..................................70
9. CAJA PARA TRANSPORTE........................................................................71
10. LIMPIEZA DEL EXTRACTOR ......................................................................71
11. MANTENIMIENTO ..............................................................................71
11.1 Revisión de la válvula y el diafragma de la bomba para pechos .................................71
11.2 Almacenamiento y transporte .............................................................71
12. SOLUCIÓN DE PROBLEMAS .....................................................................72
13. GARANTÍA .....................................................................................73
14. DATOS TÉCNICOS...............................................................................74
14.1 Especificaciones .........................................................................74
14.2 Compatibilidad electromagnética ..........................................................75
14.3 Eliminación del producto..................................................................79
15. CONDICIONES DE EMPLEO Y DE ALMACENAMIENTO .............................................79
16. VIAJE ........................................................................................79
17. REPUESTOS Y ACCESORIOS AMEDA ..............................................................80
18. REFERENCIA DE LOS SÍMBOLOS .................................................................81
ÍNDICE
"b]mbC1-7o7;Ѳovv࠸l0oѲov
Residuos de Aparatos
Eléctricos y Electrónicos
Fecha de caducidad
Rango de temperatura 4
Rango de humedad 5
Precaución
!
Frágil, manipular
con cuidado 1
Protección
contra la luz
solar 2
Mantener seco Ɗ
Advertencia
Importante
!
Fabricante 7
Número de catálogo 10
Unidad de medida
REF
UoM
Número de serie 9
Ѵ-v;ņbvѴ-lb;m|o
doble 11
Pieza aplicada de
ঞro 12
Lavarse las manos
Siga las
instrucciones
de uso
IP22 Ѵ-vbC1-1bm7;;m|u-7-7;
r-uঠ1Ѵ-v7;Ѵtb7ovovѴb7ov
%
Rango de presión
atmosférica ҙ
LOT Código de lote 8
-u1-7;1;uঞC1-1bm
de seguridad de UL
Solo para uso en
interiores 17
Radiación
;Ѵ;1|uol-]m࣐ঞ1-
no ionizante 18
Corriente alterna 14
ouub;m|;1omঞm-15
o|m7;;m1;m7b7oņ
apagado 16
!
kPa
ES
Cumplimiento con
la FCC

ENGLISH | 7
IMPORTANT SAFEGUARDS
When using electrical products, especially if children are present, the following basic safety precautions should
always be followed.
The Ameda Pearl Electric Breast pump is for multiple-users in a hospital setting and for a single-user at home.
Multiple-user pumps are designed so that the breast milk can never touch the working parts of the pump that are
shared. The only part of a multiple-user breast pump that you can safely share is the pump unit.
For proper operation, the pump must be connected to the Ameda HygieniKit Milk Collection system breast pump
kit (purchased or acquired separately). For your health and safety, the HygieniKit should never be shared between
mothers or resold from one mother to another.
READ ALL INSTRUCTIONS BEFORE USING THIS PRODUCT
DANGER: To reduce the risk of electrocution:
• Always unplug electrical product immediately after use.
• DO NOT use while bathing, showering or swimming.
• DO NOT place or store where product can fall or be pulled into a bathtub, shower, sink, or pool.
• DO NOT place or drop product into water or other liquid.
• DO NOT reach for electrical product that has fallen into water. Immediately unplug from electrical outlet and
contact manufacturer.
• DO NOT run water over breast pump.
1. WARNINGS & CAUTIONS
• NEVER leave product unattended when plugged into an electrical outlet.
• Close supervision is necessary when product is used near children or persons with disabilities.
• Use product for its intended use ONLY, as described in this manual.
• DO NOT use parts that are not recommended by the manufacturer.
ҋubou|ov;ķ-Ѵ-vbmvr;1|ro;u-7-r|;uĺ=7-l-];-m7ņou;rov;7bu;v-u;=om7ķ7omo|v;ro;u-7-r|;uĺ
Call Ameda ParentCare at 1.866.992.6332.
ҋNEVER operate electrical products with a damaged cord or plug, if not working properly, if dropped, damaged, or
becomes wet.
• Keep cord away from heated surface.
• NEVER use while sleeping or when drowsy.
• NEVER insert or drop any object into any opening or into tubing.
ҋKEEP AWAY from heated surfaces or open flames, the breast pump and detachable components are not heat-
resistant.
ҋDO NOT use near flammable materials.
mbuoml;m|-Ѳom7b|bomv$_-|==;1|&v;
• DO NOT use outdoors with electrical cord.
• DO NOT operate where oxygen or aerosol spray products are being used.
The following symbols identify all instructions that are important to safety. Failure to observe these
instructions can lead to injury to yourself or damage to the breast pump.
WARNING Can lead to serious injury or death.
CAUTION Can lead to minor injury.
IMPORTANT Can lead to material damage.
!
!
!
WARNING: To avoid fire, electrocution, serious burns or injury:
!
EN

8 | ENGLISH
o|;ثomo|v;ruo71|b=7-l-];7ĸ&v;ruo71|omѲ=oubm|;m7;7v;-v7;v1ub0;7bm|_bvl-m-Ѳĸ
• DO NOT use pump while driving.
• Pumping can induce labor, DO NOT use while pregnant unless approved by your breastfeeding specialist or
healthcare professional.
• DO NOT pump while sleeping or drowsy, it could result in tissue damage.
• After every use, clean all parts (flange, diaphragm, valve and bottle) that come in contact with your breast and
breastmilk.
• DO NOT use attachments other than those recommended by manufacturer
• DO NOT make mechanical or electrical modifications to breast pump base.
• Before each use of the Ameda Pearl Electric Breast Pump and HygieniKit system, visually inspect the
individual components for cracks, chips, tears, discoloration or deterioration. In the event that damage to
the device or kit is observed, please discontinue use until the parts have been replaced. For the replaceable
parts, please call your local distributor or the location where you purchased the pump or kit. For a listing of
distributors in your country, please visit www.ameda.com.
• DO NOT repair or modify the device by yourself; contact Ameda if a problem occurs.
• DO NOT continue pumping for more than 2 consecutive pumping sessions if no results are achieved.
• DO NOT heat or thaw frozen breastmilk in a microwave or boiling water. Microwaving can heat liquids
unevenly. Both microwaving and boiling water can result in possible burns.
• If breast pump kit is not sterile, clean and disinfect all parts that come into contact with your breast and breast
milk prior to first use.
• If you are a mother who is infected with Hepatitis B, Hepatitis C or Human Immunodeficiency Virus (HIV),
pumping breast milk will not reduce the risk of transmitting the virus to your baby through your breast milk.
• If irritation or discomfort occurs, discontinue use and see a doctor.
• Accessible materials may cause allergic reactions.
• DO NOT service the product while in use. The only user-replaceable components are the overlay panel and
rubber feet.
• DO NOT add more than 5 lbs weight to trolley basket or assemble the trolley basket higher than 19 inches
from the floor to avoid risk of tipping and falling of product.
STRANGULATION HAZARD: Keep tubing and power adapter cords out of reach of children or persons with
disabilities.
CHOKING HAZARD: Small parts, NOT for children under 3 years.
WARNING: To avoid health risk and reduce the risk of injury:
!
• DO NOT wrap cord around the body of the adapter.
• USE only the AC power adapter that is supplied with the Ameda Pearl Electric Breast Pump.
• DO NOT turn on the breast pump in an aircraft.
• DO NOT shorten tubing or modify the breast pump kit.
• Plug the AC power adapter into the pump base prior to plugging into the wall socket.
• Remove AC power adapter from power source before cleaning the pump.
• Keep away from dust, lint and direct sunlight to avoid potential reduction in pump performance.
• DO NOT attempt to remove the breast flange from your breast while pumping. If you are not feeling comfortable
or feeling pain with pumping, turn the pump off, break the seal between the breast and breast flange with your
finger, and remove breast flange from your breast gently.
• ALWAYS place pump on a horizontal flat surface when using product.
• BATTERY CANNOT BE REMOVED.
This product contains a Lithium-ion battery. The battery or internal
components cannot be replaced. DO NOT attempt to open pump base.
• Wash all parts that are exposed to breast milk immediately after use. This will help remove breast milk residue
and prevent growth of bacteria.
CAUTION: Can lead to minor injury:
!

ENGLISH | 9
• NEVER put electrical product in water or a sterilizer, as you can cause permanent damage to the breast pump.
• DO NOTv;-m|b0-1|;ub-Ѵou-0u-vb;1Ѵ;-m;uvņ7;|;u];m|v_;m1Ѵ;-mbm]0u;-v|rlrou0u;-v|rlrr-u|vĺ
• DO NOT turn the breast pump on when the tubing port cover on the front of your pump is closed.
• When plastic bottles and plastic breast pump kit parts are frozen, they can become brittle and may break
when dropped.
• DO NOT overfill bottles during pumping or when transferring to an empty bottle. Replace bottles when milk
reaches top fill line.
• Handle carefully. Bottles and breast pump kit parts may become damaged if dropped, overtightened, or
knocked over.
• Always check bottles and other breast pump kit parts for damage prior to pumping. Do not use those parts
if damaged.
SAVE THESE INSTRUCTIONS
IMPORTANT: Can lead to material damage.
!
2. INTENDED USE
The Ameda Pearl Electric Breast Pump is a powered breast pump to be used by lactating women to express and
collect milk from their breasts. It is intended for multiple users in a hospital setting. It is also intended for home use by
a single user.
3. CONTRAINDICATIONS
There are no known contraindications for use with this product.
IMPORTANT NOTE for European Users: If a serious incident occurs in relation to the use of this breast pump,
please report it immediately to Ameda at parentcare@ameda.com and to the competent authority of the Member
State in which you are located. A list of vigilance contact points in the EU can be found at https://ec.europa.eu/
health/sites/default/files/md_sector/docs/md_vigilance_contact_points.pdf.

10 | ENGLISH
4. PRODUCT DESCRIPTION
Ameda Pearl Electric Breast Pump & HygieniKit™ Milk Collection System
The subject device is compatible with the HygieniKit Milk Collection
System, but the HygieniKit Milk Collection System is not included in
the package and is sold separately.
Description
1. Ameda Pearl Electric Breast Pump Unit
2. Power Adapter
Contents of an Ameda HygieniKit Milk Collection System
3. Tubing Adapter
4. Tubing
5. Adapter Cap
6. Diaphragm
7. Breast Flange (25.0mm)
8. Silicone Valve
9. Bottle
10. Bottle Locking Ring Cap
11. Bottle Locking Disc
SUCTION
MODE
SPEED
POWER
ENGLISH | 11
DO NOT wash adapter cap,
tubing and tubing adapter.
BEFORE EVERY USE
WASH HANDS THOROUGHLY with soap and water before touching breast pump, kit and breasts.
Inspect and assemble a clean pump kit. If your tubing is moldy, discard and replace immediately.
WHEN USING A NEW NON-STERILE KIT
1. Inspect all kit components for damage (cracks, tears, etc.)
2. Place only the following parts in a pot of boiling water: diaphragm, flange, valve, bottles, bottle ring and locking
discs
3. Boil for at least 10 minutes
4. Inspect all boiled parts again
WARNING: DO NOT leave boiling parts unattended. Boiled water and steam from boiled water can cause
severe skin burns, so use caution when boiling parts in water and removing parts from boiling water.
See the Center for Disease Control website https://www.cdc.gov/healthywater/pdf/hygiene/breast-
pump-fact-sheet.pdf for additional cleaning guidelines.
AFTER EVERY USE
Store milk safely. Cap milk collection bottle or seal milk collection bag, label with date and time, and immediately
place in a refrigerator, freezer, or cooler bag with ice packs.
Clean pumping area, especially if using a shared pump. Clean the pump as specified in this manual.
$-h;-r-u|0u;-v|rlr|0bm]-m7v;r-u-|;-ѴѴr-u|v|_-|1ol;bm1om|-1|b|_0u;-v|ņ0u;-v|lbѴhĺ
Rinse0u;-v|rlrr-u|v|_-|1ol;bm|o1om|-1|b|_0u;-v|ņ0u;-v|lbѴh0_oѴ7bm]
under running water to remove remaining milk. Do not place parts in sink to rinse.
Clean pump parts|_-|1ol;bm|o1om|-1|b|_0u;-v|ņ0u;-v|lbѴh-vvoom-vrovvb0Ѵ;
after pumping. You can clean your hard plastic parts (FLANGES AND BOTTLES) on
the top rack of your dishwasher or by hand. ALWAYS CLEAN THE SOFT SILICONE
PARTS (DIAPHRAGMS AND VALVES) BY HAND. When hand-washing any pump
parts, always use a wash basin used only for cleaning the pump kit and infant feeding
items.
Place pump parts in a clean wash basin used only for infant feeding items. Do not
place pump parts directly in the sink!
Add soap and hot water to basin.
Scrub items using a clean brush used only for infant feeding items. Do not use a
brush on valves or diaphragms.
Rinse by holding items under running water, or by submerging in fresh water in
a separate basin. When rinsing the valves, use a GENTLE STREAM of running
water. Valves may be damaged by the volume and pressure the faucet is capable of
producing.
Air-dry thoroughly. Place pump parts, wash basin, and bottle brush on a clean
surface in an area protected from dirt and dust. Do not use a dish towel to rub or pat
items dry!
Clean wash basin and bottle brush. Rinse them well and allow them to air-dry after
each use. Wash them by hand or in a dishwasher at least every few days.
For detailed instructions on cleaning or disinfecting your pump parts, visit https://
www.cdc.gov/healthywater/pdf/hygiene/breast-pump-fact-sheet.pdf
Ɣĺ"$҃&"$!&$"
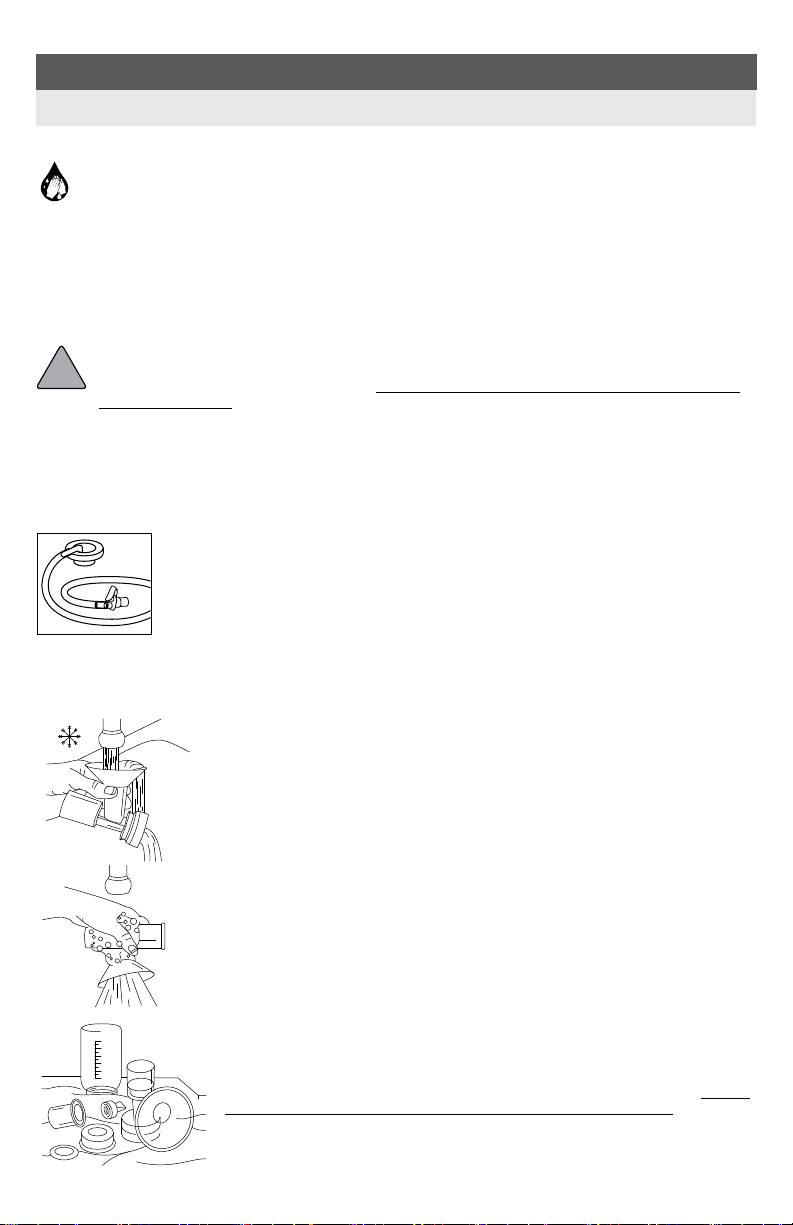
5.1 Cleaning and Disinfecting the HygieniKit
!
12 | ENGLISH
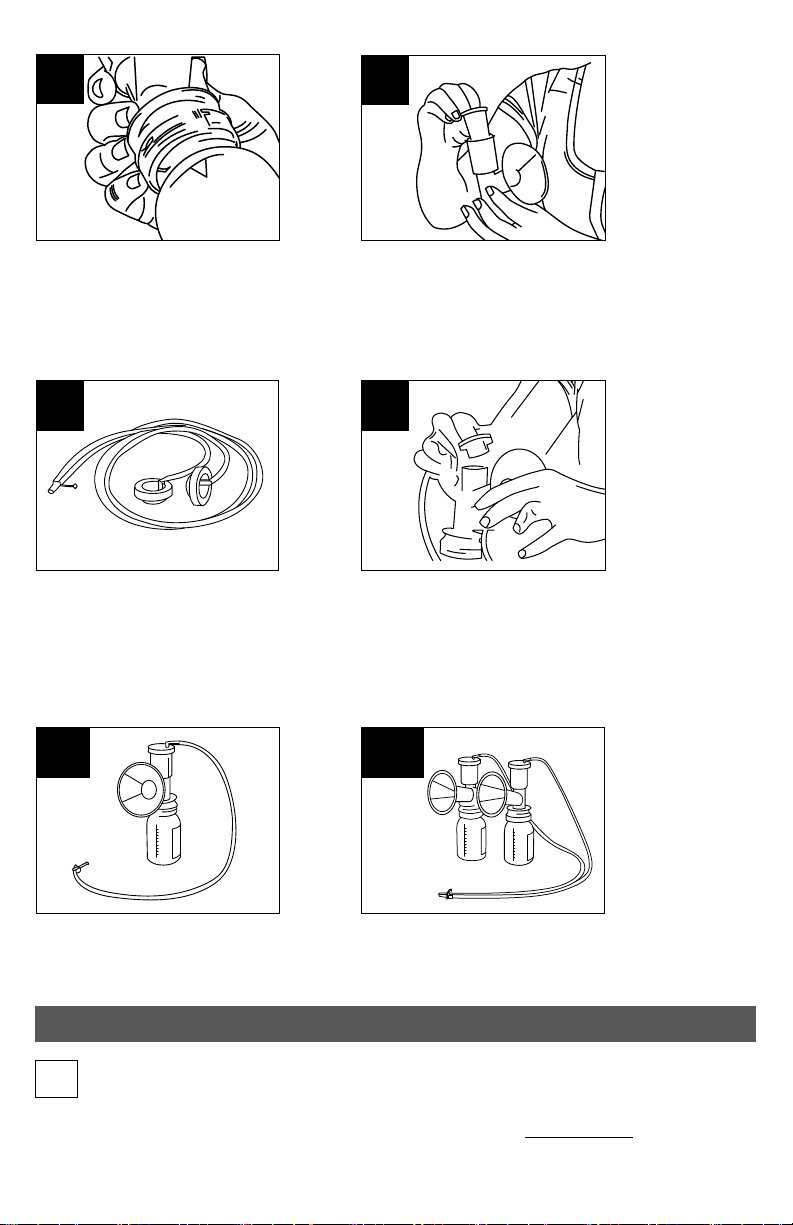
Once your pump parts are dry, wash your hands and assemble the HygieniKit Milk Collection System (Pump Kit).
PUSH the valve onto the
bottom of the flange.
Tubing Adapter
Tubing
Adapter Cap
Diaphragm
Breast
Flange
Valve
Bottle
1
HOLD by the rim or thicker
sides of the valve.
2 3
5.2 Assembling the HygieniKit™ Milk Collection System
TUBING:
It is necessary to wash the tubing only if condensation is present. If condensation is present in the tube, wash
and dry it immediately or replace the tubing. If milk is present in the tubing, do not attempt to wash or clean the
tubing. Instead contact Ameda Customer Service at 1.866.992.6332.
HOW TO WASH TUBING:
1. Rinse the tubing by pouring cool water and make sure the water flows through the entire tubing from one
end to the other end.
2. Wash the tubing in warm, soapy water and rinse thoroughly.
HOW TO DRY TUBING: Hang the tubing to air dry and make sure that the tubing is completely dry before using.
IMPORTANT: The flanges and milk storage containers can also be washed on upper rack of a standard,
household dishwasher. DO NOT use solvents or abrasives. Allow to air dry on a clean surface.
!
ENGLISH | 13
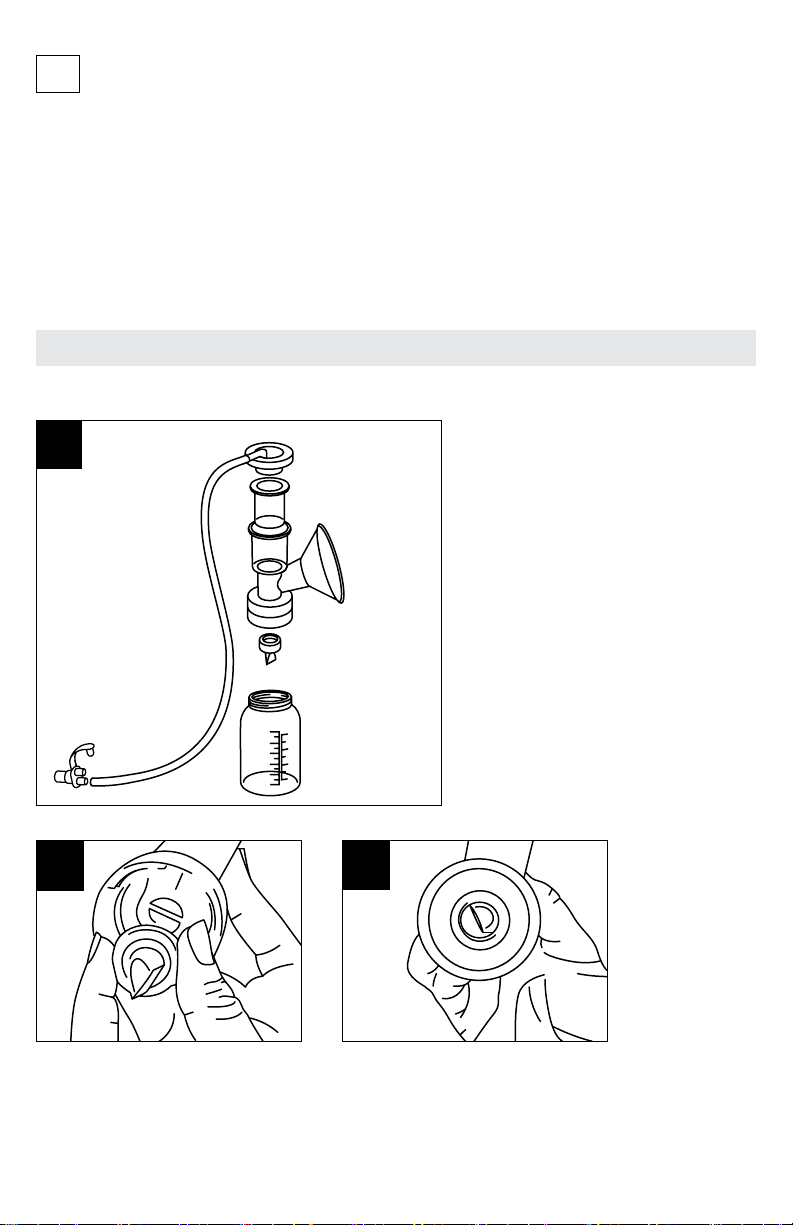
8a
ASSEMBLED HYGIENIKIT
for single pumping.
8b
ASSEMBLED HYGIENIKIT
for double pumping.
ATTACH the adapter cap(s) by
pressing it onto the top of the
flange(s) until you hear a pop.
The tubing should still be
CONNECTED to the adapter cap(s)
and tubing adapter.
=o_-;|-h;m|_;v;-r-u|Ķ-||-1_
|0bm]|o-7-r|;u1-rŎvŏ-m7|_;|0bm]
|o|_;|0bm]-7-r|;uĸ
76
4
ATTACH and TIGHTEN the bottle or
attach milk storage bag.
5
INSERT the diaphragm into the
top of the flange.
|bvblrou|-m||_-||_;bmvb7;o=|_;
7b-r_u-]lbv1olrѲ;|;Ѳ !+ |o-ob7
lobv|u;=uol=oulbm]bm|_;|0bm]ĸ
IMPORTANT: Before using the Ameda Pearl Electric Breast Pump and HygieniKit™ system, visually
inspect the individual components for cracks, chips, tears, discoloration or deterioration. In the event
that damage to the device or kit is observed, please discontinue use until the parts have been replaced.
For the replaceable parts, please call your local distributor or the location where you purchased the
pump or kit. For a listing of distributors in your country, please visit www.ameda.com.
6. INSPECTING BEFORE PUMPING
!

14 | ENGLISH
_oovbm]-m71_;1hbm]ou;Ѳ;1|ub1-Ѳvou1;
AC POWER ADAPTER
WARNING: Use ONLY the AC power adapter supplied with the Ameda Pearl Electric Breast Pump:
Model No. UES36LCP1-150200SPA.
WARNING: If the power adapter housing or wiring becomes loose, separated, or frayed, stop use of
the power adapter immediately and contact customer service at 1.866.992.6332. Stop using the device
immediately if you observe any smoke or burning from the pump unit or power adapter.
1. PUSH small end of the AC power adapter into the socket at the rear of the pump base as shown in
section 7.4
2. PLUG other end into the AC outlet as shown above
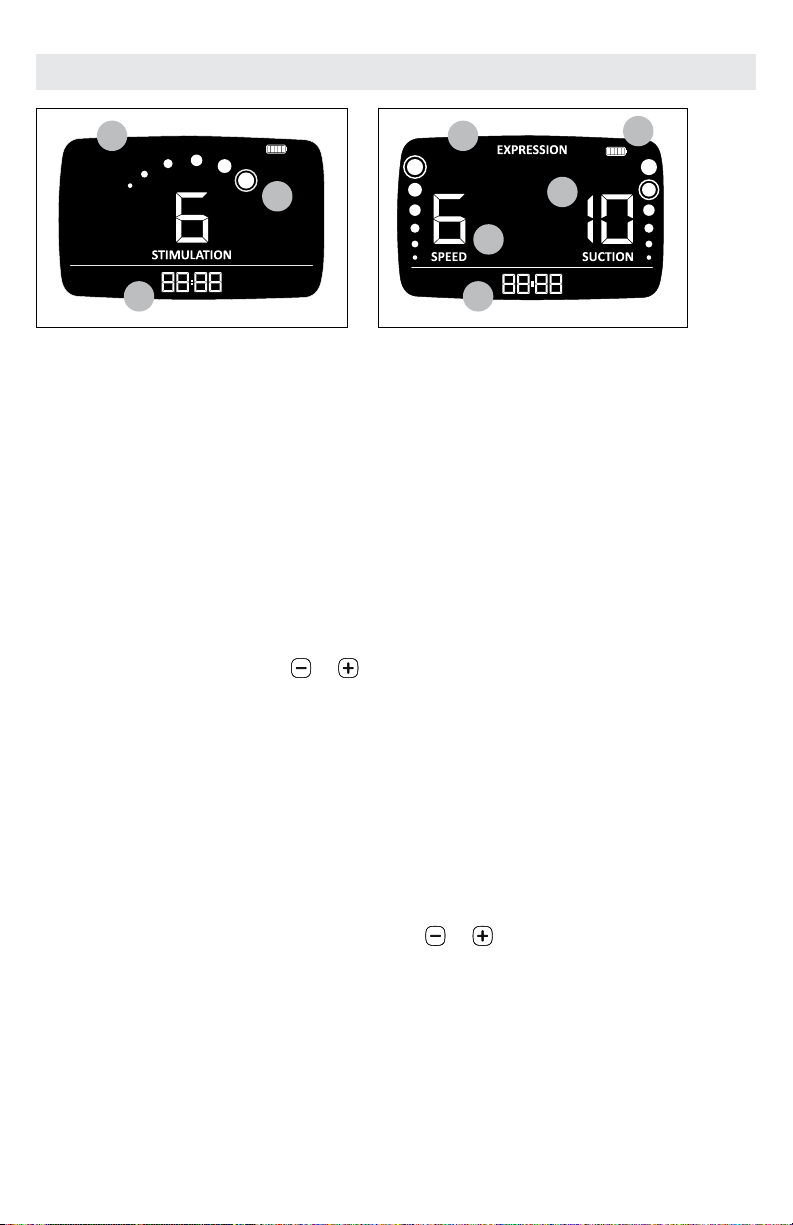
A. POWER ON/OFF BUTTON
B. MODE SELECTION BUTTON
Switches between Stimulation Mode and
Expression Mode
ĺ҃ņƳ(&&(
Decreases or increases suction strength
during pumping
D. ҃ņƳSPEED
Decreases or increases suction speed
(cycles per minute)
E. BACKLIGHT BUTTON
F. NIGHTLIGHT BUTTON
M
C
B
A
D
7. OPERATING INSTRUCTIONS
7.1 Plug into Power Source (to charge battery or run on AC power)
7.2 Button Control
!
!
E F
ENGLISH | 15
A. TIMER DISPLAY
Tracks pumping time. Automatically shuts-off after 60 minutes.
B. STIMULATION MODE
Mimics baby’s fast suction pattern with fast speed and lower suction to start milk flow. This icon will disappear
when in Expression Mode.
NOTE: After two minutes, the pump will automatically switch to Expression Mode unless you manually adjust
beforehand.
C. SUCTION STRENGTH LEVEL
Level of suction during pumping. The Ameda Pearl Electric Breast Pump has two suction modes (Dual-Phase), each
with adjustable suction levels:
– Stimulation Mode: 1 - 6 levels
– Expression Mode: 1 - 12 levels
Adjust the suction level by pressing the or button to decrease and increase level, respectively.
D. EXPRESSION MODE
Mimics baby’s slow, steady suction pattern with slower speed and higher suction to express more milk gently
and efficiently. This icon will disappear when in Stimulation Mode.
E. SPEED
Stimulation Mode: Fixed speeds at different suction levels as follows:
Suction Strength Level 1 = 120 cycles per minute
Suction Strength Level 2,3 = 100 cycles per minute
Suction Strength Level 4, 5, 6 = 80 cycles per minute
Expression Mode: 6 individually selectable speeds at any Suction Strength Level
Adjust the speed level in expression mode by pressing the or button to decrease and increase level,
respectively.
F. BATTERY LEVEL
Standard charge time, 0 to 100% capacity: At least 2 hours.
Battery operation time when the battery is fully charged: up to 4 hours.
Blinking battery segment = Battery charging.
Blinking battery status indicator = Low battery.
If the battery status indicator indicates one segment left, the pump will be off in 30 minutes.
7.3 LCD Icons & Modes
A
C
D
A
B
C
E
F

16 | ENGLISH
STEP 1: PUMP PLACEMENT
Place pump on a horizontal flat surface.
7.4 To Begin Pumping
2
M
5
4 STEP 4: PLACE THE FLANGE ON BREAST
Center flange on breast and press firmly to create a tight seal.
Check breast flange fit, if pumping causes discomfort a larger
or smaller breast flange size may be needed. See section on
how to properly fit your flange. See section 7.5 below on how
to properly fit your flange.
NOTE: Make sure your upper body is upright.
STEP 5: POWER ON THE PUMP
Press the Power button to turn on the device.
It will begin in Stimulation Mode.
STEP 2: CONNECT THE POWER ADAPTER
Insert the power adapter into the rear of the pump and
an AC power outlet. If operating on battery alone, use of
the power adapter is not required.
M
3
M
If the tubing port cover is not open, grasp the cover near the
top and gently pull the cover open and expose the tubing
port. Insert the tubing adapter into the front of pump base,
then turn slightly to right while pushing firmly.
A. For DOUBLE PUMPING:
Both tubes should be
attached to the tubing
adapter.
B. For SINGLE PUMPING:
Remove one tube from
the tubing adapter and
close one side using the
attached plug.
Single v. Double Pumping
DOUBLE PUMPING = expressing
from both breasts at the same time
SINGLE PUMPING = expressing
from just one breast at a time
STEP 3: INSERT TUBING

ENGLISH | 17
STEP 7: CHANGE MODE
Once your milk starts to flow using the STIMULATION MODE, press the
Mode button to switch into Expression Mode. Once your milk stops flowing
freely while in Expression Mode, press the Mode button to switch back to
Stimulation Mode to induce a second let-down if desired.
STEP 8: ADJUST EXPRESSION VACUUM LEVEL
Adjust the Expression Vacuum Level between 1 and 12 to your preferred
comfort level. Never set to an uncomfortable level.
$ث"|-u|o==b|_|_;v1|bomѲoĶ-m7|_;m]u-7-ѲѲbm1u;-v;|_;v1|bom
v;||bm]|oou1ol=ou|Ѳ;;Ѳĸ+ol-=bm7|_-||_;Ѳ;;Ѳo=1ol=ou|-0Ѳ;
v1|bom-ub;v=uol7-|o7-Ķ7ubm]|_;7--m7;;m7ubm]|_;v-l;
;ru;vvbomv;vvbomĸ
STEP 9: ADJUST SPEED
Adjust the speed between 1 and 6 to your preferred comfort level. Never set
to an uncomfortable level.
STEP 10: END PUMPING SESSION
When you wish to stop expressing milk, first press the Power button, then
remove milk collection kit from your breast.
$ث[;urlrbvo@Ķb=m;1;vv-uĶ"!$-Cm];u0;|;;m0u;-v|-m7
0u;-v|Y-m];|o0u;-hv1ࢼomĸ
M
8
M
7
M
6
M
9
M
10
STEP 6: ADJUST STIMULATION VACUUM LEVEL
Adjust the Stimulation Vacuum Level between 1 and 6 to your preferred comfort
level. Never set to an uncomfortable level.
$ث"|-u|o==b|_|_;v1|bomѲoĶ-m7|_;m]u-7-ѲѲbm1u;-v;|_;v1|bomv;||bm]
|oou1ol=ou|Ѳ;;Ѳĸ+ol-=bm7|_-||_;Ѳ;;Ѳo=1ol=ou|-0Ѳ;v1|bom-ub;v
=uol7-|o7-Ķ7ubm]|_;7--m7;;m7ubm]|_;v-l;rlrbm]v;vvbomĸ
NOTE: After two minutes, the pump will automatically switch to Expression
Mode unless adjusted manually.
SECURE BOTTLES
Place bottles in center of bottle
holder compartment(s) in pump.
=7bv1omm;1ঞm]|_;lbѴh1oѴѴ;1ঞom
kit from the pump, close the tubing
rou|1o;u0ru;vvbm]1o;uCulѴ
over the tubing port.
18 | ENGLISH
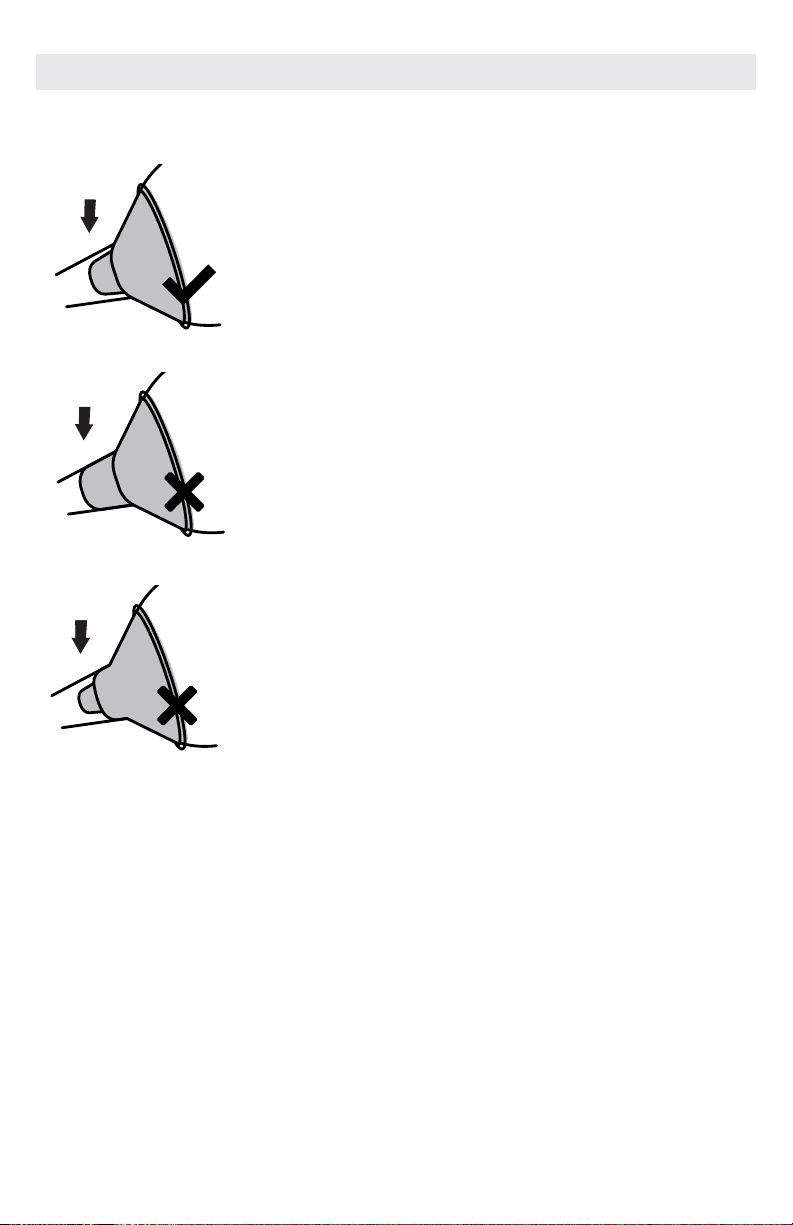
Check breast flange fit. If pumping causes discomfort, a larger or smaller breast flange size may be needed.
7.5 How to Fit Your Flange
GOOD FIT
During pumping, your nipple moves freely in the breast
flange tunnel. You see space around the nipple.
Not much areola is drawn into the tunnel with the nipple.
FLANGE TOO LARGE
During pumping, more areola is drawn into the breast
flange with your nipple. Your areola may rub against the
side of the breast flange tunnel.
FLANGE TOO SMALL
During pumping, some or all of your nipple rubs against
the sides of the breast flange tunnel.
ENGLISH | 19
Room Temperature
77°F (25°C)
Time in Refrigerator
39°F (4°C)
Time in Freezer
0°F (-18°C)
Freshly Expressed or Pumped Up to 4 Hours Up to 4 Days 6 Months - Best
12 Months - Acceptable
*Thawed, Previously Frozen 1-2 Hours Up to 1 Day
(24 Hours) Do Not Refreeze
Leftover From Feeding
(baby did not finish bottle) Use within 2 hours after the baby is finished feeding
1: Write the date on the storage container. Include your child’s name if you are giving the milk to a child care
provider.
2: Gently swirl the container to mix the cream part of the breastmilk that may rise to the top back into the rest
of the milk. Do not shake the milk as this can make some of the milk's valuable parts break down.
3: Refrigerate or chill milk right after it is pumped, if possible. You can put it in the refrigerator, place it in a cooler
or insulated cooler pack, or freeze it in small (2- to 4-ounce) batches for later feedings. Pumped milk is OK
without being refrigerated for up to 4 hours after pumping.
*NOTE: When thawing frozen milk, label as thawed when completely thawed (i.e. no ice crystals present). Use the
time when completely thawed to base acceptable time limits for use rather than when it is taken from
the freezer. These guidelines for storage and thawing of breast milk are a recommendation. Contact your
lactation consultant or breastfeeding specialist for further information.
These guidelines are for healthy full-term babies and may vary for premature or sick babies. Check with your
health care provider. Find more breastfeeding resources at: WICBreastfeeding.fns.usda.gov and www.cdc.gov/
breastfeeding.
7.6 Breast Milk Storage Guidelines
SAFE THAWING OF BREAST MILK
Always thaw the oldest breast milk first. Remember first in, first out. Over time, the quality of breast milk can decrease.
There are several ways to thaw your breast milk:
• In the refrigerator overnight.
• Set in a container of warm or lukewarm water.
• Under lukewarm running water.
• Never thaw or heat breast milk in a microwave. Microwaving can destroy nutrients in breast milk and create hot
spots, which can burn a baby’s mouth.
• If you thaw breast milk in the refrigerator, use it within 24 hours. Start counting the 24 hours when the breast
milk is completely thawed, not from the time when you took it out of the freezer.
• Once breast milk is brought to room temperature or warmed, use it within 2 hours.
• Never refreeze breast milk after it has thawed.
• Additional information: https://www.cdc.gov/breastfeeding/recommendations/handling_breastmilk.htm
20 | ENGLISH
The
Ameda Pearl Breast Pump Trolley is not included with the Ameda Pearl Electric Breast Pump and is sold
separately.
Attaching the Ameda Pearl Electric Breast Pump to Trolley (Trolley is an optional accessory)
NOTE: Attach pump to trolley prior to plugging cord into wall outlet.
1: When assembling Trolley, ensure not to place the basket any higher than 19 inches from the floor (height to
bottom of basket).
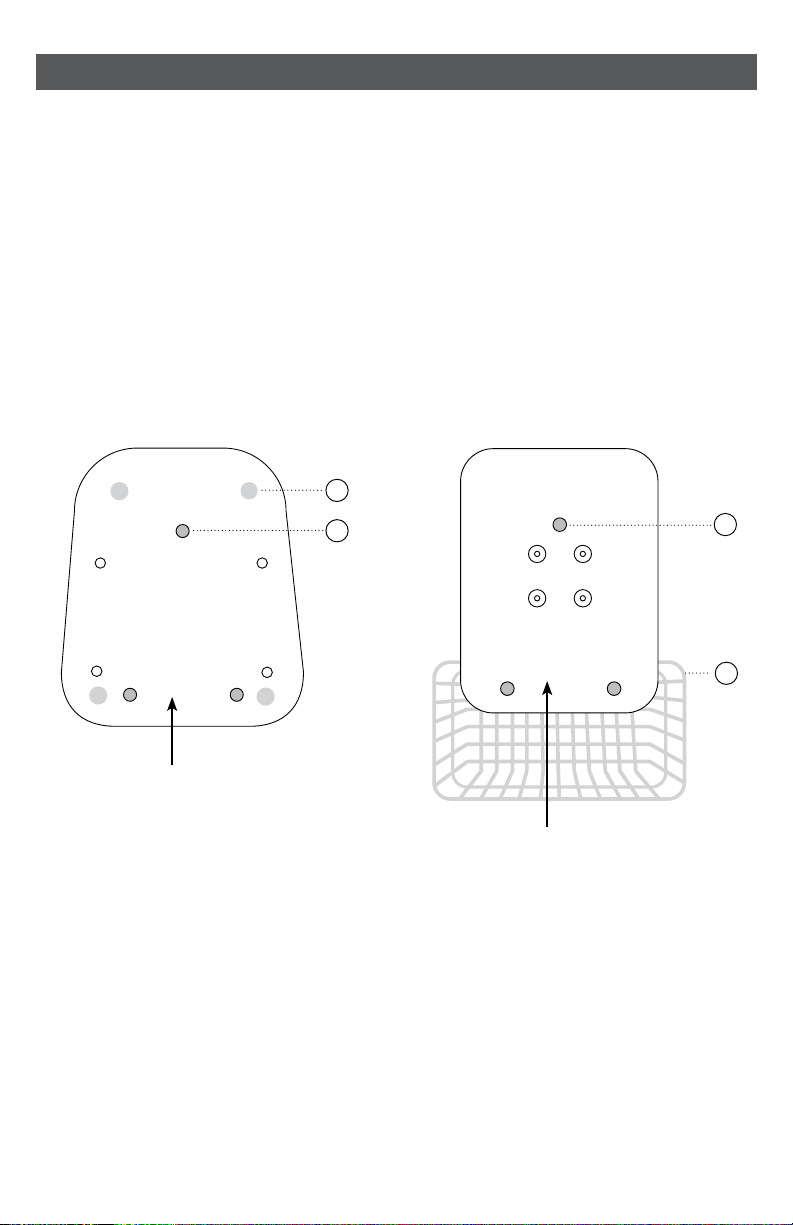
2: Place the three rubber washers on the trolley mounting plate to align over the three holes (C).
3: Place the Ameda Pearl Breast Pump on the trolley mounting plate so that the basket lies underneath the control
panel. Ensure the rubber feet (A) are on the mounting plate and the three holes (B) in the bottom of the pump
are aligned with the three washers and holes (C) in the mounting plate.
4: Use three mounting screws supplied with the trolley to secure the pump to the trolley mounting plate.
8. AMEDA PEARL ELECTRIC BREAST PUMP TROLLEY
Trolley Operating Instructions
1: Once pump is attached to trolley, ensure all locking wheels are unlocked to move the trolley-pump assembly.
Wheels are unlocked by lifting the locking tab on each locking wheel.
2: Move the trolley-pump assembly by gently pushing.
3: When trolley-pump assembly is in the desired position, lock all locking wheels by pushing down on the
locking tab on each locking wheel.
A. Rubber Feet (4)
B. Pump Mounting Holes (3)
Pump Bottom View:
C. Trolley Plate Mounting Holes (3)
D. Trolley Basket (1)
Trolley Top View:
Trolley Mounting Plate Front
A
B
Breast Pump
Bottom Front
C
D

ENGLISH | 21
Turn the breast pump off and unplug the pump from the power source.
For at-home/end-users
• After each pump session, wipe the Ameda Pearl Electric Breast Pump with a clean, damp cloth.
For Hospitals/Rental Stations
• Clean between users.
•Wear disposable gloves and use a hospital approved antibacterial cleaner such as CaviCide®, CaviWipes®,
or PDI®Sani-Cloth®AF3.
•Wipe Ameda Pearl Electric Breast Pump clean and remove all surface debris from the device, including the
power cord, trolley (if used) and carry case.
• Repeat cleaning step as necessary using a new cloth or wipe each time.
•When finished cleaning, allow cleaned surfaces to air dry for a minimum of 10 minutes.
10. CLEANING THE PUMP
Inspect the valves and diaphragms for tears or holes. Replace any damaged
valves and diaphragms prior to pumping. Wash valves and diaphragms per
section 8 "Cleaning the HygieniKit". Do not insert bottle brush or something
similar into valves. We recommend replacing valves every 8-12 weeks and
diaphragms every 4-6 weeks. When pumping at maximum settings, you may
need to replace diaphragms more frequently.
The breast pump base does not require service or maintenance. The user may replace the overlay panel and
rubber feet as needed, using Ameda supplied components.
11ĸMAINTENANCE
11.1 Breast Pump Valve and Diaphragm Check
Disconnect HygieniKit and power adapter from pump before transporting or storing the product. Be sure to
close the tubing port cover by pressing cover firmly over the tubing port. Handle with care when transporting
product. Store product in cool, dry place and protect from dust and dirt. Breast Pump and power adapter may
also be stored inside the Ameda Pearl Electric Breast Pump carry case.
11.2 Storing & Transporting
9. CARRY CASE
Carry Case is not included with the Ameda Pearl Electric Breast Pump
and is sold separately.
The Carry Case is designed to hold (1) Ameda Pearl Electric Breast
Pump, (1) AC power adapter, and (1) HygieniKit breast milk collection kit.
Place the Ameda Pearl Electric Breast Pump and power adapter into the
spaces designed for them in the Carry Case to reduce movement while
transporting the pump.
To close case push latches down until latches snap into place. Confirm
both latches are completely closed and secured before carrying case.
To open case lift latches up.
Trolley Mounting Plate Front
Other manuals for Pearl
1
Table of contents
Other Ameda Breast Pump manuals

Ameda
Ameda HygieniKit User manual

Ameda
Ameda Elite Configuration guide

Ameda
Ameda Platinum 17803 User manual

Ameda
Ameda MyaJoy User manual

Ameda
Ameda Finesse User manual

Ameda
Ameda Elite User manual

Ameda
Ameda Pearl User manual

Ameda
Ameda Mya Breast Pump User manual

Ameda
Ameda Elite Series Configuration guide

Ameda
Ameda MyaJoyPlus User manual

Ameda
Ameda Lactaline Personal User manual

Ameda
Ameda MyaJoyPlus User manual

Ameda
Ameda Elite User manual

Ameda
Ameda Purely Yours User manual

Ameda
Ameda Platinum User manual

Ameda
Ameda Purely Yours User manual

Ameda
Ameda Platinum User manual

Ameda
Ameda HygieniKit User manual

Ameda
Ameda Mya Joy User manual

Ameda
Ameda Elite User manual


