Andatech AlcoSense PRODIGY II User manual

USER MANUAL
Andatech®
PRODIGY II
Industrial Breathalyser

3
INTRODUCTION
Thank you for purchasing the Andatech®Prodigy II.
The Andatech®Prodigy II is a state-of-the-art instrument used to detect ethyl alcohol from a valid breath sample.
It uses an electrochemical fuel cell to measure the concentration of alcohol in the breath sample expelled from a
human subject.
If alcohol is present, a corresponding voltage is generated from the fuel cell, which is proportional to the alcohol
content of the sample provided by the human subject. This voltage is then sent to the CPU and converted to the
subject’s BAC (blood alcohol concentration) which is then displayed.
Operator needs to read operation manual and familiar with the operation before using. Retain the manual for
future reference.
PREPARATION
Gently pull down the battery compartment cover to remove it. Insert fresh alkaline batteries (4 x AA), checking
that the + and - on each battery are aligned according to the polarity diagram inside. Carefully replace the battery
compartment cover.
CONTENTS
DEVICE FEATURES
CONDITIONS FOR TESTING
OPERATING INSTRUCTIONS
TEST RECORDS
SETTINGS
TOUCH SCREEN CALIBRATION
PRINTER
BATTERY CHARGING
TROUBLESHOOTING
DISCLAIMERS
WARRANTY DETAILS
PRODUCT REGISTRATION
..................................................4
.....................................5
....................................5
.......................................................7
...............................................................7
................................8
................................................................8
...............................................8
...............................................8
.........................................................9
.............................................10
......................................12

4
DEVICE FEATURES
DIAGRAM EXPLANATION
Sample Port
Stylus
(back of unit)
Battery Charging
Indicator/Mouthpiece
Inserting Indicator
Button to
Remove
Mouthpiece
Function
Button
Printer
Touch Screen
On/Off
Button
1. DISPOSABLE MOUTHPIECE
Each mouthpiece is individually packed and sealed for hygiene
reasons. Before each new Standard Test, attach a new
mouthpiece to the sample port to prevent contamination from
a previous test.
2. SAMPLING CUP
The sampling cup can be used for Screening Tests and is
reusable as long as no alcohol is detected in the previous test.
Each sampling cup is also individually sealed. Attach a sampling
cup to the sample port to take a passive test. Do not allow the
mouth to touch the sampling cup during testing. After use,
remove the sampling cup and clean it with alcohol or boiling
water. Allow it to dry completely before re-using it.
3. BUTTON TO REMOVE MOUTHPIECE
The mouthpiece can be removed from the breathalyser
hygienically by pushing this button up. This will eject the
mouthpiece for easy disposal without touching the mouthpiece.
SCREEN DISPLAY
SettingsTest Records
Last Calibration
Date
Next Calibration
Date
Previous Screen/
Cancel
Next Screen/
Confirm
Main Screen
Print
Repeat Test
Screening TestStandard Test
GPS Indicator
Battery Indicator
Date & Time Indicator
Test Record
Counter
Number of Tests
Since Last Calibration
4. TOUCH SCREEN DISPLAY
This displays the instructions and the alcohol concentration
reading of breath tests taken on the unit. Select the icons and
buttons on the screen using the stylus pen provided.
5. ON/OFF BUTTON
Press and hold the On/Off button to turn the device on or off.
6. BATTERY CHARGING
The battery can be charged while inside the device. The battery
charging indicator turns red when the battery is charging, and
green when the battery is fully charged.
7. EXTERNAL POWER CONNECTORS
Connectors for 12V car (cigarette) adapter or optional 12V power
transformer. The battery can be charged while inside the device.
8. USB connector
Use a USB cable to upload test records stored in the internal
memory and upgrade the software.

5
CONDITIONS FOR TESTING
MEASUREMENTS & CONDITIONS FOR TEST
Working temperature range of Andatech®Prodigy II:
-10°C to 50°C
Storage temperature range of Andatech®Prodigy II:
-25°C to 70°C (15~90%RH)
Note: Inappropriate storage of the device will shorten
the lifespan of the fuel cell sensor.
LIABILITY FOR PROPER FUNCTION
OR DAMAGE
The liability for proper functioning of the
instrument is irrevocably transferred to the
owner or operator in the event the instrument is
serviced or repaired by personnel not employed
or authorised by Andatech. In such an event, the
warranty will be void.
• Use a clean mouthpiece for each test.
• The optimum temperature range for operating the
unit is -10°C to 50°C. Use within this temperature
range will limit condensation from the subject’s
breath and ensure an accurate reading is taken.
• Do not allow samples containing smoke, tobacco or
other chemical products to enter the unit, as damage
to the fuel cell can occur.
• It is recommended that the operator observes
the subject for approximately 20 minutes before
administering the breath test. This is to ensure the
subject does not consume anything. Following this
procedure will ensure the subject’s saliva is clear of
alcohol so that it does not alter the outcome of the
breath sample test.
• There must be an interval of at least 15 minutes after
alcohol consumption as alcohol residue in the mouth
may give a false reading. Such residue may also be
left by aromatic drinks, mouthwash, medicines and
drops, as well as by belching and vomiting. Mouth
rinsing with water or non-alcoholic drinks does not
substitute for an interval.
• A person’s blood alcohol concentration (BAC) can
OPERATING INSTRUCTIONS
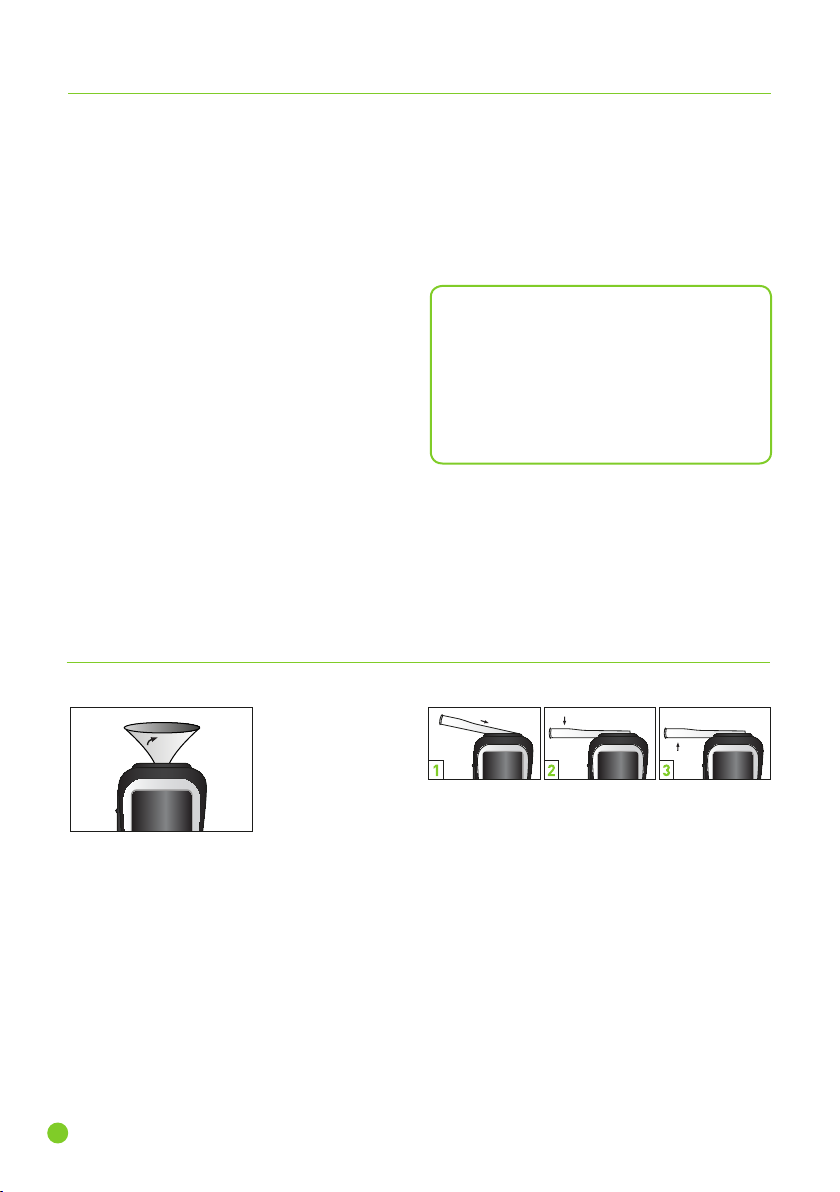
ATTACHING A MOUTHPIECE
1. Tear the perforated section from the wrapper of a
new mouthpiece.
2. Pull back the wrapper to expose half the
mouthpiece.
3. Ensuring the two small holes in the bottom of the
mouthpiece are aligned with the sensor, insert the
notched end of the mouthpiece into the slot on the
right of the screen (refer to Image 1).
4. Lower the other end of the mouthpiece until it
snaps into place (refer to image 2).
5. Remove remainder of wrapper from mouthpiece
and discard.
6. To discard the mouthpiece after a test, slide the
remove mouthpiece button upwards (refer to image
3). This will eject the mouthpiece from the unit.
7. Use a new mouthpiece for each test.
ATTACHING A SAMPLING CUP
1. Tear the perforated section from the wrapper of a
new sampling cup.
2. Pull back the wrapper to expose the bottom half of
the sampling cup.
3. Ensuring the two small holes in the bottom of the
sampling cup are aligned with the sensor, insert
the notched end of the sampling cup into the slot
on the right of the screen.
4. Lower the other end of the sampling cup until it
locks into place.
5. Remove remainder of wrapper from sampling cup
and discard.
6. To discard the sampling cup, pull it out in the
direction of the arrow shown on the sampling cup.
continue to rise for up to 2 hours after drinking
alcohol. If a result is close to the designated BAC, it
is recommended to wait and retest after 20 minutes.
• It can take 10 hours or more for a person’s BAC to
return to zero after a high BAC has been reached. A
further test should be carried out later in the day or
the following morning.

6
Refer to "Conditions for Testing" on the page 6 before conducting a Screening or Standard Test.
SCREENING TEST
1. Attach a sampling cup onto the sample port and select the Screening Test button.
2. When the screen displays “Please Blow”, take a deep breath and blow into the sampling cup until the BEEP
tone stops.
3. An “Alcohol Detected” or “No Alcohol” result will display on the screen.
4. If the screen shows “Alcohol Detected”, use a mouthpiece to perform a Standard Test to obtain a specific
alcohol reading.
5. The operator can get an immediate Screening Test result by pressing the "Manual" button while the subject is
still blowing.
6. Select to start another test.
NOTE: A Screening Test only checks for the presence of alcohol in a breath sample. An accurate test result can
only be obtained via a Standard Test using a mouthpiece.
NOTE: Test records of Screening Tests cannot be printed or stored.
OPERATING INSTRUCTIONS
STANDARD TEST WITH INPUT
1. Attach a mouthpiece onto the sample port and select the Standard Test button.
2. The breathalyser will take an Air Blank Test to ensure the mouthpiece and sensor are clear of alcohol from
previous tests.
3. If the Air Blank Test result shows 0.000, the unit will proceed to test mode (skip the step 5).
4. If alcohol is detected, verify that a clean mouthpiece is being used and select "RETEST".
5. Use the stylus pen to input information. NOTE: Maximum 16 characters for each input.
Use or to move to the previous or next field. If no data fields are selected, the unit will proceed directly
to test mode. (Contact Andatech to enable/disable data fields)
6. When the screen displays “Please Blow”, take a deep breath and blow into the mouthpiece with a slow and
steady breath until the BEEP tone stops.
7. The test result will display on the screen.
8. Select to print the test result.
9. Select to take another test.
10. If the subject does not blow into the unit within 30 seconds, the operator can either select “Refuse” to confirm
the subject refused to take the test, or “Test Again” to allow the subject to retry.
11. If the subject stops blowing too early or blows with insufficient force, select “Discontinue” to abandon the test,
or “Test Again” to retry.
12. The operator can also get an immediate Screening Test result by pressing the “Manual” button while the
subject is still blowing.
13. Push the button underneath the mouthpiece to remove the mouthpiece and take another test.

7
1. Auto Off
i. Select the time limit to turn off the device
automatically.
ii. Select to confirm.
2. Auto Print
i. Select “Auto Print” to print results automatically
after each test is completed.
ii. Select the number of printout copies required
for test results that have zero alcohol reading
( = 0 ) and for test results that have a positive
alcohol reading ( > 0 ).
iii. Select to confirm.
NOTE: If no printout is needed for zero alcohol test
results, select “0” for the field “=0”.
3. Cali: Only authorised personnel have access to
these settings.
4. Brightness: Adjust the brightness level of screen.
5. GPS
i. The Longitude and Latitude of the device's
location will be shown.
ii. The Longitude and Latitude of the test is stored
and printed on the printout.
PRINTING TEST RECORDS
Records can be printed from the Test Result screen
and Test Record screen for Standard Tests only.
Screening Test results cannot be printed.
1. Select on the test result or test record screen
to print.
2. Use or to move to the previous or next
record.
TEST RECORDS MEMORY AND UPLOAD
Up to 50,000 test records can be stored, depending on
the length of the records.
Once the memory is full, you will not be able to take
another test.
It is recommended to upload device records using
“Andalink” software on a regular basis to prevent loss
of records.
After uploading records, the device memory can be
cleared.
In order to download your data to a PC you must have
the Andalink for Prodigy II software, available from
www.andatech.com.au
SEARCHING TEST RECORDS
1. Select Test Records from the homescreen and then
select "Search".
2. Select one of the following methods to search:
i. Record No.
Search format: enter the 5-digit record number
ii. Date
Search format: 8 digits (YYYYMMDD), e.g. 31
December 2017 is 20171231.
iii. Test Mode
From the drop down menu, select “Auto”,
“Manual”, Discontinued” or “Reject”.
iv. Test Result
From the drop down menu, select "> 0" to
search for positive test results or "= 0" for 0.000
test results.
3. Select to confirm and search. A list of the test
record numbers that fulfill your search criteria will
be shown.
4. Use and to scroll through multiple pages of
the search results.
5. Select the test record number to view the test
record.
TEST RECORDS
SETTINGS
iii. Uncheck the “Print GPS” tickbox to disable
printing the Longitude and Latitude on test
records.
iv. Select to confirm.
NOTE: GPS system only functions for 5 to 10
minutes after the device is switched on. Use the
device in an open area so that it can receive the
GPS signal. If there is no GPS signal, the Longitude
and Latitude will not be shown on the printout.
6. Date & Time
i. Set the correct Date and Time.
ii. Select “Update” to confirm.
7. Advanced Settings: Only authorised personnel
have access to advanced settings.
8. Keyboard
Deselect “Keyboard” to disable the keyboard.
NOTE: Keyboard cannot be disabled if data entry is
set compulsory in advanced settings.

8
TOUCH SCREEN CALIBRATION
PRINTER
If the touch screen is not sensitive enough or not responding, please calibrate the screen.
1. While the device is switched off, press and hold the On/Off button (right button) and then press the Function
button (left button) immediately after.
2. Follow the instructions on the screen to calibrate the screen.
The Prodigy II features a built-in thermal printer.
INSERT / REPLACE PAPER
Pull the handle. When inserting a new roll of paper,
make sure the glossy/outer side of the paper is facing
the serrated tear strip once the door is closed.
NOTE: If nothing can be printed, change the orientation
of the paper roll and try again.
STANDARD TERMAL PAPER SIZE
5.7cm X 560cm
BATTERY CHARGING
The Prodigy II uses a high capacity lithium battery. It is located behind the sliding cover on the back of the device.
The battery power level is indicated on the Prodigy II’s display screen.
When the battery power is low, connect the charging cable to the charging port to charge the battery. The included
cigarette plug adaptor can also be used for charging.
The charging indicator light will turn from red to green when the battery is fully charged.
1. Connect the charging cable to charging port to charge the battery.
2. Charging indicator turns from red to green when the battery is fully charged.
TROUBLESHOOTING
'CALIBRATION NEEDED' WARNING
When the device starts up and shows the "Calibration Needed" warning and alarm, it means the device has
passed its calibration due date.
Contact an authorised calibration centre to get the device calibrated.
TOUCH SCREEN NOT RESPONDING
If the touchscreen is not sensitive enough or not responding, calibrate the screen.
Follow the instructions on page 11.
AIR BLANK TEST CONTINUES TO DETECT ALCOHOL
Let the device sit for 5 minutes to clear out any possible residue.
If the problem persists, contact Andatech.

9
DISCLAIMERS
This product must be used strictly in accordance with the instructions in this manual.
This product is intended to provide the user with an indication of alcohol on the breath. However, neither the
manufacturer nor the supplier gives any warranty (express or implied) that the product can give any indication of
blood alcohol level.
A person's BAC (Blood Alcohol Concentration) can only be accurately measured by the administration of a blood
test. This product only measures breath alcohol content which, in turn, only gives an approximate indication of
blood alcohol concentration.
In these circumstances the user of this product should not rely on the information provided thereby as an accurate
indication of their blood alcohol concentration or of their level of intoxication or of their fitness to drive and in
particular should not take any action in reliance on such information as the product can provide no more than an
indication of alcohol on the breath.
If the user of this product makes any decision or takes any action based on the use of the product such decision
or such action shall be at the sole risk of the user and neither the manufacturer nor the supplier assumes any
responsibility for such decision or action.
In particular, neither the manufacturer nor the supplier shall be in any way liable if the user of the product asserts
that the product led them to believe they were fit to operate a motor vehicle and are subsequently found not to be
so fit.
If the subject fails to give a valid breath sample, the operator can either select “Discontinue” to confirm; or can
select “Test Again” to allow the subject to re-test. A passive test can be performed by selecting “Passive” whilst
the user is blowing. Slide up the button underneath the mouthpiece to remove the mouthpiece.
THINGS TO REMEMBER
• Always wait a minimum of 15 minutes after your last drink before testing.
• NEVER take a sip of alcohol and blow immediately into the device.
• Ignoring these two points WILL cause damage to the unit that is NOT covered by warranty.

10
It is our aim to provide you with quality products that you can trust. Our products come with
guarantees that cannot be excluded under the Australian Consumer Law. You are entitled to
a replacement or a refund for a major failure and for compensation for any other reasonably
foreseeable loss or damage.
You are also entitled to have the goods repaired or replaced if the goods fail to be of acceptable quality and the
failure does not amount to a major failure.
The Guarantee
The product is guaranteed to be free from defects in workmanship and parts for a period of 1 year from the date
of purchase. Defects that occur within this warranty period, under normal use and care, will be repaired, replaced
or refunded at our discretion, solely at our option with no charge for parts and labour. The benefits conferred by
this warranty are in addition to all rights and remedies in respect of the product that the consumer has under the
Trade Practices Act and similar state laws.
Proof of Purchase
This warranty is valid for the original purchase and is not transferable. Please keep your purchase docket or
receipt as proof of purchase and as proof of date on which the purchase was made. The purchase docket (or a
copy) or receipt must be presented with the warranty when making a claim under this warranty.
Service during the Warranty Period
Authorisation Number). Ensure that the RA# is clearly stated on the outside of the packaging and that the product
is properly packaged so that no damage occurs to the product during transit. Shipping of the product back to us
for warranty will be at your cost. A product return without the RA# or proof of purchase will not be accepted.
Extent of Warranty
This warranty is limited to defects in workmanship or parts. All defective products or parts will be repaired or
replaced. This warranty does not cover manuals and packaging.
Normal Wear and Tear
This warranty does not cover normal wear and tear to the product or parts.
Exclusions
This warranty does not cover:
• Calibration costs.
• Any defect caused by an accident, misuse, abuse, improper operation, lack of reasonable care, unauthorised
modification, loss of parts, tampering or attempted repair by a person not authorised by the distributor.
• Any product that has been damaged by a lightning strike either directly or indirectly or a main power surge or
liquid ingress.
• The product if it is located outside of Australia.
• Any damage caused by improper power input or improper cable connection.
WARRANTY DETAILS
WARRANTY
The manufacturer warrants for 1 year from
the date of purchase, the product to be free
from defects in workmanship or material
(excluding recalibration) under normal use. The
manufacturer’s obligation under this warranty
is limited to replacing, adjusting or repairing the
unit if returned along with proof of purchase.
This warranty is void if the unit has been
tampered with, damaged or abused in any way.
To register your warranty online, go to
my.andatech.com.au
RECALIBRATION AND SERVICE
Andatech recommends the Andatech® Prodigy
II be calibrated every 6 months (unlimited tests)
to maintain Australian Standards.
For recalibration and technical support, please
go to my.andatech.com.au or contact:
Andatech
Hotline: 1300 800 200 (Within Australia)
+613 8899 6900 (International)
Website: www.andatech.com.au


12
PRODUCT: ANDATECH®PRODIGY II
DATE OF PURCHASE:
PLACE OF PURCHASE:
SURNAME:
GIVEN NAME:
ADDRESS :
SUBURB:
POSTCODE:
STATE:
CONTACT NO.:
EMAIL:
PRODUCT REGISTRATION
Visit my.andatech.com.au to register your warranty online and receive
calibration reminders. Alternatively, complete this form and forward to the
address below with a copy of your proof of purchase:
Andatech
PO BOX 3038, Nunawading VIC 3131 Australia.

Andatech Pty Ltd
www.andatech.com.au
1300 800 200
Version 5. Updated 10.11.2017.
Table of contents
Other Andatech Test Equipment manuals

Andatech
Andatech SOBERLIVE FRX User manual

Andatech
Andatech AlcoSense PRO User manual

Andatech
Andatech AlcoSense SURETY User manual

Andatech
Andatech AlcoSense SOBERPOINT 3 User manual

Andatech
Andatech Sentry User manual

Andatech
Andatech AlcoSense NEXUS User manual

Andatech
Andatech DrugSense Orascan User manual

Andatech
Andatech ALX3000 User manual

Andatech
Andatech AlcoSense AccessPoint User manual

Andatech
Andatech Alcosense Zenith Breathalyser User manual