Andonstar ADSM302 User manual

Andonstar ADSM302 Digital Microscope
USER MANUAL

Andonstar ADSM302 Digital Microscope
V1.1 / 2018-05-10

Andonstar ADSM302 Digital Microscope
- 1 -
TABLE OF CONTENTS
General Rules ....................................................................................................................................................- 2 -
Basic Parameters...............................................................................................................................................- 3 -
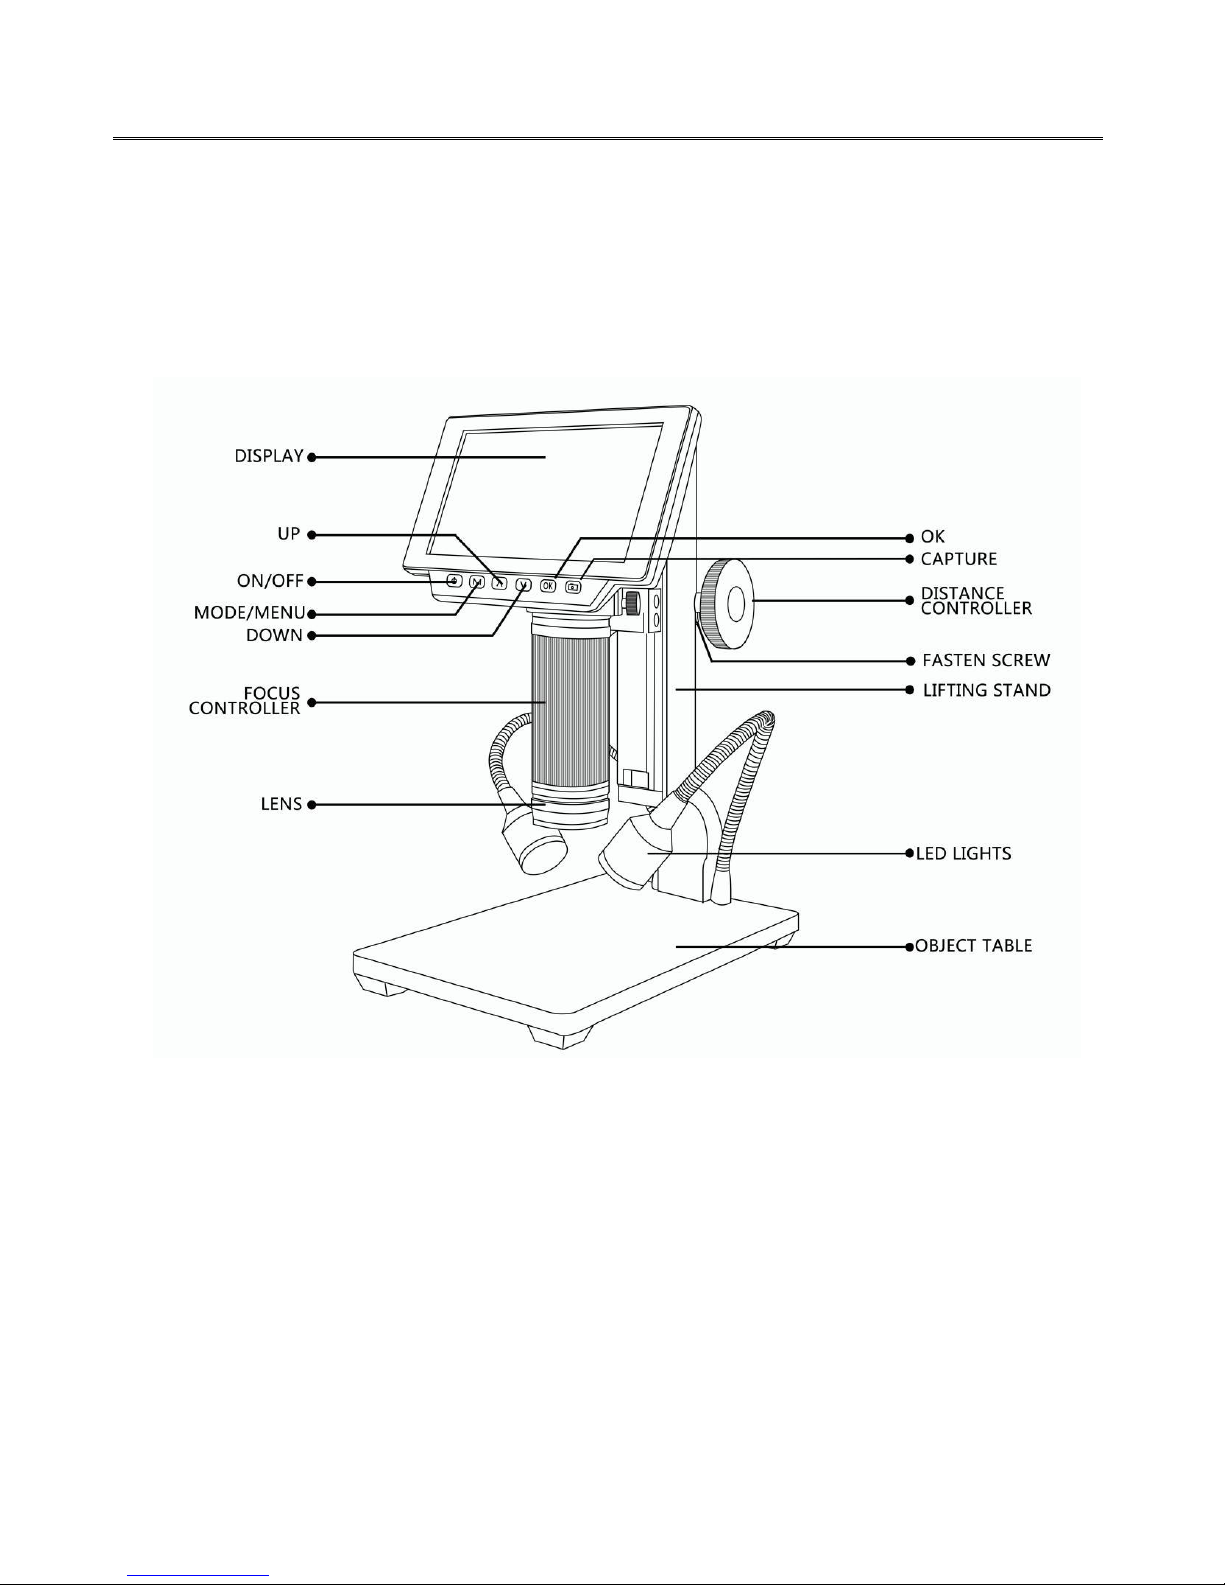
Parts of ADSM302 .............................................................................................................................................- 4 -
◆ Main Device ..........................................................................................................................................- 4 -
◆ Remote Controller.................................................................................................................................- 5 -
Connect & Outputs.............................................................................................................................................- 6 -
General Use.......................................................................................................................................................- 7 -
◆ Use Individually .....................................................................................................................................- 7 -
* Select operating mode......................................................................................................................- 7 -
* System settings.................................................................................................................................- 7 -
* Capture mode ...................................................................................................................................- 7 -
* Record mode ....................................................................................................................................- 7 -
◆ HDMI .....................................................................................................................................................- 8 -
HDMI FAQ ...........................................................................................................................................- 8 -
◆ USB .......................................................................................................................................................- 8 -
Software Installation............................................................................................................................- 8 -
Software Overview ............................................................................................................................- 10 -
*Icon Definitions .........................................................................................................................- 10 -
*Interface Definitions and Functions..........................................................................................- 11 -
Software Operation ...........................................................................................................................- 13 -
* Start .........................................................................................................................................- 13 -
* Calibration................................................................................................................................- 13 -
* Measuring................................................................................................................................- 14 -
* Image Effects...........................................................................................................................- 15 -
* Capture Image.........................................................................................................................- 15 -
* Record Video ...........................................................................................................................- 15 -
FAQ ...................................................................................................................................................- 16 -
Thanks .............................................................................................................................................................- 17 -

Andonstar ADSM302 Digital Microscope
- 2 -
General Rules
ADSM302 is a multifunctional digital microscope individually designed, developed and manufactured by
Shenzhen Andonstar Technology Co., Ltd. It realized Full HD, high object distance, multifunction, multi-output
at the same time. With help of the Andonstar measuring software, it can easily meet many different
requirements in many industries, such as industrial overhaul and teaching demonstration. And it’s appearance
design combines more ergonomic consideration, provides users better experience. We sincerely wish this
product can release your eyes and improve your work quality. Thanks for your support.
◆This operation manual allows you to work safely with the digital Microscope. Please keep this manual for
your information. Liability is void for any damage caused by not follow this manual.
◆Failure to follow the warnings and instructions may cause electric shock, fire and/or serious injury.
◆Not following this note can cause permanent damage to the device.
◆Storage and transport: Improper transport can harm the device; Always transport this device in the provided
box in order to prevent damage.
◆Information on disposal: Electronic equipment does not belong to domestic waste, but must be disposed in
accordance with the applicable statutory provisions.
◆In order to bring customers a better experience, we may change the product a little bit during perfecting it.
The description in this instruction is for reference ONLY. Thanks for understanding.
◆Safety
1.Keep the tool dry, clean, free from oil, water, gas or other materials capable of causing corrosion.
2.This appliance is not intended for use by people with limited physical, sensory or mental capabilities.
3.Keep bystanders, children away while operating the tool.
4.Do not overreach, keep proper footing and balance at all time.

Andonstar ADSM302 Digital Microscope
- 3 -
Basic Parameters
Image sensor
3 Mega Pixels HD Sensor
Video output
1080P Full HD (via HDMI) ;720P (via PC)
Video format
MOV
Magnification ratio
Up to 560×(HDMI monitor 22 inch)
Photo resolution
12M
Photo format
JPEG
Focus range
5cm to 22cm
Frame rate
Max 30f/s under 600 Lus Brightness
Video-output interface
HDMI/AV
Storage
Micro-SD card, up to 32G (option)
PC support
Yes, for Windows XP/7/8/10, PC software with measurement (gift)
Power source
5V/2A
Stand size
20cm*12cm*26.5cm
Screen size
5 inch
Accessories
Stand*1, Power Adaptor*1, USB Cable*1, HDMI Cable*1, Manual*1,
IR controller*1
Packing data
31*24.5*18cm/2.2kg

Andonstar ADSM302 Digital Microscope
- 4 -
Parts of ADSM302
◆ Main Device
*Fasten screw: It aim to adjust the compactness between the Lifting stand and the Distance controllers, so
users can fasten the distance from the lens to the object table.

Andonstar ADSM302 Digital Microscope
- 5 -
◆ Remote Controller
•Frozen: Stop the image on the screen. It works at standby, record and capture modes.
•Zoom in/out: digital zooming up to 4 times.
•Brightness up/down: exposure compensation from +2.0 to -2.0.
•Lock/unlock: to lock the file when it’s recording. So the video file which has been locked won’t be
covered by new files when the memory card is full.
•Sharpness up/down: there are three levels of sharpness: Soft/Normal/Strong. Those two buttons are
both used to switch the levels, but in different orders.
•Contrast up/down: same principle as Sharpness.
•Inverse: Invert colors.
•Black&white: Set colors to black and white.

Andonstar ADSM302 Digital Microscope
- 6 -
Connect & Outputs
The ADSM302 has 5 possible outputs: its own monitor, HDMI, AV/TV, USB and memory card.
①:AV output *
②:Memory card
③:USB output *
④:HDMI output *
⑤:Connect the device to the switch.
⑥:Connect the switch to the power supply.
⑦:Connect the two goose lights to the switch.
⑧:3-button switch (ON/OFF, goose light brightness up/down)

Andonstar ADSM302 Digital Microscope
- 7 -
*) Separate cables needed (not included).
General Use
◆ Use Individually
1. According to the instructions given by last chapters, connect the camera to the power supply like ⑤⑥⑦.
2. Press the “ON/OFF” button on the monitor. (Sometimes the camera will switch on automatically when it is
connected to the power supply)
3. Turn on the LED lights, adjust the object distance wheel and the focus controller to get the image that you
want.
4. Use the “UP/DOWN” to zoom in/out.
* Select operating mode
1. Press “M” shortly. (Or press the “Mode” on the remote)
2. Icons definition in different modes:
: standby mode; : capture mode; : record mode; : image playback mode
: video playback mode (If the files are videos, press “OK” to play the video file)
: Lock the file which is being recording
* System settings
1. Press “M” for few seconds until on the screen shows the menu. Then press “M” again to get into the system
setting menu. (Or press “MENU” on the remote twice)
2. Press “UP/DOWN” and use “OK” to choose what to set.
3. Press “M” again when you are done.
* Capture mode
There are three ways to capture pictures:
•Press “M” shortly to get into the Capture mode. Press “OK” to take pictures.
•Press “Capture” on the monitor only.
•Press “Capture” button on the IR remote to get pictures.
* Record mode
1. Press “M” shortly to get into the Record mode. Press “OK” to start recording.
2. Press “OK” to stop recording.

Andonstar ADSM302 Digital Microscope
- 8 -
Tip: Press “Lock&unlock” on the remote to lock the file when it’s recording. So the video file won’t be covered by
new files when the memory card is full.
◆ HDMI
Connect the microscope to the HDMI monitor, then connect the power supply. Turn on the microscope and
adjust the distance. Then put the object on the table and adjust the focus controller.
Please note: The ADSM302 internal screen won’t show an image when the device is connected via HDMI. You
still can take pictures and save them if you have a memory card inside the microscope, but you can’t record
videos in this output mode.
HDMI FAQ
•Why is there no image on the monitor ?
Please check all the cables connect properly and also make sure the device is switched on.
•Why the image is not clear ?
Please adjust the object distance and the focus controller, check the direction of the LED lights, and make sure
the lens is clean enough.
•Remote doesn’t work ?
There is no battery inside of the remote as standard configuration. Please check if there is battery in the remote.
◆ USB
Software Installation
Download the software first. Then open the zip file and run the setup.
http://www.andonstar.com/e_news/soft-2.html
So far the measuring software “Andonstar” can only support Windows system. If you can’t open the links or get
problem with downloading these files, please ask customer service to send you separately. You can also go visit
our website and download from there.
System Requirements:
•Windows XP SP3 / Vista / 7 / 8 / 10
•Microsoft.Net Framework 4.0
•Microsoft Visual C++ 2010 Runtime
If there isn't either of the runtimes above mentioned, there would be mistake during installation.

Andonstar ADSM302 Digital Microscope
- 9 -

Andonstar ADSM302 Digital Microscope
-10 -
Software Overview
*Icon Definitions
Zoom In
Measuring a 3points angle (degree)
Normal
Distance of parallel lines(Length)
Zoom out
Distance of a point and a line (Length)
Undoes the last action
Distance of 2 circles (Radius, length)
Cross hairs (crosier,4 grid, 8 grid)
Distance of a line and a circle(Radius, length)
Distance of 2 horizontal points
Add a square mark
Distance of 2 vertical points
Add a circle mark
Distance of any 2 points
Add text
Measuring a rectangular
(width,height, circumference&area)
Distance of 2 lines(Length)
Measuring an ellipse(Long-axis radius, short-axis
radius, circumference&area)
3 points circle
(radius, circumference&area)
Measuring a radius circle(radius, circumference&area)
Edge detection
Measuring a diameter circle
(diameter, circumference&area)
Brightness increase/decrease
Measuring a 3 points circle(radius, circumference&area)
Flip horizontal
Measuring a 3 points arc
(radius,degree,circumference&area)
Sharpen
Measuring a polygon (circumference&area)
Smooth
Measuring fold-lines (length)
Take a picture
Measuring a 4 points angle (degree)
Take a video

Andonstar ADSM302 Digital Microscope
-11 -
*Interface Definitions and Functions
① Main menu:
Here, users can open different devices or lead in pictures to observe or edit, do video setting or save setting,
choose which windows to show or hide etc.
② Toolbar:
Here are the tools that would be useful for users to do measuring and image analysis. Definition and function of
different tools would be given in chapter “Icons definitions”. Users can choose to hide or show this toolbar in
“View→Toolbars and Docking Windows→Standard”.
③ Picture Browser:
Here is where users can review all pictures they’ve captured. Users can also edit the picture by right clicking the
picture and open it in the main operating window. Choose “View→Toolbars and Docking Windows→Picture
browser” to show or hide this window.
④ Secondary operating window:
The image showing in this window always follows your cursor, and with a bigger magnification. With help of this
window, the result of measuring can be much more precisely.
It belongs to window “Picture Browser”.

Andonstar ADSM302 Digital Microscope
-12 -
.
⑤ Main operating window:
This windows shows the full view from the microscope. And it is also the place where users do measuring and
image analysis.
⑥ Calibration Management and Measuring Results:
These two windows shows at the same place, users can switch at the bottom of this window.
◆Calibration Management
Shows the list of
different calibrations.
Users can apply or
delete the one they want
◆Measure Results
Shows the size of the
whole view. Users can
change it in “File
Videosetting→Video
capture pin→(S)”.
.

- 13 -
Software Operation
* Start
1. Open the software “Andonstar”.
2. Click “File”→ “Open”→ “Open Device”→ “USB MODE” → “Andonstar Camera”.
* Calibration
1. Put a ruler under the digital microscope, adjust the focus wheel and the height of the
stand, to get the best clearance. (during the rest of the process, do not change the object
distance any more).
2. In the “Calibration management” set the name and unit length of the new calibration(refer
the picture on the right). Then, click “Calibration”, meanwhile, the “ ” in the toolbar should
have been chosen automatically. If not, please choose it yourselves.
3. Move the cursor to the main operation window, draw a line (the length is the unit length
which has been set in step 2) with help of the ruler. After these, click the “Finish” button in
the bottom of the “Calibration Management” window.
4. Check. The length of the line you draw in step 3 should become as the unit length. The
name of the new calibration should have showed in the list of calibrations.

- 14 -
3)
4)
* Measuring
1. Choose the tool you need to do measuring in the toolbar.
2. Click dots or draw lines that you need to measure in the main operating window.
3. Place the results of measuring in a proper place around the target.

- 15 -
* Image Effects
Edge detection, Inverse color, Flip horizontal, Relief, Sharpen, Smooth.
1. Choose the special effect you need in the toolbar.
2. In the main operating window, long press the Left to draw a rectangle which can covers the whole target area,
loose the Left, get the special effect result.
3. Click Left again, end the special effect.
If you want to use “Flip horizontal”, draw a random rectangle in the view, and the whole view would be flipped.
Click Left again, end the special effect.
* Capture Image
1. Click “ ” to capture.
2. The result of capture can be checked and deleted in the “Picture browser” window.
3. Check and change the save path: “File→Save Setting→Path”.
* Record Video
1. Choose the size of the view as 640*480 in “File→Video Setting→Video Capture Pin→Output size(S)”
2. Click “ ”, set some other things and start to record.
3. On the top left corner there shows“recording”and a timer. It means it’s recording.
4. Check and change the save path: “File→Save Setting→Path”.

- 16 -
FAQ
1. Why there says “missing files” during installation or initiator procedure?
Please confirm that Microsoft .NET Framework 4.0 and Microsoft Visual C++ 2010 Runtimes are installed
2. The software works fine, but the software can not recognize the microscope.
First, please make sure that you connect the camera and the PC properly and choose “PC camera” on the 5
inch monitor. Second, if there is still no image, please check the “Device Manager” of your PC, delete the “USB
Camera” in the “Imaging devices” and rescan . Let the system identifies again. After all, in the “Imaging devices”
there will show another name, which is “Andonstar Camera”. Then restart the software.
3.Why there is a measurement error?
First, if you want to get a more precise result, you need to use a more precise calibration. Second, during the
whole process, make sure the magnification is always the same as the one when you set the calibration. Since
the camera is continuously magnifying, you’d better keep the same object distance also.

- 17 -
Thanks
Thank all of you for supporting our products. We hope you enjoy our products, and would be glad if they
can even just slightly make your life better. If you have any question, or any advice and feedbacks, feel free to
contact us: support@andonstar.com We’d like to provide the best service to you. Our official website is
www.andonstar.com. We reserve all the right for the final explanation.
Warranty Card
User’s name:
Address:
Phone number:
Post code:
email:
Model name:
Purchase date:
Fault feedback:
Date:
Fault:
Notice:
Our warranty does not cover:
1
If users can not provide the purchase proof or the Warranty.
2
If users use it in an improper environment, such as incompatible power supply, high
temperature environment etc.
3
If the fault caused by accident, oversight, misoperation or natural disasters etc.
4
If the fault caused by people who are not belong to authorized organizations of our company
during repacking, repair, dismantle, Or if users repack, repair or dismantle the device not
following our advice.
5
Out of warranty period.
Table of contents
Other Andonstar Microscope manuals

Andonstar
Andonstar AD409-Max User manual

Andonstar
Andonstar A1 User manual

Andonstar
Andonstar AD203 User manual

Andonstar
Andonstar 246S User manual

Andonstar
Andonstar 246 User manual

Andonstar
Andonstar ADSM201 User manual

Andonstar
Andonstar AD205 User manual

Andonstar
Andonstar AD409 User manual

Andonstar
Andonstar AD206S User manual

Andonstar
Andonstar A1 Reference manual