manuals.online logo
Brands
  1. Home
  2. •
  3. Brands
  4. •
  5. Arkon
  6. •
  7. Automobile Accessories
  8. •
  9. Arkon GPS-DG9208G3 User manual

Arkon GPS-DG9208G3 User manual

GPS-DG9208G3 |Vehicle Specific Mounting Bracket for Most Portable GPS
!Safety Precautions
Do not install Arkon products over an air bag cover or within the air
bag deployment zone. Arkon Resources, Inc. assumes no responsi-
bility of liability for injury or death as a result of car crashes and/ or
air bag deployment.
Arkon is not responsible for any damages caused to your car, your
device, or yourself due to the installation or use of this pedestal mount.
The Mobile Mounting Specialists™
Consumer Hotline:
USA (800) 841-0884
INT’L (626) 254-9005
Monday - Friday 9 am - 5 pm, PST
www.arkon.com
Arcadia, CA 91006 USA
Designed in USA | Made in the USA & China
© Copyright 2010 Arkon Resources, Inc.
APTTO
Adapter Plate for
TomTom ONE
APTTOXL
Adapter Plate for
TomTom ONE XL / XL • S
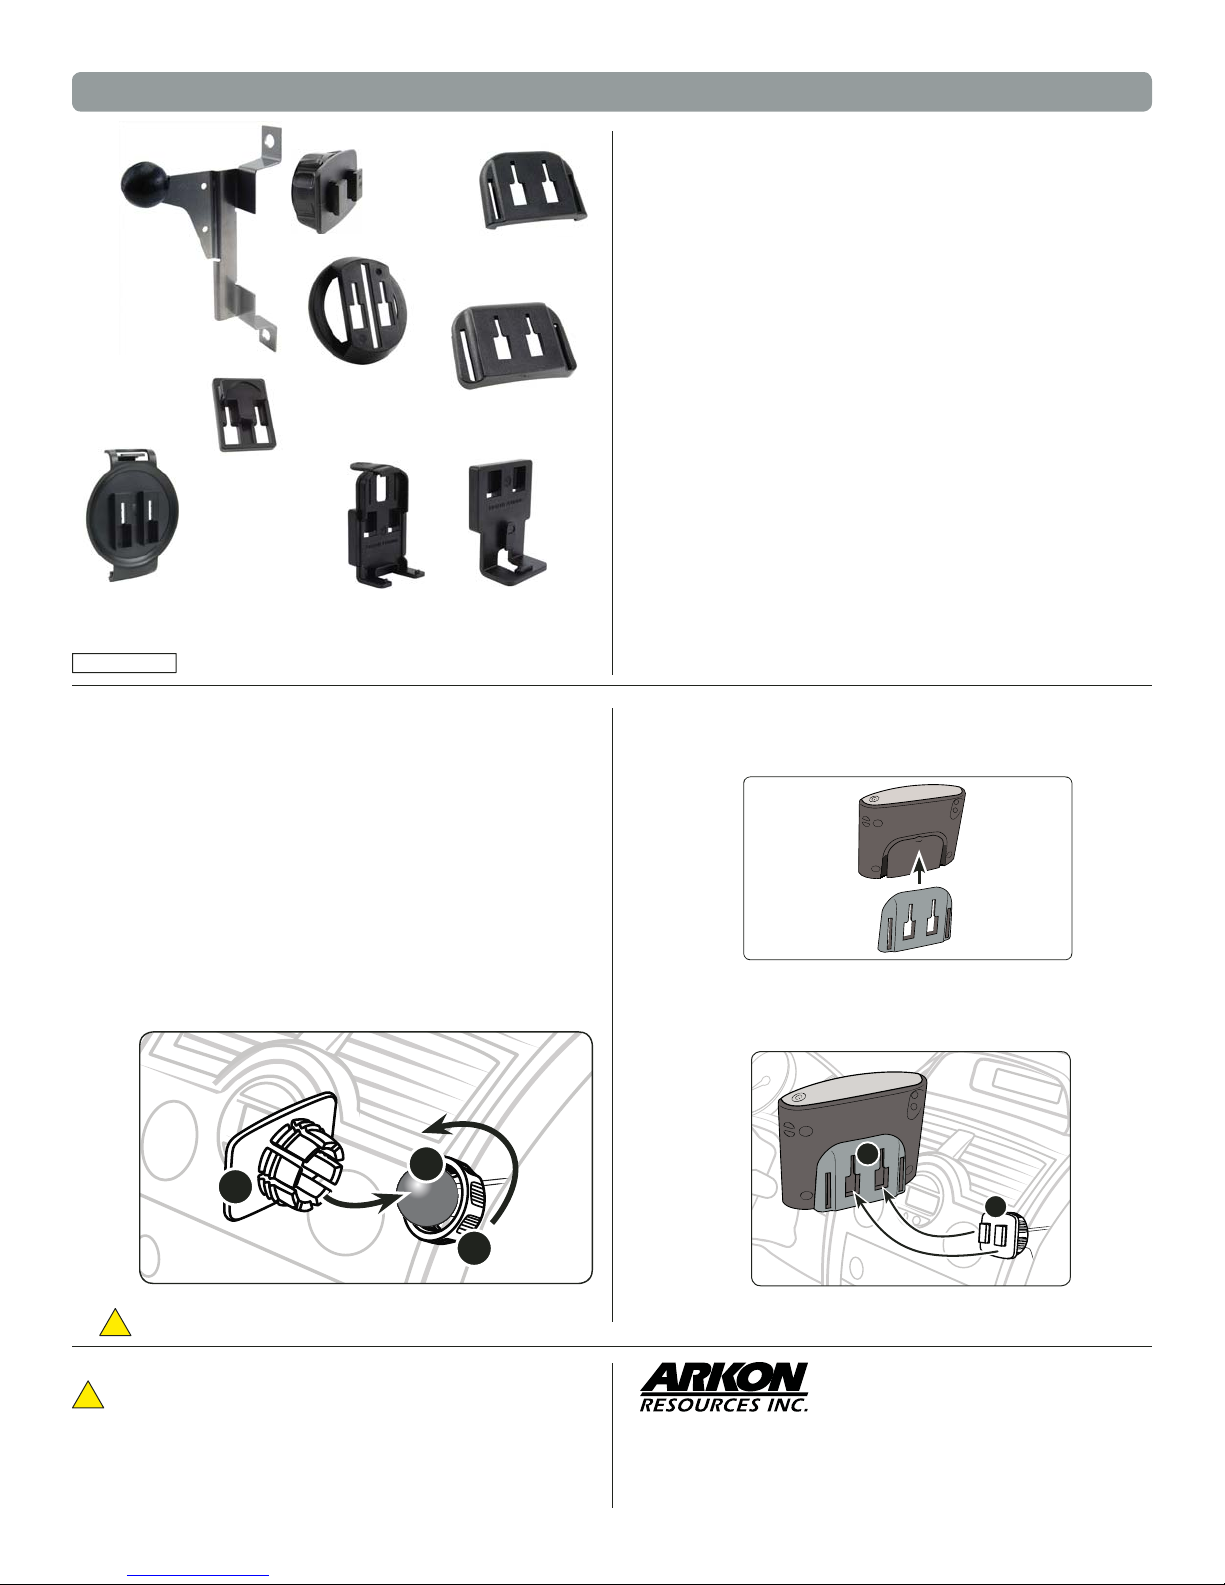
Package Contents:
(1) DG-92-08-G3 - Pro.Fit™ Vehicle Specific Mounting Bracket*
(1) SP-SBH-Kit - Dual-T Head with Swivel Ball Socket & Locking Ring
(1) APTTO - Adapter plate for TomTom ONE pattern
(1) APTTOXL - Adapter plate for TomTom ONE XL pattern
(1) APTTGO520 - Adapter plate for TomTom GO pattern
(1) APTTEP - Adapter plate for TomTom EasyPort™ pattern
(1) APTTSE - Adapter plate for TomTom Start™ and Ease™ pattern
(1) APMM200 - Adapter plate for Mio Moov 200 Series pattern
(1) APMM300 - Adapter plate for Mio Moov 300 Series and newer Magellan GPS patterns
Do not place mount in or near an air bag deployment zone.
!
Installing the Vehicle Specific Moutning Bracket
Connect Dual-T Head to VSM Mounting Pedestal
Step 1.
Patent Pending
See the included ProFit VSM Bracket manual for instructions
on installing the VSM Bracket. Arkon reccomends that you
have the VSM bracket professionally installed. Arkon is
not responsible for any unintended damaged caused by
installation of the VSM Bracket.
Step 1.
Step 1.
Slip the tightening ring (A) over the VSM bracket ball. Snap the
dual-T head adapter plate (B) on to the bracket ball (C). Screw
the tightening ring over the adapter plate until securely holding
the plate. Adjust the angle as needed. Step 1.
Connect TomTom ONE, XL, or XL• S Device to Pedestal
Slide the adapter plate up into the grooves on the back of the
TomTom ONE, XL, or XL •S device (not included, sold separately).
Connect Adapter Plate for TomTom ONE or ONE XL to Device
APTTEP
Adapter Plate
for EasyPort™
APTTSE
Adapter Plate
for TomTom
Start™ & Ease™
APMM200
Adapter Plate
for Mio Moov
200 Series
APMM300
Adapter Plate
for Mio Moov
300 Series & newer
Magellan GPS
APTTGO-S20
Adapter Plate for
TomTom GO
Continued on other side...
A
DG-92-08-G3
Pro.Fit™
Vehicle Specific
Mounting Bracket
(See included Pro-Fit
manual for instructions
& specific car
compatibility)
SP-SBH-Kit
Dual-T Tab
Connects to
adapter plates
TomTom ONE 125 (TomTom EasyPort Mount)
TomTom ONE 130, ONE 130-S (TomTom EasyPort Mount)
TomTom ONE 140, ONE 140-S (TomTom EasyPort Mount)
TomTom XL 325, XL 325-S (TomTom EasyPort Mount)
TomTom XL 330, XL 330-S (TomTom EasyPort Mount)
TomTom XL 340, XL 340-S (TomTom EasyPort Mount)
TomTom XXL 530-S, XXL 540-S (TomTom EasyPort Mount)
TomTom ONE (US Edition, US 3rd Edition)
TomTom ONE XL (1st Edition) - TomTom ONE XL-S (1st Edition)
TomTom ONE 22, ONE 22 Regional, ONE 22 Regional Traffic
TomTom XL 22, XL 22 Regional (TomTom EasyPort Mount)
TomTom ONE UK / EUROPE (NEW Edition aka 2nd Edition, 3rd Edition)
TomTom GO 520 / 530 / 630 / 720 / 730 / 920 / 920T / 930
TomTom Start and Ease
TomTom Device Compatibility:
*See included Pro.Fit maual for Vehicle Specific Mounting Bracket
instructions. For question regarding installation, contact Pro.Fit at
800.388.0073.
*See included Pro.Fit maual for Vehicle Specific Mounting Bracket instructions. For question regarding
installation, contact Pro.Fit at 800.388.0073.
Garmin NuviDevice Compatibility - 17mm Ball Pattern: 200, 200w, 205, 205w, 250, 250w,
255, 255w, 260, 260w, 265T, 265WT, 270, 275T, 285WT, 300, 300T, 310, 310T, 350, 360, 360T, 370, 370T, 500,
550, 600, 610, 650, 660, 670, 680, 710, 750, 755T, 760, 760T, 765T, 770, 775T, 780, 785T, 850, 855, 860, 880, 885T,
1200, 1250, 1260T, 1300, 1350, 1340T, 1350T, 1370T, 1390T, 1450, 1490T, 1690, 5000
Garmin StreetPilot Device Compatibility: c310, c340, c510, c530, c550, c580
Magellan GPS Device Compatibility:
Magellan Maestro 3100, 3140, 3200, 3210, 3220, 3225, 3250, 4000, 4010, 4040, 4050, 4210, 4215, 4200, 4220,
4245, 4250, 4350, 4370, 5310, 5340
Magellan RoadMate 300, 360, 500, 500 Plus, 700, 760, 800, 860T 1200, 1210, 1212, 1215, 1220, 1230, 1340,
1400, 1412, 1430, 1440, 1445T, 1470, 1475T, 2000, 2200T, 2250T, 3000T, 3050T, 6000T
Magellan Triton 1500, 200, 2000, 300, 400, 500
Mio Moov Device Compatibility: Mio Moov 200 Series and Mio Moov 300, 301, 310, 330, 330
Europe, 360, 370 Europe, 380, Mio Knight Rider Edition, Moov 500, S401, S501, M300, M400
NAVMAN Device Compatibility: S30, S30 3D, S50, S50 3D, S70, S90i
B
A
A
BC
Connect the dual T-tabs (A) on the dual-T pedestal to the dual
T-tab slots (B) on the adapter plate.
All brand names and product names are trademarks or registered trademarks of their respective owners.
GPS-DG9208G3 |Vehicle Specific Mounting Bracket for Most Portable GPS
!Safety Precautions
Do not install Arkon products over an air bag cover or within the air
bag deployment zone. Arkon Resources, Inc. assumes no responsi-
bility of liability for injury or death as a result of car crashes and/ or
air bag deployment.
Arkon is not responsible for any damages caused to your car, your
device, or yourself due to the installation or use of this pedestal mount.
The Mobile Mounting Specialists™
Consumer Hotline:
USA (800) 841-0884
INT’L (626) 254-9005
Monday - Friday 9 am - 5 pm, PST
www.arkon.com
Arcadia, CA 91006 USA
Designed in USA | Made in the USA & China
© Copyright 2010 Arkon Resources, Inc.
Step 1.
Step 1.
Step 1.
Step 2.
Connect TomTom Device to Pedestal with EasyPort™ pattern
Connect TomTom Start™ & Ease™ Device to Pedestal
Connect Garmin Device to 17mm ball head
While holding the mounted TomTom adapter plate, gently
insert the TomTom device (not included, sold separately) into
the adapter plate until an audible click is heard. The device
can then be rotated into the desired viewing angle.
Slide the adapter plate up into the grooves on the back of the
TomTom GO series device (not included, sold separately).
Step 1.
Step 1.
Connect TomTom GO GPS to Pedestal
Connect Adapter Plate for TomTom GO GPS
While holding the mounted TomTom adapter plate, gently insert
the TomTom device (not included, sold separately) into the
adapter plate until an audible click is heard.
Attach the dual-T adapter plate for TomTom to the pedestal by
inserting the dual-T tabs of the pedestal (A) into the dual T-slots
on the adapter plate (B).
Attach Garmin GPS to 17mm ball head by firmly pushing the
ball head (A) into the 17mm ball head socket on the back of the
device (B) as pictured below.
Step 1.
Connect Adapter Plate for TomTom EasyPort™ to Pedestal
A
B
B
A
B
A
A
B
AB
D
C
Step 1.
Connect Mio Moov 200 Series or NAVMAN 530 3D GPS Device
to Pedestal
Connect the adapter plate for Mio Moov to Mio device (not
included, sold separately) by placing the feet (A) of the adapter
into the corresponding notches (B) on the bottom of the device.
Holding the thumb tab down (C), insert the upper tooth (D) into
the recessed slot on the back of the device.
Connect the dual T-tabs (A) on the dual-T pedestal to the dual
T-tab slots (B) on the adapter plate.
Connect the dual T-tabs (A) on the dual-T pedestal to the dual
T-tab slots (B) on the adapter plate.
GPS-DG9208G3 |Vehicle Specific Mounting Bracket for Most Portable GPS
!Safety Precautions
Do not install Arkon products over an air bag cover or within the air
bag deployment zone. Arkon Resources, Inc. assumes no responsi-
bility of liability for injury or death as a result of car crashes and/ or
air bag deployment.
Arkon is not responsible for any damages caused to your car, your
device, or yourself due to the installation or use of this pedestal mount.
The Mobile Mounting Specialists™
Consumer Hotline:
USA (800) 841-0884
INT’L (626) 254-9005
Monday - Friday 9 am - 5 pm, PST
www.arkon.com
Arcadia, CA 91006 USA
Designed in USA | Made in the USA & China
© Copyright 2010 Arkon Resources, Inc.
A
Connect the dual T-tabs (E) on the dual-T pedestal to the dual
T-tab slots (F) on the adapter plate.
Step 2.
Step 1. Insert the power cord (not included, sold separately) into the
grooved slot in the bottom of the adapter plate.
Connect Mio Moov 300 Series, NAVMAN S50, S50 3D, 570, S90i or
newer Magellan Devices to Pedestal
Step 2.
B
E
F
Connect the dual T-tabs (A) on the dual-T pedestal to the dual
T-tab slots (B) on the adapter plate.
View Instruction & Updates
Online at
www.pro-fit-intl.com
©Pro.Fit International, Eagan, MN 2009
Pro.Fit International, Inc.® may not be held liable for any damage to a vehicle before, during or after the installation or removal of this VSM
G3TM. Pro.Fit International may not be held liable for any personal injury resulting from accident or improper installation. Pro.Fit International,
Inc.® 1335 Eagandale Court, Eagan, MN 55121, Ph: 651.688.3588 or 800.388.0073 Fx: 651.688.9876
PLEASE READ COMPLETE INSTRUCTIONS BEFORE INSTALLING THIS VSM G3
All instructions assume a drivers seat vantage point. Caution is advised when removing and reassembling
wood or plastic parts of a dash. Applying unnecessary force or pressure may cause a piece to crack or break.
When properly installed, the metal between the ball and 2 small holes is all that is exposed.
(Some exceptions apply).
Dash Trim Removal Tool (DTRT), Phillips screwdriver
VSM G3, A Plate, J Stem
Right of Radio
TOOLS REQUIRED:
PARTS INCLUDED:
LOCATION:
Page 8
Step 1: Place the DTRT in between the radio
bezel and the dash molding Photo #1. Gently
use the DTRT in a twisting motion around the
radio bezel releasing a series of eight (8)
retainer clips. Do not disconnect any wiring to
the bezel and simply set the radio bezel off to
the side.
Step 2: Remove the two Phillips screws securing
the right side of the radio to the dash molding
and carefully set them off to the side. Place
the VSM G3 flush to dash molding over the screw
holes and evenly tighten the VSM G3 to the right
side of the radio molding as pictured in Photo
#2.
Step 3: Once the VSM G3 is flush and secured
to the right side of the radio, replace the radio
bezel back into its secured original position.
You have successfully installed your VSM G3!
Note: Note: See the Assembly Instructions for G3
Components for additional information.
Dodge Challenger 2009-2010
DG-92-08-G3
Insert DTRT
Here
1
2
3

This manual suits for next models

1

Other Arkon Automobile Accessories manuals

Arkon GPS-TY6009G3 User manual

Arkon

Arkon GPS-TY6009G3 User manual

Arkon IPM2-FSM User manual

Arkon

Arkon IPM2-FSM User manual

Arkon CM012 User manual

Arkon

Arkon CM012 User manual

Arkon TTSE110 TTSE110 User manual

Arkon

Arkon TTSE110 TTSE110 User manual

Arkon SVE14A User manual

Arkon

Arkon SVE14A User manual

Arkon SLIM-GRIP SM5-FO7309G3 User manual

Arkon

Arkon SLIM-GRIP SM5-FO7309G3 User manual

Arkon TT123-G User manual

Arkon

Arkon TT123-G User manual

Arkon SLIM-GRIP IPM515 User manual

Arkon

Arkon SLIM-GRIP IPM515 User manual

Arkon GN033-SBH User manual

Arkon

Arkon GN033-SBH User manual

Arkon TT123 User manual

Arkon

Arkon TT123 User manual

Arkon CM097-2-USB User manual

Arkon

Arkon CM097-2-USB User manual

Arkon CM084-2-AMPS User manual

Arkon

Arkon CM084-2-AMPS User manual

Arkon AP013 User manual

Arkon

Arkon AP013 User manual

Arkon GN083 User manual

Arkon

Arkon GN083 User manual

Arkon CM932 User manual

Arkon

Arkon CM932 User manual

Arkon SM410 User manual

Arkon

Arkon SM410 User manual

Arkon TT121-USB User manual

Arkon

Arkon TT121-USB User manual

Arkon CM047-SRVC-2 User manual

Arkon

Arkon CM047-SRVC-2 User manual

Arkon Slim-Grip SM515 User manual

Arkon

Arkon Slim-Grip SM515 User manual

Arkon TTO215 User manual

Arkon

Arkon TTO215 User manual

Arkon GPS-TY7100G3 User manual

Arkon

Arkon GPS-TY7100G3 User manual

Arkon IPM125 User manual

Arkon

Arkon IPM125 User manual

Arkon CM012 User manual

Arkon

Arkon CM012 User manual

Arkon GPS-FO7208G3 User manual

Arkon

Arkon GPS-FO7208G3 User manual

Popular Automobile Accessories manuals by other brands

Chinavision CVXC-C137 user manual

Chinavision

Chinavision CVXC-C137 user manual

Monacor Carpower ENF-30 quick guide

Monacor

Monacor Carpower ENF-30 quick guide

Cruz 924-311 Assembly instructions

Cruz

Cruz 924-311 Assembly instructions

Boyo VTX3600 user manual

Boyo

Boyo VTX3600 user manual

Steel mate PTS410V11 manual

Steel mate

Steel mate PTS410V11 manual

BURY CC 9055 user manual

BURY

BURY CC 9055 user manual

EUFAB 13459 operating instructions

EUFAB

EUFAB 13459 operating instructions

PNEUMATIC KU-MB-B000-02 Installation instruction

PNEUMATIC

PNEUMATIC KU-MB-B000-02 Installation instruction

Quadratec Ski & Snowboard Rack installation manual

Quadratec

Quadratec Ski & Snowboard Rack installation manual

Polaris HK-338 quick start guide

Polaris

Polaris HK-338 quick start guide

AMiO CRR-02 user manual

AMiO

AMiO CRR-02 user manual

GATmatic GT510 user manual

GATmatic

GATmatic GT510 user manual

Panasonic CY-BT200U operating instructions

Panasonic

Panasonic CY-BT200U operating instructions

Rightline Gear 100R20 instructions

Rightline Gear

Rightline Gear 100R20 instructions

Code 3 XTP Series Installation and operation instructions

Code 3

Code 3 XTP Series Installation and operation instructions

Jensen CAR710W Installation & owner's manual

Jensen

Jensen CAR710W Installation & owner's manual

TIE DOWN LongRun 86295 installation instructions

TIE DOWN

TIE DOWN LongRun 86295 installation instructions

Code 3 DEFENDER TriCore Installation & operation manual

Code 3

Code 3 DEFENDER TriCore Installation & operation manual

manuals.online logo
manuals.online logoBrands
  • About & Mission
  • Contact us
  • Privacy Policy
  • Terms and Conditions

Copyright 2025 Manuals.Online. All Rights Reserved.