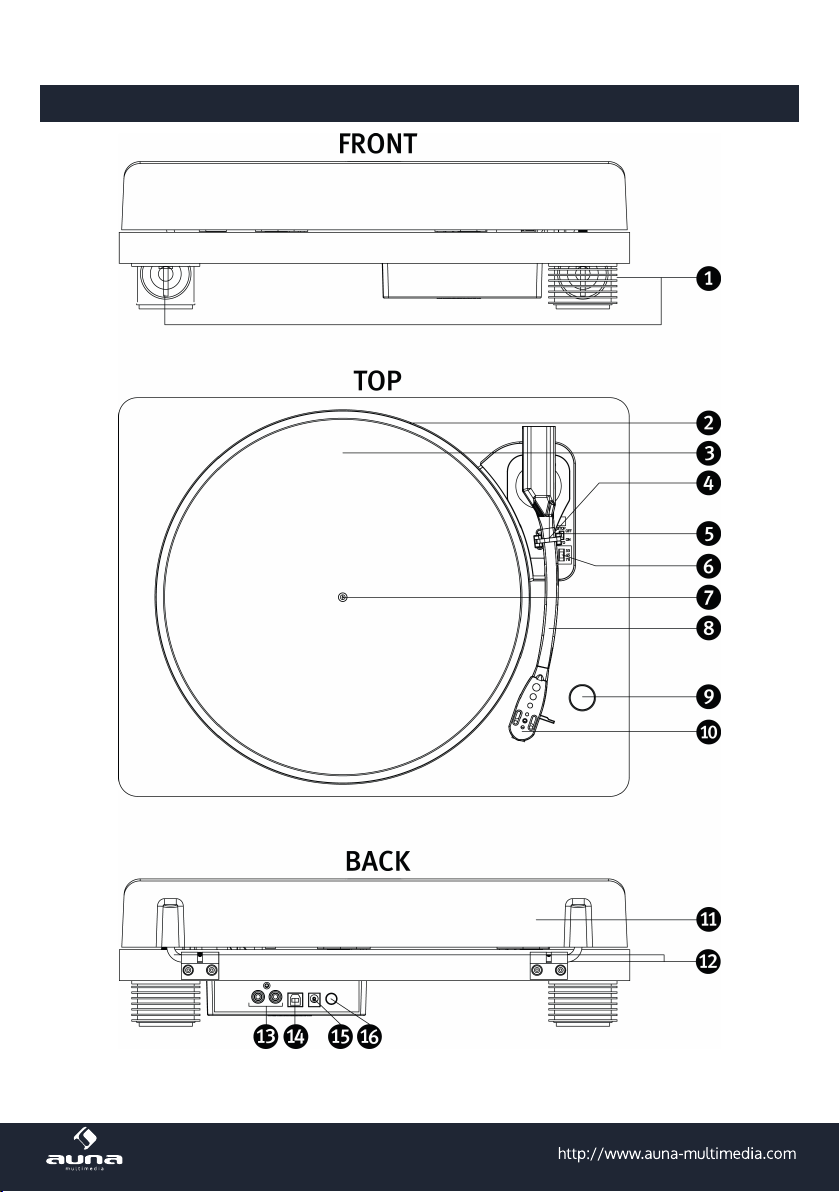
auna TT Classic User manual

www.auna-multimedia.com10029789 10029790
Plattenspieler
TT Classic

2
Sehr geehrter Kunde,
zunächst möchten wir Ihnen zum Erwerb Ihres Gerätes gratulieren.
Bitte lesen Sie die folgenden Anschluss- und Anwendungshinweise sorgfältig durch und befolgen Sie diese
um möglichen technischen Schäden vorzubeugen.
Warnung
• Diese Bedienungsanleitung dient dazu, Sie mit der Funktionsweise dieses Produktes vertraut zu ma-
chen. Bewahren Sie diese Anleitung daher stets gut auf, damit Sie jederzeit darauf zugreifen können.
• Sie erhalten bei Kauf dieses Produktes zwei Jahre Gewährleistung auf Defekt bei sachgemäßem Gebrauch.
• Bitte verwenden Sie das Produkt nur in seiner bestimmungsgemäßen Art und Weise. Eine anderweiti-
ge Verwendung führt eventuell zu Beschädigungen am Produkt oder in der Umgebung des Produktes.
• Ein Umbauen oder Verändern des Produktes beeinträchtigt die Produktsicherheit. Achtung Verlet-
zungsgefahr! Önen Sie das Produkt niemals eigenmächtig und führen Sie Reparaturen nie selber aus!
• Behandeln Sie das Produkt sorgfältig. Es kann durch Stöße, Schläge oder den Fall aus bereits geringer
Höhe beschädigt werden.
• Halten Sie das Produkt fern von Feuchtigkeit und extremer Hitze.
• Lassen Sie keine Gegenstände aus Metall in dieses Gerät fallen.
• Stellen Sie keine schweren Gegenstände auf dieses Gerät.
• Reinigen Sie das Gerät nur mit einem trockenen Tuch.
• Blockieren Sie nicht die Belüftungsönungen.
• Verwenden Sie ausschließlich vom Hersteller oder vom qualizierten Fachhandel empfohlenes Zube-
hör.
Die Gewährleistung verfällt bei Fremdeingrien in das Gerät.
Kleine Objekte/Verpackungsteile (Plastikbeutel, Karton, etc.):
Bewahren Sie kleine Objekte (z.B. Schrauben und anderes Montagematerial, Speicherkarten) und Verpa-
ckungsteile außerhalb der Reichweite von Kindern auf, damit sie nicht von diesen verschluckt werden kön-
nen. Lassen Sie kleine Kinder nicht mit Folie spielen. Es besteht Erstickungsgefahr!
Transport des Gerätes:
Bitte bewahren Sie die Originalverpackung auf. Um ausreichenden Schutz beim Transport des Gerätes zu
erreichen, verpacken Sie das Gerät in der Originalverpackung.
Reinigung der äußeren Oberäche:
Verwenden Sie keine üchtigen Flüssigkeiten, wie Insektensprays. Durch zu starken Druck beim Abwischen
können die Oberächen beschädigt werden. Gummi- oder Plastikteile sollten nicht über einen längeren
Zeitraum mit dem Gerät in Kontakt sein. Nutzen Sie ein trockenes Tuch.

3
Technische Daten
Artikelnr. 10029789, 10029790
Stromversorgung DC 5V (Netzteil für AC 220-240V, 50-60Hz im Lieferumfang enthalten)
Antriebsart Riemenantrieb
Wiedergabegeschwindigkeiten 33, 45, 78 U/min
Anschlüsse 1 x USB-Anschluss, 1 x Cinch-Ausgang
Abmessungen 40 x 35 x10cm
Lieferumfang Gerät, Mini-LP-Aufsatz („Puck“), USB-Netzadapter, USB-Kabel,
Aufnahme-Software (Audacity), Bedienungsanleitung
Vor der ersten Benutzung
• Entfernen Sie Klebeband und Transportsicherungen von dem Gerät. Achten Sie dabei darauf, den Ton-
arm oder andere bewegliche Teile nicht zu beschädigen.
• Entfernen Sie auch die Abdeckung vom Tonabnehmer.
• Beim Einsetzen oder Wechseln der Nadel: Drücken Sie die Spitze der Halterung mit einem Schrauben-
zieher vorsichtig nach unten (A). Entfernen Sie die Halterung, indem Sie sie nach vorn und unten ziehen.
Setzen Sie eine neue Nadel ein, indem Sie die Halterung festhalten und die Nadel in Richtung B drü-
cken. Drücken Sie die Halterung dann wie bei C illustriert nach oben, bis die Nadel einrastet.

4
Geräteübersicht

5
Integrierte Lautsprecher 1 9 Lautstärkeregler
Plattenteller 2 10 Tonabnehmer
Slip Mat 3 11 Staubschutz (abnehmbar)
Arm-Clip 4 12 Scharnier
Auto-Stop Schalter 5 13 Cinch-Ausgang
Umdrehungs-Wahlschalter 6 14 USB-Anschluss
Schaft 7 15 Netzteilanschluss
Tonarm 8 16 Power (on/o)
Funktionen
Allgemein
• Schließen Sie das Gerät mit dem mitgelieferten USB-Kabel am USB-Anschluss eines Computers an
oder nutzen Sie das mitgelieferte Netzteil an der Haushaltssteckdose (220V / 50Hz).
• Platzieren Sie eine Schallplate auf dem Plattenteller. Vergessen Sie nicht, falls nötig, den Puck aus
seiner Verankerung zu nehmen und auf dem Teller zu applizieren.
• Wählen Sie mithilfe des Drehzahl-Schalters die passende Geschwindigkeit.
• Drehen Sie am Lautstärkeregler (gleichzeitig An-/Ausschalter); Die Power-LED zeigt den Status des
Geräts nötigenfalls an.
• Heben Sie den Tonarm leicht an und führen Sie ihn über die ersten Rillen der Schallplatte. Der Spieler
beginnt nun automatisch die Platte zu drehen.
• Senken Sie nun den Tonarm vorsichtig, so dass die Nadel sanft auf der Platte aufsetzt.
• Genießen Sie Ihre Musikauswahl!
• Wenn eine Schallplatte zu ihrem Ende kommt, stoppt der Plattenspieler automatisch, sofern der Auto-
Stop-Schalter (7) auf „On“ steht. Steht er auf „O“, dreht der Spieler weiter, bis der Tonarm wieder
zurückgelegt wird.
• Schützen Sie die Nadel mit der mitgelieferten Schutzkappe, wenn der Plattenspieler nicht in Gebrauch ist.

6
Anschlüsse
Verbinden Sie die rückseitigen Cinch-Ausgänge mit einem passenden Kabel (mitgeliefert) mit dem AUX-
Eingang ihrer bestehenden Anlage.
Digitalisierung von LPs
Wollen Sie Ihre Schallplatten digitalisieren, nutzen Sie rückseitigen USB-Ausgang und schließen Sie den
PeggySue am USB-Port ihres Rechners an.
In der mitgelieferten Musiksoftware „Audacity“ können Sie den USB-Eingang des Computers als Signal-
quelle für die Aufnahme einstellen um so Ihre LPs zu digitalisieren.
Bitte entnehmen Sie Hinweise zum jeweiligen Vorgehen den Informationen des Softwareherstellers.
Hinweise zur Entsorgung
Bendet sich die diese Abbildung (durchgestrichene Mülltonne auf Rädern) auf dem Pro-
dukt, gilt die Europäische Richtlinie 2012/19/EU. Diese Produkte dürfen nicht mit dem
normalen Hausmüll entsorgt werden. Informieren Sie sich über die örtlichen Regelungen
zur getrennten Sammlung elektrischer und elektronischer Gerätschaften. Richten Sie sich
nach den örtlichen Regelungen und entsorgen Sie Altgeräte nicht über den Hausmüll.
Durch die regelkonforme Entsorgung der Altgeräte werden Umwelt und die Gesundheit
ihrer Mitmenschen vor möglichen negativen Konsequenzen geschützt. Materialrecycling
hilft, den Verbrauch von Rohstoen zu verringern.
Konformitätserklärung
Hersteller: Chal-Tec GmbH, Wallstraße 16, 10179 Berlin, Deutschland
Dieses Produkt entspricht den folgenden Europäischen Richtlinien:
2014/30/EU (EMV)
2014/35/EU (LVD)
2011/65/EU (RoHS)

7
Dear Customer,
Congratulations on purchasing this product. Please read and follow these instructions, in order to avoid
damaging the item. We do not cover any damages that may arise from improper use of the item or the
disregard of the safety instructions.
Important Safety Advice
• Read all instructions before using.
• To protect against a re, electric shock or personal injury, do not immerse cord, electric plugs or device
in water or other liquids.
• Do not expose the appliance to extreme temperatures. The appliance shall be used in moderate cli-
mates.
• The use of attachments that are not recommended by the appliance manufacturer may result in re,
electric shock or personal injury.
• Do not open the unit by removing any cover parts. Do not attempt to repair the unit. Any repairs or
servicing should be done by qualied personell only.
• Only qualied persons may perform technical work on the product. The product may not be
opened or changed. The components cannot be serviced by the user. The manufacturer is not respon-
sible for any radio or TV interference caused by unauthorized modications.
• The appliance is not a toy. Do not let children play with it. Never let children insert foreign objects into
the appliance.
• Never clean the surface of the device with solvents, paint thinners, cleansers or other chemical prod-
ucts. Instead, use a soft, dry cloth or soft brush.
• Save these instructions.
Small objects
Keep small objects (i.e. screws, mounting material, memory cards etc.) and packaging out of the range of
children. Do not let Children play with foil. Choking hazard!
Transporting the device
Please keep the original packaging. To gain suicient protection of the device while shipment or transporta-
tion, make sure to put it back in its original packaging.
Cleaning the surface
Do not use any volatile liquids, detergents or the like. Use a clean dry cloth.

8
Technical Data
Item # 10029789, 10029790
Power supply DC 5V (mains adapter for AC 220-240V, 50-60Hz supplied)
Drive Belt drive
Playable Speeds 33, 45, 78 RPM
Connections 1 x USB input, 1 x RCA output
Dimensions 40 x 35 x 10cm
Included Device, "Puck" for 45RPM singles, USB power adapter, USB cable,
recording software (Audacity), user manual
Before Initial Use
• Remove any tape and any protective material or transport safety styrofoam carefully to prevent dam-
ages from any movable parts.
• Remove the stylus cover.
• When inserting or exchanging the stylus,
• place a screwdriver at the tip of the stylus and push downward as shown in direction “A”.
• Remove the stylus by pulling the stylus forward and pushing downward. Hold the tip of the stylus
and insert the stylus by pressing as shown in direction “B”.
• Push the stylus upward as in direction „C“ until the stylus locks into the tip position.

9
Overview

10
Speakers 1 9 Volume knob
Platter 2 10 Stylus cartridge
Slip mat 3 11 Removable dust cover
Turntable arm lock 4 12 Hinge
Auto Stop control switch 5 13 RCA output jack
Speed selection switch 6 14 USB jack
Turntable shaft 7 15 DC in
Tone arm 8 16 Power (on/o)
Operation
Basics
• Use the supplied USB cable and the AC/DC adaptor to connect the device to a household mains supply
or connect to your PC with the USB cable.
• Place a record on the platter. Do not forget the puck when playing 45-RPM-singles.
• Select the suitable speed with the RPM switch.
• Turn the VOL/POWER knob clockwise to turn the device on and - at the same time - adjust the volume.
• Use the lever (5) to raise the tone arm and lead it towards the outer grooves of the record. The player
starts rotating the record.
• Use the lever to lower the tone arm until the stylus runs on the record groove.
• Enjoy some music.
• When a record ends, the record player automatically stops - as long as the auto stop switch is set to
„ON“. When it is set to OFF, the player keeps on rotating the record until the tone arm is manually
taken o the record.
• Use the stylus cover when the record player is not in use.

11
Connection
For listening at your home stereo, use the backward RCA jacks to connect the player to the AUX IN of your
home stereo amplier.
Convert your LPs to MP3/Wav
Use the supplied USB cable to connect your record player to your computer. With the supplied software
"Audacity" you can use the USB port of your computer as an input source and convert your favourite records
to MP3 les.
Please take detailed notes on how to record from the "Audacity" help le.
Environmental Concerns
According to the European waste regulation 2012/19/EU this symbol on the product or
on its packaging indicates that this product may not be treated as household waste. In-
stead it should be taken to the appropriate collection point for the recycling of electrical
and electronic equipment. By ensuring this product is disposed of correctly, you will help
prevent potential negative consequences for the environment and human health, which
could otherwise be caused by inappropriate waste handling of this product. For more
detailed information about recycling of this product, please contact your local council or
your household waste disposal service.
Declaration of Conformity
Manufacturer: Chal-Tec GmbH, Wallstraße 16, 10179 Berlin, Germany.
This product is conform to the following European directives:
2011/65/EU (RoHS)
2014/30/EU (EMC)
2014/35/EU (LVD)

12
Estimado cliente:
Le felicitamos por la adquisición de este producto. Lea atentamente el siguiente manual y siga cuidado-
samente las instrucciones de uso con el n de evitar posibles daños. La empresa no se responsabiliza de
los daños ocasionados por un uso indebido del producto o por haber desatendido las indicaciones de
seguridad.
Advertencia
• Este manual de instrucciones tiene como objetivo familiarizarle con el funcionamiento del producto.
Conserve este manual para que pueda realizar futuras consultas.
• Con la compra de este producto obtiene dos años de garantía en caso de defecto o avería provocados
por un uso normal del aparato.
• Utilice el producto solamente tal y como aparece indicado en este manual. Un uso alternativo puede
provocar daños en el mismo o en su entorno.
• La transformación o cambio del producto reduce la seguridad del mismo. Riesgo de lesiones. Nunca
abra el aparato ni intente repararlo usted mismo.
• Trate el producto con cuidado. Puede averiarse si recibe golpes, impactos o caídas, incluso desde poca
altura.
• Mantenga el producto alejado de la humedad y del calor extremo.
• No deje caer objetos de metal sobre el aparato.
• No coloque objetos pesados encima del aparato.
• Limpie el aparato utilizando solamente un paño seco.
• No obstruya las ranuras de ventilación.
• Utilice exclusivamente los accesorios recomendados por el fabricante o por un proveedor cualicado.
La garantía expirará si abre el aparato.
Piezas pequeñas/partes del embalaje (bolsas de plástico, cartón, etc.)
Mantenga las piezas pequeñas (p.ej. tornillos y otro material de montaje) y las partes del embalaje fuera
del alcance de los niños para evitar que se atraganten. No permita que los niños pequeños jueguen con los
plásticos, pueden provocar riesgo de asxia.
Transporte del aparato:
Conserve el embalaje original. Para proteger el aparato durante el transporte, introdúzcalo en su embalaje
original.
Limpieza exterior:
No utilice líquidos volátiles, como sprays insecticidas. El exterior del aparato podría dañarse si se frota
demasiado fuerte. Evite que el aparato esté en contacto continuado con objetos de goma o plástico. Utilice
un paño seco.

13
Datos técnicos
Número de artículo 10029789, 10029790
Suministro eléctrico DC 5V (Fuente de alimentación AC 220-240V, 50-60Hz incluida)
Tipo de motor Motor de correa
Velocidad de reproducción 33, 45, 78 revoluciones/min
Conexiones 1x conexión USB, 1x salida RCA
Dimensiones 40 x 35 x10 cm
Contenido del envío Aparato, aguja (puck) para mini LP, adaptador USB, cable USB, soft-
ware de grabación (Audacity), manual de instrucciones.
Antes del primer uso
• Retire la cinta adhesiva y los seguros para el transporte del aparato. Asegúrese de que el brazo y otras
piezas móviles no se dañan durante el proceso.
• Retire la tapa de la aguja.
• Para colocar o sustituir la aguja: Presione la punta del soporte con un destornillador hacia abajo (A).
Retire el soporte tirando de él hacia adelante y hacia abajo simultáneamente. Coloque la aguja suje-
tando el soporte y presionando la aguja en dirección al punto B. Presione el soporte como muestra la
acción C hacia arriba hasta que la aguja se encaje.

14
Descripción del aparato

15
Altavoz integrado 1 9 Regulador de volumen
Plato 2 10 Aguja
Alfombrilla adherente 3 11 Protección antipolvo (extraíble)
Pinza del brazo 4 12 Bisagra
Interruptor detención automática 5 13 Salida RCA
Interruptor para modicar revoluciones 6 14 Conexión USB
Eje 7 15 Conexión de la fuente de alimentación
Brazo 8 16 Power (on/o)
Funciones
General
• Conecte el aparato con el cable USB incluido a una conexión USB del ordenador o utilice el adaptador
de red para conectarlo a una toma de corriente (220V / 50Hz).
• Coloque un disco sobre el plato. No olvide retirar el adaptador de su soporte si fuera necesario y
colocarlo en el plato.
• Seleccione el número de revoluciones con el interruptor correspondiente.
• Gire el regulador de volumen (interruptor on/o); el LED de encendido muestra el estado del aparato.
• Eleve ligeramente el brazo y guíelo sobre las primeras ranuras del disco. El reproductor comenzará a
girar el disco automáticamente.
• Baje el brazo con cuidado para que la aguja se coloque suavemente sobre el disco.
• Disfrute de la música.
• Cuando se haya terminado la reproducción del disco, el tocadiscos se detendrá automáticamente si el
interruptor automático (7) está colocado en la posición „on“. En caso contrario, el reproductor conti-
nuará funcionando hasta que retire el brazo.
• Proteja la aguja con la cubierta incluida cuando no utilice el tocadiscos.

16
Conexiones
Conecte la salida RCA trasera con el cable incluido a una entrada AUX de otro dispositivo.
Digitalización de LP
Si desea digitalizar sus discos, utilice la salida USB trasera y conecte el TT Classic a un puerto USB de su
ordenador.
En el software incluido “Audacity” puede digitalizar la entrada USB del ordenador y establecerla como
fuente de sonido para iniciar la grabación. Siga las instrucciones del proceso indicadas por el responsable
del software.
Indicaciones para la retirada del aparato
Si el aparato lleva adherida la ilustración de la izquierda (el contenedor de basura tacha-
do) entonces rige la normativa europea, directiva 2012/19/UE. Este producto no debe
arrojarse a un contenedor de basura común. Infórmese sobre las leyes territoriales que
regulan la recogida separada de aparatos eléctricos y electrónicos. Respete las leyes
territoriales y no arroje aparatos viejos al cubo de la basura doméstica. Una retirada de
aparatos conforme a las leyes contribuye a proteger el medio ambiente y a las personas a
su alrededor frente a posibles consecuencias perjudiciales para la salud. El reciclaje ayuda
a reducir el consumo de materias primas.
Declaración de conformidad
Fabricante: Chal-Tec GmbH, Wallstrafte 16, 10179 Berlín (Alemania).
Este producto cumple con las siguientes directivas europeas:
2014/30/UE (EMC)
2014/35/UE (LVD)
2011/65/UE (refundición RoHS)

17
Chère cliente, cher client,
Toutes nos félicitations pour l’acquisition de ce nouvel appareil. Veuillez lire attentivement et respecter
les consignes suivantes de branchements et d’utilisation pour éviter d’éventuels dommages techniques.
Consignes de sécurité
• Ce mode d’emploi sert à vous familiariser aux fonctions de ce produit. Conservez-le bien an de
pouvoir vous y référer à tout moment.
• L’achat de ce produit donne droit à une garantie de deux ans en cas de défectuosité de l’appareil
sous réserve d’une utilisation appropriée de celui-ci.
• Veiller à utiliser le produit conformément à l’usage pour lequel il a été conçu. Une mauvaise utili-
sation est susceptible d’endommager le produit ou son environnement.
• Tout démontage ou toute modication de l’appareil porte atteinte à la sécurité du produit. Atten-
tion aux risques de blessure ! Ne jamais ouvrir le produit de son propre chef et ne jamais le réparer
soi-même !
• Manipuler le produit avec précaution. Les chocs, les coups ou les chutes - même de faible hauteur
- peuvent endommager l’appareil.
• Ne pas exposer le produit à l’humidité ou à une chaleur extrême.
• Ne pas introduire d’objets métalliques dans cet appareil.
• Ne pas poser d’objets lourds sur l’appareil.
• Nettoyer l’appareil uniquement avec un chion sec.
• Ne pas obstruer les ouvertures d’aération.
• Utiliser uniquement les accessoires recommandés par le fabricant ou par une entreprise spéciali-
sée et qualiée.
Toute ouverture non autorisée de l’appareil entraîne l’annulation de la garantie.
Petits objets / éléments d’emballage (sac plastique, carton, etc.)
Tenir les petits objets (par exemple les vis et le matériel d’assemblage, les cartes mémoire) et le maté-
riel d’emballage hors de la portée des enfants pour éviter qu’ils ne les avalent. Empêcher les enfants de
jouer avec les lms de protection. Il existe un risque d’étouement !
Transport de l’appareil
Conserver l’emballage d’origine. Pour garantir une protection suisante de l’appareil pendant son
transport, emballer l’appareil dans son emballage d’origine.
Nettoyage en surface de l’appareil
Ne pas utiliser de liquides volatiles comme ceux contenus dans les bombes insecticides. Une pression
trop importante exercée sur la surface de l’appareil pendant le nettoyage peut l’endommager. Éviter le
contact prolongé du caoutchouc ou du plastique avec l’appareil. Utiliser un chion sec.

18
Fiche technique
Numéro d’article. 10029789, 10029790
Alimentation électrique DC 5 V (bloc d’alimentation pour AC 220-240 V, 50-60 Hz fourni dans
l’emballage)
Type de fonctionnement Entraînement par courroie
Vitesse de lecture 33, 45, 78 tours/min
Connecteurs 1x port USB, 1x sortie RCA
Dimensions 40 x 35 x 10 cm
Contenu de l’emballage Appareil, centreur de disque (« Puck »), adaptateur secteur USB, câble USB,
logiciel d’enregistrement (Audacity), Mode d’emploi
Avant la première utilisation
• Retirer les rubans adhésifs et les xations de transport de l’appareil. Ce faisant, veiller à ne pas
endommager le bras de lecture ou toute autre pièce mobile.
• Retirer également la protection de la tête de lecture.
• Pour installer ou remplacer le diamant : avec précaution et en s’aidant d’un tournevis, exercer une
pression vers le bas sur l’extrémité du support (A). Retirer le support en tirant dessus vers l’avant
et vers le bas. Installer un nouveau diamant en maintenant le support et en dirigeant le diamant
vers B. Puis appuyer sur le support comme illustré en C jusqu’á ce que le diamant s’encliquète.

19
Aperçu de l’appareil

20
Enceintes stéréo intégrées 1 9 Bouton de volume
Platine 2 10 Tête de lecture
Slip Mat 3 11 Couvercle anti-poussière
Support du bras de lecture 4 12 Charnière
Bouton auto-stop 5 13 Sortie RCA
Sélecteur de vitesse 6 14 Prise USB
Tige 7 15 Prise secteur pour bloc d’alimentation
Bras de lecture 8 16 Marche/arrêt (on/o)
Fonctions
Généralités
• Brancher l’appareil au porte USB d’un ordinateur à l’aide du câble USB fourni ou utiliser le bloc
d’alimentation fourni en le branchant à une prise de courant électrique (220 V/ 50 Hz).
• Placer un disque vinyle sur la platine. Ne pas oublier de placer le puck au centre de la platine si
nécessaire.
• Sélectionner la vitesse souhaitée à l’aide du sélecteur de tours/minutes.
• Régler le volume avec le bouton de volume (qui sert également de bouton marche/arrêt) ; le
voyant LED de marche aiche le statut de l’appareil si nécessaire.
• Soulever légèrement le bras de lecture et le placer au-dessus du premier sillon du disque vinyle.
Le lecteur se met automatiquement à tourner la platine.
• Rabaisser avec précaution le bras de lecture de sorte à ce que le diamant se pose délicatement
sur le disque.
• Prenez du plaisir en écoutant la musique !
• Lorsqu’un disque vinyle arrive à sa n, la platine vinyle s’arrête automatiquement de tourner si le
bouton auto-stop (7) est sur « On ». S’il est sur « O », le lecteur continue de tourner jusqu’à ce que
l’utilisateur soulève le bras de lecture et le replace sur son support.
• Protéger le diamant avec le capuchon de protection fourni lorsque la platine vinyle n’est pas utili-
sée.
Table of contents
Languages:
Other auna Turntable manuals

auna
auna Peggy Sue User manual

auna
auna Belle Epoque 1905 User manual

auna
auna TT-Play PLUS User manual

auna
auna Belle Epoque 1912 User manual

auna
auna 10032018 User manual

auna
auna The Player User manual

auna
auna Belle Epoque 1908 User manual

auna
auna Jerry Lee Series User manual

auna
auna Belle Epoque 1905 User manual

auna
auna TT-Classic Light User manual

auna
auna Blackwood & Deerwood User manual

auna
auna 10008989 User manual

auna
auna Belle Epoque 1907 User manual

auna
auna Verticalo User manual

auna
auna Vinyl Clean User manual

auna
auna Berklee TT Play User manual

auna
auna ClearTech Record Player User manual

auna
auna Peggy Sue BT User manual

auna
auna TT-186E User manual

auna
auna Verticalo SE User manual