auna TT-186E User manual

http://www.auna-multimedia.com
Plattenspieler
Stereoanlage mit USB-MP3-Aufnahme
10006239

2
Sehr geehrter Kunde,
wir gratulieren Ihnen zum Erwerb Ihres Gerätes. Lesen Sie die folgenden Hinweise sorgfältig durch
und befolgen Sie diese, um möglichen Schäden vorzubeugen. Für Schäden, die durch Missachtung
der Hinweise und unsachgemäßen Gebrauch entstehen, übernehmen wir keine Haftung.
Sicherheitshinweise
• Verwenden Sie das Gerät nicht in der Nähe von Wasser und setzen Sie es keiner Feuchtigkeit aus.
• Stellen Sie sicher, dass keine Flüssigkeiten über dem Gerät vergossen werden.
• Bewegen Sie das Gerät vorsichtig.
• Blockieren Sie nicht die Belüftungsauslässe.
• Setzen Sie das Gerät keiner zu starken Hitze oder Sonne aus.
• Falls ein Mangel am Gerät auftritt oder das Stromkabel beschädigt ist, führen Sie keine Reparatu-
ren selbst durch. Lassen Sie das Gerät nur von einem Fachmann reparieren.
• Die Gewährleistung erlischt, sollten Sie das Gerät selbst önen oder reparieren.
Batterien einlegen
• Das Batteriefach bendet sich auf der Rückseite der Fernbedienung.
• Entfernen Sie die Abdeckung durch Drücken des Hebels.
• Legen Sie 2 AAA Batterien (nicht im Lieferumfang enthalten) in das Fach ein. Beachten Sie hierbei
die Polung.
• Setzen Sie die Abdeckung wieder ein.
Anordnung der Bedienelemente
1 Staubschutz
2 LCD-Anzeige
3 Aufnahme-Taste
4 Quelle-Taste
5 Power-LED
6 Lautsprecher links
7 Aus/Funktionsschalter
8 3,5mm-Kopfhöreranschluss
9 USB-Anschluss
10 Bandwahl
11 SD/MMC Kartenslot
12 +10 Taste
13 Überspringen zurück Taste
14 Wiedergabe/Pause/Stopp
15 X-Bass ein/aus
16 Fernbedienungsempfänger
17 Lautsprecher rechts
18 Lautstärkeregler
19 Frequenzregler
20 FM Stereo LED-Anzeige
21 Überspringen vor Taste
22 LED Skalenzeiger
23 Spindeladapter
24 Plattentellergeschwindigkeitsregler
25 Tonarmhalter
26 Line-Ausgang
27 FM-Antenne
28 Auto-Stopp ein/aus
29 Netzkabel
2

3
Inbetriebnahme
• Entpacken Sie das Gerät und alle Teile und entfernen Sie die Schutzverpackungen/-folien.
• Verbinden Sie das Gerät erste mit der Stromquelle, wenn alle anderen notwendigen Verbindungen
sichergestellt wurden.
• Verdecken Sie nicht die Belüftungsönungen. Stellen Sie sicher, dass rund um das Gerät einige
Zentimeter Luft sind.
Stromanschluss: Verbinden Sie das Netzkabel (29) mit einer Steckdose. Stellen Sie Aus/ Funktion
(7) auf „PHONO“ oder „USB/SD“. Die Power-LED (5) schaltet sich ein. Das Gerät ist nun betriebsbe-
reit und kann Musik wiedergeben.
Radio hören
Manuelles Einstellen:
Stellen Sie die Funktionswahltaste (7) auf „Tuner“ und wählen sie das gewünschte Band mit dem
Bandwahlschalter (10). Drehen sie den Frequenzregler (19) um den gewünschten Sender zu erhal-
ten. Regeln Sie die Lautstärke mit dem Lautstärkeregler (18).
FM-Stereo Empfang:
Stellen Sie den Bandwahlschalter (10) auf FM und die Sender werden in Mono empfangen. Im
manchen Fällen wird hierdurch der Empfang von schwachen Sendern verbessert. Stellen Sie den
Bandwahlschalter (10) auf FM-St und die Sender werden in Stereo empfangen. Die FM-St LED (20)
leuchtet nun.
Hinweise für einen besseren Empfang:
AM: Die Stabantenne kann bewegt und umgestellt werden um die Empfangsqualität zu verbessern.
FM: Die Wurfantenne (31) sollte vollständig abgewickelt und ausgestreckt sein.
Wiedergabe von USB oder Speicherkarte
Anschluss
Das System ist in der Lage MP3 Dateien die auf USB Speichermedien oder Speicherkarten sind wie-
derzugeben.
Stellen Sie die Funktionswahltaste (7) auf „USB/SD“ und wählen
Sie mit der Quelle-Taste (4) „USB“ oder „card“ aus.
Schließen Sie einen USB-Speicher an oder legen Sie eine Spei-
cherkarte ein. Legen Sie ein USB-Medium oder eine Speicherkarte
falschherum ein, kann dies das Gerät und/oder den Speicher be-
schädigen.
Das Gerät liest das Medium nach dem Einlegen automatisch ein,
zeigt die Anzahl der vorhandenen Titel an und startet die Wieder-
gabe.
Hinweis: Der USB-Anschluss unterstützt keine USB-Verlängerungskabel und kann auch nicht direkt
mit einem PC verbunden werden.
3

4
Wiedergabe/Pause/Stopp
Drücken Sie „Play/pause/stop“ (14) um die Wiedergabe des ersten Titels zu starten. Um die Wieder-
gabe zu unterbrechen, drücken Sie „Play/pause/stop“ (14). Die Abspieldauer hält an. Drücken Sie
zum Fortsetzen der Wiedergabe erneut „Play/pause/stop“ (14). Falls Sie „Play/pause/stop“ (14) für
mehr als 2 Sekunden gedrückt halten, wird die Wiedergabe gestoppt.
Überspringen/Suchmodus (Überspringen/Suche vor/ Überspringen/Suche zurück)
Drücken Sie während der Wiedergabe „skip up“ (21) wechselt das Gerät zum nächsten Titel.
Drücken Sie während der Wiedergabe „skip down“ (13) wechselt das Gerät zum Beginn des aktuellen
Titels. Drücken Sie erneut „skip down“ (13) wechselt das Gerät zum vorherigen Titel. Falls Sie „skip
up/down“ (21,13) während der CD/MP3-Wiedergabe gedrückt halten, spult das Gerät vor/zurück
solange die Taste gedrückt wird. Hinweis: Der Ton ist während des Vor-/Rücklaufs deaktiviert.
+10/-10 Titel (über Fernbedienung):
Drücken Sie +10 (12)/-10 um 10 Titel vor oder zurück zu springen.
ID3 (Titel/Album) Funktion (über Fernbedienung):
Drücken Sie „Info“ während der MP3-Wiedergabe und die Titelinformation wird angezeigt. Drücken
Sie zum Deaktivieren erneut „Info“.
Titelname Suchfunktion (über Fernbedienung)
Sie können Lieder mittels Titelnamen im Stoppmodus suchen: Drücken Sie einmal „Find“ und danach
„skip up“ (oder „skip down“) (21,13). Nun können Sie die Titel in alphabetischer Reihenfolge durch-
suchen und durch Drücken von „Play/pause/stop“ (14) wiedergeben.
Hinweis: Ist für den Titel kein Name festgelegt, wird „nole“ auf der LCD-Anzeige (2) angezeigt. Die
LCD-Anzeige (2) unterstützt nur englische Schriftzeichen.
Anforderungen an MP3-Titel:
• MP3-Bitrate: 128kbps
• Die Wiedergabeleistung variiert je nach Aufnahmequalität. Das Einlesen der CDs ist durch die län-
gere Spieldauer auch länger.
Wiederholung/Intro/Zufallswiedergabe
Drücken Sie „repeat/intro/random“ vor oder während der Wiedergabe, um um folgende Wiederga-
bemodi zu aktivieren: (1) Wiederholung 1 >(2) Wiederholung alle Titel > (3) Intro > (4) Zufallswie-
dergabe > (5) aus
Wiedergabemodus LCD-Anzeige
Wiederholung Titel
Wiederholung alle ALL
Intro INTRO
Zufallswiedergabe RANDOM
Aus -------------
4

5
Wiederholung: Sie können ununterbrochen einen Titel oder alle Titel hören.
Introwiedergabe (über Fernbedienung): Sie können sich die ersten 10 Sekunden aller Titel auf
der CD anhören.
Zufallswiedergabe: Sie können sich alle Titel in zufälliger Reihenfolge anhören.
Programmierte Wiedergabe (über Fernbedienung)
Sie können bis zu 10 CD/MP3-Titel in beliebiger Reihenfolge wiedergeben. Das Gerät muss sich dafür
im Stopp-Modus benden:
1. Wechseln Sie in den USB/SD-Modus und stoppen Sie die Wiedergabe.
2. Drücken Sie „Program“ und „PROG“ wird angezeigt. Des weiteren wird die Programm- und die
Titelnummer angezeigt.
3. Wählen Sie den gewünschten Titel mit 21/13.
4. Drücken Sie „Program“ um den Titel der Programmierung hinzuzufügen.
5. Wiederholen Sie die Schritte 3 und 4 für alle weiteren Titel.
6. Haben Sie alle Titel der Wiedergabeliste hinzugefügt drücken Sie zum Starten der Wiedergabe 14.
7. Zum Beenden der Wiedergabe drücken Sie „STOP“ bis „PROG“ auf der Anzeige (2) erlischt.
MP3-Dateien von Schallplatte erstellen
Das Gerät kann von Schallplatte MP3-Dateien erstellen und auf USB oder SD/MMC-Karte speichern.
A. Schallplatte encodieren
1. Schließen Sie einen USB-Speicher mit ausreichend freiem Speicher an.
2. Wählen Sie die Funktion „Phono“ (7) und drücken Sie danach sofort „Record“ (3).
3. Die LCD-Anzeige (2) zeigt blinkend „USB“ an und danach während der Encodierung oder
&
4. Starten Sie die Wiedergabe der gewünschten Schallplattentitel.
5. Drücken Sie zum Beenden „Record“ (3), das Display hört auf zu blinken und zeigt „Phono“ an.
Hinweis:
• Die Aufnahmegeschwindigkeit beträgt 1:1 zur Wiedergabedauer.
• Das Gerät erstellt einen Ordner zur Encodierung.
• Das Aufnahmeformat ist voreingestellt - MP3-Bitrate: 128kbps, 44.1khz.
• Kein Titel wird während der Encodierung aufgenommen.
• Um die Aufnahme zu unterbrechen, drücken Sie erneut „Record“.
• Die Dateien werden auf USB gespeichert, falls USB und Speicherkarte eingelegt sind.
• Da standardmäßig zu USB encodiert wird, kann es zu Fehlern kommen, falls Sie zu SD encodie-
ren wollen und ein USB-Speicher angeschlossen ist. Schließen Sie deshalb in dieser Zeit keinen
USB-Speicher an.
B. Titeltrennung (über Fernbedienung)
Sie können die von Schallplatte zu USB/SD aufgenommene Musik in Titel aufteilen. Jedes Mal wenn
Sie „ “ drücken, wird eine neue Datei/Titel erzeugt. Der Text „PHONO““ blinkt zur Bestätigung kurz
auf der Anzeige (2).
Entnehmen von USB/Speicherkarte
Um ein Speichermedium zu entnehmen, muss das Gerät zuerst ausgeschaltet oder in einen anderen
Modus z.B. CD, Kassette, Schallplatte geschaltet werden. Ziehen Sie einen USB-Speicher ab oder
ziehen Sie die Speicherkarte gerade aus dem Kartenslot.
5

6
Schallplatte
Hinweis: Entfernen Sie den Nadelschutz. Lösen Sie den Tonarm vor dem Gebrauch vom Halter und
befestigen Sie diesen nach Gebrauch wieder am Halter.
1. Stellen Sie die Funktionswahltaste (7) auf „Phono“.
2. Stellen Sie die Geschwindigkeit am Plattentellergeschwindigkeitsregler ein.
3. Legen Sie die Schallplatte auf den Plattenteller (verwenden Sie den Spindeladapter falls notwen-
dig).
4. Heben Sie den Tonarm an und bewegen Sie diesen langsam zum Rand der Schallplatte. Der Plat-
tenteller beginnt sich zu drehen.
5. Legen Sie den Tonarm auf die gewünschte Stelle der Schallplatte.
6. Regeln Sie die Lautstärke.
7. Am Ende der Schallplatte stoppt der Plattenteller automatisch. Heben Sie nun den Tonarm an und
legen diesen auf den Halter.
8. Um den Plattenteller manuell zu stoppen, heben Sie den Tonarm an und legen diesen auf den
Halter.
Hinweis: Sollte die Schallplatte über Auto-Stopp-Bereiche verfügen und Auto-Stopp aktiv sein, hält
der Plattenteller vor dem Ende der Schallplatte an. (Zum Aktivieren der Auto-Stopp-Funktion schal-
ten Sie das Gerät aus und den Auto-Stopp-Schalter (28) auf ein). Beginnen Sie nun die Wiedergabe.
Line-Ausgang
Sie können das Gerät an ein vorhandenes HiFi-System mittels Cinch-Kabel anschließen. Verwenden
Sie hierzu den Line-Ausgang (26).
Fernbedienung
• Die Fernbedienung benötigt zum Betrieb 2 AAA-Batterien.
• Die Batterien sind nicht im Lieferumfang enthalten.
Tastenbelegung
1) Find
2) Info
3) Rec
4) Rep/intro/ran
5) Program
6) Play/pause
7) Skip/search forward
Skip/search backward
8) Stop
9) +10/-10
10) Source
11) Track separation
Dateinamensuche
ID3-Anzeige
Aufnahme/Kopieren
Wiederholung/Intro/Zufallswiedergabe
Programmierte Wiedergabe
Wiedergabe/Pause
Überspringen vor, Vorlauf
Überspringen zurück, Rücklauf
Stopp/Programmierte Wiedergabe beenden
10 Titel vor/zurück während der MP3-Wiedergabe
CD/USB oder SD-Modus
Titeltrennung während der Aufnahme
6

7
Sicherheitshinweise
• Diese Bedienungsanleitung dient dazu, Sie mit der Funktionsweise dieses Produktes vertraut zu machen. Be-
wahren Sie diese Anleitung daher stets gut auf, damit Sie jederzeit darauf zugreifen können.
• Sie erhalten bei Kauf dieses Produktes zwei Jahre Gewährleistung auf Defekt bei sachgemäßem Gebrauch.
• Bitte verwenden Sie das Produkt nur in seiner bestimmungsgemäßen Art und Weise. Eine anderweitige Ver-
wendung führt eventuell zu Beschädigungen am Produkt oder in der Umgebung des Produktes.
• Ein Umbauen oder Verändern des Produktes beeinträchtigt die Produktsicherheit. Achtung Verletzungsgefahr!
• Önen Sie das Produkt niemals eigenmächtig und führen Sie Reparaturen nie selber aus!
• Behandeln Sie das Produkt sorgfältig. Es kann durch Stöße, Schläge oder den Fall aus bereits geringer Höhe
beschädigt werden.
• Halten Sie das Produkt fern von Feuchtigkeit und extremer Hitze.
Hinweise zur Entsorgung
Bendet sich die linke Abbildung (durchgestrichene Mülltonne auf Rädern) auf dem
Produkt, gilt die Europäische Richtlinie 2012/19/EU. Diese Produkte dürfen nicht mit
dem normalen Hausmüll entsorgt werden. Informieren Sie sich über die örtlichen
Regelungen zur getrennten Sammlung elektrischer und elektronischer Gerätschaf-
ten. Richten Sie sich nach den örtlichen Regelungen und entsorgen Sie Altgeräte
nicht über den Hausmüll. Durch die regelkonforme Entsorgung der Altgeräte werden
Umwelt und die Gesundheit ihrer Mitmenschen vor möglichen negativen Konsequen-
zen geschützt. Materialrecycling hilft, den Verbrauch von Rohstoen zu verringern.
Das Produkt enthält Batterien, die der Europäischen Richtlinie 2006/66/EG unterliegen und nicht mit
dem normalen Hausmüll entsorgt werden dürfen. Bitte informieren Sie sich über die örtlichen Be-
stimmungen zu gesonderten Entsorgung von Batterien. Durch regelkonforme Entsorgung schützen
Sie die Umwelt und die Gesundheit ihrer Mitmenschen vor negativen Konsequenzen.
7

8
Important Safety Instructions
01. Read the instructions. All uses guidelines must be read before start device.
02. Keep the instructions for future use.
03. Attention, use and security guidelines must be respected.
04. The device must not be used near water or be put in contact with moisture.
05. Make sure has no liquid is spilled on device and device openings.
06. Move device carefully, avoid shocks.
07. Do not block the breakdown of the device outputs.
08. Do not place the device near from a heat source (e.g. radiator). Do not expose it to the Sun.
09. Plug the device as indicate on this information form.
10. This device has a connection with overload protection (security device) decision-making. If the
replacement of decision-making is required, please you send has an experienced or the device ma-
nufacturer technician.
11. For cleaning the device, please follow the recommendations of the notice.
12. The sector cord should be unplugged a long period of use.
13. Device shall be repaired by a qualied person when:
a. the taken or the power cord is damaged,
b. objects have fallen into the apparatus or a liquid has been spilled into device,
c. device was exposes to the rain,
d. device does not work correctly without notable exterior change,
e. device fell and the subwoofer is broken.
14. The user shall not try to maintain device beyond that which is described in this information form.
The guarantee would negate.
15. Unpack all parts and remove protective material.
16. Do not connect the unit to the mains before checking the mains voltage and before all other
connections have been made.
17. Do not cover any vents and make sure that there is a space of several centimeters around the
unit for ventilation.
18. The apparatus shall not be exposed to dripping or splashing and that no objects lled with liquids,
such as vases, shall be placed on the apparatus.
19. The ventilation should not be impeded by covering the ventilation openings with items, such as
newspapers, table-cloths, curtains, etc.
20. No naked ame sources, such as lighted candles, should be placed on the apparatus.
21. The mains plug is used as the disconnect device, the disconnect device shall remain readily ope-
rable.
Battery Installation
The battery compartment is located on the back of the remote control.
1. Remove the battery compartment door by pressing in on the tab and
lifting it o.
2. Insert two (2) AAA size batteries (not included) into the battery com-
partment following the polarity markings inside the battery compartment.
3. Replace the battery compartment door.
8

9
Location of Controls
01) Dust Cover
02) LCD Display
03) Record Button
04) Source Button
05) Power LED Indicator
06) Left Speaker
07) O/Functions Selector
08) 3.5mm headphone Jack
09) USB Socket
10) Radio Band Selector
11) SD/MMC Card Slot
12) +10 Button
13) Skip Down Button
14) Play/Pause/Stop Button
15) X-Bass On/O Button
16) Remote Sensor
17) Right Speaker
18) Volume knob
19) Tuning Knob
20) FM Stereo LED Indicator
21) Skip Up Button
22) LED Dial Pointer
23) Spindle Adaptor
24) Turntable Speed Selector
25) Pick-Up Holder
26) Line Out Socket
27) FM Wire Antenna
28) Auto Stop On/O Switch
29) AC Power Cord
Precautions for Use
Installation
• Unpack all parts and remove protective material.
• Do not connect the unit to the mains before checking the mains voltage and before all other con-
nections have been made.
• Do not cover any vents and make sure that there is a space of several centimeters around the unit
for ventilation.
Connection
1. Connect the Power Cord(29)to AC outlet.
2. Switch the O/Function Selector(7)to “PHONO or USB/SD” position. If the Power LED Indicator(5)
light up and backlight at the LCD Display(2) is light up, it’s mean the power supply is normal. Now
your system is ready to play music.
Listening to the Radio
Manual tuning
1. Select Function Selector(7) to “TUNER” position.
2. Select the desired band by Radio Band Selector(10)
3. Tune to the required station by turning the Tuning Knob(19).
4. Adjust the Volume Knob(18) to desired volume level.
9

10
FM & FM-stereo reception
• Set the “ Band/FM-St “ selector (10) at “ FM ” position. Programs are received in mono mode. In
particular when stereo signals are weak. It is preferable to receive the program in mono.
• Set the “ Band/FM-St “ selector (10) at “FM-St” position for receiving stereo programs. The “FM-
St” LED indicator will light up to show FM stereo program is receiving.
Hints for best reception:-
- AM : The receiver has a built-in am bar antenna. If am reception is weak, slightly rotate or re-
positioning of the unit will usually improve the am reception.
- FM : The receiver has a build-in FM wire antenna (31) hanging at the rear cabinet. This wire should
be totally unraveled and extended for best reception.
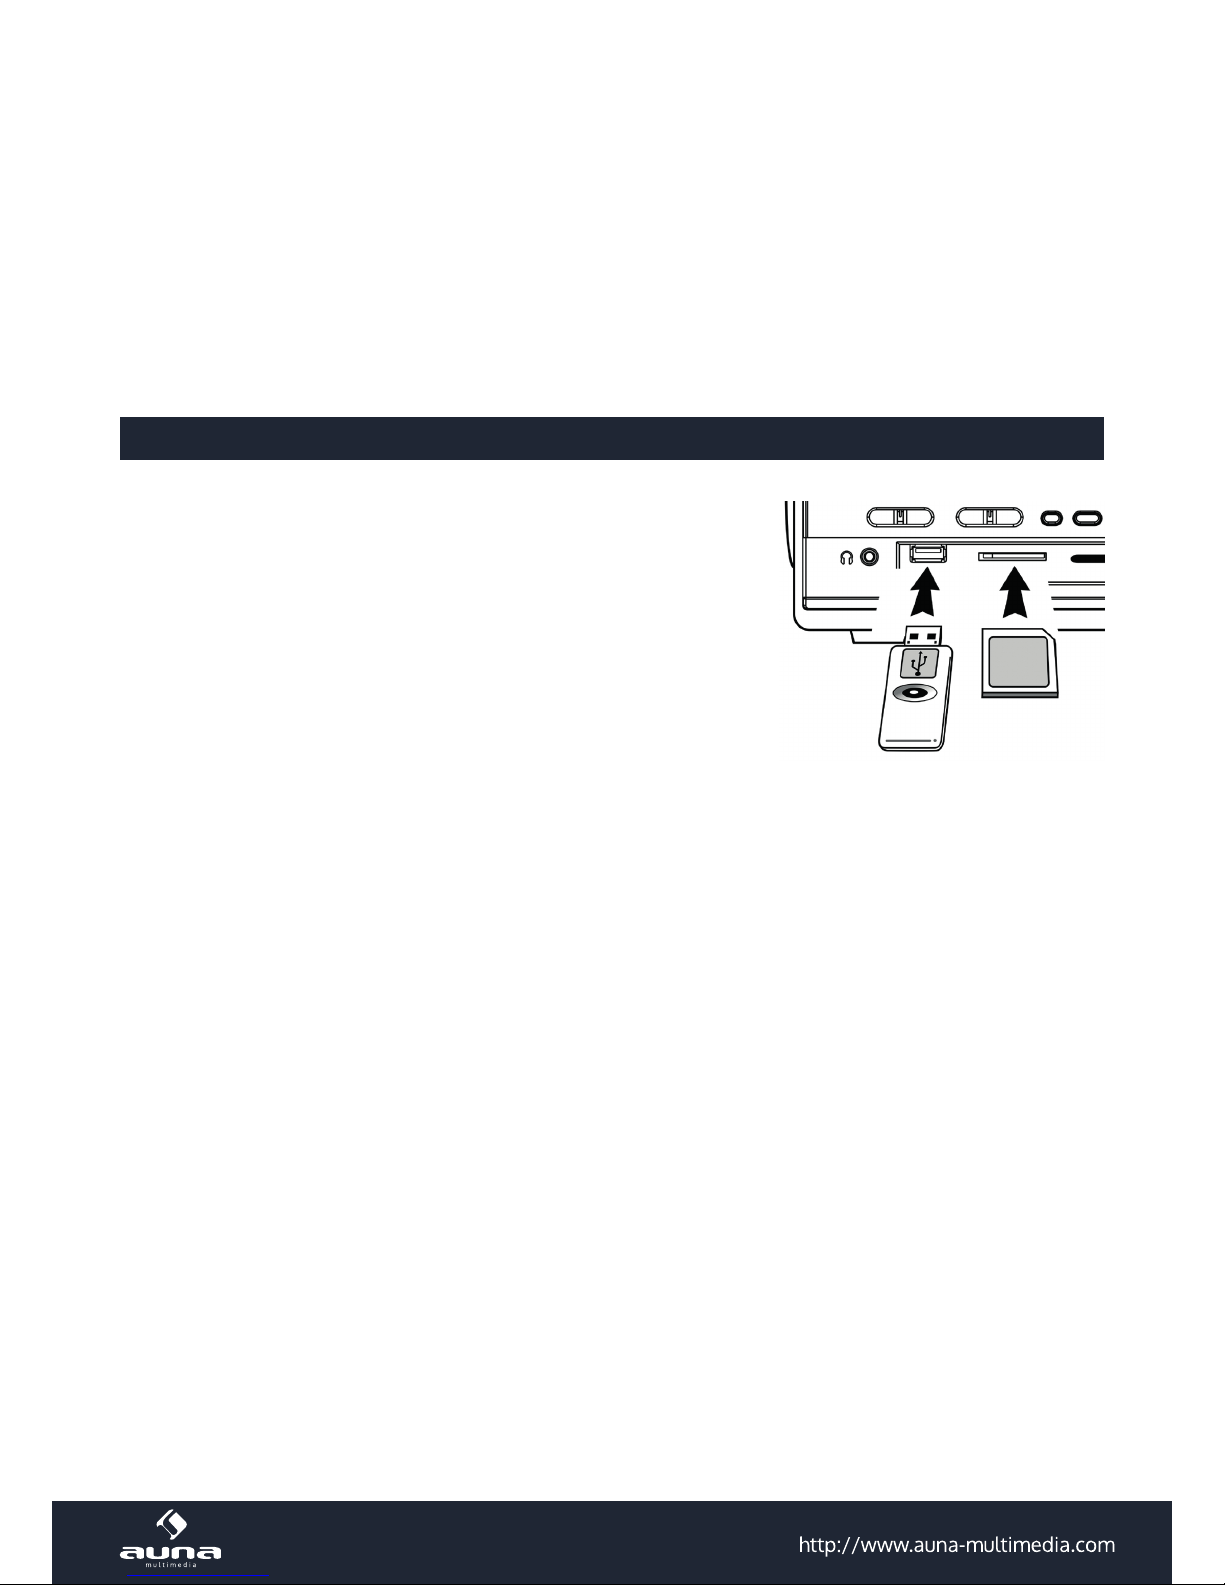
Playback of MP3 Song via USB or Memory Card
Connecting
The system is able to decode and playback all MP3 le which stored in
the memory media with USB connecting port or SD.MMC memory card.
1. Set Function Selector(7)at USB/SD mode and then press Source
Button(4)to select “USB” or “SD” mode.
2. Plug-in the USB with the face up and make sure it going into comple-
tely or insert the memory card in the direction of the arrow as shown in
the label on the underside of the memory card slot cover. Insert straight
without bending.
• Connecting the USB upside down or backwards could damage the
audio system or the storage media(USB thumb drive/SD/MMC Card).
Check to be sure the direction is correct before connecting.
• The system will start reading the storage media automatically after
connecting and will start to playback automatically.
Remark : USB port does not support connection with USB extension cable and is not designed for com-
municate with computer directly.
PLAY / PAUSE / STOP MODE
1. Press “ Play/Pause/Stop ” button (14) once to pause the playback, the playing time will be freeze & ashing
on the LCD display (2). Press again to resume normal playback.
2. If press and hold the “Play/Pause/Stop button(14)for two seconds during playback mode. The system will go
to stop mode.
SKIP/SEARCH MODE (SKIP/SEARCH UP / SKIP/SEARCH DOWN )
1. During play or pause mode, if “Skip Up” Button(21)is pressed. It will go to next rack and display the track
no. and change to the play.
2. During play or pause mode, press “Skip Down” Button(13)again will go to the previous track and change to
play or pause .
3. If press and hold the “Skip Up/Down” button(21/13)during playback, the playing track will go fast forward
or backward until the button being released.
Remark : The system will become muting during search up/down mode
+10/-10 tracks(by remote handset)
1. Press “ +10 button (12) /-10 button (on remote control) to skip to your favorite track more convenience.
ID3 (le/artist/album) function (by remote handset)
1. Press the “ Info “ button during playback of MP3 le, the song le/artist/album is being displayed. Press the
“ Info ” button again to disable the function.
Song le name search function (by remote handset)
You can search the track by the le name during stop mode:-
1. Press the “ Find “ button once, then press the “Skip up ” (21) (or Skip down ) button (13), you can search
a le under alphabet order on LCD display, then press the “ Play/Pause/Stop ” button (14) to start the playback
of the selected track.
10

11
Remark:
- In that case of no name had been assigned for the track, “ NOFILE “ is being displayed” on LCD
display (2).
- the LCD display support English language only
MP3 track format requirement:
- MP3 bit rate : 128 kbps.
- The performance of playing MP3 is various from the quality of USB/SD media and the method of
encoding.
Repeat/intro/random mode (by remote handset)
Press the repeat/intro/random button during playback, you can be played in dierence mode as fol-
low:-
(1) repeat 1 (2) repeat all track (3) intro play (4) random (5) o mode
indicator
Play mode on LCD display
Repeat single track
Repeat all tracks all
Intro play mode Intro
Random mode Random
O mode -----------------
Repeat play
You can listen the desired tracks or all tracks repeatedly by this function.
Intro play
You can listen the beginning (10 seconds) of each le by this function & saving your time to search
the desire song
Random play
You can listen all the tracks in a random order by this function
Tracks programming (by remote control)
Up to 10 tracks can be programmed for MP3 le and play in any order. Before use, be sure the system
is at stop mode before programming:-
1. Set in USB/SD stop mode.
2. Press the “Program” button, “ Prog “ will appear on LCD display (2). Moreover, it will indicate pro-
gram no. and digits for track no. to be programmed.
3. Select a desired track by pressing Skip up (21) or down(13) buttons.
4. Press the “ Program ” button to store the trace into memory.
5. Repeat steps 3 and 4 to enter additional tracks into the memory if necessary.
6. When all the desired tracks have been programmed, press “Play/Pause/Stop” button (14) to play
the tracks in assigned order.
7. To cancel the programmed le, stop playback the unit and then press “Program” button on remote
handset until “Prog“ is disappear on LCD display (2).
11

12
Encoding of Phono into MP3 le
The system is able to encode the phono to MP3 format and recording at memory media with USB connec-
ting port or SD/MMC card.
A) Phono encoding
1) Insert the USB or SD media to the main unit refer the Playback of MP3 song via USB storage media
or memory card section.
2) Set the function button to “Phono“ mode and then press the “Rec“ button (3) directly.
3) The LCD display will show or & and ashing, and the system is starting the encoding
mode after few seconds.
4) Start playback at phono for the track which you want to record to USB.
5) After nish of recoding, press the “ Rec “ button (3) until the LCD stop ashing and return to “phono“
mode.
Remark:
- The recording speed is 1:1 and according to the actual playing time of the phono
- The system will create a folder and then store the encoding track in it.
- The recording format is set at – MP3 bit rate: 128 kbps, sampling rate: 44.1khz
- No song title will be recorded during encoding mode.
- If both media (USB/SD) inserted to the unit, unit defaulted record to USB media when encoding from
phono.
- Due to this unit defaulted at USB mode encode, thus, during encoding to SD card, please do not insert
the USB media, it will cause the unit had abnormal phenomenon.
B) Track separation (by remote handset)
You can divide the recording music from phono to USB/SD track by track during encoding. Every time
when press the track separation button once at remote handset during encoding from phono to USB/SD,
the system will generate a new track and continuous the recording. The text “phono“ at LCD display will
ashing one time, it mean the unit is creating a new track successfully.
Removing of USB / memory card
To remove the USB / memory card, turn o the power or switch the function mode to tuner rst. For
USB port – un-plug it by pulling out the USB socket directly, for memory card –pull out the SD/MMC card
straightly without bending.
Phono
noted:
- Remove the stylus protector.
- Be sure that the tone arm is being detached from the tone arm rest before opera-
ting and re-secured again afterwards.
1. Select to “ Phono ” function (7).
2. Set the speed selector to the proper position depending on the record to be played.
3. Place the record on the platter (use the spindle adaptor if required).
4. Lift the tone arm from the rest and slowly move it to the record side. The platter
will start to rotate.
5. Place the tone arm to the desired position of the record.
6. Adjust the volume to the desired level.
7. At the end of record, the platter will automatically stop rotating. Lift the tone arm
from the record and return it to the rest.
8. To stop manually, lift the tone arm from the record and return it to the rest.
Remark : As some kind of record the auto-stop area was out of the unit setting, so it will stop before the last rack
nish. In this case, select the auto-stop switch to “ o “ position, then it will run to the end of the record but will not
stop automatically (turn o the power button or switch back the auto-stop switch (34) to “ on “ position to stop the
platter rotate). Then put back the tone arm to the rest position.
12

13
Line out connection
You can connect the system to your whole hi- system by connecting the line out socket (32) to the
auxiliary input socket with a RCA cable (not included).
Remark: Due to ErP stage two requirement and protect the environment. The unit will switch to standby
mode automatically once no any music playing over 15 minutes
Remote control transmitter
Battery installation (battery not provided)
The infra-red transmitter requires 2 pc AAA size battery for operation
Button description
01) Find
02) Info
03) Rec
04) Rep/intro/ran
05) Program
06) Play/pause
07) Skip/search forward
Skip/search backward
08) Stop
09) +10/-10
10) Source
11) Track separation
In MP3 playback, press to active le/folder name search
function.
Press to select encoding bitrate
Press to active encoding or recording function
Press to active repeat / intro / random function
Press to active programming function
Press once to start playback. Press again to enter pause
mode.
Press once to skip to next track, press & hold for search
forward
Press once to skip to previous track. press & hold for
search backward
Press to stop playback or cancel the stored program.
In MP3 mode, press to skip 10 track forward or backward
Press to select CD/USB or SD mode repeatedly
Press to divide the recording track at turntable or tape
one by one during encoding
13

14
Hints on Disposal
According to the European waste regulation 2012/19/EU this symbol on the product
or on its packaging indicates that this product may not be treated as household was-
te. Instead it should be taken to the appropriate collection point for the recycling of
electrical and electronic equipment. By ensuring this product is disposed of correct-
ly, you will help prevent potential negative consequences for the environment and
human health, which could otherwise be caused by inappropriate waste handling of
this product. For more detailled information about recycling of this product, please
contact your local council or your household waste disposial service.
Your product contains batteries covered by the European Directive. 2006/66/EC, which cannot be
disposed of with normal household waste. Please check local rules on separate collection of batteries.
The correct disposal of batteries helps prevent potentially negative consequences on the environ-
ment and human health.
14

15
Chère cliente, cher client,
Toutes nos félicitations pour l’acquisition de ce nouvel appareil. Veuillez lire attentivement et respecter les
instructions de ce mode d’emploi an d’éviter d’éventuels dommages. Nous ne saurions être tenus pour
responsables des dommages dus au non-respect des consignes et à la mauvaise utilisation de l’appareil.
Consignes de sécurité
• Ne pas utiliser l’appareil à proximité d’eau et ne pas l’exposer à l’humidité.
• Veiller à ne renverser aucun liquide sur l’appareil.
• Déplacer l’appareil avec précaution.
• Ne pas bloquer les ouvertures d’aération.
• Ne pas exposer l’appareil aux chaleurs extrêmes ou au soleil.
• Si une des pièces de l’appareil est manquante ou si le cordon d’alimentation, ne pas eectuer soi-
même les réparations soi-même. Faire réparer l’appareil uniquement par un spécialiste.
• La garantie s’annule si l’appareil est ouvert ou réparé par l’utilisateur.
Introduction des piles
• Le compartiment des piles se trouve à l’arrière de la télécommande.
• Retirer le couvercle en appuyant sur le levier.
• Introduire 2 piles AAA (non fournies à la livraison) dans le compartiment. Respecter les polarités
indiquées.
• Refermer le couvercle.
Inventaires des éléments de commande
1 Couvercle anti-poussière
2 Écran LCD
3 Touche d’enregistrement
4 Touche de sélection de la source
5 Voyant de marche
6 Haut-parleur gauche
7 Commutateur d’éteinte / de fonction
8 Prise casque 3,5 mm
9 Prise USB
10 Commutateur de bande
11 Fente pour carte SD/MMC
12 Touche +10
13 Touche saut avant
14 Lecture/pause/stop
15 X-Bass activé/désactivé
16 Capteur pour télécommande
17 Haut-parleur droit
18 Bouton de volume
19 Bouton de réglage de la fréquence
20 Voyant lumineux FM Stéréo
21 Touche saut avant
22 Achage lumineux gradué
23 Centreur de disque
24 Bouton de réglage de la vitesse de la platine
25 Support du bras de lecture
26 Sortie Line
27 Antenne FM
28 Auto-stop active/désactivé
29 Cordon d’alimentation

16
Mise en marche
• Déballer l’appareil et tous les composants puis retirer tous les emballages.
• Brancher l’appareil sur une source d’alimentation électrique uniquement lorsque tous les autres
branchements nécessaires auront été eectués.
• Ne pas bloquer les ouvertures d’aération. Veiller à ménager un espace vide de plusieurs cen-
timètres tout autour de l’appareil.
Branchement électrique : brancher le cordon d’alimentation (29) sur une prise électrique. Mettre
le commutateur d’éteinte/de fonction (7) sur « PHONO » ou « USB/SD ». Le voyant lumineux (5)
s’allume. L’appareil est à présent prêt à l’emploi et à lire de la musique.
Écouter la radio
Réglage manuel :
Mettre le commutateur de fonction (7) sur « Tuner » et sélectionner la bande souhaitée à l’aide du
commutateur de bande (10). Tourner le bouton de réglage de la fréquence (19) pour trouver la sta-
tion souhaitée. Régler le volume avec le bouton de réglage du volume (18).
Réception FM-Stéréo :
Régler le commutateur de bande (10) sur FM, les stations seront alors reçues en mono. Dans cer-
tains cas, cela permet à améliorer la réception des stations à signal faible. Mettre le commutateur
de bande (10) sur FM-St, les stations seront alors reçues en stéréo. Le voyant lumineux FM-St (20)
s’allume a présent.
Conseils pour une meilleure réception :
AM : l’antenne à tige peut être bougée et déplacée pour améliorer la qualité de réception.
FM : l’antenne laire (31) doit être complètement démêlée et déroulée.
Lecture à partir d’un support USB ou d’une carte mémoire
Branchement
Le système est en mesure de lire des chiers MP3 contenus par des supports de stockage USB ou
des cartes mémoire.
Mettre le commutateur de fonction (7) sur « USB/SD » et sélecti-
onner « USB » ou « card » avec la touche de sélection de la source.
Brancher un support de stockage USB ou insérer une carte SD. Si
un support de stockage USB ou une carte SD sont insérées dans
le mauvais sens, cela peut endommager l’appareil et/ou le support
de stockage.
L’appareil lit automatiquement le support après son insertion, a-
che le nombre de titres disponibles et démarre la lecture.
Remarque : la prise USB n’est pas conçue pour le branchement
d’un câble de rallonge USB et ne peut pas être connectée directement à un PC.
16

17
Lecture/Pause/Stop
Appuyer sur « Play/pause/stop » (14) pour démarrer la lecture premier morceau. Pour interrompre
la lecture, appuyer sur la touche « Play/pause/stop » (14). La durée de lecture s’arrête. Appuyer de
nouveau sur « Play/pause/stop » (14) pour reprendre la lecture. Si la touche « Play/pause/stop » est
appuyée pendant plus de 2 secondes, la lecture est interrompue.
Saut/mode recherche (saut/recherche avant/arrière)
Appuyer sur « skip up » (21) pendant la lecture pour passer au titre suivant. Appuyer sur la « skip
down » (13) pendant la lecture pour revenir au début du titre en cours de lecture. Si la touche «
skip up/down » est maintenue enfoncée pendant la lecture de CD/MP3, l’appareil eectue une avan-
ce / un retour rapide tant que la touche est enfoncée. Remarque : le son est désactivé pendant le
retour/l’avance rapide.
+10/-10 titres (via la télécommande) :
Appuyer sur +10 (12)/-10 pour faire un saut avant ou arrière de 10 titres.
Fonction ID3 (titre/album) (via la télécommande) :
Appuyer sur « Info » pendant la lecture de MP3 pour acher les informations sur le morceau. Appuy-
er de nouveau sur « Info » pour désactiver cet achage.
Fonction de recherche du titre d’un morceau (via la télécommande)
En mode Stop, il est possible de rechercher des morceaux grâce au nom du morceau : appuyer une
fois sur « Find » puis sur « skip up » (ou « skip down ») (21, 13). Il est à présent possible de re-
chercher les morceaux classés par ordre alphabétique et de les lire en appuyant sur « Play/pause/
stop » (14).
Remarque : si aucun titre n’est attribué au morceau, « nole » s’ache sur l’écran LCD (2). L’écran
LCD (2) autorise l’alphabet anglais.
Caractéristiques des morceaux MP3
• Taux de compression MP3 : 128 kbps
• Les performances de lecture varient en fonction de la qualité de l’enregistrement. L’analyse du CD
est plus longue si la durée de lecture est plus longue.
Répétition/intro/lecture aléatoire
Appuyer sur « repeat/intro/random » avant ou pendant la lecture pour activer les modes de lecture
suivants : (1) Répétition 1 > (2) Répétition de tous les titres > (3) Intro > (4) Lecture aléatoire >
(5) désactivé
Mode de lecture Écran LCD
Répétition d’un titre
Répétition de tous les titres ALL
Intro INTRO
Lecture aléatoire RANDOM
Désactivé -------------
17

18
Répétition : il est possible de répéter en boucle un seul morceau ou tous les morceaux.
Lecture d’intro (via la télécommande) : il est possible d’écouter les 10 premières secondes de
tous les morceaux d’un CD.
Lecture aléatoire : il est possible d’écouter tous les titres dans un ordre aléatoire.
Lecture programmée (via la télécommande)
Il est possible de lire jusqu’à 10 morceaux d’un CD/MP3 dans un ordre programmé. Pour cela,
l’appareil doit se trouver en mode Stop :
1. Basculer en mode USB/SD et arrêter la lecture.
2. Appuyer sur « Program » ; « PROG » s’ache alors à l’écran. Ensuite, le numéro du programme et
du morceau s’achent.
3.Sélectionner le morceau souhaité avec 21/13.
4.Appuyer sur « Program » pour ajouter le titre à la liste de lecture programmée.
5.Répéter les étapes 3 et 4 pour tous les autres morceaux.
6.Si tous les morceaux ont été ajoutés à la liste de lecture, appuyer sur 14 pour démarrer la lecture.
7.Pour terminer la lecture, appuyer sur « STOP » jusqu’à ce que « PROG » (2) disparaisse de l’écran.
Créer des chiers MP3 à partir d’un disque vinyle
L’appareil peut créer des chiers MP3 à partir de disques vinyles et les enregistrer sur support USB
ou carte SD/MMC.
A. Encodage d’un vinyle
1. brancher un supp9ort de stockage USB disposant de susamment de mémoire.
2. Sélectionner la fonction « Phono » (7) puis appuyer immédiatement sur « Record » (3).
3. « USB » s’ache en clignotant sur l’écran LCD (2) de même que ou &
4. Démarrer la lecture du morceau souhaité sur le disque vinyle.
5. Appuyer sur « Record » (3) pour terminer, l’achage s’arrête de clignoter et « Phono » s’ache.
Remarque :
• La vitesse d’enregistrement est de 1:1 par rapport à la durée de lecture.
• L’appareil crée un dossier pour l’encodage.
• Le format d’enregistrement est prédéni – taux de compression MP3 : 128 kbps, 44.1 khz.
• Aucun morceau n’est enregistré pendant l’encodage.
• Pour interrompre l’enregistrement, appuyer de nouveau sur « Record ».
• Les chiers sont enregistrés sur USB si un support USB ainsi qu’une carte SD sont tous deux insérés.
• Comme l’encodage s’eectue par défaut sur support USB, des erreurs peuvent survenir si
l’utilisateur veut encoder sur support SD alors qu’un support USB est branché. C’est pourquoi il ne
faut pas brancher un support USB dans ce cas de gure.
B. Séparation des pistes (via la télécommande)
Il est possible de séparer la musique enregistrée sur support USB/SD depuis un disque vinyle en
pistes séparées. Un nouveau chier/titre est créé à chaque pression de la touche « ». Le texte «
PHONO » clignote brièvement sur l’écran (2) en guise de conrmation.
Retrait du support USB / de la carte mémoire
Pour retirer un support de stockage, l’appareil doit être préalablement éteint ou être activé dans un
autre mode, par ex. CD, cassette, vinyle. Débrancher alors le support USB ou retirer la carte SD de
la fente.
18

19
Disque vinyle
Remarque : retirer la protection du diamant. Détacher le bras de lecture de son support avant utili-
sation et le xer de nouveau sur son support après utilisation.
1.Mettre le commutateur de fonction (7) sur « Phono ».
2.Régler la vitesse au niveau du bouton de réglage de la vitesse de la platine.
3.Placer un disque vinyle sur la platine (utiliser le centreur de disque si nécessaire).
4.Soulever le bras de lecture et le déplacer lentement vers le bord du disque vinyle. La platine com-
mence à tourner.
5.Déposer le bras de lecture à l’endroit souhaité du disque vinyle.
6.Régler le volume.
7. La platine s’arrête automatiquement de tourner à la n du disque vinyle. Soulever à présent le bras
de lecture et le redéposer sur son support.
8. Pour arrêter manuellement la platine, soulever le bras de lecture et redéposer celui-ci sur son sup-
port.
Remarque : si le disque vinyle dispose d’une zone auto-stop et que la fonction auto-stop est active,
la platine s’arrête de tourner avant la n du disque. (Pour activer la fonction auto-stop, éteindre
l’appareil et mettre le bouton auto-stop (28) sur ON. Démarrer à présent la lecture.
Sortie Line
Il est possible de brancher l’appareil à une chaîne Hi-Fi avec un câble RCA. Pour cela, utiliser la sortie
Line (26).
Télécommande
• La télécommande nécessite 2 piles AAA pour fonctionner.
• Les piles ne sont pas fournies à la livraison.
Aectation des touches
1) Find
2) Info
3) Rec
4) Rep/intro/ran
5) Program
6) Play/pause
7) Skip/search forward
Skip/search backward
8) Stop
9) +10/-10
10) Source
11) track separation
Recherche par nom de chier
Achage ID3
Enregistrement/copie
Répétition/Intro/Lecture aléatoire
Lecture programmée
Lecture/pause
Titre suivant, avance rapide
Titre précédent, retour rapide
Stop/Arrêter la lecture programmée
Saut avant/arrière de 10 titres pendant la lecture MP3
CD/USB ou mode SD
Séparation des pistes pendant l’enregistrement
19

20
Consignes de sécurité
• Ce mode d’emploi a pour but de familiariser l’utilisateur avec le fonctionnement de ce produit.
Conserver ce mode d’emploi pour pouvoir s’y référer à tout moment.
• L’achat de ce produit donne droit à une garantie de deux ans en cas de défectuosité de l’appareil
sous réserve d’une utilisation appropriée de celui-ci.
• Veiller à utiliser le produit conformément à l’usage pour lequel il a été conçu. Une mauvaise utili-
sation est susceptible d’endommager le produit ou son environnement.
• Tout démontage ou toute modication apportée au produit réduit la sécurité de celui-ci. Attention,
risques de blessure !
• Ne jamais ouvrir le produit de sa propre initiative et ne jamais eectuer de réparations soi-même !
• Manipuler le produit avec précaution. Il peut être endommagé par des chocs, des coups ou une
chute même de faible hauteur.
• Tenir le produit à l’écart de l’humidité et des chaleurs extrêmes.
Information sur le recyclage
Vous trouverez sur le produit l’image ci-contre (une poubelle sur roues, barrée
d‘une croix), ce qui indique que le produit se trouve soumis à la directive euro-
péenne 2012/19/UE. Renseignez-vous sur les dispositions en vigueur dans votre
région concernant la collecte séparée des appareils électriques et électroniques.
Respectez-les et ne jetez pas les appareils usagés avec les ordures ménagères. La
mise au rebut correcte du produit usagé permet de préserver l’environnement et
la santé. Le recyclage des matériaux contribue à la préservation des ressources
naturelles.
Ce produit contient des piles qui sont soumises à la directive européenne 2006/66/CE selon laquelle
elles ne doivent pas être éliminées avec les ordures ménagères. Renseignez-vous sur les dispositions
en vigueur concernant la mise en rebut séparée des piles. La mise en rebut correcte du produit usagé
permet de préserver l’environnement et la santé.
20
Other manuals for TT-186E
1
Table of contents
Languages:
Other auna Turntable manuals

auna
auna RTT 1922 User manual

auna
auna Belle Epoque 1905 User manual

auna
auna TT Classic User manual

auna
auna TT-Play Prime User manual

auna
auna TT-931 User manual

auna
auna TT-370 User manual

auna
auna TT1200 User manual

auna
auna TT-186 DAB User manual

auna
auna Jerry Lee Series User manual

auna
auna Peggy Sue BT User manual

auna
auna 10021685 User manual

auna
auna TT-Play PLUS User manual

auna
auna Nostalgy User manual

auna
auna Pureness User manual

auna
auna Mary Ann User manual

auna
auna Graceland TT User manual

auna
auna TT-18SB User manual

auna
auna Berklee TT Play User manual

auna
auna TT-186E User manual

auna
auna 10008991 User manual