manuals.online logo
Brands
  1. Home
  2. •
  3. Brands
  4. •
  5. Avaya
  6. •
  7. Handset
  8. •
  9. Avaya 9630 Deskphone Edition User manual

Avaya 9630 Deskphone Edition User manual

- 7 -
NOTES
T
T
TE
E
EL
L
LE
E
EP
P
PH
H
HO
O
ON
N
NE
E
E
&
&
&
V
V
VO
O
OI
I
IC
C
CE
E
EM
M
MA
A
AI
I
IL
L
L
U
U
US
S
SE
E
ER
R
R
G
G
GU
U
UI
I
ID
D
DE
E
E
9
96
63
30
0
H
HA
AN
ND
DS
SE
ET
T
- 1 -
These icons are displayed on the phone screen:
Ringing indicates an incoming call is arriving on this line.
Active indicates the line is in use.
On Hold/Hold indicates a call is on hold on this line.
Or that this line's call was put on hold pending a conference or a transfer.
Missed Calls precedes the number of missed calls in the call log.
Call Forward is active.
EC500 (extension to cellular) feature is active.
Buttons Description/Actions
NAVIGATION
BUTTONS
•Use the up & down navigation arrows to scroll through lists.
•Use the left & right navigation arrows to move between menus or to move the
cursor during text input.
•Use the “OK“ button for a shortcut to an action.
CONTACTS
To Add a Contact:
•Press the “Contacts”
button.
•Press the “New” soft key.
•Enter the name and phone
number of the new entry.
•Press the ”Save” soft key
To Access:
•Press the “Contacts” button.
•Use the up and down arrows to highlight
the contact you wish to dial, then press
the “Call” soft key or press “OK” to dial
contact.
You can save up to 250 names & numbers.
CALL LOG
Your telephone maintains a log of up to 90 calls to/from your phone. Details are
available for up to 30 outgoing, incoming (answered) and missed calls.
•To call a party listed in the Call Log, press the “Call Log”button.
•Use the up & down arrow keys to highlight the party you would like to dial.
•Either press the “Call” soft key or press “OK” to dial the number.
•To add a number from the Call Log to your Contacts press ‘+Contacts’.
FORWARD Press the “Forward” button to display the forwarding menu for your extension.
HEADSET •To activate, press “Headset” button to use headset (red light is lit).
•To deactivate, press “Headset” button.
MESSAGE Press the “Message” button to retrieve your voicemail messages.
MUTE
•Press the “Mute” button to deactivate your phone’s microphone.
Red light on “Mute” indicates that your voice cannot be heard.
•Press the “Mute” button again to continue talking.
PHONE Pressing the “Phone” button exits the current call feature or menu and returns to
the call screen. To access the phone feature list, press the right or left arrow key.
SPEAKER If speaking through the handset and you wish to put a call on ‘hands-free’, press
the “Speaker” button and replace handset.
VOLUME Press the volume controls to adjust the volume of the ringer, handset, headset or
speaker.
- 6 -
- 5 -
VOICEMAIL
Setting up Your Modular Messaging Voice Mailbox
ACCESSING
YOUR VOICE
MAILBOX:
•Press the “Message” button on your phone or call 7 7 7 7
•The system will speak your mailbox name.
•When prompted for your password enter “1212” followed by #.
CHANGING
YOUR
PASSWORD:
•You will now be prompted to enter a new password.
•Your voicemail password must be a minimum of 4 digits.
•Follow the prompts to enter, and re-enter, your new password.
RECORDING
YOUR NAME:
•You will now be prompted to record your name.
•Follow the prompts to record & save your name recording.
RECORDING
YOUR
PERSONAL
GREETING
•Press 4for “Greetings”
•You will hear “System greeting is active for all calls”.
•Press 1to “To Configure your Personal Greeting”
•Press 2to “Record Personal Greeting”
•Record your message after the tone.
•When you are finished recording, press #.
•Press 1to listen to your greeting.
[if you want to re-record your message press 2]
EXITING: To exit the voicemail system either hang up or press 9 9.
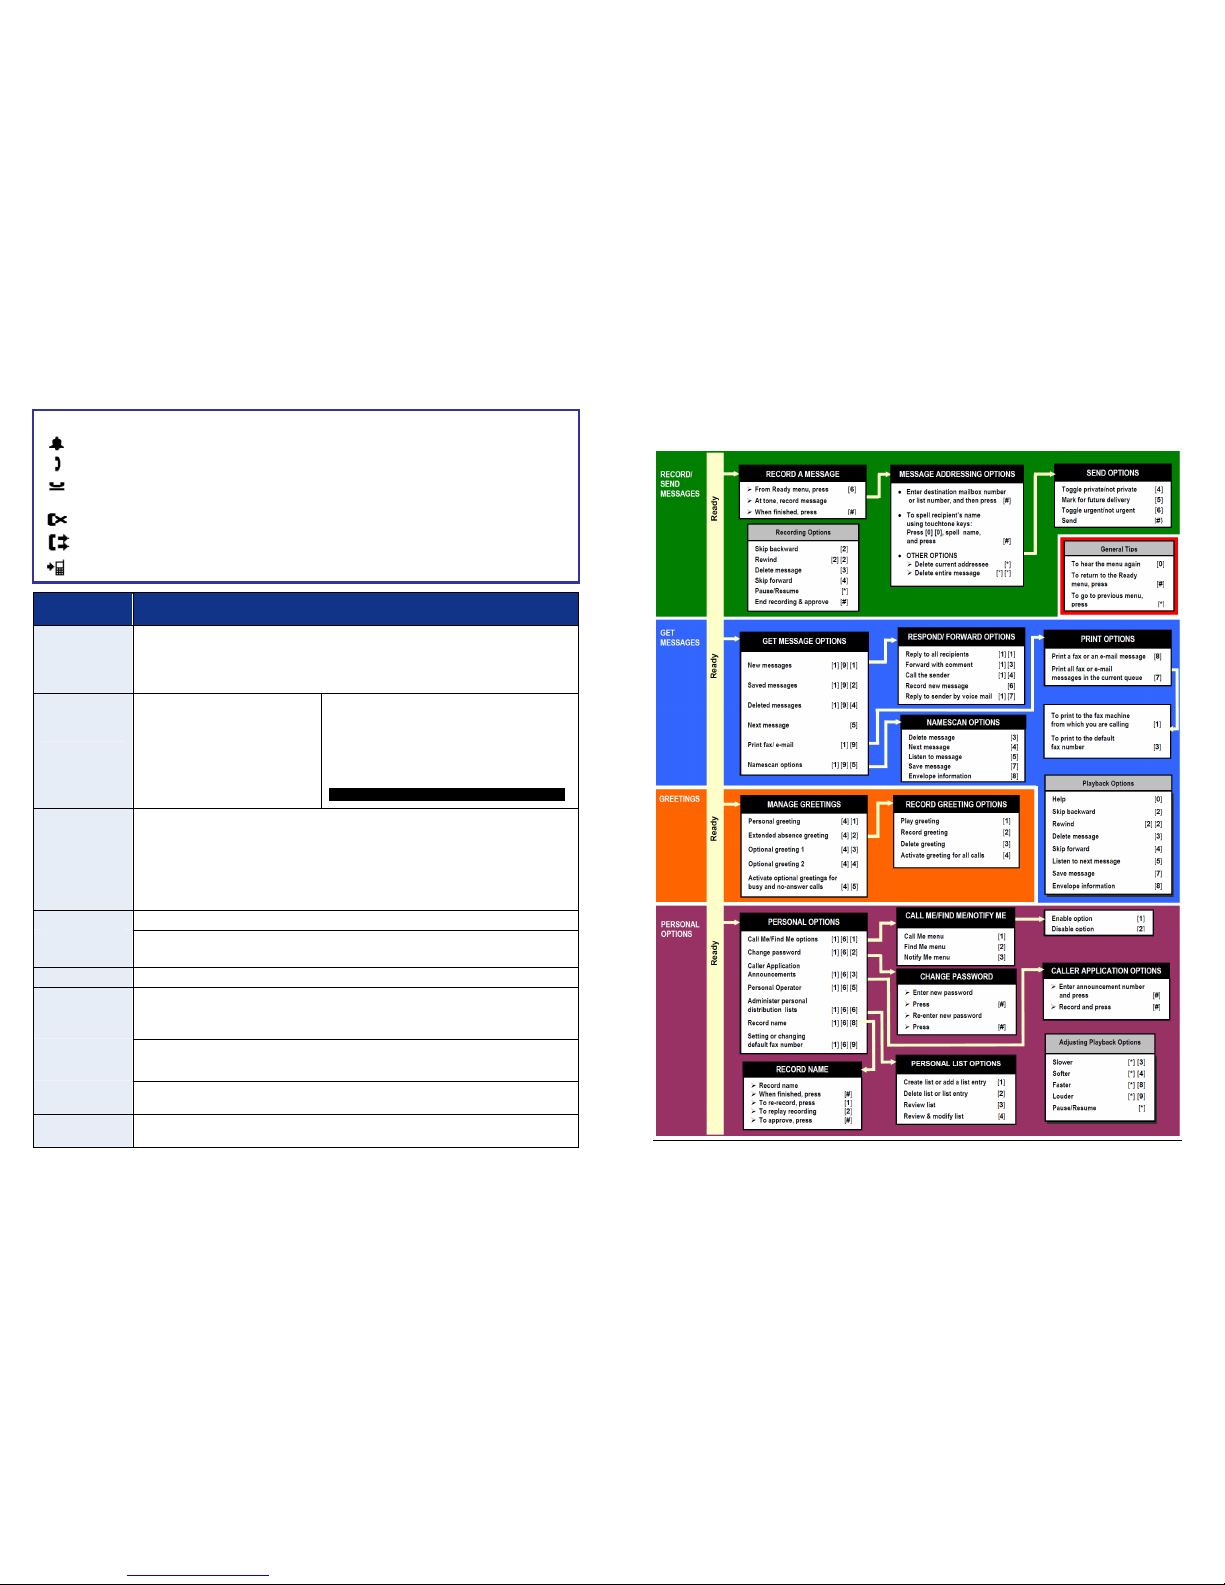
Retrieving your Voicemail Messages
When someone leaves a message in your voicemail box, the Message Indicator at the top of your
telephone handset will light up red to show that you have voicemail messages waiting …
ACCESSING
YOUR VOICE
MAILBOX:
•Press the “Message” button on your phone or call 7 7 7 7
[If calling from another extension you will then need to dial * # & enter your
mailbox number]
•To access your voice mailbox if you’re out of the office, call
(0 2) 9 8 5 0 – 7 7 7 7 then dial # and enter your mailbox number.
•The system will speak your mailbox name.
•When prompted enter your password followed by #.
PLAYING
YOUR
MESSAGES:
•Press 5to “Listen to a Message”
•You will hear the message header being played – date, time, number,
duration of the message – followed by the message.
•When finished playing, the message will be automatically saved.
•When finished listening to all messages, hang up or press 9.
PLAYBACK
CONTROLS:
While playing messages the following controls are available:
Rewind ................. 2 2 Skip Back................ 2 Slower ......................... * 3
Pause/Resume ........ * Skip Forward........... 4 Faster .......................... * 8
Louder................... * 9 Quieter ..................* 4 Next Message................5
Delete...................... 3 Save........................ 7 Ready Menu...................#
Details on all features & functions of your voicemail system can be found on the next page …
- 2 -
Soft Keys Description/Steps
SEND ALL
To divert all calls to your cover path (e.g. Voicemail).
•To activate press “Send All” soft key.
•To deactivate press “Send All” soft key.
REDIAL
•Press “Redial” soft key (phone can be set to re-dial last number called OR
display list of last 6 numbers dialed).
•If list is displayed, use arrow keys to highlight number and press “OK” key to
call OR press appropriate line appearance button.
HOLD •Press the “Hold“ soft key. Original held call appearance becomes shaded.
•To retrieve caller, press the ”Resume” soft key.
CONFERENCE
(up to 6 parties)
With the first caller on line (incoming or outgoing, internal or external call):
•Press the “Conf” soft key.
The call is placed on hold and next available line appearance is selected.
•Dial the number of next required party (internal or external)
If you dial an incorrect number, press the “Clear” soft key to clear the dialed
number & give you dial tone again - you can then dial another number.
If answered, press the “Join” soft key (all 3 parties are connected)
If not answered, press the “Cancel” soft key to return to the original call.
Repeat the above procedure using the “Add” soft key to connect additional
parties (maximum of 6 including yourself) to the conference.
Once the conference call is in progress, as the initiator, you can press the “Drop”
soft key to disconnect the last party that you added to the conference.
TRANSFER
•Press the “Transfer” soft key, dial the extension number & introduce call.
•The transfer is completed when you either hang up or press the “Complete”
soft key.
If you have made an error dialing the number:
•Press the “Clear” soft key to clear the dialed number & give dial tone again.
You can then dial another number.
If no answer or busy and you wish to retrieve the call:
•Press the “Cancel” soft key to return to the original call.
DROP
Press the “Drop” soft key to disconnect a call and retain the line for further use if
required. The “Drop” soft key is also used to disconnect the last party added to a
conference call if you are the initiator of that conference call.
CLEAR
Press the “Clear” soft key to disconnect a call during Transfer and to return to the
original caller. The “Clear” soft key can also be used to clear numbers on
initiating a call if entered incorrectly.
- 3 -
Features Description/Steps
PLACING A
CALL
External: Lift handset or press “Speaker” then dial 0followed by the number.
Internal: Lift handset or press “Speaker” then dial the extension number.
CALL PICK-UP
When a phone in your pick up group is ringing, your “Call Pickup” button will flash.
Press “Call Pickup” (or dial *3) to answer another ringing phone from your pick up
group.
CALL
FORWARD
A temporary diversion for all calls to another destination (e.g. another extension).
•To activate, press “Call Forward” button (you will hear dial tone).
•Dial the number to which you want your calls diverted (you will hear a
confirmation tone of 3 beeps and the call forward button will be lit).
•To deactivate, press “Call Forward” button.
DIRECTORY,
NEXT &
MAKE CALL
To access the internal telephone directory to find names & extension numbers:
•Press the “Directory” button.
•Enter the surname using telephone keypad.
•Press “Next” to scroll through the matching entries.
•Press “Make Call” to call the name shown on the display.
AUTOMATIC
CALL BACK
To activate:
•Dial an extension, if busy or not answering press “Auto Callback” button. This
needs to be initiated before the call goes to the extension’s coverage path.
•“Auto Callback” is now set. A confirmation tone of 3 beeps will be heard.
•The system will automatically call you back when the extension becomes
available.
To Deactivate:
•Press “Auto Callback”.
MENU Button
After pressing “MENU”, select “Options & Settings” then use the up/down arrow keys to scroll through
options:
Call Settings Set the redial option; set the phone display screen upon answering or calling
option; set the display of call timers; set visual alerting; and set the audio path
Application
Settings Set call log, personalize button labels or reset default button labels.
Screen &
Sound Options
Set brightness; set contrast; change ring pattern, turn button clicks on/off, turn
error tones on/off.
Advanced Set language and automatic gain control options.
After pressing “MENU”, select “Network Information” then use the left/right arrow keys to view a
summary of network parameters.
- 4 -
Additional Feature Buttons (where programmed)
TEAM BUTTON
The TEAM button has a number of functions:
•Display: Shows when the monitored extension is active on a call.
•Notify/Pickup: The TEAM button will ring when there is an incoming call to
the monitored extension. Pressing the TEAM button once will display the
incoming caller, pressing again will answer the call.
•Call: When the TEAM button is pressed, it acts as a speed dial to call the
extension.
BRIDGED LINE
In addition to your own lines, your telephone may show one or more bridged lines
on the display. These lines could belong to another person or could be a group
line. Bridging allows you to see when that line is in use or answer calls for that
line.
EXTENSION TO
CELLULAR –
EC500 &
EXTEND CALL
Extension to Cellular (EC500) allows your mobile to function as an extension of
your office phone. When EC500 is active incoming calls will ring on both your
office extension & your mobile phone. To activate EC500:
•Press the “EC500” button.
•Incoming office calls will now ring on both your extension & mobile phone.
•To deactivate, press the “EC500” button.
EC500 enables you to switch calls between your office & mobile phones when
you are in the office. To move an active call from your mobile to your office
phone:
•Press the active line appearance on your office phone.
•As you are now conferenced on the call, hang up on your mobile phone.
To move an active call from your office phone to your mobile phone:
•Press the “Extend Call” button on your office phone.
•When your mobile rings, answer the incoming call.
•As you are now conferenced on the call, hang up your office phone.
NOTES

Other manuals for 9630 Deskphone Edition

7

Other Avaya Handset manuals

Avaya IP Office 9641 User manual

Avaya

Avaya IP Office 9641 User manual

Avaya Integral 3 / 5 FC1 User manual

Avaya

Avaya Integral 3 / 5 FC1 User manual

Avaya IP Office 20DT User manual

Avaya

Avaya IP Office 20DT User manual

Avaya 7406E Operator's manual

Avaya

Avaya 7406E Operator's manual

Avaya 6120 Installation and operating instructions

Avaya

Avaya 6120 Installation and operating instructions

Avaya Blue Voice L Home User manual

Avaya

Avaya Blue Voice L Home User manual

Avaya WT9620 User manual

Avaya

Avaya WT9620 User manual

Avaya L100 Series How to use

Avaya

Avaya L100 Series How to use

Avaya Integral D3 User manual

Avaya

Avaya Integral D3 User manual

Avaya 1616 User manual

Avaya

Avaya 1616 User manual

Avaya 6120 User manual

Avaya

Avaya 6120 User manual

Avaya 3730 User manual

Avaya

Avaya 3730 User manual

Avaya 7406E User manual

Avaya

Avaya 7406E User manual

Avaya 3735 User manual

Avaya

Avaya 3735 User manual

Avaya IP Office 5420 User manual

Avaya

Avaya IP Office 5420 User manual

Avaya IP Office 20DT User manual

Avaya

Avaya IP Office 20DT User manual

Avaya FC1 User manual

Avaya

Avaya FC1 User manual

Avaya 3641 User manual

Avaya

Avaya 3641 User manual

Avaya 16xx Quick start guide

Avaya

Avaya 16xx Quick start guide

Avaya 6120 User manual

Avaya

Avaya 6120 User manual

Avaya IP Office D100 User manual

Avaya

Avaya IP Office D100 User manual

Avaya i2210 User manual

Avaya

Avaya i2210 User manual

Avaya D260 Guide

Avaya

Avaya D260 Guide

Avaya 3631 User manual

Avaya

Avaya 3631 User manual

Popular Handset manuals by other brands

NEC M166C Customer Engineer Manual

NEC

NEC M166C Customer Engineer Manual

Fysic FX-8025 manual

Fysic

Fysic FX-8025 manual

Uniden XDECT 7005 owner's manual

Uniden

Uniden XDECT 7005 owner's manual

ESI III Quick reference guide

ESI

ESI III Quick reference guide

GE 28111 user guide

GE

GE 28111 user guide

Mitel Telepo 6940IP Quick reference guide

Mitel

Mitel Telepo 6940IP Quick reference guide

LG-Ericsson iPECS 1040i Key Features Guide

LG-Ericsson

LG-Ericsson iPECS 1040i Key Features Guide

Motorola i560 TELUS user guide

Motorola

Motorola i560 TELUS user guide

Panasonic KX-TD7685 - Wireless Digital Phone Brochure & specs

Panasonic

Panasonic KX-TD7685 - Wireless Digital Phone Brochure & specs

AT&T CL80101 Specifications

AT&T

AT&T CL80101 Specifications

Tynetec 7202 Operator's guide

Tynetec

Tynetec 7202 Operator's guide

Funkwerk f.airnet  FC11 user guide

Funkwerk

Funkwerk f.airnet FC11 user guide

COBHAM Thrane IP Handset user manual

COBHAM

COBHAM Thrane IP Handset user manual

Snom M10 KLE user manual

Snom

Snom M10 KLE user manual

Kirk 4080 user guide

Kirk

Kirk 4080 user guide

GE 21095 user guide

GE

GE 21095 user guide

Gigaset A450 manual

Gigaset

Gigaset A450 manual

Snom M70 user manual

Snom

Snom M70 user manual

manuals.online logo
manuals.online logoBrands
  • About & Mission
  • Contact us
  • Privacy Policy
  • Terms and Conditions

Copyright 2025 Manuals.Online. All Rights Reserved.