Avaya IP500 User manual

V11
Telephone User Guide
For
Avaya IP500
Phone: 07 5478 2000 Fax: 07 5478 2611
172 Brisbane Road, Mooloolaba, Qld 4557
WILDWOOD (AUST) PTY LTD ACN 096 593 878 ABN 61 096 593 878
All manuals and user guides at all-guides.com
all-guides.com

V11
2
Quick Reference Guide
AVAYA IP 500
Handset Overview
All manuals and user guides at all-guides.com

V11
3
Function Function escription
ANSWER A CALL
•Lift handpiece OR
•Press Speaker button OR
•Press Headset Button
To answer an incoming call from any handset – Universal Answer
•Lift handset
•ial *30 to answer a call ringing anywhere OR
ial *32*Ext No# to answer the call for a particular extension.
EFAULT RINGING PATTERNS
•Internal Calls – Single ring
•External Calls – ouble ring
CHANGING RING OPTIONS
You can chose from eight different ring sounds.
•Press the Soft Key for Option
•Press the Soft Key for Ring Options
•Press the Soft Key for Ring Pattern
•To select a ring pattern press the arrow keys or use the key pad to dial between
1 and 8 – you will hear the different tones as you scroll through
•When you have selected the ring pattern, press the Soft Key for Save
MAKE A CALL To Access:
•Lift handset or Press Speaker key or Press Headset Button
•ial 0
•ial phone number
All manuals and user guides at all-guides.com

V11
4
RE IAL Last Number Redial
•Without lifting the handset, Press Redial Twice, then lift handset
OR
Scroll through the last 10 numbers dialed:
•Press Redial
•Press Arrow Keys to scroll through the last 10 numbers
•Press the soft key beside the number on the screen to dial
CALLER I The log can store up to 48 entries for both incoming & outgoing caller I .
NOTE: This must be activated by your service provider e.g. Telstra
•Press the second Soft Key for Log on the menu on the screen
•Then Press the Soft Key for one of the following options:
-Missed Calls
-Incoming Answered Calls
-Outgoing Calls
-More to display a second menu for All Calls
•Press the arrows to display further pages of entries
•Press the Soft Key option to Call, elete, Save or one/Exit to exit.
HOL To place an outside call on Hold:
•Press the HOL button
The symbol will change next to the call appearance key
To pick up the outside call again:
•Press the Call Appearance Key next to the screen
TRANSFER To transfer an incoming call to another extension:
•Press Transfer
•ial Extension number
•Announce call
•Press the Transfer key again
•Hang Up
TRANSFERRING
CALLS OFFSITE
•Whilst on the first call press Transfer
•ial the offsite/external telephone number
•Announce the call
•Press Transfer then hang up
All manuals and user guides at all-guides.com

V11
5
TRANSFER CALLS
FROM A PANASONIC
COR LESS PHONE
•After taking an incoming call to place it on hold look at the screen; the word
“recall” will appear on the bottom left hand side of the telephone screen.
•To place the call on hold, press the black button on the left hand side
•ial the extension number
•Announce the caller
•Press “off” to hang up and the call will be transferred.
Note:
To avoid any confusion the “hold” button on the handset is only used when the
Panasonic is not part of a telephone system
PARKING CALLS You are able to park a call so it can be retrieved by another extension.
The call is allowed to be parked for 5 minutes before the parked call will ring back to
your extension if it is idle.
Note: A slot ID must be assigned before following this procedure.
eature keys can be setup to park & un-park calls.
To park a call to be picked up by any extension:
•ial *37*N# - where N is the slot I you have assigned
•Inform your colleagues of the parked call & the slot I you have assigned.
To un-park a call from another extension:
•ial *38*N# - where N is the slot I you have assigned
MUTE To prevent the other person on the line from hearing you:
•Press MUTE button to turn on and off
Microphone for Hands free operation, also acts as mute button
INTERCOM To initiate an internal intercom call:
•Lift Handset OR Press Speaker button OR press Headset button
•ial extension number
To answer an Intercom call:
•Lift handset or Press Speaker or Press Headset
RING BACK REQUEST
Note: Must be activated in system programming
To request an extension to call you back when they are no longer busy:
•ial the Extension Number
•When you hear the busy tone, Press the Soft Key for RBak
•Hang Up
•When the extension becomes free – your handset will ring.
•Lift the handset and you will be connected to that extension
All manuals and user guides at all-guides.com

V11
6
CONFERENCE
To set up a Conference Call:
•Make or Receive Intercom or Outside call
•Press the Conference key
•ial extension you want to add OR Access an outside line.
•When called party answers, Press Conference
•Repeat steps 2-4 to add more parties.
To exit a Conference without affecting the other parties:
•Hang up.
VOLUME CONTROL
To Adjust Ringing Volume:
•Press the Volume Arrow keys whilst you hear the sound to adjust ……
•Speaker volume when on hook
•Ring volume when station is ringing
•Receiving volume when call in progress
A JUSTING ISPLAY CONTRAST
•Press the Soft Key for Option
•Press the Soft Key for Contrast
•Press Arrow keys to adjust level of contrast
•When finished either press Soft Key for one or Press Exit Button
CALL FORWAR To Activate Call Forward to another extension or external number.
To set the number to which your calls are forwarded:
•ial *07*Ext No#
To switch call forwarding on dial:
•For Forward Unconditional - *01. To take off *02
•For Forward When Busy - *03. To take off *04
•For Forward When No Answer - *05. To take off *06
To cancel all forwarding:
•ial *00
O NOT ISTURB
When activated, you will not receive any internal or external calls to your extension.
You are still able to make outgoing calls.
To Activate:
•ial *08 – An N is displayed.
To eactivate:
•ial *09
Note: Callers will hear either busy tone or are re-directed to your oicemail.
All manuals and user guides at all-guides.com
all-guides.com

V11
7
EFAULT PHONE/
ERASE ALL SETTINGS
To erase all settings on a handset – personlised options, call log and speed dial list,
for example if a staff member leaves:
•Press the Soft Key for Option
•Press the Arrow Keys until a menu called “Select Items to Erase” is displayed
•Press the Side Soft Key to select the items that you wish to erase for either:
-Speed ials
-Call Log
-User Labels
-Language
-Options
-All
•Then Press the Soft Key for Erase
•Press the Soft Key for one when finished
All manuals and user guides at all-guides.com

V11
8
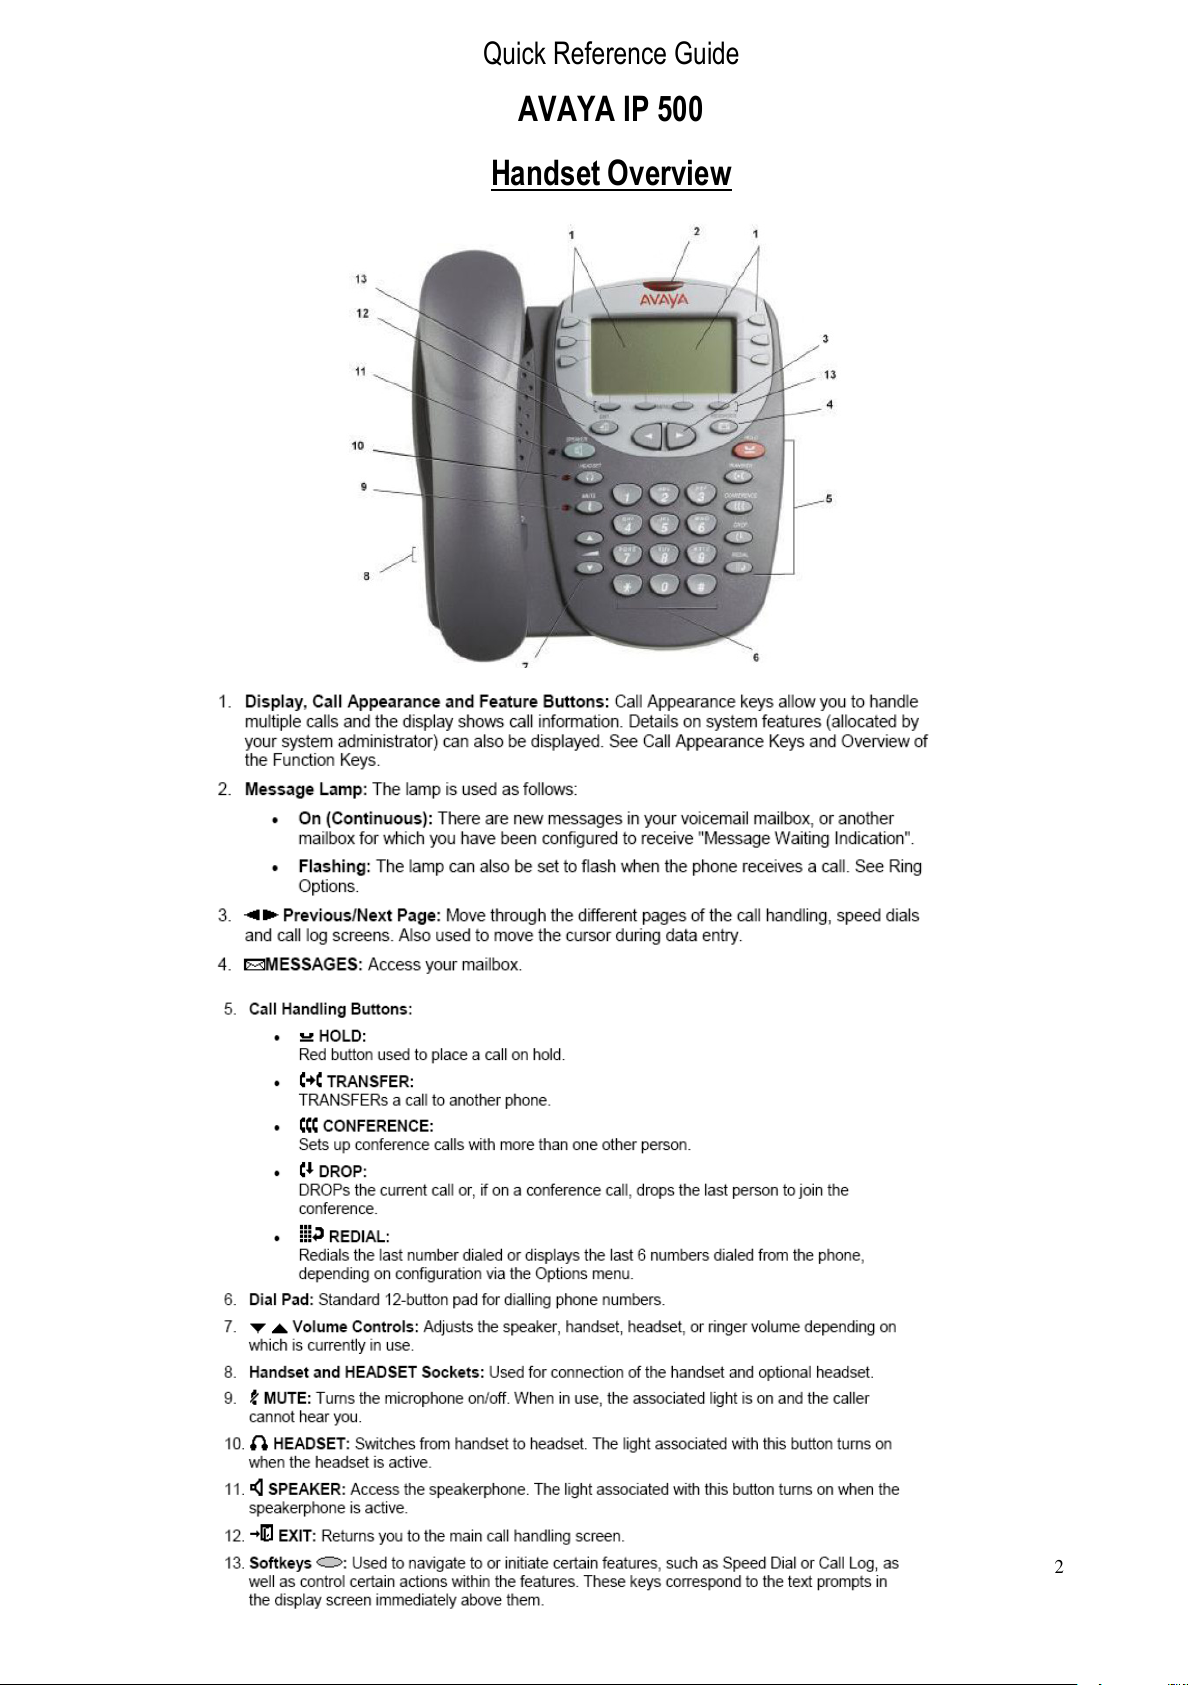
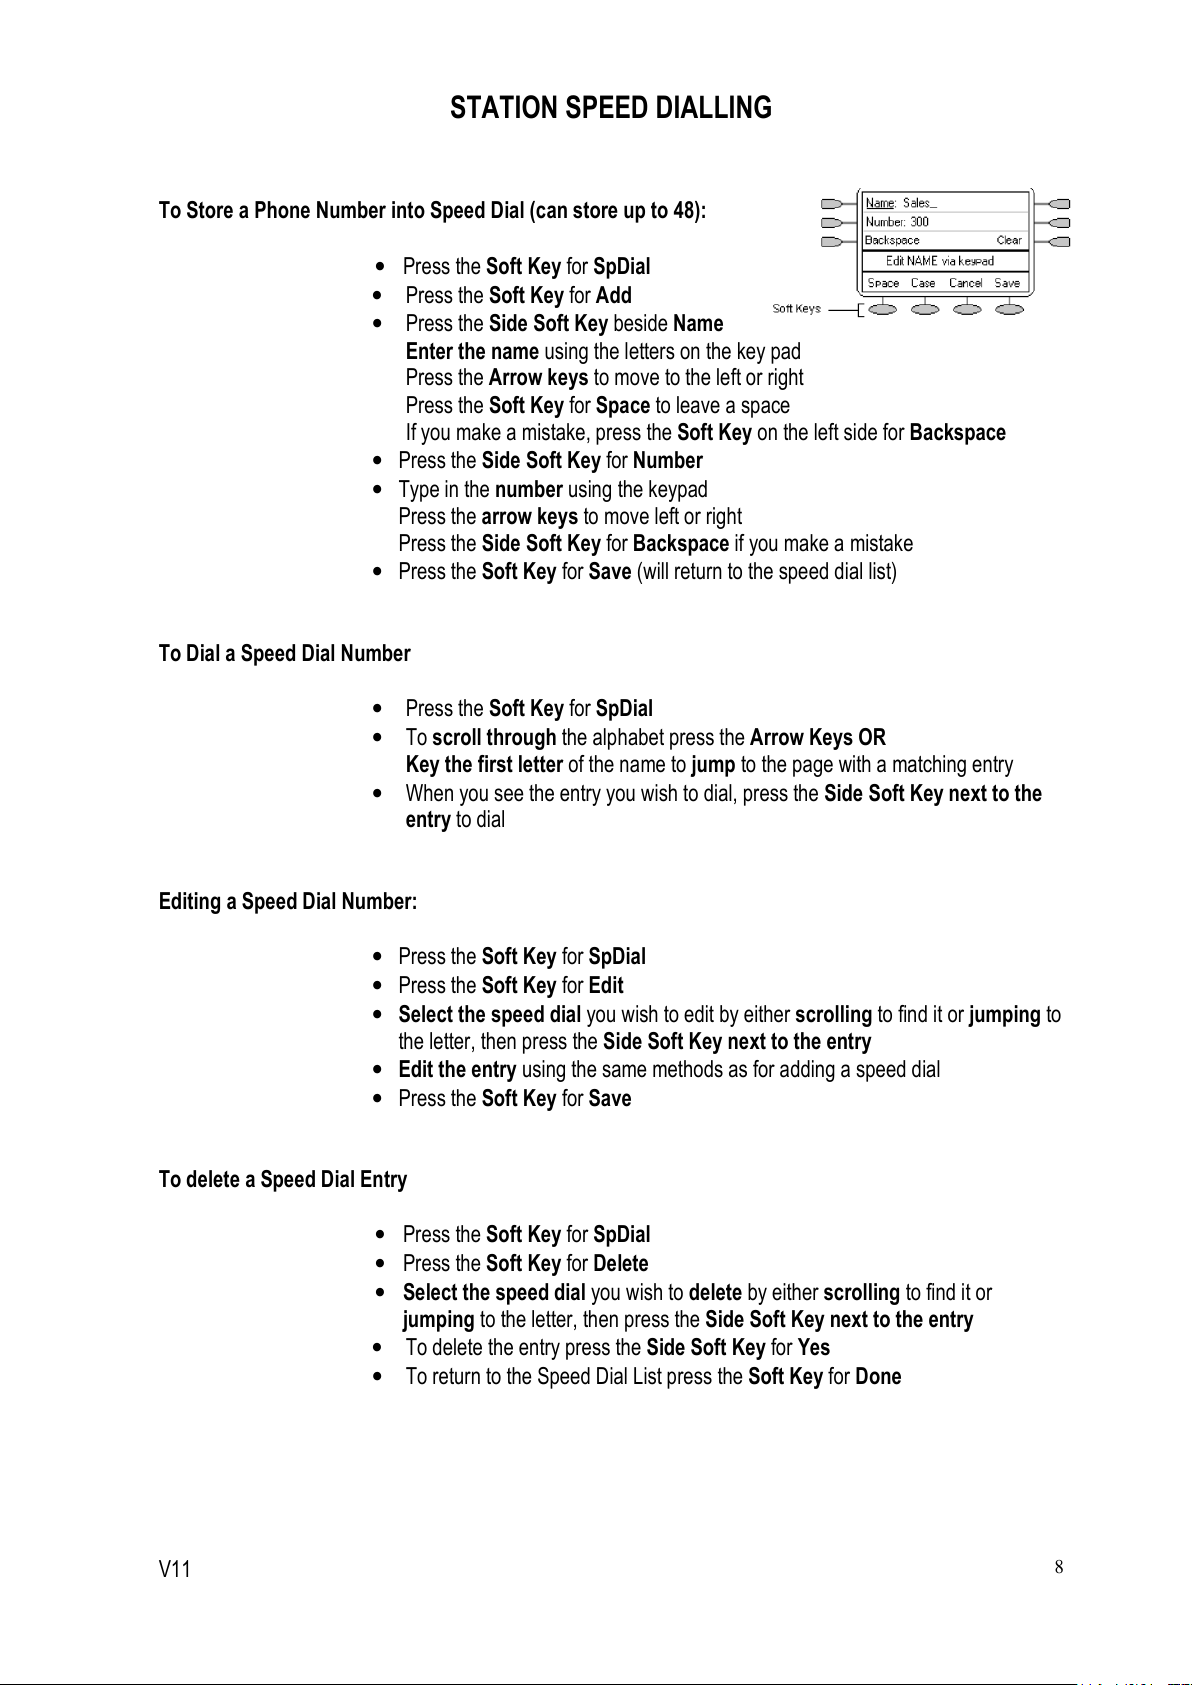
STATION SPEE IALLING
To Store a Phone Number into Speed ial (can store up to 48):
•Press the Soft Key for Sp ial
•Press the Soft Key for Add
•Press the Side Soft Key beside Name
Enter the name using the letters on the key pad
Press the Arrow keys to move to the left or right
Press the Soft Key for Space to leave a space
If you make a mistake, press the Soft Key on the left side for Backspace
•Press the Side Soft Key for Number
•Type in the number using the keypad
Press the arrow keys to move left or right
Press the Side Soft Key for Backspace if you make a mistake
•Press the Soft Key for Save (will return to the speed dial list)
To ial a Speed ial Number
•Press the Soft Key for Sp ial
•To scroll through the alphabet press the Arrow Keys OR
Key the first letter of the name to jump to the page with a matching entry
•When you see the entry you wish to dial, press the Side Soft Key next to the
entry to dial
Editing a Speed ial Number:
•Press the Soft Key for Sp ial
•Press the Soft Key for Edit
•Select the speed dial you wish to edit by either scrolling to find it or jumping to
the letter, then press the Side Soft Key next to the entry
•Edit the entry using the same methods as for adding a speed dial
•Press the Soft Key for Save
To delete a Speed ial Entry
•Press the Soft Key for Sp ial
•Press the Soft Key for elete
•Select the speed dial you wish to delete by either scrolling to find it or
jumping to the letter, then press the Side Soft Key next to the entry
•To delete the entry press the Side Soft Key for Yes
•To return to the Speed ial List press the Soft Key for one
All manuals and user guides at all-guides.com

V11
9
FUNCTION KEY PROGRAMMING
If any one of the keys on the phone is programmed with an Admin or Admin1 feature key, it allows you to
program further features against other function keys. Both Admin and Admin1 are allocated to your function
keys by your system administrator and would appear as follows:
All manuals and user guides at all-guides.com

V11
10
To assign a feature against a Function Key (Soft Key):
•Press the Side Soft Key for Admin or Admin1 (generally will be Admin)
The names shown above are the features that you can assign to soft keys.
•Press the Arrow Keys to scroll through the list of features/pages
•To select a feature, press the Side Soft Key adjacent to the feature on the
screen
•If the function requires some data to be entered, [ ] is shown at the bottom of
the display. Enter the data using the normal phone keypad.
•The upper part of the display reverts to showing the features currently
assigned to the soft keys (before you have re-programmed them)
•To select the soft key against which to program the new feature, press the
desired soft key
CAUTION: Do not select the soft key used for the Admin function. Replacing this
function will lock the telephone for further programming until reset through the
telephone system.
•If the soft key is not already used, it will confirm that the soft key has been
programmed by saying BUTTON PROGRAMME .
To end programming, press EXIT.
To continue, press the soft key for Cont
•Repla, Keep and elet are shown along the right hand edge of the display.
Press the soft key for repla to replace existing feature with the new feature
Press the soft key for Keep to keep the existing feature that is already there
Press the soft key for elet to delete the existing feature and not program
anything there
All manuals and user guides at all-guides.com

V11
11
All manuals and user guides at all-guides.com
all-guides.com
Other manuals for IP500
4
Table of contents
Other Avaya IP Phone manuals

Avaya
Avaya 9650 Deskphone Edition User manual

Avaya
Avaya 1140E User manual

Avaya
Avaya IP Office 1603 User manual

Avaya
Avaya 5620 User manual

Avaya
Avaya 16 SERIES User manual

Avaya
Avaya 1140E Safety guide

Avaya
Avaya T7316 User manual

Avaya
Avaya 40DHB0002UKAE User manual

Avaya
Avaya 9630G Deskphone Edition User manual

Avaya
Avaya IP OFFICE 2420 User manual

Avaya
Avaya 9601 Assembly Instructions

Avaya
Avaya 4625SW User manual

Avaya
Avaya one-X 1603 User manual

Avaya
Avaya IP 9608 User manual

Avaya
Avaya 1165E User manual

Avaya
Avaya IP Office 4601 User manual

Avaya
Avaya IP Office 4621 User manual

Avaya
Avaya one-X 16-603578 User manual

Avaya
Avaya 9500 User manual

Avaya
Avaya IP Office 2050 User manual