Avery Weigh-Tronix ZT350 User manual

ZT350
Mobile Dimensioning Unit
User Instructions
AWT35-501609
Issue AB

ZK830_u_en_501609.book
Avery Weigh-Tronix is a trademark of the Illinois Tool Works group of companies whose ultimate parent company is Illinois Tool
Works Inc (“Illinois Tool Works”). Copyright © 2018 Illinois Tool Works. All rights reserved.
No part of this publication may be reproduced by making a facsimile copy, by the making of a copy in three dimensions of a two-dimensional
work and the making of a copy in two dimensions of a three-dimensional work, stored in any medium by electronic means, or transmitted
in any form or by any means, including electronic, mechanical, broadcasting, recording or otherwise without the prior written consent of the
copyright owner, under license, or as permitted by law.
This publication was correct at the time of going to print, however Avery Weigh-Tronix reserves the right to alter without notice the
specification, design, price or conditions of supply of any product or service at any time.

ZT350 Dimensioner User Instructions 3
Table of Contents
page
Table of Contents ...................................................................................................................................... 3
Chapter 1 General information and warnings ......................................................................................... 5
About this manual ..............................................................................................................5
Text conventions ......................................................................................................... 5
Special messages ....................................................................................................... 5
Installation .......................................................................................................................... 5
Safety instructions .............................................................................................................. 5
Disposal of electrical and electronic equipment ................................................................. 6
Chapter 2 Introduction .............................................................................................................................. 7
Product Overview ...............................................................................................................7
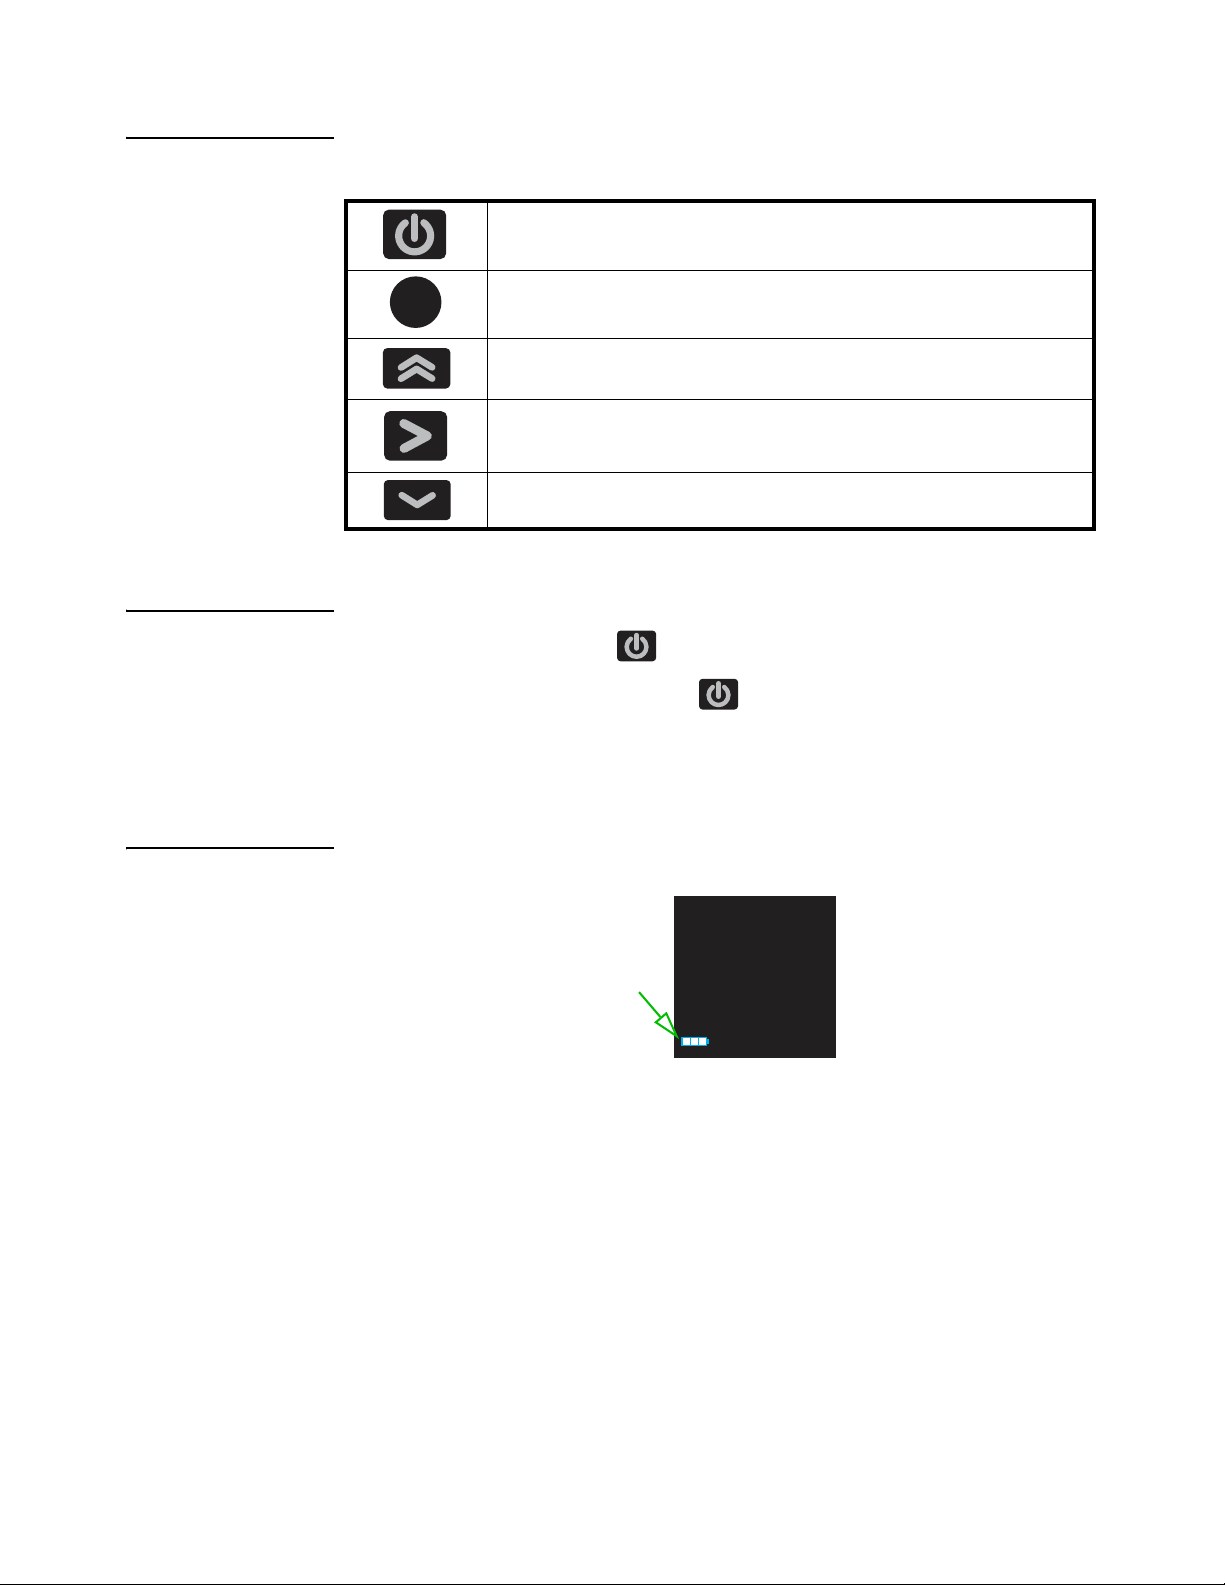
Buttons ........................................................................................................................8
ZT350 Power On/Off ................................................................................................... 8
ZT350 Battery .............................................................................................................. 8
Chapter 3 Operation .................................................................................................................................. 9
ZT350 Tasks ...................................................................................................................... 9
Quick Check .............................................................................................................. 10
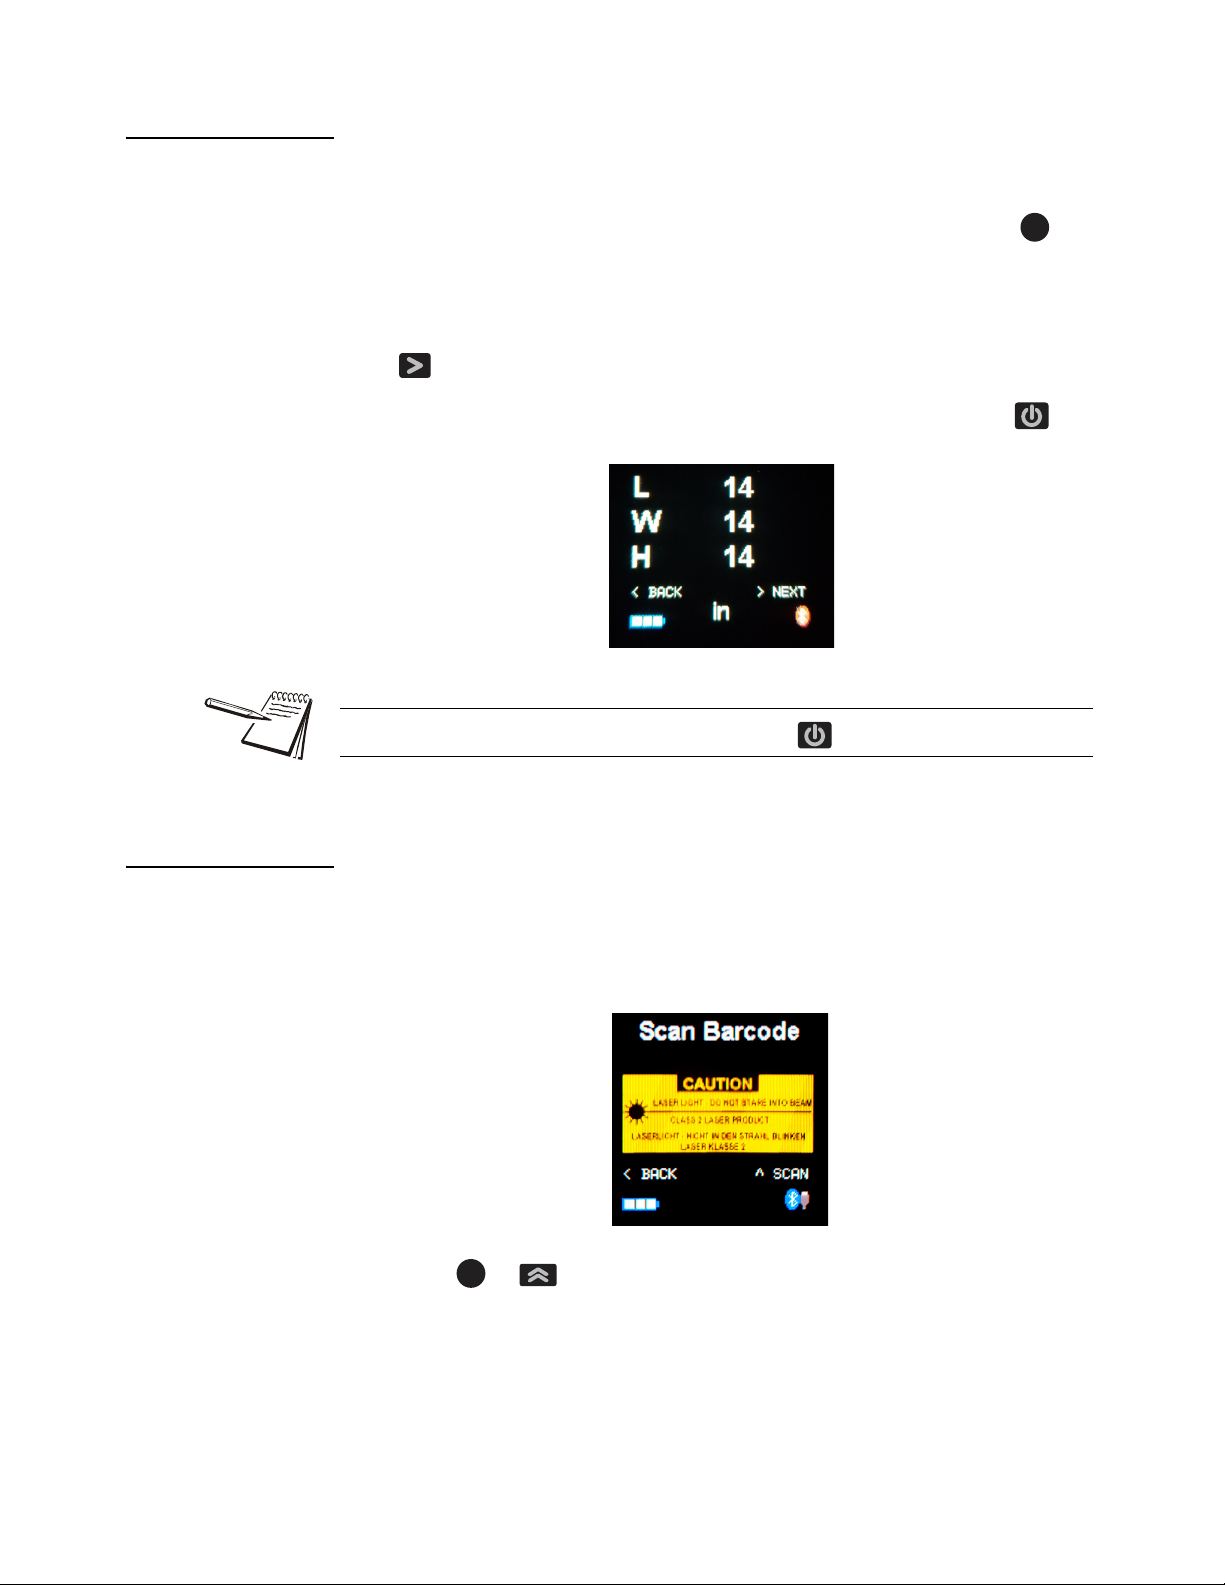
Measure .................................................................................................................... 10
+Weigh ...................................................................................................................... 12
Upload ....................................................................................................................... 13
BT Pair ...................................................................................................................... 13
ZT350 Bluetooth pairing ................................................................................................... 13
Pairing with a weight indicator ................................................................................... 13
Pairing with PC .......................................................................................................... 14
ZT350 Application ............................................................................................................ 18
Installing CDM software ............................................................................................ 18
ZT350 Application USB Transfer ..................................................................................... 21
ZT350 Application Bluetooth Transfer ............................................................................. 22
ZT350 Application ............................................................................................................ 24
ZT350 Application & ZT350 device connection problems ................................................ 24
Chapter 4 Maintenance ........................................................................................................................... 27
Charging the ZT350 ......................................................................................................... 27
Battery replacement ......................................................................................................... 27
Replacing the tape cassette ............................................................................................. 28
Chapter 5 ZT350 Replacement Parts List .............................................................................................. 29

4 ZT350 Dimensioner User Instructions

ZT350 Dimensioner User Instructions 5
1.1 About this manual
1 General information and warnings
1.1 About this manual
This manual is divided into chapters by the chapter number and the large text at the top
of a page. Subsections are labeled as shown by the 1.1 and 1.1.1 headings. The
names of the chapter and the next subsection level appear at the top of alternating
pages of the manual to remind you of where you are in the manual. The manual name
and page numbers appear at the bottom of the pages.
1.1.1 Text conventions
Key names are shown in bold and reflect the case of the key being described. If a key
has a dual function it may be referred to by its alternate function.
Displayed messages appear in bold italic type and reflect the case of the displayed
message.
Annunciator names appear as italic text.
1.1.2 Special messages
Examples of special messages you will see in this manual are defined below. The
signal words have specific meanings to alert you to additional information or the relative
level of hazard.
1.2 Installation
1.3 Safety instructions
lCaution: Class 2 Laser Product, do not stare into beam.
CAUTION!
This is a Caution symbol.
Cautions give information about procedures that, if not observed, could result
in damage to equipment or corruption to and loss of data.
NOTE: This is a Note symbol. Notes give additional and important information, hints
and tips that help you to use your product.
NO USER SERVICEABLE PARTS. REFER TO QUALIFIED SERVICE
PERSONNEL FOR SERVICE.

6 ZT350 Dimensioner User Instructions
General information and warnings
lDo not use this device in a hazardous environment.
lThe safety of this device cannot be ensured if it is not operated properly in
accordance with the instructions below.
lUse storage batteries from the manufacturer only.
lDo not charge the battery in humid or dusty rooms or below 0°C (32°F)
ambient temperature.
lAvoid falling, shaking and other types of strong mechanical impact.
1.4 Disposal of electrical and electronic equipment
In conformance with the European Directive 2002/96/EC on Waste Electrical and
Electronic Equipment (WEEE) this device may not be disposed of in domestic waste.
This also applies to countries outside the EU, per their specific requirements.
Please dispose of this product in accordance with local regulations at the collecting
point specified for electrical and electronic equipment.

ZT350 Dimensioner User Instructions 7
2.1 Product Overview
2 Introduction
This manual covers the use and service of the ZT350 mobile dimensioning unit, a
handheld, compact, robust device to capture precise and detailed dimensions. The
ZT350 can be paired via Bluetooth to a scale to record weights, it can scan barcodes
and download all the size, weight and barcode information to a PC or other smart
device, which can help to optimize assets and costs in parcel handling and shipping
situations.
With a ten foot tape, the ZT350 is suitable for most small parcel and freight measuring
requirements.
A durable, rechargeable Li-ion battery and components that can be replaced in the field
make this a convenient yet cost effective dimensioning solution.
2.1 Product Overview
Figure 2.1 shows several views of the ZT350 and the different parts.
Figure 2.1 ZT350 overview
Tape cassette
Battery
compartment
Non-slip
Tape Tip
Screen
DOWN button
Power
button
UP button
M button
Status LED
Mini USB
Charging
LED
RIGHT button
Tape
brake
Charge
contacts

8 ZT350 Dimensioner User Instructions
Introduction
2.1.1 Buttons
The buttons on ZT350 function as follows:
2.1.2 ZT350 Power On/Off
To power on the ZT350, press once.
To power off the device, press and hold until you see Power Off/Release Now
and hear a series of 5 quick beeps. Release the button and the unit will power off.
The ZT350 will automatically power off after 10 minutes of no use.
2.1.3 ZT350 Battery
The battery level icon, shown in Figure 2.2, appears in the lower left of the screen.
Figure 2.2 Battery icon
When the battery goes below 10% power remaining the indicator turns red.
For battery charging, replacement and ZT350 maintenance information see
Maintenance on page 27.
ON/OFF button. It can also be used as a backspace button. Also acts as a LEFT
button for menu navigation.
mbutton. Press to record a measurement.
SCAN button. Also acts as an UP button for menu navigation.
SEND button. Sends a data record via Bluetooth. Also acts as a RIGHT button for
menu navigation.
Saves data. Also acts as a DOWN button for menu navigation.
m
Battery
charge
icon

ZT350 Dimensioner User Instructions 9
3.1 ZT350 Tasks
3 Operation
This chapter covers the operation of the ZT350 and the PC application that comes with
the unit for communicating with the ZT350.
3.1 ZT350 Tasks
The ZT350 is programmed with a set of five tasks. Tasks are functions that capture the
dimensions, barcode and weights to perform the required job function.
To access the Tasks menu:
1. Press to power up the ZT350 …
A startup screen appears with the NTEP certificate number and serial
number of the unit displayed.
2. As instructed on-screen, press any key to continue …
The first time you power up the unit out of the box, the following screen
is displayed. See the note below.
3. From the Tasks screen, Use the or key to highlight the task you want
and press to start that task. See the list below for information on the task
you pick.
lQuick Check (See Quick Check on page 10)
lMeasure (See Measure on page 10)
l+Weigh (See +Weigh on page 12)
lUpload (See Upload on page 13)
lBT Pair (See BT Pair on page 13)
The next time you get to step 2, after this initial power up, the unit will be in the task
that was last in use when the unit was powered down.
You can always get back to the Tasks menu by pressing and at the same
time.

10 ZT350 Dimensioner User Instructions
Operation
3.1.1 Quick Check
Use Quick Check to check the dimensions of a product. The Quick Check task only
displays the dimensions on the screen. It does not send or store information.
1. Extend the tape to measure one of the carton’s dimensions and press to
capture the dimension.
2. Repeat the operation for the other two dimensions.
3. When complete all three measurements are on the screen. To clear press
.
4. If at any time the measurement was incorrectly taken you can press to
retake the measurement.
3.1.2 Measure
This task allows you to scan a barcode, enter in the number of pieces and the
dimensions. The records are stored in the ZT350. You can store 600 records. Follow
these steps:
1. If you access the Measure task you will see the following screen:
2. Press or to trigger the scan laser.
3. Scan the barcode …
You are prompted for Pieces. If you are measuring one carton you
accept the default number 1 on the display. If you have a number of
identically sized cartons in a shipment, you enter the total number of
cartons and measure just one. See the next steps on this process.
m
When you see < BACK on the screen it means the button.
m

ZT350 Dimensioner User Instructions 11
3.1 ZT350 Tasks
4. By default 1is displayed. Use the or key to increase or decrease the
number.
5. Press to accept the displayed number of pieces and move to the actual
measuring process …
The following screen is displayed:
6. Extend the tape and measure the length dimension. Press to capture the
L(length) dimension.
The saved dimension is shown on the display.
7. Repeat the operation for the W(width) and H(height) dimensions.
8. When complete the measurements are on the screen, as shown below. To
save the dimensions and clear the screen press .
m
If at any time the measurement was incorrectly taken you can press and
recapture the measurement.

12 ZT350 Dimensioner User Instructions
Operation
3.1.3 +Weigh
Use this task to capture the weight from an SMA protocol connected scale. This
information plus the scanned barcode and saved dimensions are stored on the device.
You must have your ZT350 paired to the scale prior to this task. See BT Pair on
page 13 for information on pairing.
1. When you access the +Weigh task you will see this screen:
2. Press or to trigger the reader and scan the barcode. This identifies
the record.
The screen below is displayed. It shows the weight transmitted from the
indicator.
3. Press to accept and store the weight.
4. Extend tape, to capture the dimension, press to capture for L.
5. Perform the operation for the W and H.
6. When complete the measurements are on the screen, to clear press next .
m
If there is no Bluetooth connection between the ZT350 and the weight indicator the
following error screen is displayed:
m

ZT350 Dimensioner User Instructions 13
3.2 ZT350 Bluetooth pairing
7. Any time the measurement was incorrectly taken you can press and
retake the measurement.
3.1.4 Upload
Use this task to send the captured records on the device to the ZT350 application. See
ZT350 Application on page 18.
3.1.5 BT Pair
Use this task to pair the ZT350 with a scale display. You must scan a created ‘pair’
barcode to make the pairing. See ZT350 Bluetooth pairing on page 13 for details.
3.2 ZT350 Bluetooth pairing
The ZT350 has the ability to pair with a weight indicator or PC. The Bluetooth pairing
is 1 to 1. It can only be connected to one device at a time.
3.2.1 Pairing with a weight indicator
1. Ensure the weight indicator has SMA enabled and a Bluetooth module installed.
2. Obtain the MAC Address of the Bluetooth module.
3. You need to create and print a barcode to allow the ZT350 to pair with the
Bluetooth Module.
4. Create a barcode in Code 128 starting with <Fnc 1> (This is case sensitive.)
Followed by the MAC Address of the Bluetooth module. There should be no
space after <Fnc 1>.
Example barcode: <Fnc 1>00066649CAAE
Free barcode generator can be found at http://www.barcode-
generator.org/
5. Once the barcode has been generated and printed, power on the ZT350.
6. Press & to access the Tasks Menu.

14 ZT350 Dimensioner User Instructions
Operation
7. Highlight BT Pair and press …
You will see this screen:
8. Press or to trigger the scan laser and scan the barcode.
9. The ZT350 will start the pairing process with the Bluetooth module.
You will see this display:
Once scanned the Bluetooth icon in the lower right hand corner of the
screen will turn blue and the display will return to the Scan Barcode
screen.
10. The blue status LED above the key will be solid indicating a connection to
a device.
11. To return to the Tasks menu Press &
12. Keep the barcode to pair again if the pairing process does not automatically
connect after a power cycle on the ZT350 or the weight indicator.
3.2.2 Pairing with PC
1. Ensure the PC has Bluetooth installed and enabled and obtain the MAC
Address of the Bluetooth Radio.
2. You need to create and print a barcode to allow the ZT350 to pair with the
Bluetooth module.
m
m

ZT350 Dimensioner User Instructions 15
3.2 ZT350 Bluetooth pairing
3. Create a barcode in Code 128 starting with <Fnc 4> *This is case sensitive.
Followed by the MAC Address of the Bluetooth module. There should be no
space after <Fnc 4>.
Example barcode: <Fnc 4>00066649CAAE
Free barcode generator can be found at http://www.barcode-
generator.org/
4. Once the barcode has been generated and printed, power on the ZT350.
5. Press & to access the Tasks Menu.
6. Highlight BT Pair and press …
You will see this screen:
7. Press or to trigger the scan laser and scan the barcode.
m

16 ZT350 Dimensioner User Instructions
Operation
8. The ZT350 will start the pairing process with the Bluetooth module.
You will see this display:
The ZT350 may not show that it paired until the PC is setup and the
application is looking for the device
On the PC, depending on the operating system and security settings you
may be prompted to allow the ZT350 to pair with the PC.
Windows 7 Example:
Windows 10 Example:

ZT350 Dimensioner User Instructions 17
3.2 ZT350 Bluetooth pairing
9. Once accepted to connect there is no pairing pin. The PC will install the
required drivers. Follow prompts as required.
Windows 7 Examples:

18 ZT350 Dimensioner User Instructions
Operation
Windows 10 Example:
3.3 ZT350 Application
ZT350 application requires Microsoft Windows 7 32/64 bit or greater to operate. Before
connecting the ZT350 device to the PC, please install CDM v2.12.00 WHQL
Certified.exe.
3.3.1 Installing CDM software
1. Launch CDM v2.12.00 WHQL Certified.exe.
This screen is displayed:
Depending on the current security settings of the computer you may need
administrator permission to install. Please consult with your local IT group.

ZT350 Dimensioner User Instructions 19
3.3 ZT350 Application
2. Click on Extract …
3. Click on Next …

20 ZT350 Dimensioner User Instructions
Operation
4. Click on I accept this agreement then click on Next …
Installation will take place.
5. When complete click Finish.
6. Turn on the ZT350 device.
7. Plug the USB cable into the ZT350 and then to an available USB port on the
PC.
8. The drivers will start installing. Depending on the operating system and PC
hardware, the installation may take several minutes.
9. Verify the installation is complete by looking for the device in Device Manager
under Ports. Device will be listed as USB Serial Port. The COM number
assignment is dependent on the hardware and operating system.
Table of contents
Other Avery Weigh-Tronix Measuring Instrument manuals

Avery Weigh-Tronix
Avery Weigh-Tronix ZM205 User manual

Avery Weigh-Tronix
Avery Weigh-Tronix WPI-135 User manual

Avery Weigh-Tronix
Avery Weigh-Tronix 2060 Instruction manual

Avery Weigh-Tronix
Avery Weigh-Tronix ZM301 User manual

Avery Weigh-Tronix
Avery Weigh-Tronix 615XL User manual

Avery Weigh-Tronix
Avery Weigh-Tronix M3060 User manual

Avery Weigh-Tronix
Avery Weigh-Tronix E1070 User manual

Avery Weigh-Tronix
Avery Weigh-Tronix evolution Series User manual

Avery Weigh-Tronix
Avery Weigh-Tronix WI-125 User manual

Avery Weigh-Tronix
Avery Weigh-Tronix ZM510 User manual