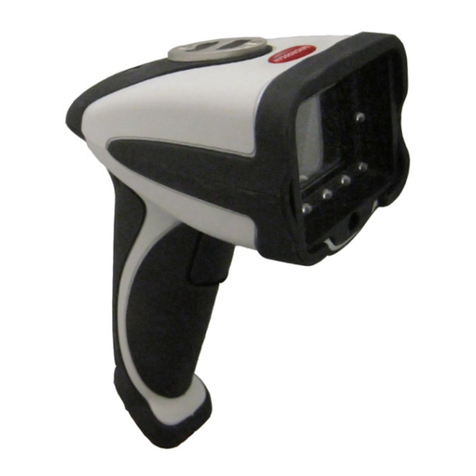
Axicon 15000 series User manual

THE BARCODE EXPERTS
Church Road, Weston on the Green, Oxfordshire, OX25 3QP, UK
Web: www.axicon.com
user guide
Axicon 15000 series
2D-linear barcode verier
Industry
Partner

Page 2 of 28
Axicon Auto ID Limited | 15000 series verier user guide | June 2017
www.axicon.com

Contents
Introduction 5
How the verier works 6
Getting started 7
Calibration 10
Operating the verier 11
Settings 13
2D matrix codes 18
Several barcodes in eld of view 19
Saving and printing 20
Disclaimer 21
Software licence agreement 22
Warranty 24
Service contract 25
Annual service 26
Certicate of conformance 27
Contact us 28
Page 3 of 28
Axicon Auto ID Limited | 15000 series verier user guide | June 2017
www.axicon.com

Introduction
The Axicon 15000 series is designed to work with any PC running a currently
supported version of Windows (Windows 7, Windows 8, Windows 10 – both 32 bit and
64 bit versions).
Specication and application
This verier can be used to verify barcodes with a size of up to 51mm x 31mm for
15000 or 95 x 70mm for 15500. These will usually be barcodes used on retail point
of sale or healthcare items. ITF-14 and GS1-128 barcodes will typically be too large
to be read by this verier.
Linear barcodes: EAN-8, EAN-13, UPC-A, UPC-E, Code 39, Code 93, Code 128,
Codeabar, ITF, MSI Plessey.
2D barcodes: GS1 Data Matrix, GS1 QR codes
Other: OCR human readable characters for EAN/UPC barcodes can be matched to
the barcode number
Application standards: Data content checking can be performed for GS1 DataMatrix
or GS1 QR Codes that encode GS1 Application Identiers.
Multiple barcodes within the eld of view will be found and can be veried to the
appropriate standards.
www.axicon.com
Page 4 of 28
Axicon Auto ID Limited | 15000 series verier user guide | June 2017

What is in the case.
• Axicon 15000 Series verier
• Software CD
• Wallet containing this user guide and the calibration card.
System requirements
• Currently supported Windows Operating System (either 32 or 64 bit)
• 12 MB disc space
• 512 MB RAM minimum
• USB 2.0 port
Software Installation
Insert the CD into an appropriate drive and the Install program should start
automatically. If it does not, run Setup.exe. When the software has been
successfully installed, leave the CD in the drive, so that the USB driver will be
installed when the verier is connected to the computer.
Hardware installation
Connect the USB lead from the verier to a USB2 port on the computer. Please
install the software before connecting the 15000 series verier.
www.axicon.com
Page 5 of 28
Axicon Auto ID Limited | 15000 series verier user guide | June 2017

How the verier works
The verication begins with capturing an image which includes one or more
barcodes. Having captured this image, the verier is then asked to decode any
barcodes it can nd in the image. This is a two stage process, which is started by
clicking on the green arrow icon (or pressing one of the buttons on the verier) to
start the image capture, and then by clicking on the decode command icon (the two
turning arrows) or by pressing one of the buttons a second time.
The image that has been captured and decoded can be saved as a .png le, and
this can be re-veried at any later time. This is useful when the image contains
more than one barcode. The software allows the creation of verication reports for
each barcode that appears in the image, and the user simply clicks on the relevant
barcode for which a report is required.
More details about this process, saving image les, and saving verication reports
are explained later on in this user guide.
www.axicon.com
Page 6 of 28
Axicon Auto ID Limited | 15000 series verier user guide | June 2017

The le menu and the icons
The top left of the Axicon Camera Verier window includes the menu bar with ve
options, and the toolbar which includes seven command icons.
The File dropdown menu includes options for saving, load scan (open), appending
and printing verication reports.
The Edit dropdown menu provides options for cutting, copying and pasting.
Getting started
The home window for the software is shown below, and this will appear when the
software is launched. The window has four main areas, and these are explained
below.
Double-click on the Axicon Camera Verier icon. The rst window will open, and the
software will check if the verier is connected. If a verier is not connected, the
message Found Readers 0 will appear in the status bar. It will then be possible to
load (to open) previously saved verication reports. When a verier is connected,
the message here will provide the verier’s serial number.
www.axicon.com
Page 7 of 28
Axicon Auto ID Limited | 15000 series verier user guide | June 2017

Getting started
The View dropdown menu gives access to Settings (F5) and User data.
The Reader menu provides options for choosing which verier is operational, reader
information,Scanning, decoding, and calibrating the reader (the verier).
The Help menu provides access to the Axicon website, a check for software
updates, and information about the software.
The Command icons
Quit the application, or use Ctrl + Q
Load a saved barcode image, or use Ctrl +O
Save the current image and verication report, or use Ctrl + S
Start collecting barcode images in the eld of view, or press one of the two
buttons on the verier. (They both do the same thing, so use whichever one is
more convenient.)
Find and decode the barcodes seen in the eld of view.
Edit the settings for the application, or use F5
Display and edit user-dened data for this scan.
www.axicon.com
Page 8 of 28
Axicon Auto ID Limited | 15000 series verier user guide | June 2017

This panel has three tabs, where the rst set
of information about the barcode is shown.
The General tab will show you the decoded
data from the symbol, its x and y dimensions,
the print gain, and the aperture size.
The Reader tab simply gives you detailed
information about the verier such as its
serial number and build version.
The Scan tab provides details of when the image to be veried was scanned by the
verier.
The Details tab provides a summary of the results of the verication.
The ISO tab will include details of all the
separate parameters dened by ISO/IEC
for the particular barcode being veried.
The bottom left panel will include details
that relate to the analysis of a symbol
by one or more of the optional plugins.
Plugins are briey explained later on.
The status bar is at the very bottom of the
window, and provides details of what the
verier is doing.
www.axicon.com
Page 9 of 28
Axicon Auto ID Limited | 15000 series verier user guide | June 2017

Users must calibrate the verier on a regular basis to ensure that its measurements
are equivalent to reference values. The calibration card supplied with the verier
provides barcodes with known maximum and minimum reectance values. The
calibration card is certied for a minimum of one year (unless it has been physically
damaged).
When it is not being used please keep the card at in its plastic envelope, and away
from direct sunlight. If the card shows any sign of damage – for example, scratches
or any change in colour – please obtain a new card from us before proceeding.
Take the card from the plastic wallet, and place on a at surface. Place the verier
over the EAN-13 barcode at the top left hand side of card so that it appears in the
Axicon Camera verier window as shown below. Start the image capture process
by clicking on the green arrow icon. This will change to the pause button icon while
this is taking place.
Calibration
Then select Reader, and from the pull-down menu select Calibrate. The verier
will ask the user to conrm positioning and conrm that the RMax and RMin gures
shown on the window conform to those printed on the card. If they are dierent,
alter the numbers on the window as required and then press Start.
The verier software will then check the image before calibrating the instrument
and then rechecking. When this has been done a message Calibration Successful
will be shown and the verier is ready for use.
www.axicon.com
Page 10 of 28
Axicon Auto ID Limited | 15000 series verier user guide | June 2017
Activate the verier by pressing the green Start Scanning arrow, or press one of
the buttons on the verier (Both buttons perform the same functions). Then place
the verier over the barcode(s). The message Scanning will appear at the bottom
of the window. Press the Search/verify button to search for all barcodes within the
current eld of view or alternatively press one
of the buttons on the verier (both buttons
perform the same function).
The verier will draw a purple box around each
of barcodes it has found, and automatically
select the rst barcode to decode. It will
change the colour of the box around this one to
blue and display the verication results.
When only one symbol is present the box will
be blue, and if it is an EAN/UPC barcode a
purple box will appear around the numbers shown below it.
Operating the verier
www.axicon.com
Page 11 of 28
Axicon Auto ID Limited | 15000 series verier user guide | June 2017
Any linear barcode will be veried using ten dierent scan lines, as specied by
ISO/IEC 15416, and the verication grade will be based on the average of these ten
readings.
In this case the verier has responded with the message Found codes: 1 and
has found both the EAN-13 barcode and the numbers (the Human Readable
Interpretation) beneath the barcode.
The verier will automatically display the overall verication result based on the
average of ten scans made of the barcode.
To get more information about the grading of any of the particular parameters you
can click on the relevant parameter.
The verier will then indicate where the scan lines were taken and (if relevant)
which scans were a pass for that parameter (shown in green) and which scan lines
were a fail (shown in red).
To get a scan reectance prole of your linear barcode you can click on the Details
tab and select any of the Scan Info rows available. The reectance prole will now
show at the bottom of the scan info results. Click on the reectance prole to
enlarge it.
Operating the verier
www.axicon.com
Page 12 of 28
Axicon Auto ID Limited | 15000 series verier user guide | June 2017
Settings
The verier has a range of conguration settings. These can be set by clicking on
View and then selecting Settings.
Appearance: The Appearance tab allows you to change the colours used for Fail,
Warning and Pass, choose the language and switch between metric or imperial units
of measurement.
Plugins: The Plugins tab can be used to select data content checking to any of the
various standards shown.
www.axicon.com
Page 13 of 28
Axicon Auto ID Limited | 15000 series verier user guide | June 2017
Settings
Reports: In this window you can enable Auto Save, select the type of report le
to be created, and choose an output le where the data will be kept. There is an
option to add the records to an existing le rather than replacing the le, which is
mainly of benet with spreadsheet (.csv) les.
Saving: The Saving tab can be used to enable an Autosave of all of the barcodes
checked for audit purposes. The options are as follows:
Autosave – records will be automatically saved to provide a complete audit trail of
verications performed. The Autosave Directory name should be set by the user.
If Enable is ticked on and a directory specied but all other boxes remain unticked
then the verier software will create sequentially numbered les of the saved data.
This will ensure that records cannot be inserted, deleted or modied without it
being apparent (essential for compliance with 21 CFR Part 11 requirements).
www.axicon.com
Page 14 of 28
Axicon Auto ID Limited | 15000 series verier user guide | June 2017
If Use Decode box is ticked, the le name will automatically be created using the
rst digits of the decoded number.
If Use Date and Time box is ticked, the le name will automatically be created
using the date followed by the time as a le name.
If Use Decode and Use Date and Time boxes are both ticked, the le name will
automatically be created using the decoded number followed by the date and time.
If Save as box is ticked, a dialogue box will appear and you can enter a lename.
If Auto Save as box is ticked in addition to Use Decode or Use Date & Time (or
both), then the dialogue box will appear with the pre-selected data and allow the
operator to override this if required.
www.axicon.com
Page 15 of 28
Axicon Auto ID Limited | 15000 series verier user guide | June 2017
Settings
User data: User Data allows you to program the Axicon 15000 series software to
ask questions when a verication is being made, to collect the answers and to store
these with the verication report. This supplementary user date will then always be
displayed with the verication report.
Such data may typically be a job reference number or batch number, but equally
it could be information about the barcode such as the substrate or print process or
details about the operator, the department or the site. Multiple questions can be
entered if desired.
To set up the User-Data:
From the pull-down menu select View and then Settings. Click on the User Data
tab of the Settings window. To add a User Data item press the +symbol at the
bottom left of the window. The Create User Datum window will be shown. This can
now be completed as required.
www.axicon.com
Page 16 of 28
Axicon Auto ID Limited | 15000 series verier user guide | June 2017

An example of a Job Reference entry is shown
here. The title is entered and the Allow Blank is
un-ticked to force you to enter data into this eld.
This sample shows how you can be oered a
pull-down menu of options but with a default
option given. The default can be left blank. When
the list of selected questions has been completed
press the OK button.
Now when you verify a barcode and select save
scan the User Data dialogue window will appear
and allow you to enter the required information.
If you now save the scan le the User Data
information is automatically saved with it.
When loading a pre-saved scan le for which User
Data has been attached you simply need to load the
scan le, and re-verify the code using the Search
for all barcodes icon and then select View/User-
Data from the pull-down menu.
The Axicon software also includes a facility for
populating the User data settings screen from
an existing scan le (whether made from this
computer or not). Simply load an existing scan le,
go to the View/settings/User Data screen and then
press the populate icon.
There are also facilities to edit an existing User
Data entry (ideal for adding items to a pull-down
menu). You can also clear an existing User Data
population.
www.axicon.com
Page 17 of 28
Axicon Auto ID Limited | 15000 series verier user guide | June 2017
After you have activated the verier and set it to search/verify for any barcodes,
the result of verifying a GS1 DataMatrix symbol will appear like this window:
By clicking on the individual parameter the reason for any data content error is
displayed
If required the Data Content box can be stretched vertically to show more
information – just hover over the top edge of the box until the double horizontal
lines appear and then stretch the box.
2D matrix codes
www.axicon.com
Page 18 of 28
Axicon Auto ID Limited | 15000 series verier user guide | June 2017

Several barcodes in eld of view
In cases where there are multiple barcodes within the eld of view the verier will
automatically recognise the codes present.
Each symbol that is recognised as a barcode will be surrounded by a purple or blue
box. The blue box indicates which symbol’s results are being shown on the right
hand side of the Axicon Camera Verier window. To change to the other barcode,
click on the purple box, which will now become blue.
The results for this barcode are now shown in the window.
www.axicon.com
Page 19 of 28
Axicon Auto ID Limited | 15000 series verier user guide | June 2017
A verication report may be saved in .csv, .pdf, .html or .txt formats. Additionally
reports can be manually saved for subsequent printing or else printed without
saving.
Use the File tab from the pull-down menu and then select Save Report.
Options will then be given for the various report saving options and you can then
select between these as required.
If you want the report to be automatically opened on creation (for example, if
there is a need to print the report) then tick the open report box.
For some le types you may wish to save data to a single le and append the data
rather than replacing the previous data – for example when saving data to a .csv
le.
In this case the Append Report box should be ticked. If this is left unticked and the
same le name as previous is specied then the data will be overwritten.
After a successful decode of a barcode, the results can be saved to a le in special
form of .png format). This is done by using the File/Save as function. These results
can be reviewed at some later stage and shared with others.
When a saved scan is opened by the application, the original data is available and
displayed. In addition, the original image can also be re-veried using the verify
button – this will then automatically use any plugins that are activated (such as CIP
or serialisation validation) regardless of whether the plugins were used at the time
of original verication.
To open a saved scan, use the File option from the pull-down menu and then
select Load Scan. Select the le to be viewed and re-veried. The .png le is then
displayed in the viewing area. The user should then press the Verify button.
The full verication information is then shown and can be viewed (and additionally
printed) as required.
Saving and printing
www.axicon.com
Page 20 of 28
Axicon Auto ID Limited | 15000 series verier user guide | June 2017
Other manuals for 15000 series
2
Table of contents
Other Axicon Barcode Reader manuals

Axicon
Axicon 15000 series User manual

Axicon
Axicon 6025-S Operator's manual

Axicon
Axicon 12600 Operator's manual

Axicon
Axicon 12000 User manual

Axicon
Axicon 6525-S User manual

Axicon
Axicon 15000 series User manual

Axicon
Axicon 12000 Operator's manual

Axicon
Axicon PV-1072 User manual

Axicon
Axicon PV-1072 User manual

Axicon
Axicon 6000 series User manual